
Last Updated: October 29, 2026
Overview
The Emails widget puts an incident's email thread in the incident workspace, so an analyst can read the correspondence and reply without leaving D3.
The thread gets there on its own. A data ingestion schedule reads a monitored mailbox and brings each sent and received message in as an event. A preprocessing playbook looks at the email's subject: if the subject carries the tag of an incident that already exists, the email is attached to that incident; if it does not, the event is escalated to a new incident. Either way the message appears in that incident's Emails widget.
When an analyst replies from the widget, D3 writes the incident's tag into the reply's subject line, so every later message in the thread lands on the same incident.
This article covers the setup. For what the widget shows once it is running, see Email and SLA Widgets.
Requirements
-
Office 365. The widget is fed by the Office 365 integration, so the monitored mailbox must be an Office 365 mailbox.
-
An Office 365 connection that uses the Client Credentials grant type. See Connections.
-
The widget turned on for your instance. The Emails widget is turned on by default for the whole D3 instance. If it has been turned off, Emails does not appear in the workspace builder's widget list.
The setting that turns the Emails widget on or off applies to the whole instance and is not in the Configuration module. If Emails is missing from the widget list, ask D3 Support to turn it back on for your instance.
Step 1: Set Up the Office 365 Connection
Go to Configuration > CONNECTIVITY > Connections and create or open an Office 365 connection.
-
On General Settings, name the connection and choose the Site it serves.
-
On Account Credentials, choose how to supply the credentials (Manual Input or Password Vault), select the Microsoft 365 Environment, and set Grant Type to Client Credentials.
-
Fill in Tenant ID, Client ID and Client Secret from the application you registered in Microsoft Entra ID, then select Test Connection.
-
Save the connection.
Step 2: Add the Emails Widget to the Incident Type
The widget is placed per incident type, on the workspace that incident type uses. Decide now which incident type the email events will be escalated to — the preprocessing playbook in Step 3 has to name the same one.
-
Go to Configuration > MANAGEMENT > Incident Type Manager and select the incident type.
-
Open the Incident Workspace tab and select the workspace you want to change.
-
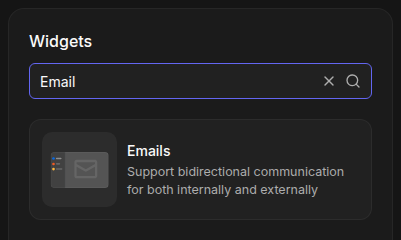
In the Widgets panel on the right, search for Emails.
-
Drag Emails onto the workspace canvas, position it, and select Save.
The Emails widget in the workspace builder's widget list
For the builder itself, see Configuring an Incident Type: Incident Workspace and Incident Workspace Widgets.
Step 3: Build the Preprocessing Playbook
The preprocessing playbook decides, for every ingested email event, whether it belongs to an incident that already exists. Create it in Configuration > AUTOMATION > Preprocessing Playbooks, with the On Event Ingestion trigger. See Preprocessing Playbooks.
The playbook has five tasks: pick the subject and the incident number out of the email, decrypt the subject's tag, check that the two incident numbers match, then either attach the event to that incident or raise a new one. The example below is the Office 365 Email Preprocessing Playbook.
The shape of the playbook: a trigger, a formatter, a command, a conditional, and one task on each branch

Task names are yours to choose. The names used below are the ones the expressions refer to, so if you rename a task, update every expression that reads its output.
Task 1 — Extract Key Artifact
A Data Formatter task that reads the ingested email and returns the values the later tasks use:
-
Whole Subject — the email's subject line.
-
Incident Number — the incident number written in the subject's tag.
-
Incident Number List — the same incident number as a list, the form the escalation expects.
The expressions in the next tasks read these values by name, so keep the names exactly as shown.
Task 2 — Decrypt Incident Number
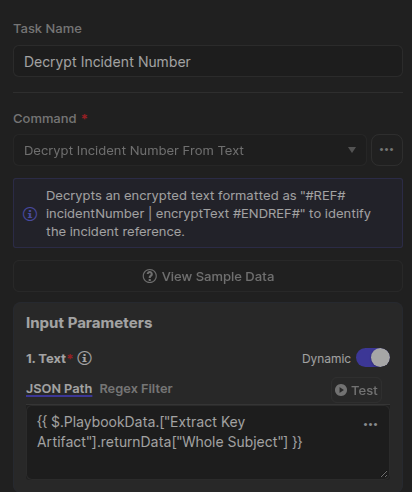
A Command Task that runs the built-in utility command Decrypt Incident Number From Text. The command reads a subject line and returns the incident number its tag refers to.
It takes one input, Text. Turn Dynamic on and pass the subject from Task 1:
{{ $.PlaybookData.["Extract Key Artifact"].returnData["Whole Subject"] }}
The command returns a Status of Successful and, under Data, an IncidentNumber. See Utility Commands.
The Decrypt Incident Number task, with the subject passed in as Text
Task 3 — Incident Number match?
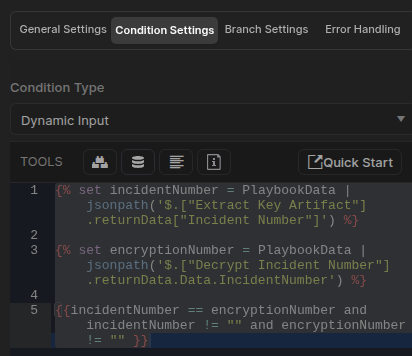
A Conditional Task that checks the incident number written in the subject against the one decrypted from its tag. On Condition Settings, set Condition Type to Dynamic Input and use:
{% set incidentNumber = PlaybookData | jsonpath('$.["Extract Key Artifact"].returnData["Incident Number"]') %}
{% set encryptionNumber = PlaybookData | jsonpath('$.["Decrypt Incident Number"].returnData.Data.IncidentNumber') %}
{{incidentNumber == encryptionNumber and incidentNumber != "" and encryptionNumber != ""}}
The condition is true only when both numbers are present and the same. The true branch runs Task 4. The false branch runs Task 5.
The Incident Number match? condition
Task 4 — Escalate to Existing D3 Incident
A Passdown Task on the true branch, which hands the incident number to the escalation so the event is attached to that incident instead of raising a new one.
-
Destination JSON Path:
$.EscalateTo
-
Data, with Dynamic on:
{{ $.PlaybookData.["Extract Key Artifact"].returnData["Incident Number List"] }}
Task 5 — Escalate to New D3 Incident
An Escalate Task on the false branch, which raises a new incident for an email that belongs to no existing one. Fill in every required input, and in particular:
-
Incident Type — the incident type whose workspace carries the Emails widget, from Step 2. If the event is escalated to any other incident type, the thread will not be shown.
-
Playbook — the investigation playbook the new incident should run.
-
Title, Description, Severity and Owner — set from the event, or fixed.
Step 4: Schedule the Mailbox Ingestion
The schedule is what actually reads the mailbox. Go to Configuration > AUTOMATION > Data Ingestion, open the Event Intake tab, and add a schedule on the Office 365 data source.
-
Set INTEGRATION to Office 365, choose the Fetch Event command, and select the connection from Step 1.
-
Set the Interval (Minutes) at which the mailbox is checked.
-
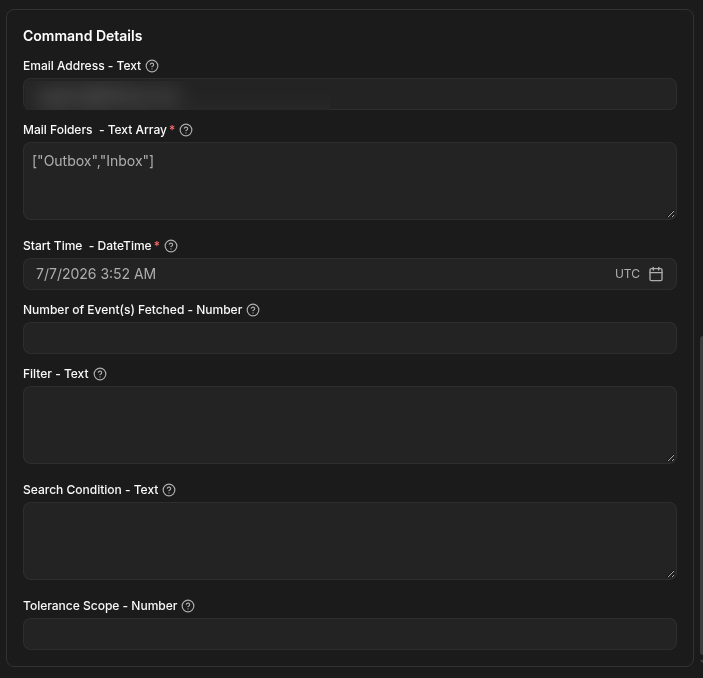
Under Command Details, fill in:
-
Email Address — the mailbox to monitor.
-
Mail Folders — the folders to read, as a list. Include both the received and the sent folders, so that replies are ingested alongside incoming mail — for example
["Inbox","Outbox"]. -
Start Time — the point from which mail is collected.
-
-
Save the schedule and start it.
The Fetch Event command details of an Office 365 ingestion schedule
For the rest of the schedule's options, see Configuring Data Ingestion.
Replying From the Widget
Once the pieces above are in place, an email that arrives in the monitored mailbox becomes an event, the preprocessing playbook attaches it to an incident, and the message appears in that incident's Emails widget.
When an analyst replies from the widget, D3 appends the incident's tag to the subject line, in this shape:
Original subject #REF# <incident number> | <reference> #ENDREF#
The recipient's mail client keeps that subject on every reply, so each later message in the thread is recognised and attached to the same incident. The whole conversation stays in one place, and an exported incident report includes it under Email Communication. See Exporting Incidents.