
last updated: mar 21, 2025
Utility commands are built-in command to manipulate system data. The platform provides hundreds of utility commands to automate data manipulation, enrichment, and actions within the system. Users can also create and customize utility commands to support data processing and utility functions with greater flexibility and control.
-20241011-220807.png?cb=8cad20354c9b0c84d4de08289a2636a9)
The Utility Commands module is a central repository for all commands accessible to users. It provides an editor interface to build custom commands using Codeless Playbook or Python implementation.
Anatomy of the Utility Commands Module
Access the Utility Commands module in Configuration by clicking the tool icon in the left-side navigation bar.
Additional Utility Commands can alsocessed in Playbooks
The Utility Command module consists of the main Command Editor canvas and a panel for configuring its basic details and input/output data. The following is an overview of:
-
Action Bar
-
Command Details
-
Command Editor
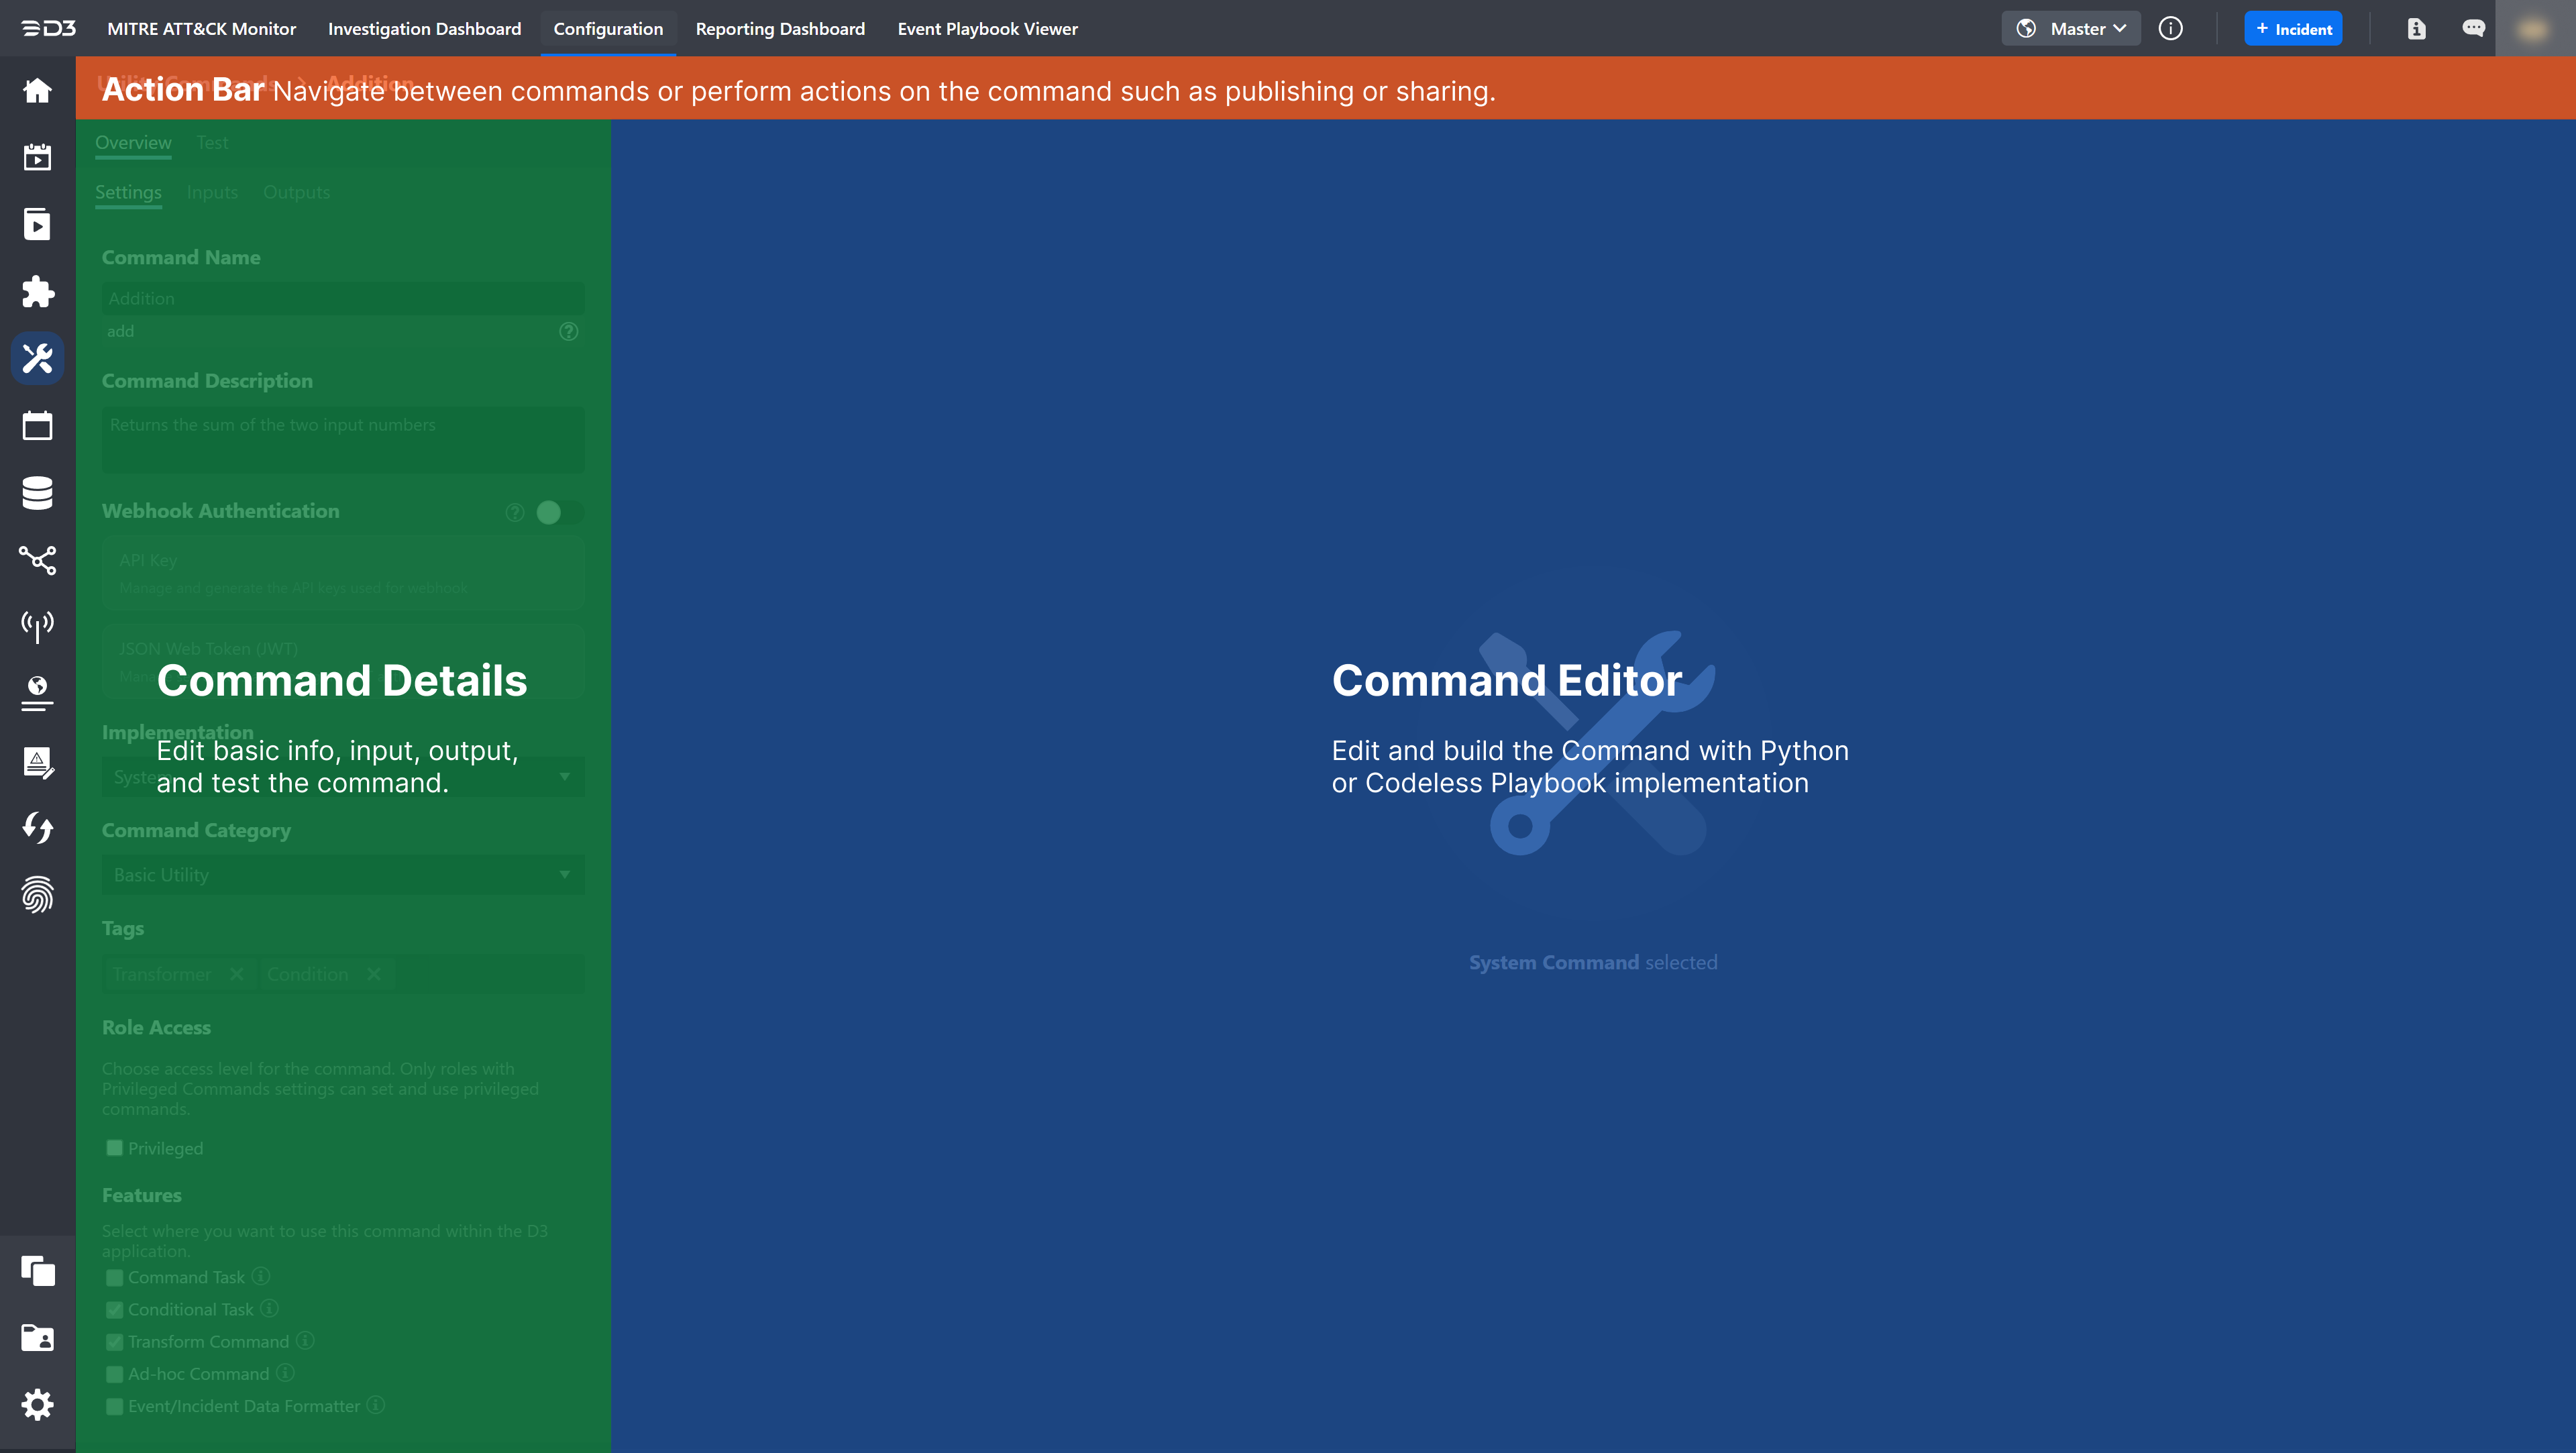
Action Bar

The action bar provides quick access to key actions available for a custom utility command.
-
Back button: Navigate back to the previous page.
-
Live / Edit Mode: Allow users to modify an existing command without affecting versions currently used in other playbooks.
-
Submit: Submit this Command to be used by others after editing.
-
More button
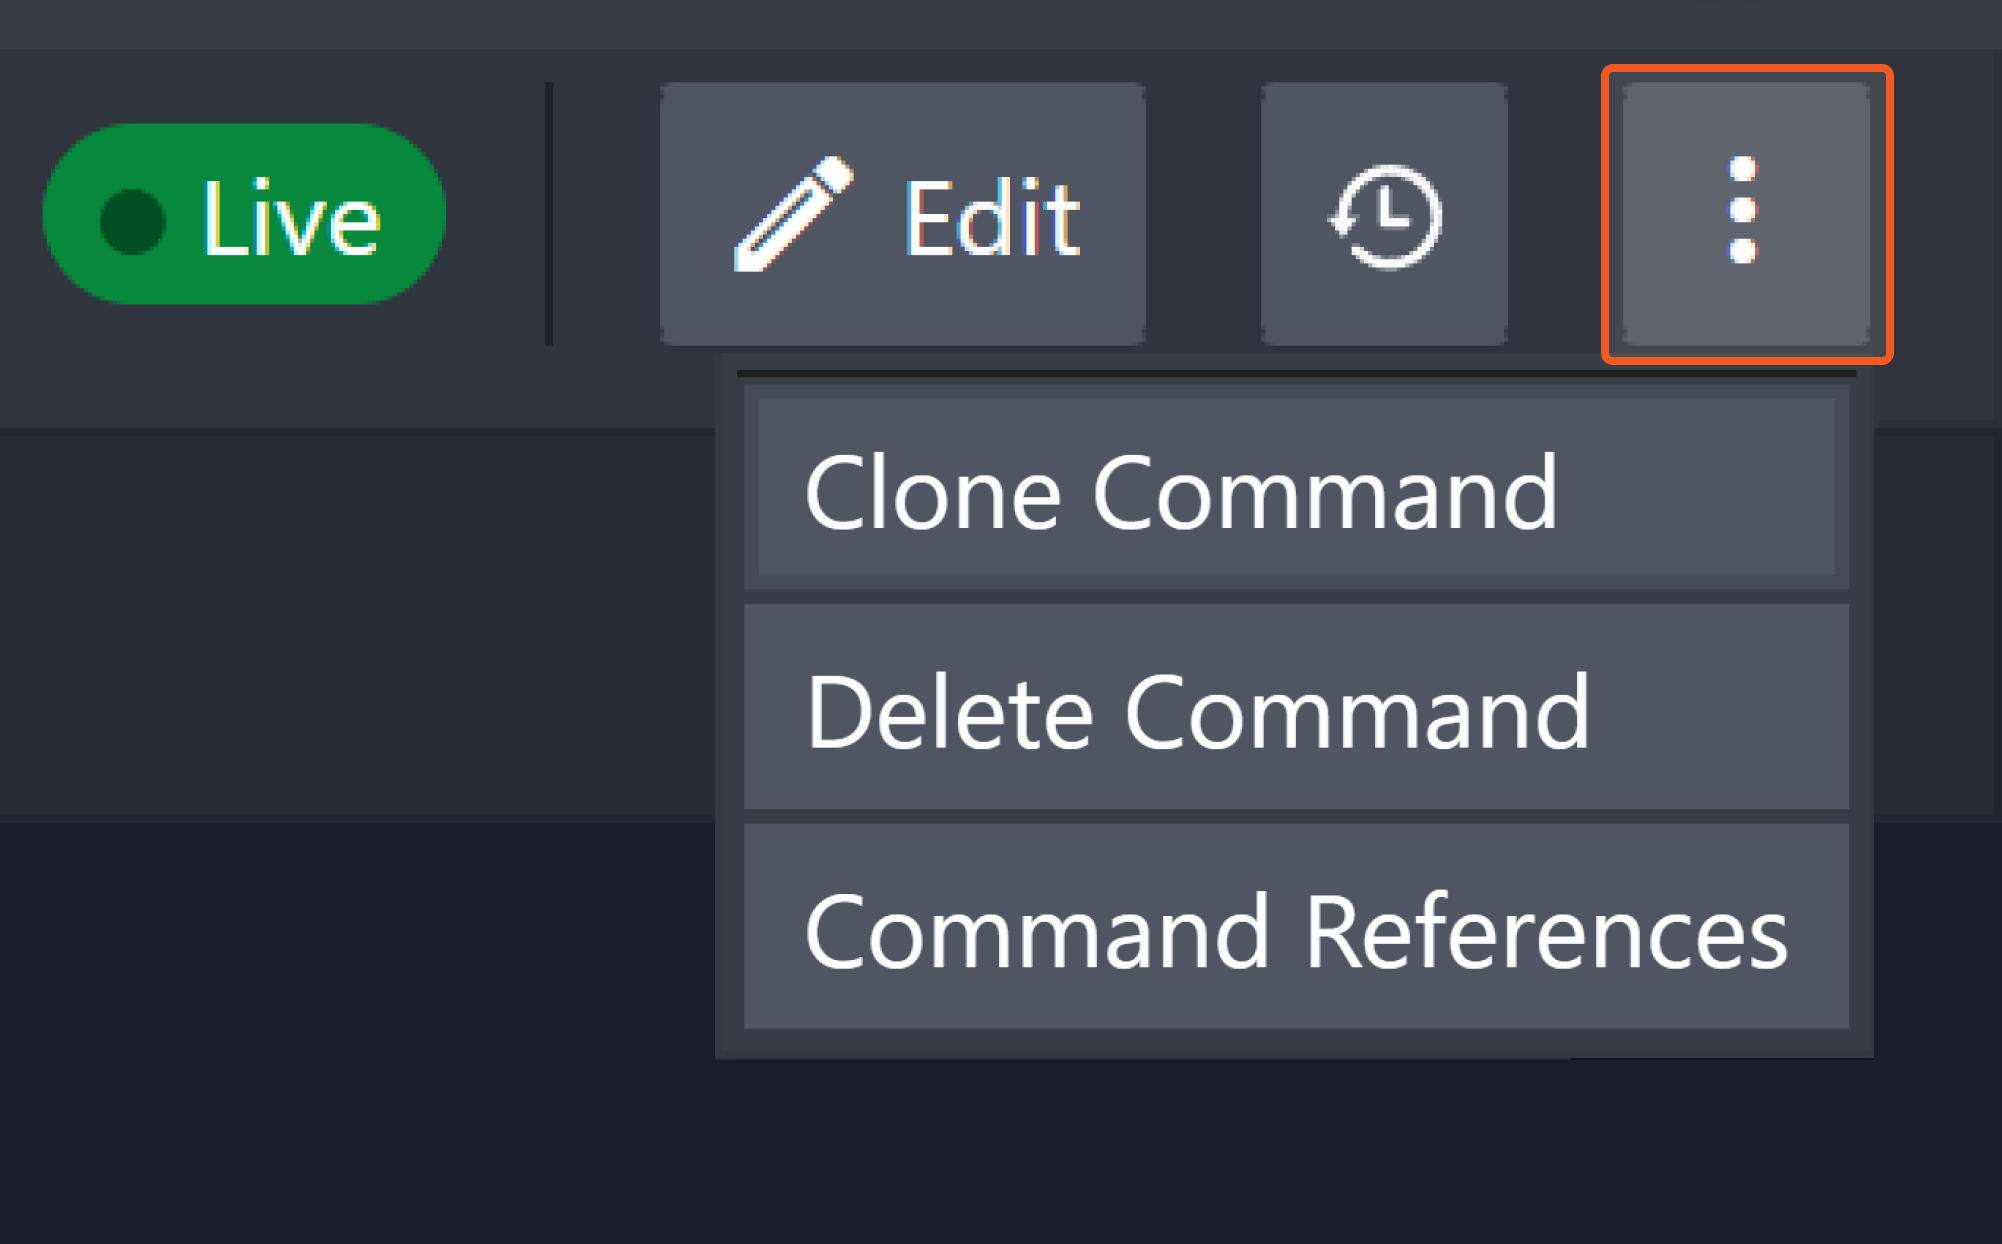
-
Clone Command: Make a copy of the current Command.
-
Delete Command: Delete the Live or Draft version of the command. Delete both versions to completely remove the command.
-
Command Reference: See the relationships between other Playbooks and Commands. This feature is only available for Commands built with the Playbooks.
READER NOTE
Editing features of the Action Bar are only available for custom Commands. For System commands, users are not allowed to edit them.
Command Details
Command Details is located on the left side of the screen and provides high-level information about the selected Command. This panel provides you with the following tabs, depending on the type of implementation:
-
Overview
-
Settings
-
Inputs
-
Outputs
-
-
New Task (Playbook only): Displays playbook tasks, integrations, and utility commands for configuring a playbook.
-
Test (Python only): Tests a Python-implemented command.
Overview
The Overview tab allows users to configure essential command information, such as the name and description. The tab also provides configuration options for command input and output parameters.
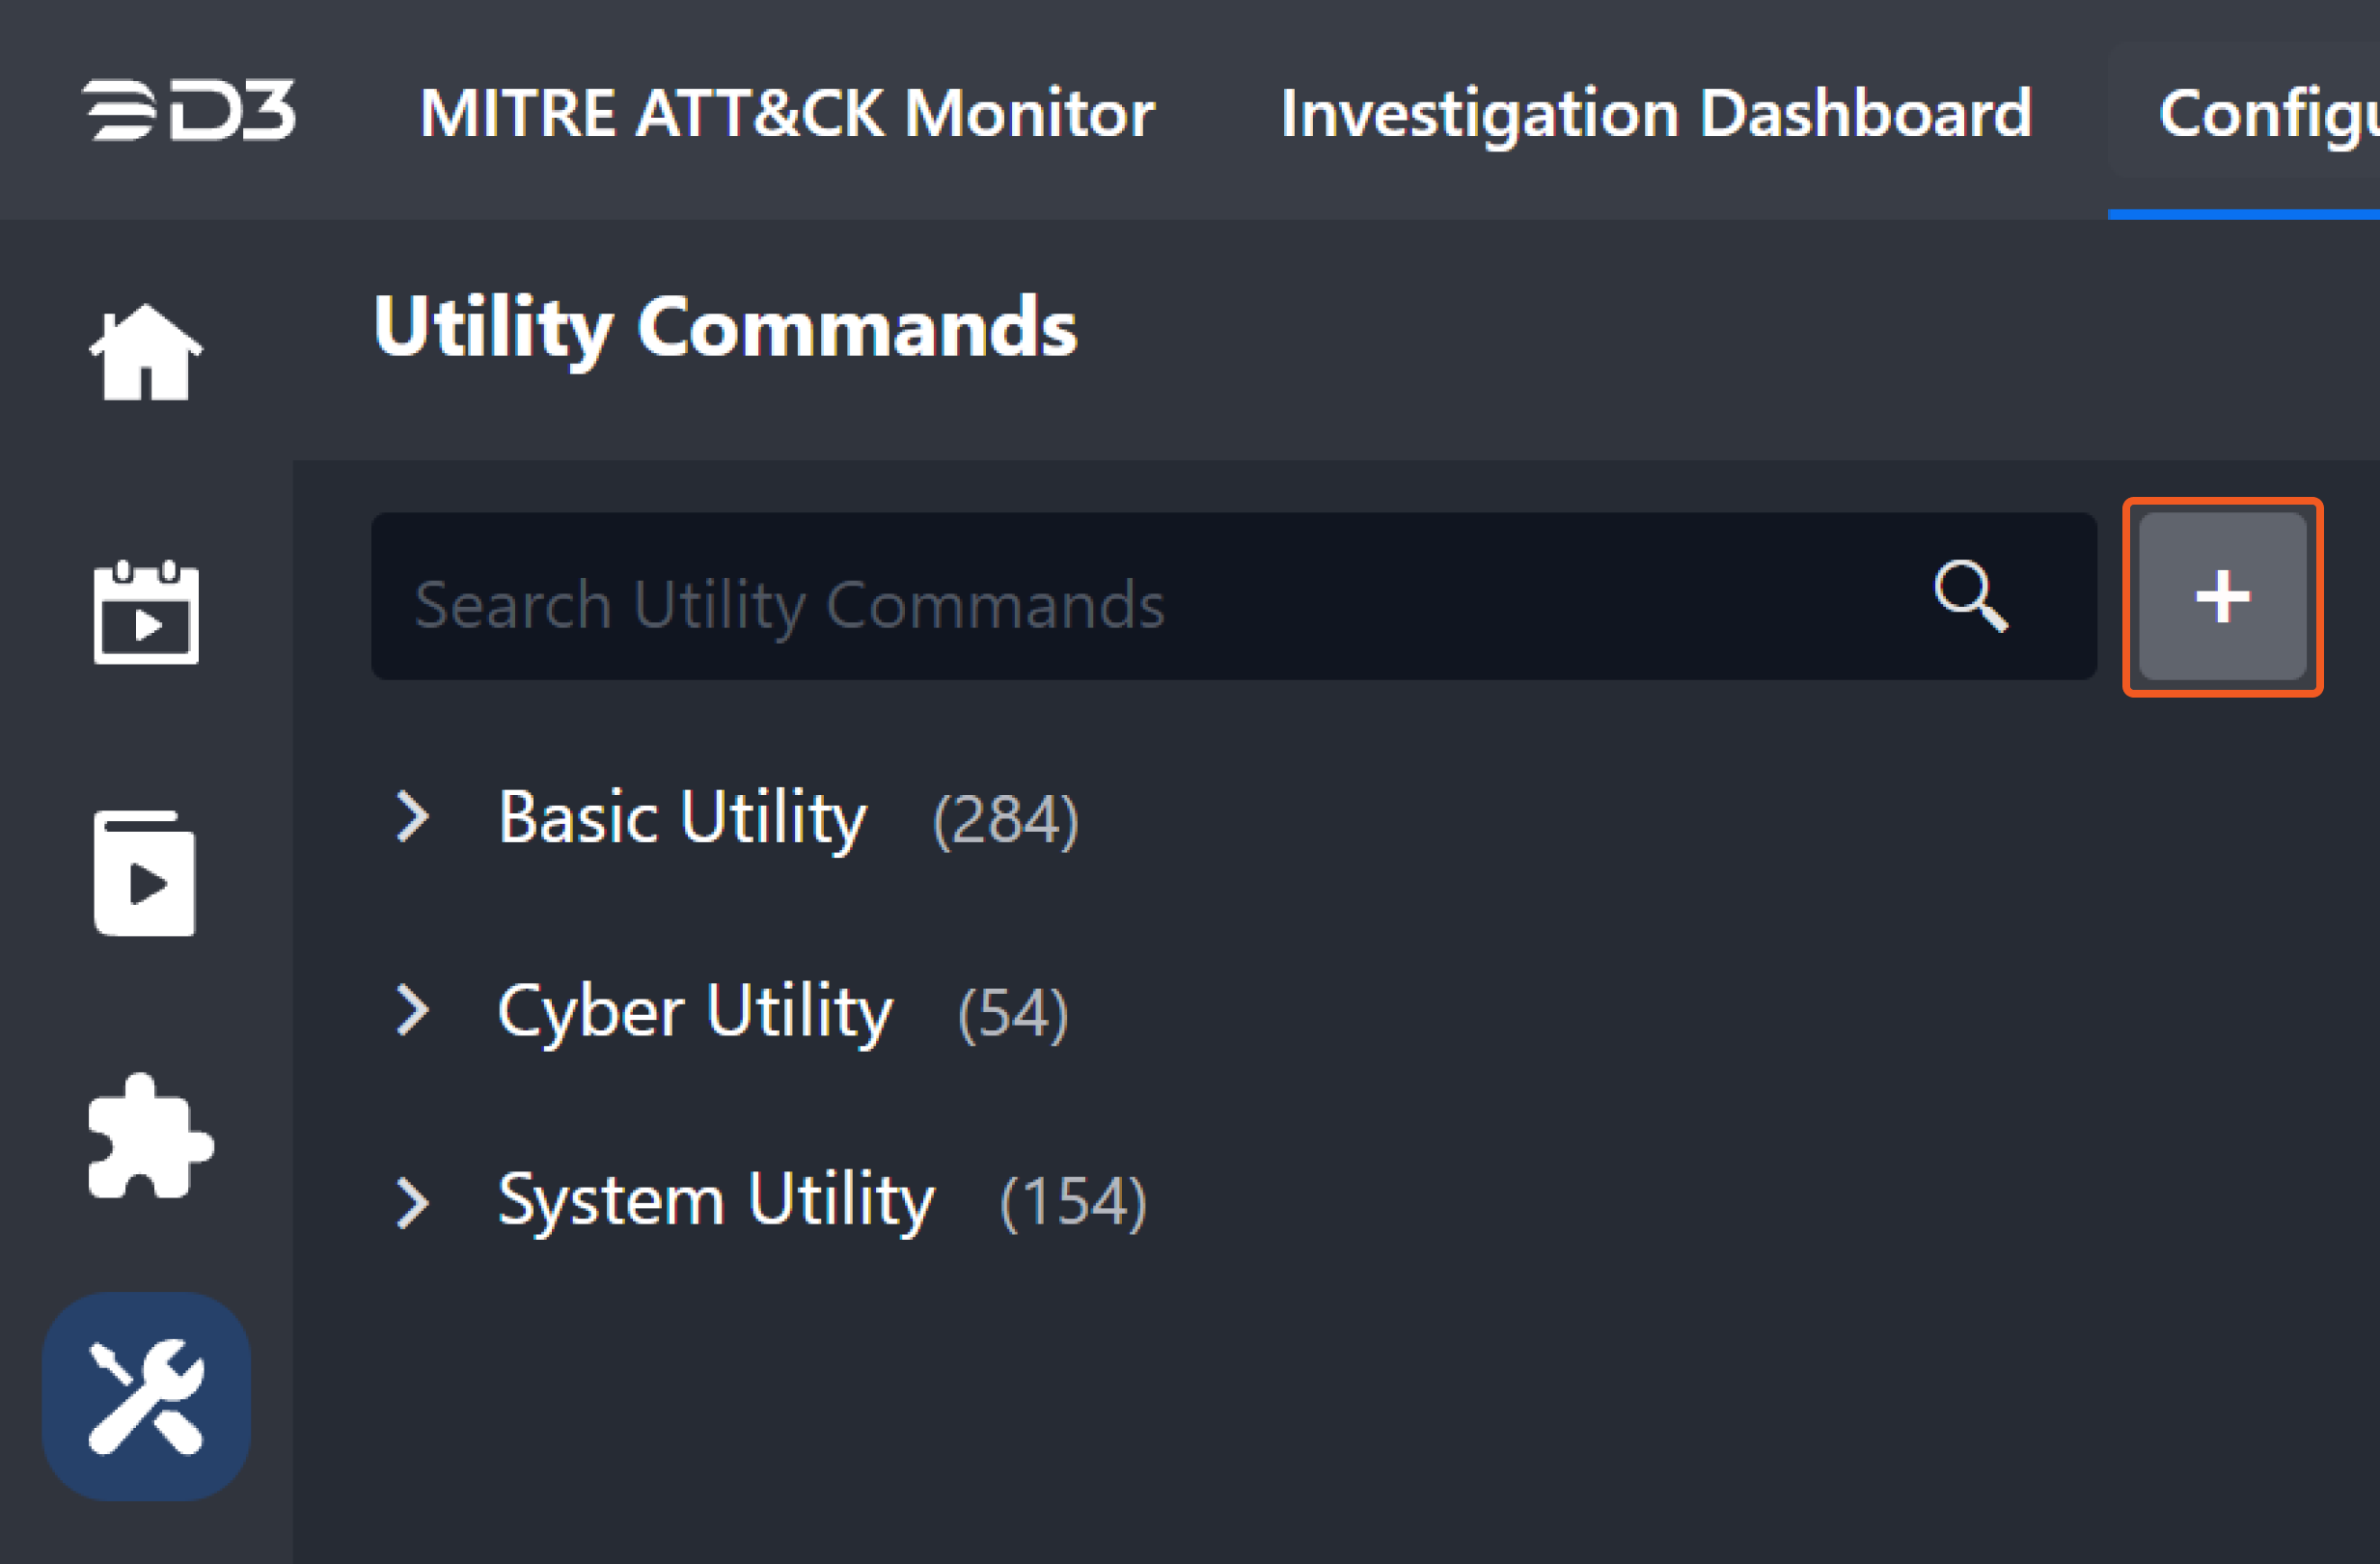
More than 300 out-of-the-box utility commands are available for immediate use. These system commands are not editable. To create a custom command, click the + button. See Creating a Utility Command for details.
Custom commands will require either python implementation or codeless playbook implementation. This will determine the view of the Command Editor, and cannot be changed later.
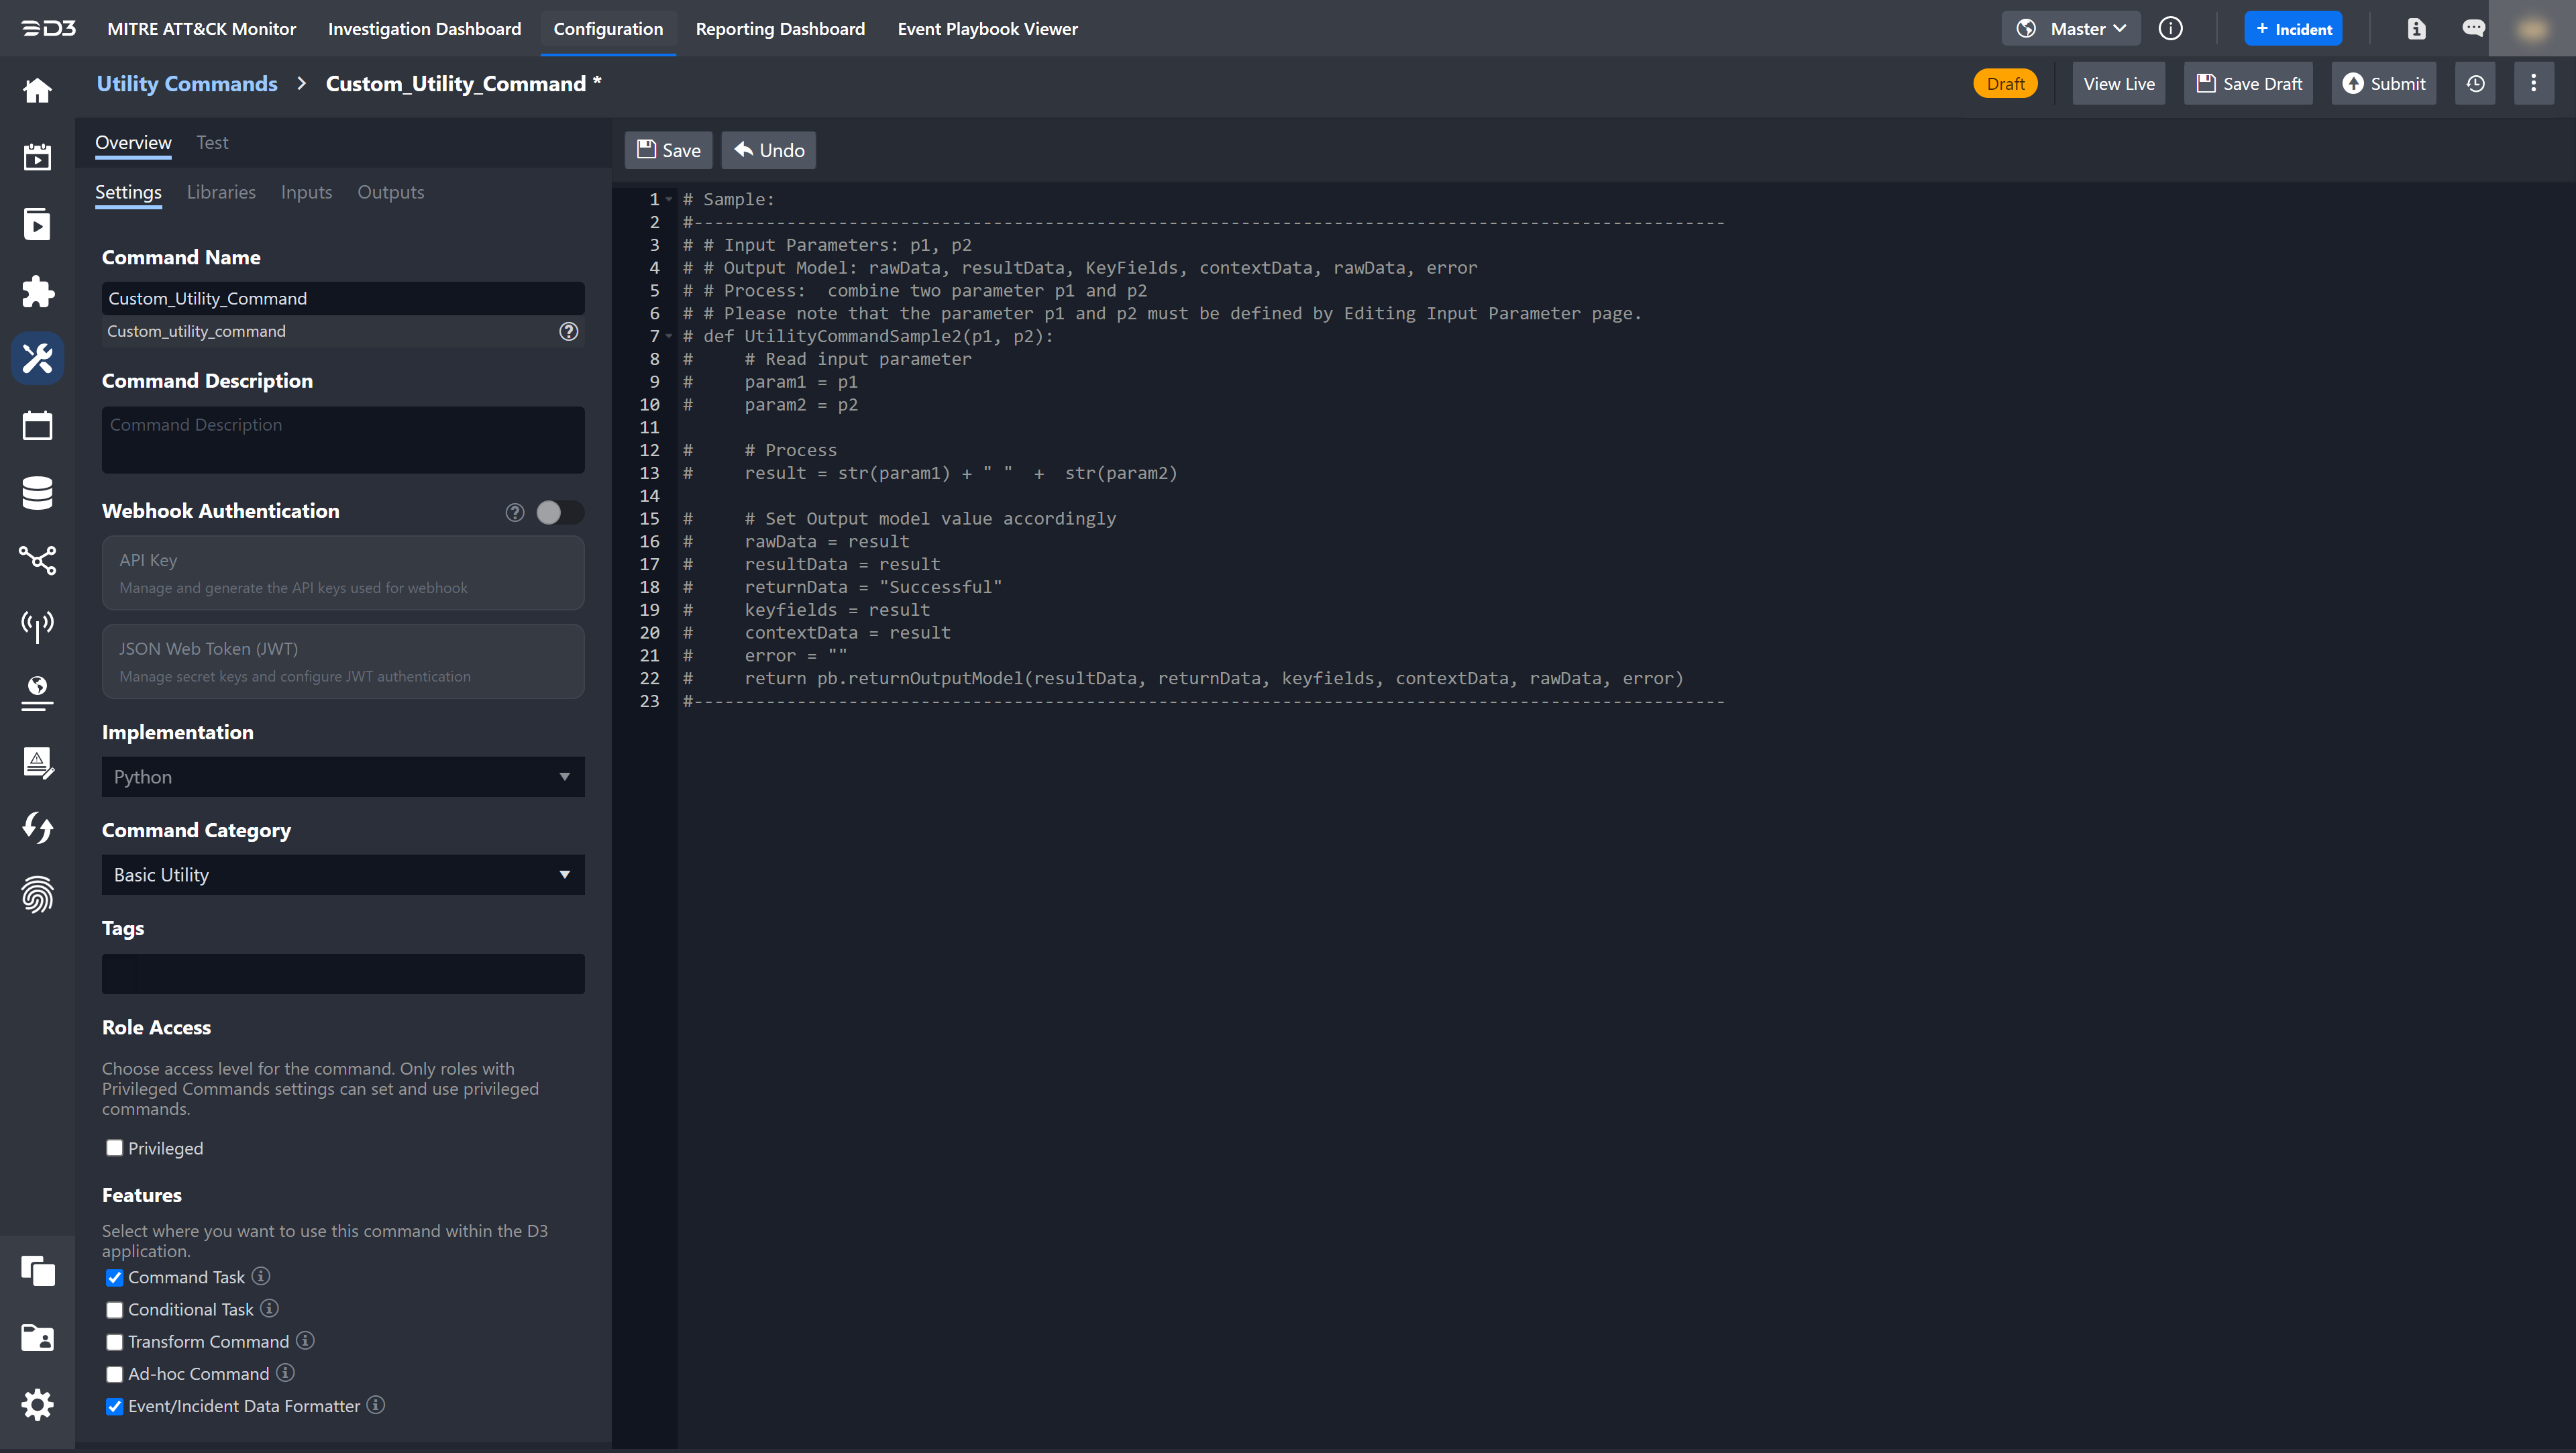
Settings
The Settings tab displays the commansic information and allows users to edit these fields.
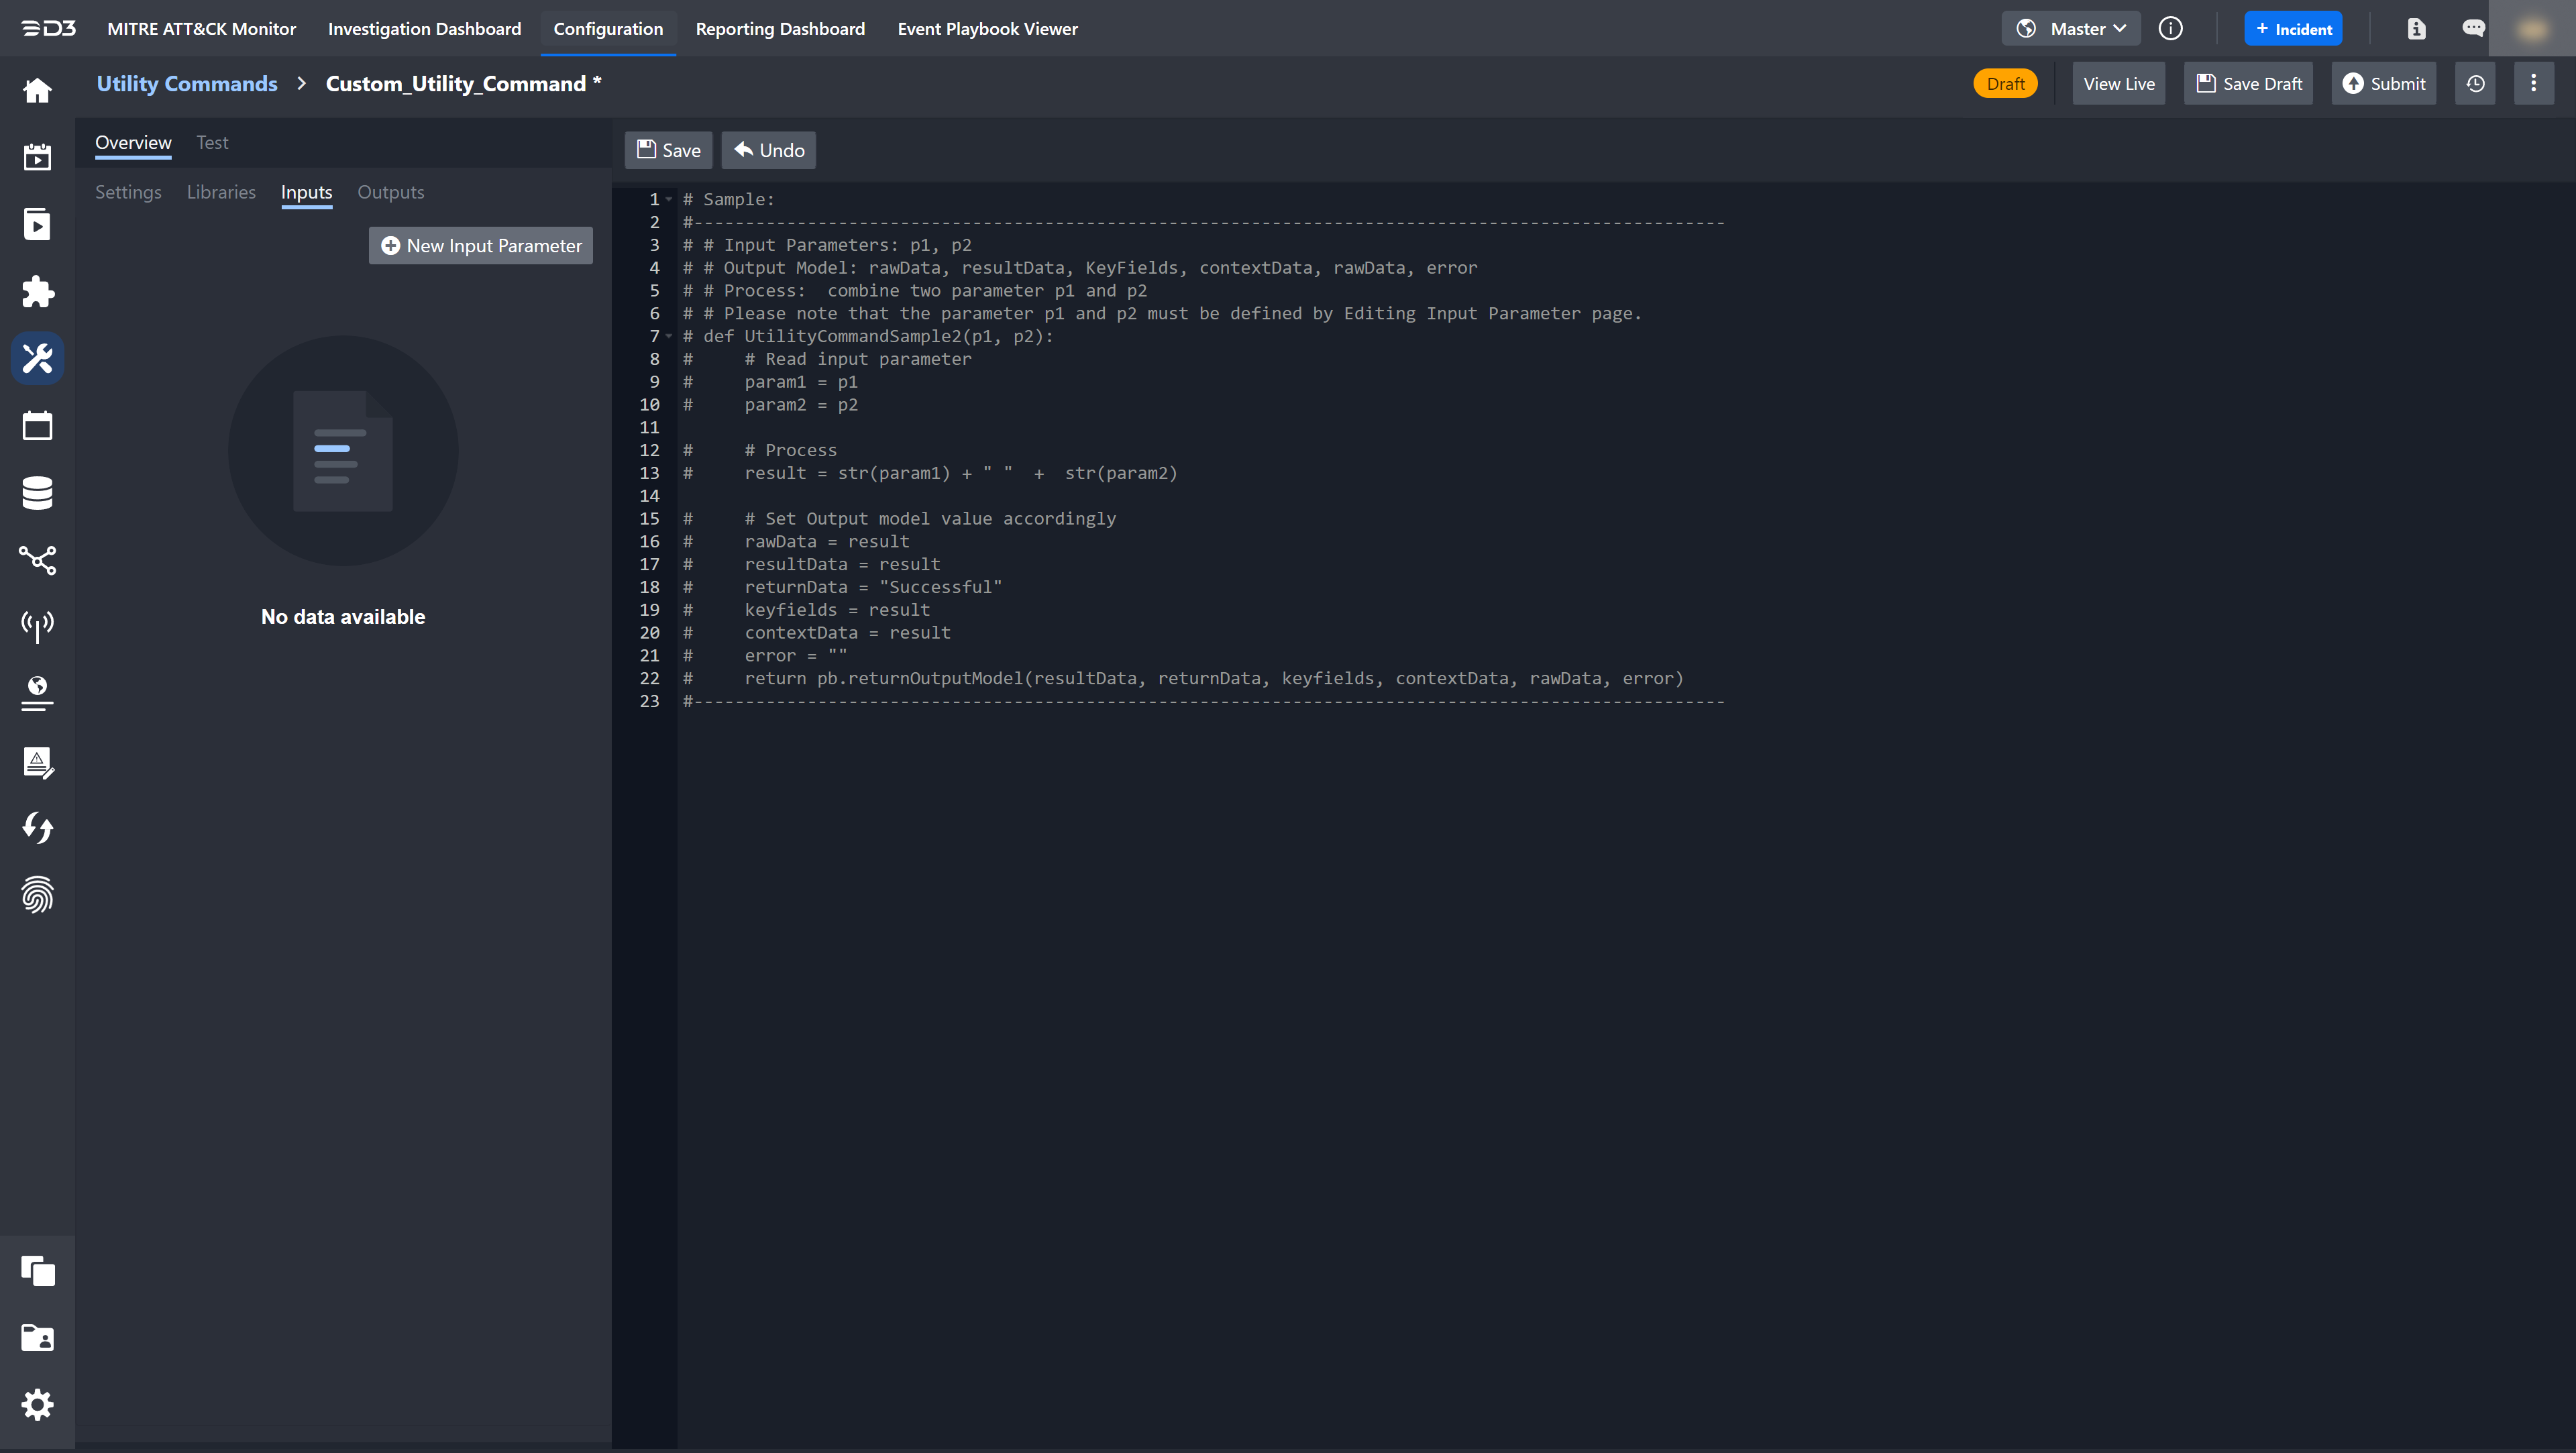
Inputs
Inputs are the parameters required to execute the command. For a custom command, users can add the required input parameters.
Outputs
Outputs defines the type of output tmmand can return after execution.
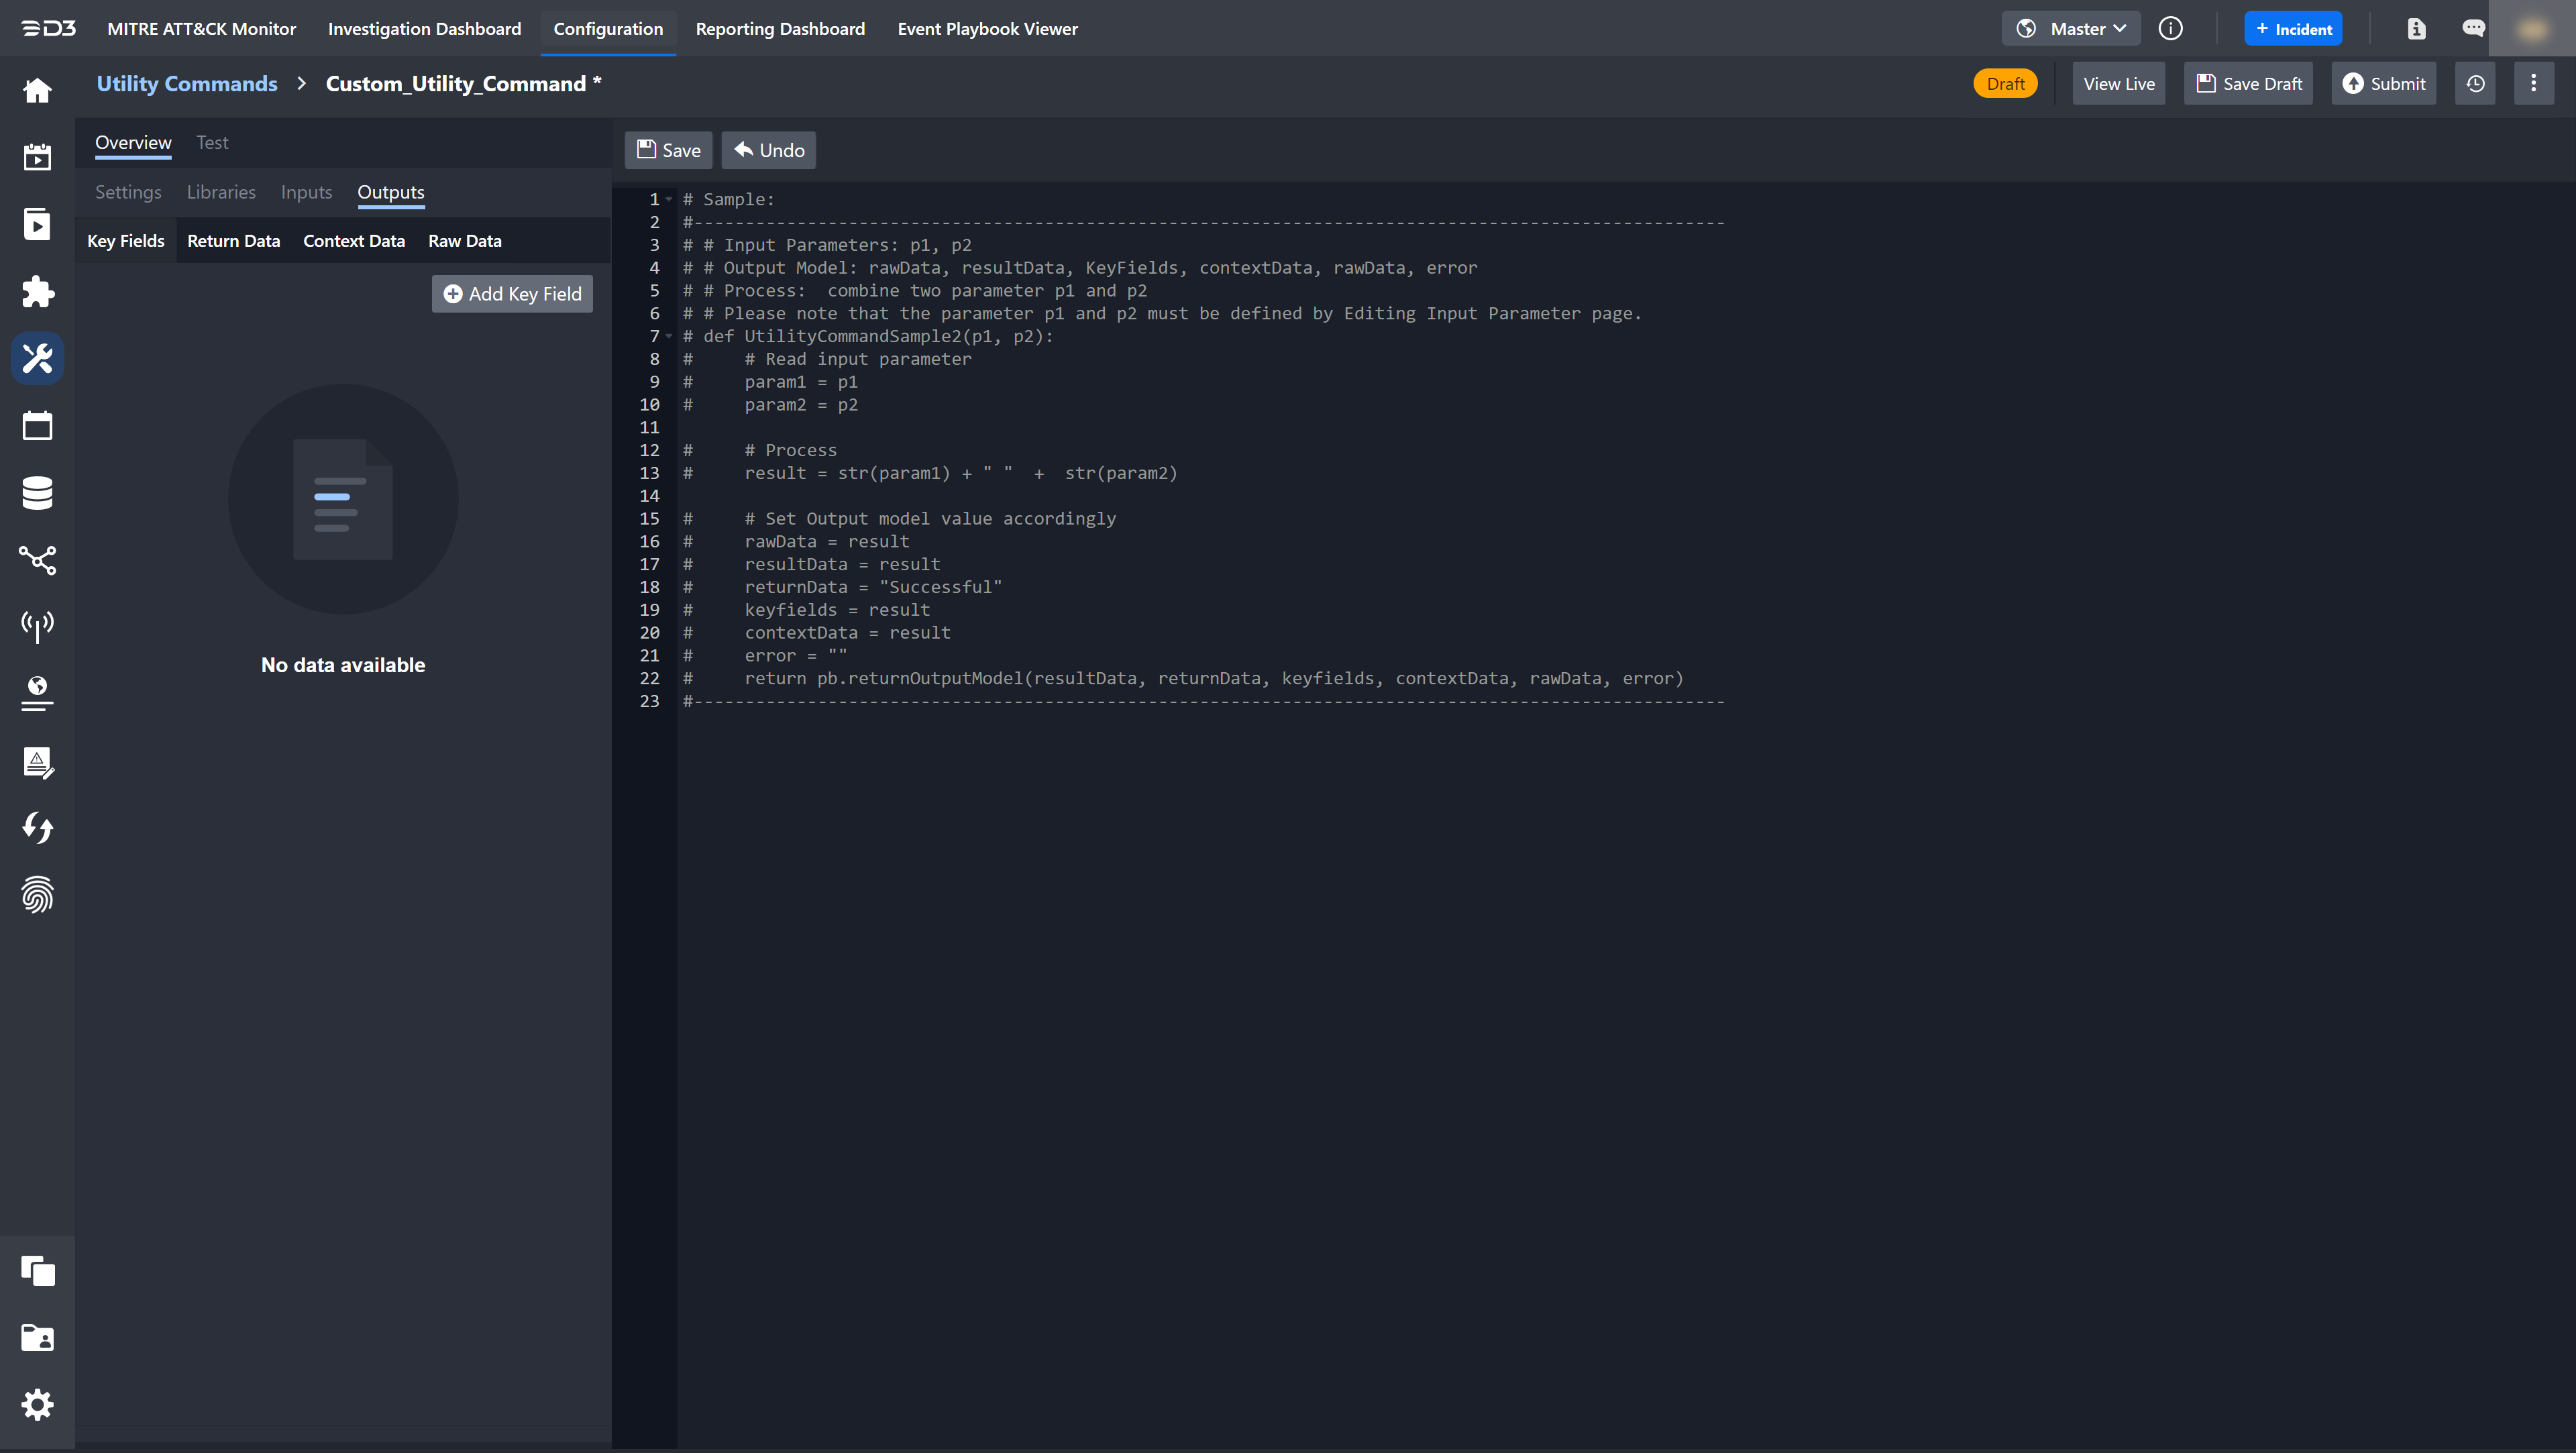
Users can define four output types for greater flexibility.
-
Key Fields: The most important fields to be extracted out as individual fields.
-
Return Data: The Success / Failure status of a task for integration commands. For Transformation and Condition Commands, the return data is specified with corresponding output data types.
-
Context Data: The raw data that has been parsed and formatted which can then be stored in D3 Playbooks for data sharing.
-
Raw Data: The unformatted and raw output data
Users can set the Sample Data fields to show example data that the command can output.
Command Editor
The workspace allows users to create commands using two implementation methods: a codeless playbook or a Python script. Each implementation method provides a different editor interface.
|
Implementation Method |
Screenshot |
|---|---|
|
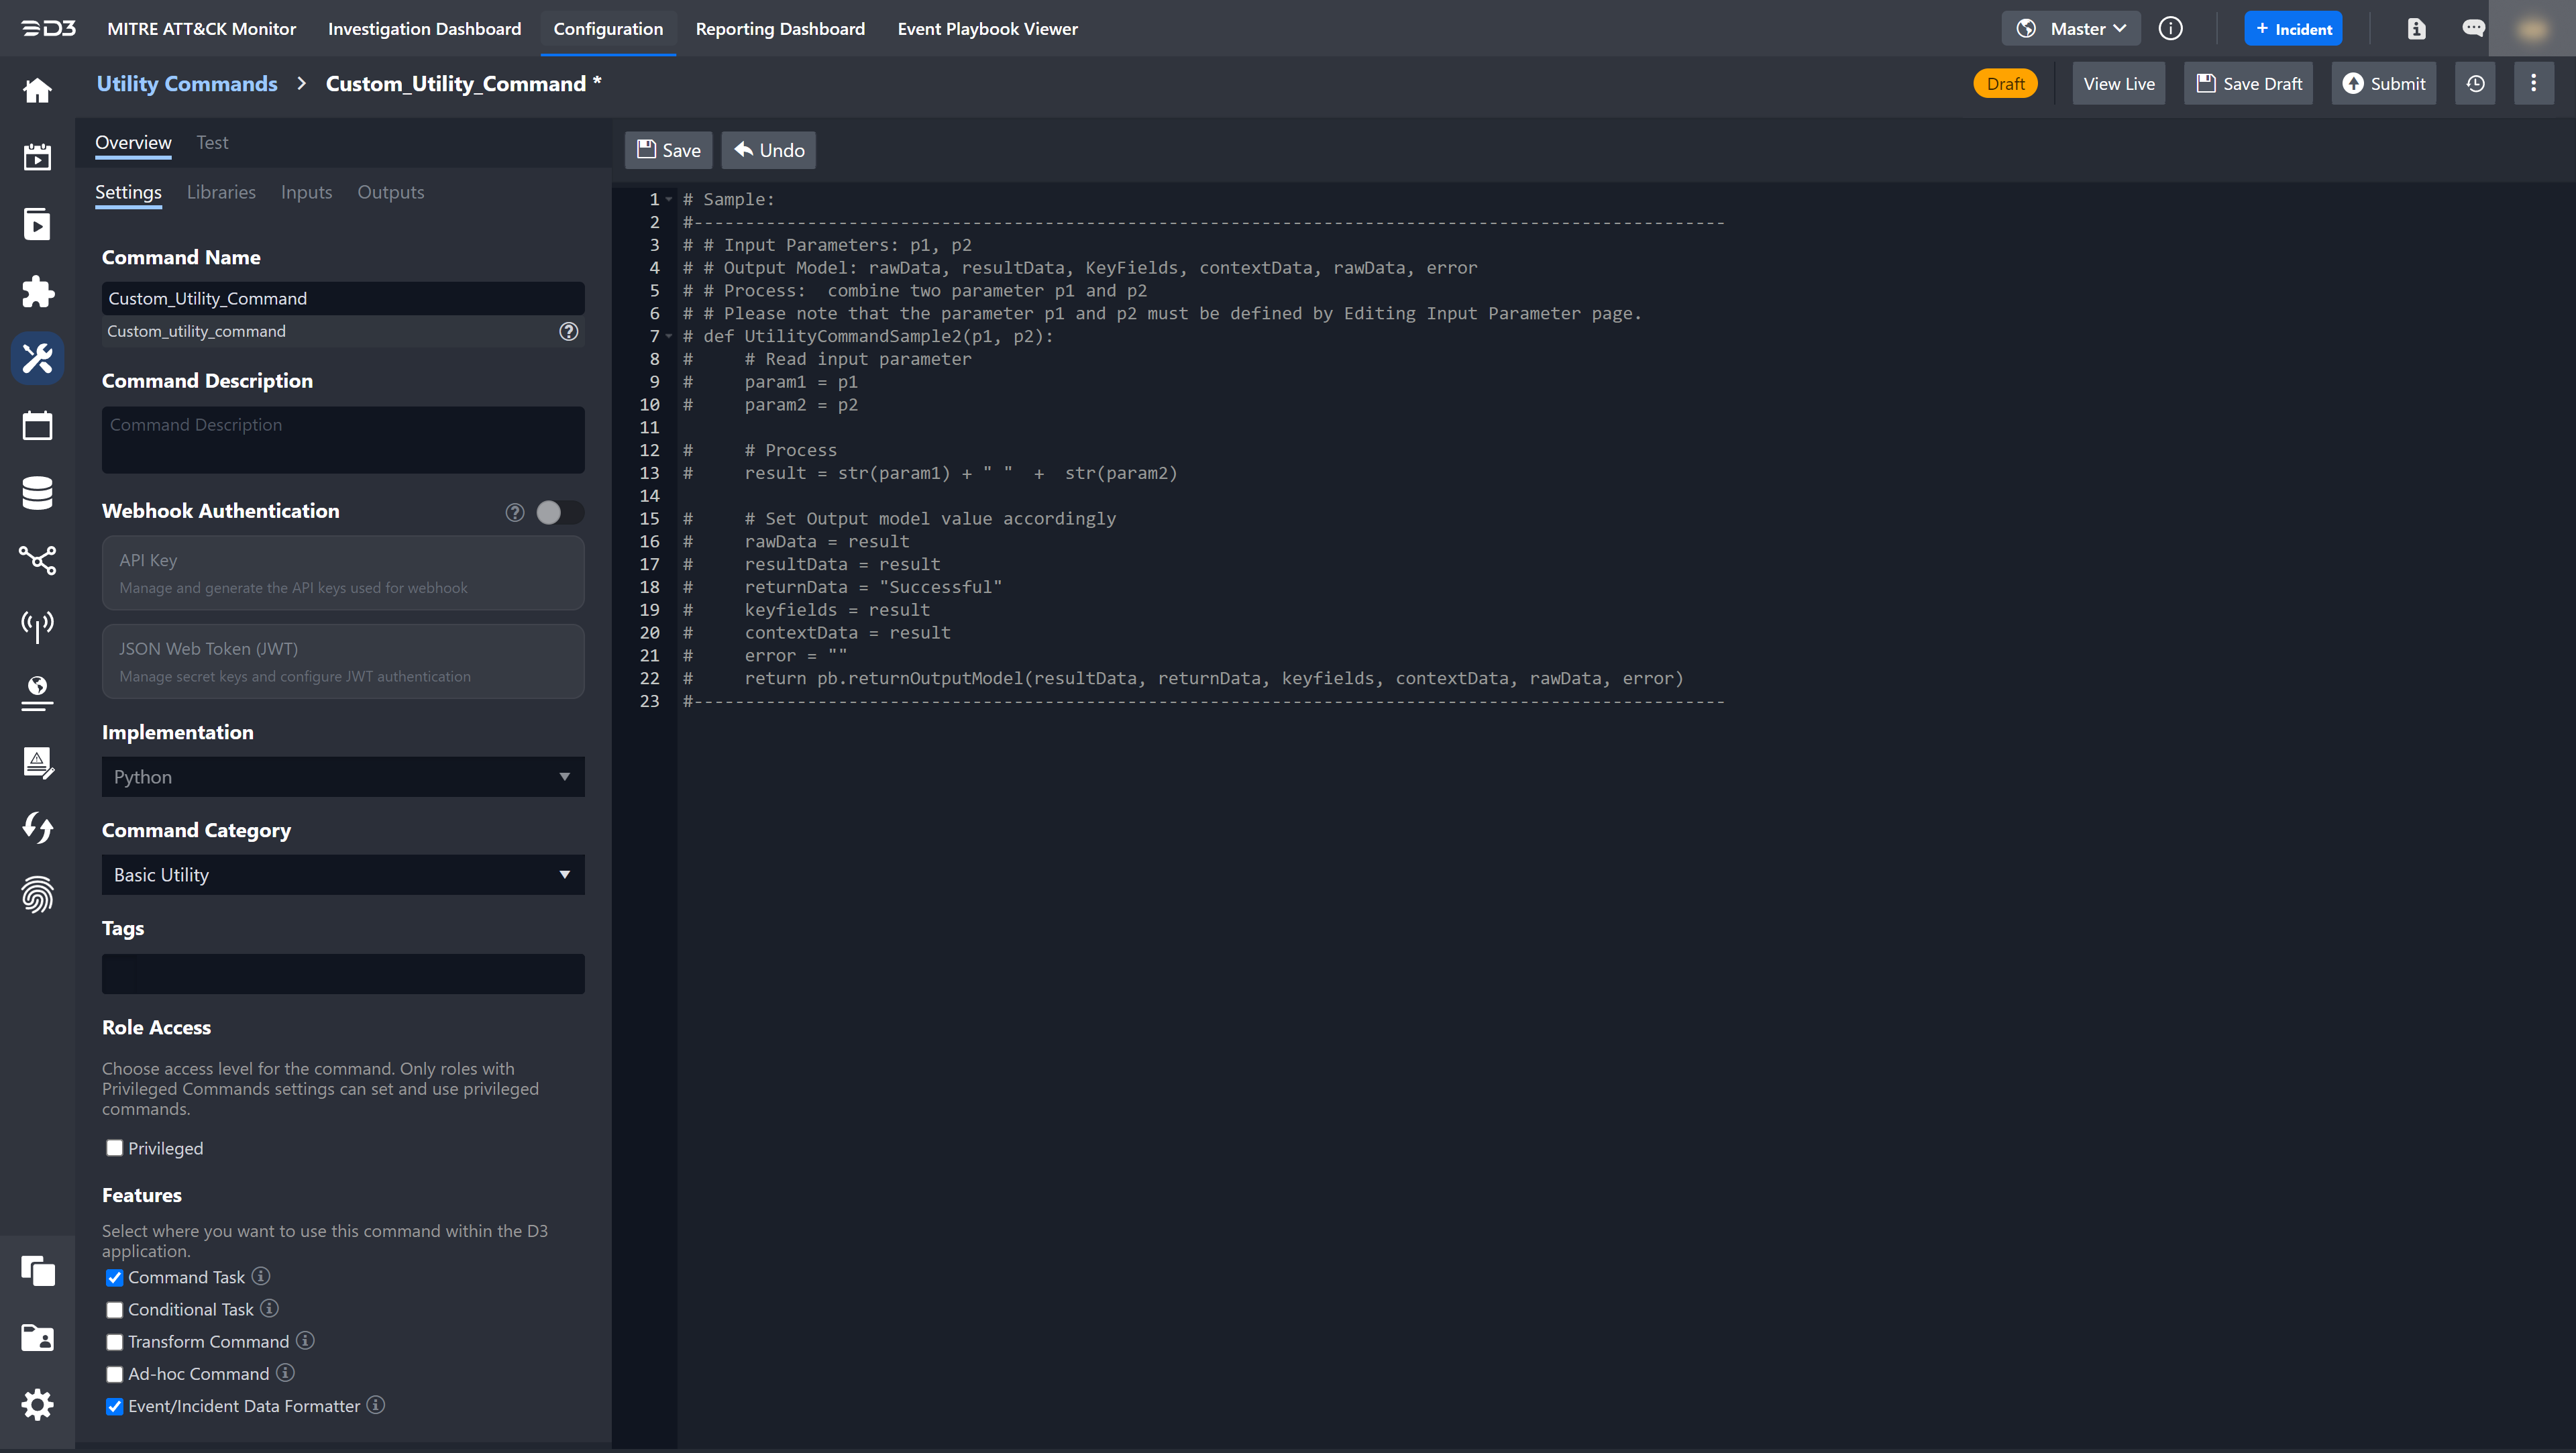
Python This method is suitable for those with advanced experience in writing Python scripts. It allows them to create and edit the Python scripts used to execute the custom command. |
|
|
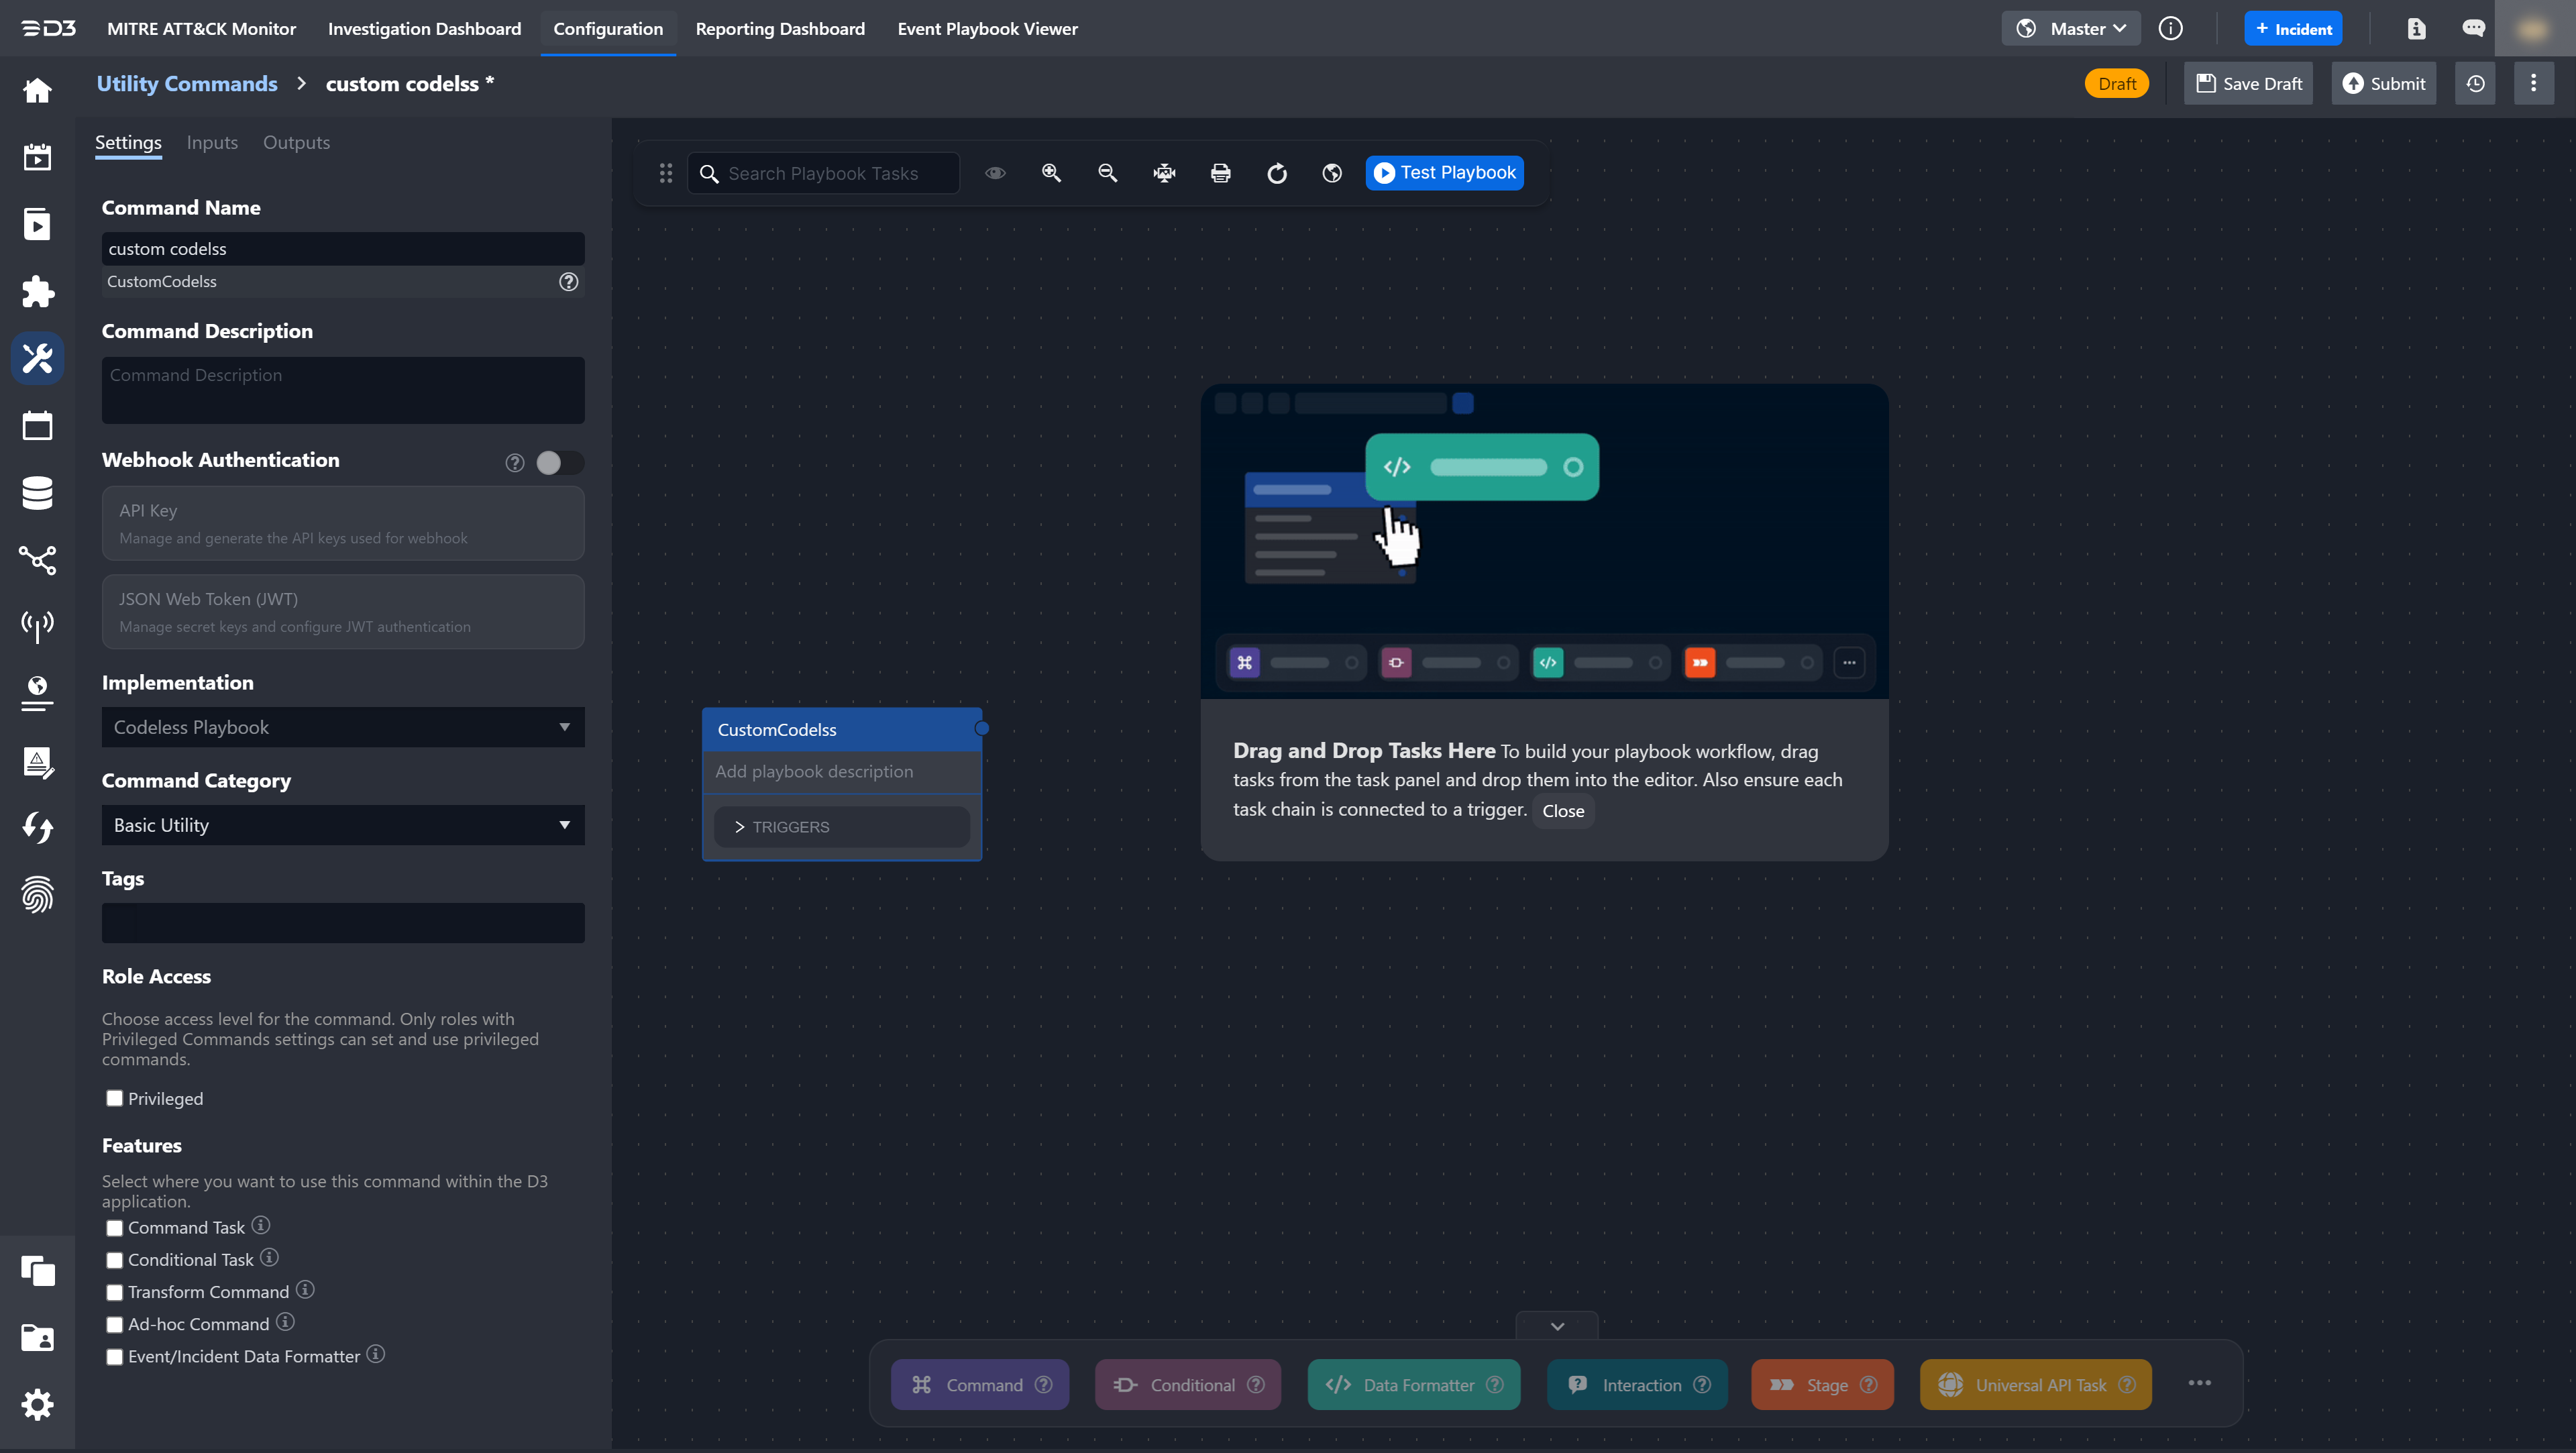
Codeless Playbook This method uses the same interface as the investigation playbook editor. Users can drag and drop task nodes from the right-side panel to create workflows. |
|
Categories of Utility Commands
There are 3 main categories of Utility Commands: Basic Utility, Cyber Utility, and System Utility.
|
Command Type |
Details |
Example Commands |
|
Basic Utility |
Enables simple data processing on the following data types:
The types of data manipulation functions include:
|
Append Text Contains Number Contains Text Convert Number to Text Ends with Less or equal |
|
Cyber Utility |
Performs cyber-specific data processing, typically for enriching or extracting information from artifacts. Examples of artifacts include:
|
Extract Artifacts From Excel File Check Email Authenticity Extract URLs from JSON Object |
|
System Utility |
Performs actions on system objects such as:
|
Close Incident Add to Global List Generate Summary Report Resume SLA Send Email Add TTP to Incident |
Creating a Utility Command
To create a custom utility command:
-
Click the + button.
-
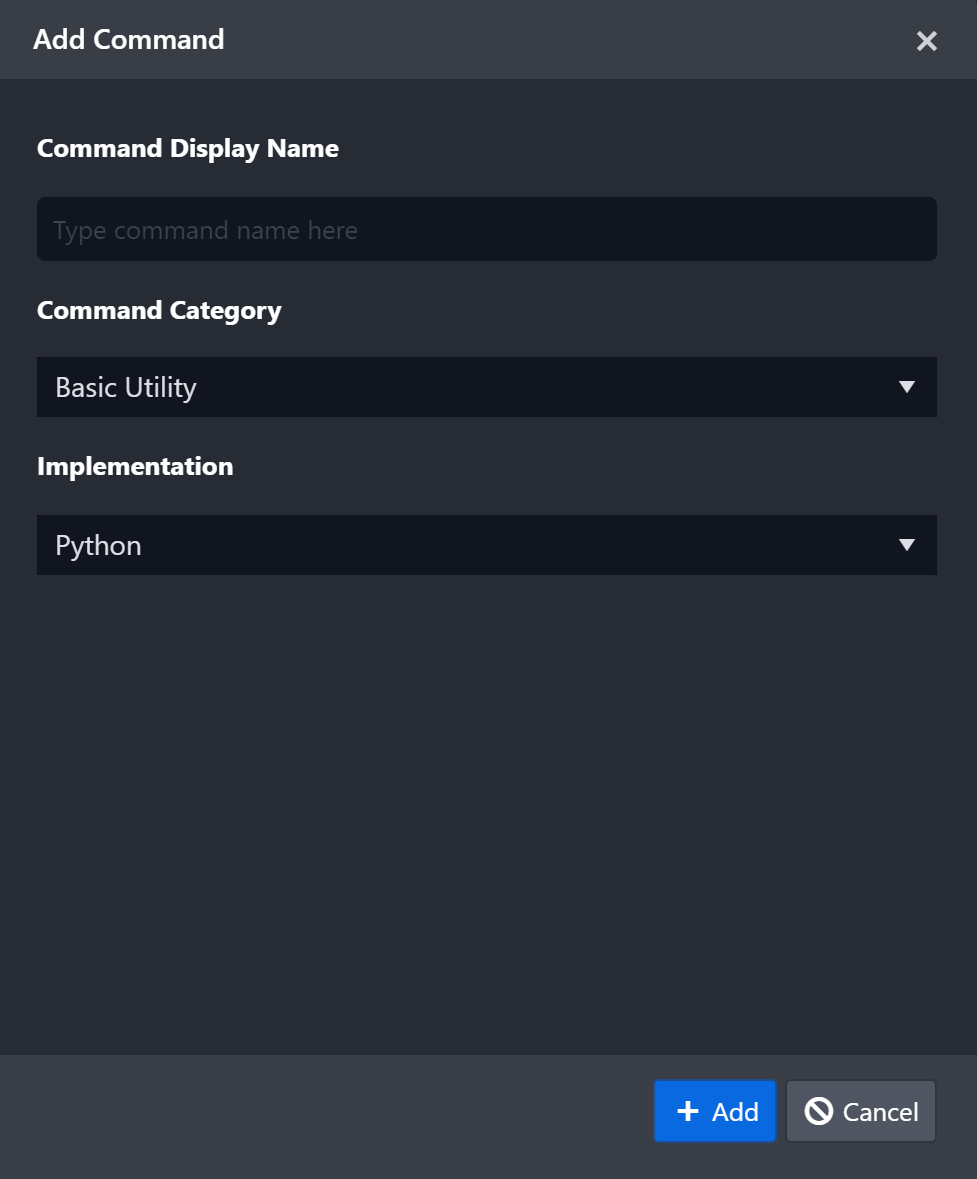
In the Add Command pop-up, provide the command name, then select the implementation type and command category.
NOTE
The implementation method and command category cannot be changed after the command is created.
-
Click + Add to create custom Utility Command.
-
In the Settings tab, fill out the following details for the Command's information.
-
Command Name: A name for the Command, which must match the function name used in the Python script.
-
Command Description: A clear description of the command.
-
Webhook Authentication: Enables the command to be run from outside of D3 using the API Key or JSON Web Token authentication method.
-
Implementation: Provides two methods for creating a command: codeless playbook or Python script. This option is selected when the command is first added and cannot be changed.
-
Command Category: One of the command categories. This option cannot be changed in settings.
-
Tags: Further categorize and improve searchability and classification.
-
Role Access: chooses the access level for this command. If Privileged is checked, then only roles with Privileged Commands settings can set and use this command.
-
Features: Decides where the Command will be available for use within the D3 platform.
-
Schedule: Sets specific time intervals and frequency for when the action will run. This action can be performed by selecting the Enable Schedule checkbox. This section will only appear for submitted/live commands.
-
After clicking + New Schedule, users can create a schedule and recurrence pattern for a custom command. This option is available only when the command is live.
.png?cb=2402b206f1e9c507aa304b1b4f57f565)
Configuring Input Parameters
Configuring input parameters defines the data types that the command can ingest for processing.
In this example, we're going to create an add_string command that appends two strings. The input parameters for this command are text strings.
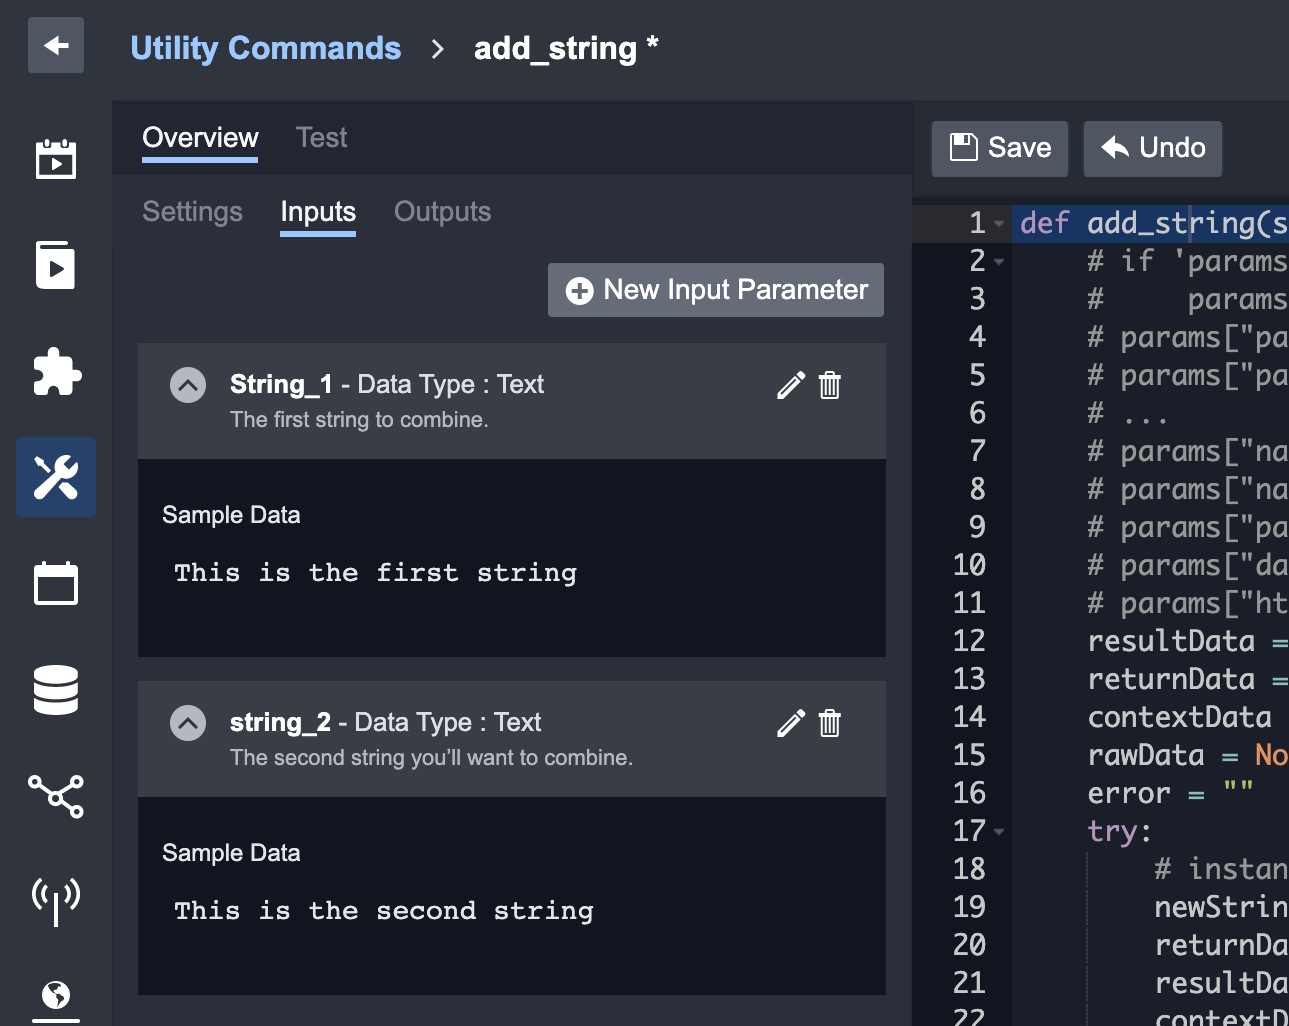
Follow the steps below to create an Input Parameter.
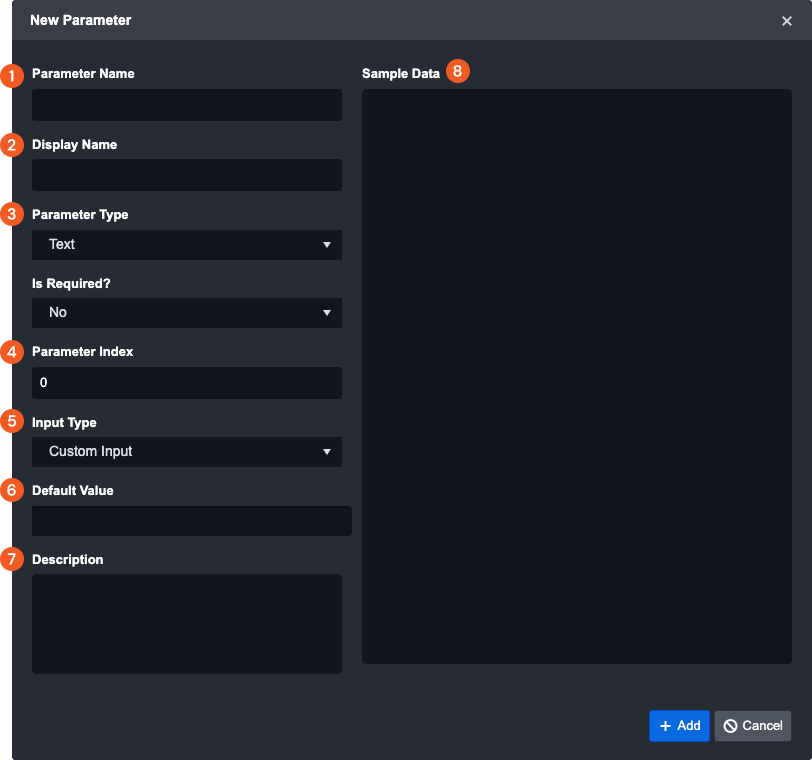
-
Insert the Input Parameter name that is used within the Command.
-
Define what Display Name will be displayed. The parameter name will be used if this field is blank.
Select the data type this parameter should have. -
In our add_string example, the parameter type will be “Text.”
-
Define the parameter's order in which it will appear in the Inputs tab.
-
Select the type of input this Command can use (Custom Input, Text Template, or HTML template).
-
Set the pre-filled Default Value for this parameter.
-
Provide a description of the current parameter's function and purpose.
-
Provide a sample of possible input for this Command.
-
Click on Save
Configuring Output
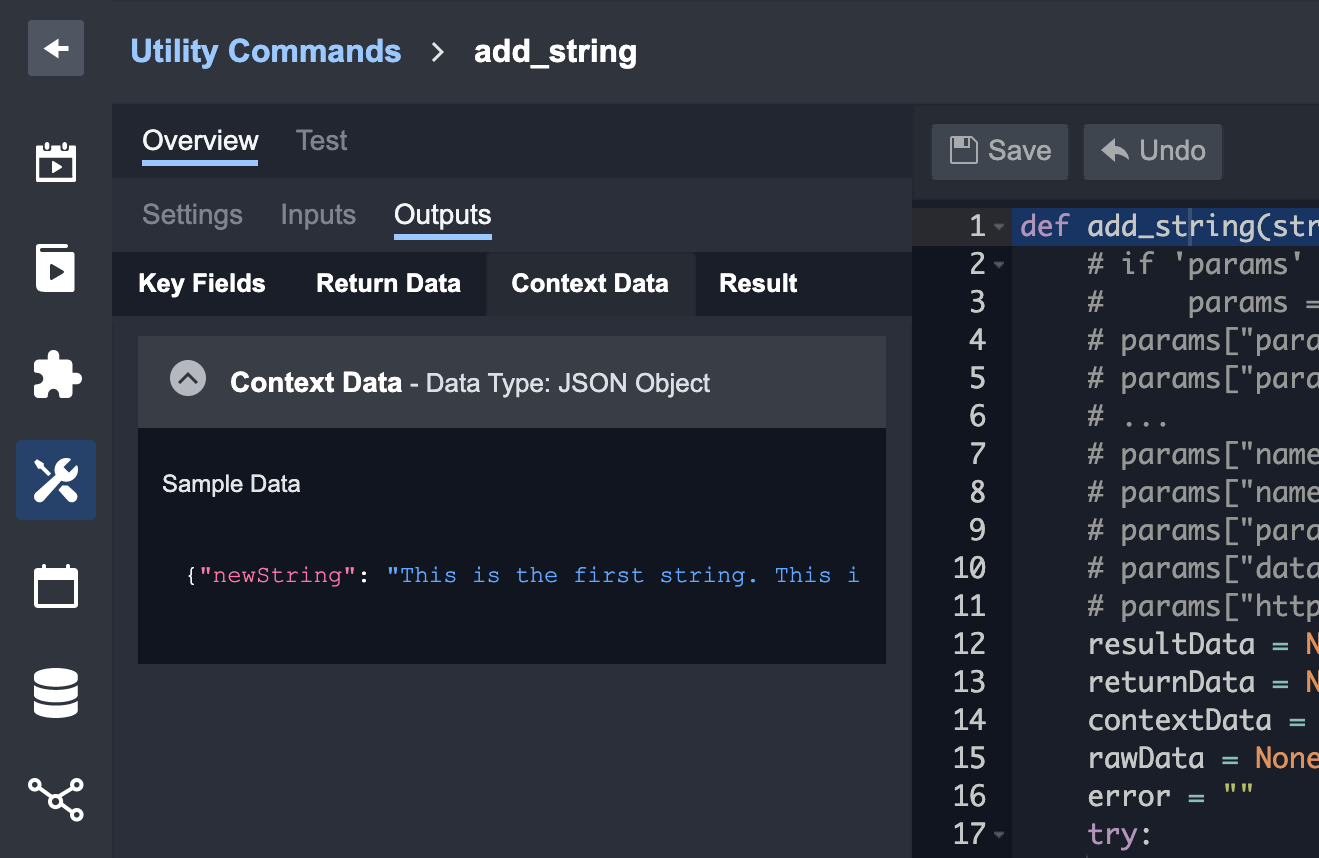
Define sample outputs for a utility command to help users understand the command context.
-
Key Fields: The most important fields to be extracted out as individual fields.
-
Return Data: The Success / Failure status of a Task for Integration Commands. For Transformation and Condition Commands, the return data is specified with corresponding output data types.
-
Context Data: The raw data that has been formatted into a structured JSON object format, which can then be stored in D3 Playbooks for data sharing.
-
Raw Data: The unformatted and raw information of external Events provided by third-party vendors.
Set the Sample Data fields to show example data that the command can output.
Testing & Submitting a Command
The D3 platform allows users to test custom and built-in commands. Each implementation method has a different test interface, but both function similarly.
To test a Command (Python Implementation)
-
Select the command to test.
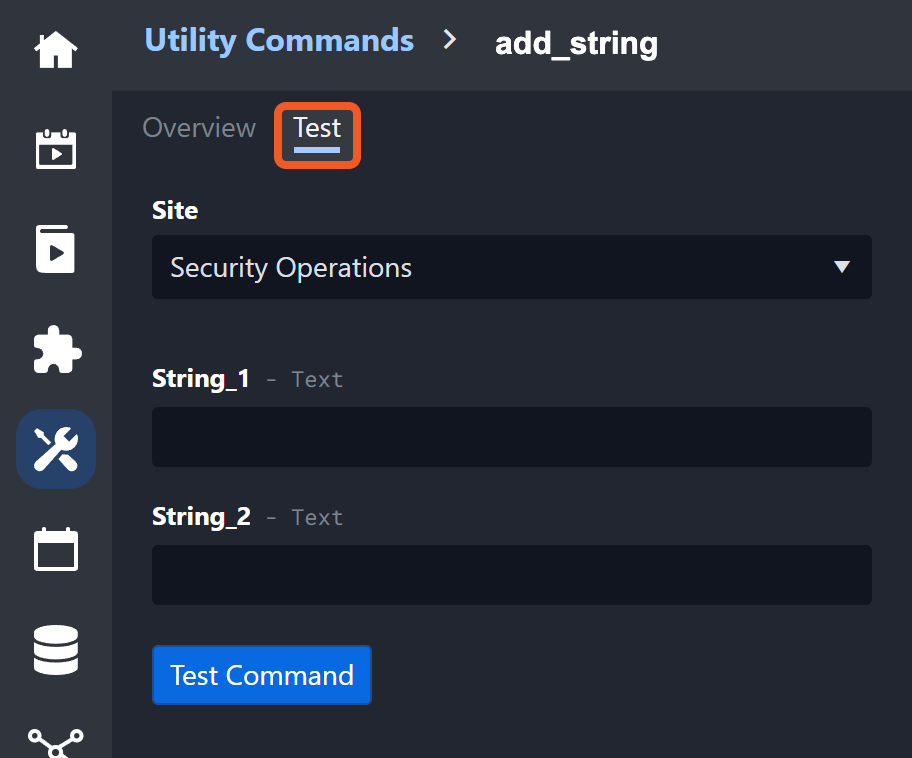
-
Navigate to the Test tab on the left panel.
-
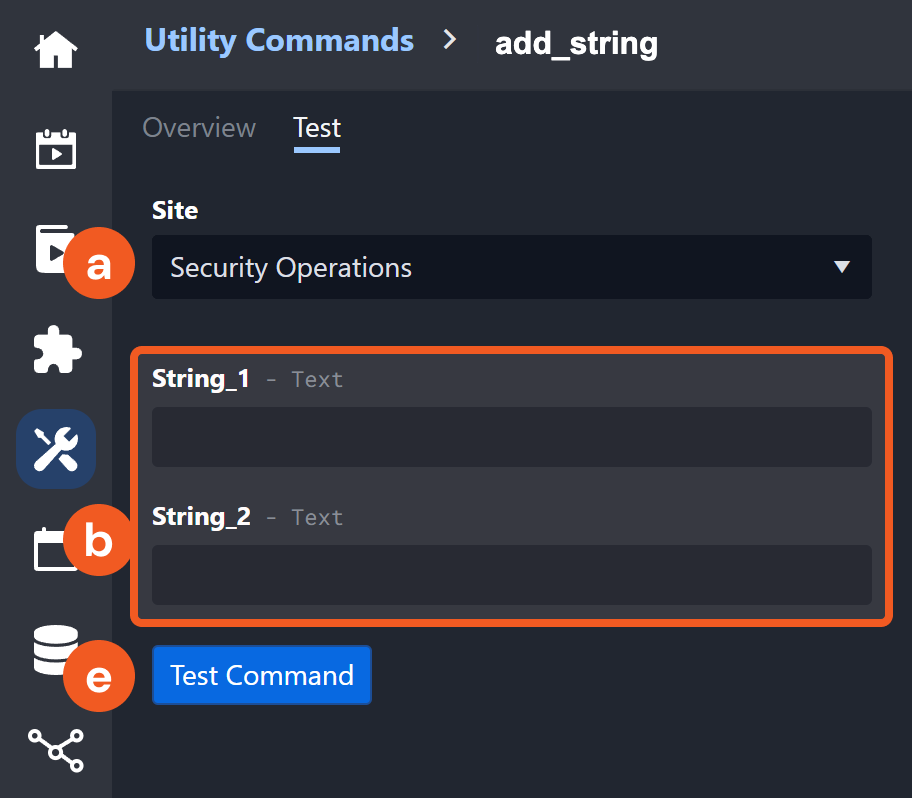
After, specify the following:
-
Select the site on which to test the command.
-
Provide the necessary Inputs.
-
Click Test Command.
-
-
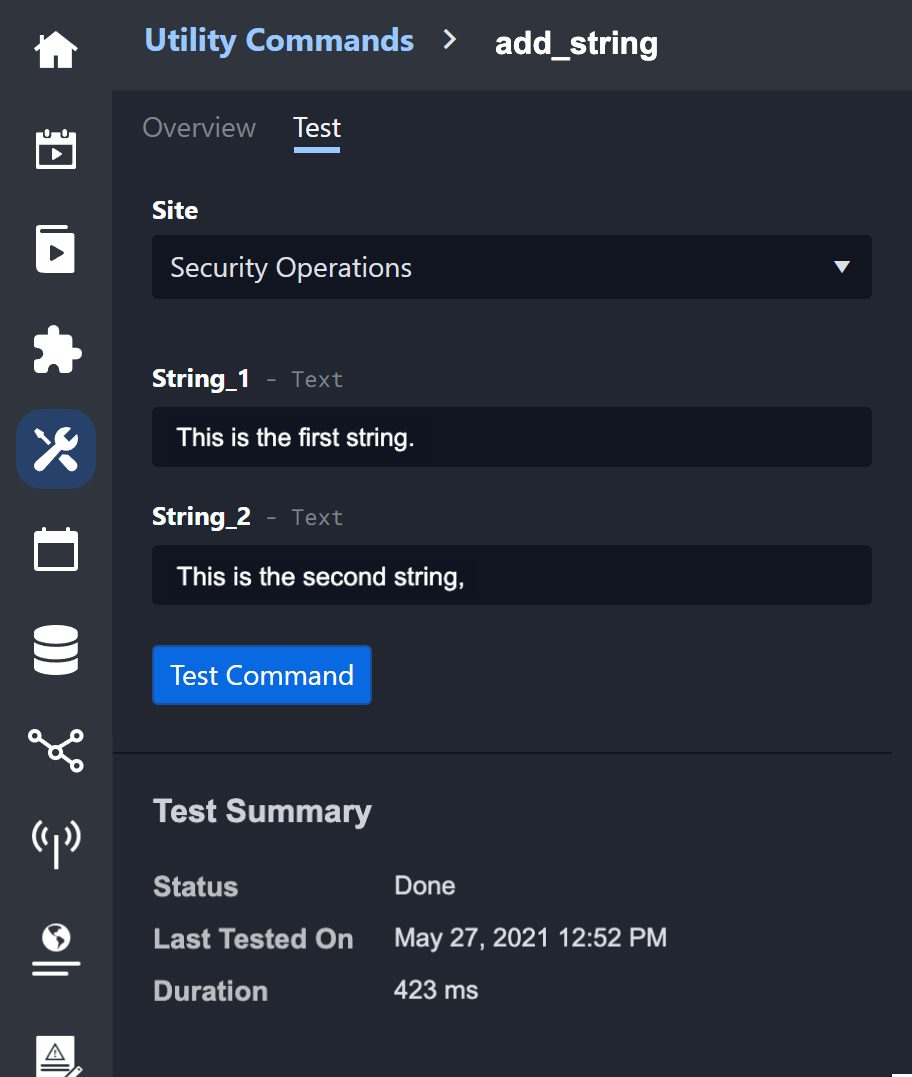
Result: A new Show Test Result button and Test Summary will appear.
-
Click Show Test Result
-
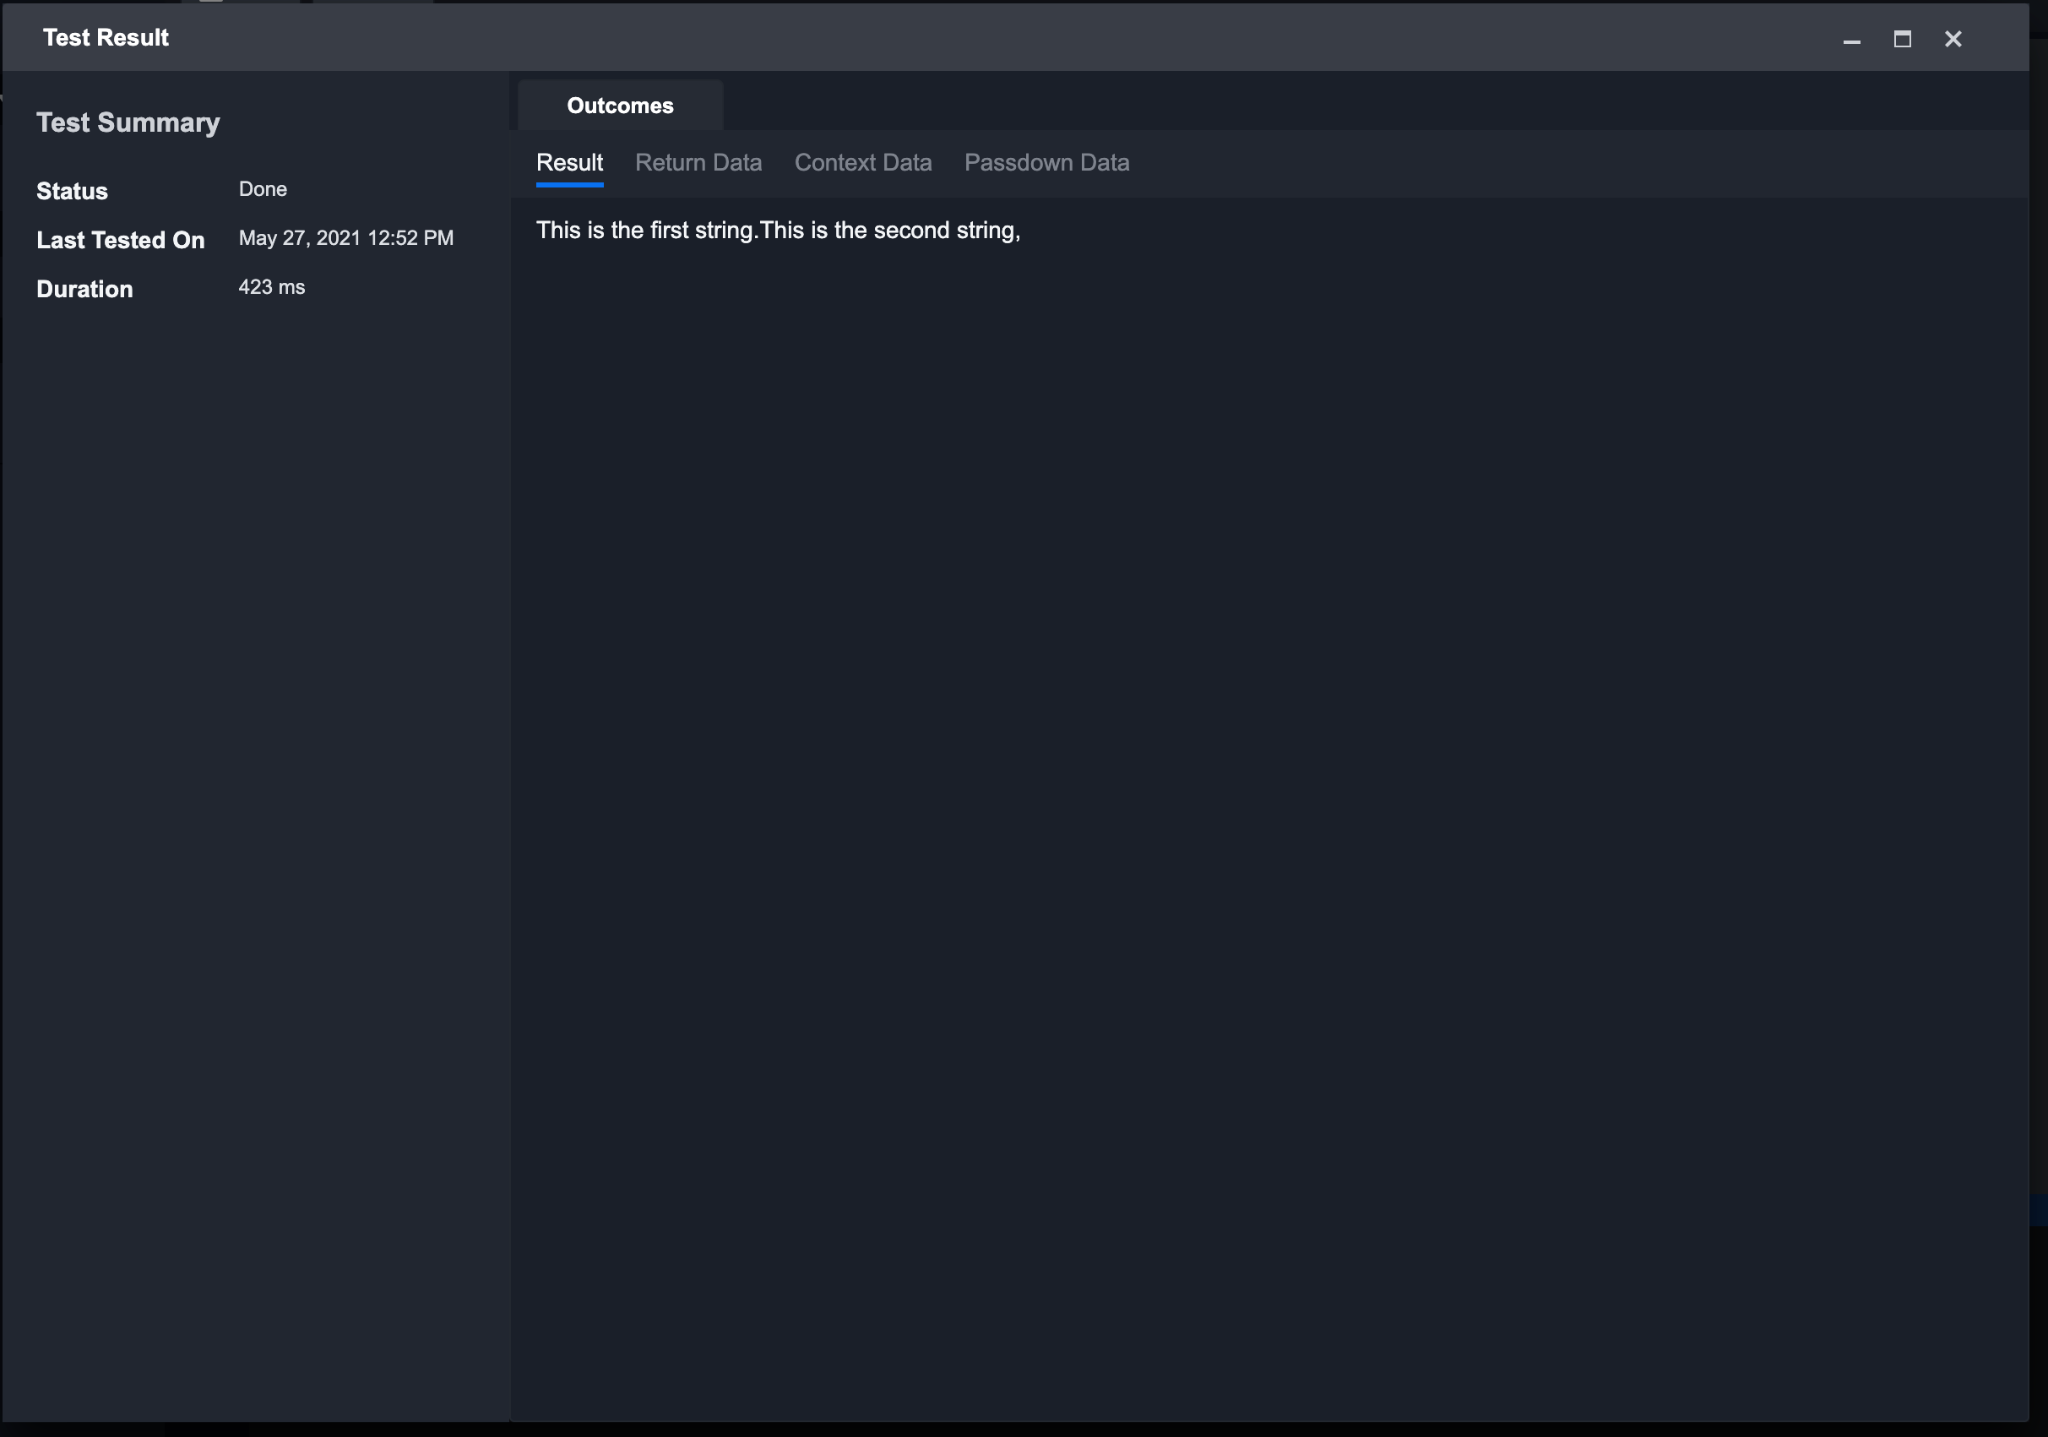
Result: The test result of the command will appear in a pop-up.
Outputs are provided for the following (if applicable): Result, Return Data, Context Data, Passdown Data, Raw Data.
-
Once the command functions as intended, click Submit to publish the command.
After submission, the command becomes available for use.
Testing a Command (Codeless Playbook Implementation)
To test a Utility Command built with the Playbook implementation, click the Test Playbook button located at the top of the editor.
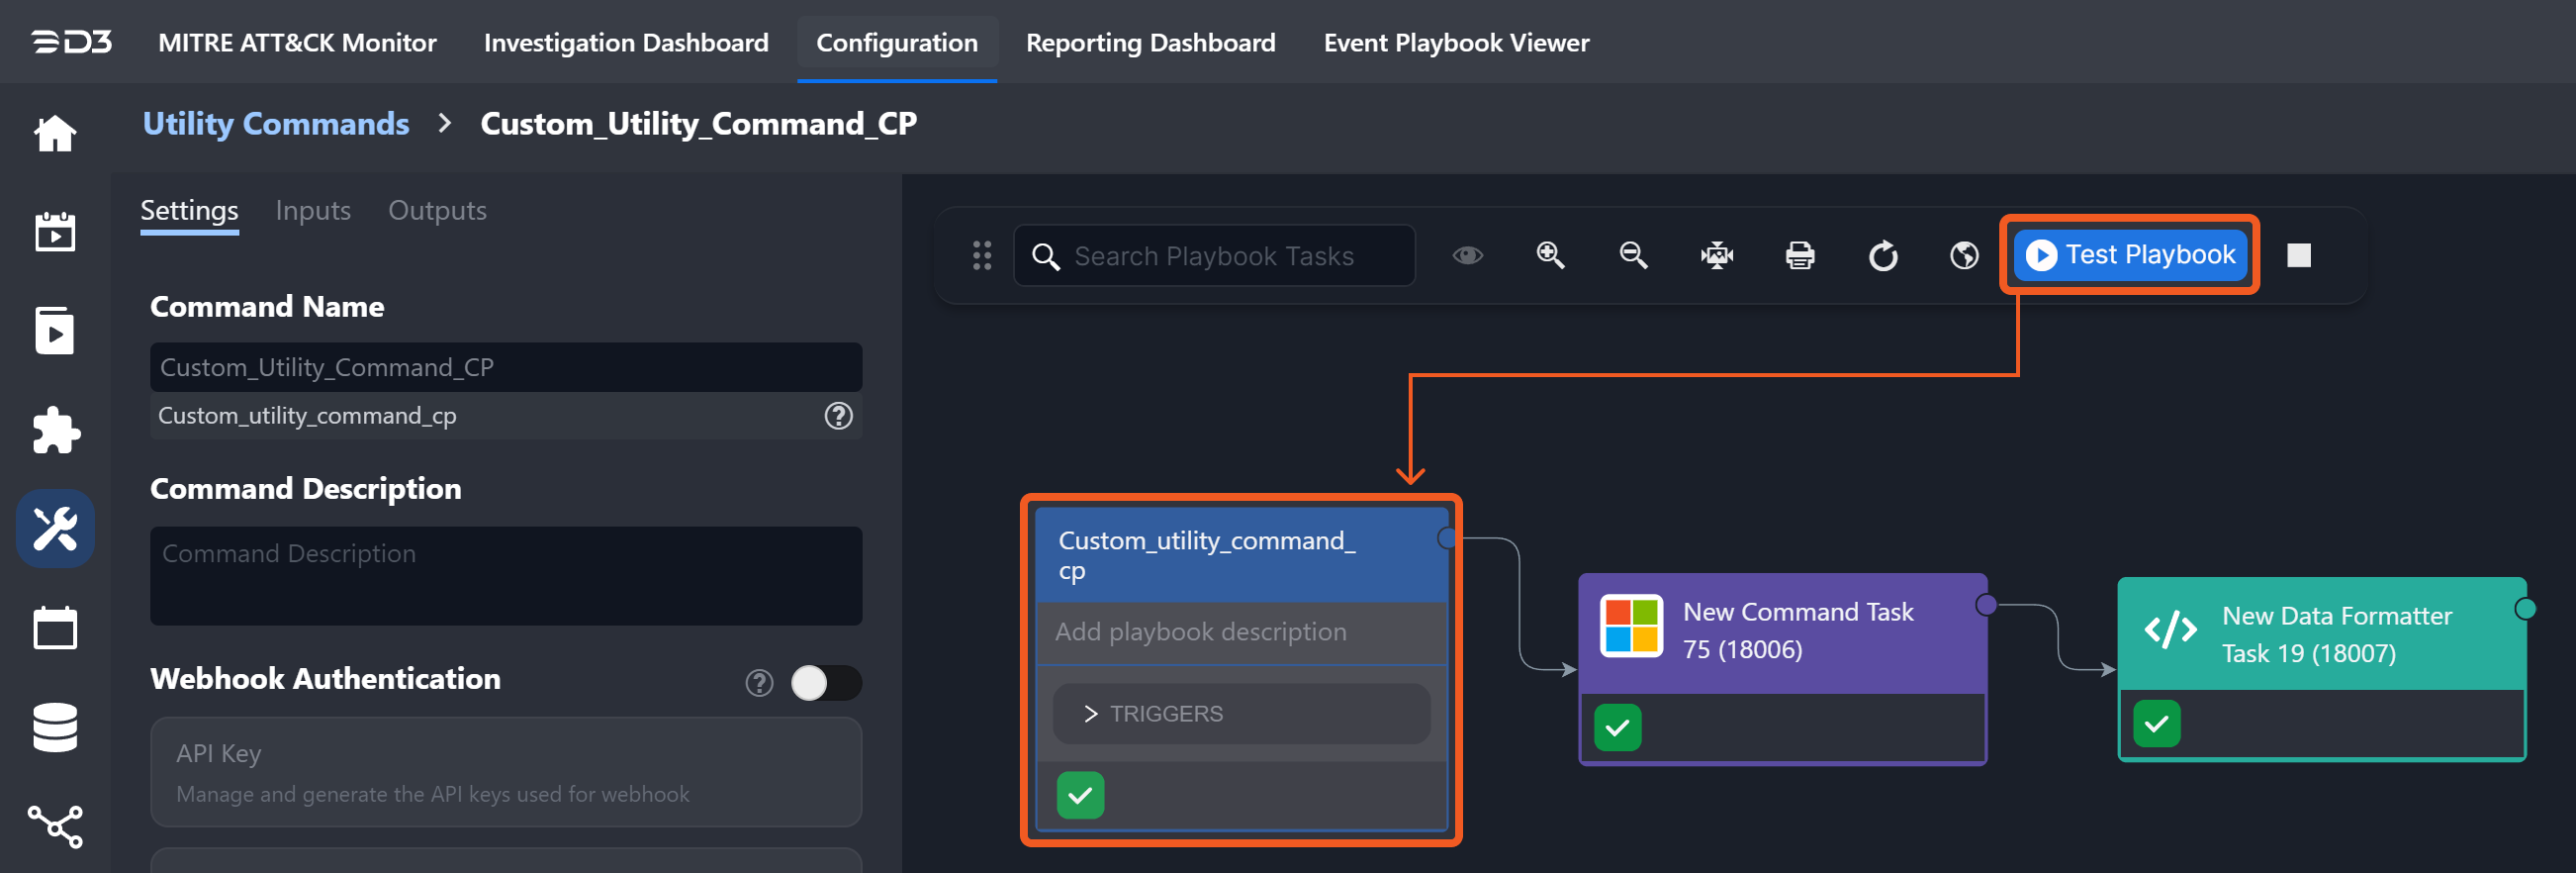
After the playbook runs, click the ✅ icon for the first task to view the command test result. To view individual task results, click the corresponding ✅ icon for each task.
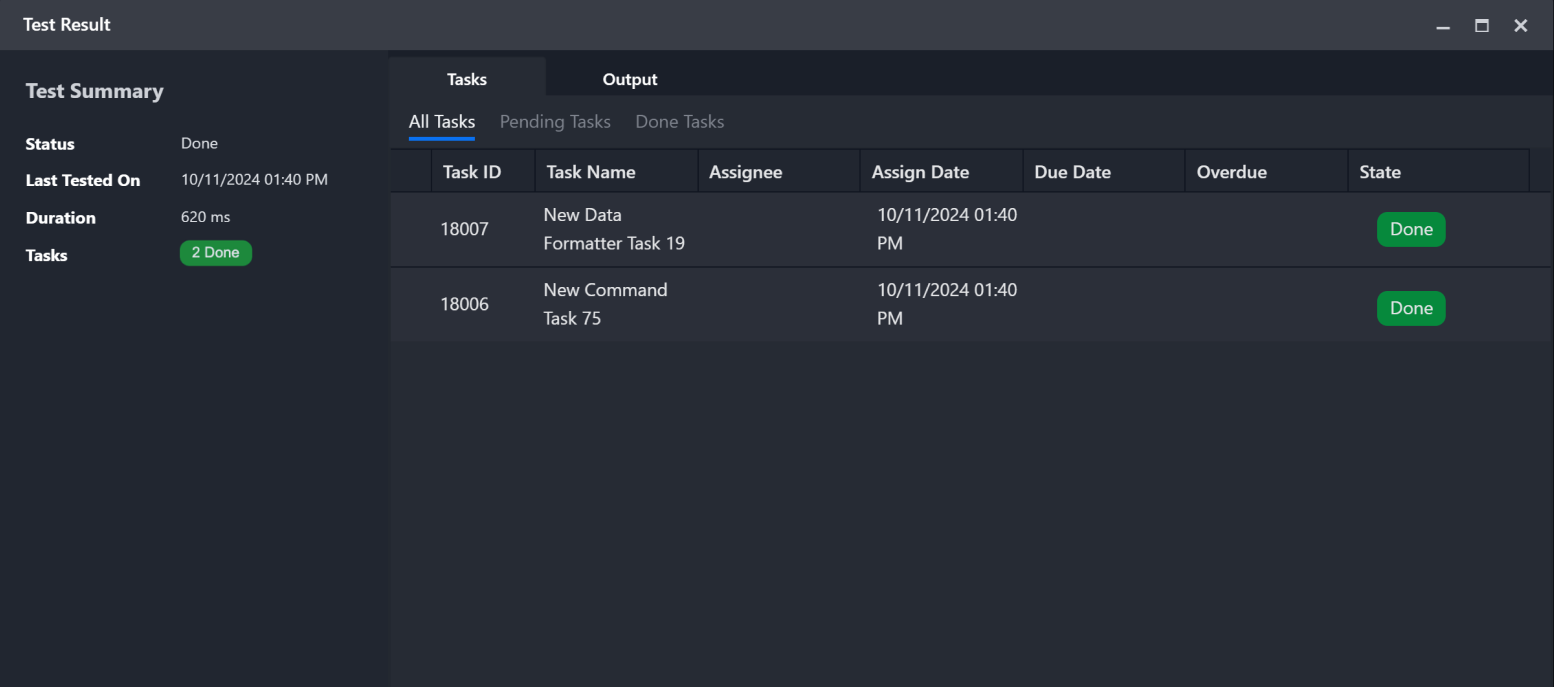
Command's Overall Test Result
In the base task's test result, users can view the individual tasks in the current command and their test statuses. Clicking a task opens its Task Details, which show execution and input details.
Pending Tasks did not automatically proceed through the test and could be awaiting further action.
Done Tasks shows all tasks that were able to run through the test. It will contain both failed and successful tasks.
Remote Utility Command with D3 Webhook API
A utility command can be run remotely from a third-party system or another D3 instance through the D3 Webhook API. To enable remote execution, users must enable the webhook, grant access to the D3 API, and use a REST API tool such as Postman.
The following is a general how-to for setting up a remote utility command with D3's webhook API.
-
Find and select the desired utility command. Navigate to Configuration > Utility Commands > [Desired Utility Command]. For custom utility commands, verify that the command has been submitted.
-
Under Webhook Authentication, toggle on Remote Command. Select the desired authentication method.
Authentication Method: API Key
-
In the Setup API Keys window, users can select an existing key or generate a new key for authentication. To generate a new key, click the + button next to ALL KEYS.
-
If generating a new key, enter a key alias, then click Generate.
-
For detailed information about configuring the remote command API key, refer to the Authentication Method: API Keys subsection under Remote Command.
Authentication Method: JSON Web Token (JWT)
-
In the Setup JWT window, users can select an existing key or generate a new key for authentication. To generate a new key, click the + button next to ALL KEYS.
-
Enter a key alias and select the assigned user. Optionally, allow all users to view the key. Click Generate.
READER NOTE
The assigned user will be recognized as the user when a command requires a user parameter.
-
For detailed information about configuring the JSON web token, refer to the Authentication Method: JWT subsection under Remote Command.
Exporting & Importing Custom Utility Commands
D3 allows users to export and import custom utility commands between D3 environments. This document provides step-by-step instructions for the export and import process.
READER NOTE
The prerequisites for using this guide are:
-
An active custom utility command created in D3
-
Another D3 environment to import the custom utility command to
Exporting a Custom Utility Command
-
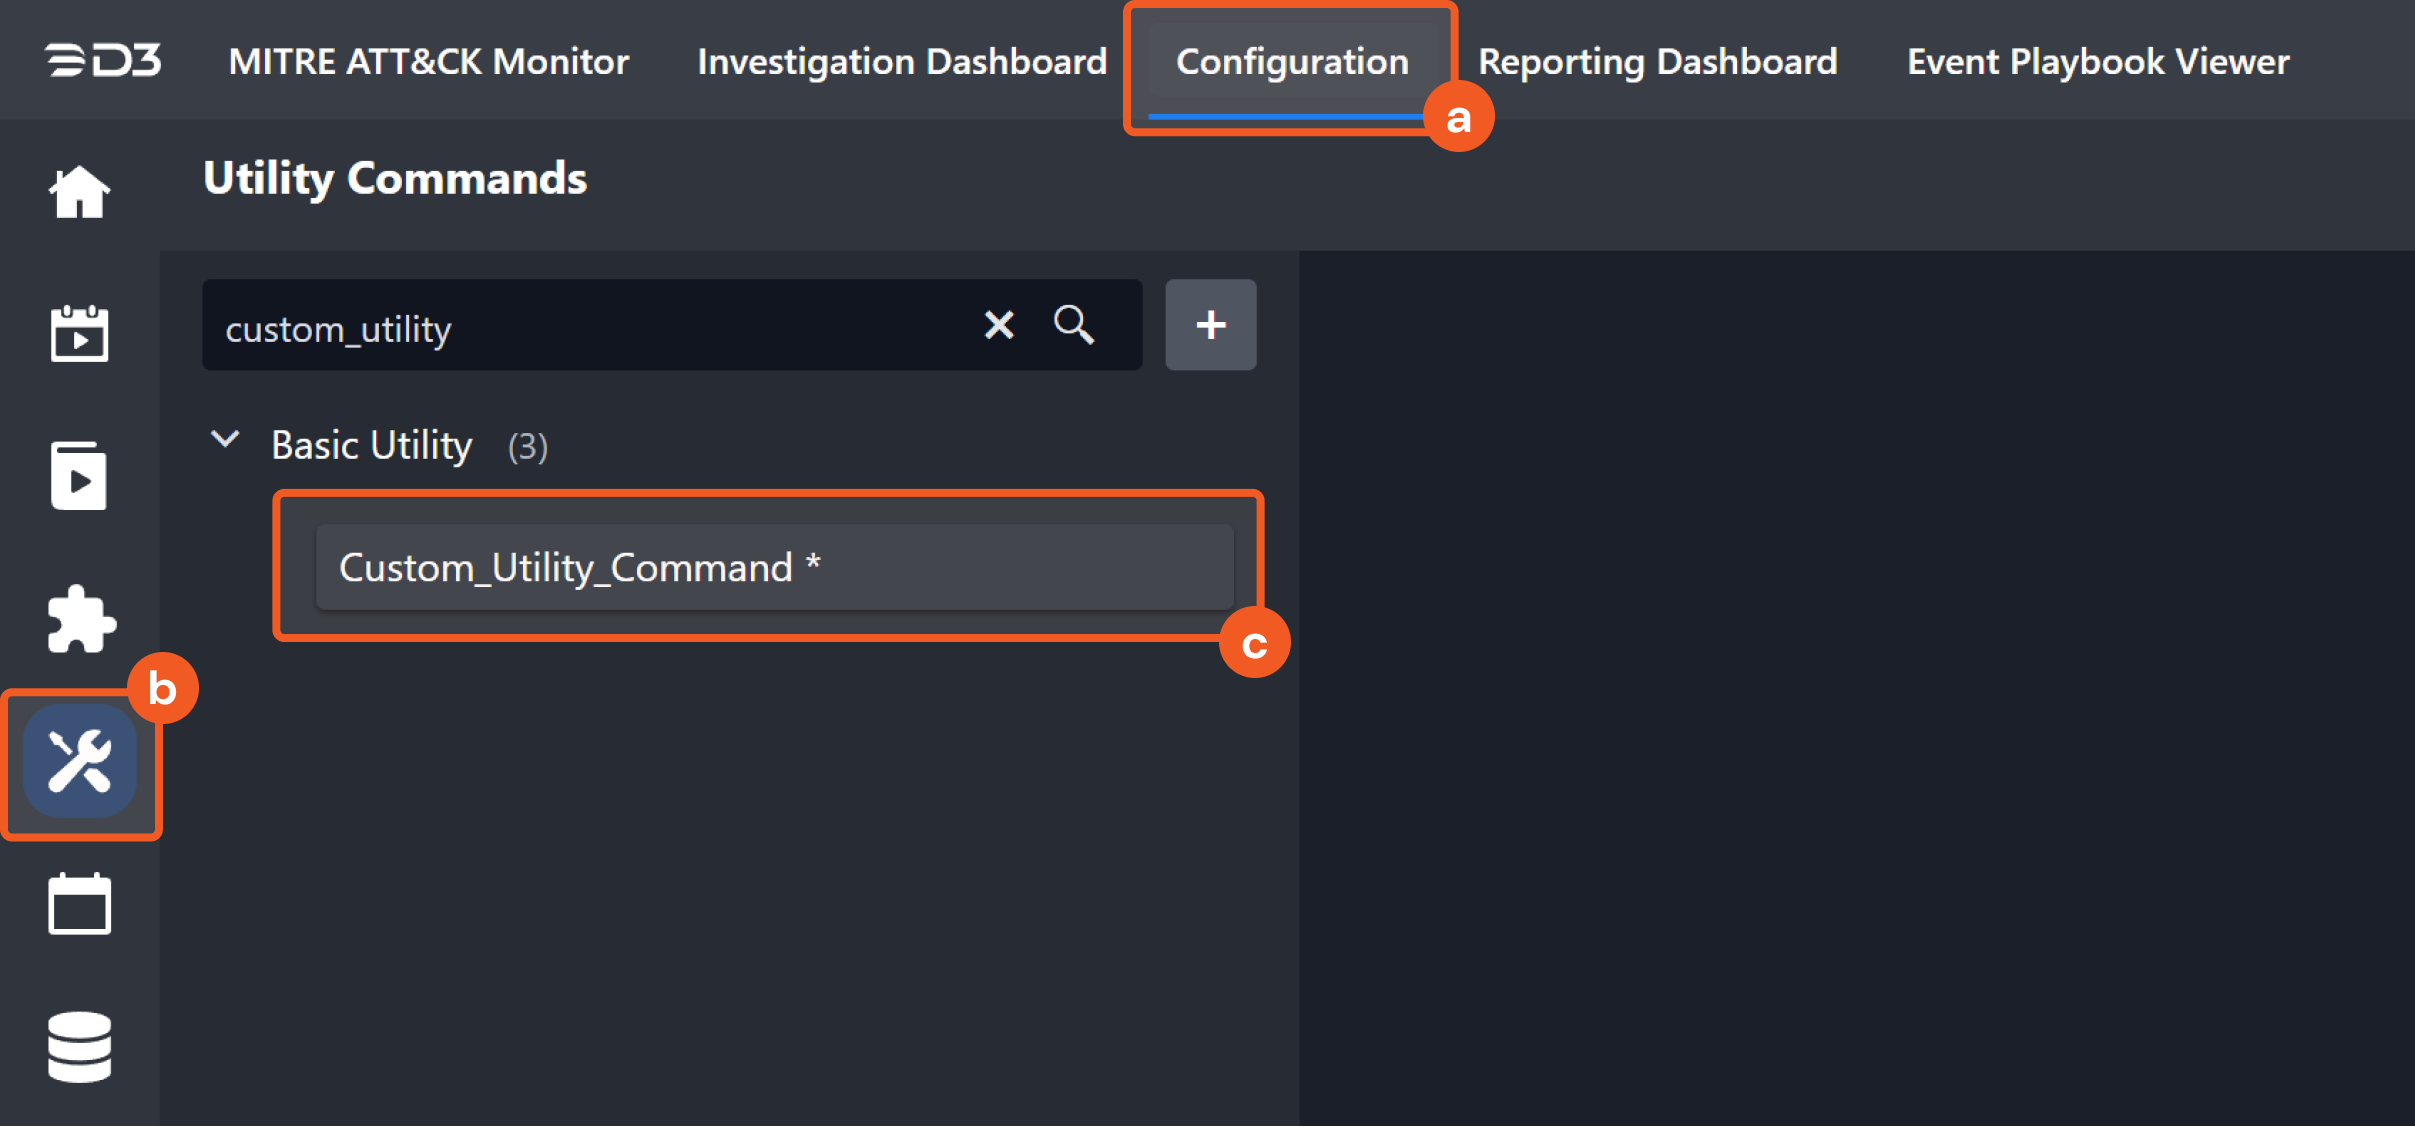
After logging in to the D3 environment that contains the custom utility command, navigate to Configuration in the top menu bar. In the left-side menu, click Utility Commands. Use the search box to find and select the custom utility command to export.
-
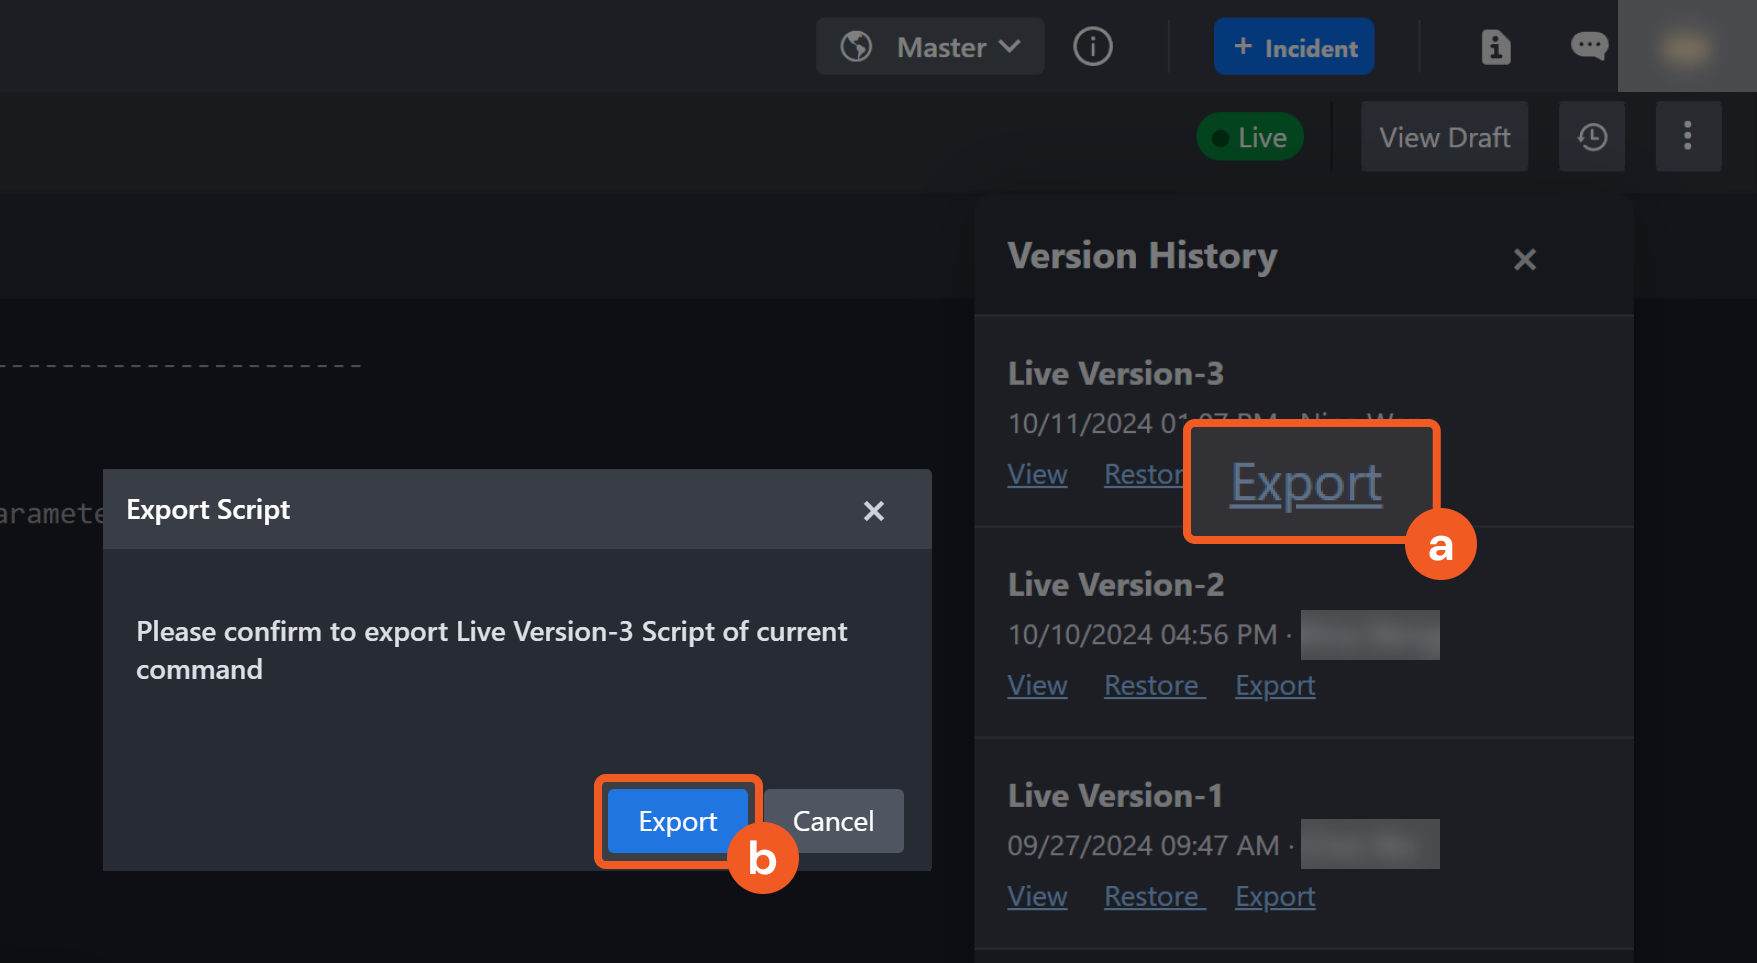
Ensure that the command status is Live. An indicator appears near the upper-right corner. If the command status is Draft, submit it to go live. Click the three-dot button, then select Version History.
.png?cb=1fa0c32e7f2d08ee56cbcf0363306618)
-
Select the custom utility command version to export. Click Export, then click Export again in the confirmation window. The custom utility command will be exported and downloaded as an XML file, which is required for the import process.
Importing a Custom Utility Command
-
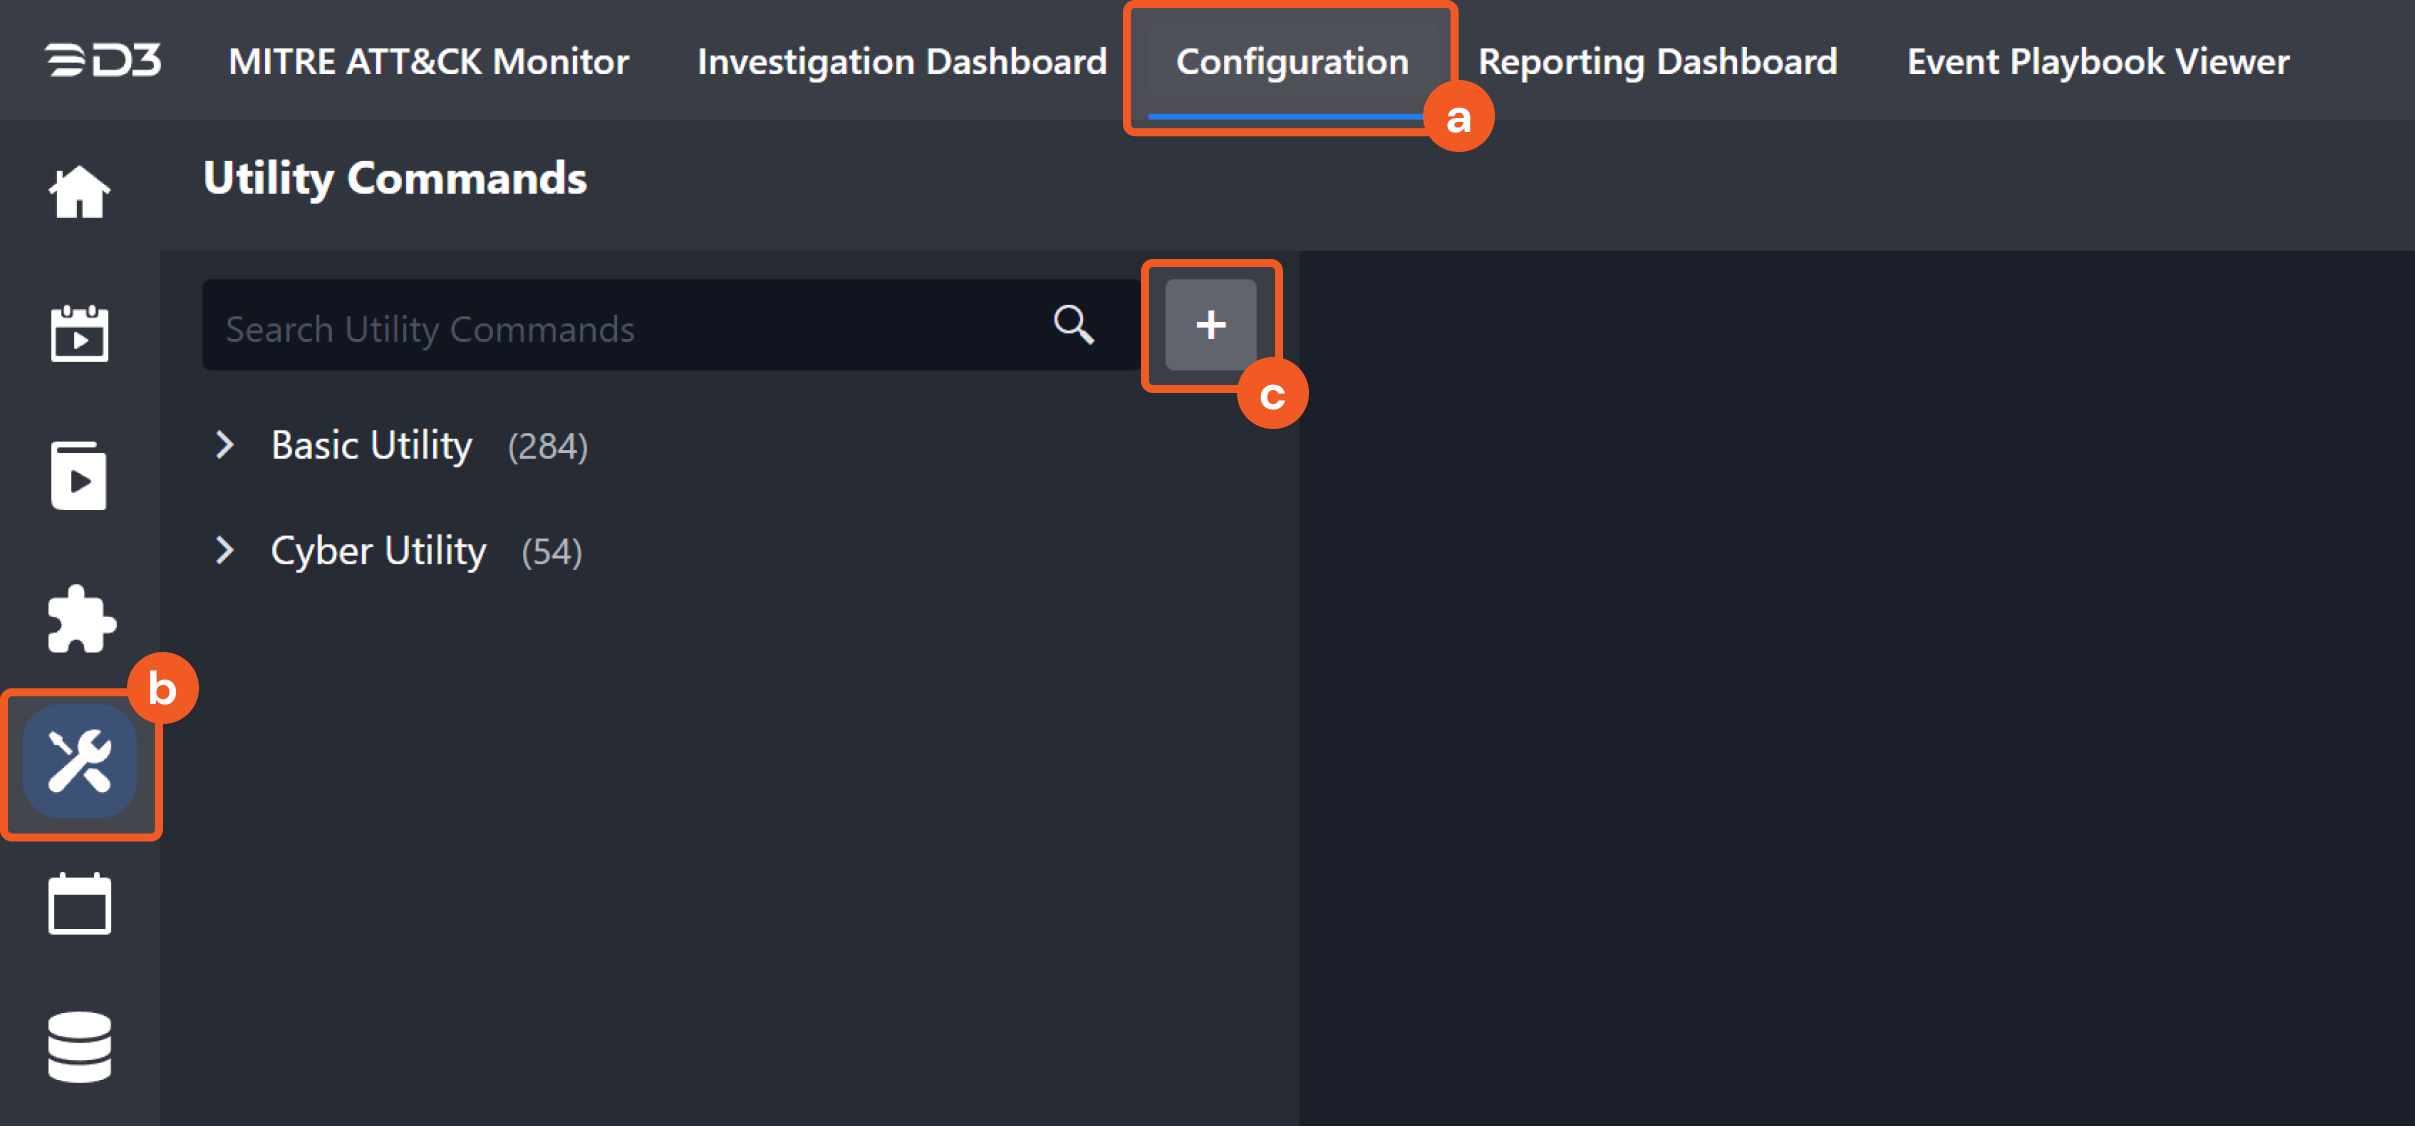
Log in to the D3 environment to which the custom utility command will be imported. Navigate to Configuration in the top menu bar. In the left-side menu, click Utility Commands, then click + to add a new custom utility command.
-
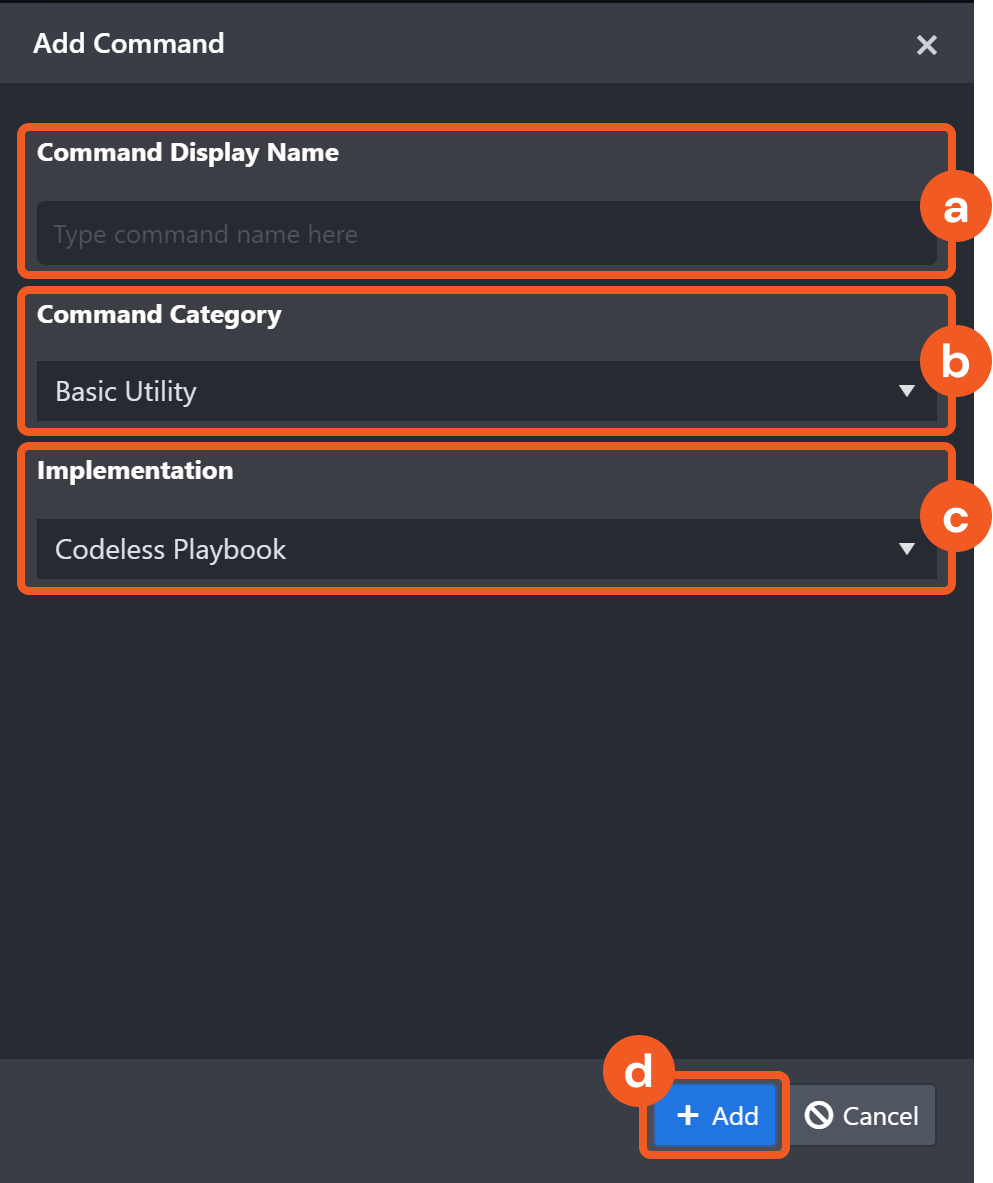
Configure the custom utility command to add.
-
Command Name: Enter a relevant name for the command. Please note that the command name must start with a letter, and can only contain letters, numbers and underscores!
-
Implementation: Select Codeless Playbook for the purposes of importing a custom utility command.
-
Command Category: Select the command category for the command to import. Available categories include Basic Utility, Cyber Utility, and System Utility.
-
Click Add to confirm and add the custom utility command.
-
-
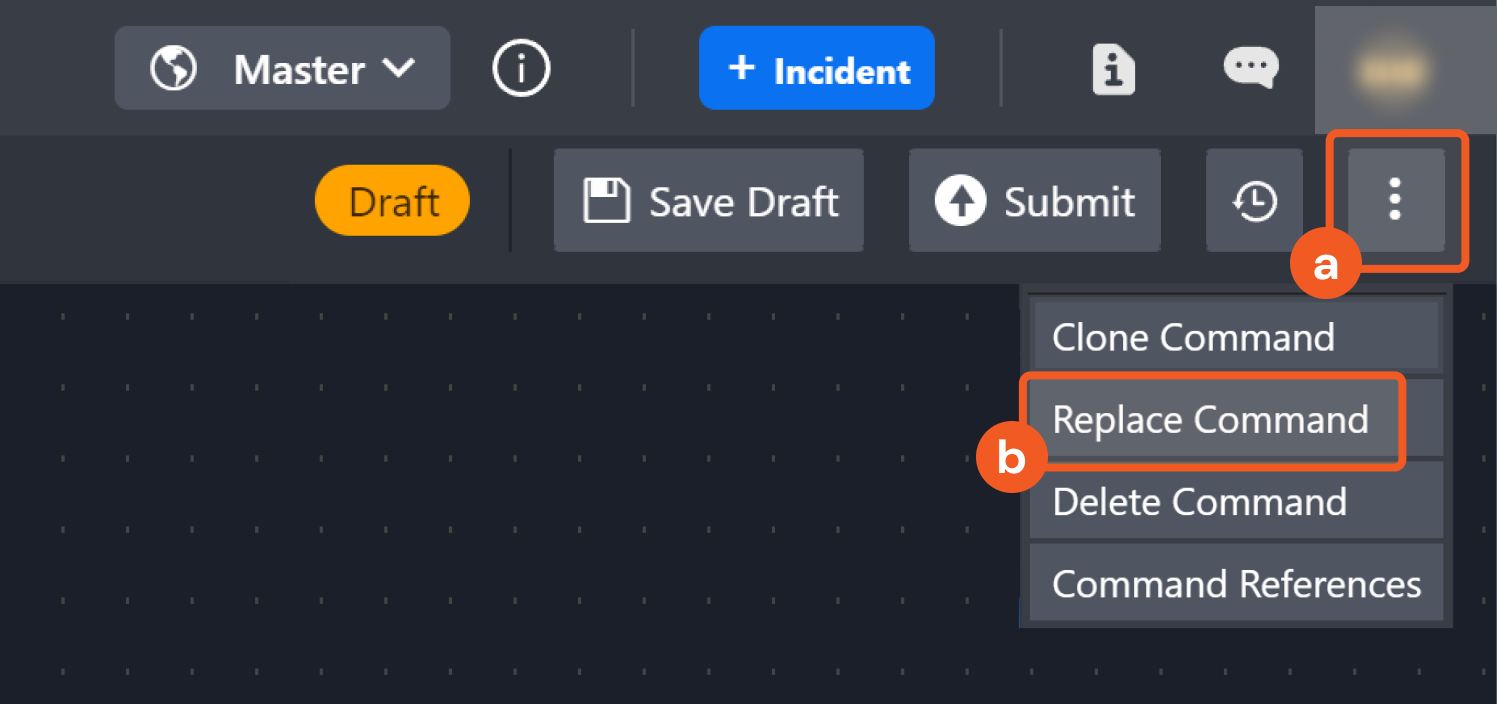
Click on the three-dot button found near the top right corner, then Replace Command.
-
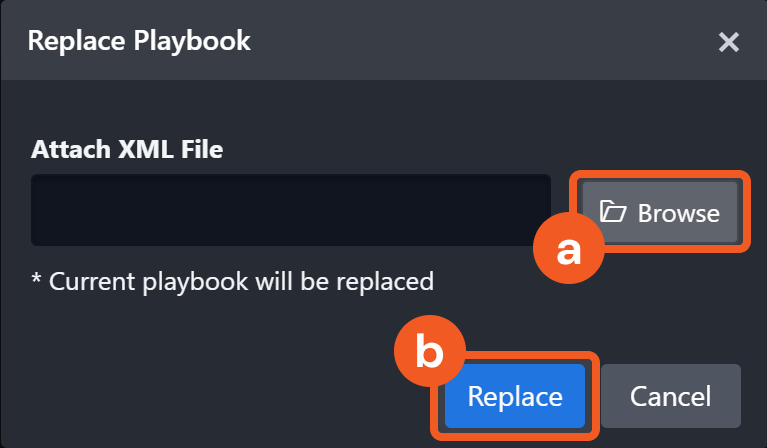
Replace the command with the exported XML file. Click Browse to locate and select the previously exported XML file, then Replace to confirm the configuration.
-
View the custom utility command tasks in the editor. Click Submit in the upper-right corner to make the command live and available for use in the D3 environment.