
Last updated: Mar 26, 2025
Overview
Multi-tenancy allows a single master source to share content with multiple tenant destinations. This model consists of one master instance and one or more tenant instances. The master instance acts as the source of shared data, while tenant instances receive the shared content. This relationship is one-way. Only the master instance can distribute data to tenant instances, and tenant instances cannot edit or delete shared items.
READER NOTE
A tenant instance functions like a standard instance of D3. However, certain capabilities are limited due to the multi-tenancy relationship:
-
Tenant instances cannot make edits to any shared content from the master instance
-
Tenant instances cannot create their own sites: the master instance creates sites for each specific tenant
-
Tenant instances cannot request updates from the master instance
Tenant Onboarding
To establish a connection between the master and tenant instances, users must first onboard the tenant in the master instance.
Instance Registration
In Tenant Instance
-
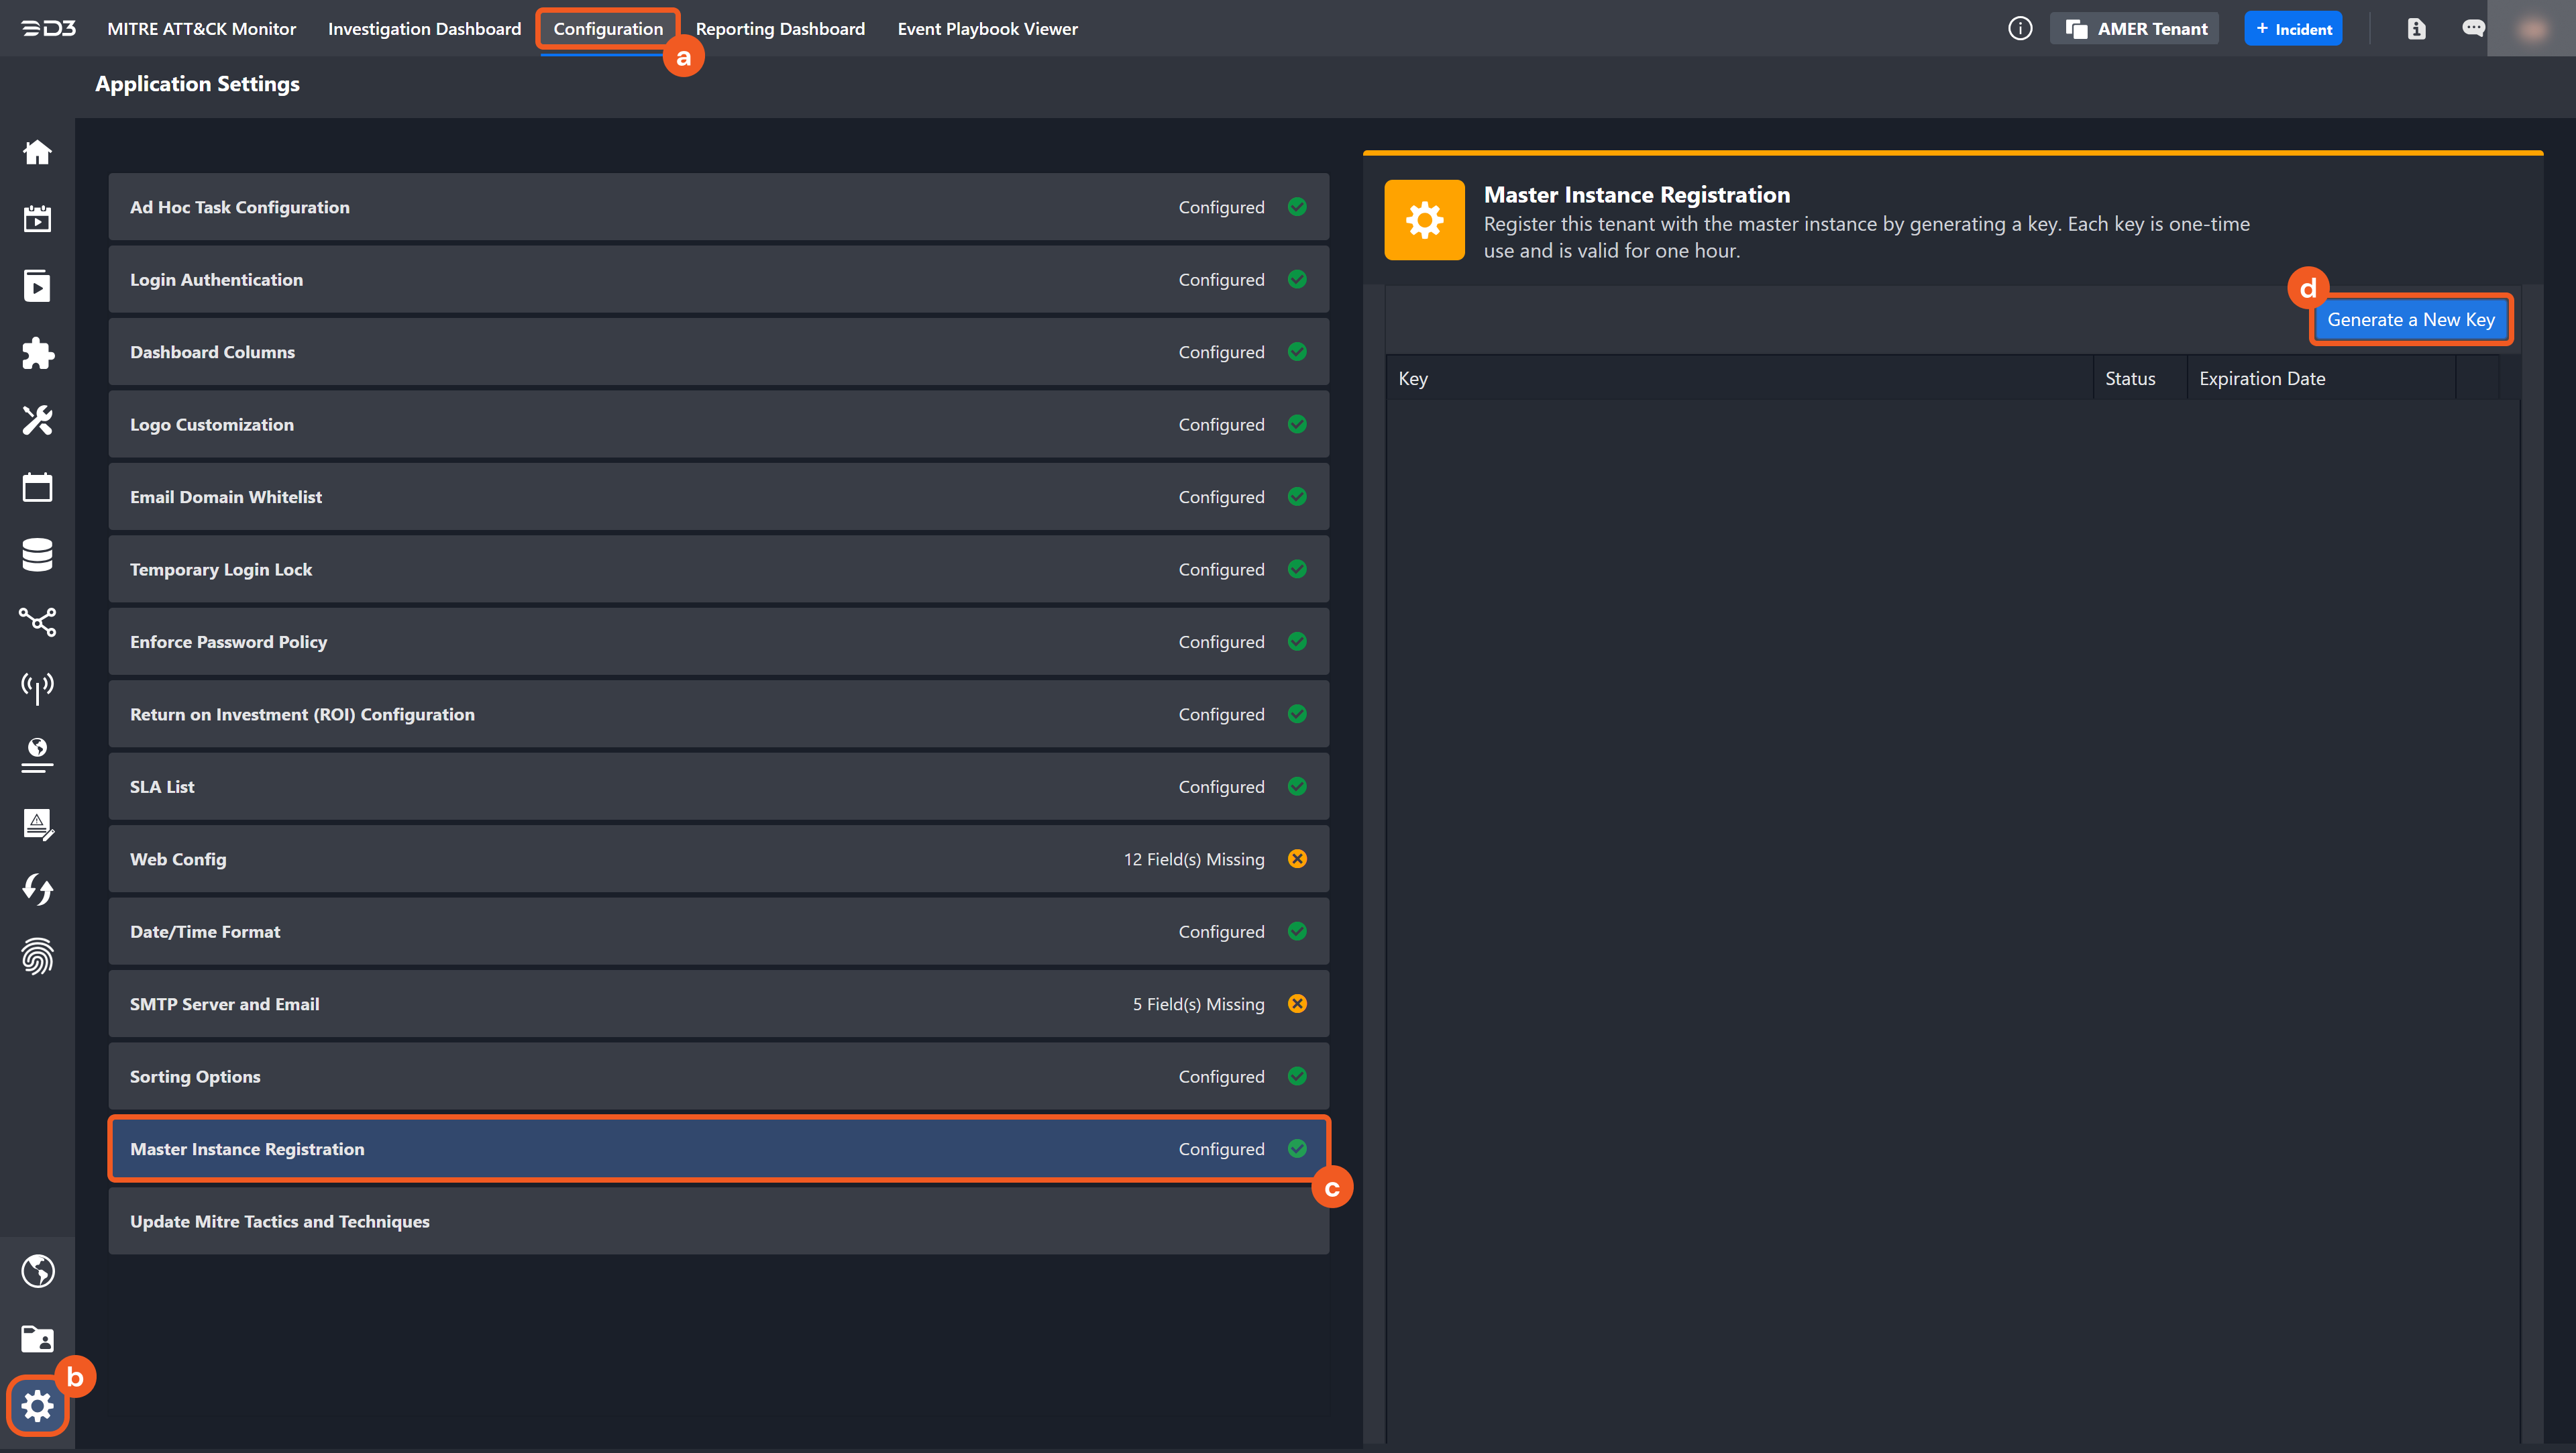
Navigate to the Master Instance Registration page, then generate a new one-time key.
-
Click on the Configuration navigational bar.
-
Click on the Application Settings module.
-
Click on the Master Instance Registration setting.
-
Click on the Generate New Key button.
-
-
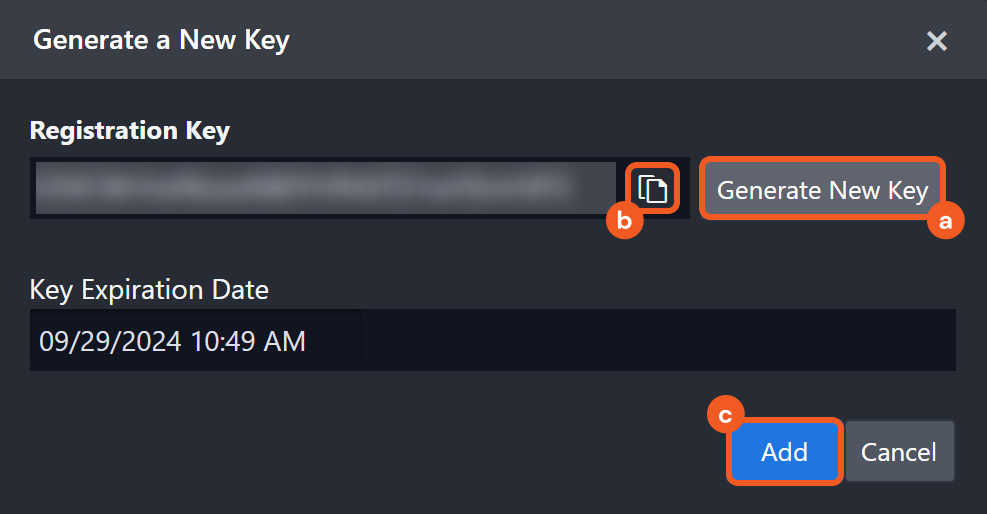
Copy this one-time key and pass it securely to the administrator overseeing the Master instance.
-
Click on the Generate New Key button in the popup.
-
Click on the Copy button, then store it in a secure location for the Master instance administrator.
-
Click on the Add button.
-
In Master Instance
-
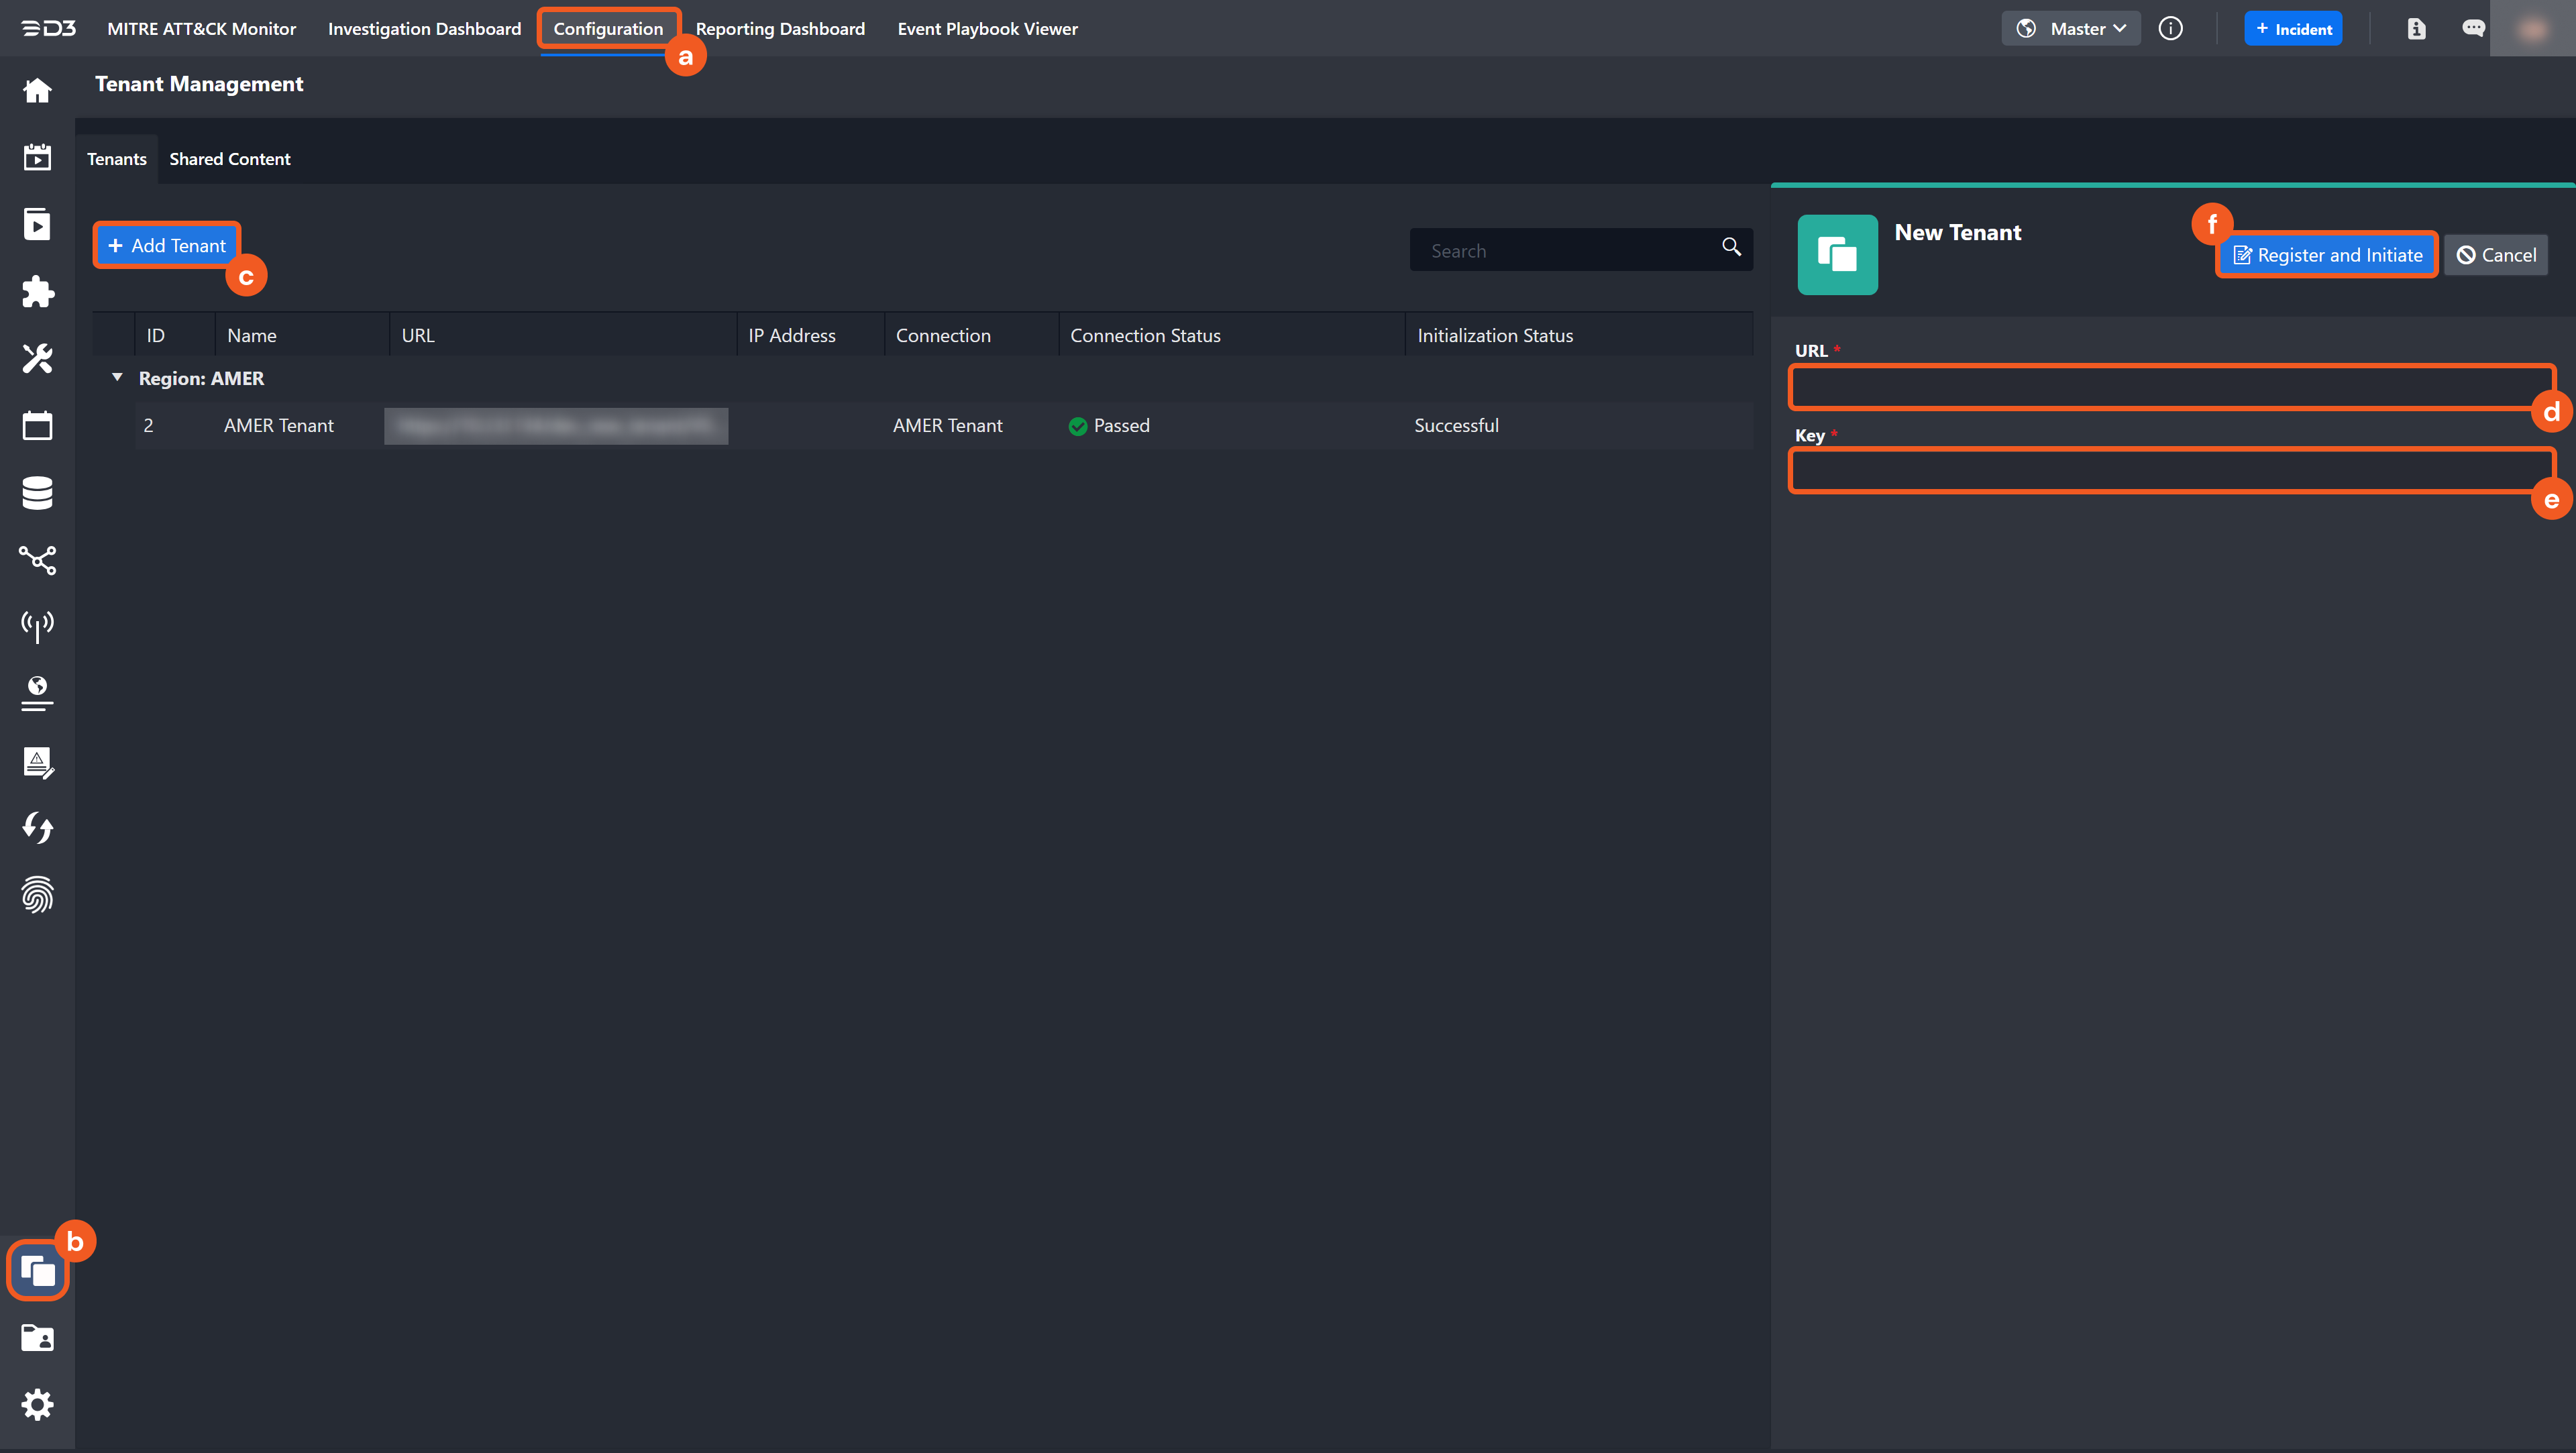
Register and initiate the tenant within the Tenant Management page.
-
Click on the Configuration navigational bar.
-
Click on the Tenant Management module.
-
Click on the + Add Tenant button.
-
Enter the tenant instance’s vSOC login URL.
-
Enter the one-time key obtained from step 2b in the Tenant Instance section.
-
Click on the Register and Initiate button.
-
RESULT *
The tenant instance is now connected to the master instance.
Instance Initialization
Once a successful connection is established between a master and tenant instance, each of the instances will perform the following initialization procedures:
In Tenant Instance
Navigate to Configuration > Master Instance Details to view information about the master instance, including the URL, IP address, and connection status.
-
A new connection named Master will be created under Built-in Integrations. This connection is view-only.
-
User, Group, and Role information will be received from the master instance.
-
The corresponding Region D3 Agent will be automatically synchronized.
In Master Instance
Navigate to Configuration > Tenant Management to view information about the new tenant instance, including the URL, IP address, and connection status.
-
A new connection named after the tenant instance will be created under D3 Integration.
-
All User, Group, and Role data in the tenant instance will be cleared.
-
User, Group, and Role information from the master instance will be pushed to the tenant.
-
The corresponding Region D3 Agent will be automatically synchronized.
Master Instance
The master instance includes features for managing, creating, and sharing data across tenant instances:
View as Tenant Instance
The master instance can access any of its associated tenant instances.
To navigate to a tenant instance
-
Click on the instance dropdown positioned off-center to the right.

-
Select the tenant instance.
RESULT *
The system opens the tenant instance in a new window.
READER NOTE *
Click the (i) button next to the dropdown to view information about the current instance.
Tenant Management
-20240929-175652.png?cb=144b803f7c1377ef116cccad14e41f78)
View connected tenant information in the Tenant Management module under Configuration > Tenant Management. In this module, users can perform the following actions:
-
Add a new Tenant
-
View Tenant Information
-
Tenant Details
-
Tenant Sites
-
Adding a New Tenant
See the Instance Registration section.
Viewing Tenant Information
Tenant Details
Tenants are grouped by region and displayed in a table view. Users can view tenant information, including:
-
ID
-
Name
-
URL
-
IP Address
-
Connection
-
Connection Status
-
Initialization Status
Tenant Sites
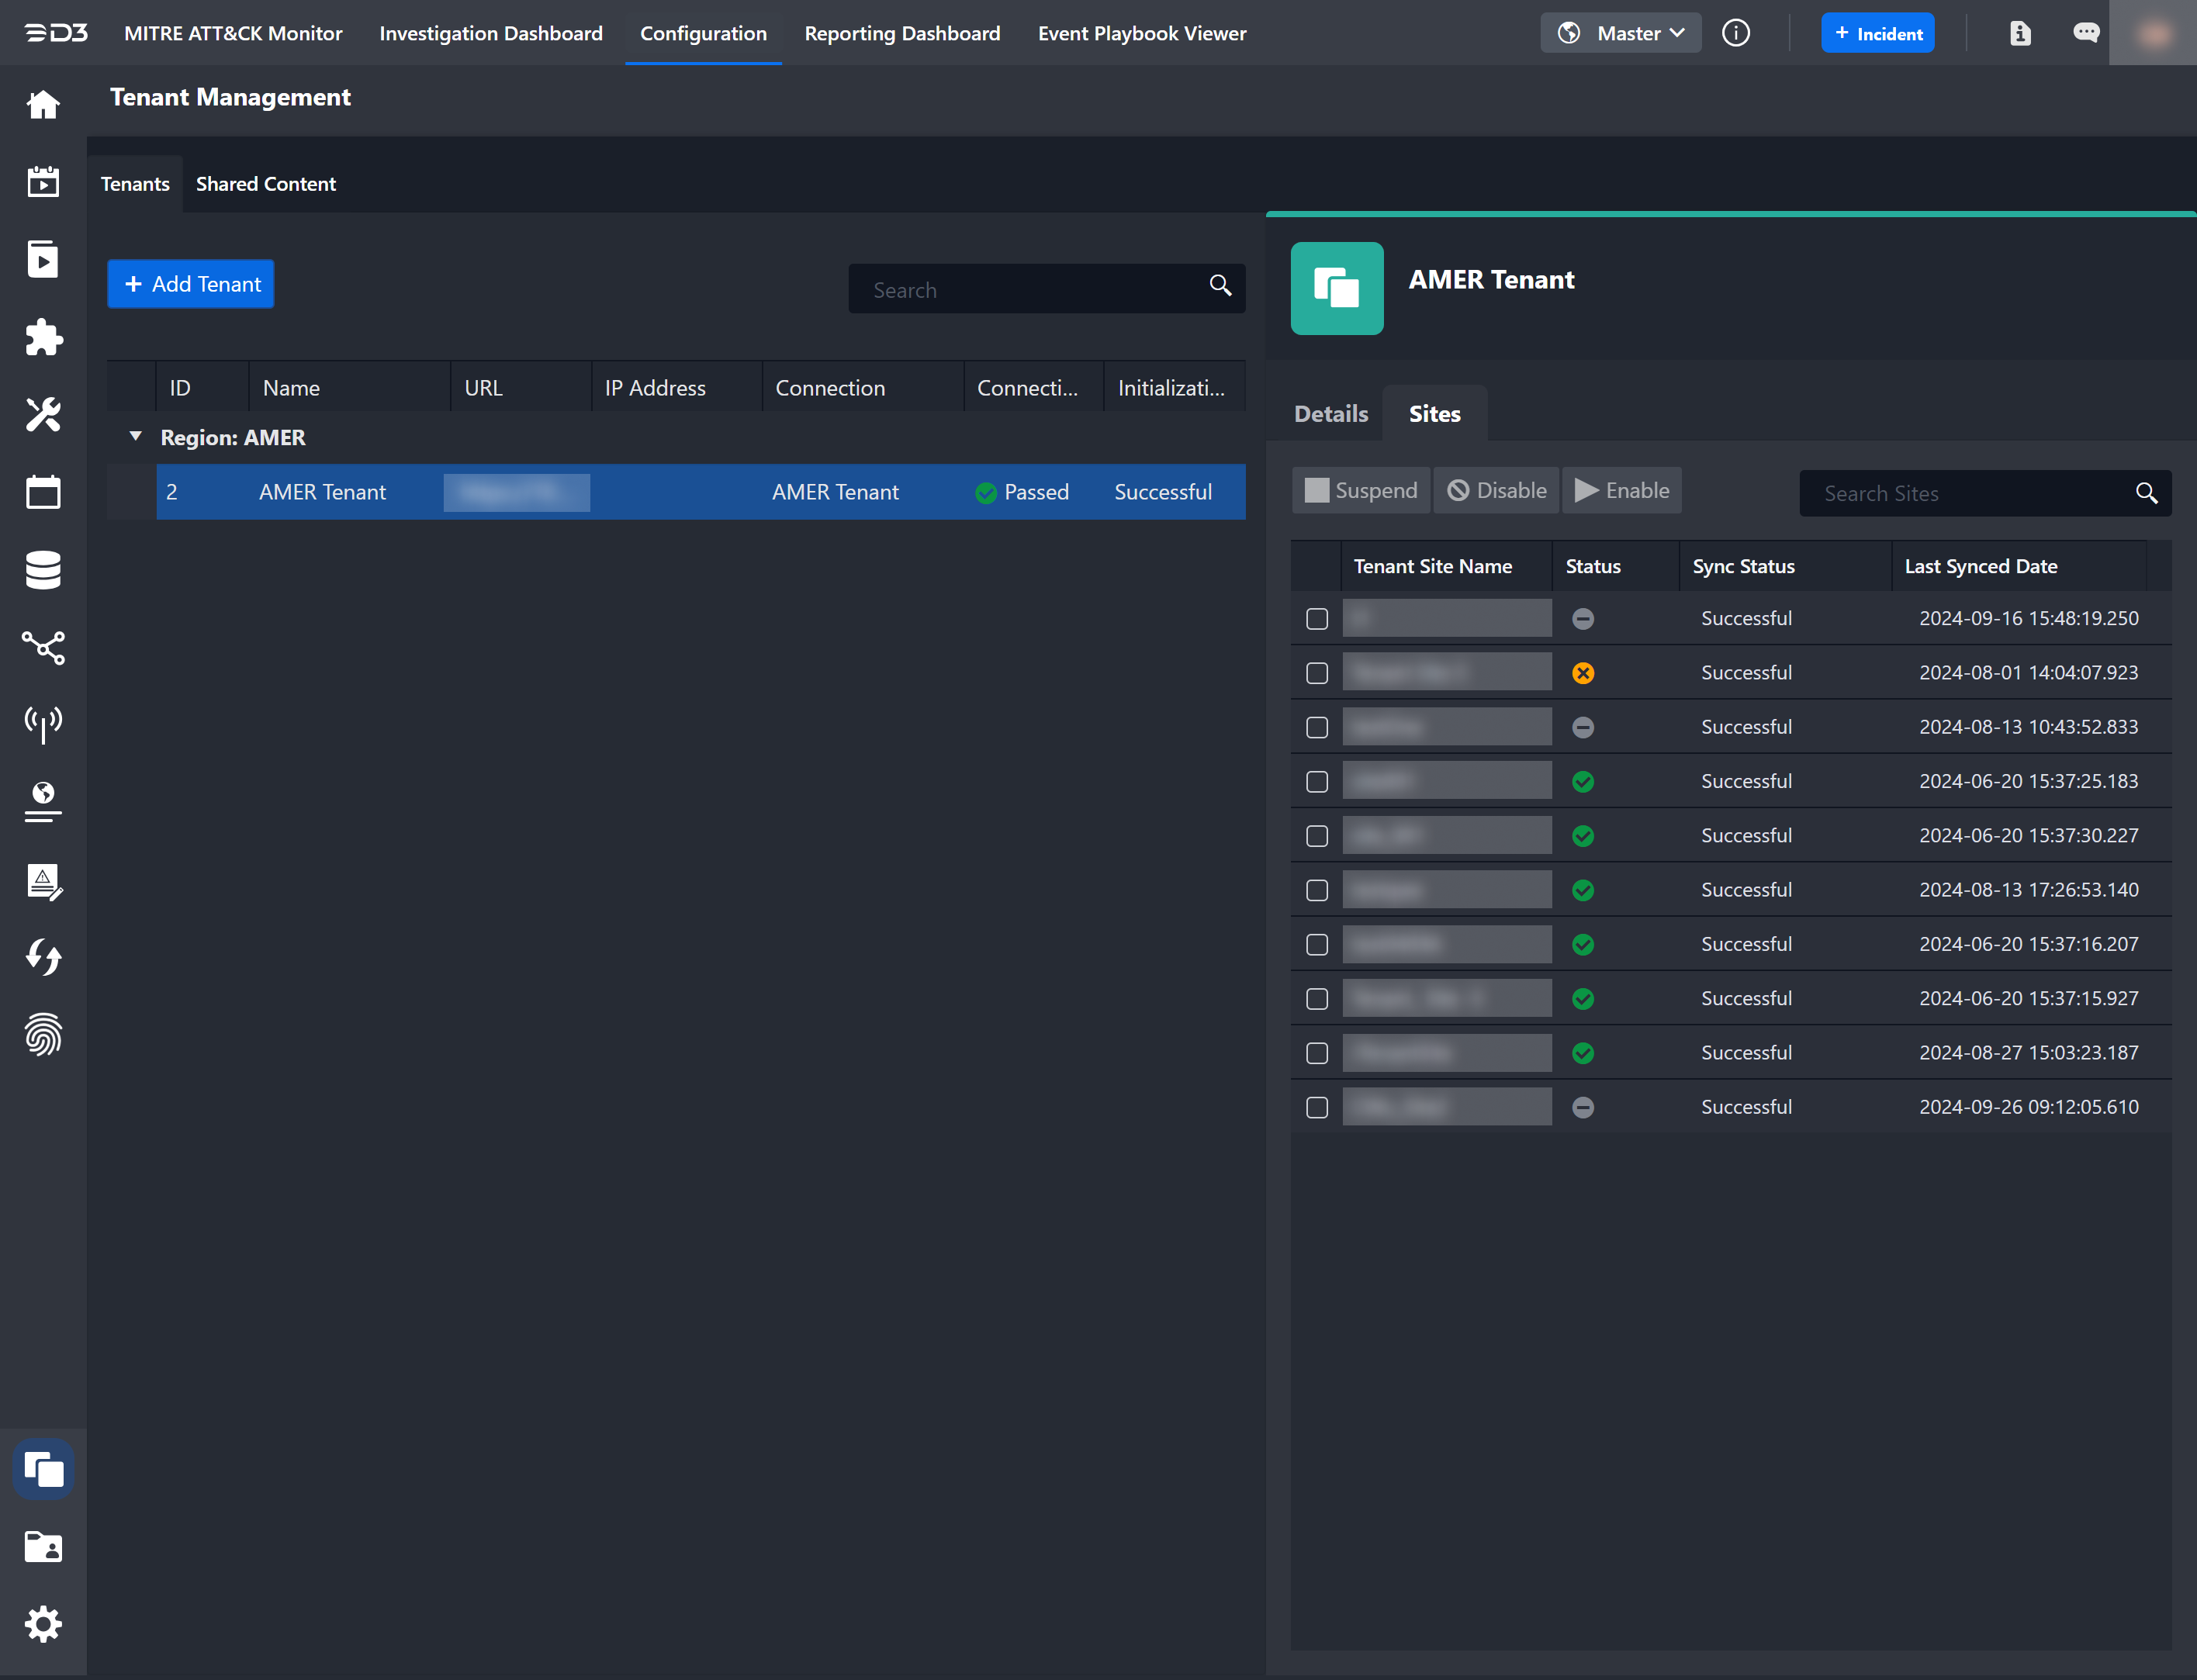
The tenant sites are displayed in a table view, which includes the following columns:
|
Column Name |
Description |
|
Tenant Site Name |
Name of the tenant instance's site. |
|
Active |
Status of the site (active or inactive). |
|
Sync Status |
Results of the latest synchronization action (successful or failed). |
|
Last Synced Date |
Date of the last synchronization action. |
To activate or deactivate a tenant site
MSSPs can purge and manage client data during offboarding. Select a site checkbox, then click Disable.

The site's status is indicated in the Status column, which can display two possible values: Successful and Failed. In case the action fails, an information icon will appear, and hovering over it will provide details about the failure. When a site is successfully deactivated, this site will be removed from the tenant instance.
|
State |
Description |
|
Successful |
Site activation was successful. |
|
Successful |
Site deactivation was successful. |
|
Failed ⓘ |
Site deactivation failed. Hover over the information icon to view error messages. |
|
Failed ⓘ |
Site activation failed. Hover over the information icon to view error messages. |
Shared Content Management
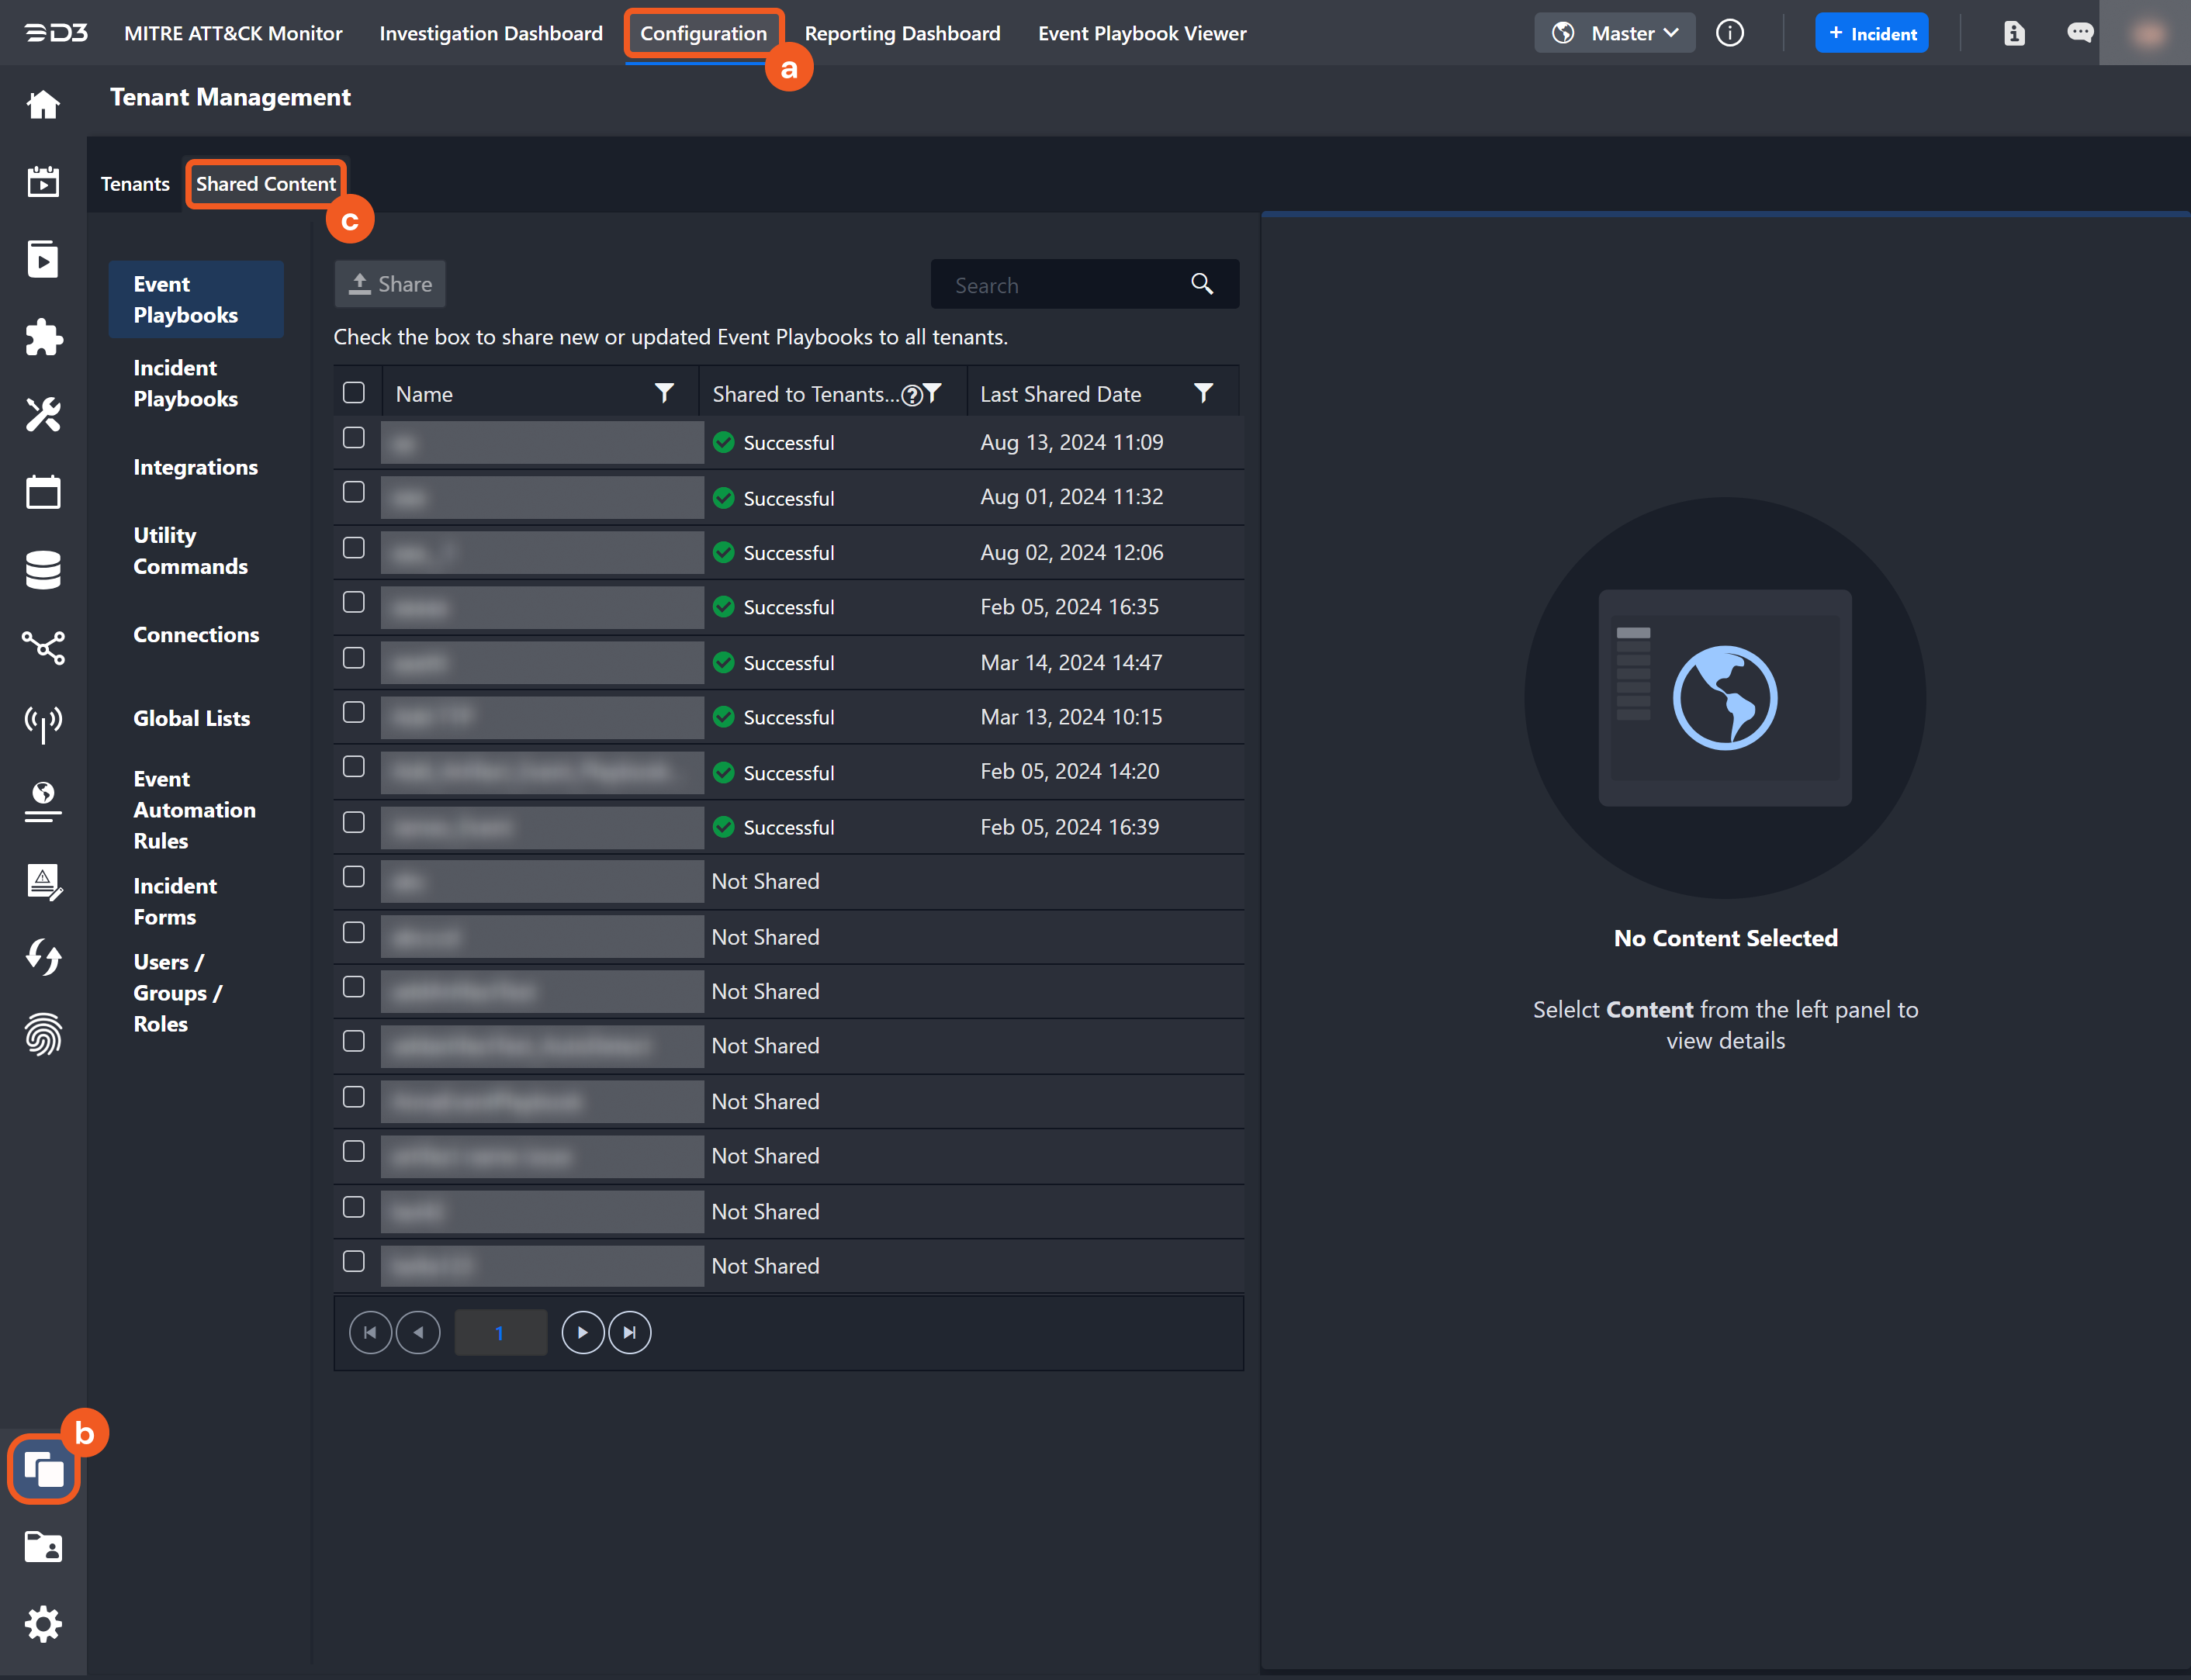
In the master instance, users can share content with all tenant instances. Shared content is view-only from the tenant perspective. Tenants can use shared content but cannot edit or delete it. The Shared Content module is located under Configuration > Tenant Management. Nine content types are available for sharing and are described in the following sections.
-
Event Playbooks
-
Incident Playbooks
-
Integrations
-
Utility Commands
-
Connections
-
Global Lists
-
Event Automation Rules
-
Incident Forms
-
Users / Groups / Roles
After content is shared, the Shared to Tenants column in the content list displays the overall share status across all tenants. Three status states are available.
|
State |
Description |
|---|---|
|
Successful |
The content is successfully shared to all tenants |
|
Sharing |
The content is currently being shared with all tenants |
|
Incomplete |
The content is not fully shared to all tenants. Depending on the content type, there are multiple reasons that a piece of content might fail to share. In general, there are a few reasons that may cause the sharing to fail: There is a new version of the content and it is outdated on some of the tenant sites
|
|
Not Shared |
The content has not been shared yet |
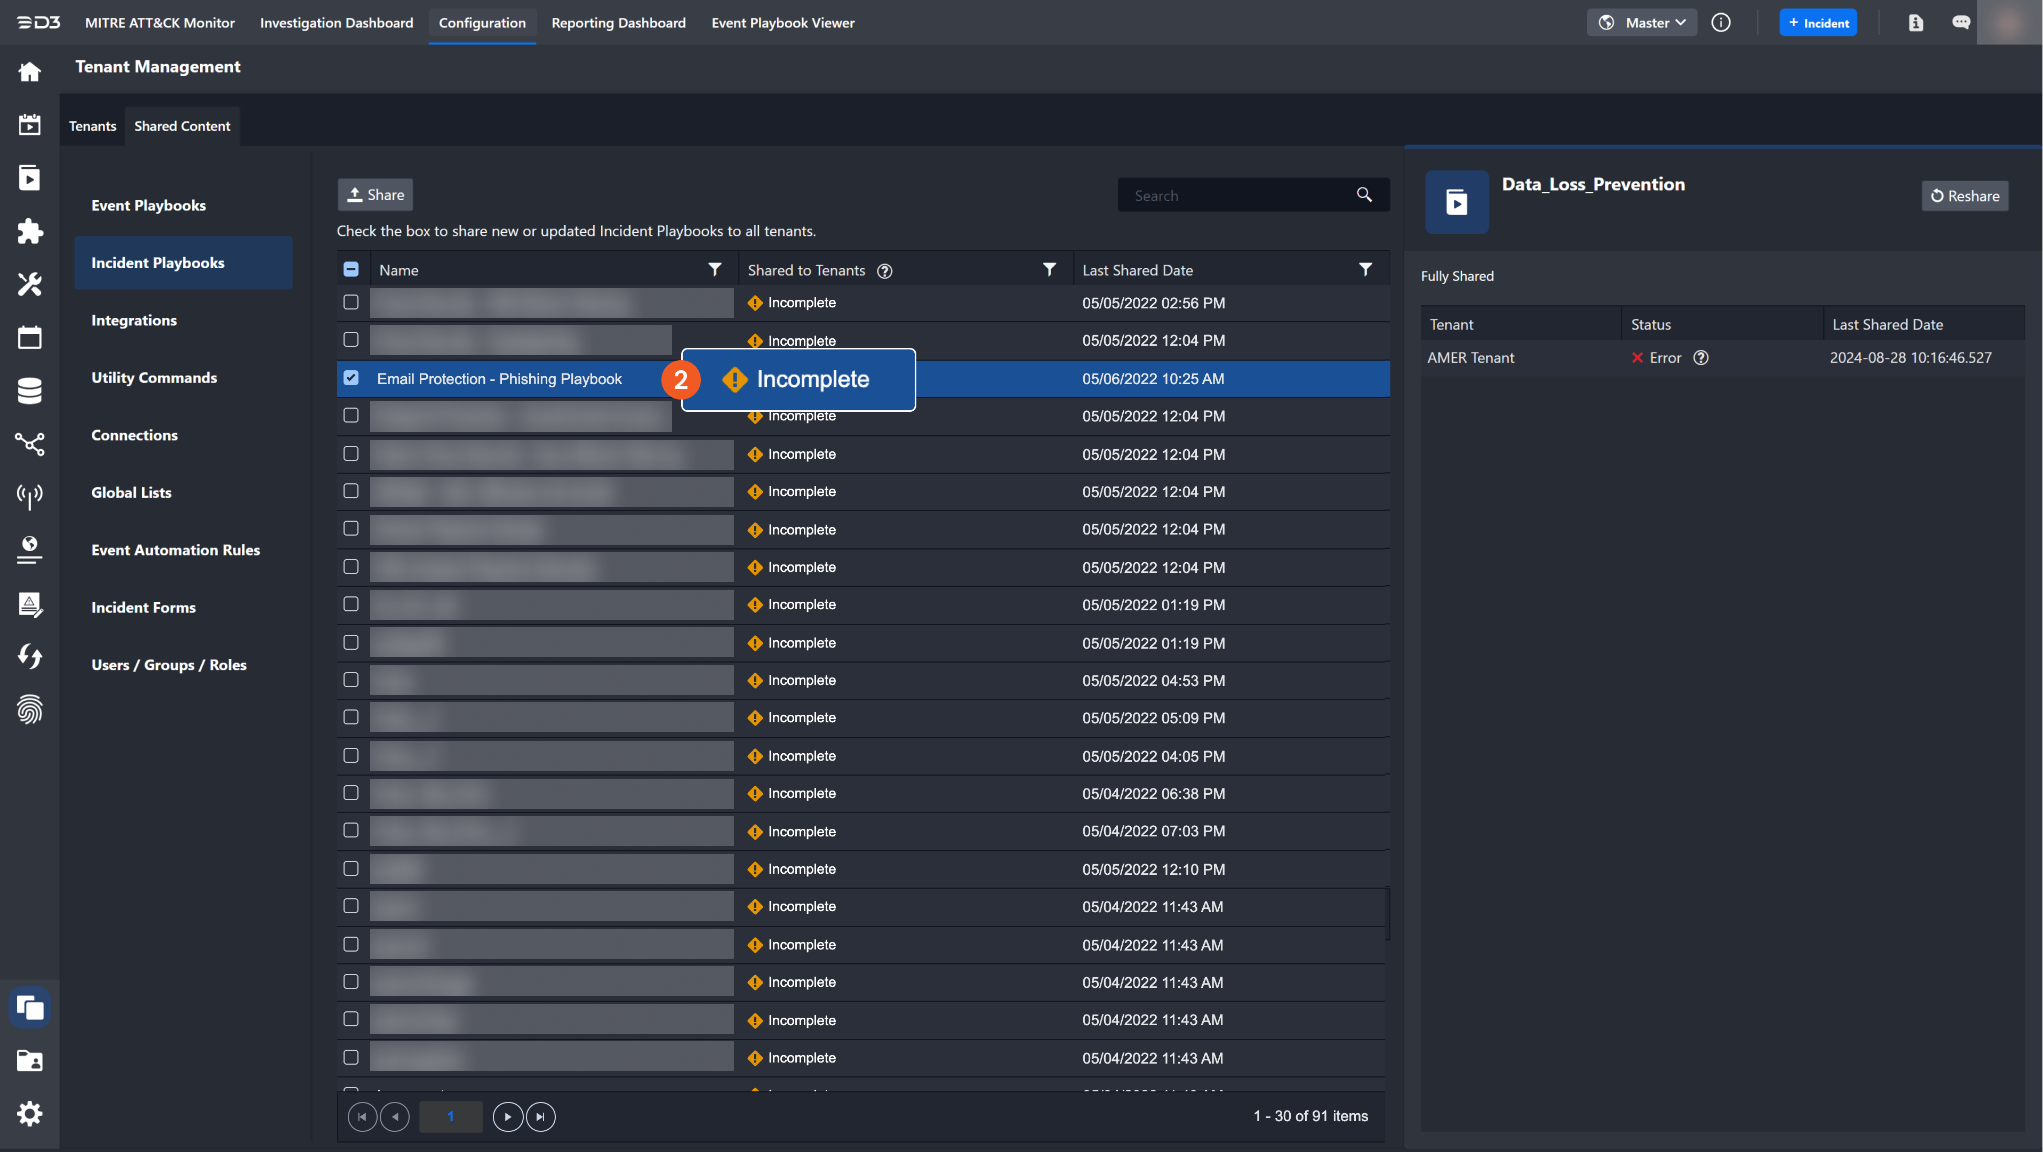
If shared content displays the Incomplete status, users can identify the affected tenant in the sharing log. In most cases, the status changes to Incomplete when related data or configurations are modified, causing the shared content to become outdated. Some content types, including incident playbooks, connections, global lists, and event automation rules, contain site-specific data. For these content types, the sharing log provides a detailed breakdown of the sites that caused sharing failures.
To view sharing log details
In this example, one of the incident playbooks "Email Protection - Phishing Playbook" failed to share with all tenants.
-
Navigate to Configuration > Tenant Management > Shared Content > Incident Playbooks.
-
Click on the content that has an Incomplete share status.
-
In the right-side panel, the X icon identifies the tenant responsible for the failed sharing operation.
-
Hover over (?) next to the X icon. The tooltip will display the summary message explaining the cause of this error.
-
Because incident playbooks contain site-specific data, users can also view a detailed breakdown of the sites within the tenant that caused the sharing error.
-
Click on the tenant with a failed status.
RESULT
The pop-up window will display all the sites that failed to receiv
at failed to receive this item.
-20240929-192814.png?cb=dd184cbbb54d9e7f596efa9f9c745de6)
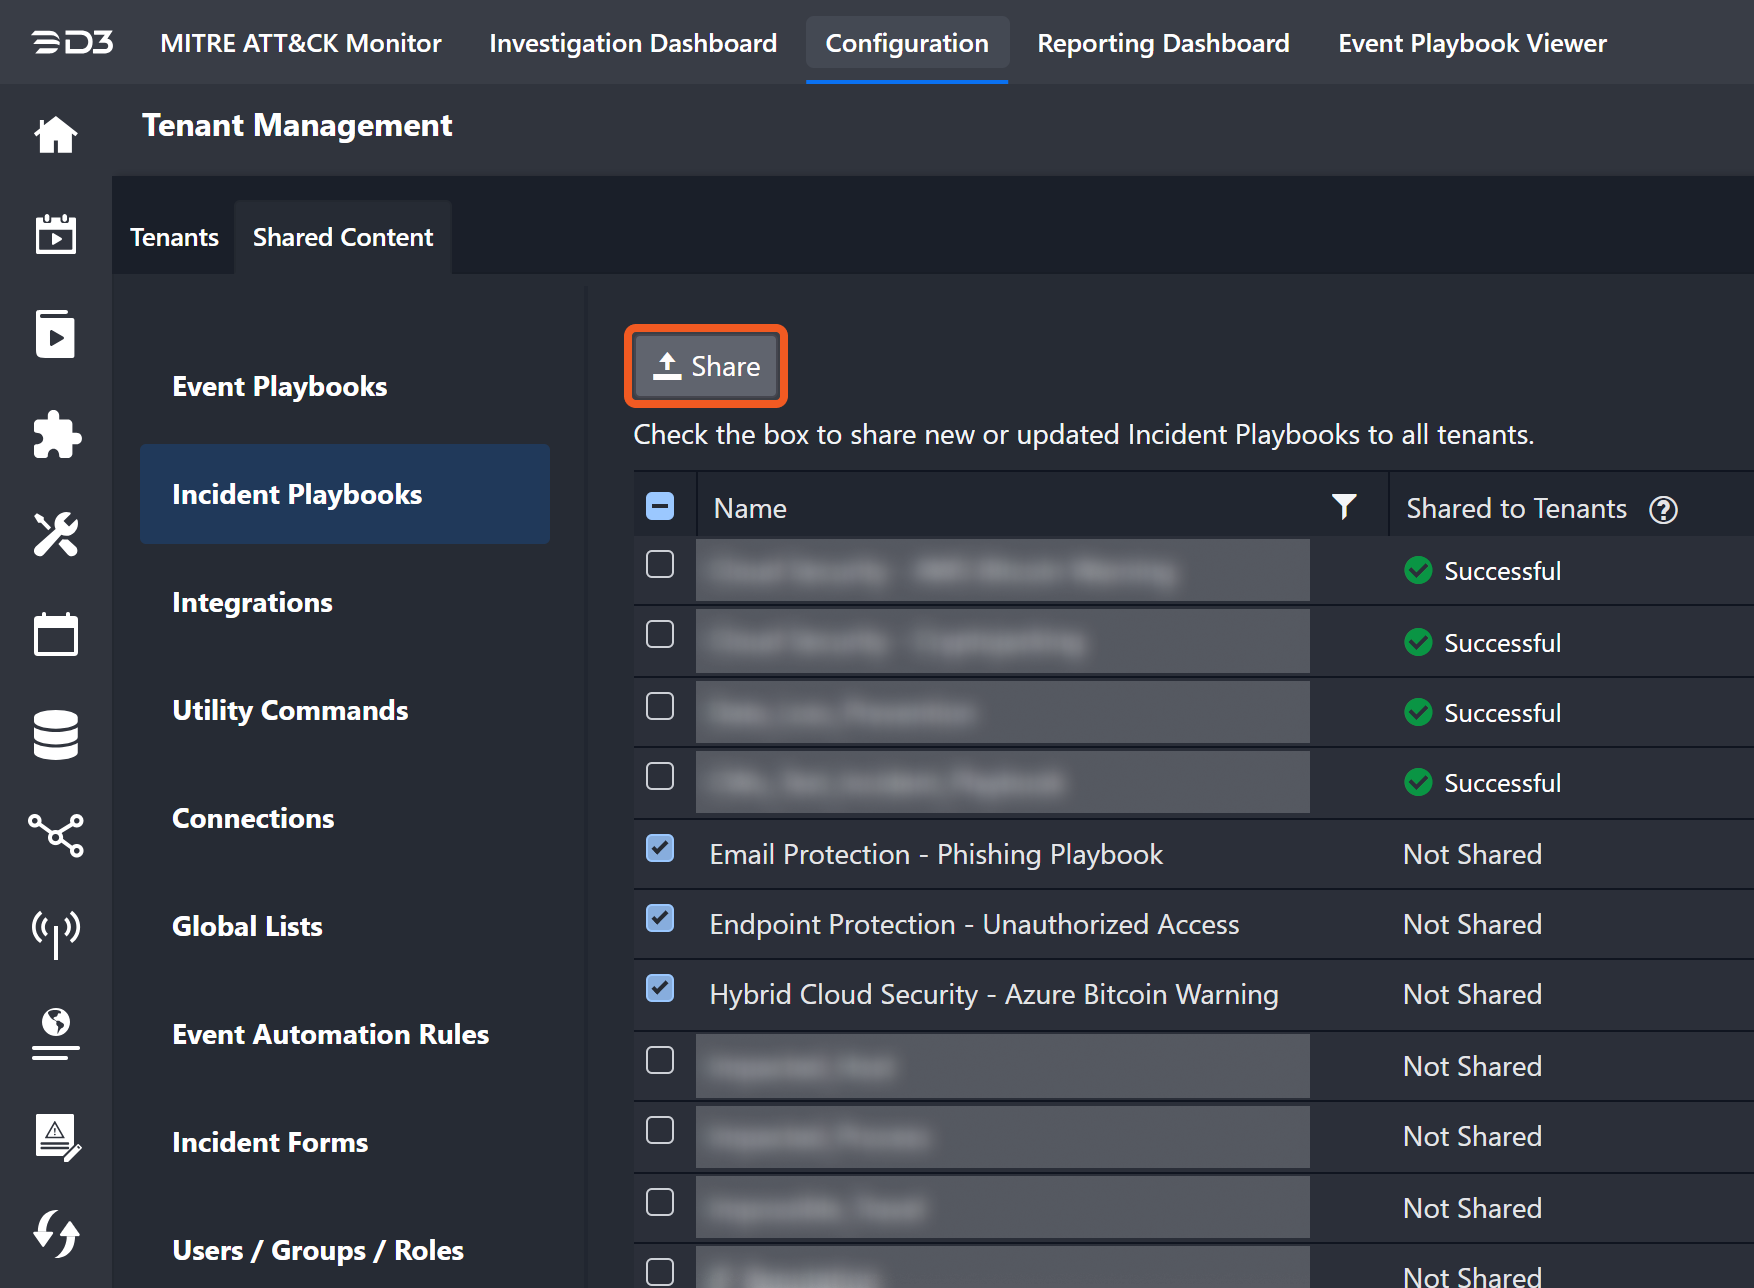
To share/reshare content
In this example, we will share a few selected incident playbooks to all tenants. The same steps apply to resharing content.
-
Navigate to Configuration > Tenant Management > Shared Content > Incident Playbooks.
-
Select the content to share or reshare.
-
Click on the Share button.
RESULT
The selected content will be shared to all tenants. Once it is done sharing, the status will be come Successful or Incomplete.
READER NOTE
Tenants can identify content that was shared with the Shared tag.
Content Types
The following content types support tenant instance setup and management.
|
Event Playbooks |
Event playbooks are pre-determined workflows that are applied to events at different stages of their life cycle. For an event playbook to be eligible to share, it must be submitted at least once. In other words, the event playbook must have at least one live version. The newest version of the playbook will be shared, along with specific content pieces that the playbook uses:
|
|---|---|
|
Incident Playbooks |
Incident playbooks are similar to event playbooks, but applied to incidents instead. One key difference is that incident playbooks require the playbook to be Published in addition to being live. Therefore, when an incident playbook is shared to tenants, it will also be automatically published to all of the tenants’ sites. If any of the sites are inactive, it will return an error and cause the playbook to be Incomplete. The newest version of the playbook will be shared, along with specific content pieces that the playbook uses:
|
|
Integrations |
Integrations connects D3 to various third-party systems in order to exchange data. The following integration information will be shared:
Only custom integrations or configured built-in integrations can be shared. Please note that all connection data will not be shared as it is managed in the Connections section. |
|
Utility Commands |
Utility commands are built-in commands used to manipulate data. All custom utility commands are shared automatically. Similar to playbooks, only commands with at least one live version can be shared. When a new command version is submitted, associated playbooks are updated automatically. |
|
Connections |
Connections are saved credentials used to connect to different third-party systems. Only connections that have the Tenant toggle activated can be shared. 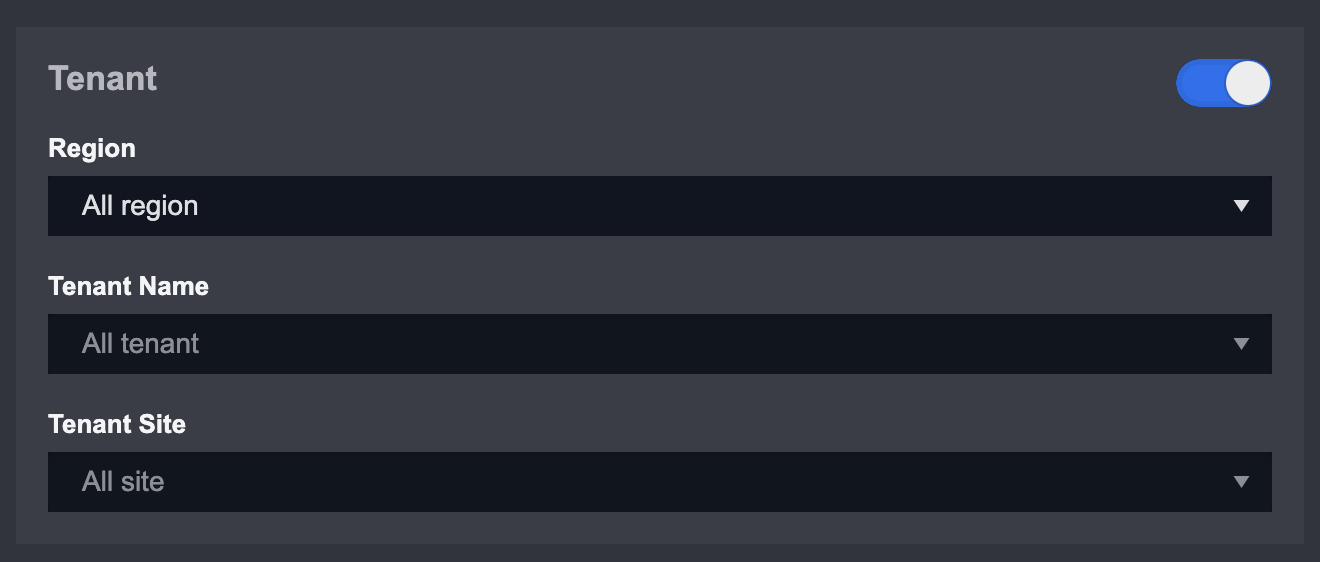
After enabling the toggle, users can define the applicable region, tenant, and tenant site. When tenant configurations overlap between connections, the more specific configuration takes precedence. For example, a connection assigned to a specific tenant site overrides a connection assigned to all tenant sites. Connections also support duplicate names through custom properties. This allows different sites to use unique credentials while referencing the same connection name in playbooks. During playbook execution, the system automatically checks for a valid connection with the matching name at the site level. |
|
Global List |
Global lists are lists that store reusable data across the system in JSON format. All data related to a global list will be shared, including its Active status. However, site permission data will not apply – the global list will be accessible by all sites within a tenant. |
|
Event Automation Rules |
Event automation rules automate event escalation and dismissal based on predefined criteria. Only rules with the Shared by default toggle enabled can be shared with tenants. All automation rule data, including Active status, is shared. Site permissions are not included, and the automation rule becomes accessible to all tenant sites. 
|
|
Incident Forms |
Incident forms are user-defined sections within the incident workspace; each form belongs to a specific incident type. All incident types and their forms can be shared to tenants. All tenant sites will be able to access the shared incident forms. |
|
Users / Groups / Roles |
The Users / Groups / Roles configuration in the master instance will be automatically shared to tenants when a tenant instance is initialized. Users can reshare updated configurations to all tenants. |
Playbook: Testing with Tenant Connections
All playbooks in D3 support testing with sample data. In the master instance, users can also test playbooks using tenant connection data to verify workflow behavior across tenant site instances.
To test with tenant connections in an event playbook
-
Click on the Test Playbook button.

-
Build the test data as a standard preprocessing (event) playbook.
-
Enable the Test the event playbook in a Tenant environment toggle.
-
Select the Tenant Region, Tenant Name, and Tenant Site.
Example: AMER, AMER Tenant, Security Operations -
Click Run Test button.
-20240929-203814.png?cb=880ed83605706b78d864e5008639b915)
RESULT
The event playbook will be tested with the specified site’s connection information.
To test in Incident Playbook
-
Click on the Test Playbook button.

-
Choose an incident to serve as sample data.
-
Enable the Test the event playbook in a Tenant environment toggle.
-
Select the Tenant Region, Tenant Name, and Tenant Site
Example: AMER, AMER Tenant, Security Operations -
Click on the Run Test button.
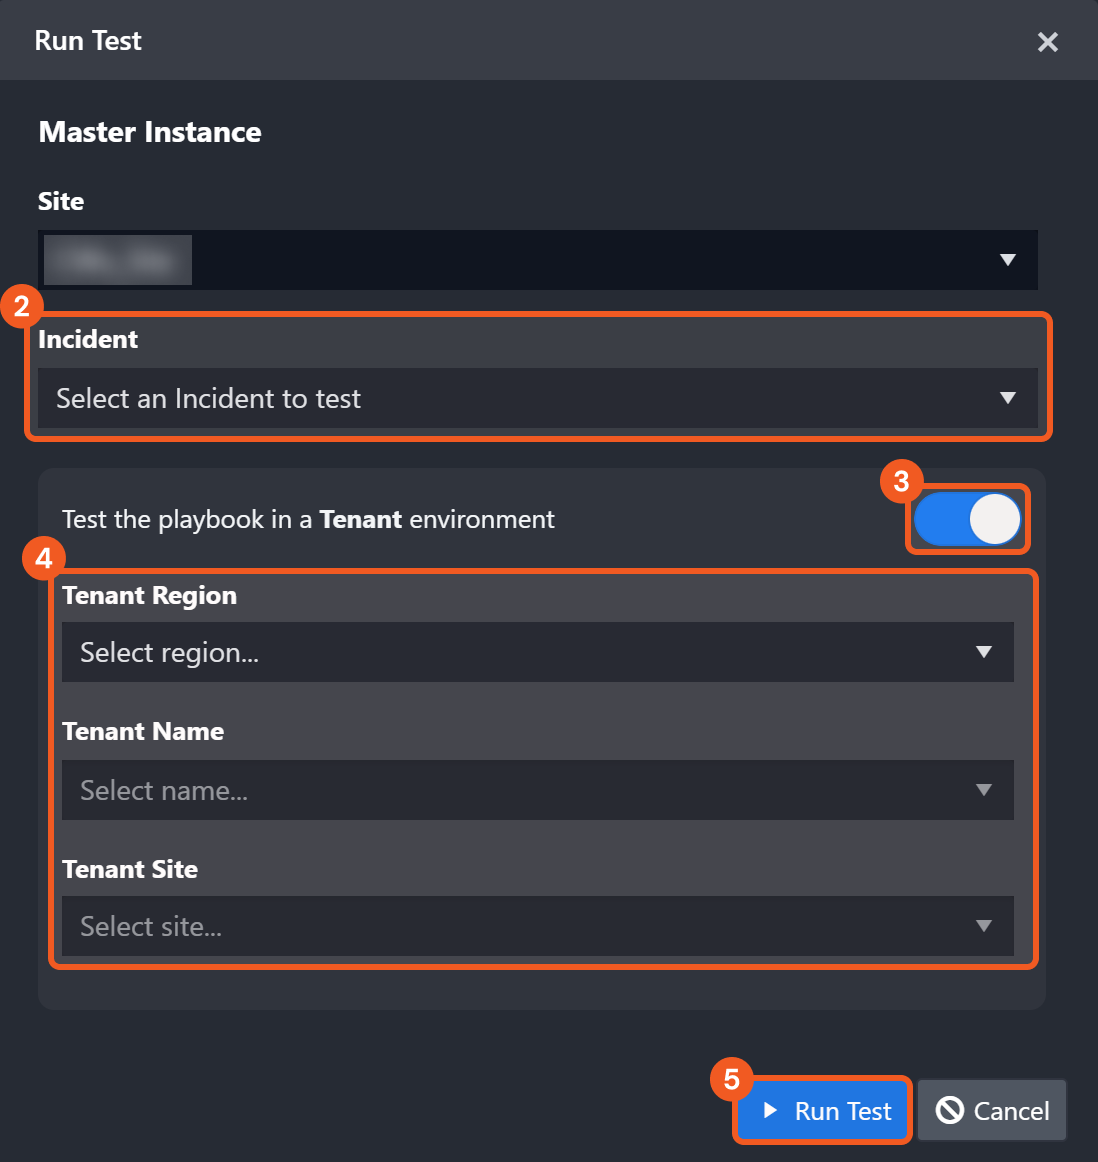
RESULT
The incident playbook will be tested with the specified site’s connection information.
Multi-tenancy Utility Commands
|
User Onboarding/Offboarding |
Tenant Onboarding/Offboarding |
System Import/Explore |
|---|---|---|
|
CreateUser |
CreateTenantSite |
CreateSite |
|
DeleteUser |
CreateOrUpdateConnectionByClone |
ImportPlaybookFromXML |
|
InactiveUser |
SyncConnection |
ImportIntegrationFromXML |
|
SyncAllUserGroupRole |
SyncEventAutomationRule |
ImportCommandFromXML |
|
|
PublishMasterPlaybookToAllSite |
ImportEventAutomationRule |
|
|
ShareMasterGlobalList |
ImportConnection |
|
|
Create Tenant Data Ingestion Schedule |
ImportEventAutomationRule |
|
|
Update Tenant Site Status |
CreateGlobalList |
|
|
|
PublishMasterPlaybookToAllSite |
|
|
|
ShareMasterGlobalList |