Last Updated: November 10, 2026
Overview
Morpheus Guidance is where administrators manage the guidance that D3 Morpheus follows across its features. It has these parts:
-
Rules: hard constraints that Morpheus applies on every conversation turn, whatever the task or the analyst's request.
-
SOPs (standard operating procedures): shared procedures that tell Morpheus how to triage, investigate and decide. Each SOP states which features use it.
-
Commands: the custom commands Morpheus can run during Adaptive Tasking. Requires the
Feature.AdaptiveTasking.CustomCommands.Enabledsetting. -
Permissions: caps on which actions Morpheus may take during Adaptive Tasking, by read and write risk class, with optional per-site overrides.
One SOP can serve several features. The features that read SOPs from this page are:
|
Feature |
How it uses the SOP |
|
APD |
Event disposition. An APD SOP needs Dismiss, Escalate and Investigation Guidelines sections. See Data Ingestion. |
|
Adaptive Tasking |
Picked by Morpheus during an incident conversation. See Morpheus Adaptive Tasking. |
|
Adaptive Playbook |
Guides an adaptive playbook run. |
Before You Begin
-
Morpheus Guidance is in the Configuration module, under Configuration > Morpheus Guidance (in the Automation group).
-
The page is available to users whose role has the Administrator access type. See Roles.
-
If Morpheus Guidance is not in your Configuration menu, ask your D3 administrator whether Adaptive Tasking is enabled for your instance.
The page opens on the Rules tab. Click SOPs or Commands to switch tabs, and Permissions at the top right to open the permissions page.
Rules
A rule is a hard constraint Morpheus applies unconditionally on every conversation turn, regardless of the immediate task or the analyst's request.
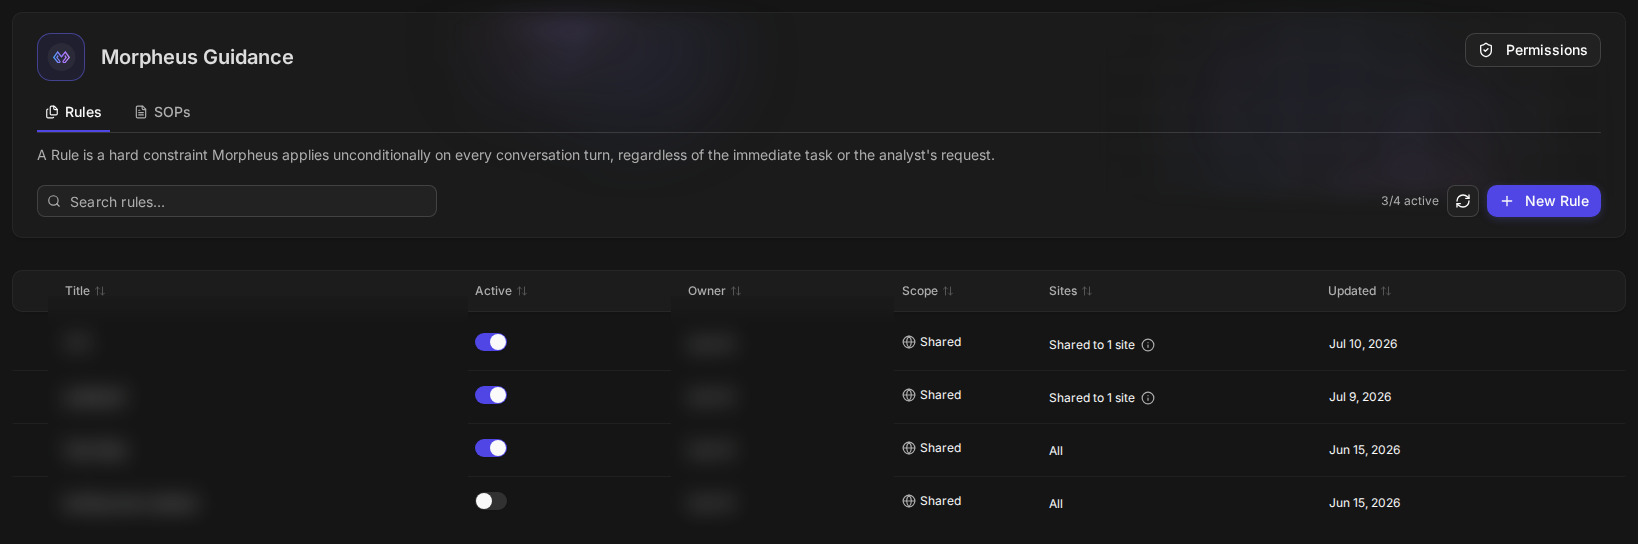
Toolbar
-
Search rules... filters the list.
-
The counter (for example 3/4 active) shows how many of the listed rules are turned on.
-
The refresh button reloads the list.
-
New Rule opens the Create New Rule window.
Columns
Click a column header to sort by it.
|
Column |
Description |
|
Title |
The rule's title. |
|
Active |
A switch that turns the rule on or off. |
|
Owner |
The user who created the rule. |
|
Scope |
Shared: the rule applies to everyone on the rule's sites. |
|
Sites |
All, or Shared to n site(s). Hover over the info icon to see the site names. |
|
Updated |
The date of the last change. |
Hover over a row to show its actions: Edit (pencil) opens the Edit Rule window, and Delete (trash) asks for confirmation before it deletes the rule. A deleted rule cannot be restored.
Creating a Rule
-
On the Rules tab, click New Rule.
-
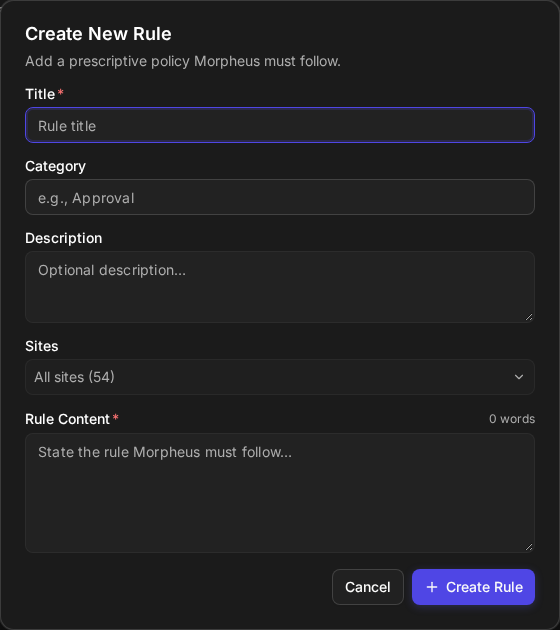
Fill in the Create New Rule window:
Field
Description
Title (required)
A name for the rule.
Category
Optional grouping label (for example, Approval).
Description
Optional description.
Sites
The sites the rule applies to. Defaults to all sites. Click the field to search the sites, select them one by one, or use Select All.
Rule Content (required)
The rule Morpheus must follow, in plain text. The word count is shown above the box.
-
Click Create Rule. The rule is created as a shared rule.
Example of a rule's shape
|
Title |
Approval before containment |
|
Category |
Approval |
|
Rule Content |
Ask the analyst for approval before isolating a host. |
To change a rule, hover over its row and click Edit. The Edit Rule window has the same fields; click Save Changes.
SOPs
An SOP is a shared procedure Morpheus follows: how to triage, investigate and decide. Each SOP says which features use it.
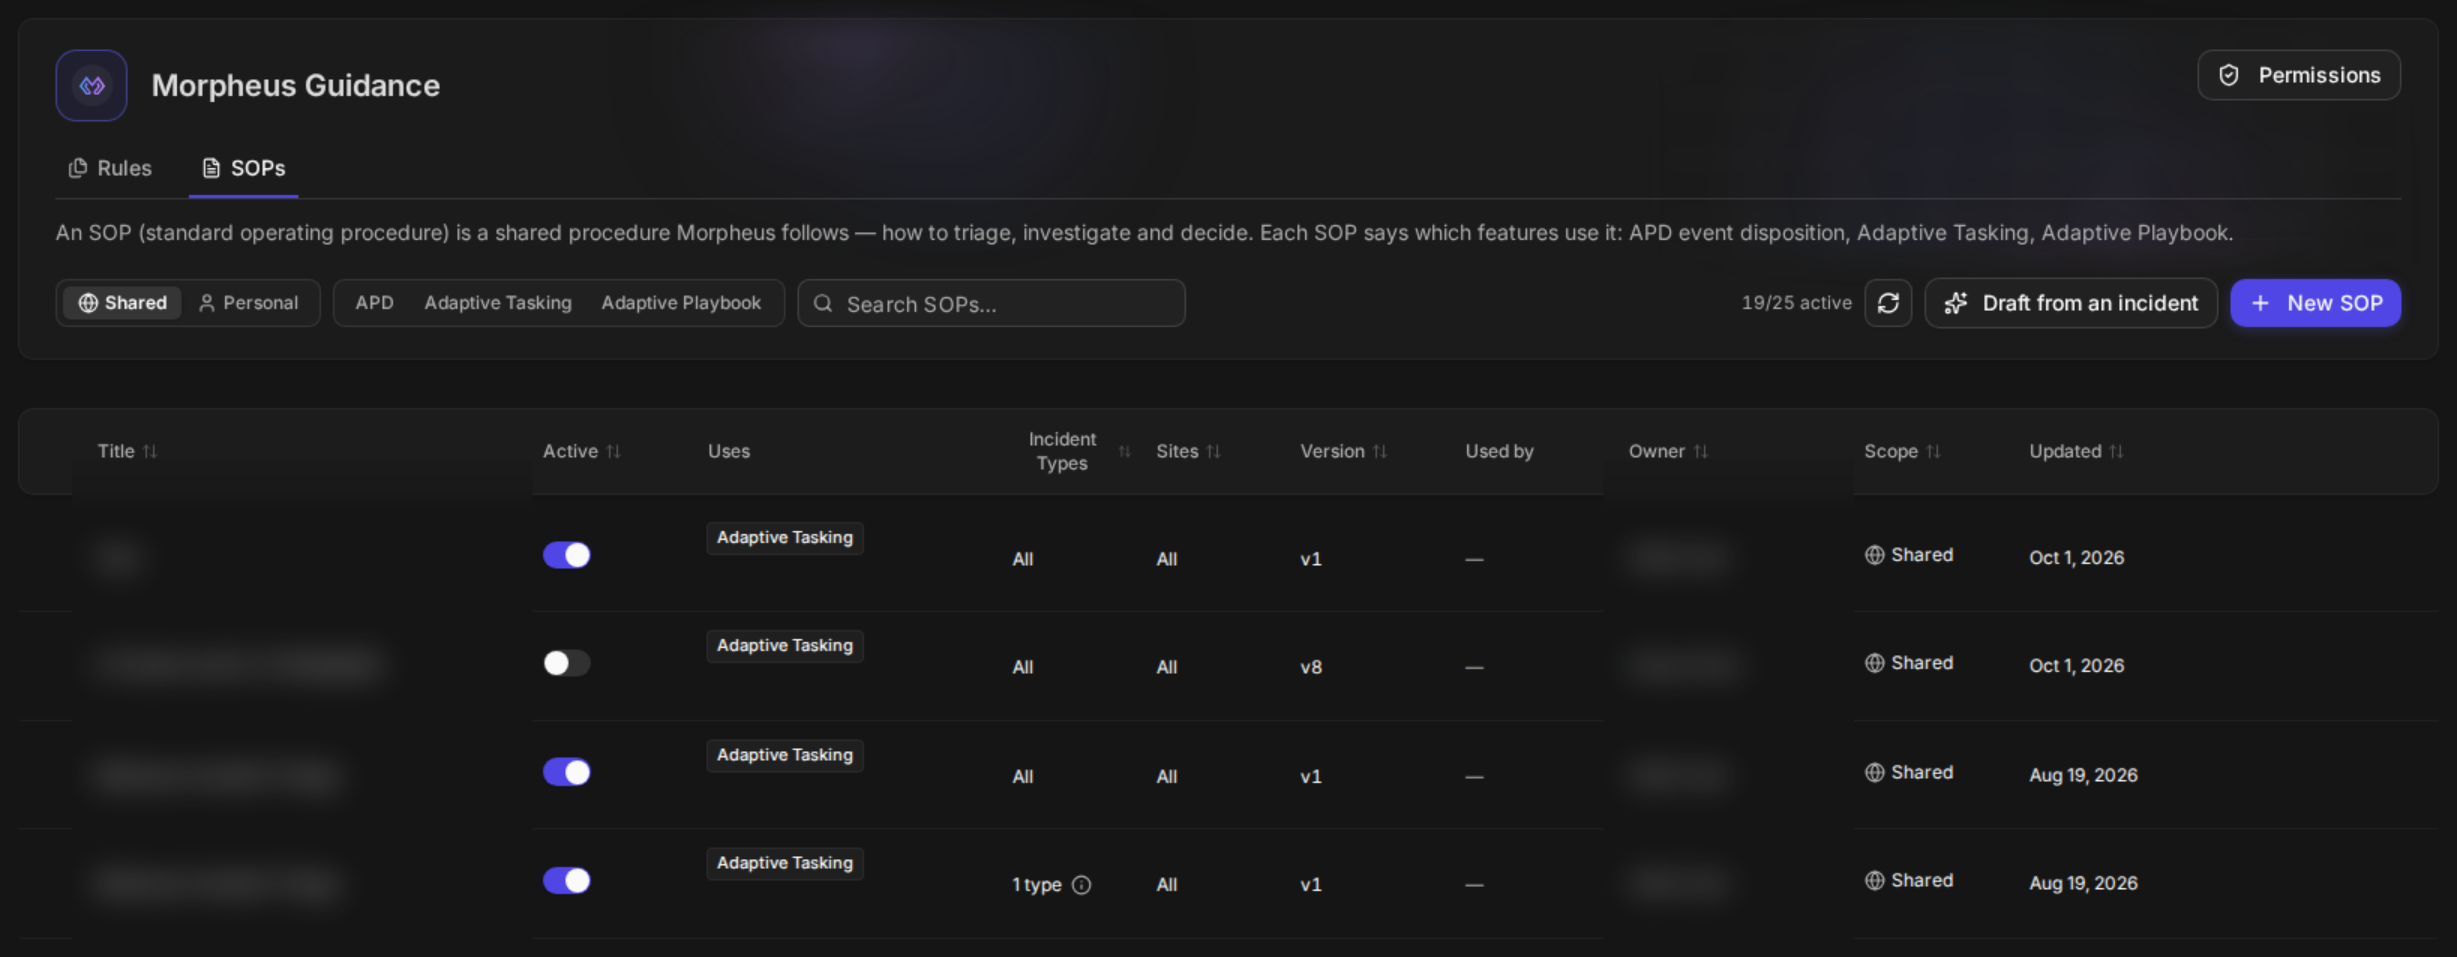
Toolbar
-
Shared / Personal: shows the shared SOPs or your personal SOPs. One of the two is always selected; the tab opens on Shared.
-
APD, Adaptive Tasking, Adaptive Playbook: show only the SOPs that feature uses. Click the selected filter again to clear it.
-
Search SOPs... filters the list.
-
The counter (for example 19/25 active) shows how many SOPs on the page are turned on. The refresh button reloads the list.
-
Draft from an incident drafts an SOP from an existing incident (see Drafting an SOP from an Incident).
-
New SOP opens the Create SOP window.
Columns
The list shows 25 SOPs per page, with page controls below it. Click a column header with a sort icon to sort by it.
|
Column |
Description |
|
Title |
The SOP's title. |
|
Active |
A switch that turns the SOP on or off. |
|
Uses |
A badge for each feature that uses the SOP: APD, Adaptive Tasking or Adaptive Playbook. |
|
Incident Types |
All, or the number of incident types the SOP applies to. Hover over the info icon to see them. |
|
Sites |
All, or the number of sites the SOP applies to. |
|
Version |
The published version (for example v1). Each save makes a new version. |
|
Used by |
For an APD SOP, the ingestion jobs whose APD policy follows or pins this SOP. Otherwise —. |
|
Owner |
The user who created the SOP. |
|
Scope |
Shared or Personal. |
|
Updated |
The date of the last change. |
|
Actions |
Edit SOP (pencil) and Delete (trash). Delete asks for confirmation, and a deleted SOP cannot be restored. An SOP that APD ingestion jobs still follow cannot be deleted until those jobs are moved to another SOP. |
Creating an SOP
-
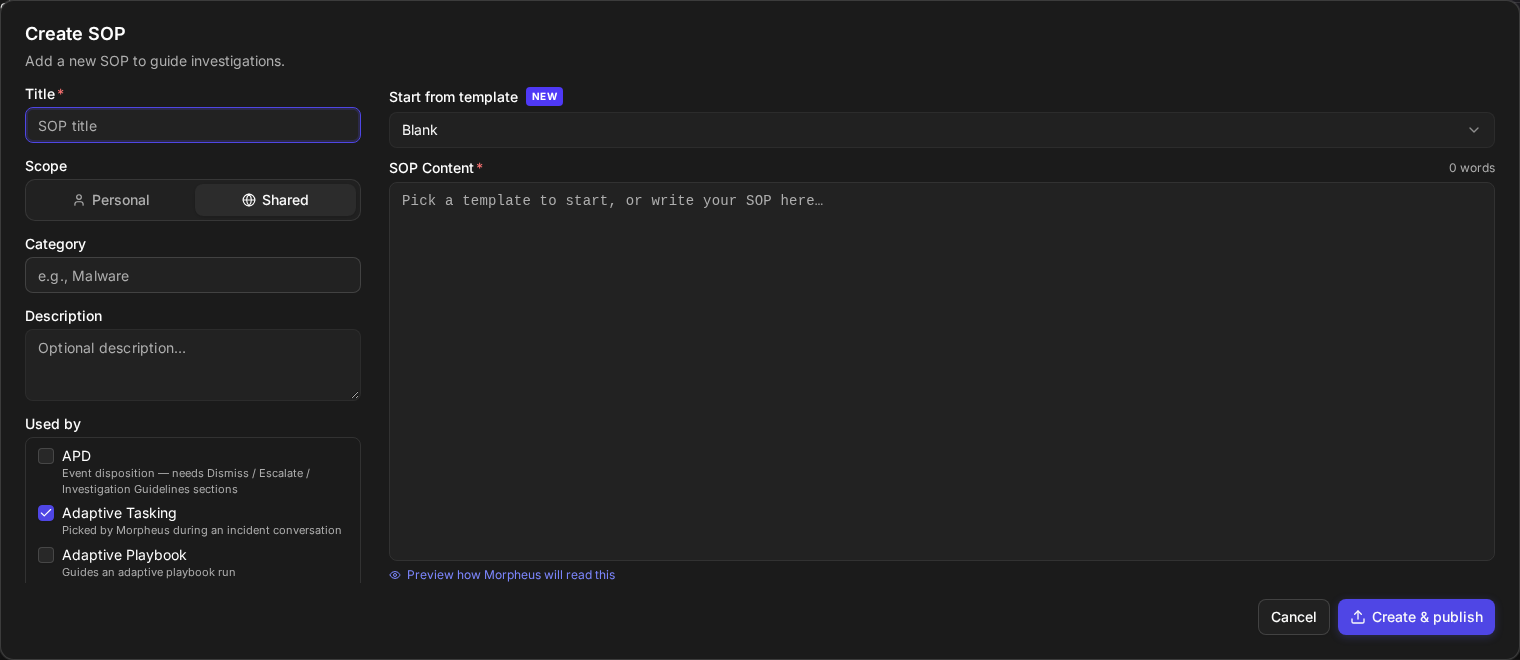
On the SOPs tab, click New SOP.
-
Fill in the left side of the Create SOP window:
Field
Description
Title (required)
A name for the SOP.
Scope
Personal (only you) or Shared (everyone on the SOP's sites). Only administrators can create shared SOPs.
Category
Optional grouping label (for example, Malware).
Description
Optional description.
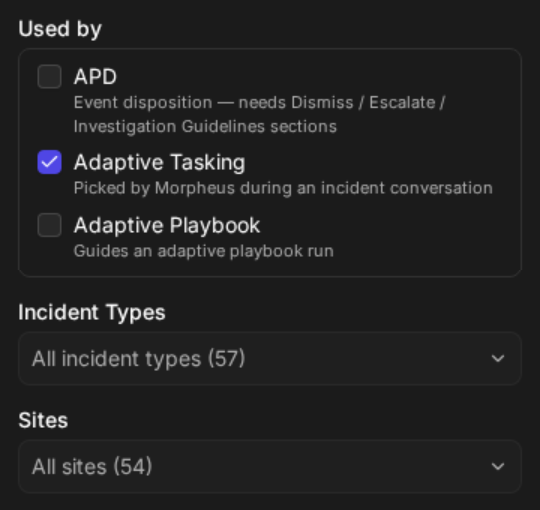
Used by
The features that use the SOP: APD, Adaptive Tasking, Adaptive Playbook. Select one or more.
Incident Types
The incident types the SOP applies to. Defaults to all incident types.
Sites
The sites the SOP applies to. Defaults to all sites.
-
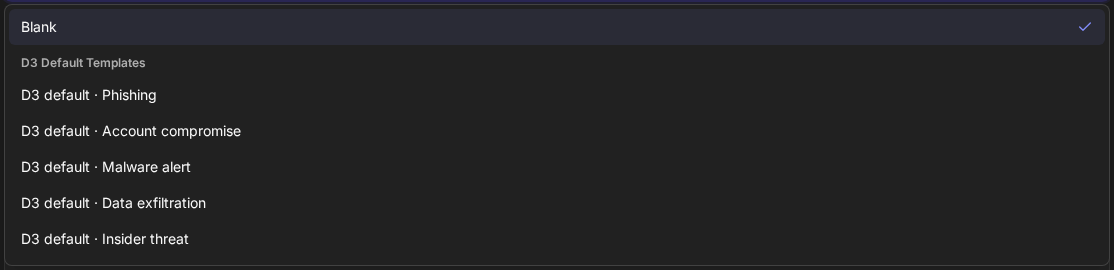
On the right side, choose a starting point in Start from template: Blank, or one of the D3 Default Templates (Phishing, Account compromise, Malware alert, Data exfiltration, Insider threat). A template fills SOP Content.
-
Write or edit the procedure in SOP Content (required). The word count is shown above the box. When the content has headings, a Sections outline of them appears beside it.
-
(Optional) Click Preview how Morpheus will read this. The preview shows what Morpheus sees when it is choosing between SOPs (the title, description and category), followed by the full procedure, which Morpheus reads after it picks the SOP.
-
Click Create & publish. The SOP is published as version 1.
Used by options
Templates
To change an SOP, click Edit SOP on its row. The Edit SOP window has the same fields, without Start from template; click Save.
SOPs Used by APD
An SOP used by APD (Attack Path Discovery) is one that an intake's APD Policy can follow, so one disposition procedure is written once and every intake that should follow it does. It carries APD's instructions in three sections, and it must have all three before it can be saved:
|
Section |
What APD does with it |
|
Dismiss |
Closes an event on its own when it matches, with no analyst involved. |
|
Escalate |
Turns an event into an incident when it matches. It can also say which incident type, severity and playbook to use (see Escalation Routes below). |
|
Investigation Guidelines |
How APD investigates before it decides: what to check first, which sources to trust, and when to leave an event open for an analyst. |
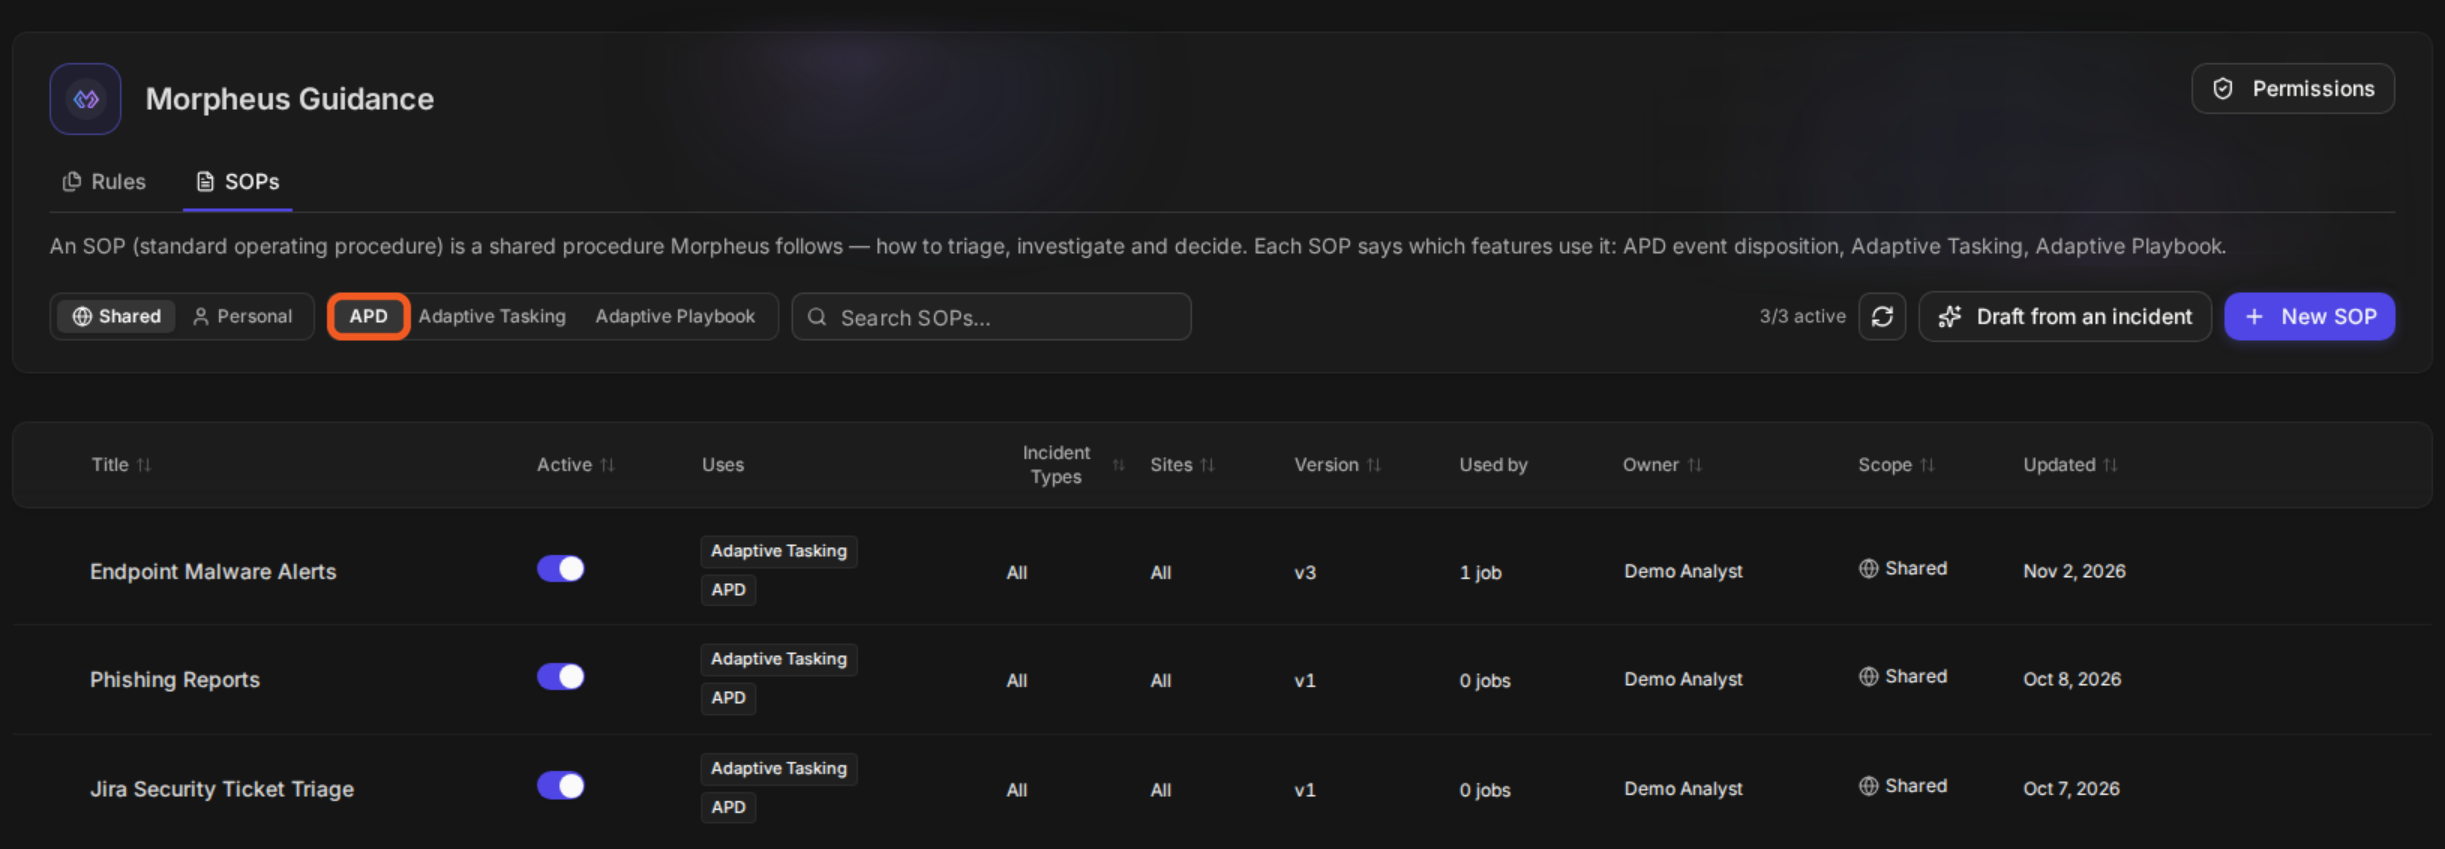
The same SOP can also be used by other features, such as Adaptive Tasking, and each of them reads the whole procedure. To list only the SOPs APD can use, click the APD filter on the SOPs tab.
The SOP list, filtered to SOPs used by APD
To create an SOP for APD, follow Creating an SOP above, with these additions:
-
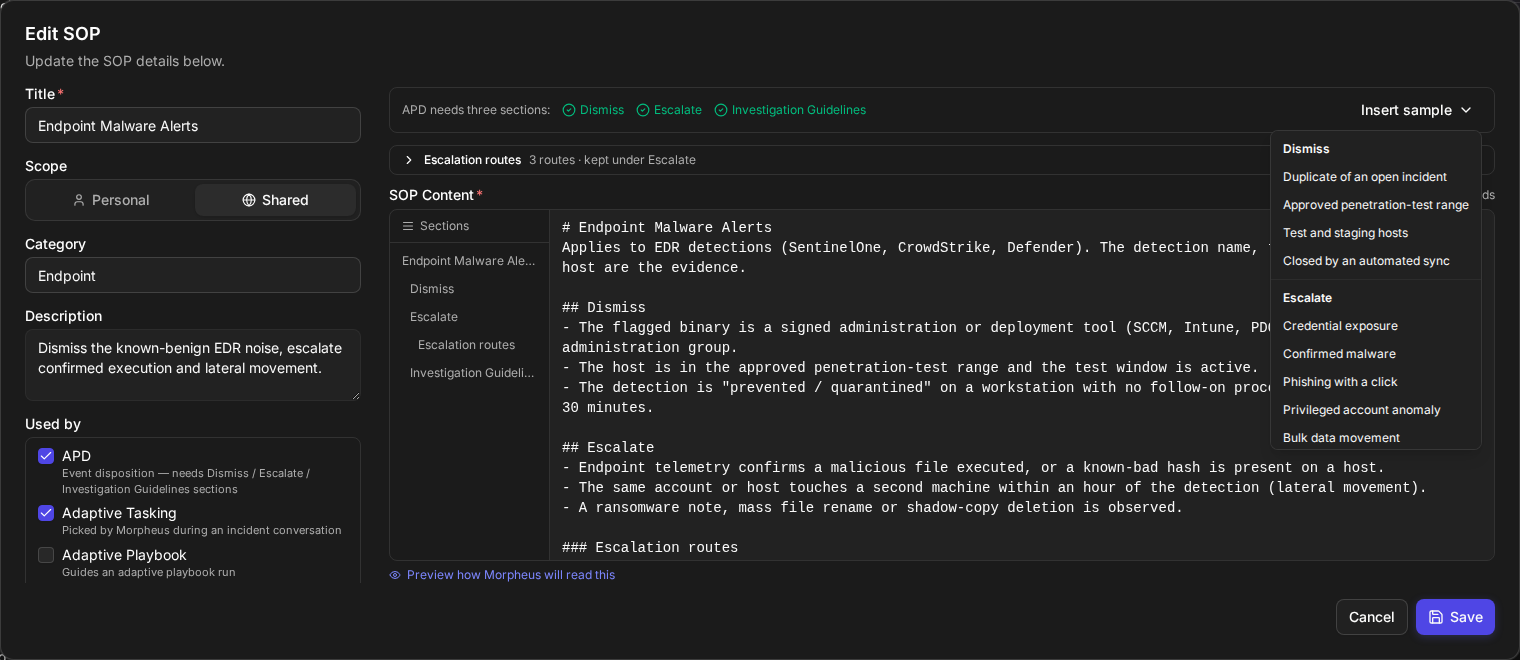
Under Used by, select APD. A bar appears above the content listing the three sections APD needs, with a check mark next to each one the SOP already has.
-
Click + Insert APD template. The three sections are added to SOP Content, each with a one-line prompt that says what belongs there.
-
Replace each prompt line with your own rules, or click Insert sample to add a clause written by D3, then adjust it to your environment.
-
(Optional) Add Escalation routes (see Escalation Routes below).
-
Click Create & publish. The SOP is published as v1, and intakes can now choose it.
An SOP used by APD in the editor
Create & publish stays disabled while a section is missing, or while a template prompt line is still in the text. Hover over the button to see which one.
The Insert sample clauses are starting points written by D3:
|
Section |
Samples |
|
Dismiss |
Duplicate of an open incident · Approved penetration-test range · Test and staging hosts · Closed by an automated sync |
|
Escalate |
Credential exposure · Confirmed malware · Phishing with a click · Privileged account anomaly · Bulk data movement |
|
Investigation Guidelines |
Check the identity first · Correlate on the host · Prefer telemetry over text · Open when evidence is mixed |
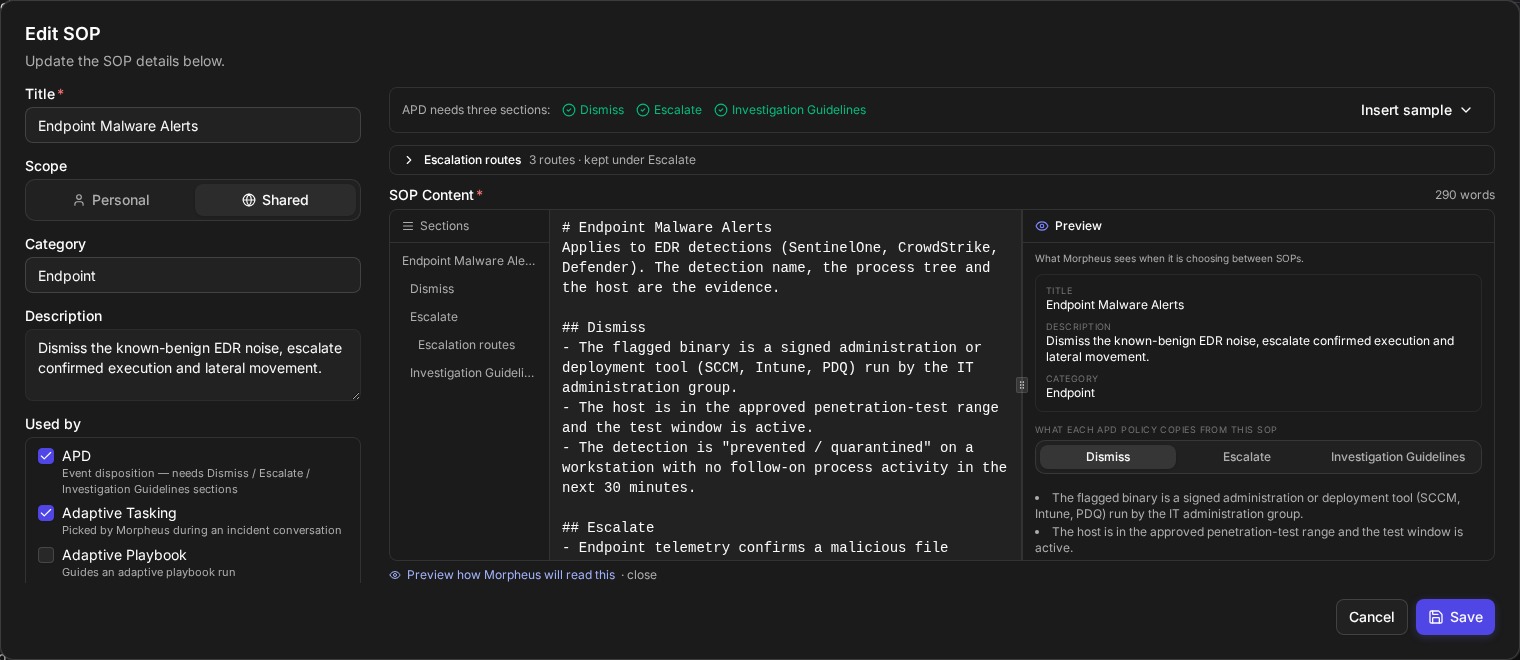
For an SOP used by APD, Preview how Morpheus will read this shows the Dismiss, Escalate and Investigation Guidelines tabs exactly as each intake's policy will copy them.
The preview of an SOP used by APD
Escalation Routes
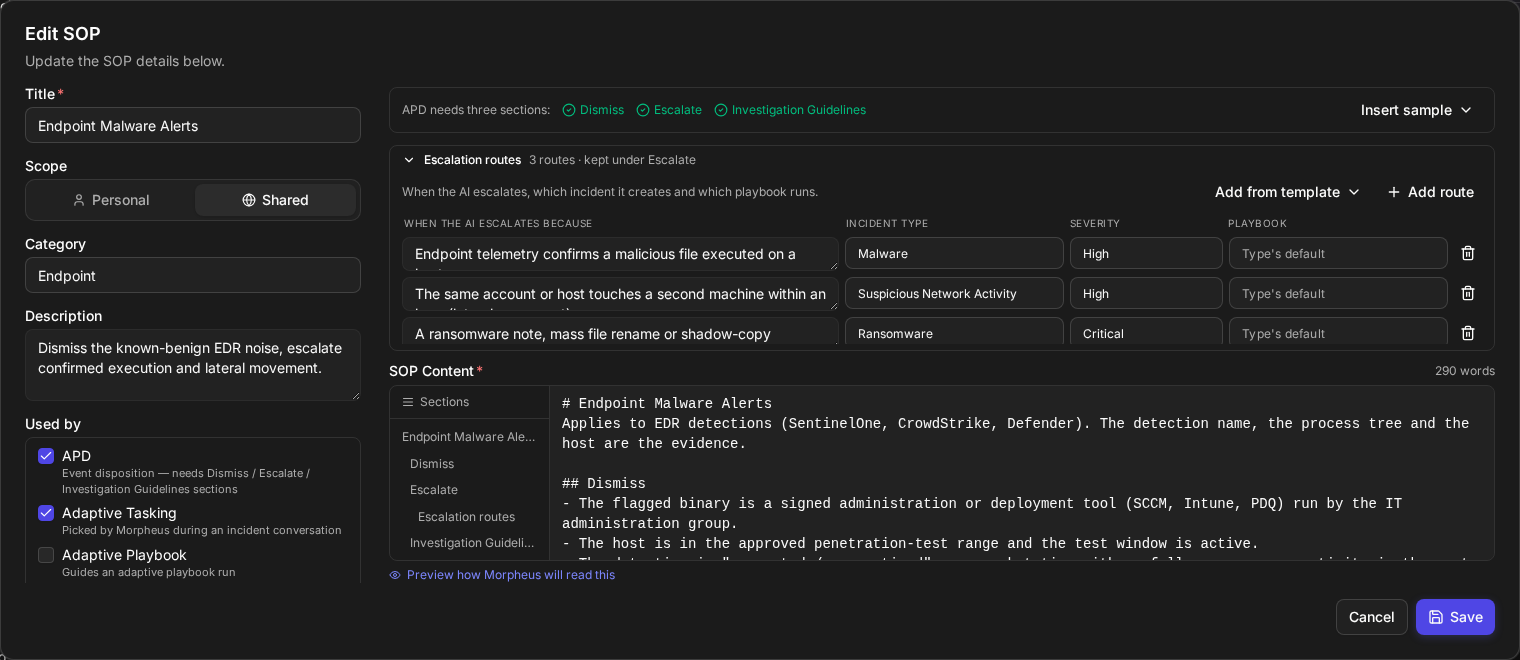
An escalation route tells APD which incident to create, and which playbook to run, when it escalates for a particular reason. For example, credentials found in a ticket become a Compromised Credential incident of High severity. Without routes, every escalation creates an incident with the site's defaults.
Routes are edited under Escalation routes in the SOP window, one row per route:
|
Column |
What to enter |
|
When the AI escalates because |
The reason, in plain words, for example credentials appear in the ticket body. |
|
Incident type |
The incident type to create. Leave it blank to use the default type. |
|
Severity |
The severity to give the incident. Leave it blank to use the default. |
|
Playbook |
The playbook to run on the incident. Leave it blank to use the incident type's default. |
Click Add from template to start from one of five routes (Credential exposure, Confirmed malware, Phishing with a click, Privileged account anomaly or Bulk data movement), then adjust the reason to your environment. Click + Add route to write one from scratch.
Escalation routes in the SOP window
Every match of a route creates a new incident. The routes are kept under the Escalate section of the SOP, so they are versioned, followed and pinned together with the rest of it.
Incident types, severities and playbooks are matched by name on each event's site. A name the site does not have is listed under the routes as Not in the catalog the AI uses here, and APD uses the default for that field instead.
Changing a Shared SOP
Changing an SOP used by APD changes the policy of every intake that follows it, in one place. Because the change goes live for those intakes at once, D3 Morpheus shows you which intakes will move before anything is saved.
-
On the SOPs tab, click Edit SOP on the SOP's row.
-
Make your changes.
-
Click Save. The confirmation opens.
-
Check the list, then click Save vn.
The confirmation before a shared SOP changes
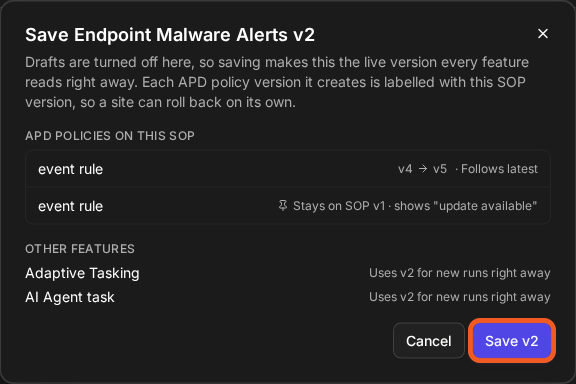
The confirmation lists:
-
APD policies on this SOP: each intake that follows the SOP, with the policy version it moves to (v4 → v5 · Follows latest), and each pinned intake, which stays where it is and shows that an update is available.
-
Other features: features such as Adaptive Tasking that use the new version for new runs right away.
The new SOP version is live as soon as you confirm. A toast reports how many APD policies were updated and how many pinned ones were left unchanged, for example Saved v2 · 1 APD policy updated · 1 pinned unchanged.
Saving a shared SOP used by APD changes what APD does on every intake that follows it, as soon as you confirm. To try a change on some intakes first, pin the others before you save.
If an intake that follows the SOP could not be updated, the confirmation stays open with Retry updating policies. Until every intake has moved, the SOP's row on the SOPs tab shows a red retry icon; click it, then click Retry updating policies.
Some changes are refused while intakes depend on the SOP, so no intake is left without instructions:
-
Removing APD from an SOP that intakes follow. Switch those intakes to another SOP or to local guidance first.
-
Deleting an SOP that intakes use. The delete confirmation names how many intakes use it.
Drafting an SOP from an Incident
-
On the SOPs tab, click Draft from an incident.
-
In Select an incident to generate from, search by case number or title and click the incident. The SOP is drafted from the incident you choose.
Analysts can also capture an SOP from an incident conversation with /Turn-into-SOP in the Morpheus panel. See Morpheus Adaptive Tasking.
Commands
The Commands tab requires the Feature.AdaptiveTasking.CustomCommands.Enabled setting. Without it, Morpheus Guidance shows only Rules and SOPs. Only Python custom commands can be made available to Morpheus, and at most 50 commands can be made available at a time.
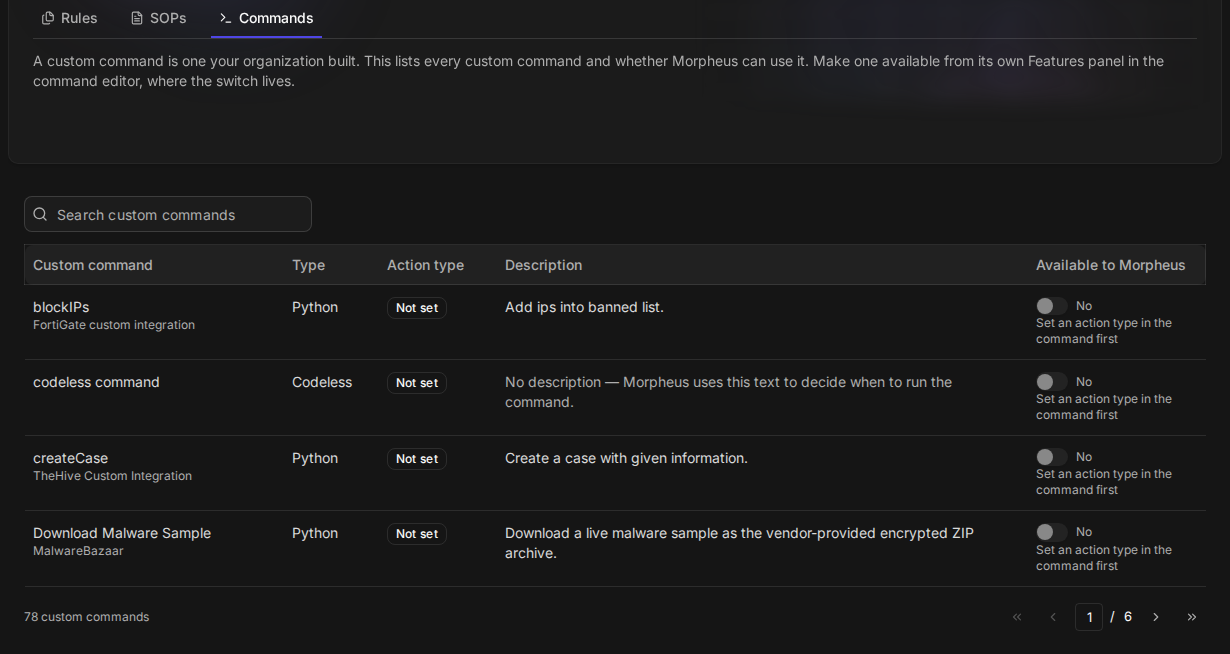
The Commands tab lists every custom command your organization has built, and whether Morpheus can run it during Adaptive Tasking. A command is made available from its own Features panel in the command editor.
The Commands tab
-
Search custom commands filters the list.
-
The count of custom commands is shown below the list, with page controls.
|
Column |
Description |
|
Custom command |
The command's name. For a command in a custom integration, the integration name is shown below it. |
|
Type |
Python or Codeless. Only Python commands can be made available to Morpheus. |
|
Action type |
What the command does. Not set means the command has no action type yet. |
|
Description |
The command's description. Morpheus uses this text to decide when to run the command, so a command without one shows No description. |
|
Available to Morpheus |
Whether Morpheus can run the command (Yes or No). A command with no action type shows Set an action type in the command first, and its switch cannot be turned on. |
Making a Command Available to Morpheus
-
Open the command in the command editor and click Settings.
-
Under Features, turn on Adaptive Tasking (Let Morpheus run this command while it works an incident.). The Action type, Input schema and Output schema settings appear below it.
-
In Action type (marked Required), select what the command does. For example, Read means the command looks something up and returns it, and changes nothing. The action type decides which permission rule applies when Morpheus wants to run the command (see Permissions).
-
Check the Input schema (what Morpheus must pass to run the command) and the Output schema (what Morpheus gets back, so it knows what it can use the result for before running it). A schema that exists shows Set. Click a schema's name to show it.
A command made available to Morpheus
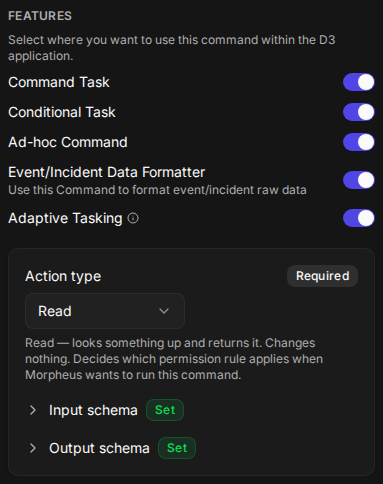
The AI drafts the schemas. Regenerate beside a schema drafts it again.
To draft the input schema, the full script is sent to the AI. Clear any hardcoded credentials from the script first.
The schemas are frozen while the command version is live. They show Frozen — version 4 is live (with the live version number), and Regenerate is unavailable. To change them, click Edit to create a draft.
The input and output schemas
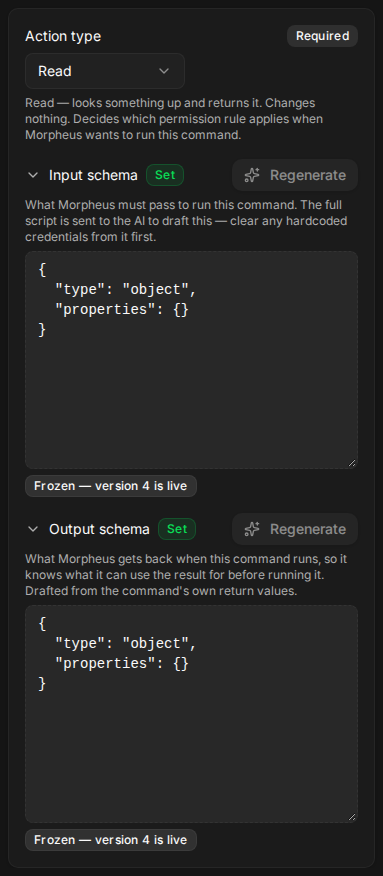
On the Commands tab, the command now shows its action type and Yes under Available to Morpheus.
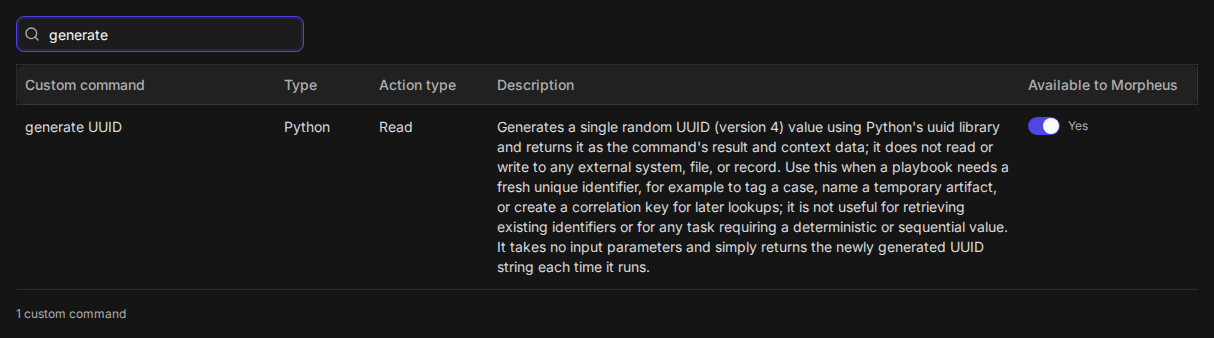
The Adaptive Tasking switch is shown only for Python custom commands.
Permissions
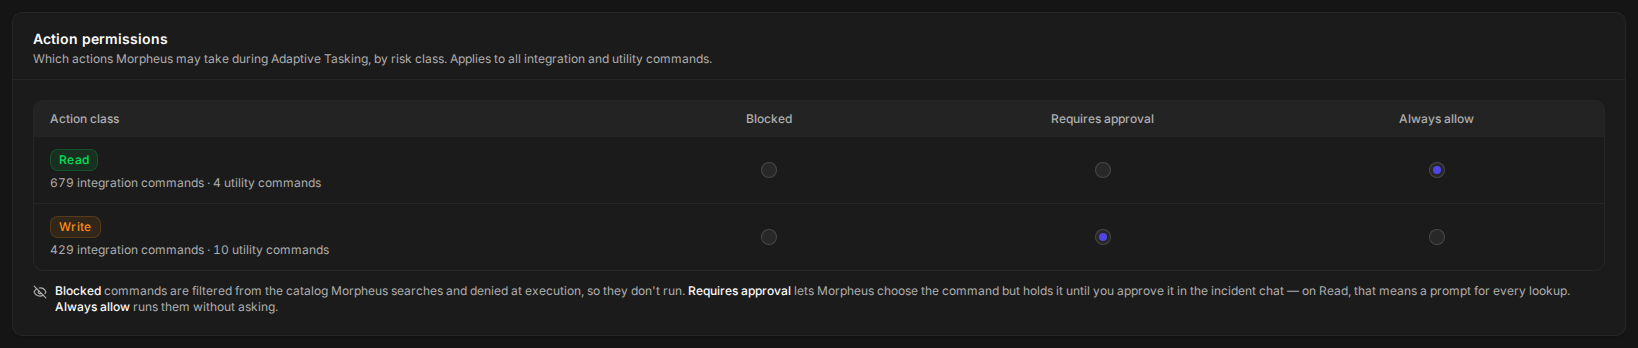
Permissions cap which actions Morpheus may take during Adaptive Tasking, by read and write risk class. They apply to all integration and utility commands. To open them, click Permissions at the top right of Morpheus Guidance. Back to Morpheus Guidance returns to the tab you came from.
Action Permissions
The organization default. Each row is a risk class, with the number of integration and utility commands in it. Select one option per row. The change is saved as soon as you select it; there is no Save button.
|
Option |
What happens |
|
Blocked |
The commands are removed from the catalog Morpheus searches and denied at execution, so they do not run. |
|
Requires approval |
Morpheus can choose the command, but it waits until you approve it in the incident chat. On Read, that means a prompt for every lookup. |
|
Always allow |
The commands run without asking. |
Site Overrides
All sites use the organization default unless they have an override. Add an override only for sites that need different permissions.
-
Under Site overrides, click Add site override.
-
In the Add site override window, search for and select the Site.
-
Under Policy, choose Blocked, Requires approval or Always allow for Read and for Write.
-
Click Add override. Every other site keeps the organization default.
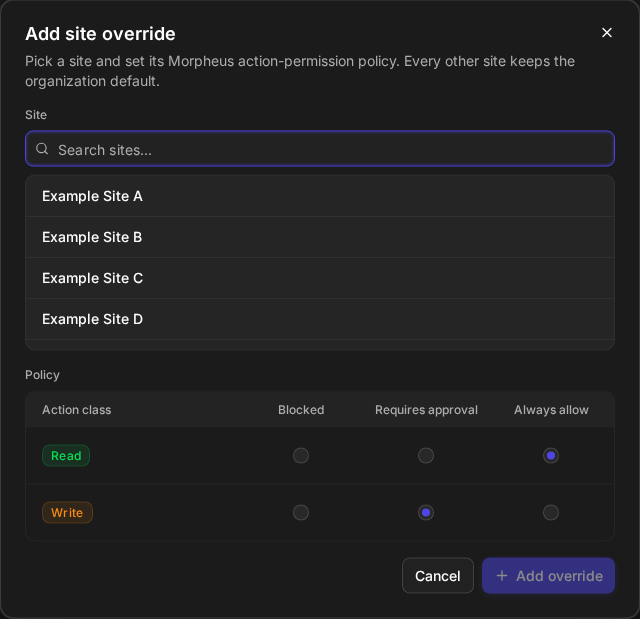
The overrides are listed under Site overrides, with Search overridden sites... and a count of the overridden sites.
Tool Classification
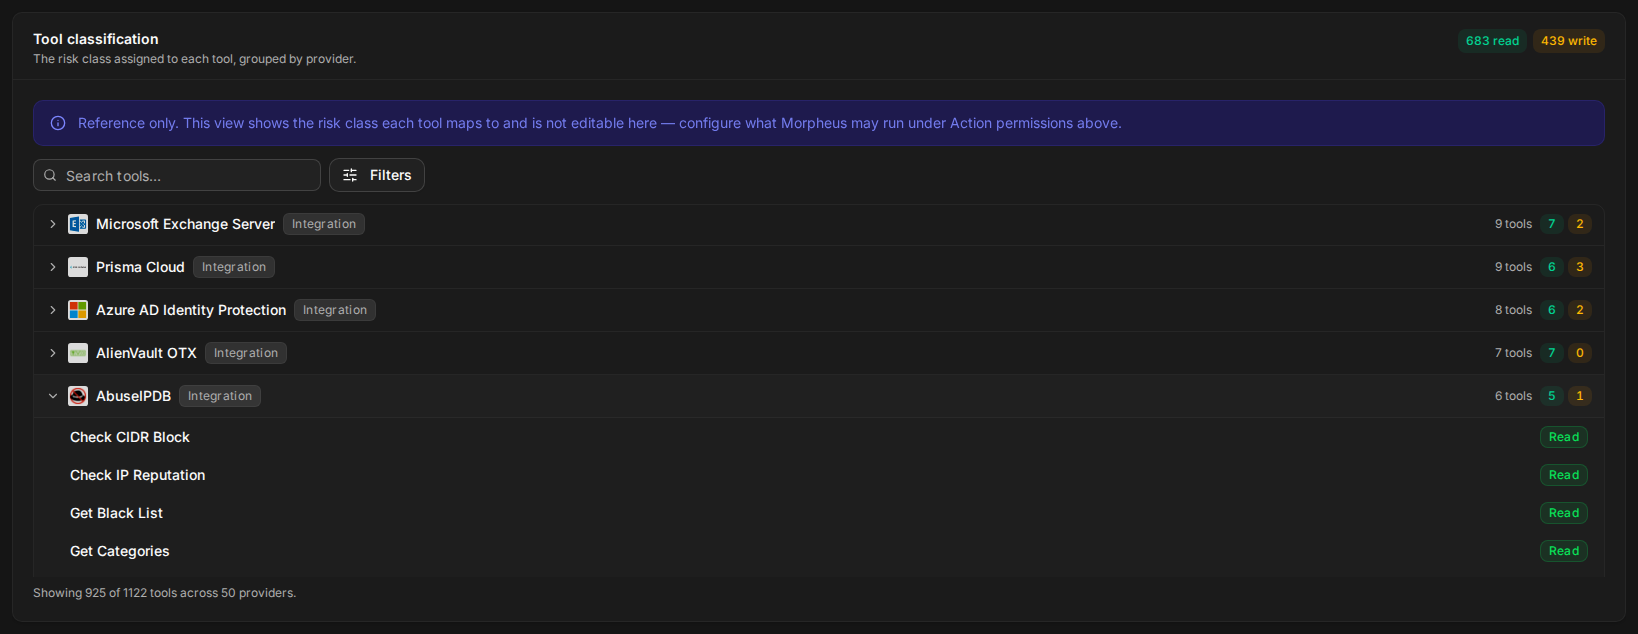
A reference list of the risk class (Read or Write) each tool maps to, grouped by provider. It cannot be edited here: what Morpheus may run is set under Action permissions.
-
The badges at the top right show the total read and write tools.
-
Search tools... filters the list.
-
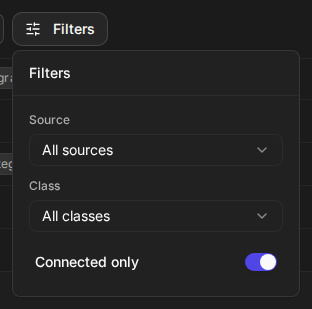
Filters sets the Source (All sources, Integration, Utility), the Class (All classes, Read, Write) and Connected only.
-
Each provider row shows its type (Integration or Utility), its tool count, and how many tools are read and write. Click a row to list its tools with their class.