Field Mappings
LAST UPDATED: JULY 28, 2025
Third-party vendors provide semantically distinct entities—such as events, incidents, and alerts—using varied JSON structures and key names. To normalize inter-vendor and payload heterogeneity for streamlined processing and operational support, raw JSON keys containing relevant event- or incident-related information are reassigned to D3 data model or user-defined field names. This key reassignment process is known as field mapping.
IFM and EFM in the Data Pipeline
Field Mapping Types
There are two field mapping types: Incident Field Mapping (IFM) for incident-level data and Event Field Mapping (EFM) for event-level data. Both occur in the post-ingestion processing pipeline, which varies slightly based on the integration fetch command used.
Fetch commands are of two main types:
Fetch Incident – Applies both incident field mappings and event field mappings.
Fetch Event – Applies only event field mappings.
FLOW DIAGRAM
-20250722-184013.png?inst-v=14315ac1-e236-4137-b3db-d5c917e51e5f)
The array data representing a D3 event is nested within the array data representing a D3 incident.
INCIDENT-EVENT PAYLOAD
FLOW DIAGRAM
-20250722-184033.png?inst-v=14315ac1-e236-4137-b3db-d5c917e51e5f)
EVENT PAYLOAD
Source Field as Individual Mappings
A source field is a relative JSONPath expression used in EFM and IFM to reference a specific field within the raw JSON payload. The source field begins at the array defined by the Main JSON Path (IFM) or Main Event JSON Path (EFM), and traverses deeper into the JSON structure to reach the desired key.

See Source Field — Supported JSONPath Expressions for syntax details.
Source Resolution
Each event or incident source defines how data for a vendor-specific entity type should be interpreted and normalized. In D3, source is implemented as an integration-specific, named configuration that links to an EFM or IFM set. To apply the correct set, D3 must resolve each object within the array defined by the Main (Event) JSON Path to a specific source.
The Main Event JSON Path points to an array, with each object evaluated against configured EFM sources. The Main JSON Path also points to an array, with each object evaluated against configured IFM sources and potentially containing a nested array referenced by the Main Event JSON Path. A source's applicability is determined by a search string, which may be built-in or user-defined.
OBJECTIVE – Understand the relationship between event sources and search strings.
The Zendesk integration includes five built-in event sources:
(Default Event Source)
Event Source for Ticket
Event Source for User
Event Source for Group
Event Source for Organization
Event Source for Organization *
PARTIAL PAYLOAD 1
{
    "results": [
        {
            ...
            "result_type": "organization",
            ...
        }
    ]
}
Select the Event Source for Organization.
Click on the Edit Event Source button.

Observe the alignment between the search string and the payload's source discriminator.
Event Source for Group *
PARTIAL PAYLOAD 2
{
    "results": [
        {
            ...
            "result_type": "group",
            ...
        }
    ]
}
Select the Event Source for Group.
-20250716-164738.png?inst-v=14315ac1-e236-4137-b3db-d5c917e51e5f)
Click on the Edit Event Source button.
Observe the alignment between the search string and the payload's source discriminator.
Event Source for User *
PARTIAL PAYLOAD 3
{
    "results": [
        {
            ...
            "result_type": "user",
            ...
        }
    ]
}
Select the Event Source for User.
-20250716-171533.png?inst-v=14315ac1-e236-4137-b3db-d5c917e51e5f)
Click on the Edit Event Source button.
Observe the alignment between the search string and the payload's source discriminator.
Event Source for Ticket *
PARTIAL PAYLOAD 4
{
    "results": [
        {
            ...
            "result_type": "ticket",
            ...
        }
    ]
}
Select the Event Source for Ticket.
Click on the Edit Event Source button.
Observe the alignment between the search string and the payload's source discriminator.
(Default Event Source) *
PARTIAL PAYLOAD 5
{
    "results": [
        {
            ...
            "result_type": "neither_ticket_user_group_nor_organization",
            ...
        }
    ]
}
Select the (Default Event Source).
Click on the Edit Event Source button.
Observe the Main Even JSON Path.
NOTES ON DEFAULT EVENT SOURCE *
The Event Source popover for (Default Event Source) includes a Main Event JSON Path field instead of a Search String field.
When no search string matches the value of the target field in the payload, the D3 system evaluates the Main Event JSON Path.
If the path resolves successfully, the default field mapping set is applied.
If the path fails to resolve, no field mapping is applied.
OBJECTIVE – Understand the relationship between incident sources and search strings.
PARTIAL PAYLOAD 1
{
    "value": [
        {
            ...
            "discriminator": "lorem_ipsum",
            "properties": {
                ...
                "title": "demo_title",
                "description": "demo_description",
                "incidentNumber": 133,
                ...
            },
            ...
            "alertDetails": [
                {
                    ...
                    "Tactics": "CredentialAccess",
                    "Techniques": "",
                    "Type": "SecurityAlert"
                    ...
                }
            ]
            ...
        }
    ]
}
Add an incident source, within a site, using the following search string:
CODE{.discriminator}={{ipsum$}}
Observe the alignment between the search string and the payload's source discriminator.
PARTIAL PAYLOAD 2
[
    {
        ...
        "discriminator": "value_for_demo_incident_source",
        ...
    }
]
Add an incident source, within a site, using the following search string:
CODE{$..discriminator}=value_for_demo_incident_source-20250722-205814.png?inst-v=14315ac1-e236-4137-b3db-d5c917e51e5f)
Observe the alignment between the search string and the payload's source discriminator.
Search Strings
Each non-default source involves a search string that determines its applicability during source resolution. A search string evaluates data within the Main (Event) JSON Path to determine whether a specific key exists and whether its value matches the configured value. When a key-value pair in the payload matches a configured search string, the corresponding EFM or IFM set is used to normalize the third-party data.
The search string must adhere to one of the following formats:
FORMAT 1
{<Descriminator JSONPath>}=<Discriminator's literal value without quotes>FORMAT 2
{<Descriminator JSONPath>}={{<Regular expression matching discriminator's value>}}TEST 1
Navigate to the Fetch Event command of the Zendesk integration.
-20250630-175639.png?inst-v=14315ac1-e236-4137-b3db-d5c917e51e5f)
Enable webhook authentication, then select the API Key option.
-20250630-183146.png?inst-v=14315ac1-e236-4137-b3db-d5c917e51e5f)
Create an API key. Note the selected site.
-20250630-185629.png?inst-v=14315ac1-e236-4137-b3db-d5c917e51e5f)
Copy the request information to Postman, then select a preprocessing playbook under the Additional Settings accordion.
-20250630-185035.png?inst-v=14315ac1-e236-4137-b3db-d5c917e51e5f)
In Postman:
Prepare the POST request URL.
-20250718-190151.png?inst-v=14315ac1-e236-4137-b3db-d5c917e51e5f)
Prepare the request header key and value.
-20250718-190210.png?inst-v=14315ac1-e236-4137-b3db-d5c917e51e5f)
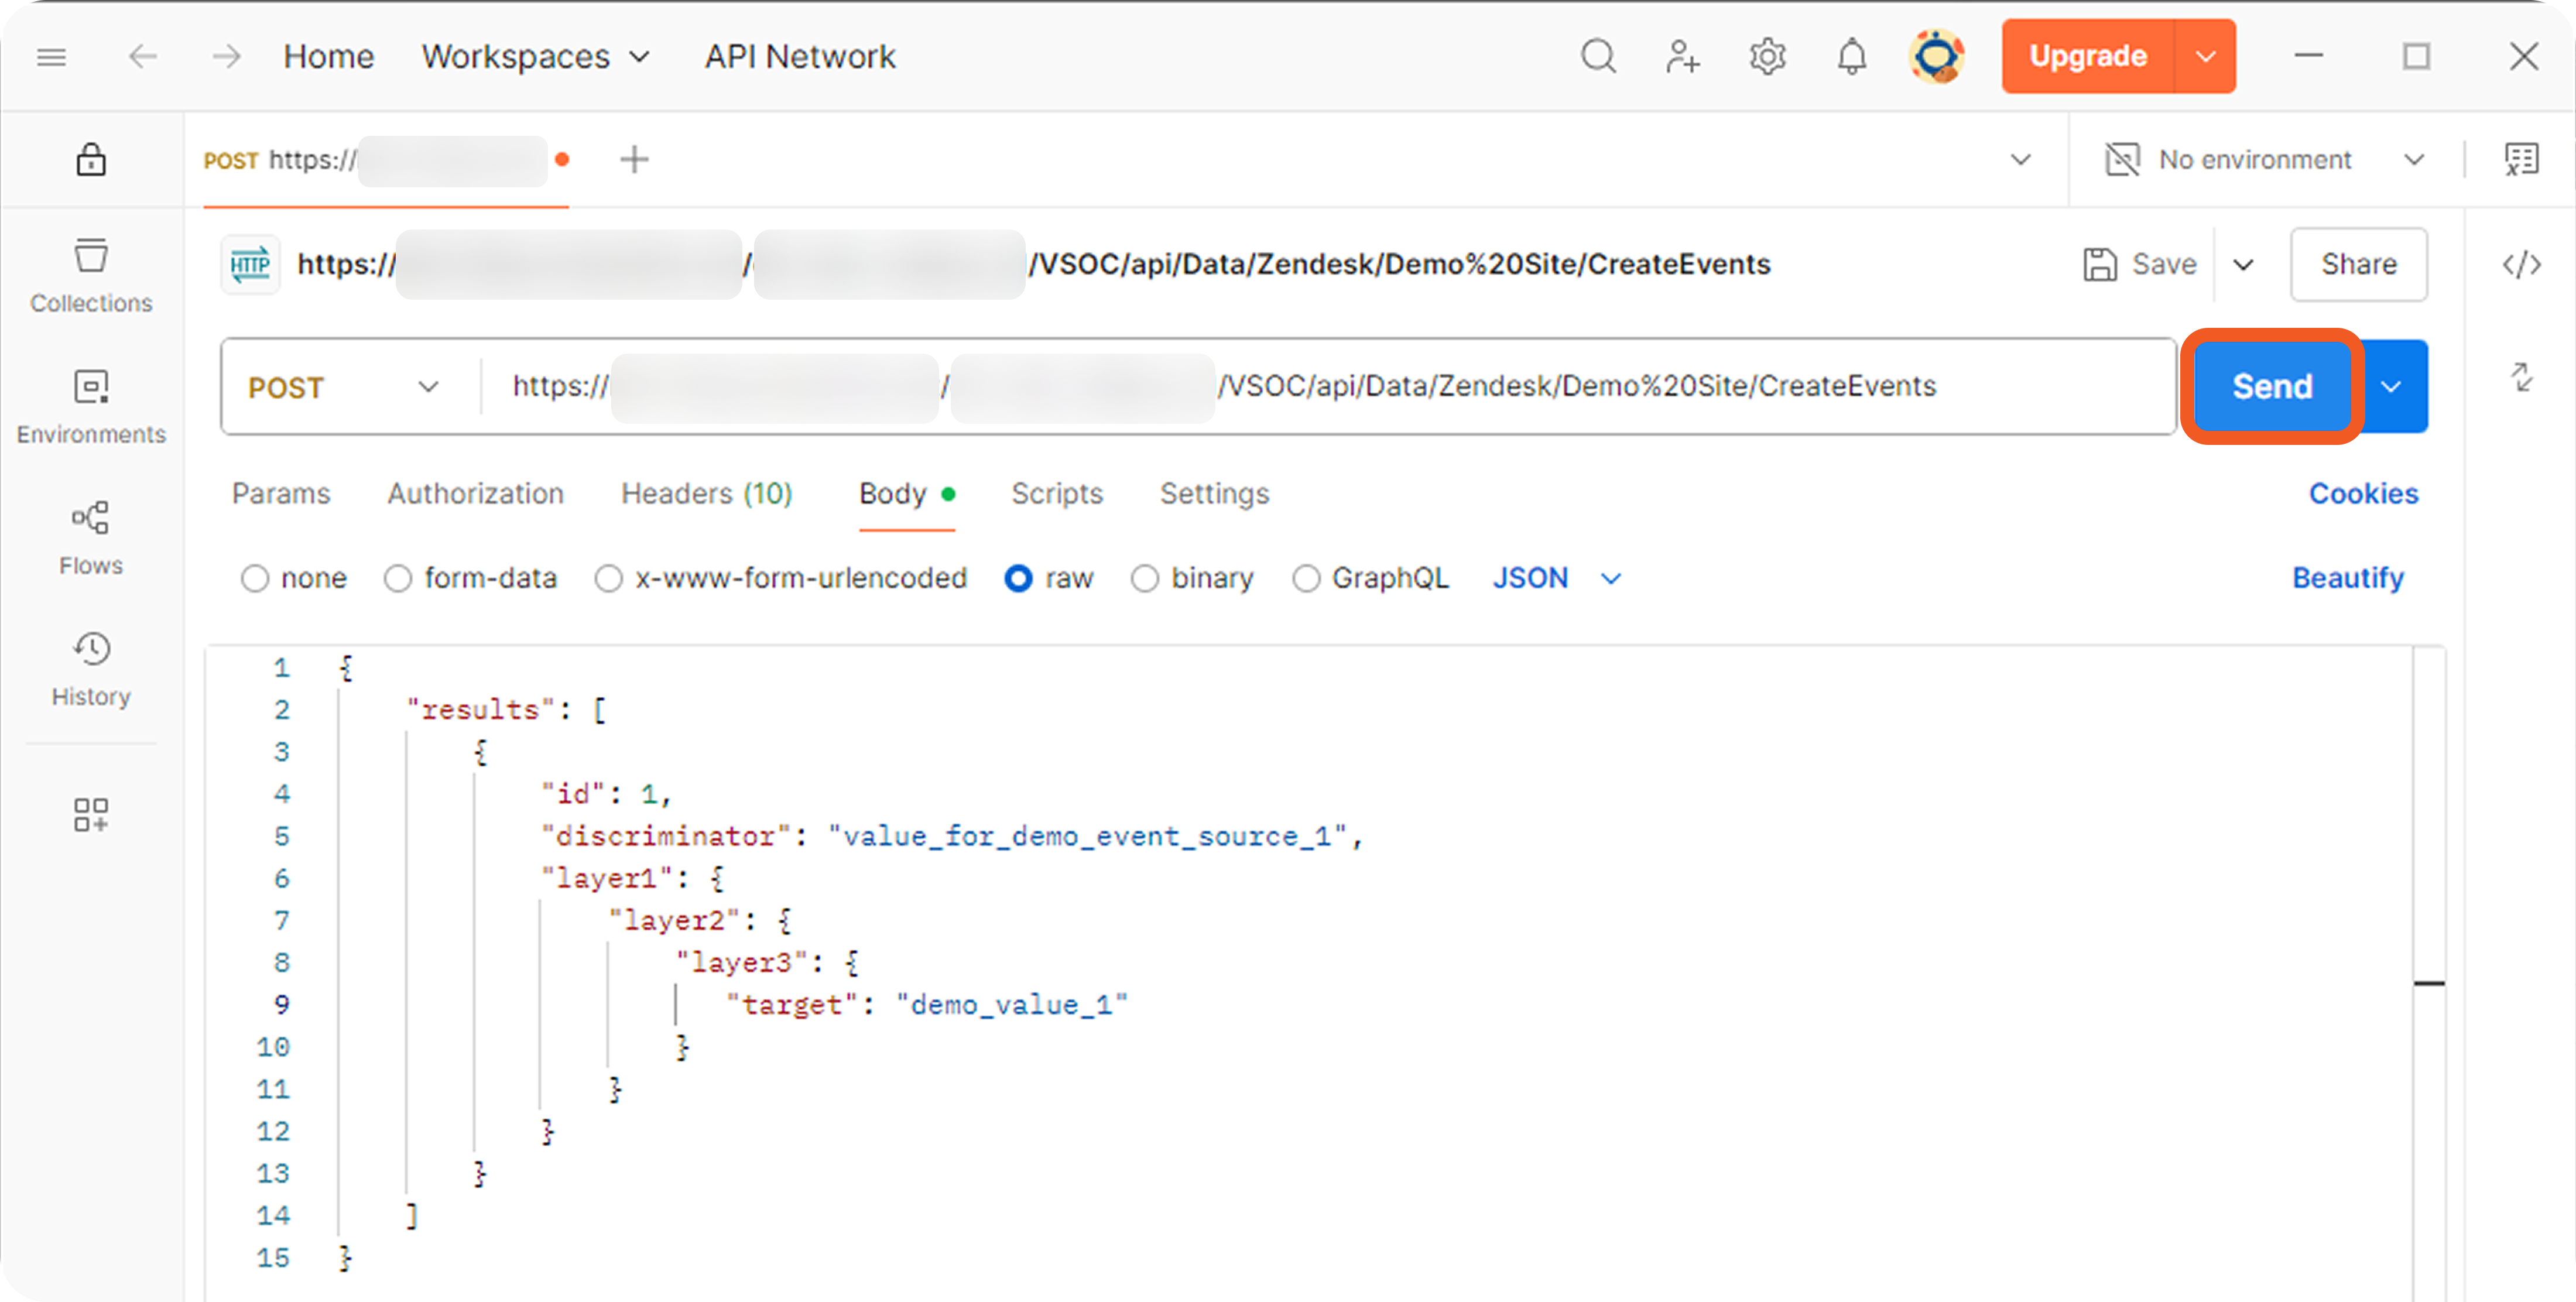
Prepare the following payload for ingestion:
JSON{ "results": [ { "id": 1, "discriminator": "value_for_demo_event_source_1", "layer1": { "layer2": { "layer3": { "target": "demo_value_1" } } } } ] }-20250718-190546.png?inst-v=14315ac1-e236-4137-b3db-d5c917e51e5f)
Click on the Set Up Event Field Extraction Mapping button in D3 vSOC.
Note the Main Event JSONPath expression.
-20250630-175827.png?inst-v=14315ac1-e236-4137-b3db-d5c917e51e5f)
WHAT IT MEANS *
At runtime, the $.results expression directs the system to iterate over each object in the top-level "results" array.
If this array is not at the top level, the Main Event JSON Path must include either the full path of parent objects or (cautiously) use recursive descent to locate it.
The source field (step 8) operates relative to each object in this scope.
Create an event source called Demo Event Source 1 using the following search string:
CODE{$.discriminator}=value_for_demo_event_source_1This instructs the system to evaluate the discriminator key in the payload, and apply this event source when its value equals the string "value_for_demo_event_source_1".
-20250718-215452.png?inst-v=14315ac1-e236-4137-b3db-d5c917e51e5f)
Add a mapping field for Demo Event Source 1:
RELATED RESOURCE *
Learn more about JSONPath expressions for source field here.
Send the POST request prepared in step 4 and step 5.
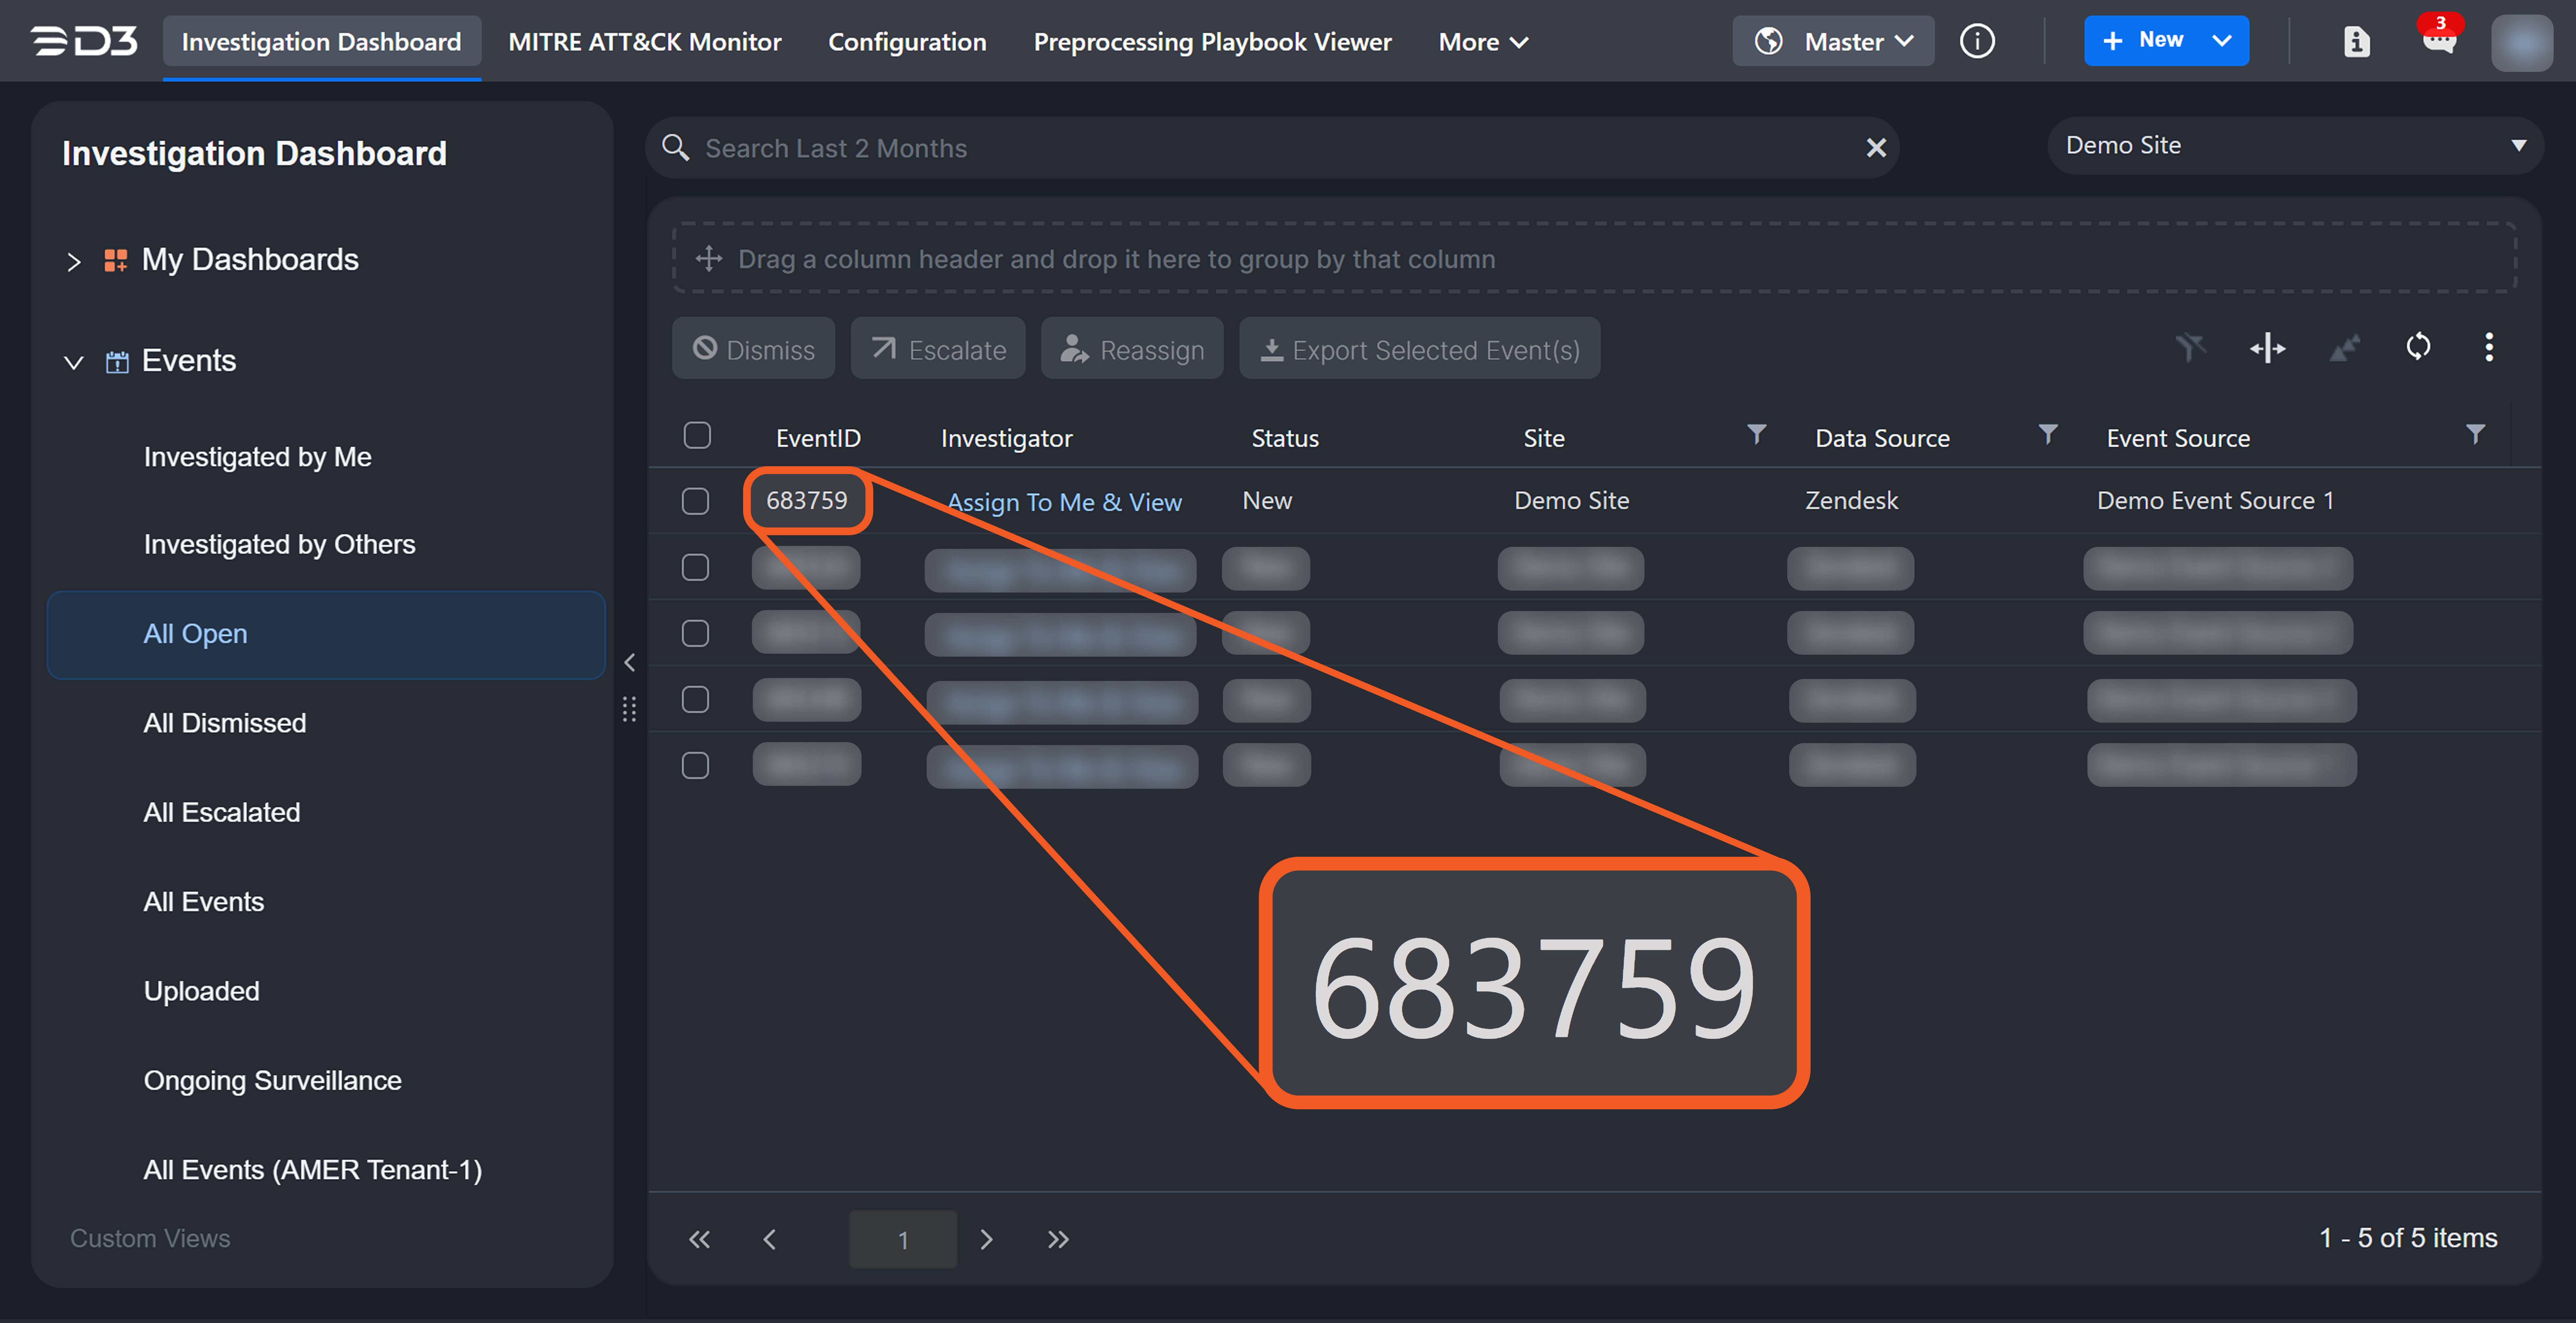
Verify that an event was created in the Data Ingestion module.
-20250725-165556.png?inst-v=14315ac1-e236-4137-b3db-d5c917e51e5f)
Note the eventId number.
-20250725-165621.png?inst-v=14315ac1-e236-4137-b3db-d5c917e51e5f)
Navigate to the Investigation Dashboard page.
-20250630-190451.png?inst-v=14315ac1-e236-4137-b3db-d5c917e51e5f)
Select the site in which the API key was generated in step 3.
-20250630-190521.png?inst-v=14315ac1-e236-4137-b3db-d5c917e51e5f)
Locate the event with an ID matching the one observed in step 12, then click on the event to view its details.
Verify that the value from the "target" payload field appears next to the mapped field (Demo Field 1 configured in step 9).
-20250725-165918.png?inst-v=14315ac1-e236-4137-b3db-d5c917e51e5f)
TEST 2
Prepare the following payload for ingestion:
JSON{ "results": [ { "id": 2, "discriminator": "value_for_demo_event_source_2", "layer1": { "layer2": { "layer3": { "target": "demo_value_2" } } } } ] }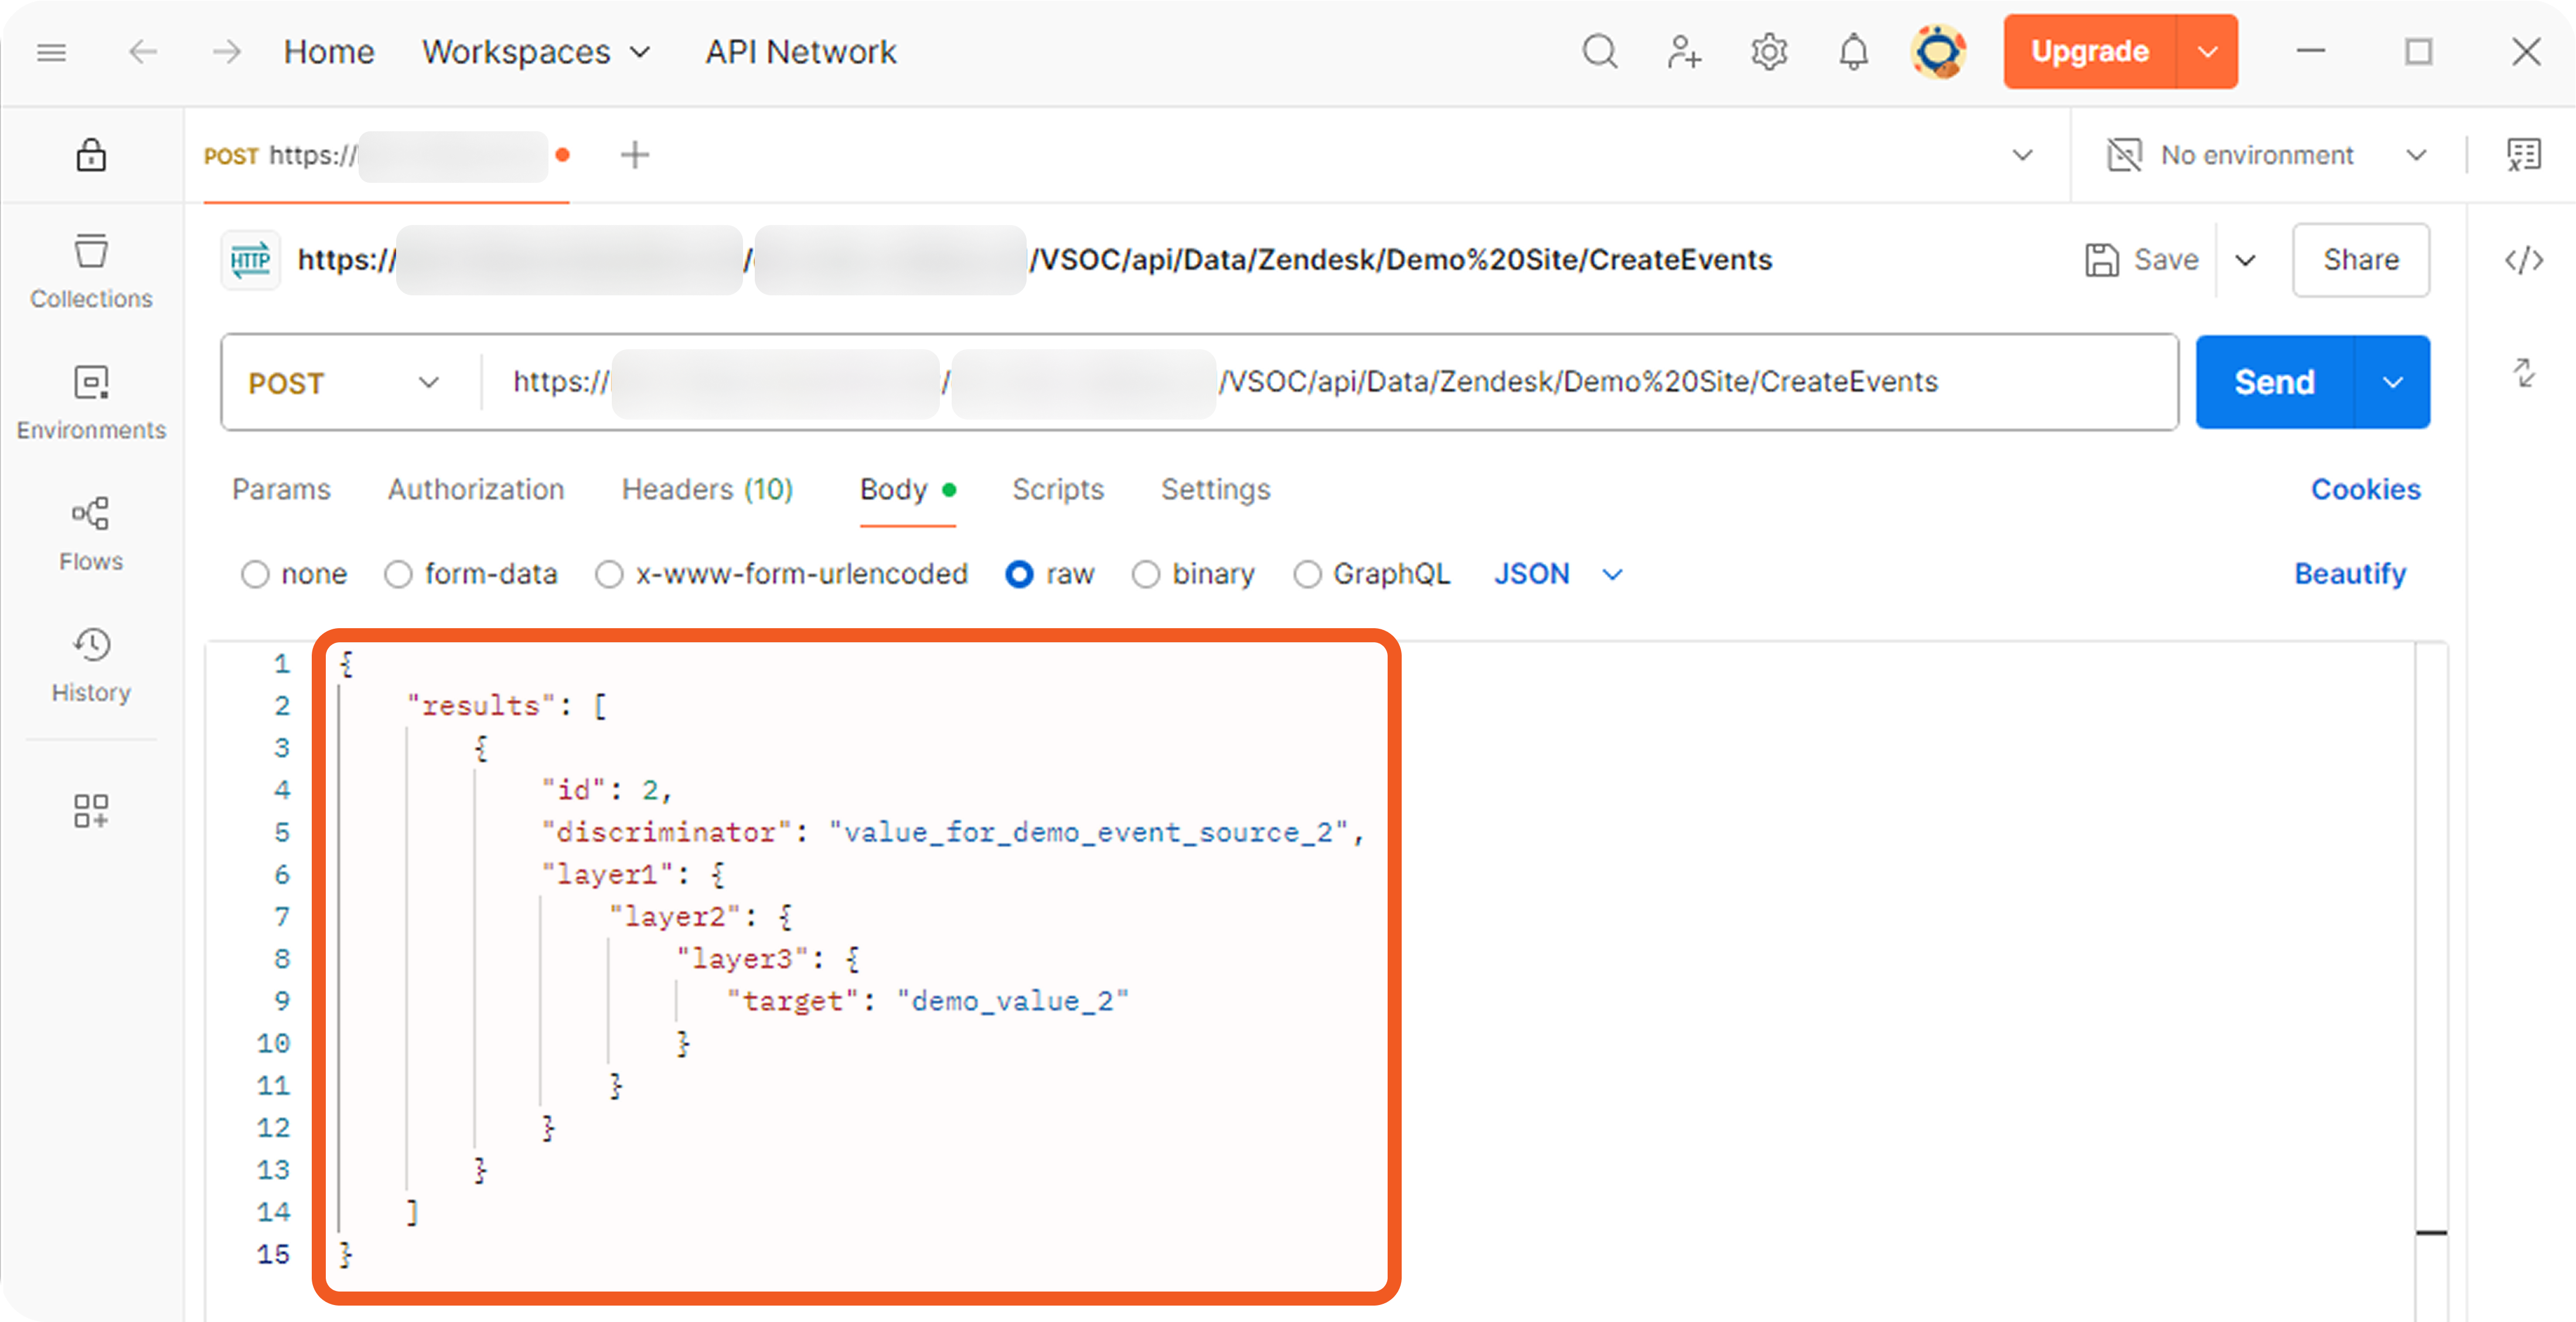
Create an event source called Demo Event Source 2 using the following search string:
CODE{$.discriminator}={{2$}}This instructs the system to evaluate the discriminator key in the payload, and apply this event source when its value matches any string that ends with "2".
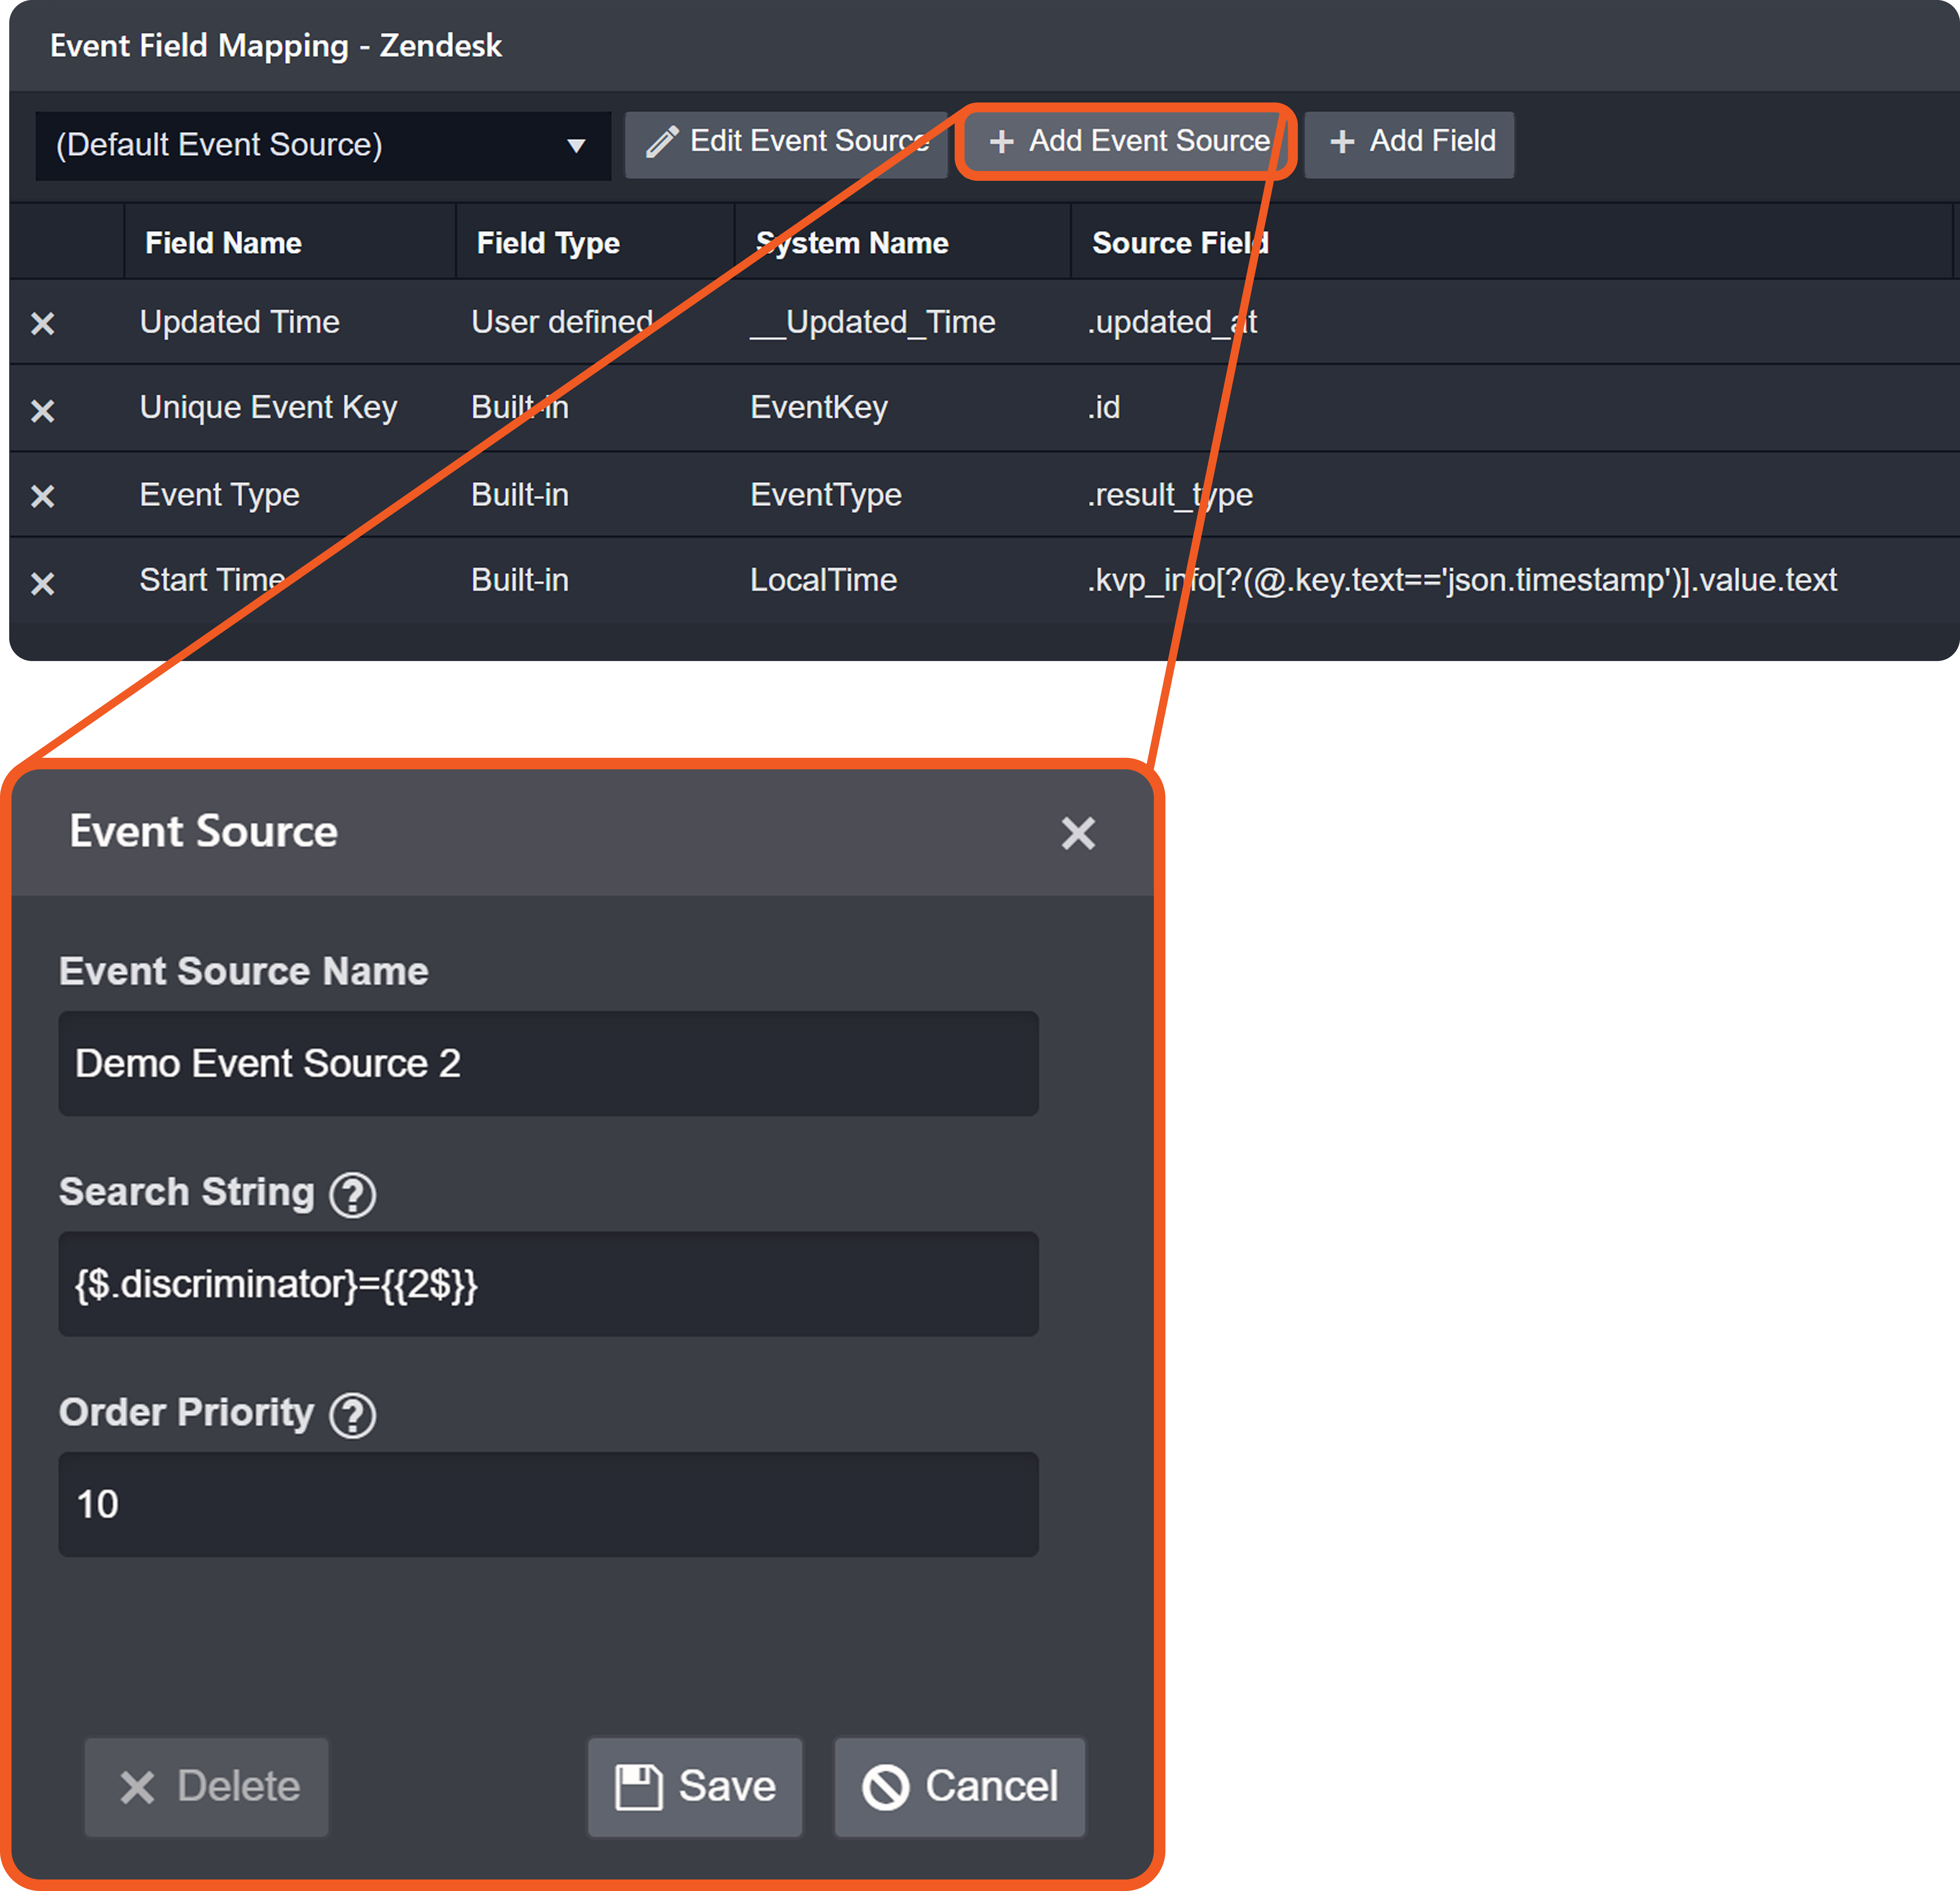
Add a mapping field for Demo Event Source 2:
Send the POST request.

Verify that an event was created in the Data Ingestion module.
Note the eventId number.
Navigate to the Investigation Dashboard page.
Select the site in which the API key was generated in step 3.
Locate the event with an ID matching the one observed in step 22, then click on the event to view its details.
Verify that the value from the "target" payload field appears next to the mapped field (Demo Field 2) configured in step 19.
PART 1
Navigate to the Fetch Incident command of the Microsoft Sentinel integration.
Enable webhook authentication, then select the API Key option.
Create an API key. Note the selected site.
-20250723-184346.png?inst-v=14315ac1-e236-4137-b3db-d5c917e51e5f)
Copy the request information to Postman, then select a preprocessing playbook under the Additional Settings accordion.
-20250723-183456.png?inst-v=14315ac1-e236-4137-b3db-d5c917e51e5f)
In Postman:
Prepare the POST request URL.

Prepare the request header key and value.
Prepare the following payload for ingestion:
JSON{ "value": [ { "discriminator": "lorem_ipsum", "properties": { "title": "demo_title", "description": "demo_description", "incidentNumber": 99999 }, "alertDetails": [ { "Tactics": "CredentialAccess", "Techniques": "", "Type": "demo_type", "SystemAlertId": "3f8a1b94-b79e-4b65-beb7-2a14f0a6e5a9", "Placeholder": "demo_value" } ] } ] }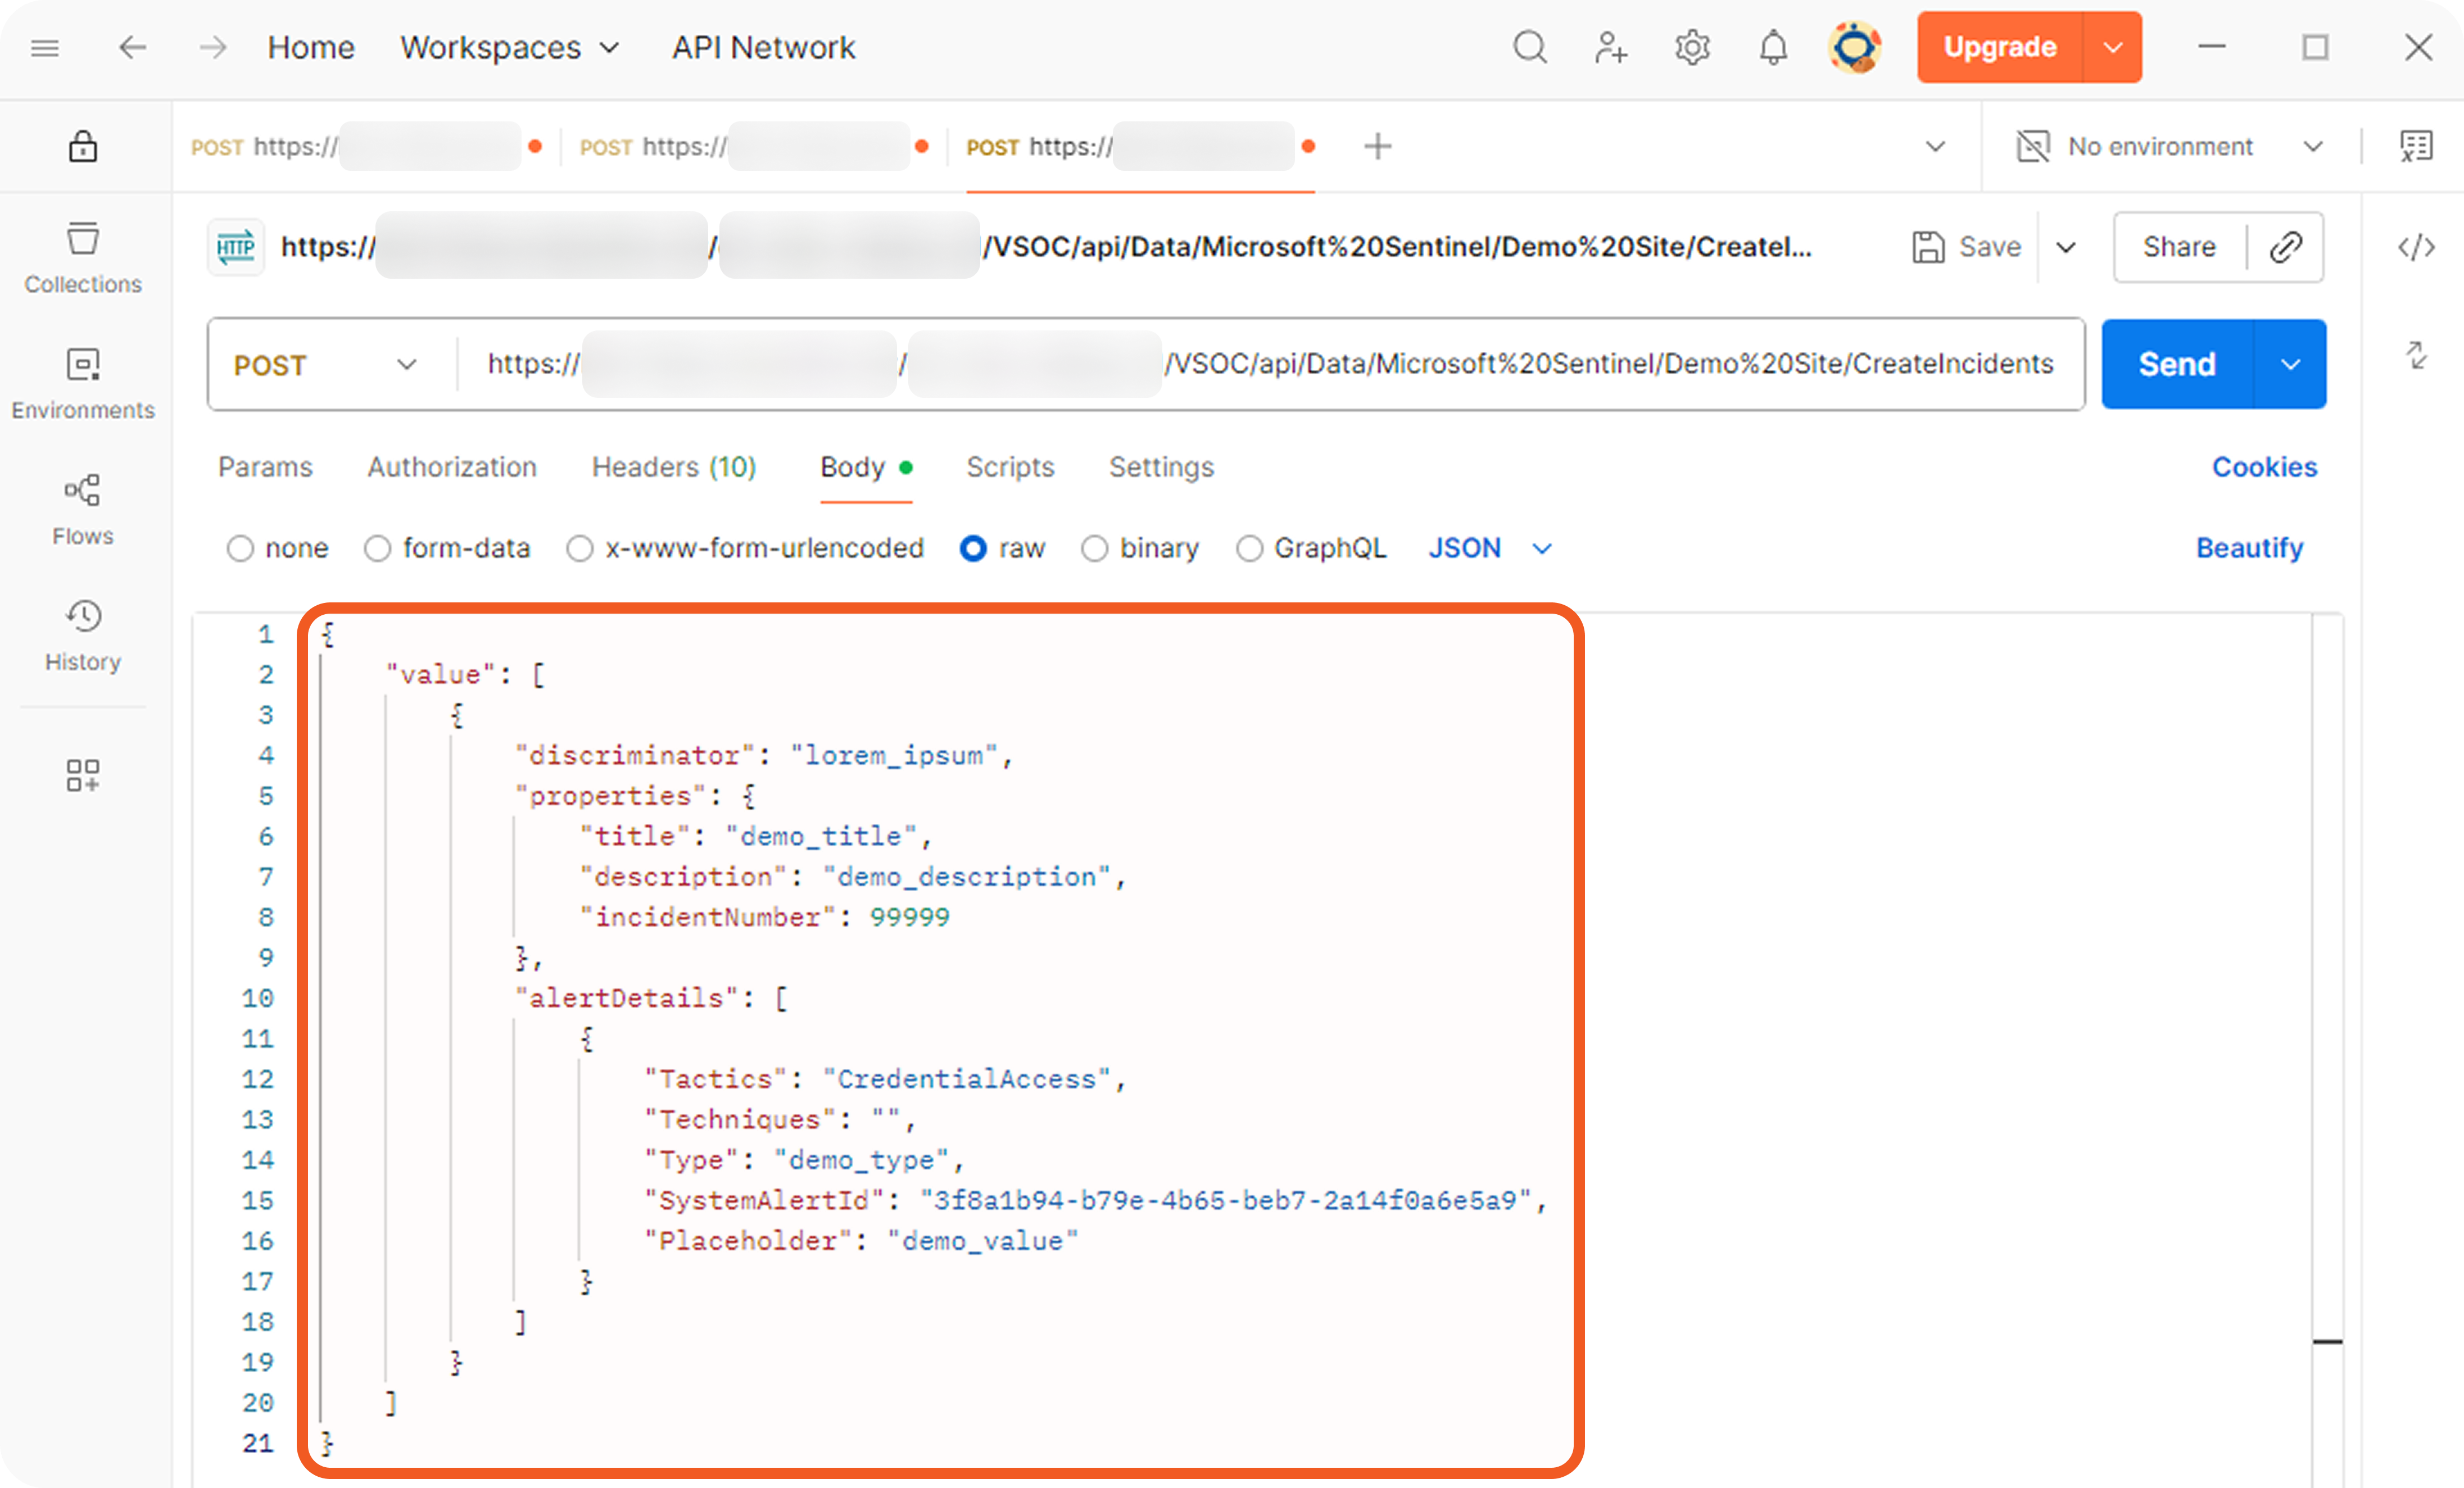
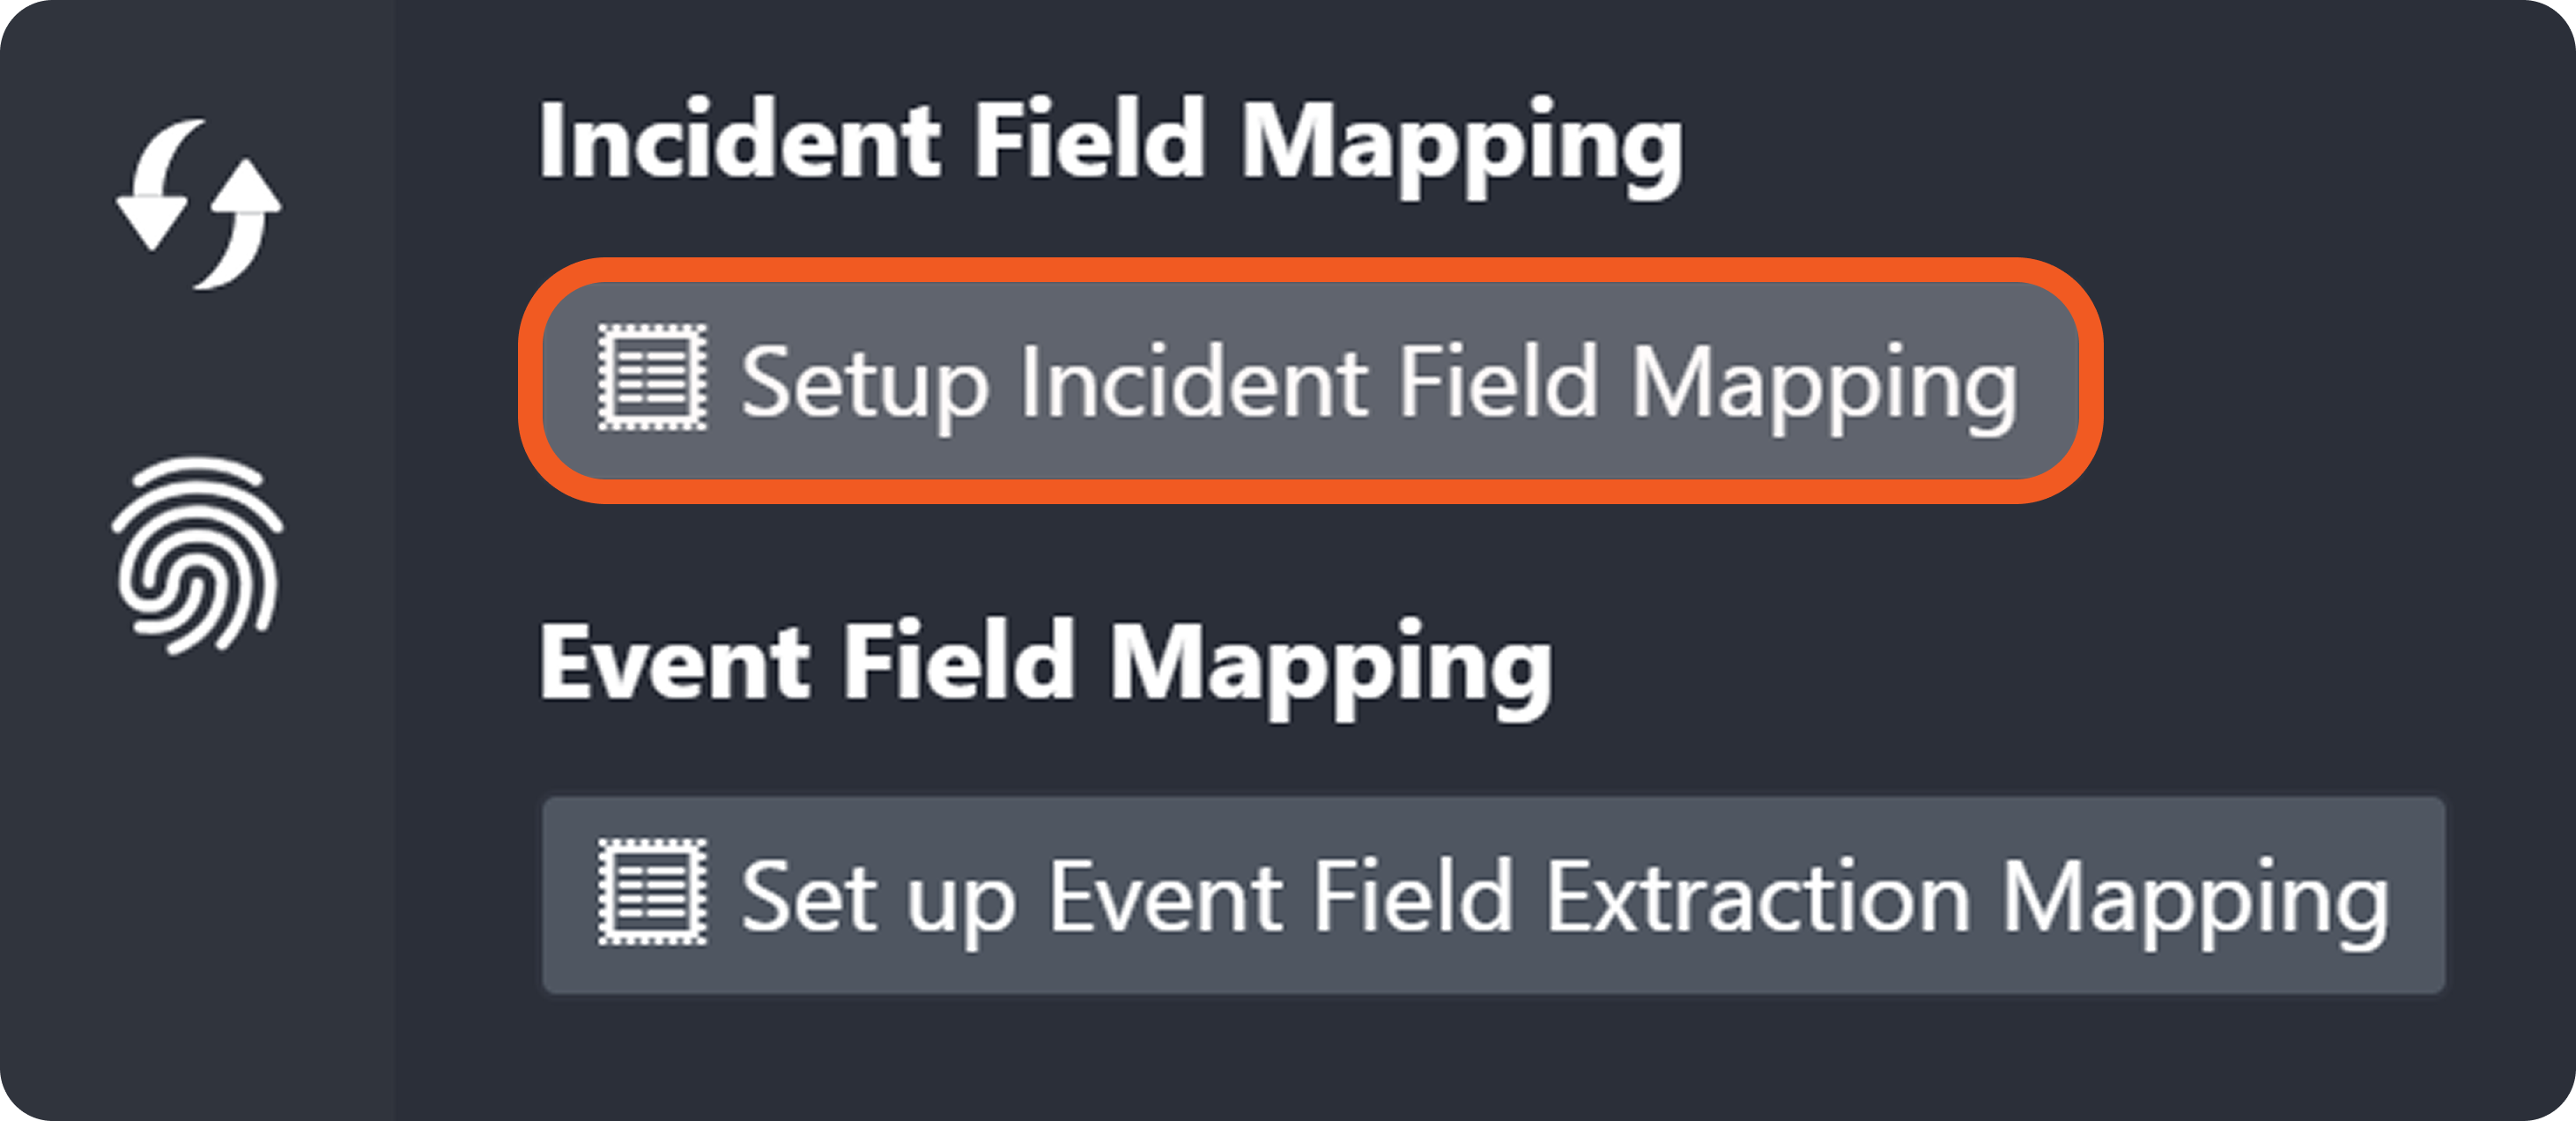
Click on the Set Up Incident Field Mapping button in D3 vSOC.
Add an incident source, within a site, using the following search string:
CODE{.discriminator}={{ipsum$}}-20250723-191208.png?inst-v=14315ac1-e236-4137-b3db-d5c917e51e5f)
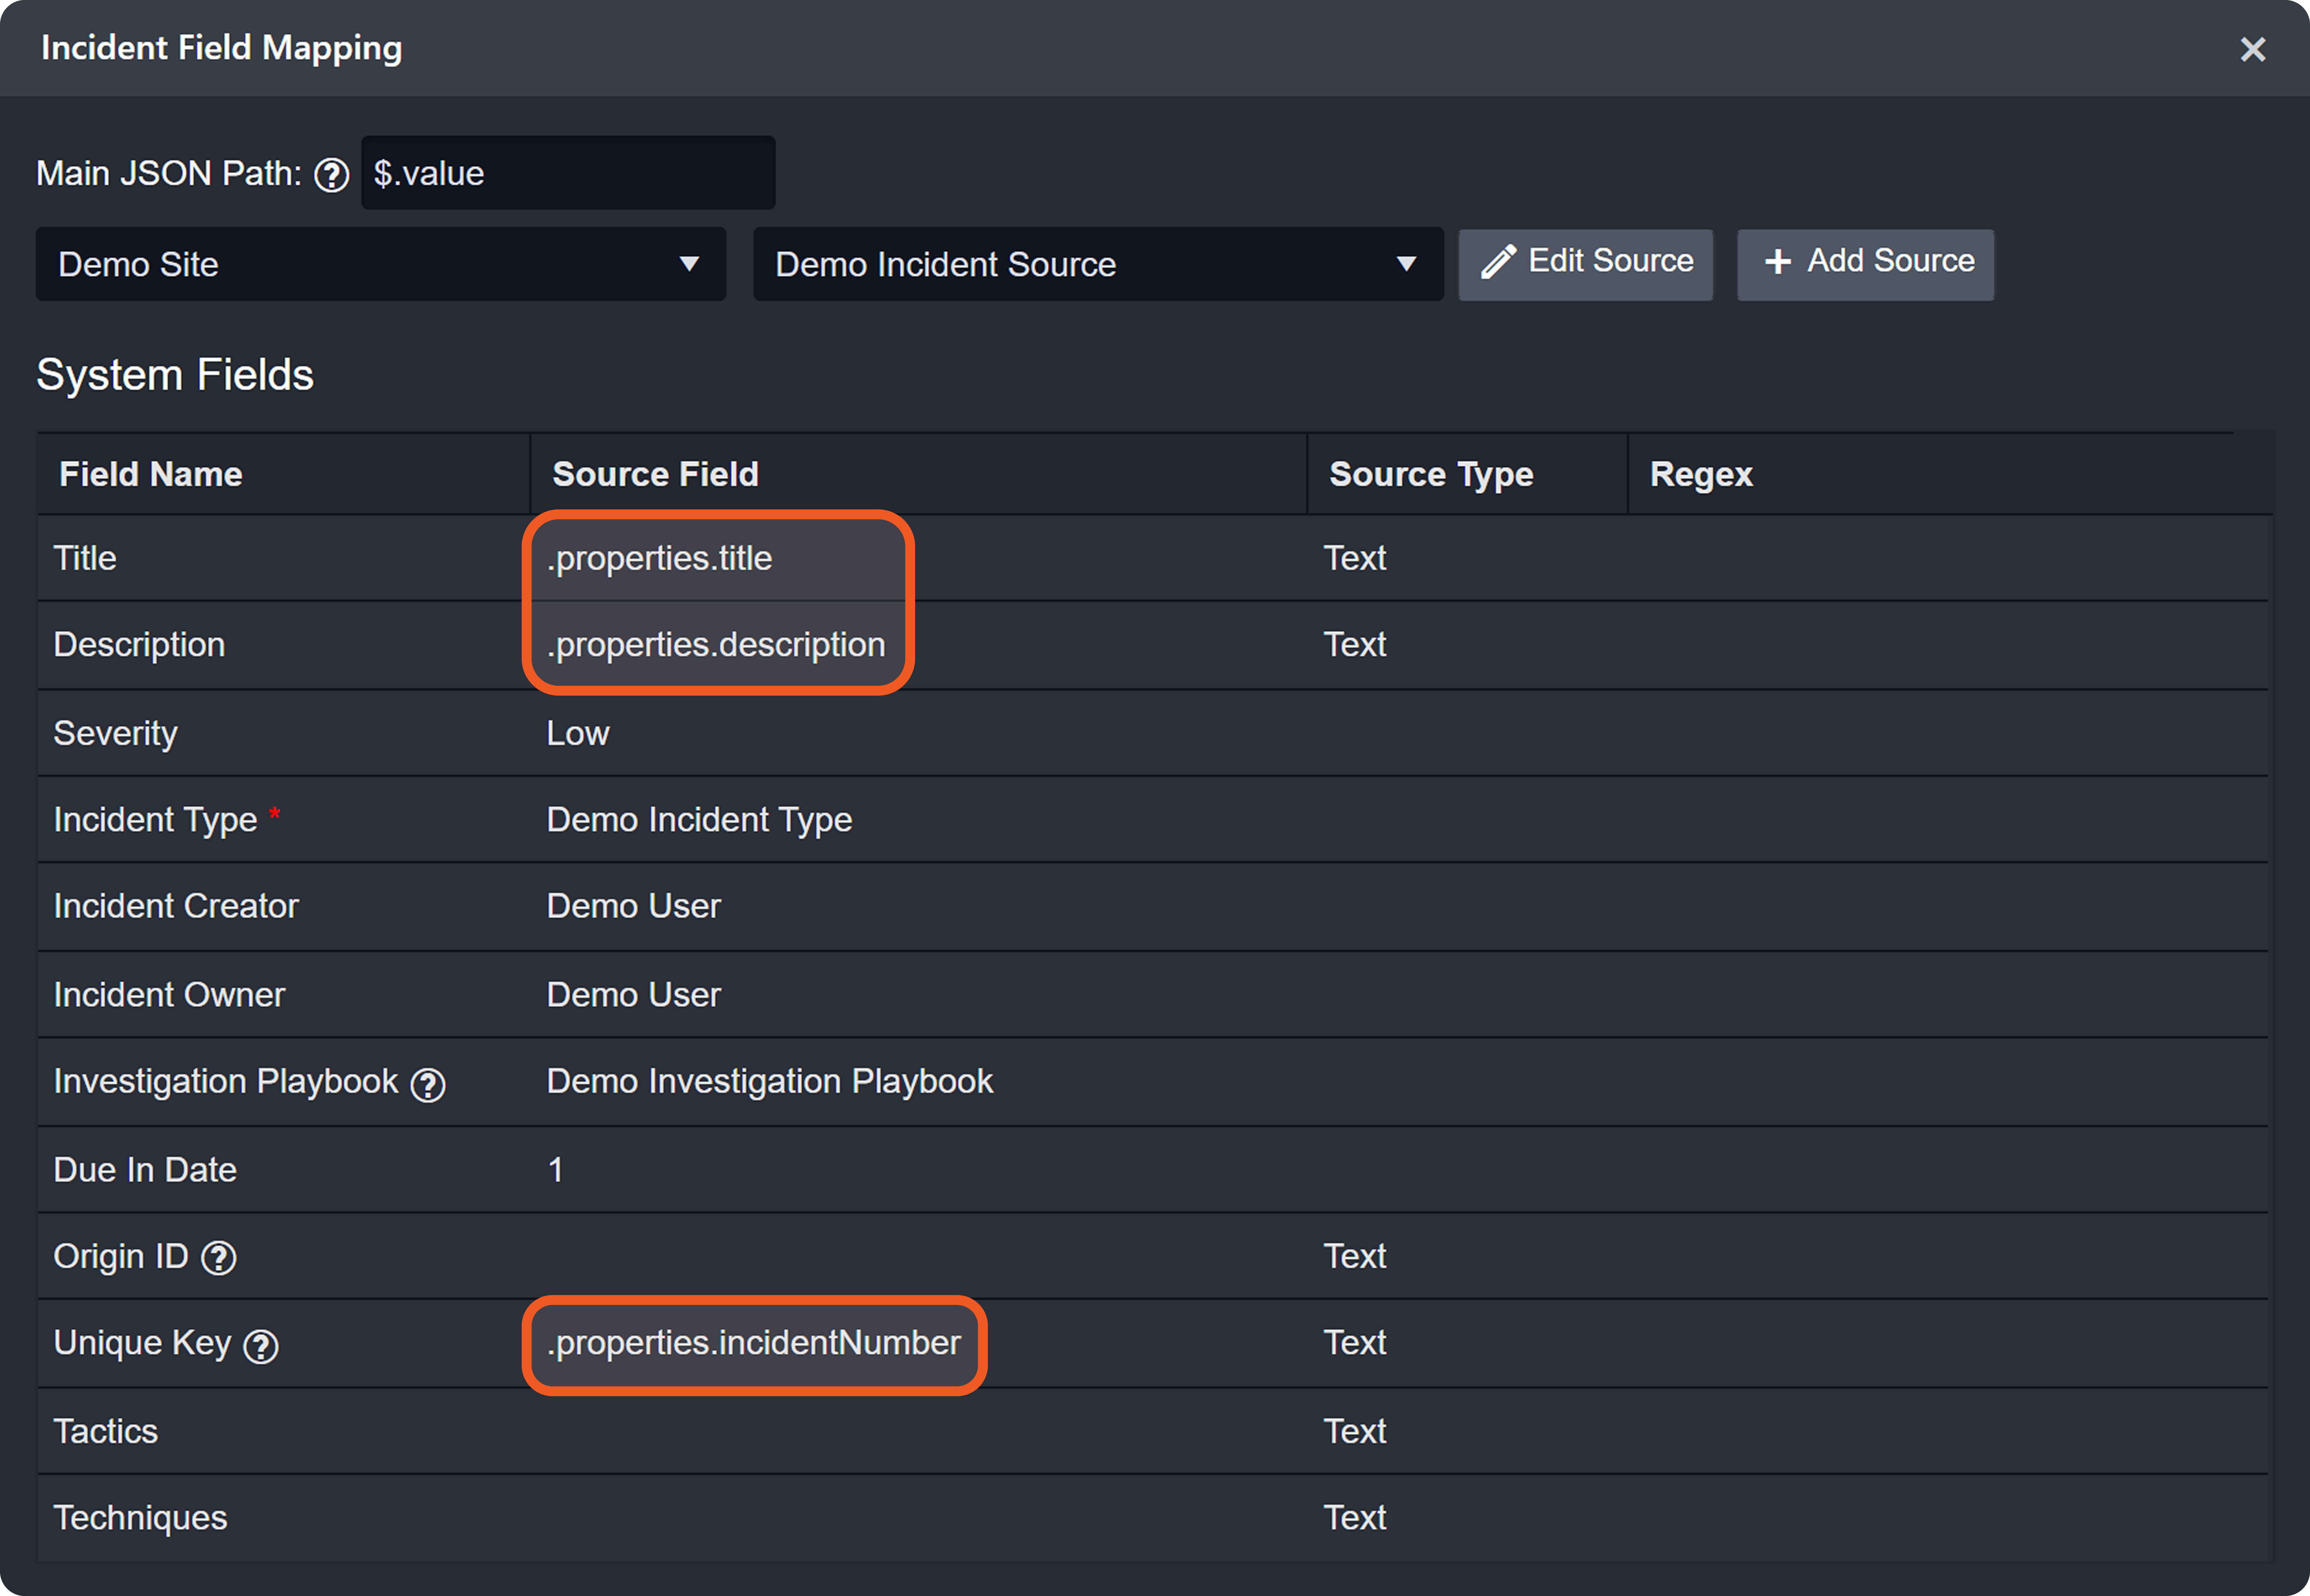
Click on and configure the following system fields.
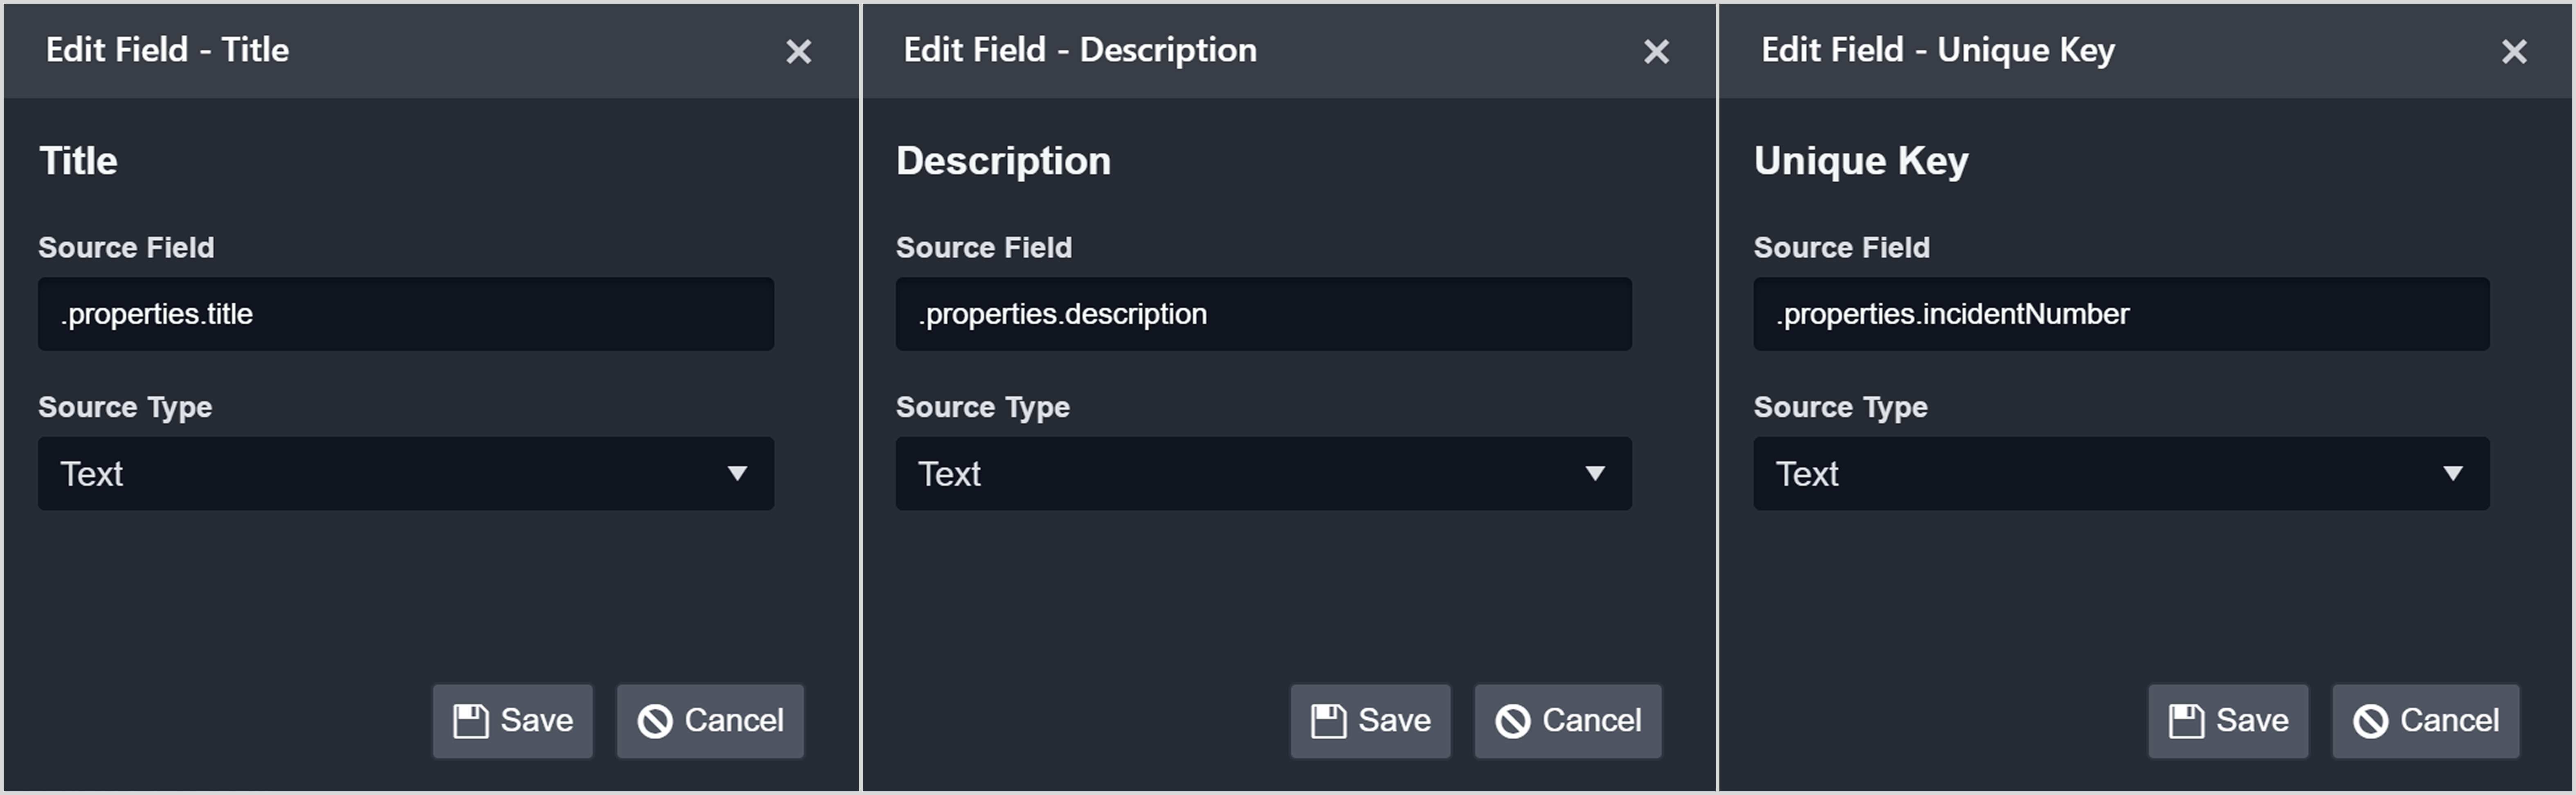
Verify that the IFM reflects the updated source fields.
Click on the Set Up Event Field Extraction Mapping button.
Set the Main Event JSONPath to $.alertDetails.
Create an event source called Demo Event Source using the following search string:
CODE{$.Type}=demo_type
This instructs the system to evaluate the $.value.alertDetails.Type key in the payload, and apply this event source when its value equals the string "demo_type".
Click on the + Add Field button to configure the following fields:
PROGRESS SUMMARY
The
valuearray serves as the entry point for the IFM.Each unique object within it (based on
incidentNumber) contains data used to generate a D3 incident.Three IFMs are configured.
The
alertDetailsarray serves as the entry point for the EFM.Each unique object within it (based on
SystemAlertId) contains data used to generate a D3 event.Four EFMs are configured.
A user-defined
Demo Keymapping field is set to extract D3 event data from the path $.value.alertDetails.Placeholder.
Send the POST request prepared in step 5.

Verify that a D3 incident was created in the Data Ingestion module, noting the IncidentNo value.
Navigate to the Investigation Dashboard page.
Select the site in which the API key was generated in step 3.
Locate the incident by its unique incident number from step 15, then select it to view details.
Verify that the incident workspace reflects the two other values configured in step 9.
Click on the Events sidebar navigation icon, then click on the event row entry.
Verify that the four values configured in step 13 are displayed.

Order Priority
When search strings from different sources simultaneously match different key-value pairs in the ingested JSON payload, the Order Priority field determines which match takes precedence.
The (Default Event Source) mappings apply regardless of Order Priority.
Only one non-default event source applies per post-ingestion pipeline execution.
Search strings from multiple event sources may match fields within the same payload.
The source with the lower Order Priority takes precedence.
If priorities are equal, the source created first takes precedence.
OBJECTIVE – Understand the effect of order priority when search strings from different sources simultaneously match different key-value pairs in the ingested JSON payload.
Create the following two event sources, each configured with the default Order Priority value.
SEARCH STRING 1
CODE{$.discriminator1}=value1SEARCH STRING 2
CODE{$.discriminator2}=value2Prepare the following payload for ingestion:
 JSON
JSON{ "results": [ { "id": "902", "discriminator1": "value1", "discriminator2": "value2", "target0": "(Default Event Source) matched", "target1": "Demo Event Source 1 matched", "target2": "Demo Event Source 2 matched" } ] }Add the following field mappings:
(Default Event Source):
Demo Event Source 1:

Demo Event Source 2:

Send the POST request.
Verify that an event was created in the Data Ingestion module.
Note the eventId number.
Navigate to the Investigation Dashboard page.
Select the site in which the API key was generated.
Locate the event with an ID matching the one observed in step 6, then click on the event to view its details.
Verify that the Unique Event Key matches the id specified in step 2, and that both the mappings for the (Default Event Source) and Demo Event Source 1 are displayed.
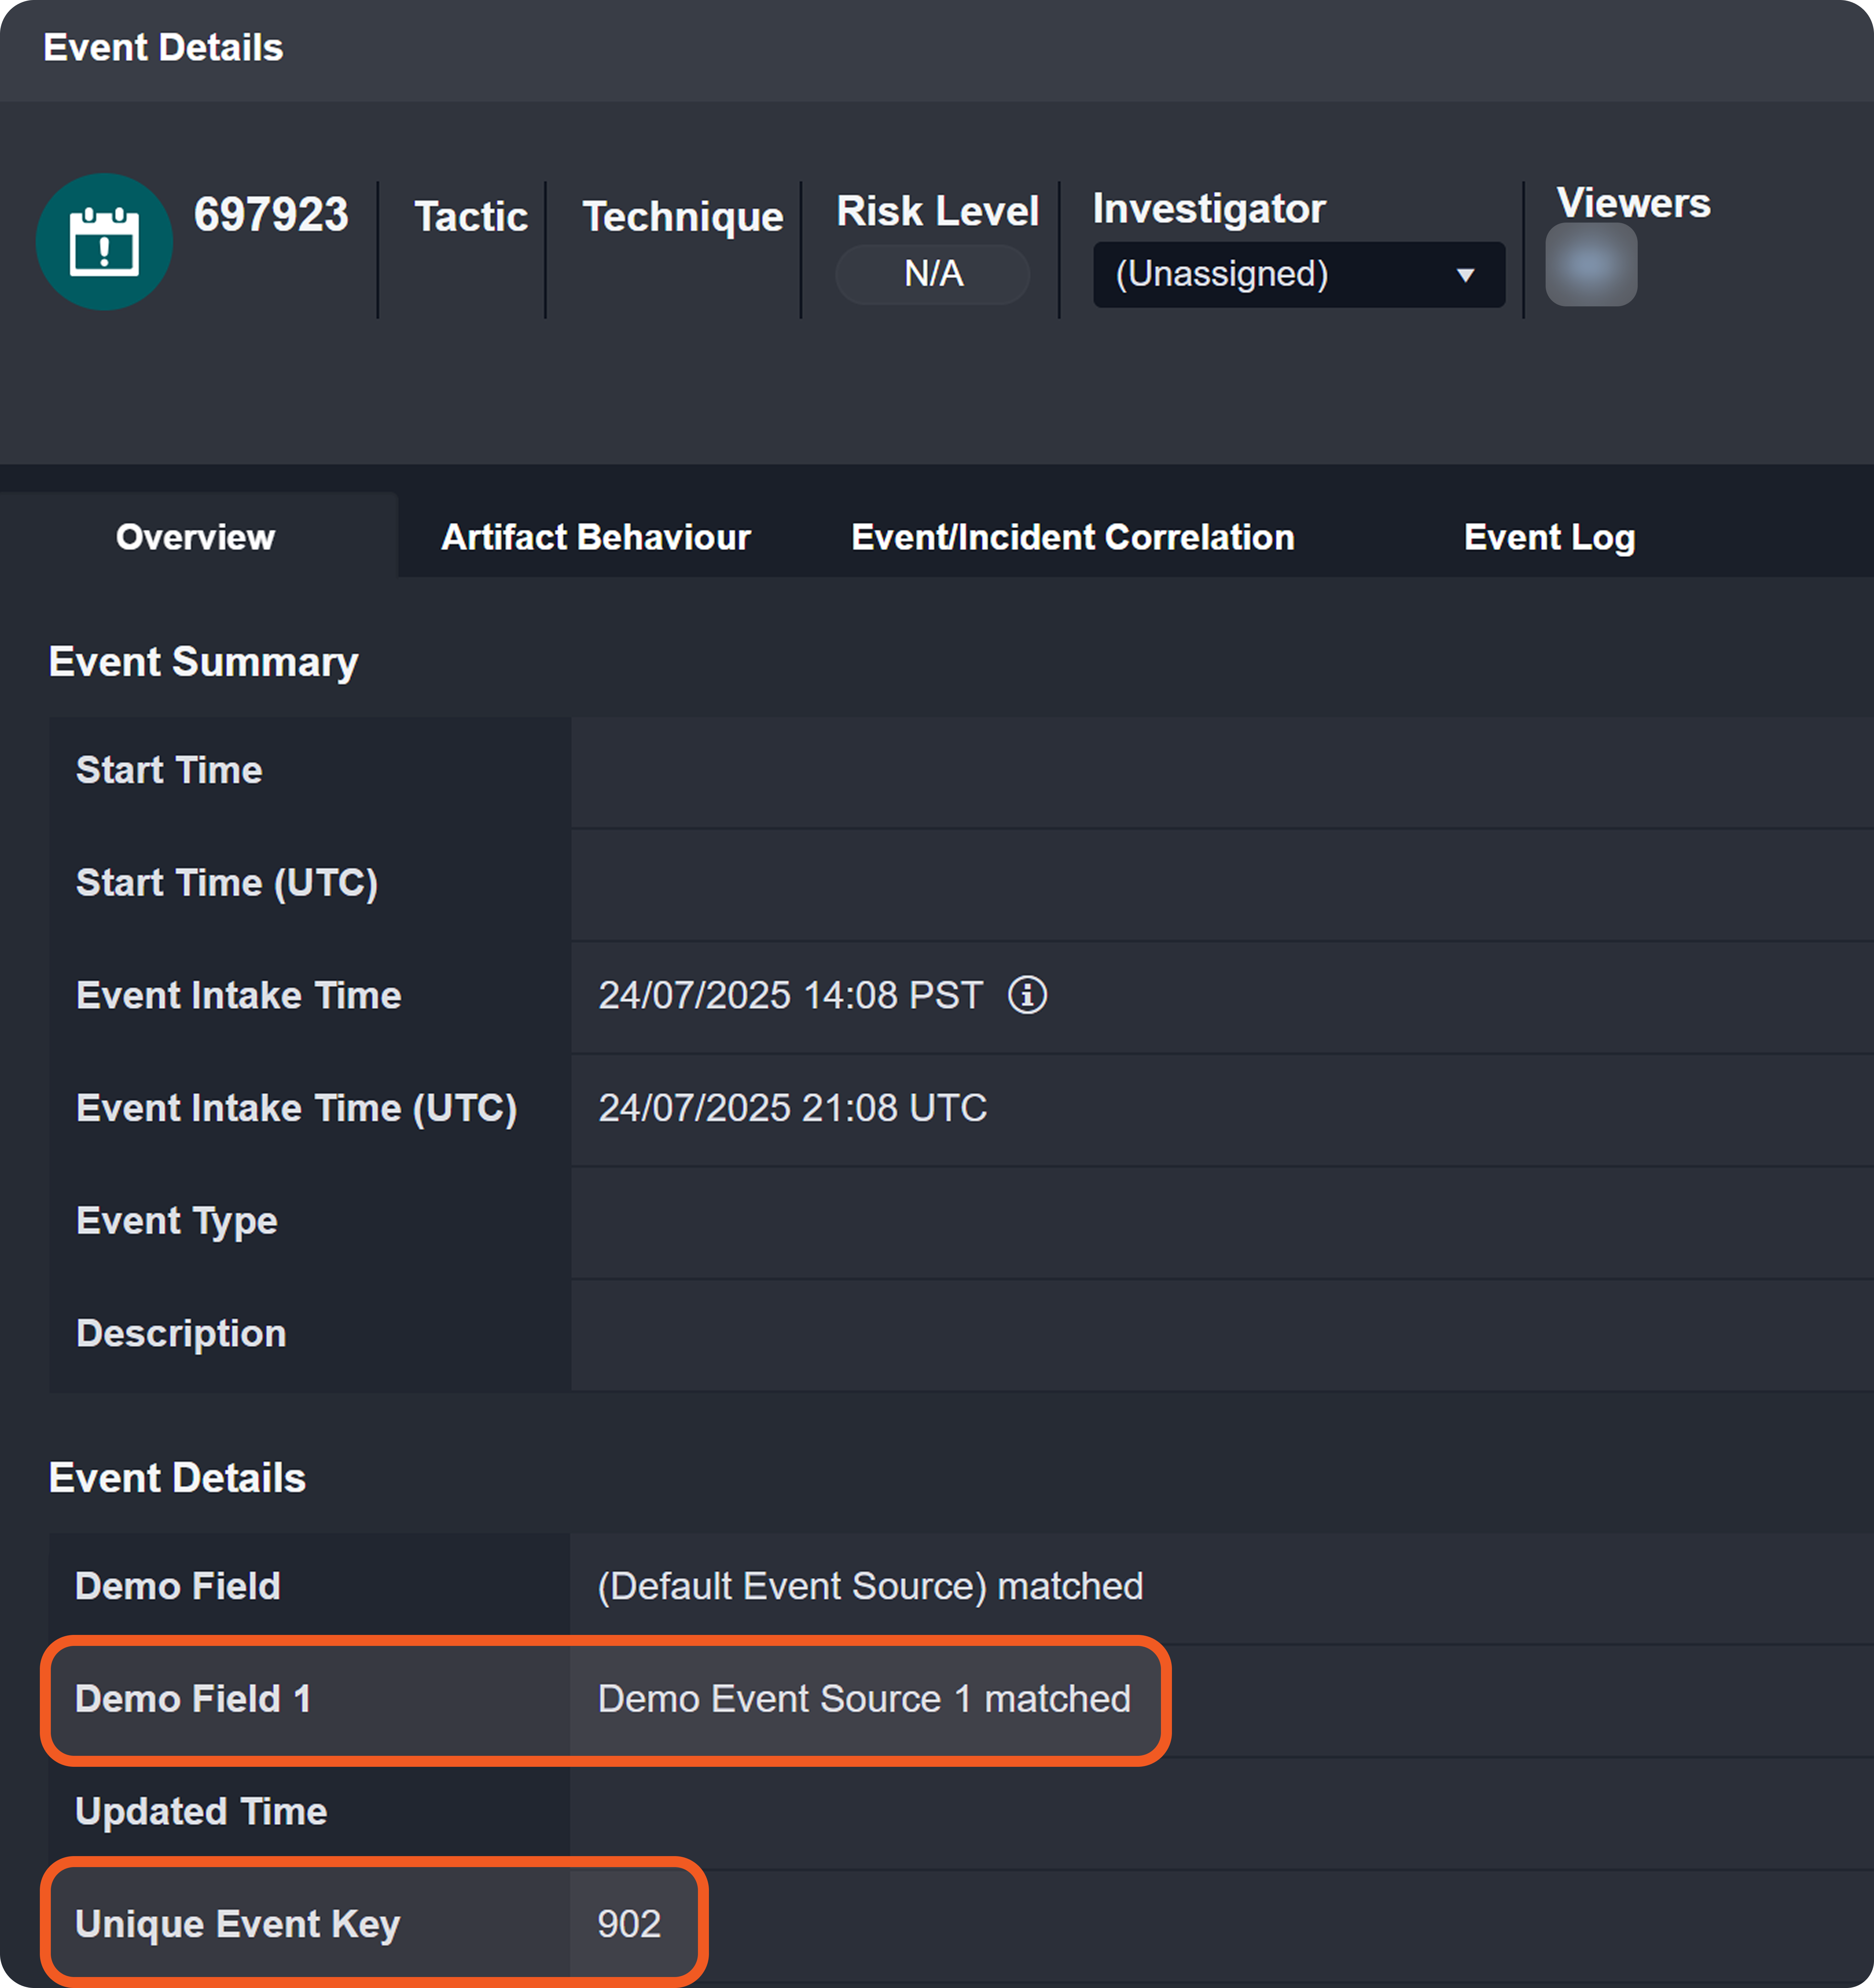
Demo Event Source 1 matched because it was created first in step 3.
Modify the Order Priority of Demo Event Source 1 to a value that is lower than that of Demo Event Source 2.

Change the
idfield in the payload in Postman to a new, previously unused value.-20250724-223443.png?inst-v=14315ac1-e236-4137-b3db-d5c917e51e5f)
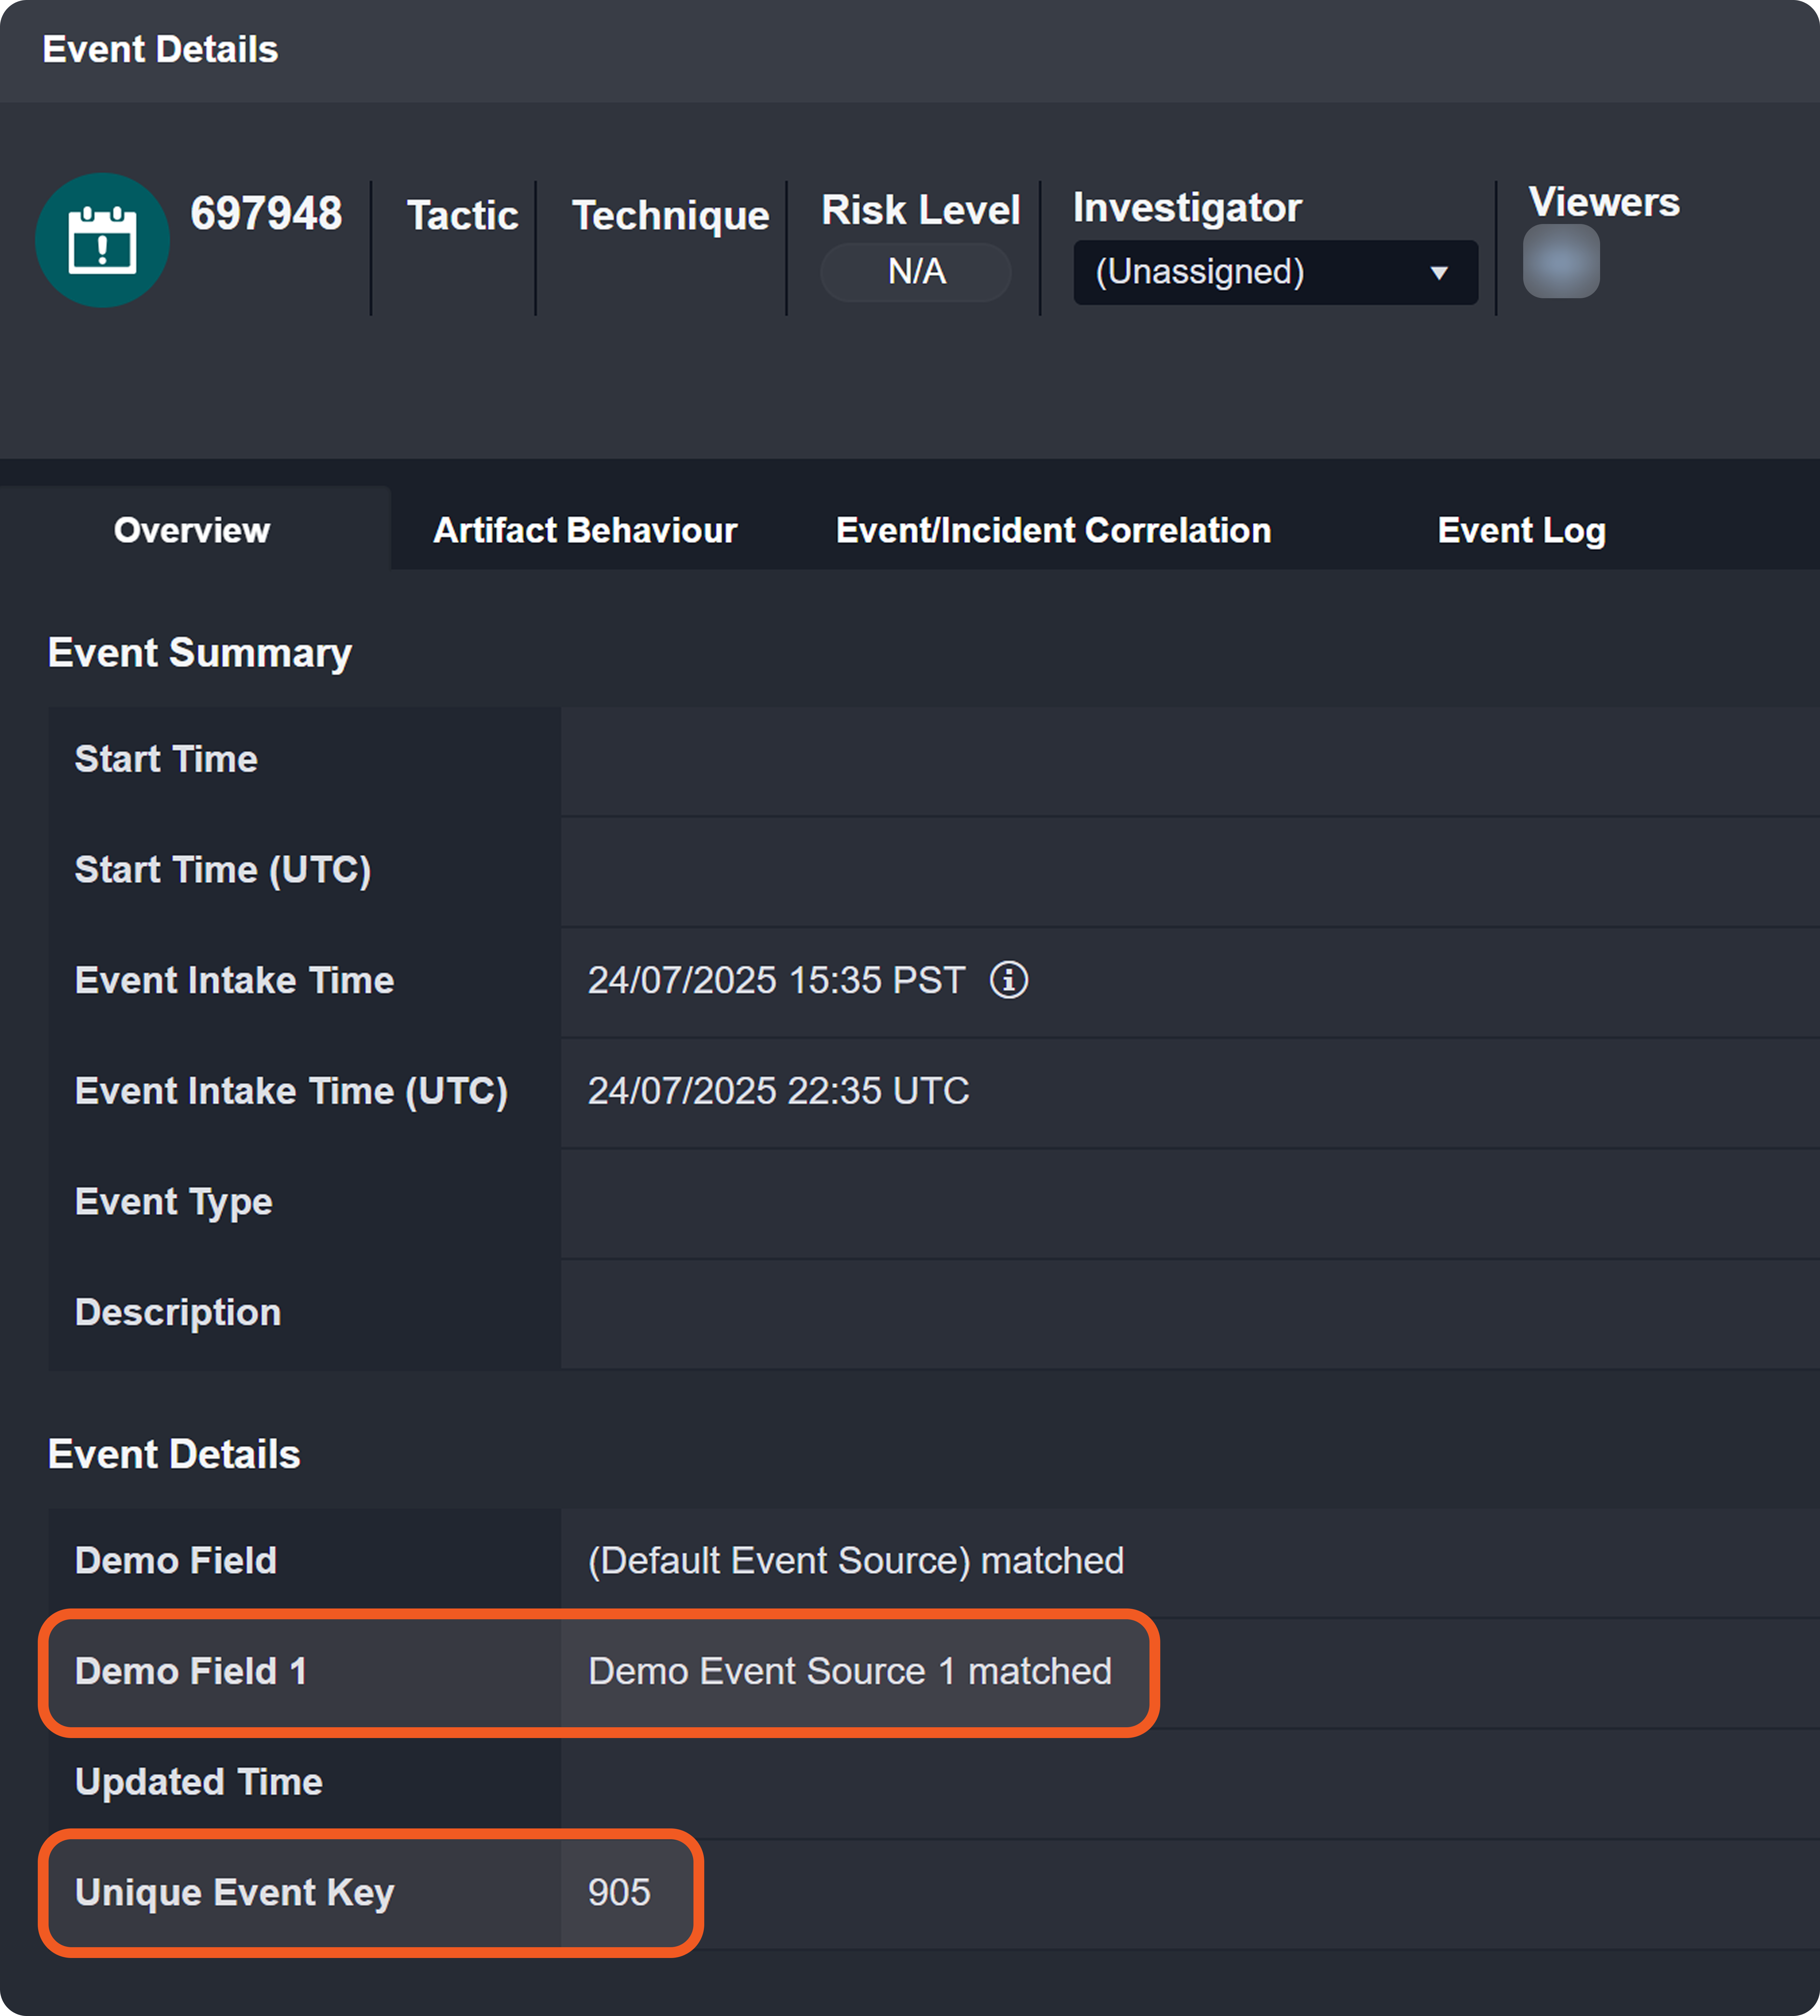
Repeat steps 4-9 for the newly ingested data.
Verify that the Unique Event Key matches the id specified in step 12, and that, again, both the mappings for the (Default Event Source) and Demo Event Source 1 are displayed.
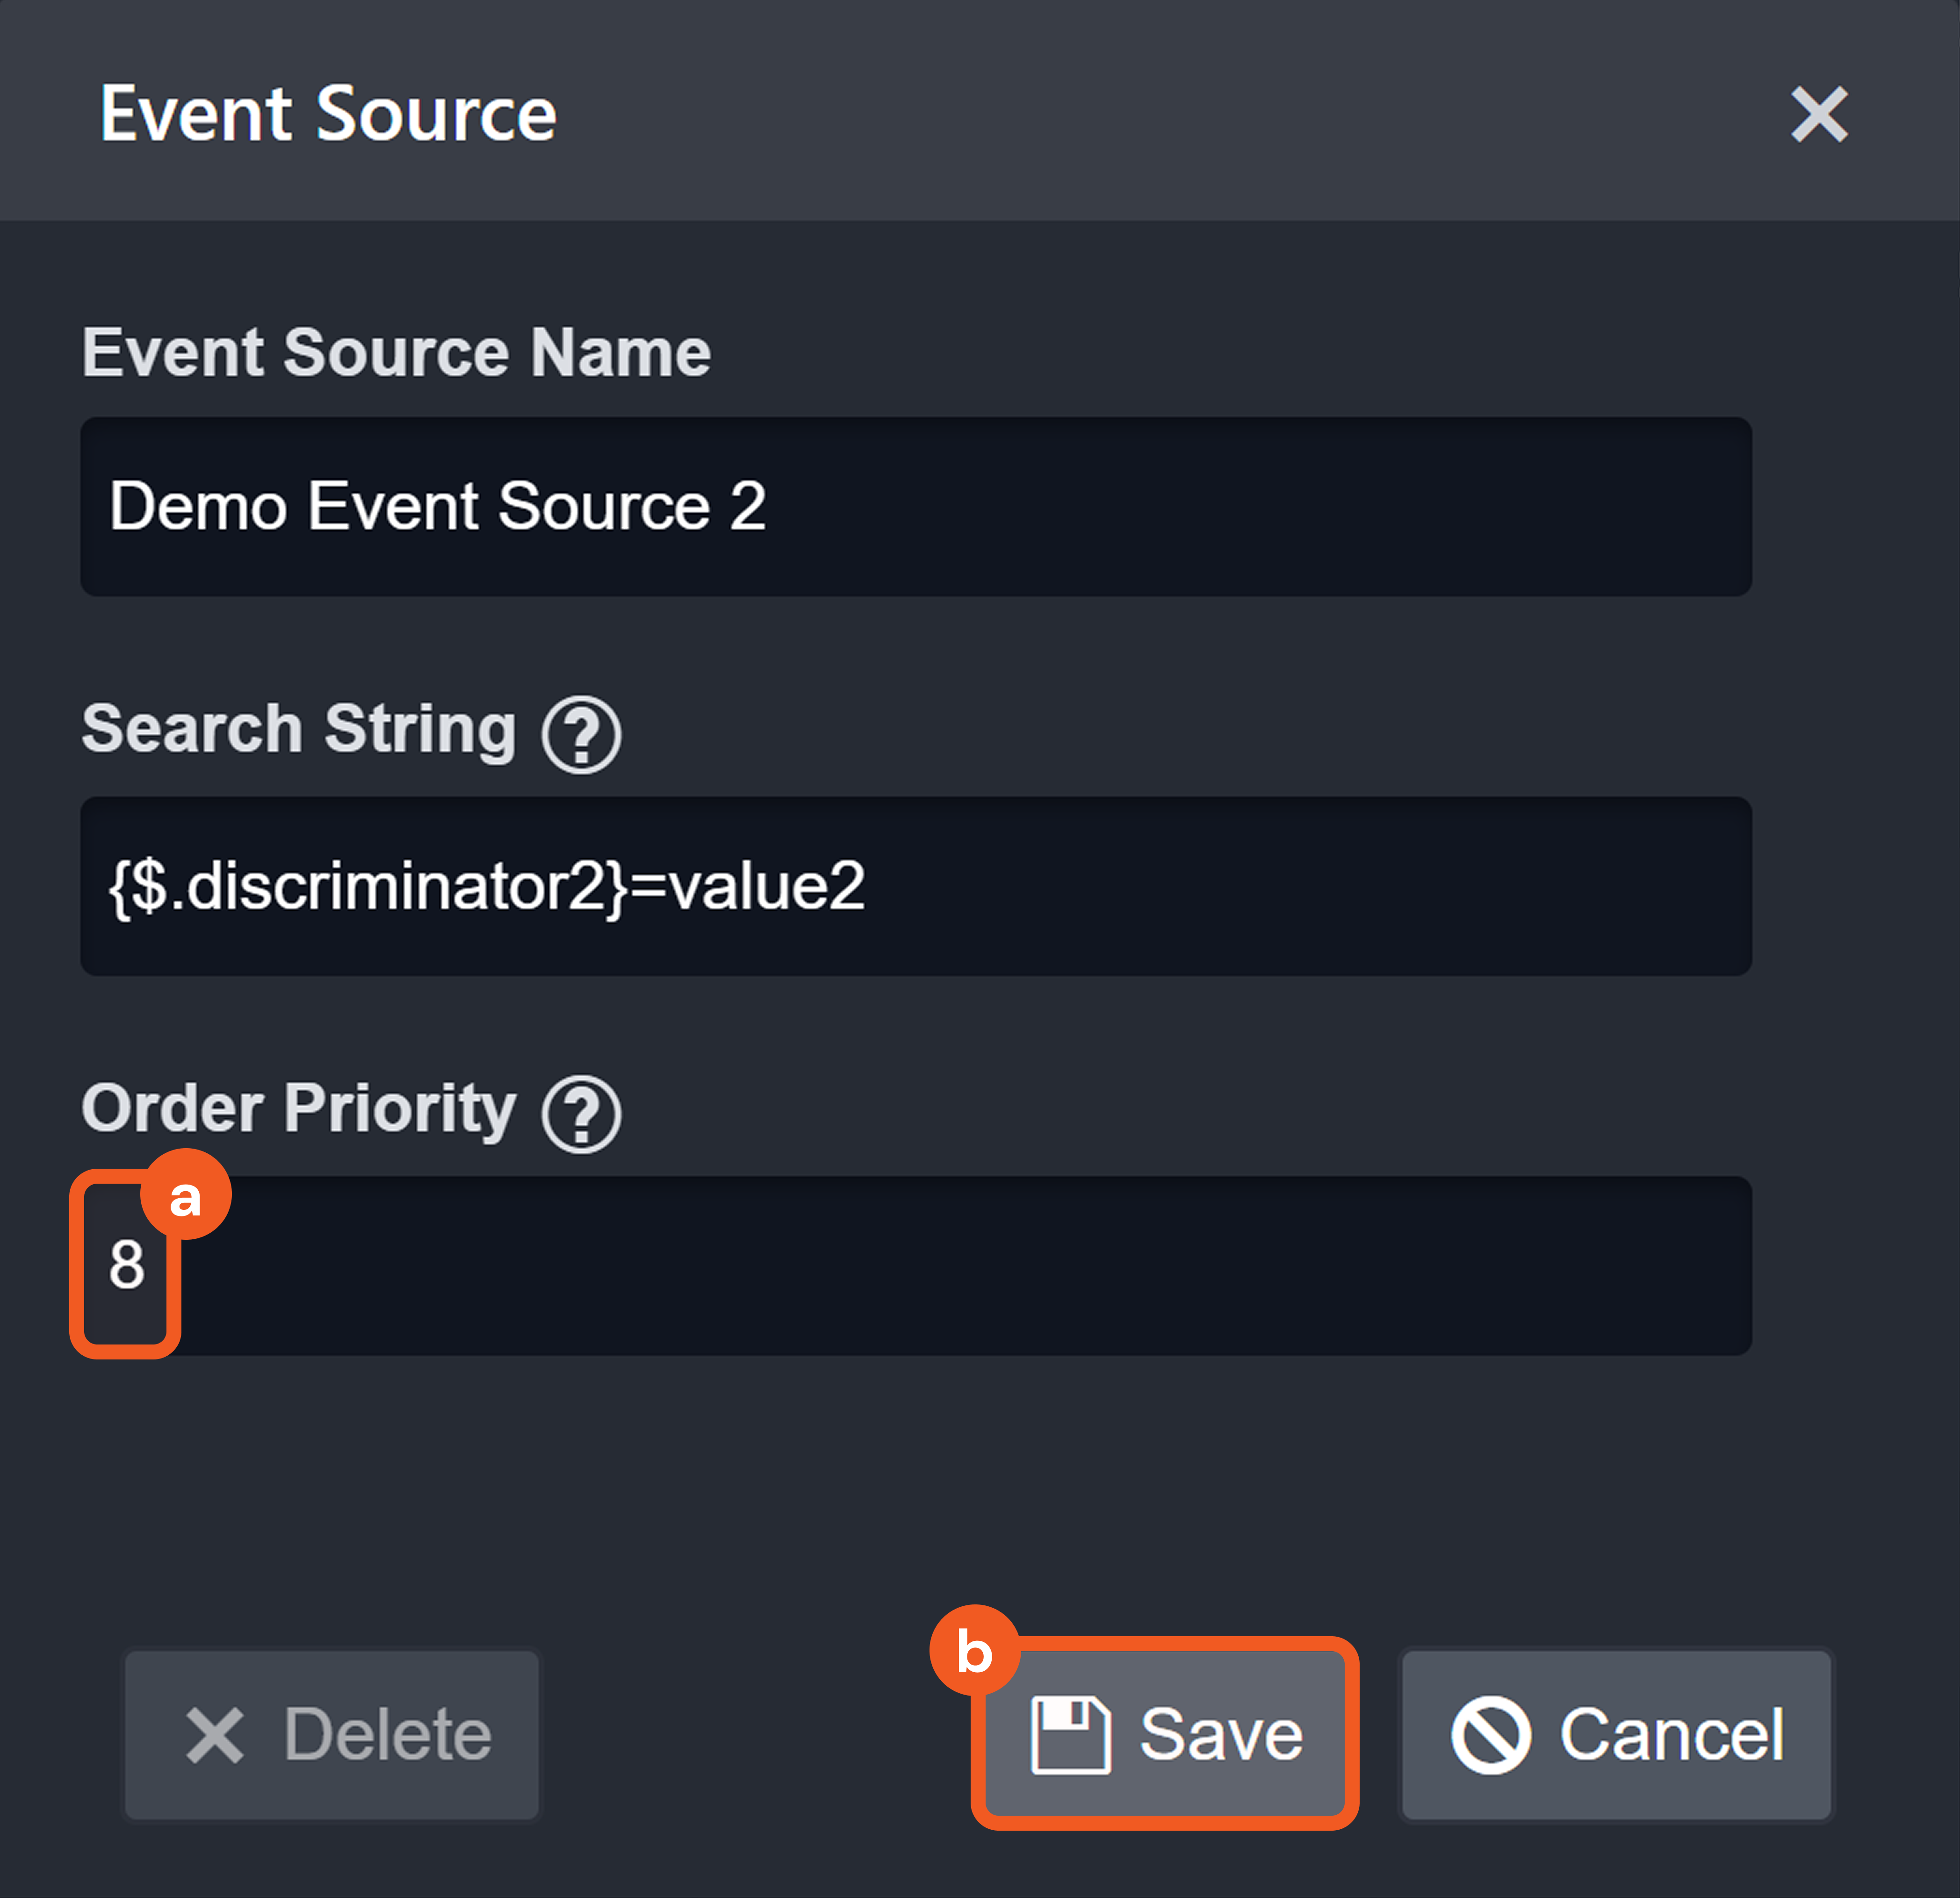
Modify the Order Priority of Demo Event Source 2 to a value that is lower than that of Demo Event Source 1.
Change the
idfield in the payload in Postman to a new, previously unused value.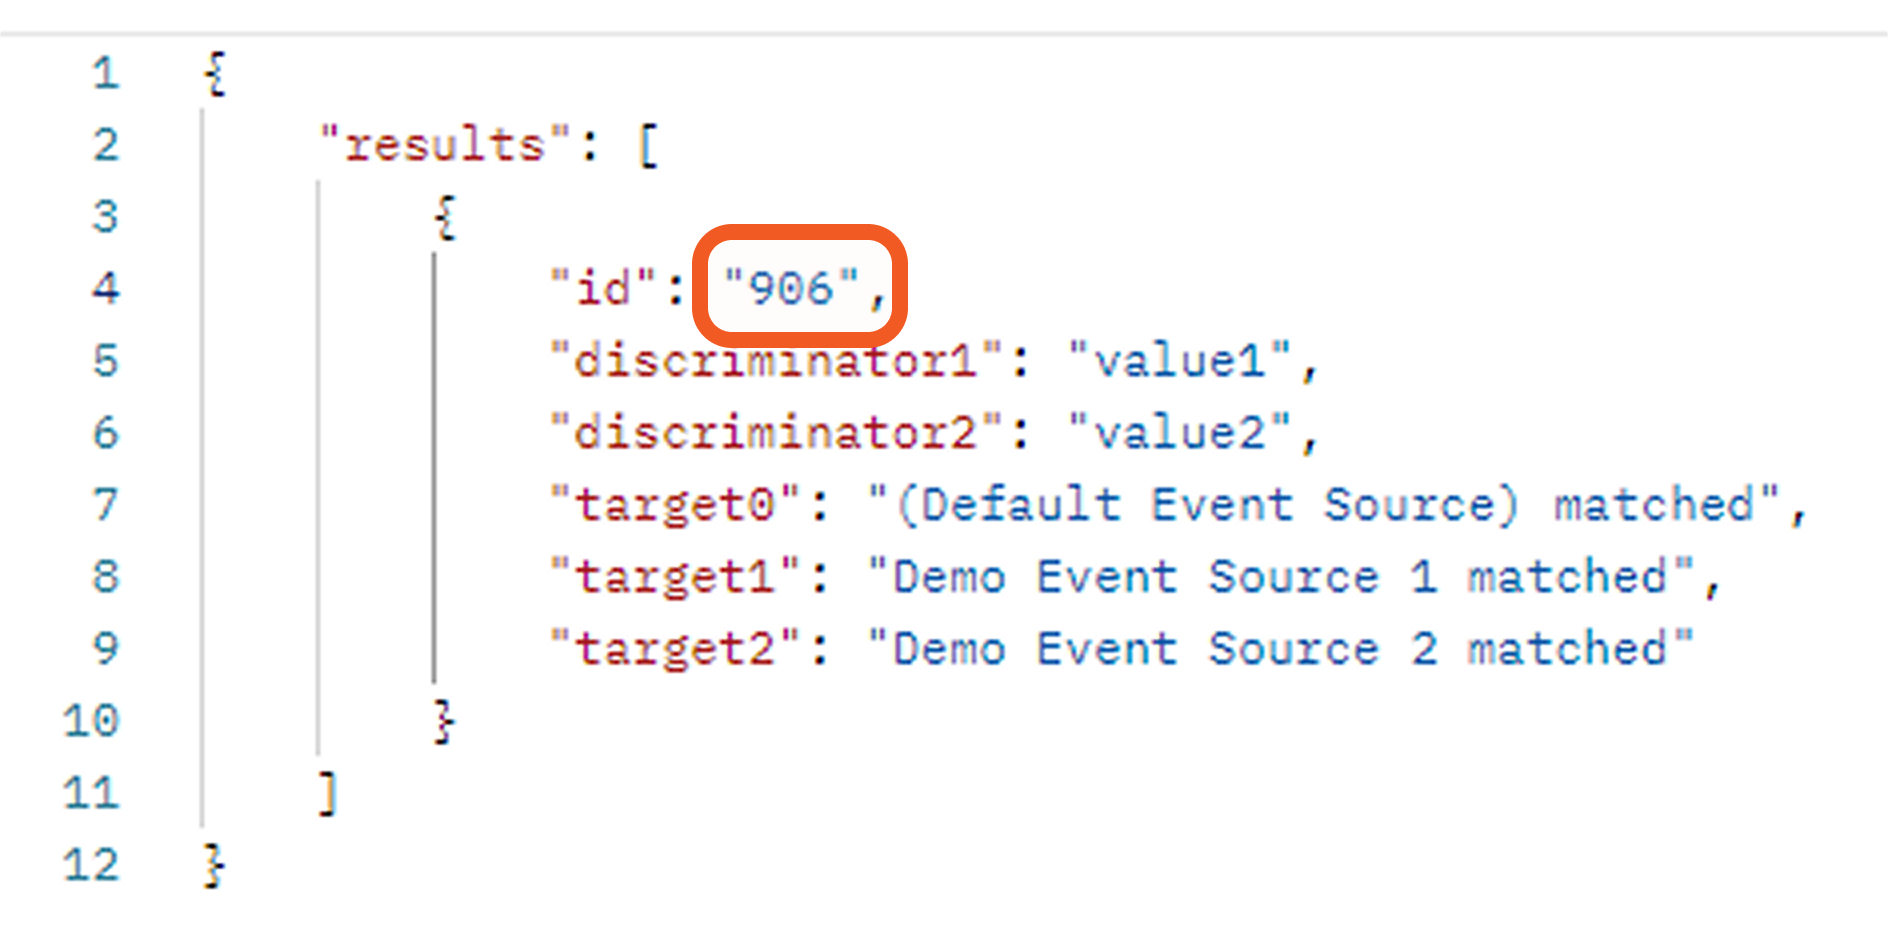
Repeat steps 4-9 for the newly ingested data.
Verify that the Unique Event Key matches the id specified in step 16, and that both the mappings for the (Default Event Source) and Demo Event Source 2 are displayed.