.png)
Triggers
LAST UPDATED: JAN 7, 2024
Overview
Next-generation playbooks introduce the ability to add and remove triggers as needed, replacing the previous default inclusion of all triggers on the initial playbook node. Additionally, new trigger options have been added to support more varied workflows.
Adding a Trigger
Triggers can now be added individually based on user requirements and preferences.
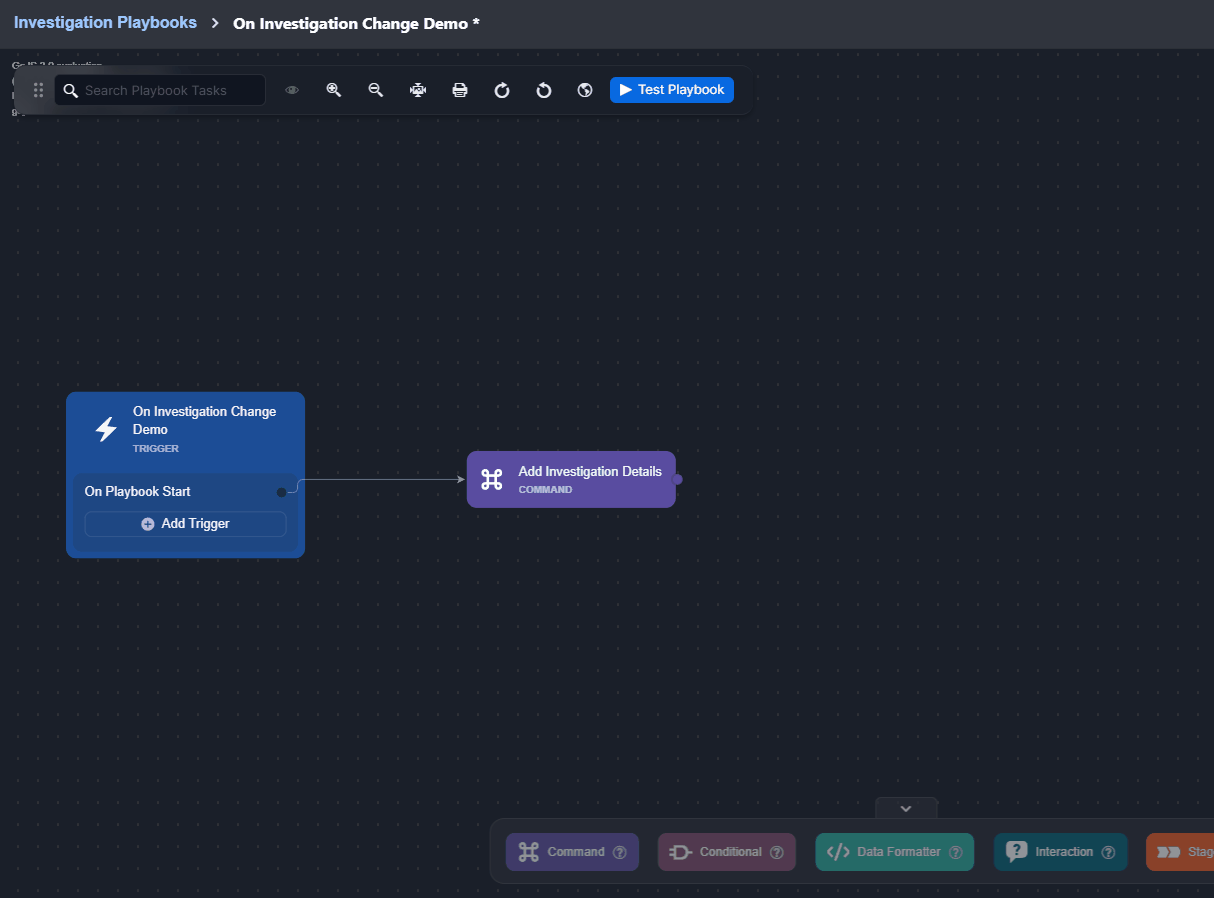
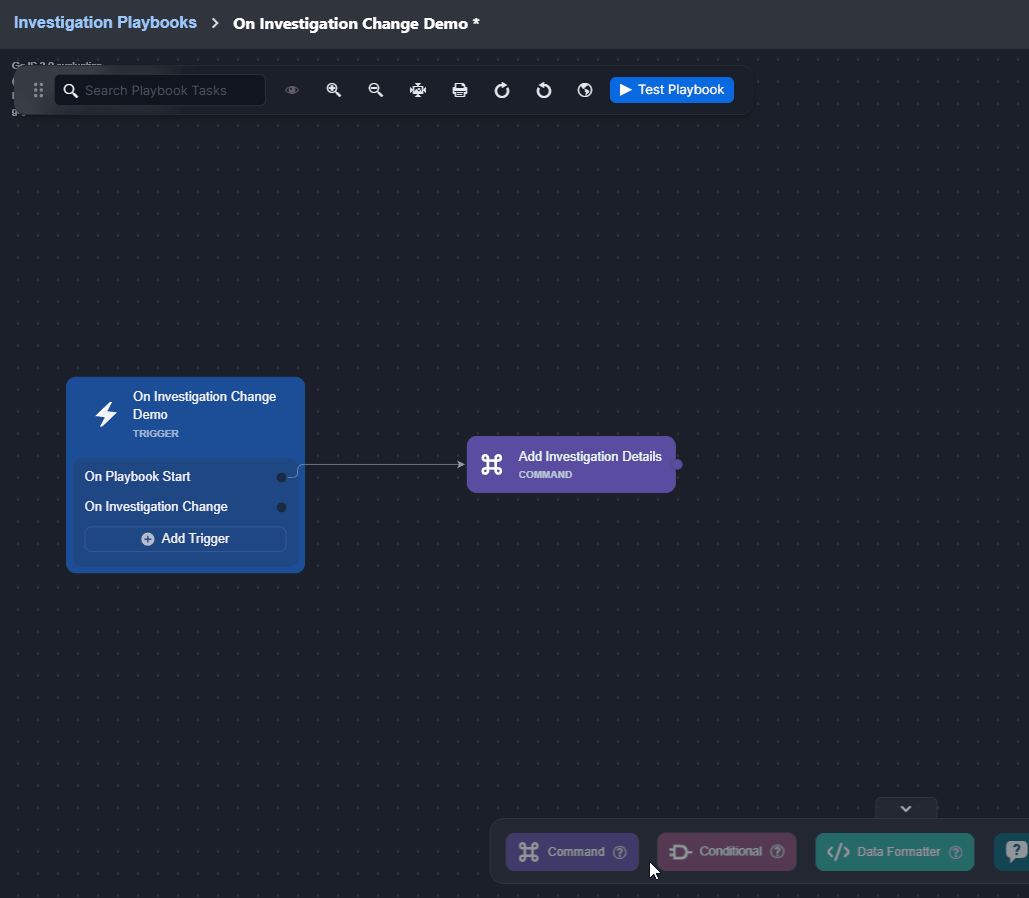
Adding a Trigger to an Investigation Playbook
READER NOTE
The On Playbook Start trigger is included by default.
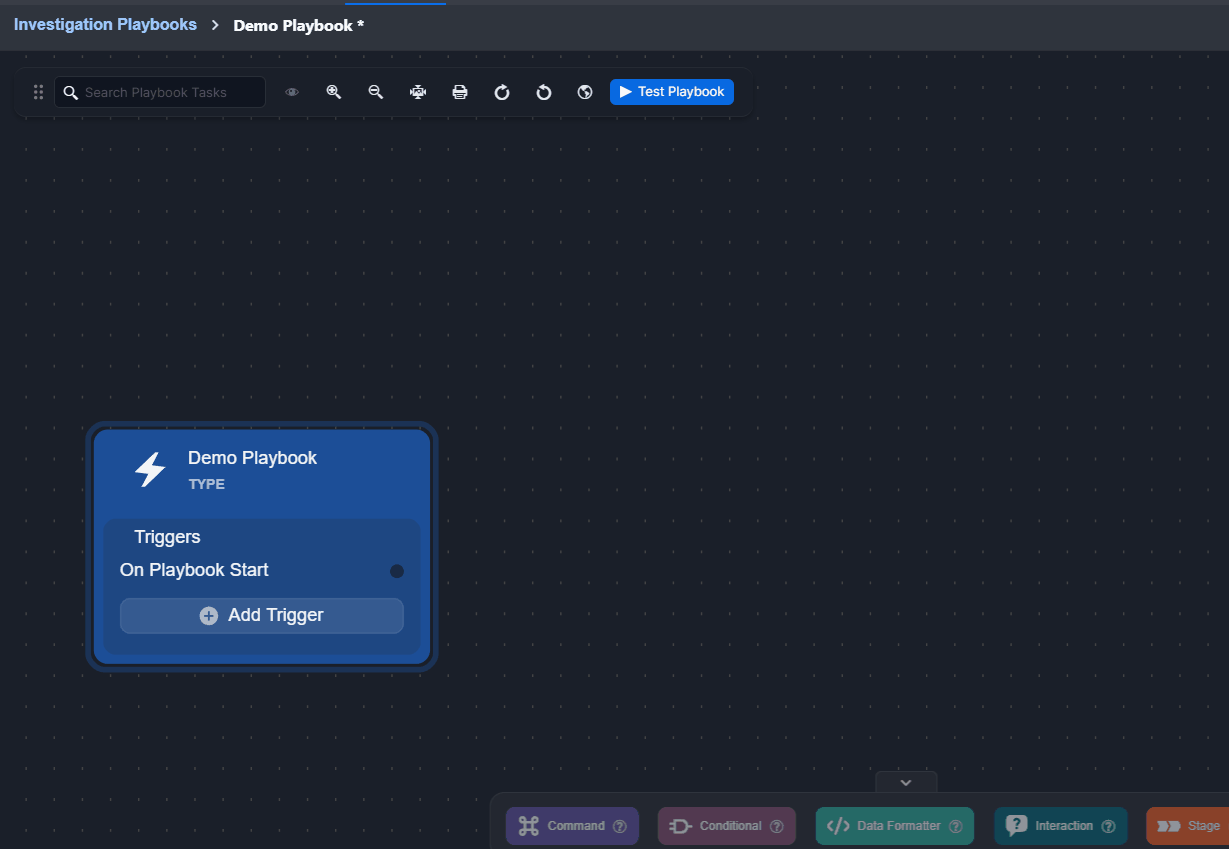
Click on the + Add Trigger button.
Select a trigger.
Click on the Add Trigger button.
Adding a Trigger to a Preprocessing Playbook
READER NOTE
The On Event Ingestion trigger is included by default.
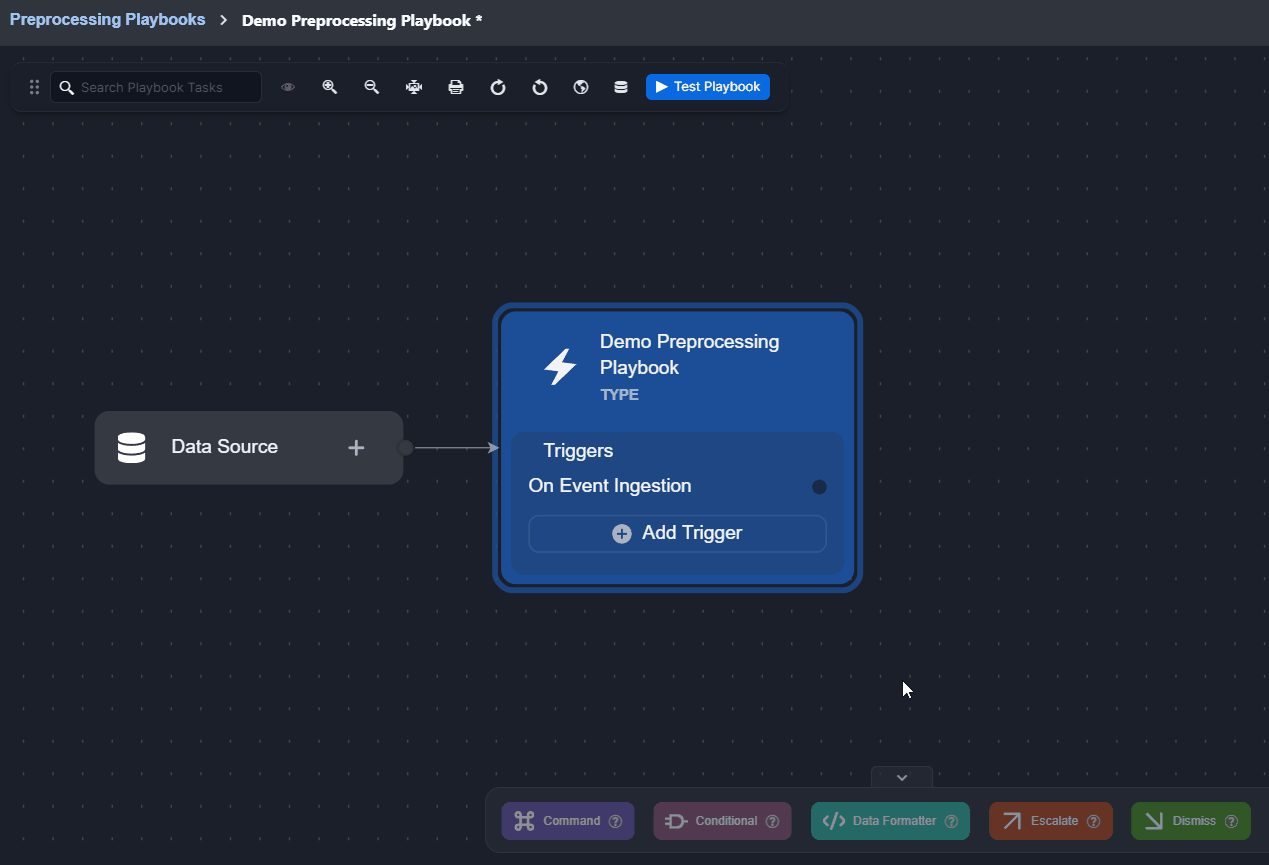
Click on the Add Trigger button.
Select a trigger.
Click on the Add Trigger button.
Deleting a Trigger
For both preprocessing and investigation playbooks, triggers can be deleted using the Delete Trigger button that pops up upon clicking on a trigger.
Click on the trigger to delete.
Click on the Delete Trigger button.
Click on the Yes button to confirm deletion.
READER NOTE
Triggers can be deleted unless they are depended by other nodes. In such cases, deletion can be handled in one of two ways:
Delete the dependent node(s) first.
Remove the linking arrow, leaving orphan nodes.
New Triggers
New trigger options have been added to both preprocessing and investigation playbooks, allowing support for more varied workflows.
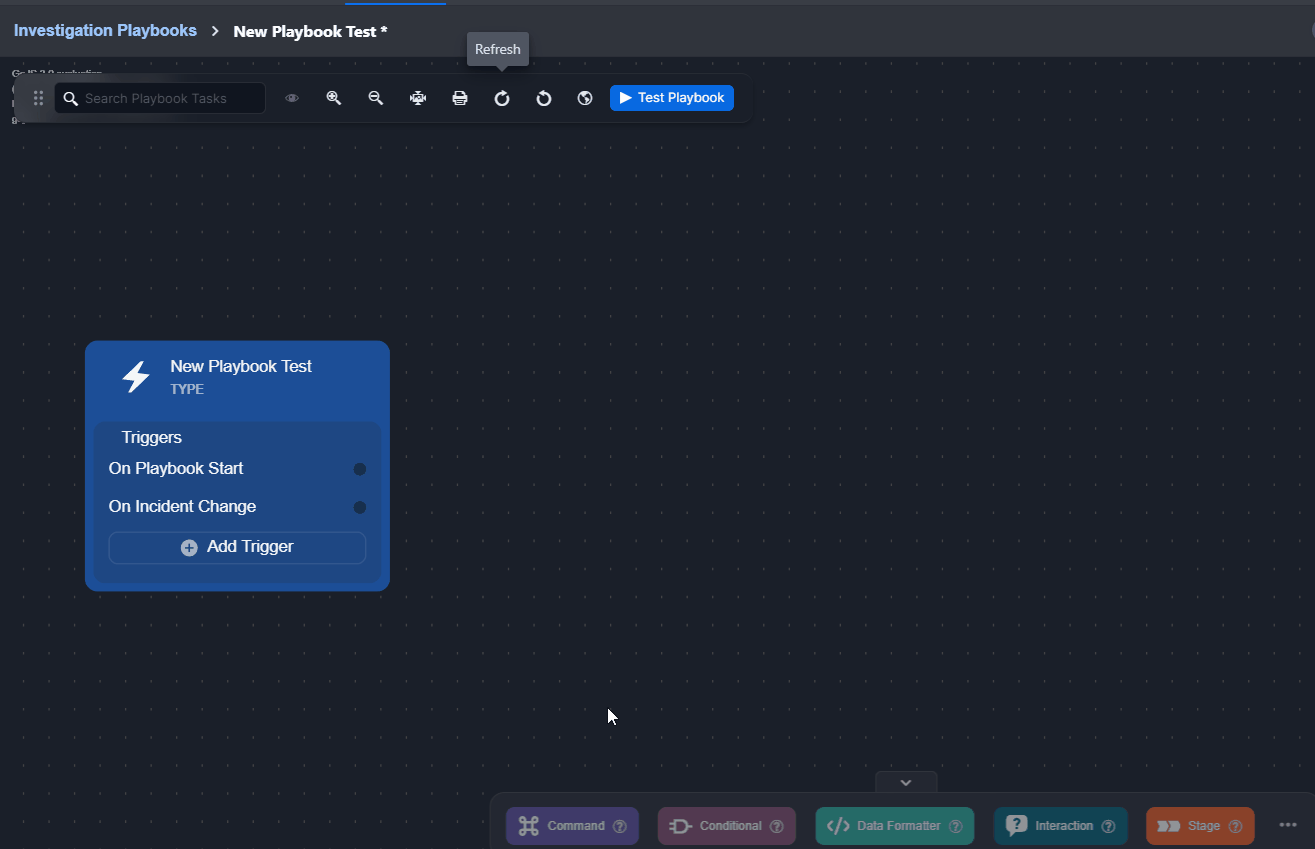
Investigation Playbooks
On Playbook Start
All existing playbook nodes previously connected to the header of the root node have been updated to flow from the On Playbook Start trigger node. This is the main workflow of an investigation playbook.

On Investigation Change
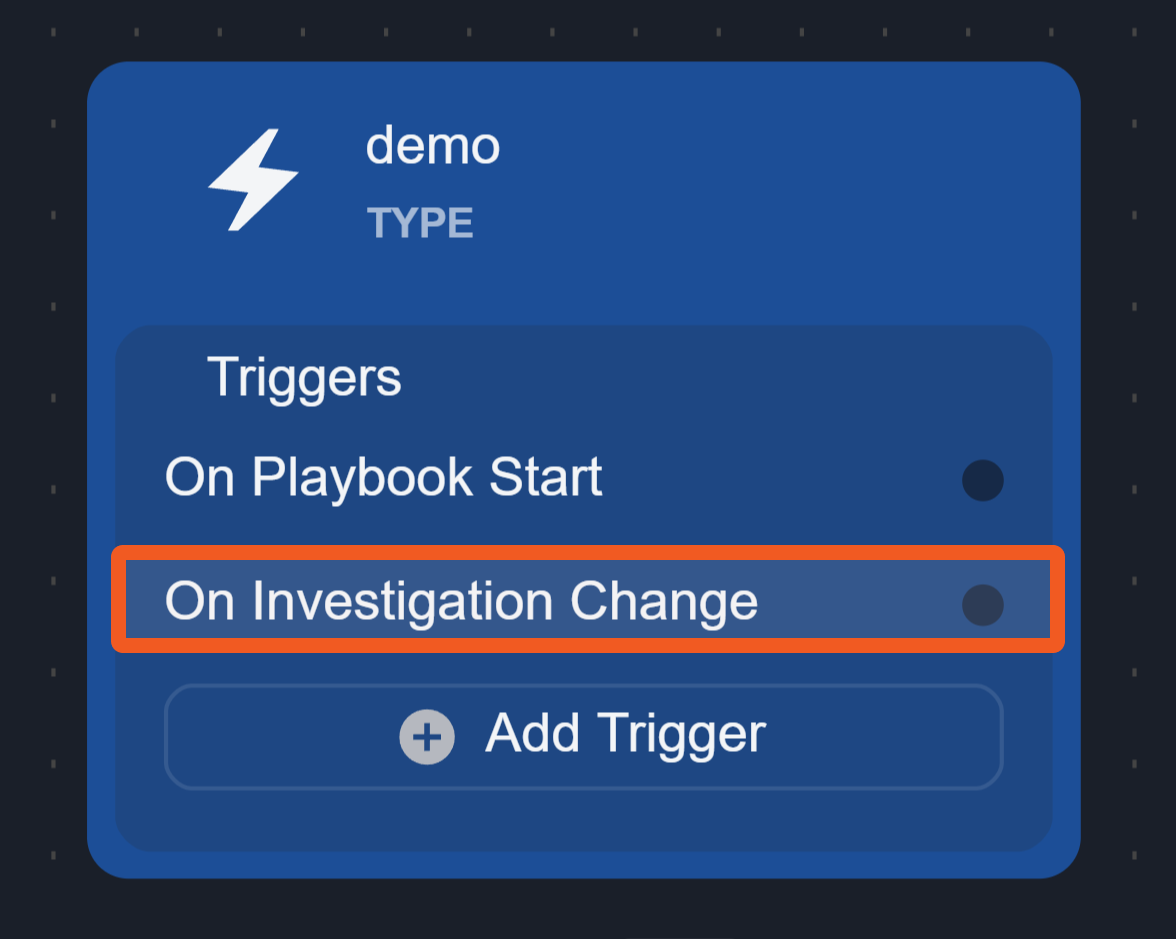
This trigger activates linked tasks when data in the Investigation tab of the Incident Workspace changes.
Data in the Investigation tab of the incident workspace can be updated manually or through a utility command.
Navigate to Investigation Dashboard, then click into an incident.
-20241223-224442.png?inst-v=260ff065-eacd-4502-b259-6f48de11932a)
Click on the Investigation tab.
-20241223-224556.png?inst-v=260ff065-eacd-4502-b259-6f48de11932a)
Manual Updates | |
Updates are made using the buttons. | 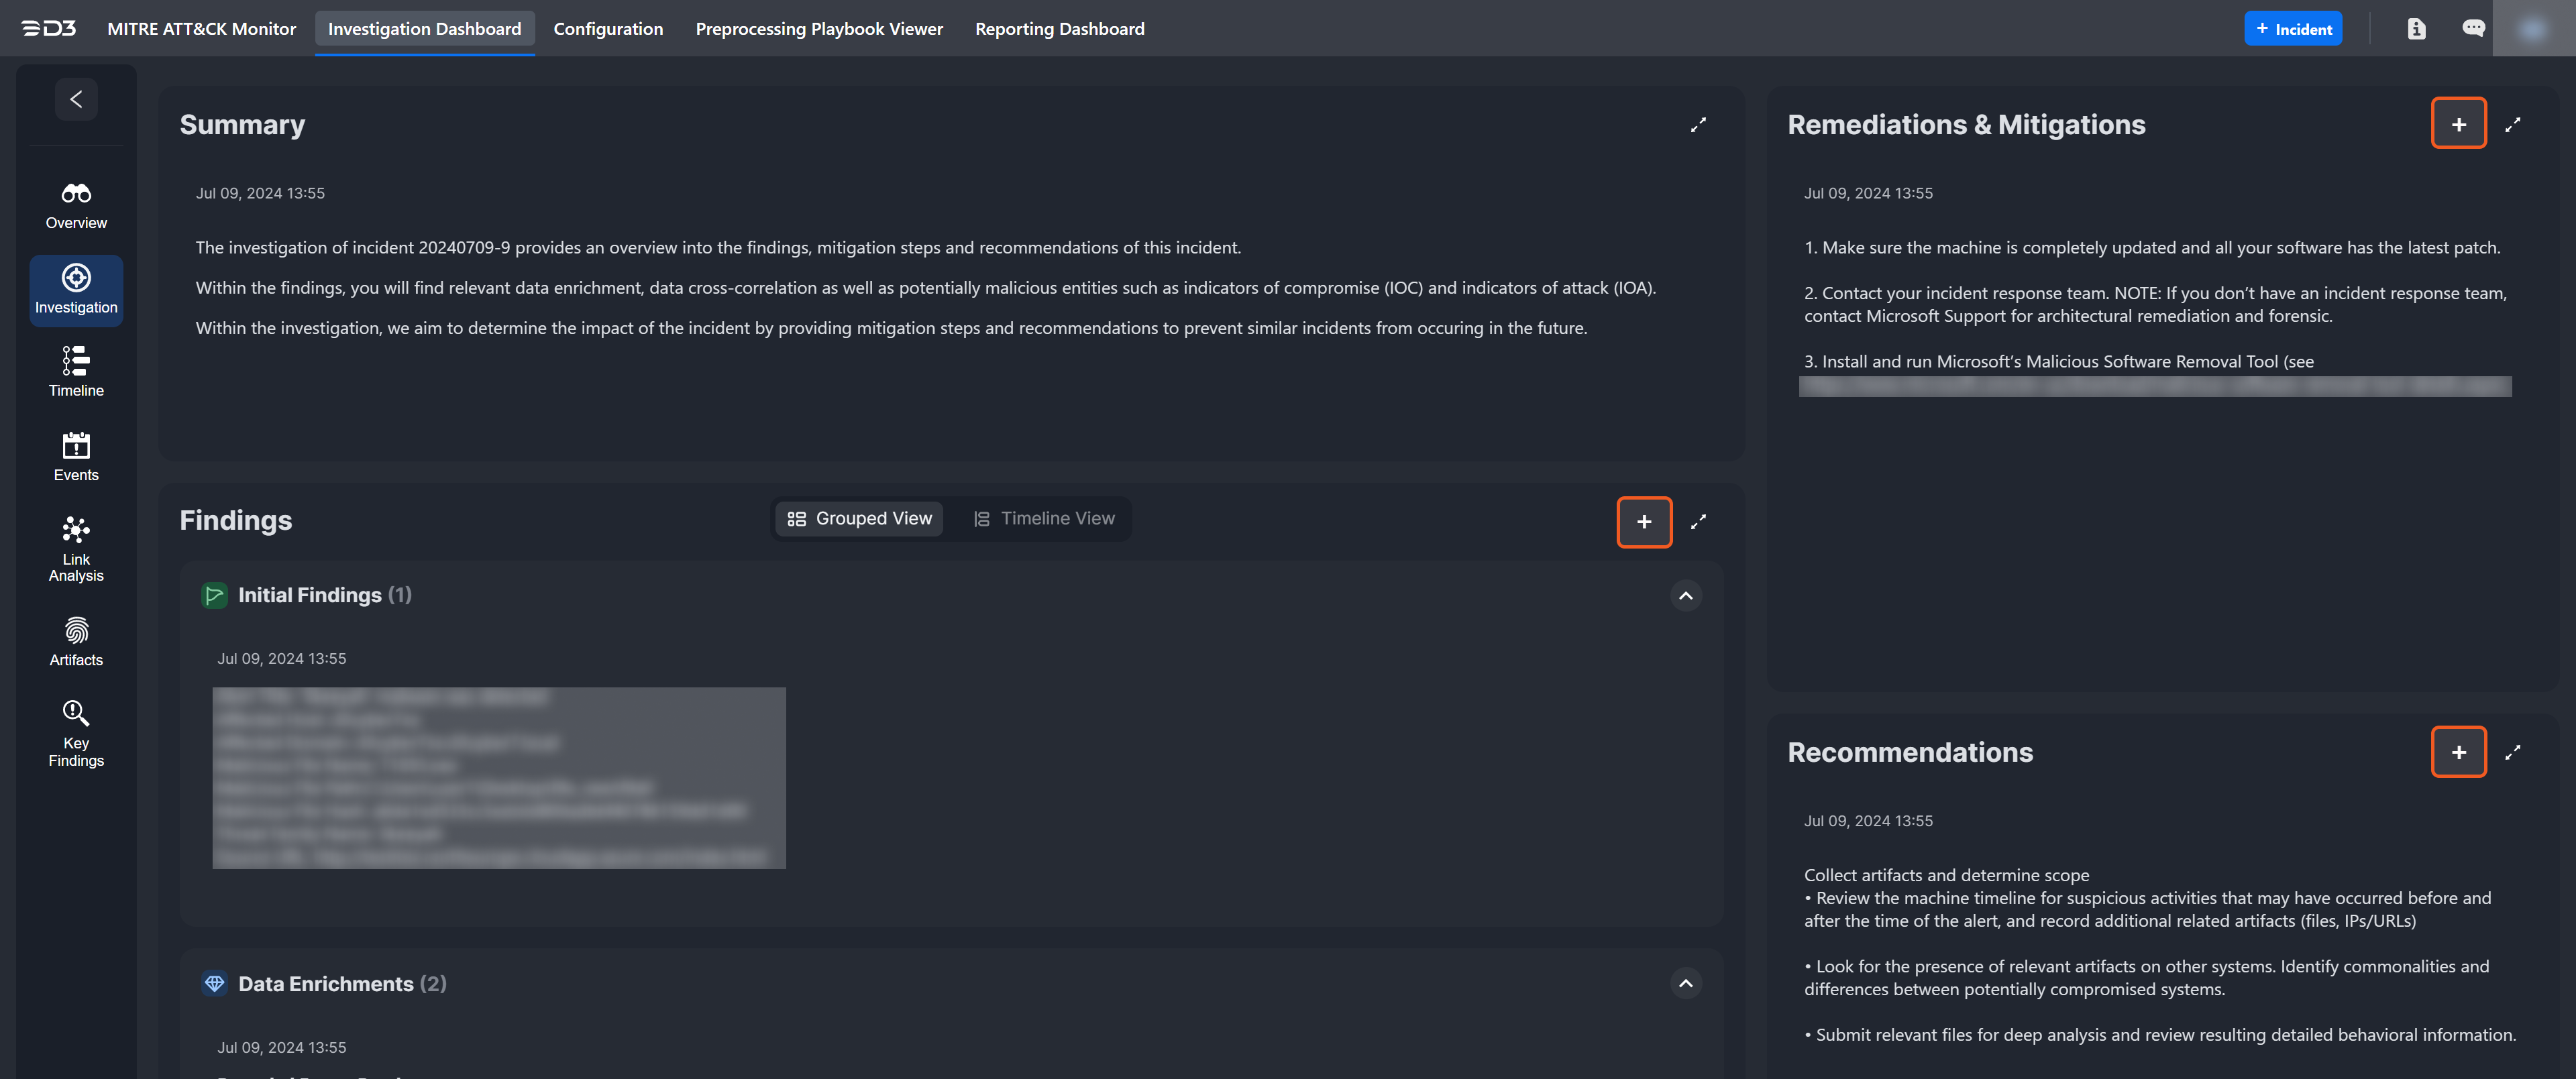 |
Edits to the investigation summary can be made by clicking on the |  |
Edits to the Summary section can also be done within the Overview tab. Click on the | 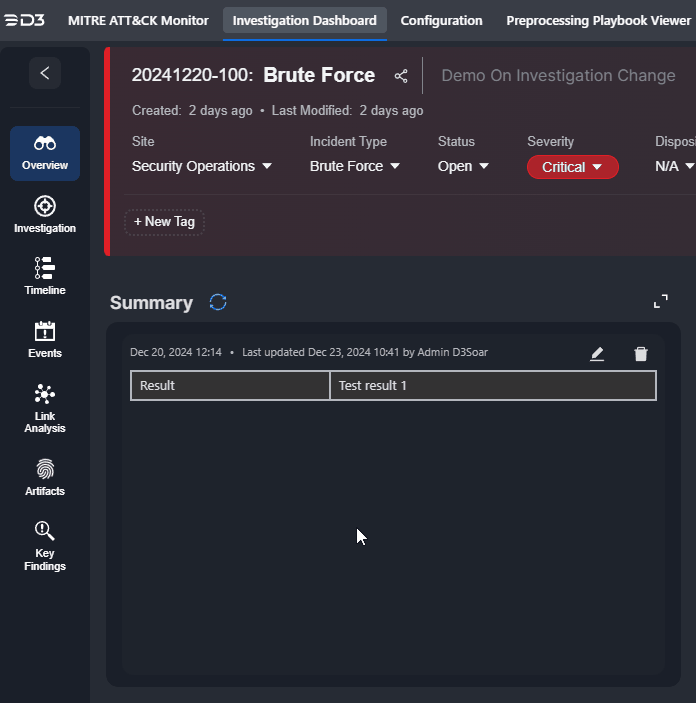 |
Updates via a Utility Command | |
Changes to the data within the Investigation tab can be done using certain utility commands, such as Add Investigation Details and Add Investigation Table Content. See the demonstration for details. | 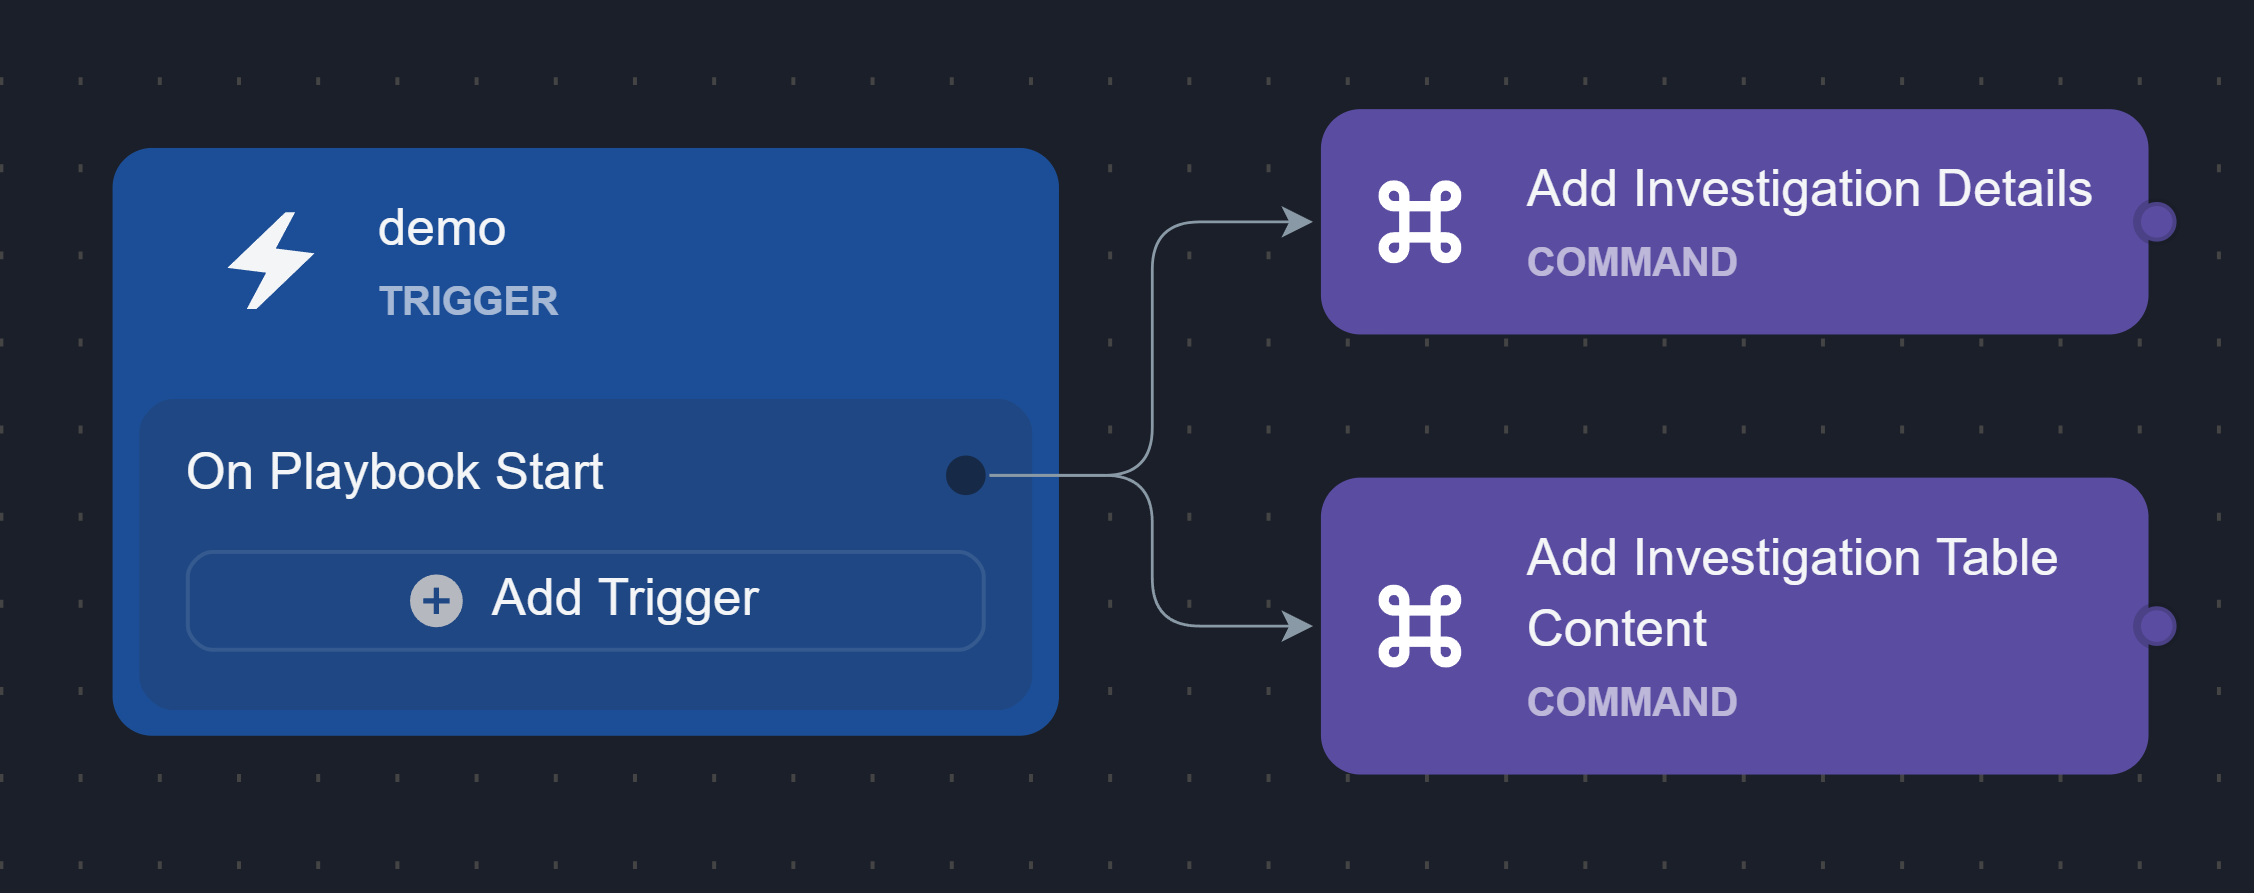 |
%201-20241223-222903.png?inst-v=260ff065-eacd-4502-b259-6f48de11932a)
-20241223-223130.png?inst-v=260ff065-eacd-4502-b259-6f48de11932a)
-20241223-223702.png?inst-v=260ff065-eacd-4502-b259-6f48de11932a)
%201-20241223-223447.png?inst-v=260ff065-eacd-4502-b259-6f48de11932a)
Demonstration
Observe how the On Investigation Change trigger automates responses when a playbook is assigned to an incident:
WARNING
Task 4 in this demonstration requires using the Test Playbook button, which will impact actual incidents in the system. To avoid unintended effects, perform testing in on a demo site.
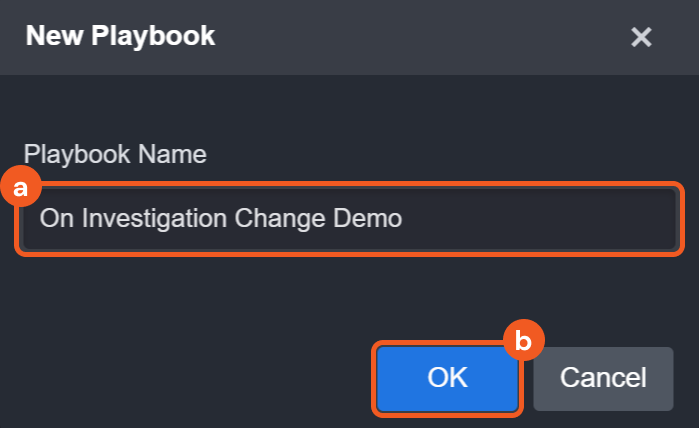
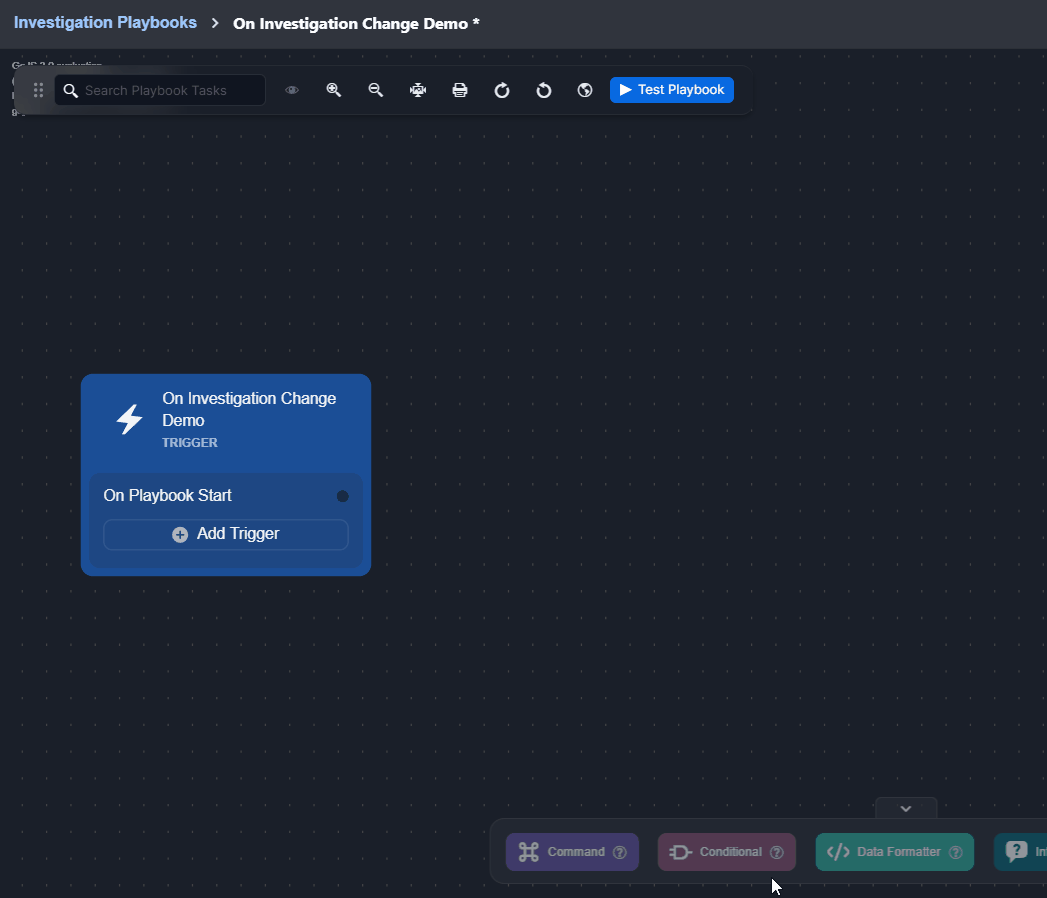
Task 1: Adding a Playbook
Add an Investigation Playbook.
.png?inst-v=260ff065-eacd-4502-b259-6f48de11932a)
Navigate to Configuration.
Click on the Investigation Playbooks tab.
Click on the + Playbook button.
Enter a name for the playbook, then click on the OK button.
Task 2: Updating Investigation Details
Use the Add Investigation Details utility command task to update the information in the Remediations and Mitigations section of the Investigation tab within the Incident Workspace.
Add the Add Investigation Details utility command task to the On Playbook Start trigger.
Configure the command to add Remediations and Mitigations content.
.png?inst-v=260ff065-eacd-4502-b259-6f48de11932a)
Turn on the Dynamic toggle.
Copy and paste the provided code to dynamically retrieve the incident number.
CODE{{ $.PlaybookData.DataSource.incident.IncidentNo }}Select the Remediations and Mitigations option from the dropdown.
Add the remediation strategy, such as "Recommend to disable infected devices."
Choose the Add option for the Editing Type dropdown.
Enable Auto Run, then click on the
-20241223-231527.png?inst-v=260ff065-eacd-4502-b259-6f48de11932a) button.
button.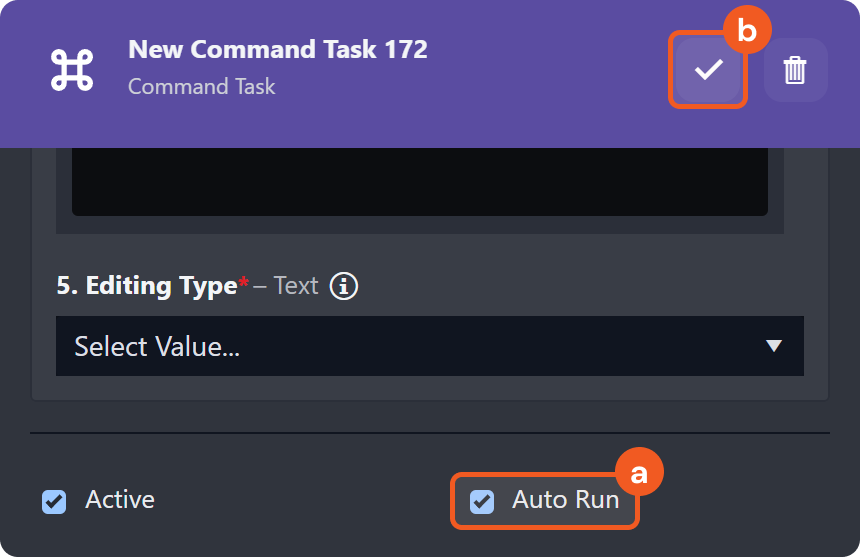
Task 3: Notifying the Manager of Data Changes
Add a Send Email utility command task to the On Investigation Change node to notify the manager about investigation changes.
Add the On Investigation Change trigger.
Connect a Send Email utility command task to the On Investigation Change trigger.
Follow these steps:
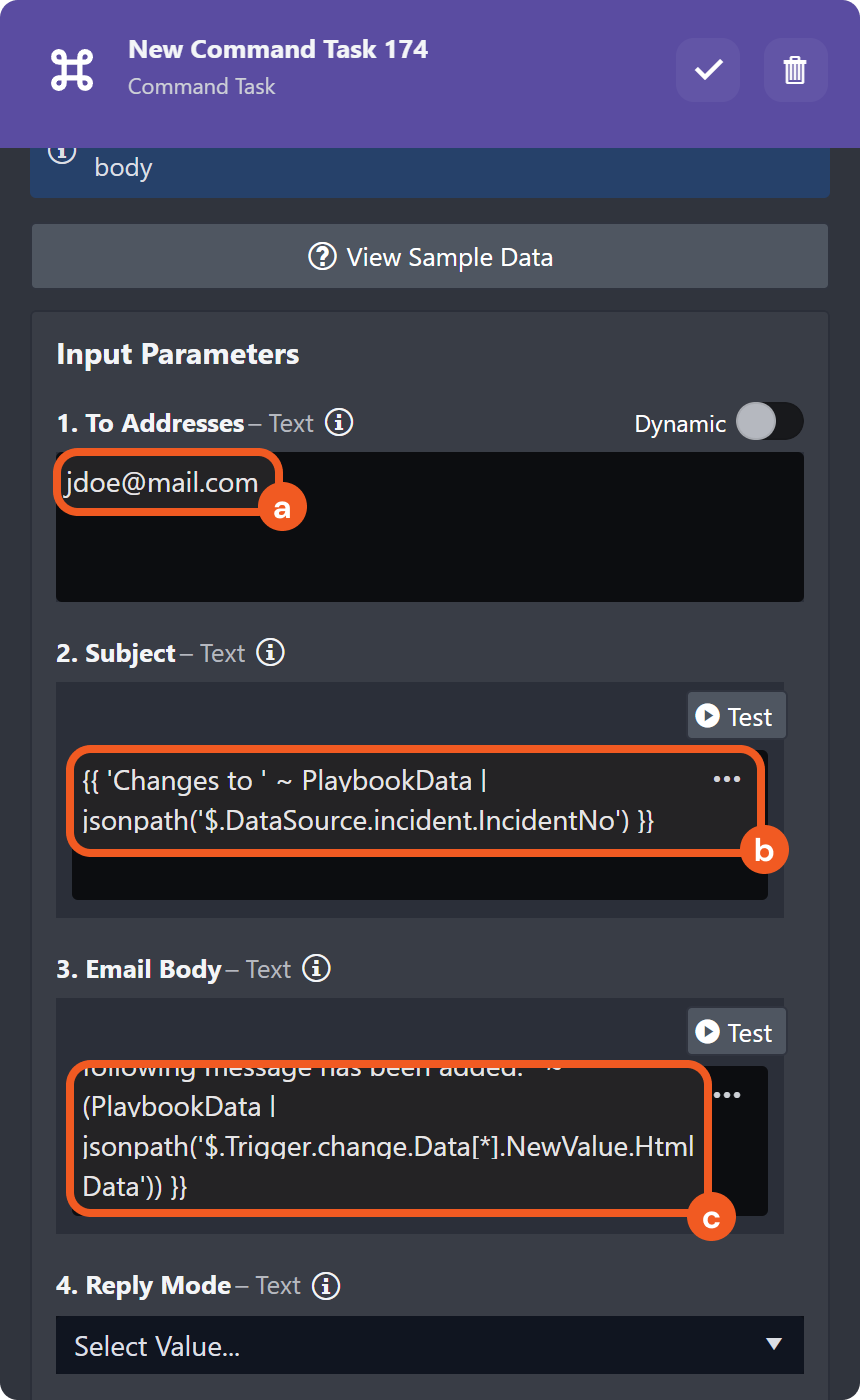
Enter the manager’s email address.
Copy and paste the provided code to generate the email subject "Changes to
<Incident number>."CODE{{ 'Changes to ' ~ PlaybookData | jsonpath('$.DataSource.incident.IncidentNo') }}Copy and paste the provided code to generate the email body "There is a change to the
<Investigation Type>section of incident<Incident ID>. The following message has been added:<HTML data>."CODE{{ 'There is a change to the ' ~ (PlaybookData | jsonpath('$.Trigger.change.InvestigationType')) ~ ' section of incident ' ~ (PlaybookData | jsonpath('$.DataSource.incident.ID')) ~ '. The following message has been added: ' ~ (PlaybookData | jsonpath('$.Trigger.change.Data[*].NewValue.HtmlData')) }}
Enable Auto Run, then click on the
button.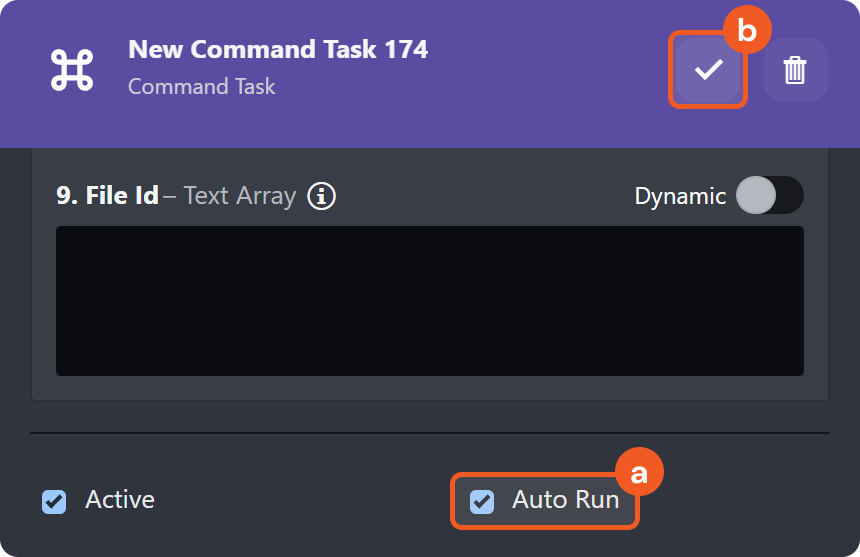
Task 4: Testing the Playbook and Confirming Email Delivery
Test the playbook on an incident.
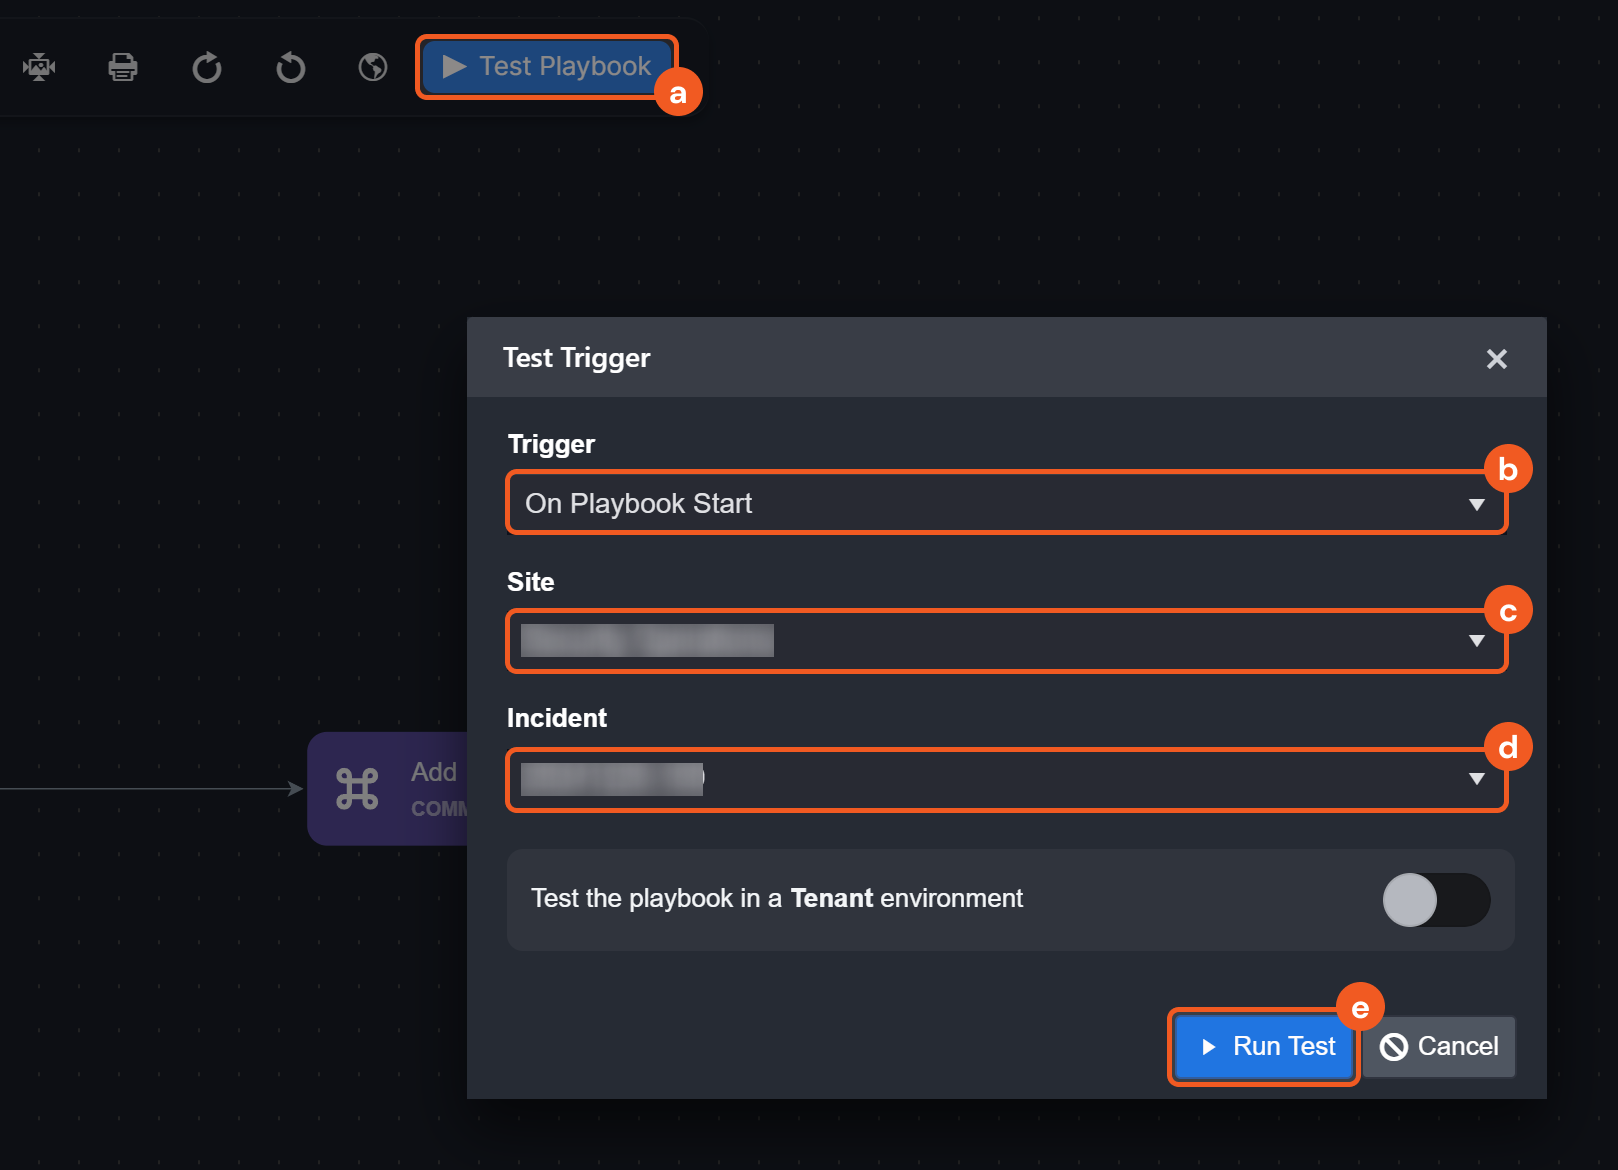
Click on the Test Playbook button.
Ensure that the trigger is set to On Playbook Start.
Select a site.
Choose an incident.
Click on the Run Test button.
Verify that the manager has received the email.

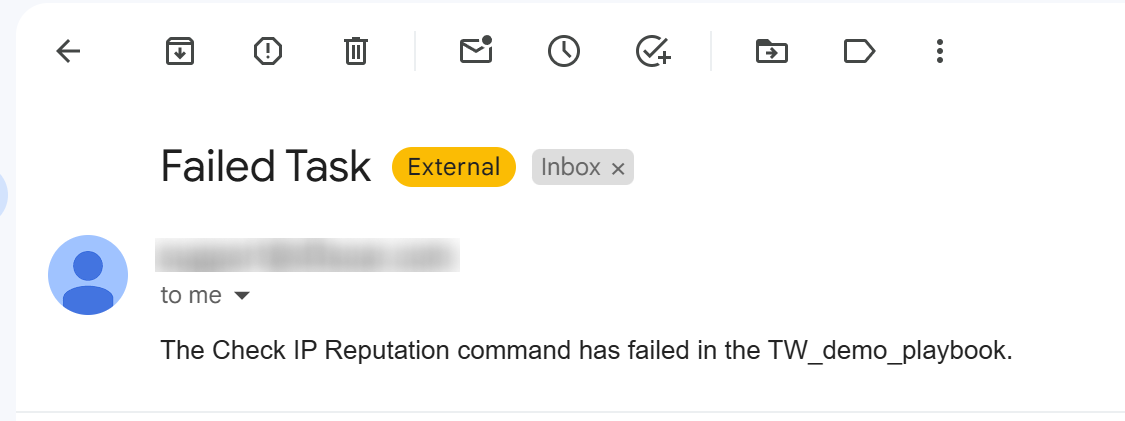
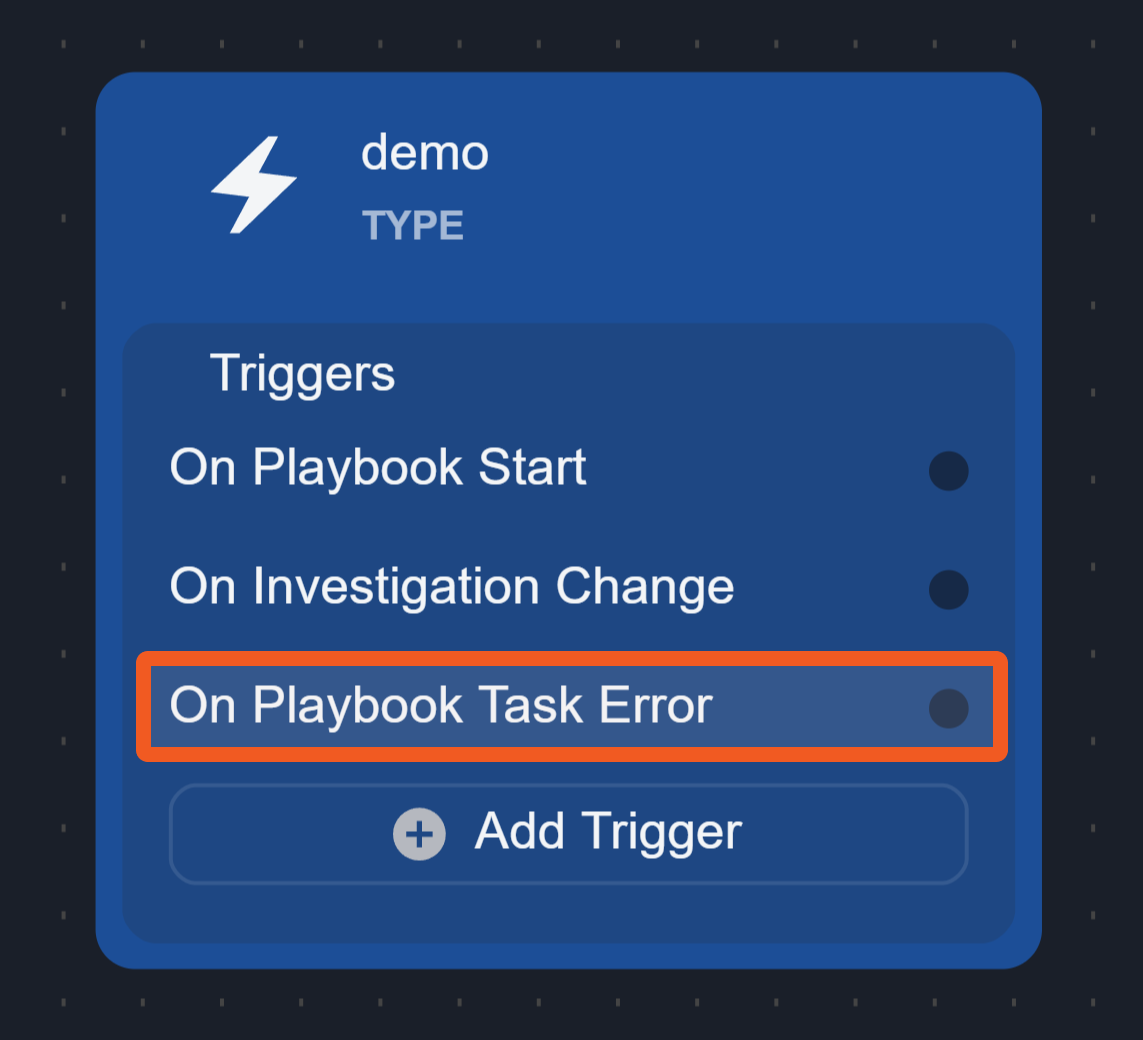
On Playbook Task Error
The On Playbook Task Error trigger initiates tasks linked to it when a playbook task has the Error Trigger checkbox selected (selected by default). Tasks on this path will not trigger additional error paths, ensuring simple error handling and avoiding loops.
This trigger node can be added to both Investigation Playbooks and Preprocessing Playbooks.
Demonstration
Observe how the On Playbook Task Error trigger supports troubleshooting below:
WARNING
Task 4 in the demonstration below requires using the Test Playbook button, which will impact actual incidents in the system. To avoid unintended effects, perform testing in a demo environment.
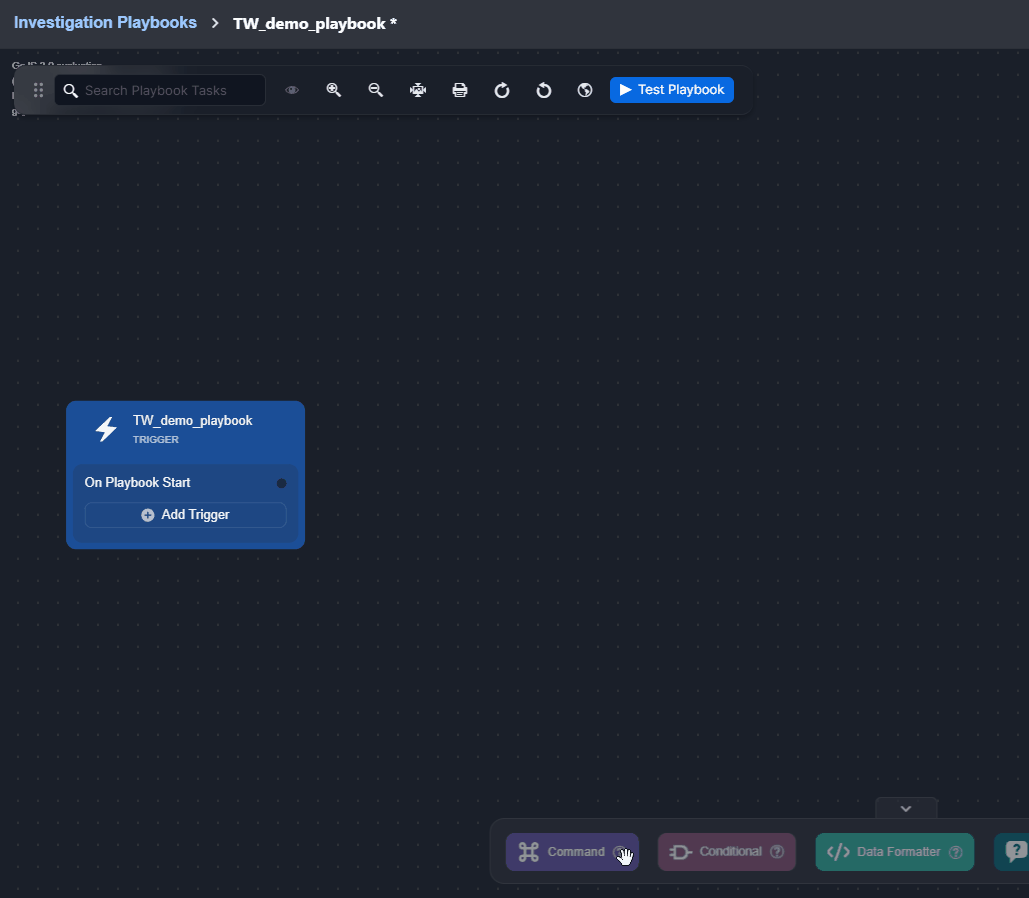
Task 1: Adding a Playbook
Add an Investigation Playbook.
Navigate to Configuration.
Click on the Investigation Playbooks module.
Click on the + Playbook button.
Enter a name for the playbook, then click on the OK button.
.png?inst-v=260ff065-eacd-4502-b259-6f48de11932a)
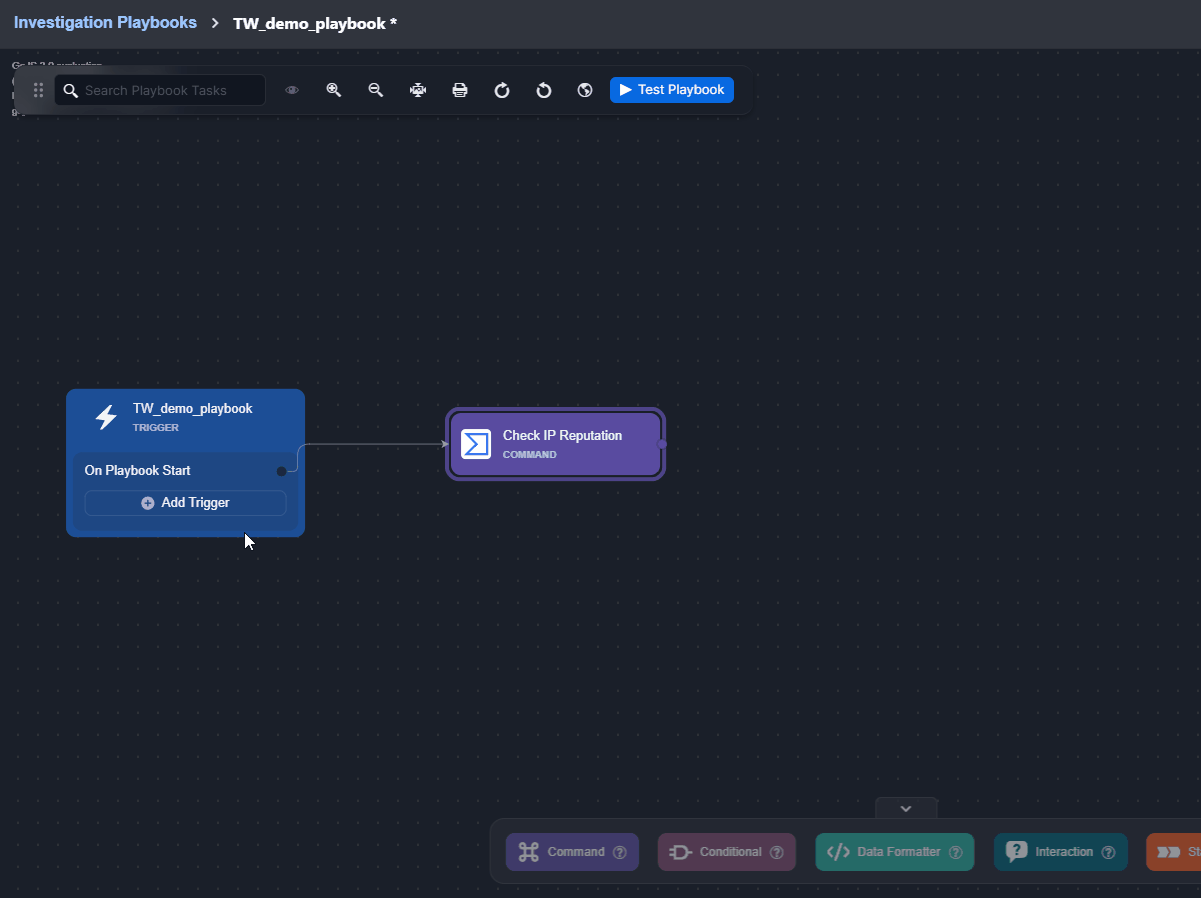
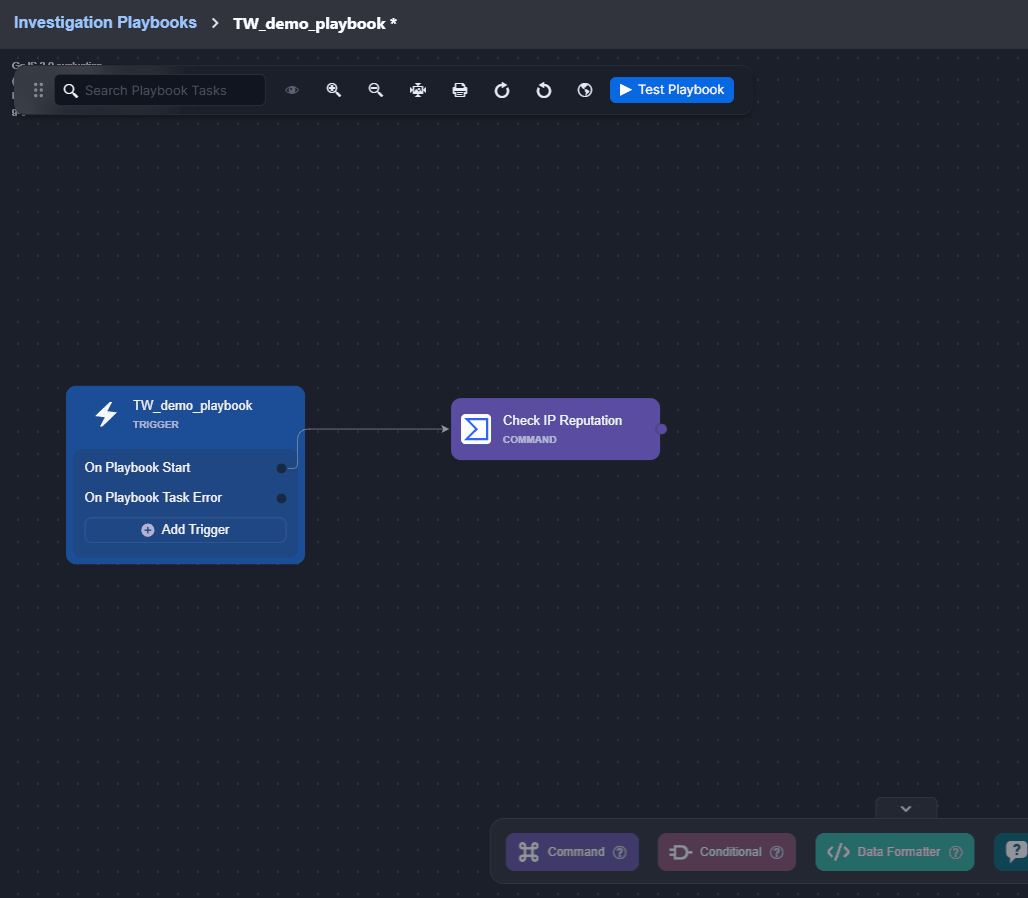
Task 2: Adding a Command Task Designed to Fail
Add a Check IP Reputation task from VirusTotal. Any other integration command task can be used.
Set the task to Auto Run, then ensure that the Error Trigger error handling option is ticked.
.png?inst-v=260ff065-eacd-4502-b259-6f48de11932a)
Leave the connection dropdown empty to intentionally trigger task failure during playbook execution, then click on the
button..png?inst-v=260ff065-eacd-4502-b259-6f48de11932a)
Task 3: Adding a Task to Troubleshoot the Error
Add the On Playbook Task Error trigger.
Connect a Send Email utility command task to the On Playbook Task Error trigger. This will be used to send an email notification to the manager, informing them of the failure to execute the Check IP Reputation task.
Enter the manager’s email address, email subject, and email body.
.png?inst-v=260ff065-eacd-4502-b259-6f48de11932a)
Set this task to Auto Run, then click on the
button..png?inst-v=260ff065-eacd-4502-b259-6f48de11932a)
Task 4: Testing the Playbook
Test the playbook on an incident.
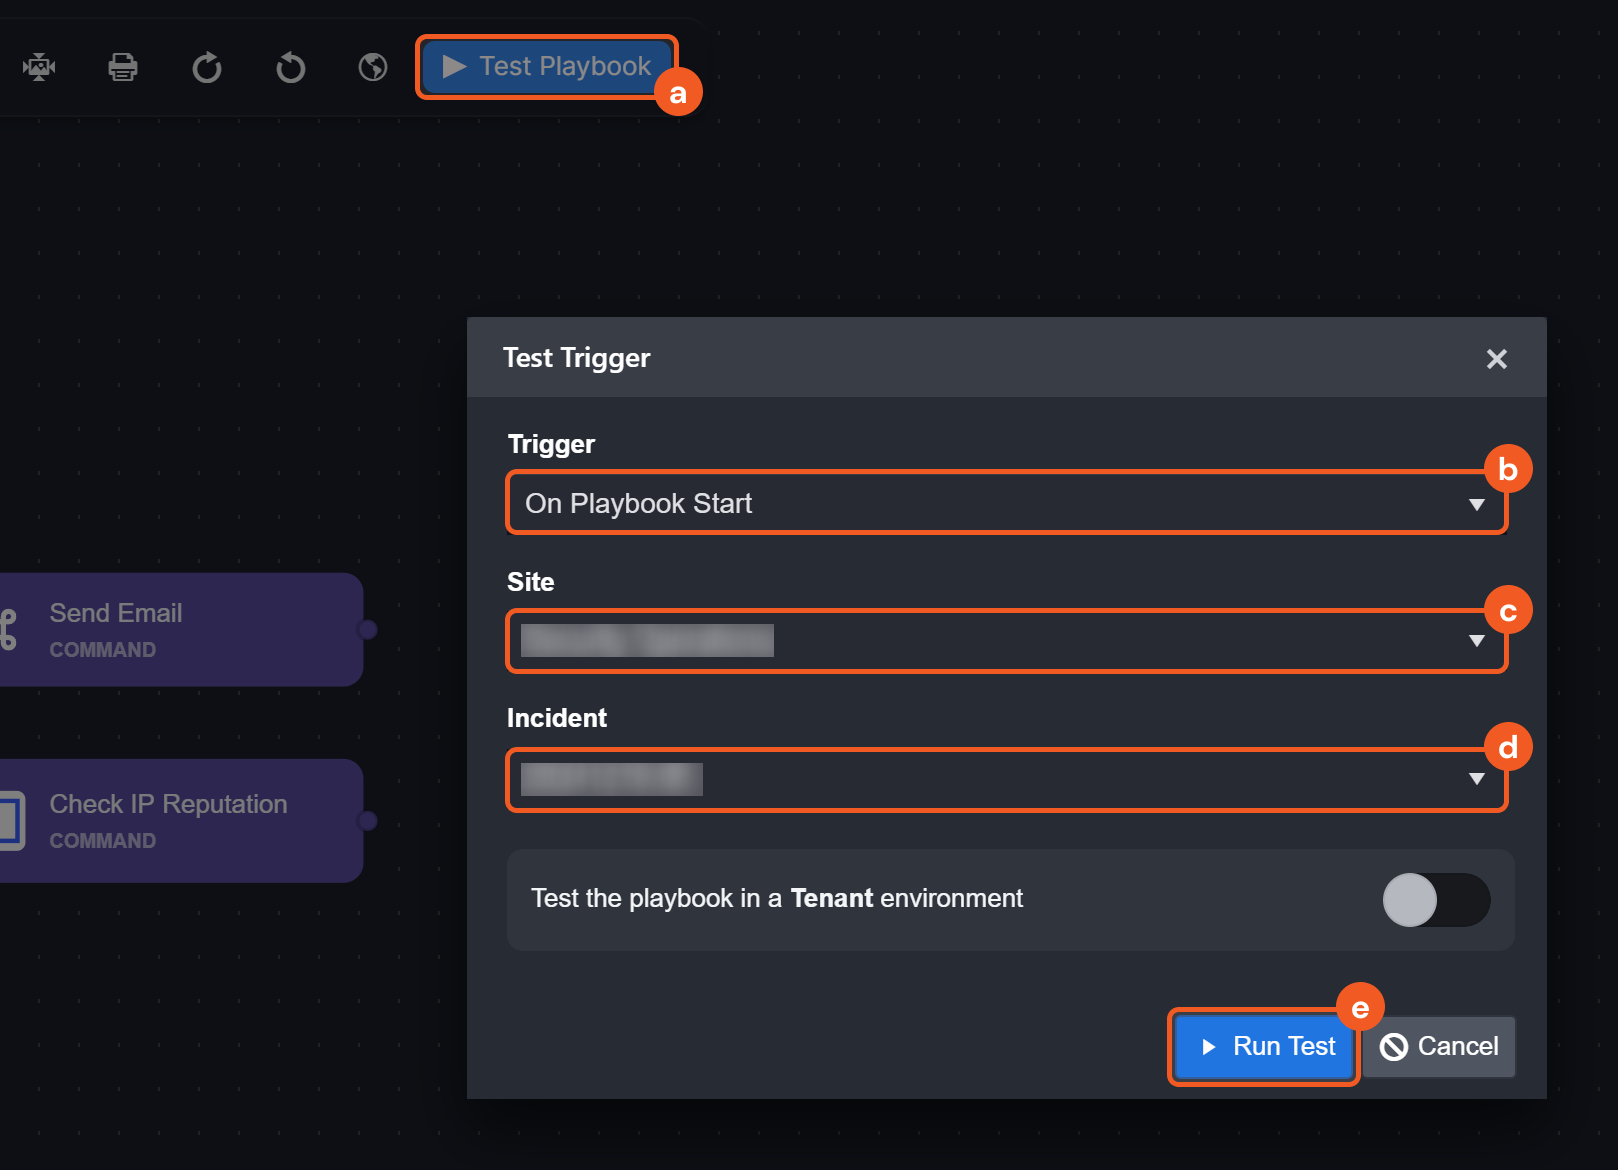
Click on the Test Playbook button.
Ensure that the trigger is set to On Playbook Start.
Select a site.
Choose an incident.
Click on the Run Test button.
Verify that the manager has received the email regarding the task failure.