Playbook UX Enhancements
LAST UPDATED: JAN 15, 2025
D3 has introduced several enhancements to its playbook for improved usability and operational efficiency.
Feature 1 - Revamped Task Nodes
Playbook nodes have been enhanced with hidden initial triggers by default, modernized styling, and -20241224-003921.png?inst-v=05328674-b079-4c01-ba41-8dd92707b455) (connector) buttons.
(connector) buttons.
EXAMPLES
-20241224-003654.png?inst-v=05328674-b079-4c01-ba41-8dd92707b455)
-20241224-004627.png?inst-v=05328674-b079-4c01-ba41-8dd92707b455)
-20241224-004410.png?inst-v=05328674-b079-4c01-ba41-8dd92707b455)
-20241227-175807.png?inst-v=05328674-b079-4c01-ba41-8dd92707b455)
-20250103-182433.png?inst-v=05328674-b079-4c01-ba41-8dd92707b455)
-20250103-182524.png?inst-v=05328674-b079-4c01-ba41-8dd92707b455)
Clicking a connector button renders a task list, prompting the user to select the task type to connect.

Clicking on a node, or branches of a conditional task node, will render a + Add a task placeholder UI.
-20241224-013313.png?inst-v=05328674-b079-4c01-ba41-8dd92707b455)
Clicking on this prominent placeholder UI will also render the task list popup.
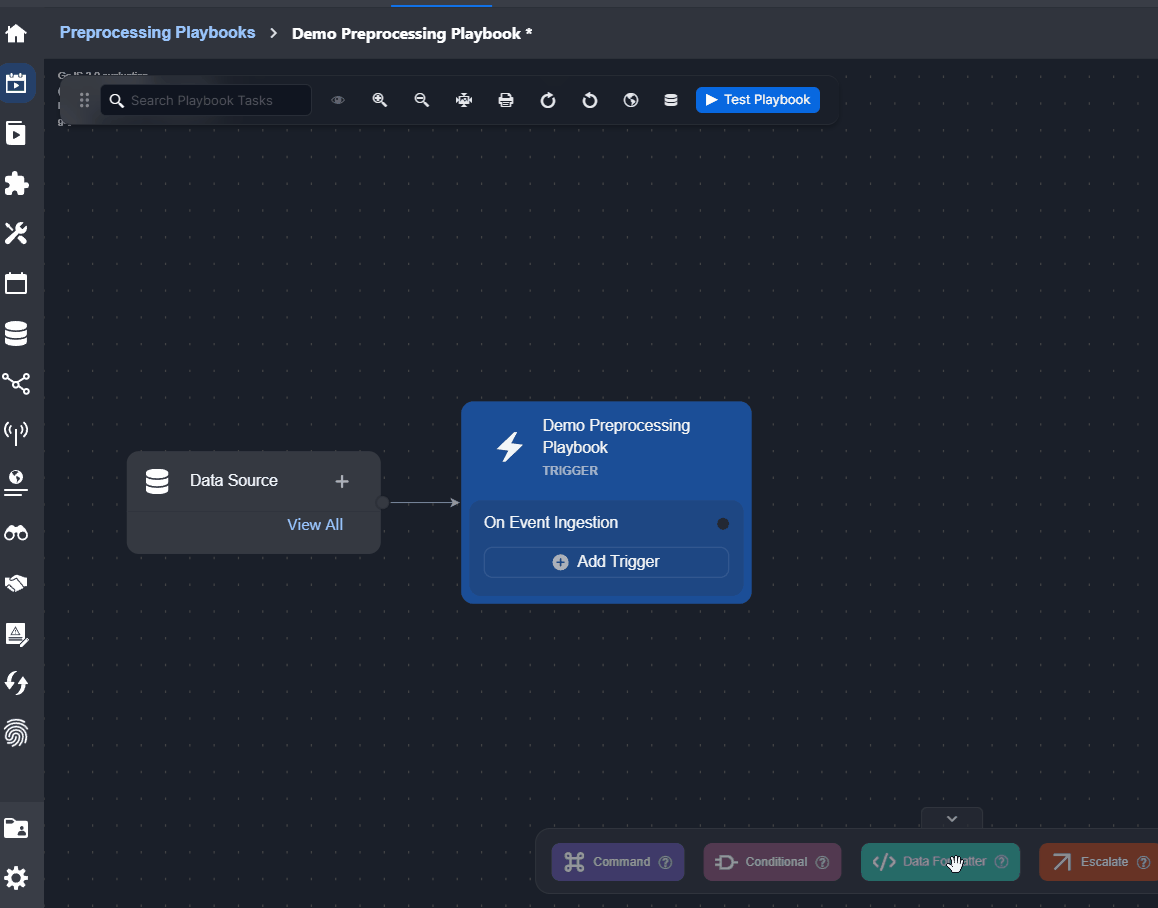
Feature 2 - Adding In-Between Tasks
Users can efficiently insert a new task node between existing ones without the need to manually create or delete connecting arrows.
Click on the connecting arrow between the tasks to insert a new task node.
-20241224-020105.png?inst-v=05328674-b079-4c01-ba41-8dd92707b455)
Click on the + button that rendered on the connecting arrow.
-20250103-182100.png?inst-v=05328674-b079-4c01-ba41-8dd92707b455)
Select the task type from the task list popup.
If a Stage task has been selected, it will appear as shown below:
%201-20241224-020616.png?inst-v=05328674-b079-4c01-ba41-8dd92707b455)
Feature 3 - Orphan Node
Users can now drag and drop commands onto the playbook canvas as orphan nodes, with their positions automatically saved. Orphan nodes can remain in a live playbook but will not execute (even if the auto-run option is enabled).
-20241224-021953.png?inst-v=05328674-b079-4c01-ba41-8dd92707b455)
Feature 4 - Node Action Bar
When hovering over a node, an action bar is displayed, providing quick access to essential task management options.
-20241224-024322.png?inst-v=05328674-b079-4c01-ba41-8dd92707b455)
The available actions are:
Copy
-20241224-024438.png?inst-v=05328674-b079-4c01-ba41-8dd92707b455) : Duplicates the current task node to reuse its configuration elsewhere.
: Duplicates the current task node to reuse its configuration elsewhere.The copied task node can be pasted into the same playbook or another playbook.
Activation Toggle
-20241224-024544.png?inst-v=05328674-b079-4c01-ba41-8dd92707b455) : Marks the task as inactive or active.
: Marks the task as inactive or active.Keeping it enabled will allow the task to execute as part of the workflow.
-20241224-025235.png?inst-v=05328674-b079-4c01-ba41-8dd92707b455)
Turning it off will prevent the node from executing and block the execution of subsequent tasks.
-20241224-025155.png?inst-v=05328674-b079-4c01-ba41-8dd92707b455)
Delete
%201-20241224-031252.png?inst-v=05328674-b079-4c01-ba41-8dd92707b455) : Permanently removes the task node from the playbook.
: Permanently removes the task node from the playbook.
Additionally, the action bar displays the ID of the task node, offering a reference for identifying a specific task within the playbook.
Feature 5 - Playbook Execution History
-20241224-031944.png?inst-v=05328674-b079-4c01-ba41-8dd92707b455)
The playbook execution summary panel provides a quick overview of the playbook's execution activity over the past 1, 7, 14, or 30 days (adjusted within the Execution Logs page). It displays:
Run Count: The number of times the playbook has been executed within a timeframe.
View Execution Logs: A link to detailed execution logs.
-20241227-183612.png?inst-v=05328674-b079-4c01-ba41-8dd92707b455)
Feature 6 - New Preprocessing Playbook Task Types
-20241224-181559.png?inst-v=05328674-b079-4c01-ba41-8dd92707b455)
Escalate
The new Escalate task type simplifies access to the Create Incident With Conditions utility command, useful for event-incident correlation.
See the Escalation and Dismissal Mini Guide.

Dismiss

See the Escalation and Dismissal Mini Guide.
The new Dismiss task simplifies event dismissal.
This task performs the same function as a Passdown task configured to set the trigger output data’s "Dismiss" value to True.
The trigger output data can be found by clicking on the  icon within the playbook toolbar.
-20250116-010713.png?inst-v=05328674-b079-4c01-ba41-8dd92707b455)
Escalation and Dismissal Mini Guide
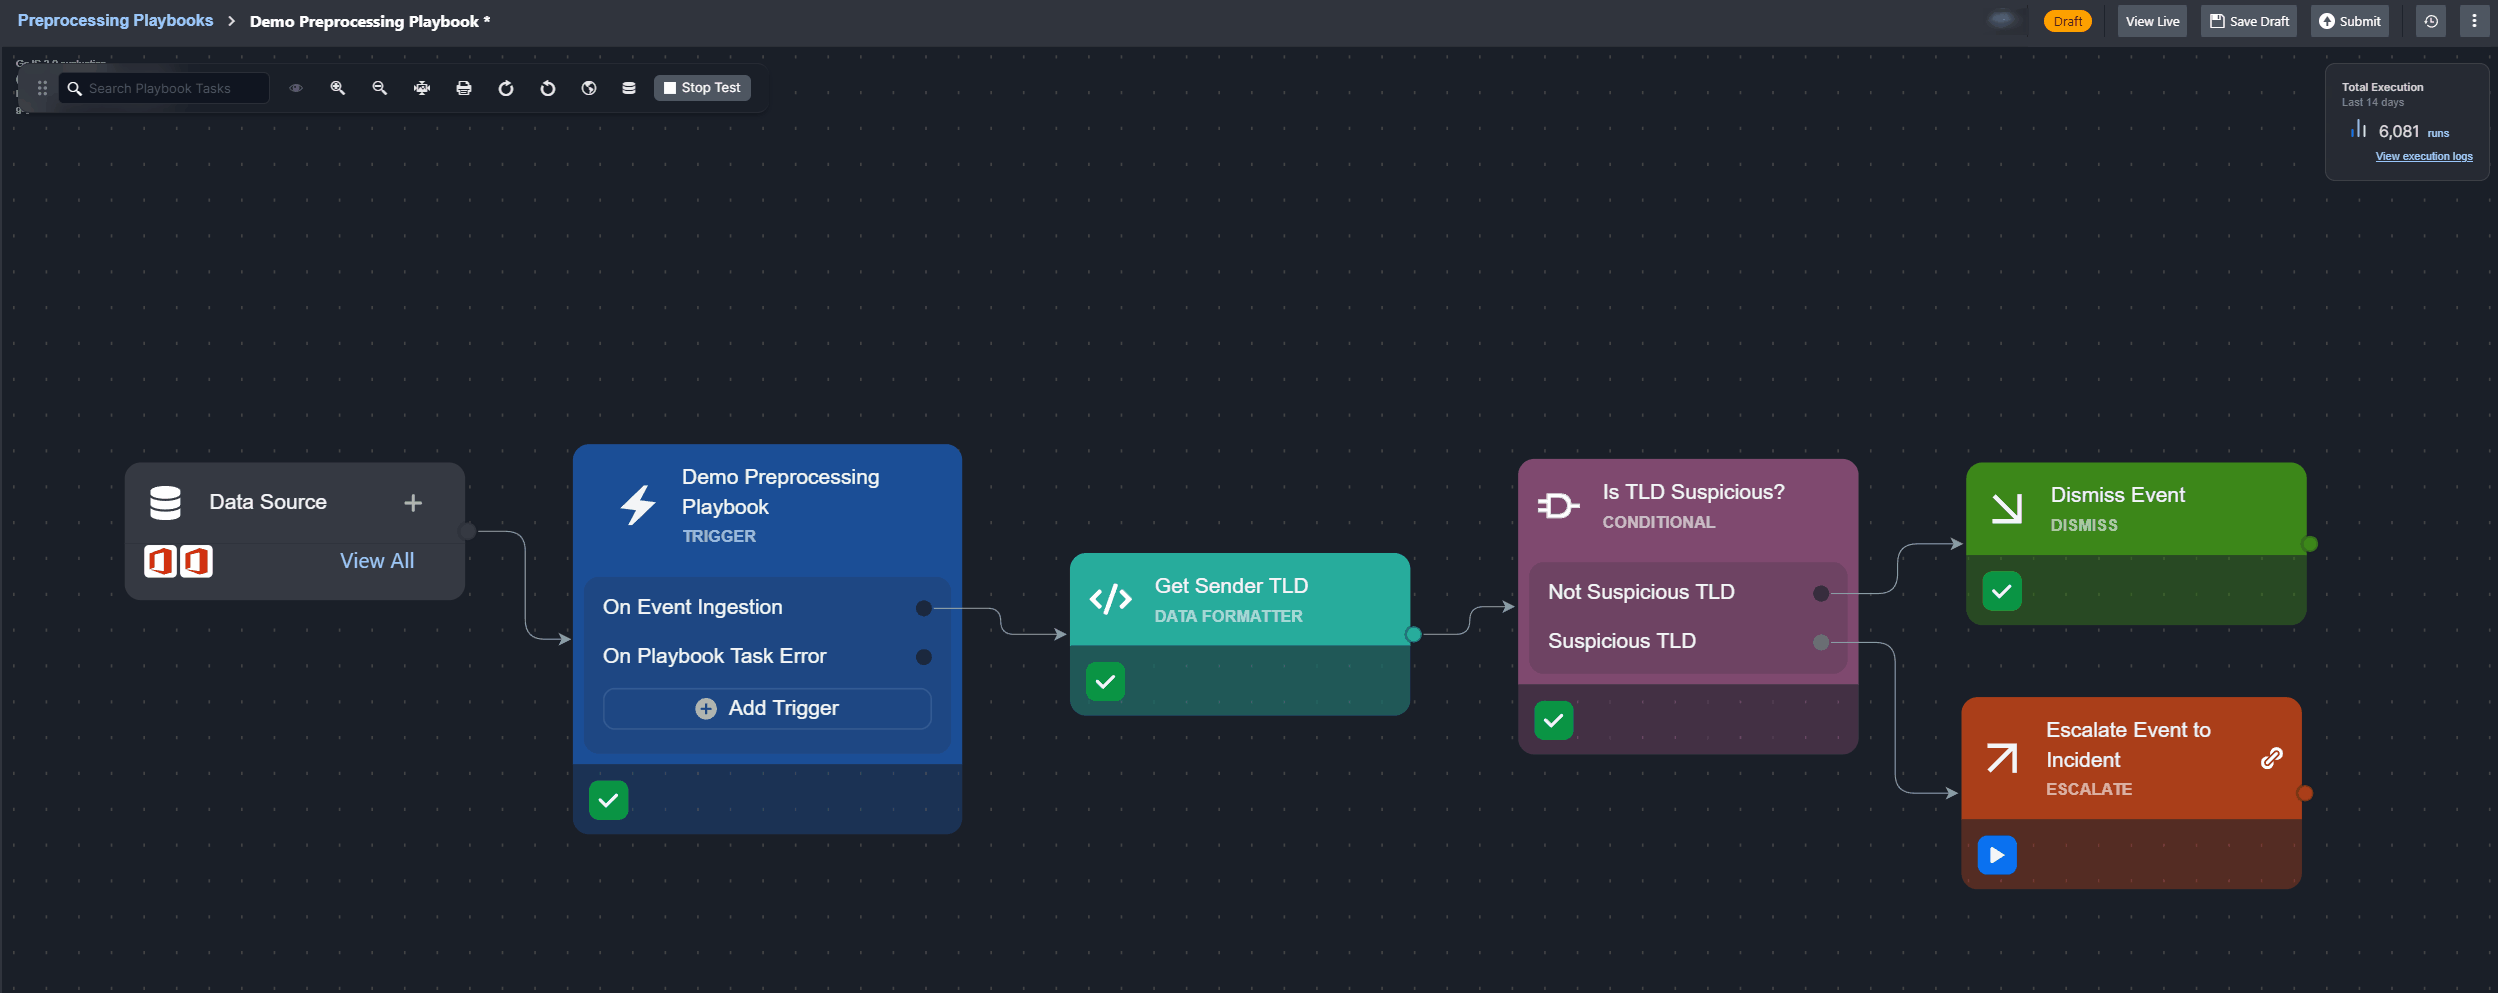
SCENARIO An analyst is creating a preprocessing playbook to evaluate the top-level domain (TLD) of emails from ingested Office 365 data. Events from whitelisted domains are dismissed, while others are escalated to incidents.
Task 1: Adding a Playbook
Add a Preprocessing Playbook.
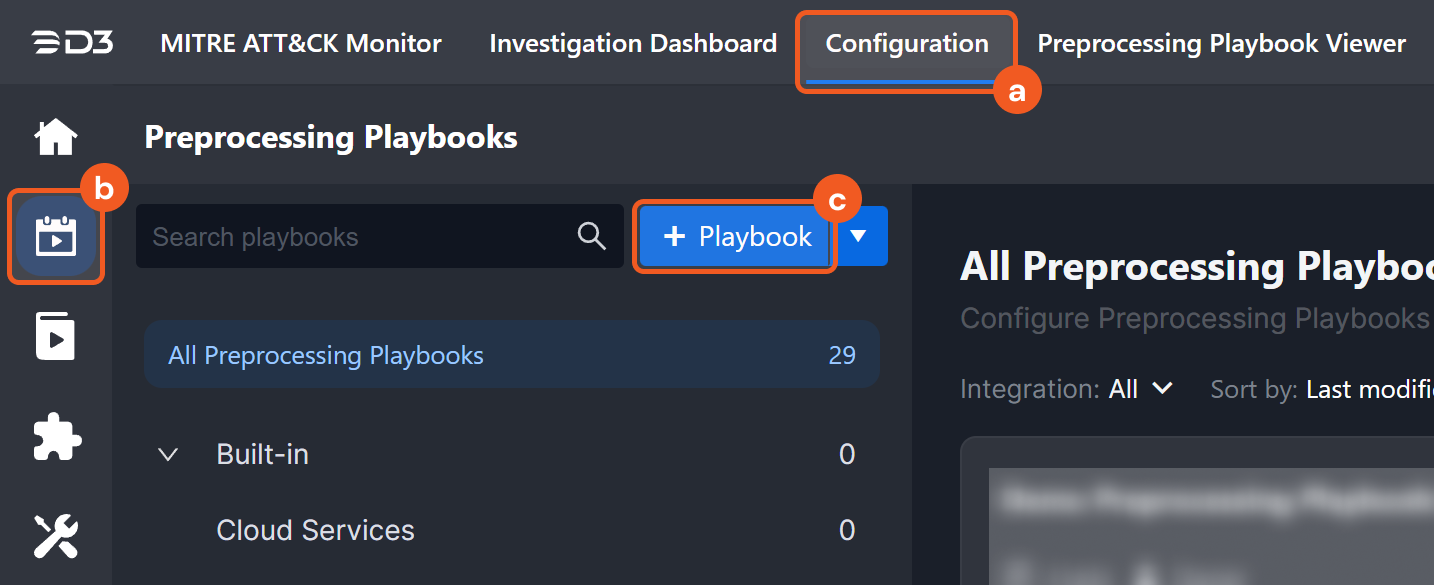
Navigate to Configuration.
Click on the Preprocessing Playbook module.
Click on the + Playbook button.
Enter a name for the playbook, then click on the OK button.

Task 2: Creating a Data Source
Create a data source to simplify the amount of configuration required to test the playbook upon its completion.
Select the Fetch data intake option, then click on the Next button.
-20241223-204728.png?inst-v=05328674-b079-4c01-ba41-8dd92707b455)
Search for the Office 365 integration using the search bar, select it, then click on the Next button.
.png?inst-v=05328674-b079-4c01-ba41-8dd92707b455)
Select the site to use using the dropdown, then click on the Next button.
.png?inst-v=05328674-b079-4c01-ba41-8dd92707b455)
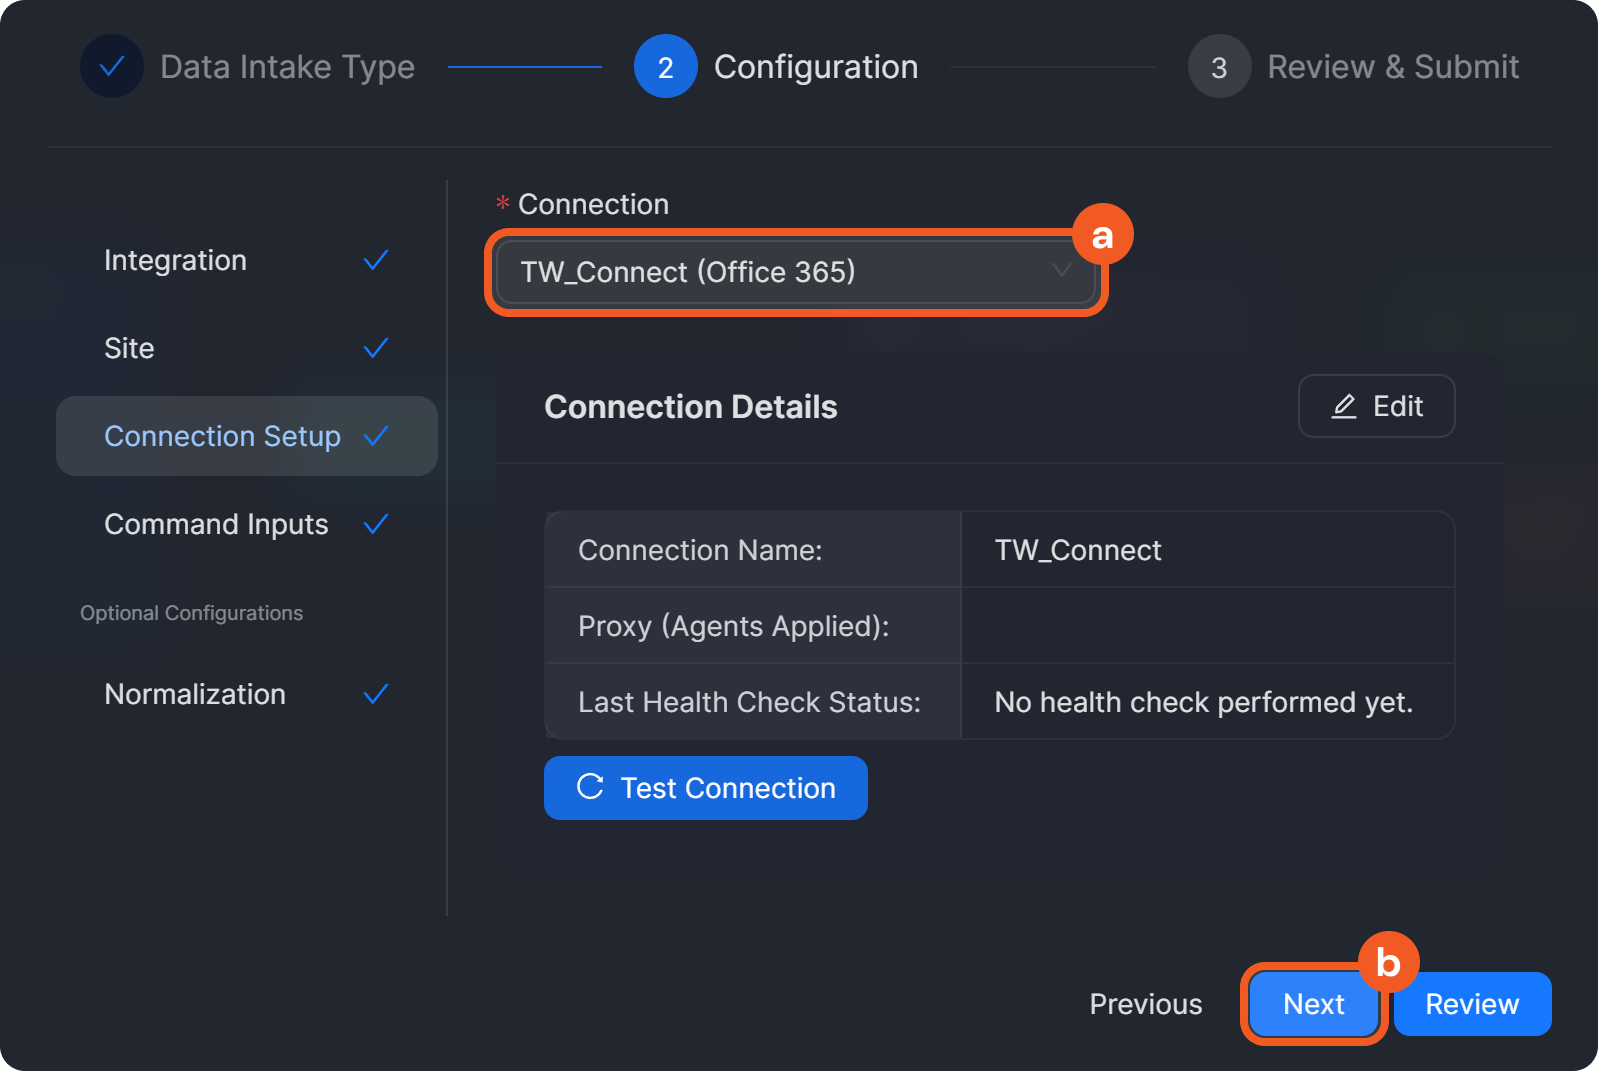
Choose an existing connection or create a new one, then click on the Next button.
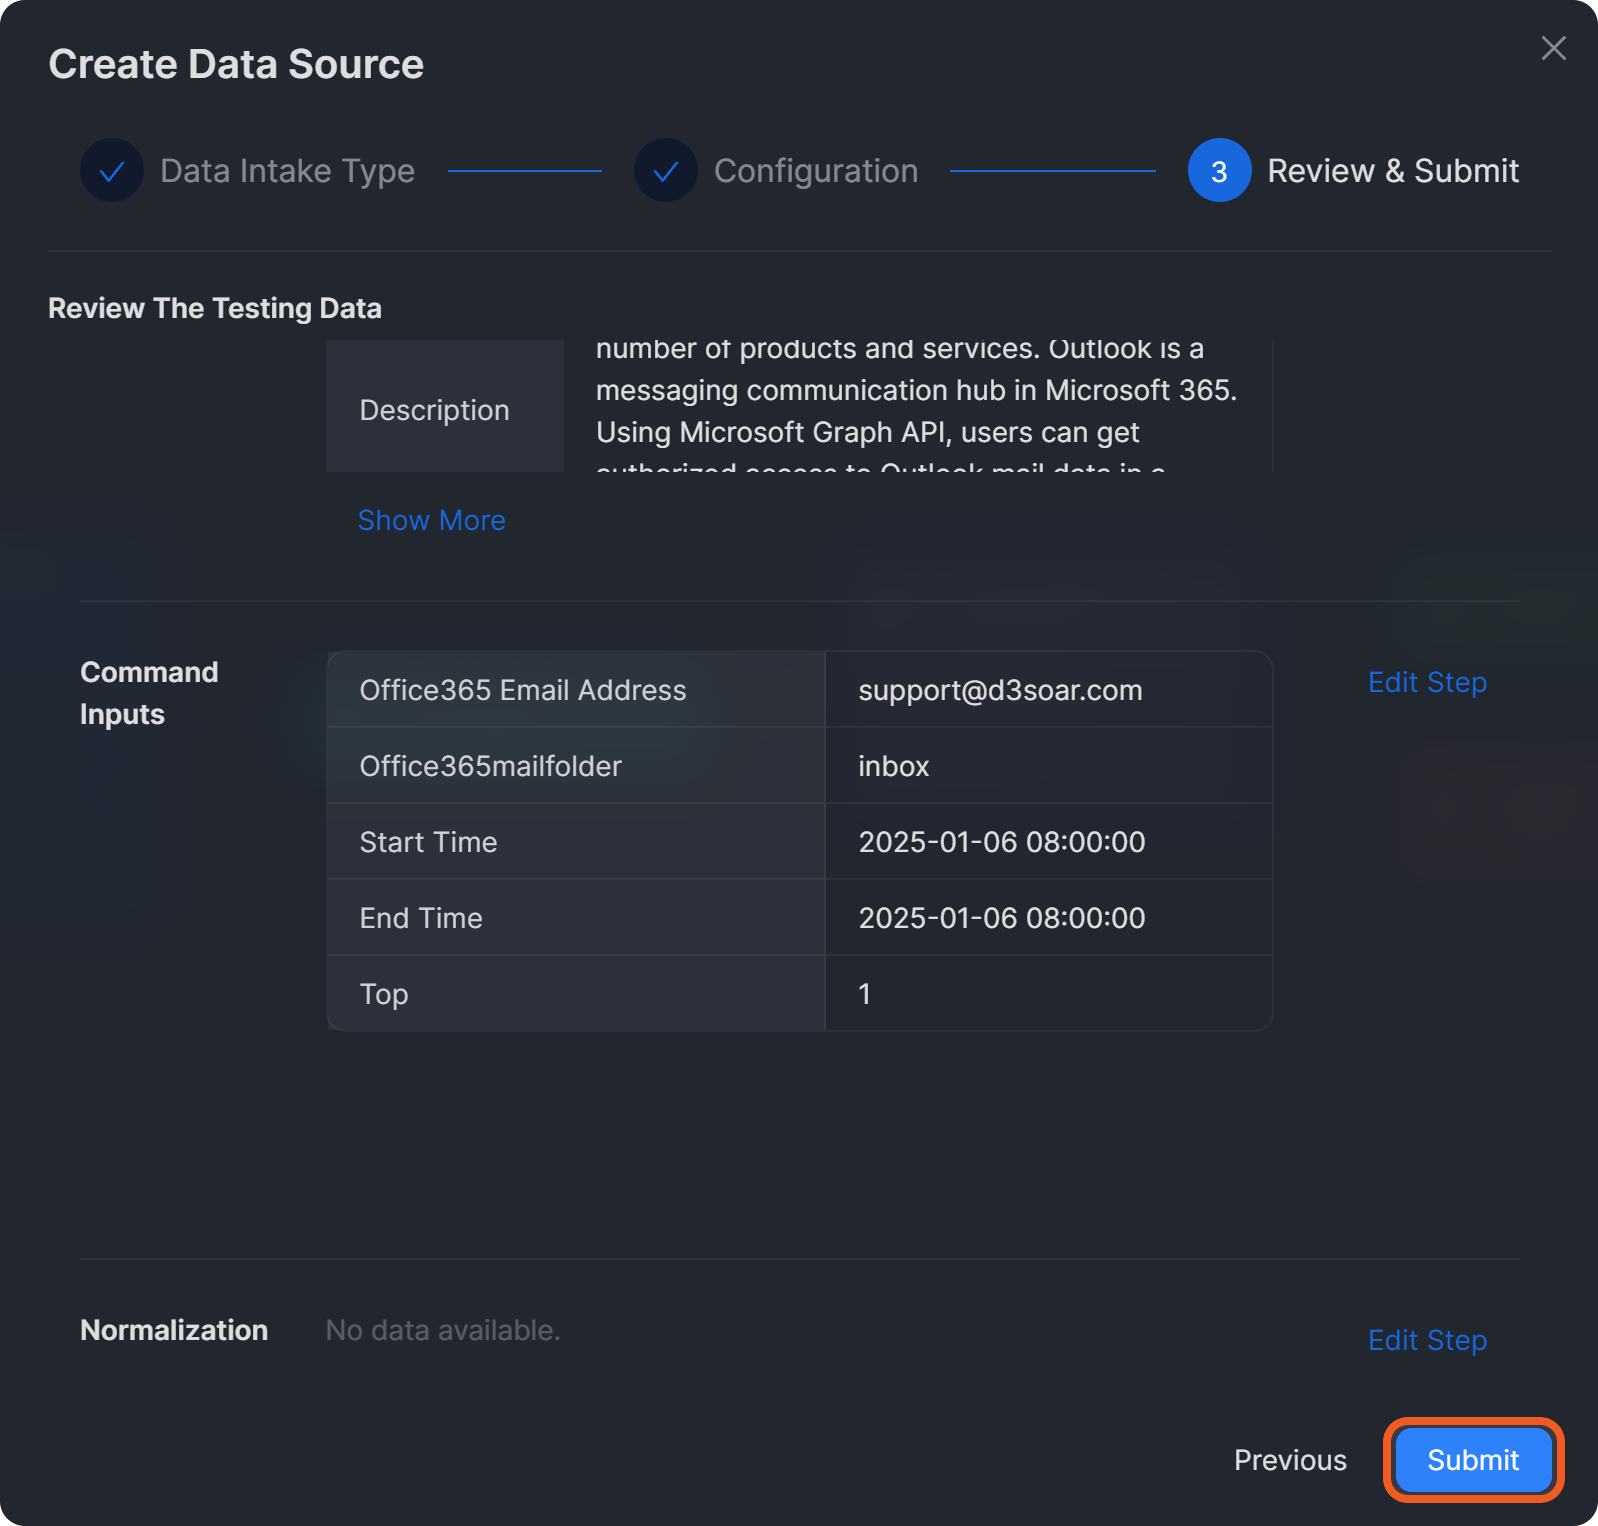
Configure the command input values as necessary, then click on the Review button.
.png?inst-v=05328674-b079-4c01-ba41-8dd92707b455)
Refer to the Fetch Event command for Office 365 for detailed information regarding its input parameters.
Click on the Submit button upon reviewing the test data.
For more information on creating a data source, refer to this documentation.
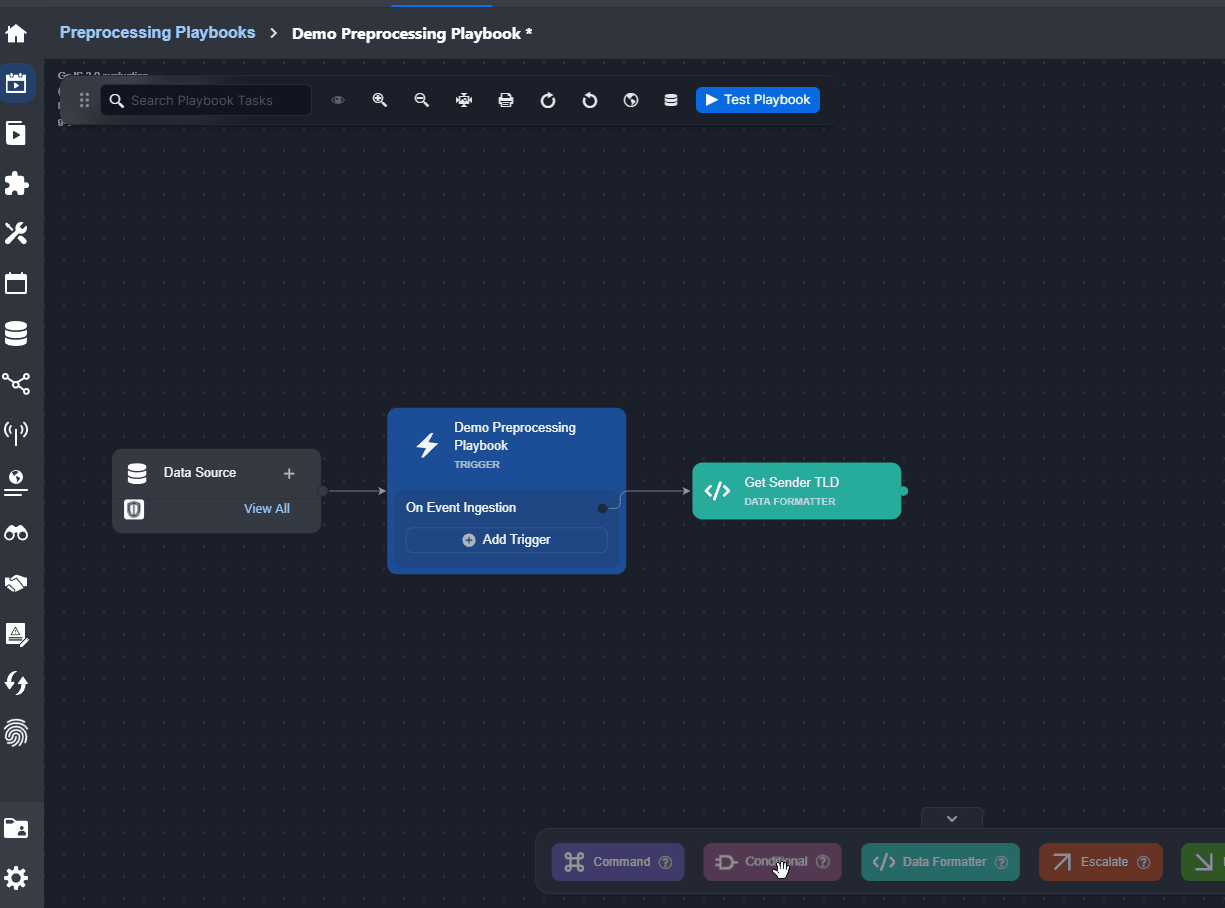
Task 3: Formatting the Ingested Data
Add a data formatter task to retrieve and process the email address from the ingested data.
Add a data formatter task to the On Event Ingestion trigger.
Name the task “Get Sender TLD”, then add the code provided in the code snippet:
 CODE
CODE{% set split_vals = PlaybookData | jsonpath('$.Trigger.data.Data.sender.emailAddress.address') | split('.') %} {{{ "TLD": split_vals[-1] }}}This code extracts the email address from the ingested data, splits it into individual items separated by dots (
.), and saves the result as an array. The TLD is extracted for use in Task 3 to check against a whitelist.Ensure that auto run is enabled, then click on the
-20241224-195752.png?inst-v=05328674-b079-4c01-ba41-8dd92707b455) button to save.
button to save.-20241224-195957.png?inst-v=05328674-b079-4c01-ba41-8dd92707b455)
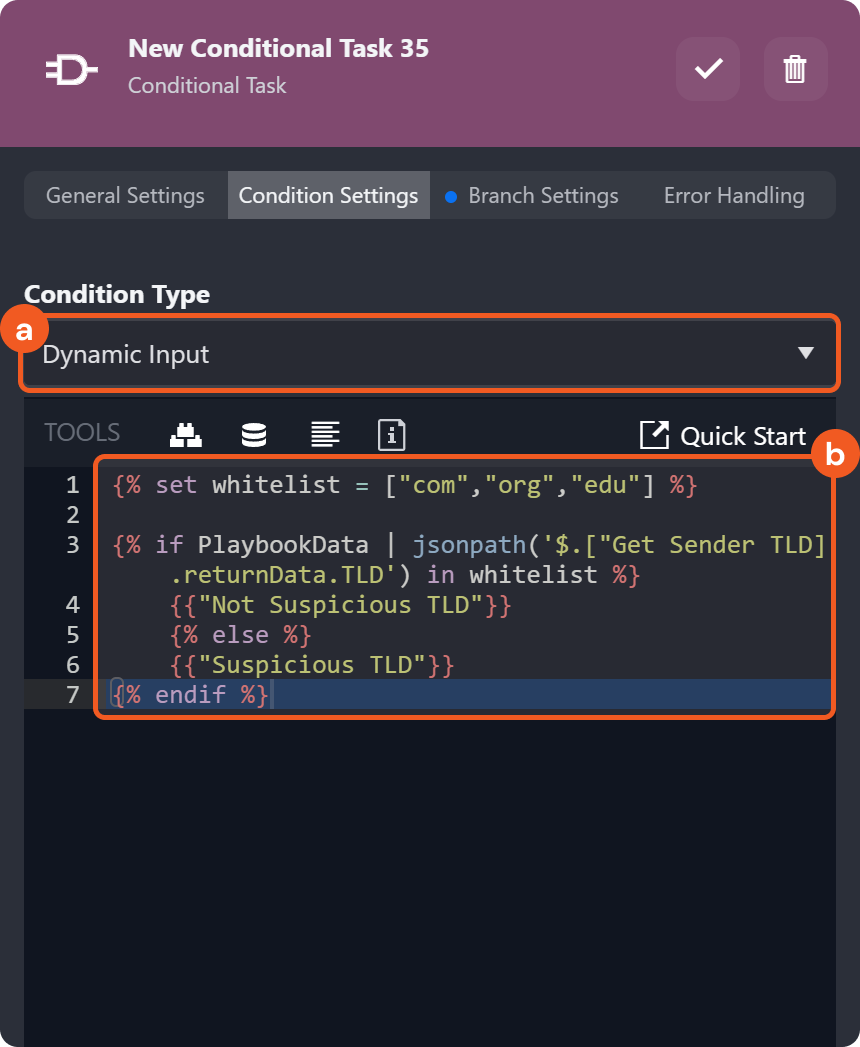
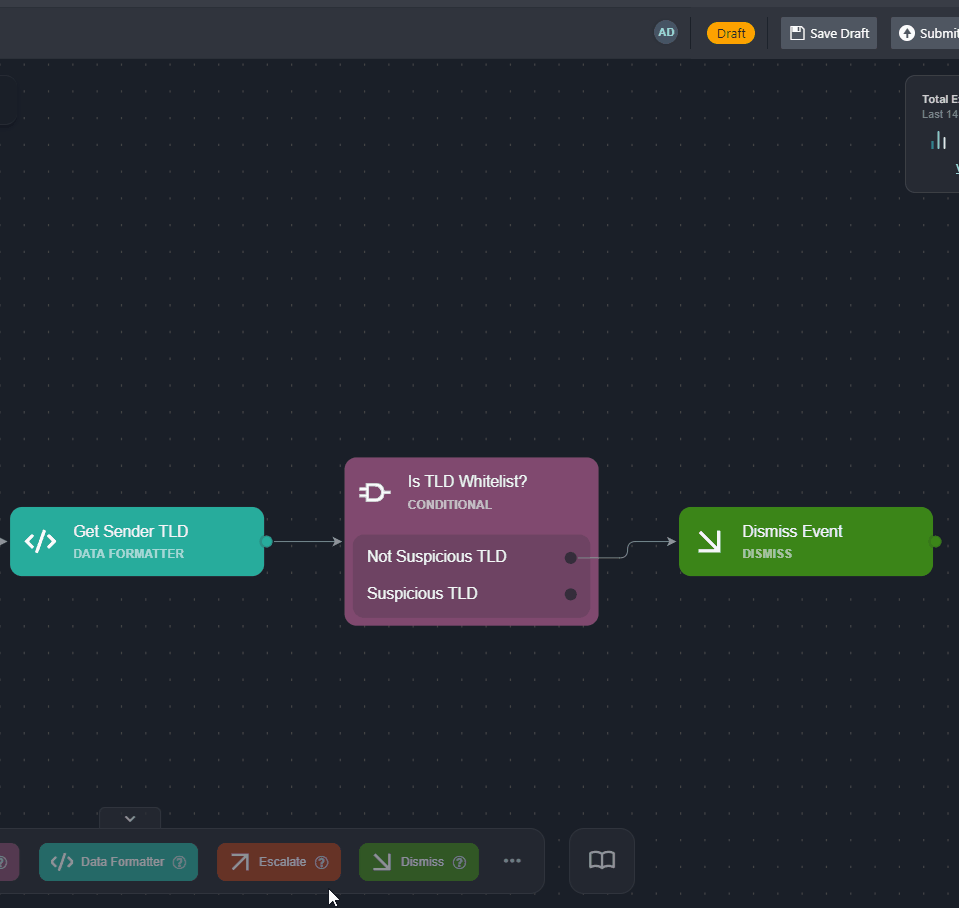
Task 4: Creating a Conditional Task
Use a conditional task to split the workflow into two paths: one for non-suspicious TLDs and one for suspicious TLDs.
Connect a conditional task to the previously configured data formatter task.
Enter a name for the task, ensure auto run is enabled, then click on the Condition Settings tab.
.png?inst-v=05328674-b079-4c01-ba41-8dd92707b455)
Select Dynamic Input using the dropdown, and then add the code provided in the code snippet:
 CODE
CODE{% set whitelist = ["com","org","edu"] %} {% if PlaybookData | jsonpath('$.["Get Sender TLD"].returnData.TLD') in whitelist %} {{"Not Suspicious TLD"}} {% else %} {{"Suspicious TLD"}} {% endif %}This code checks whether a sender's TLD is in a predefined whitelist. It retrieves the TLD from the data formatter task and outputs "Not Suspicious TLD" if found; otherwise, it outputs "Suspicious TLD."
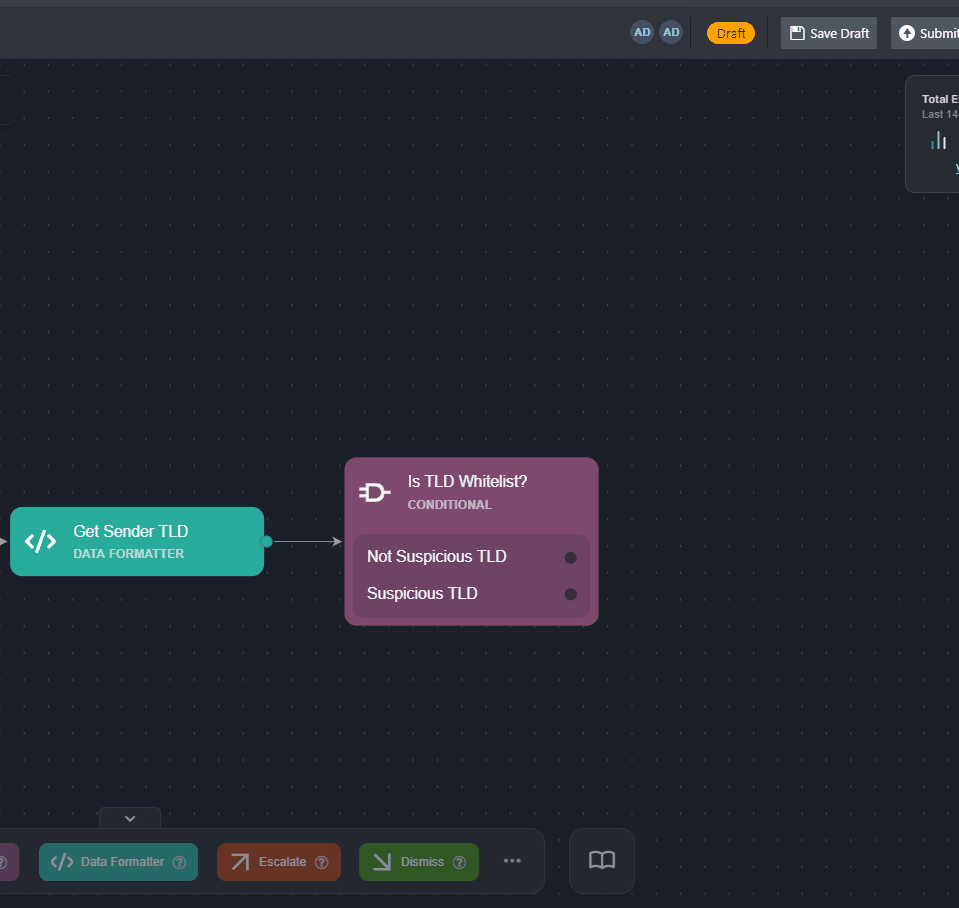
Click on the Branch Settings tab, add the following branches: Not Suspicious TLD and Suspicious TLD, then click on the
%201-20241224-200609.png?inst-v=05328674-b079-4c01-ba41-8dd92707b455) button to save.
button to save.-20241224-200750.png?inst-v=05328674-b079-4c01-ba41-8dd92707b455)
Task 5: Dismissing Events with Whitelisted Domains
Connect a Dismiss task to the Not Suspicious TLD branch.
Enter a task name, ensure that auto run is enabled, then click on the
%201%20(1)-20241224-201048.png?inst-v=05328674-b079-4c01-ba41-8dd92707b455) button to save.
button to save.-20241224-201200.png?inst-v=05328674-b079-4c01-ba41-8dd92707b455)
Task 6: Escalating Events Outside Whitelisted Domains
Connect an Escalate task to the Suspicious TLD branch.
Configure the Escalate task.
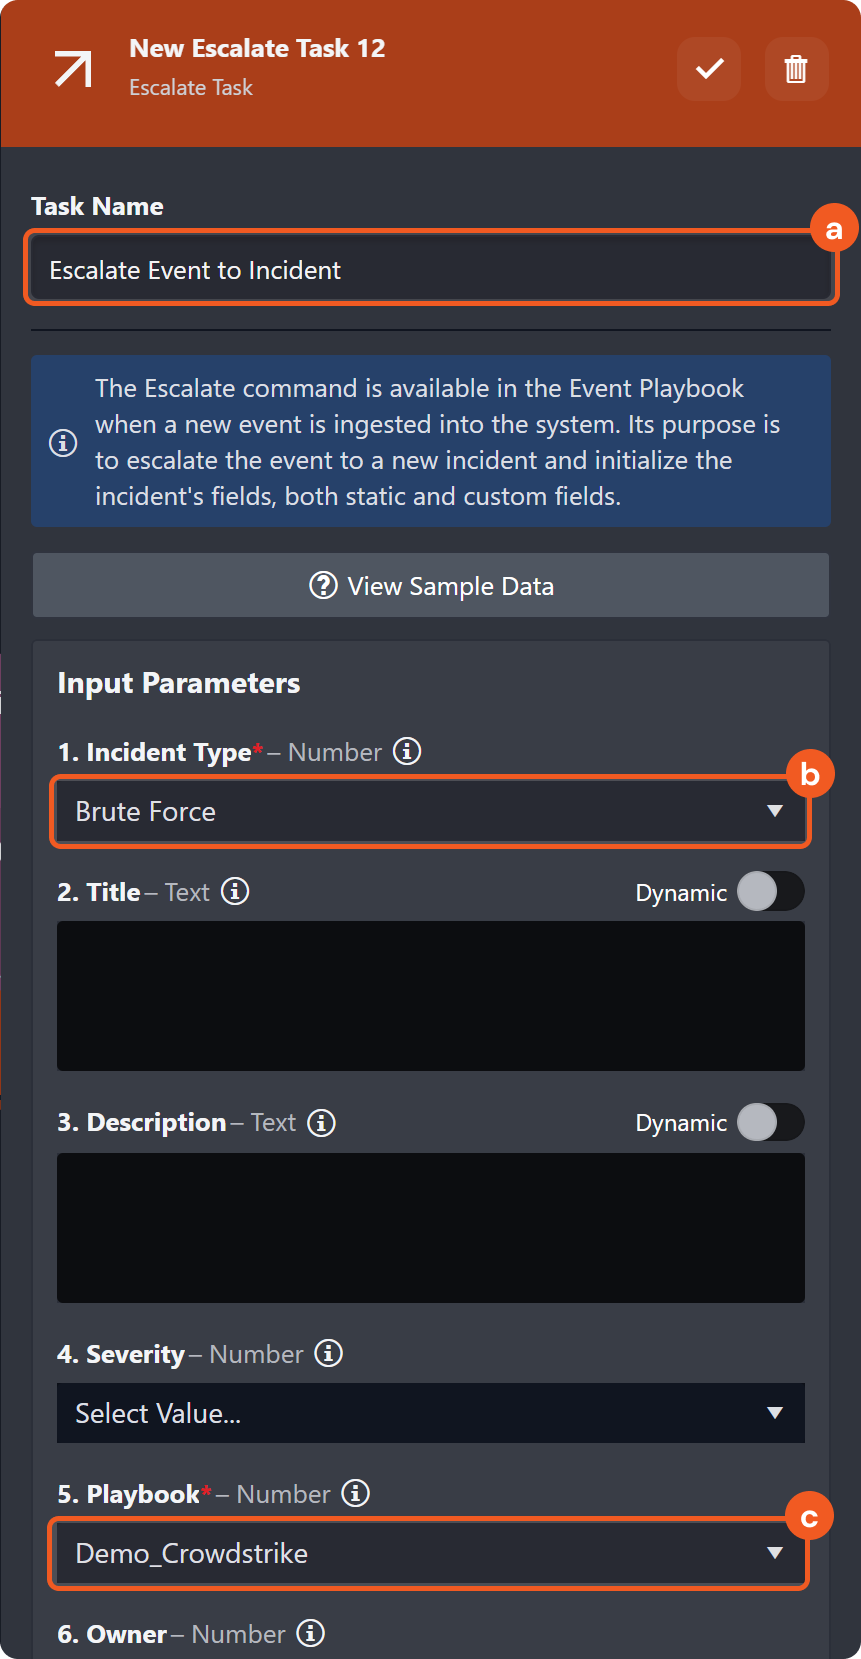
Enter a name for the task.
Select an incident type using the dropdown.
Select an incident playbook to use on the incident upon escalating the event.
Ensure that auto run is enabled, then click on the
%201%20(2)-20241224-201434.png?inst-v=05328674-b079-4c01-ba41-8dd92707b455) button to save.
button to save.-20241224-201510.png?inst-v=05328674-b079-4c01-ba41-8dd92707b455)
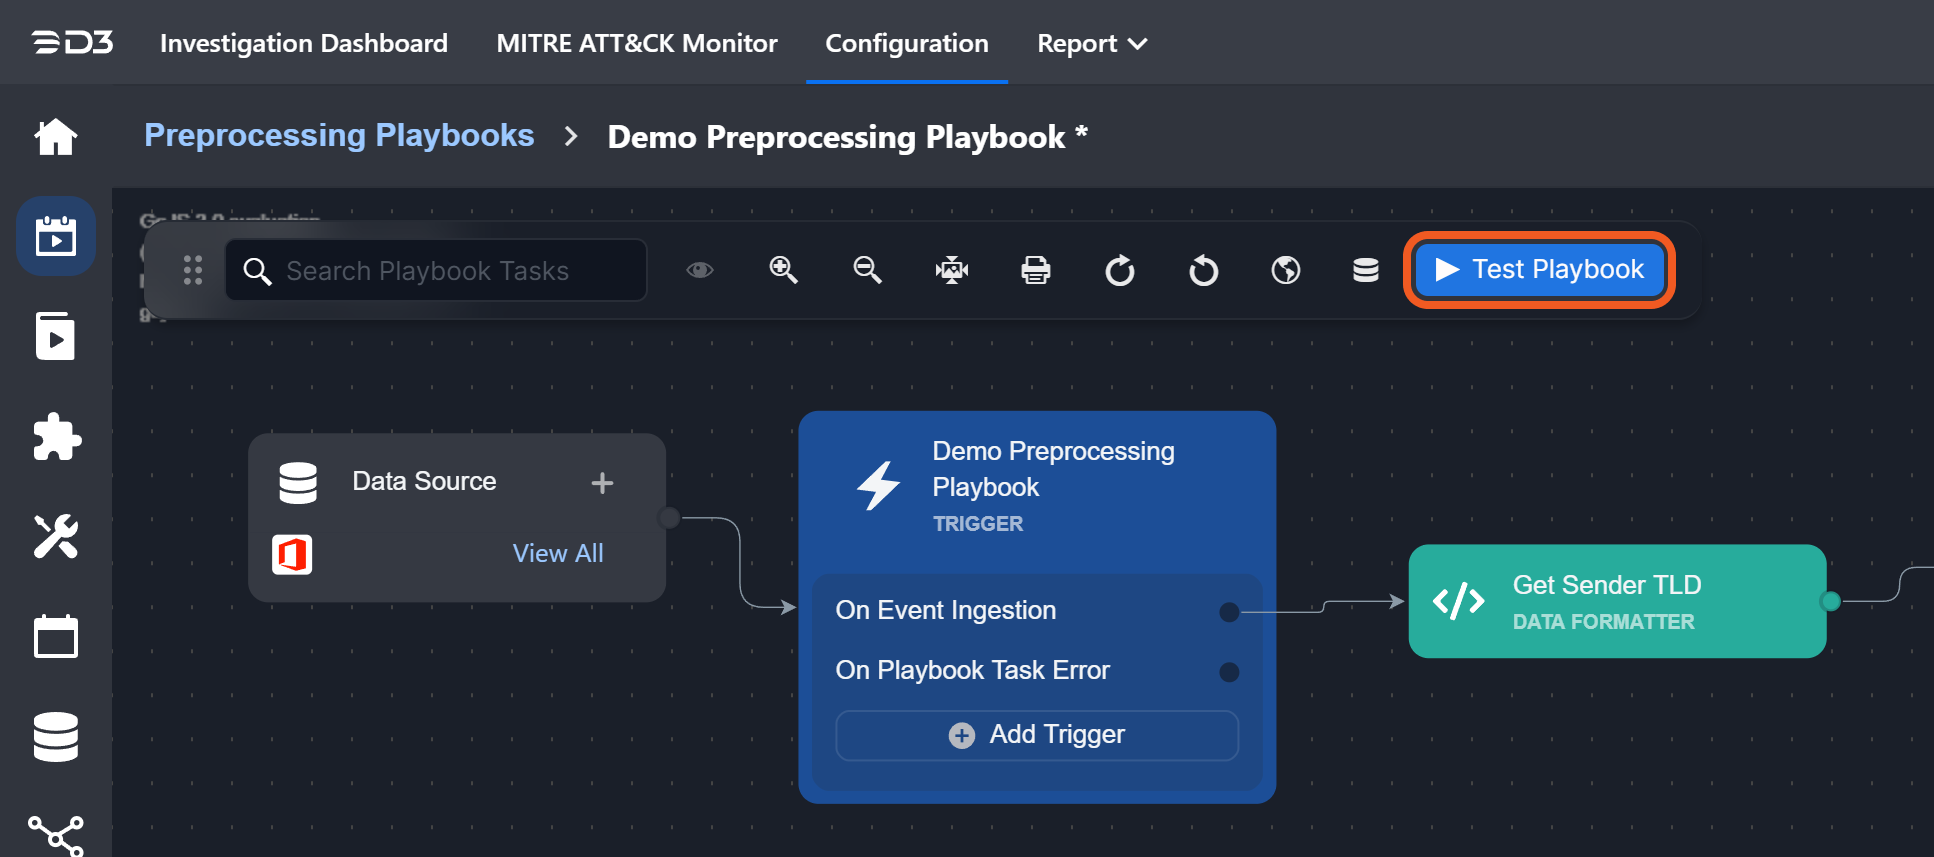
Task 7: Test the Playbook
With all tasks for the playbook configured, test it using the Test Playbook functionality.
Click on the Test Playbook button.
Select the previously created data source, and then click on the Run Test button.

Confirm that the playbook has executed without failure and performed as intended.
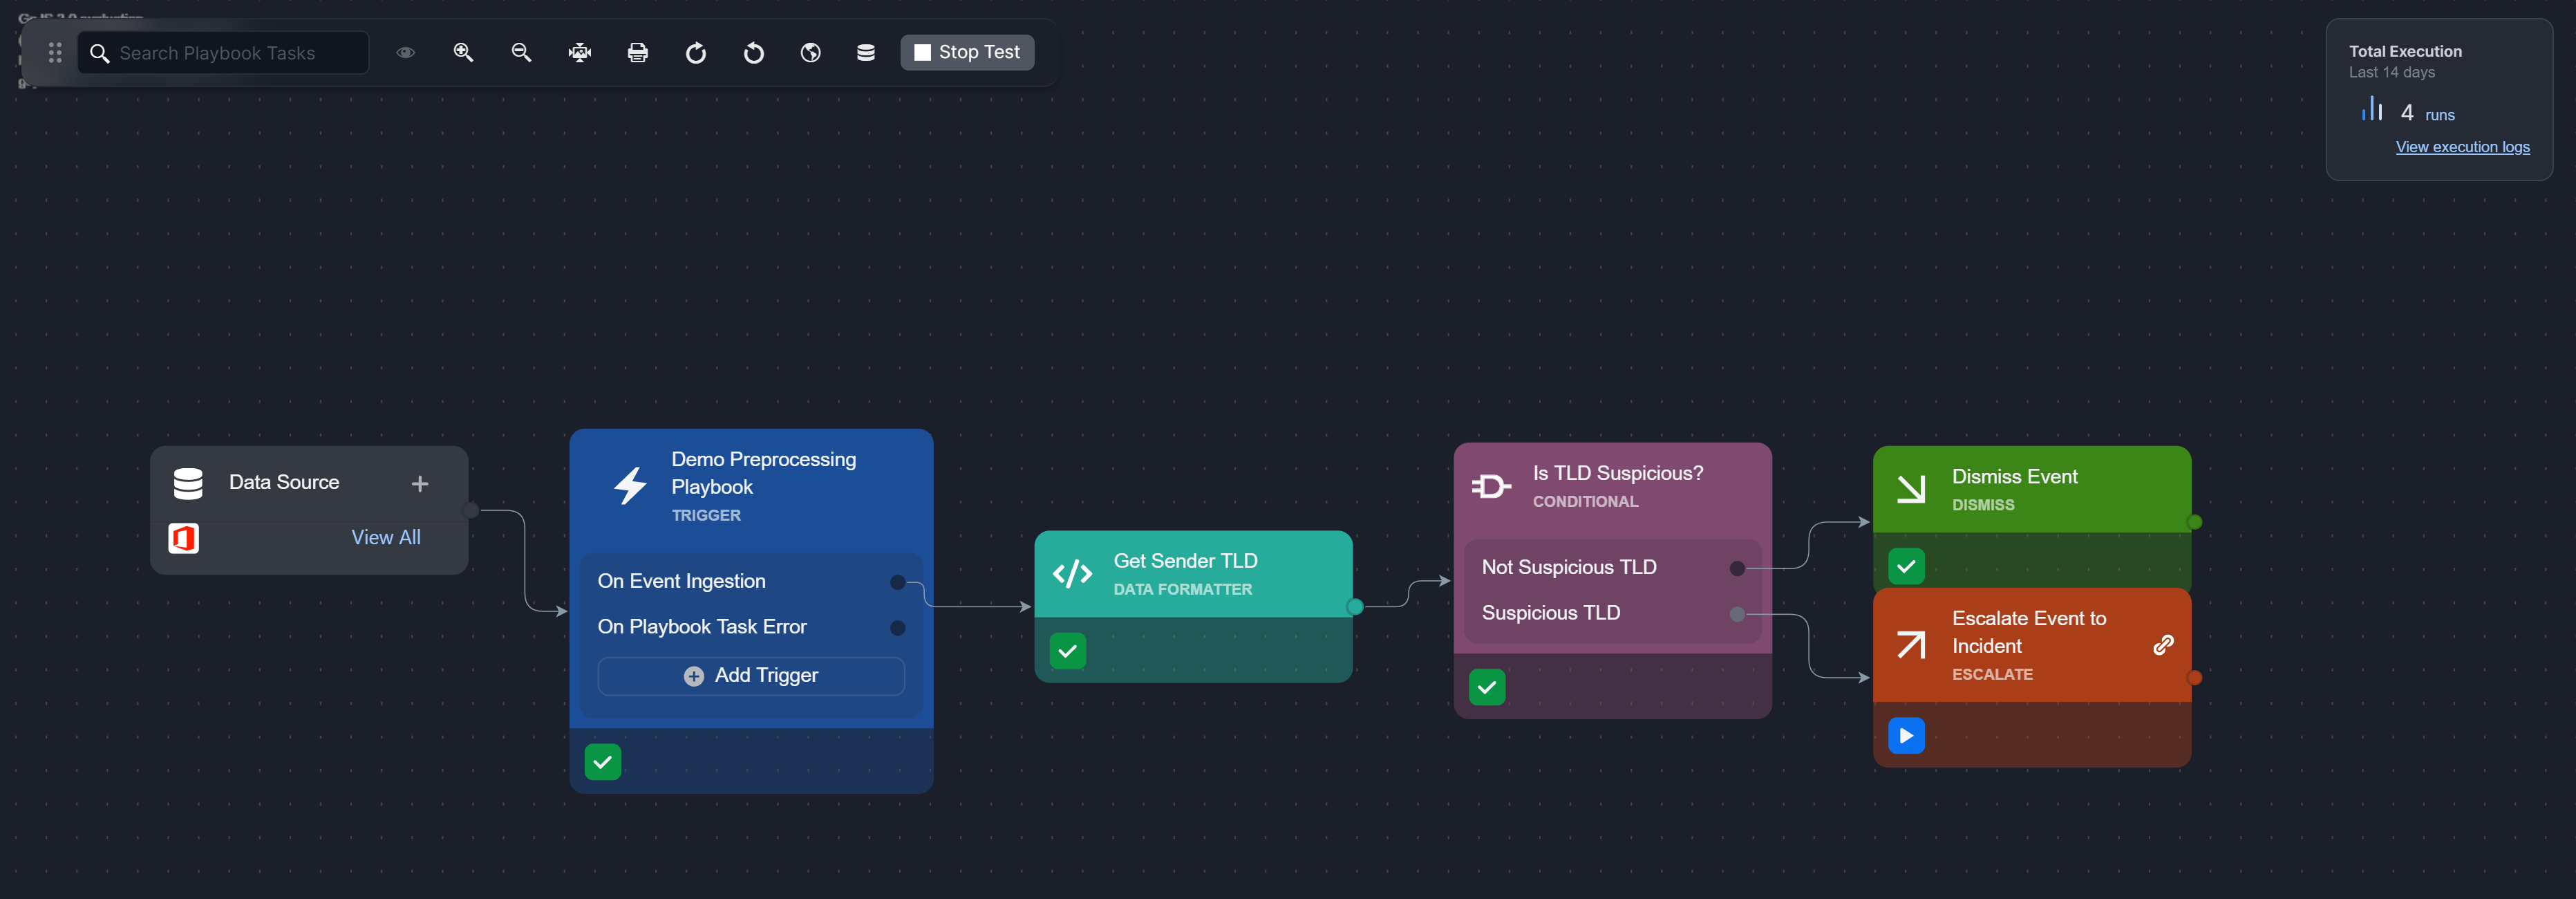
READER NOTE
Users may navigate to the investigation playbook specified within the Escalate Event to Incident task by clicking on the  icon on the task.
Task 8: Submitting the Playbook
Once the playbook is complete, submit the playbook to make it available for use on ingested data.
Click on the Submit button.
-20241224-201616.png?inst-v=05328674-b079-4c01-ba41-8dd92707b455)
Clicking on the popup Submit button to render the playbook
 .
.-20241224-201643.png?inst-v=05328674-b079-4c01-ba41-8dd92707b455)
Task 9: Using the Playbook on Ingested Data
To use the preprocessing playbook on ingested Office 365 data, schedule a data ingestion job.
Navigate to Configuration > Data Ingestion.
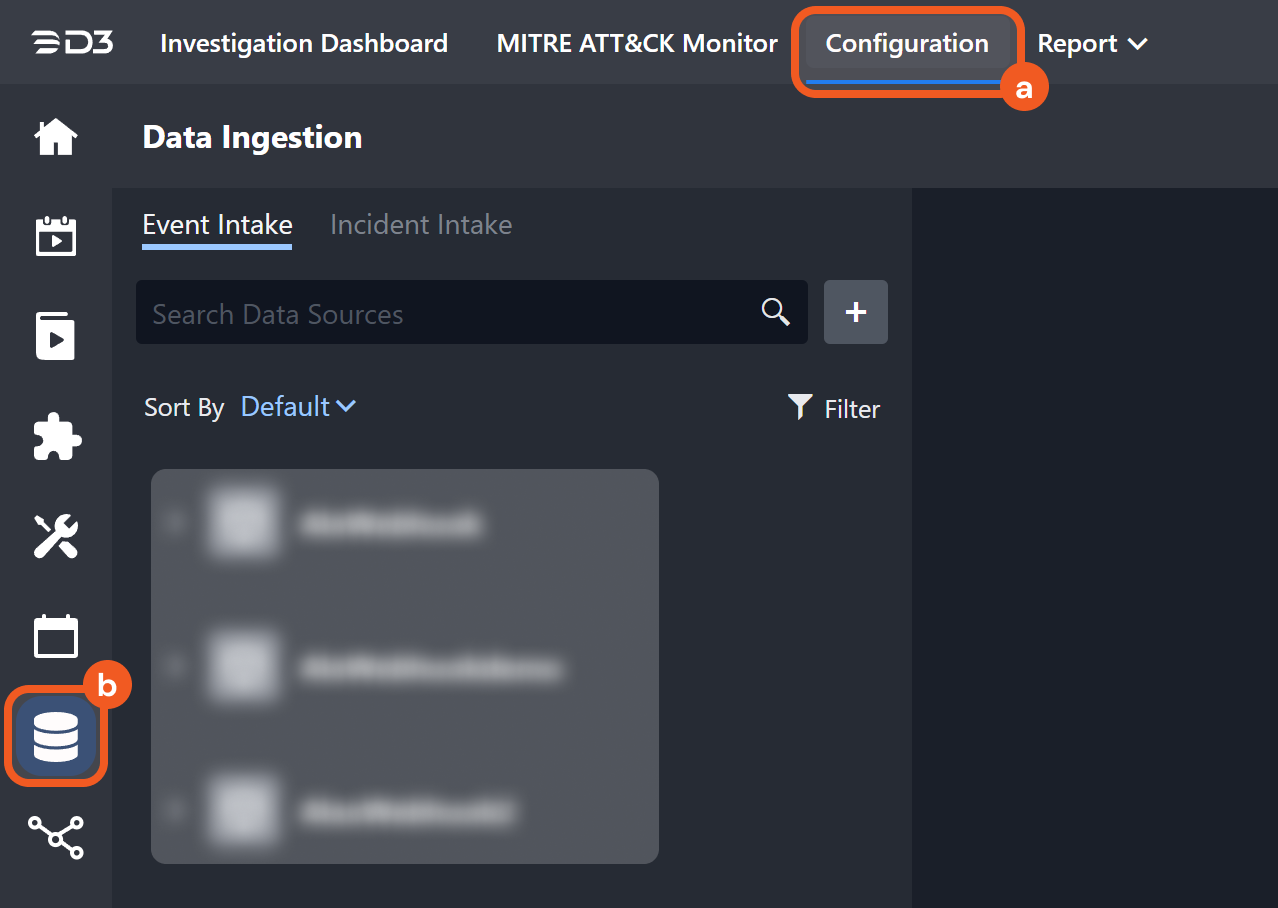
Click on the
 button and then the Schedule button.
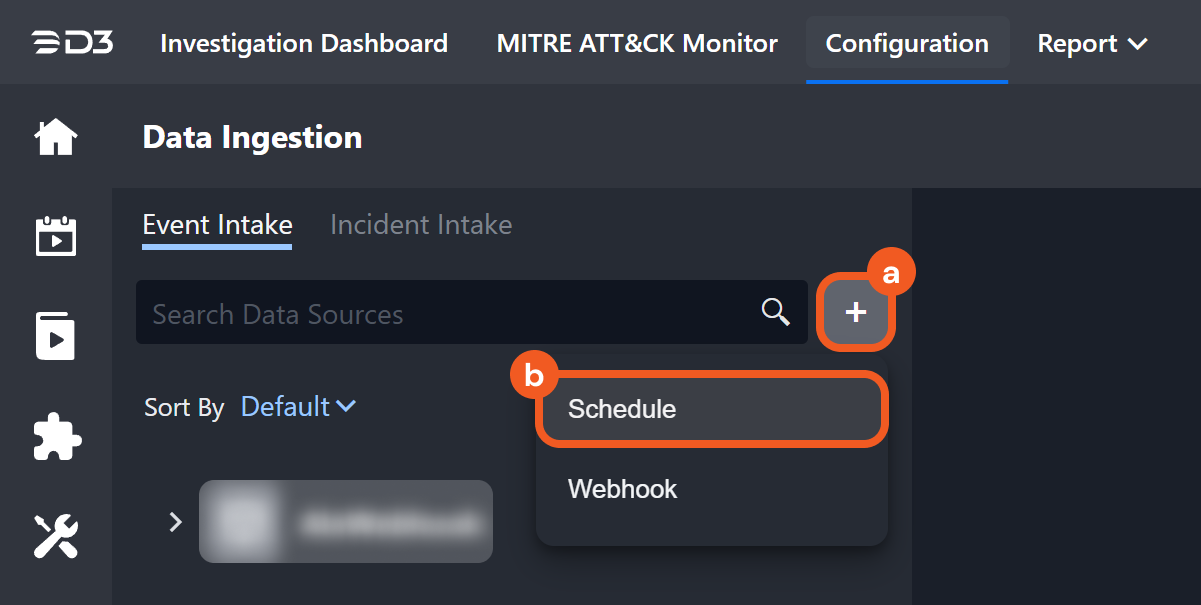
Schedule a data ingestion job using Office 365.
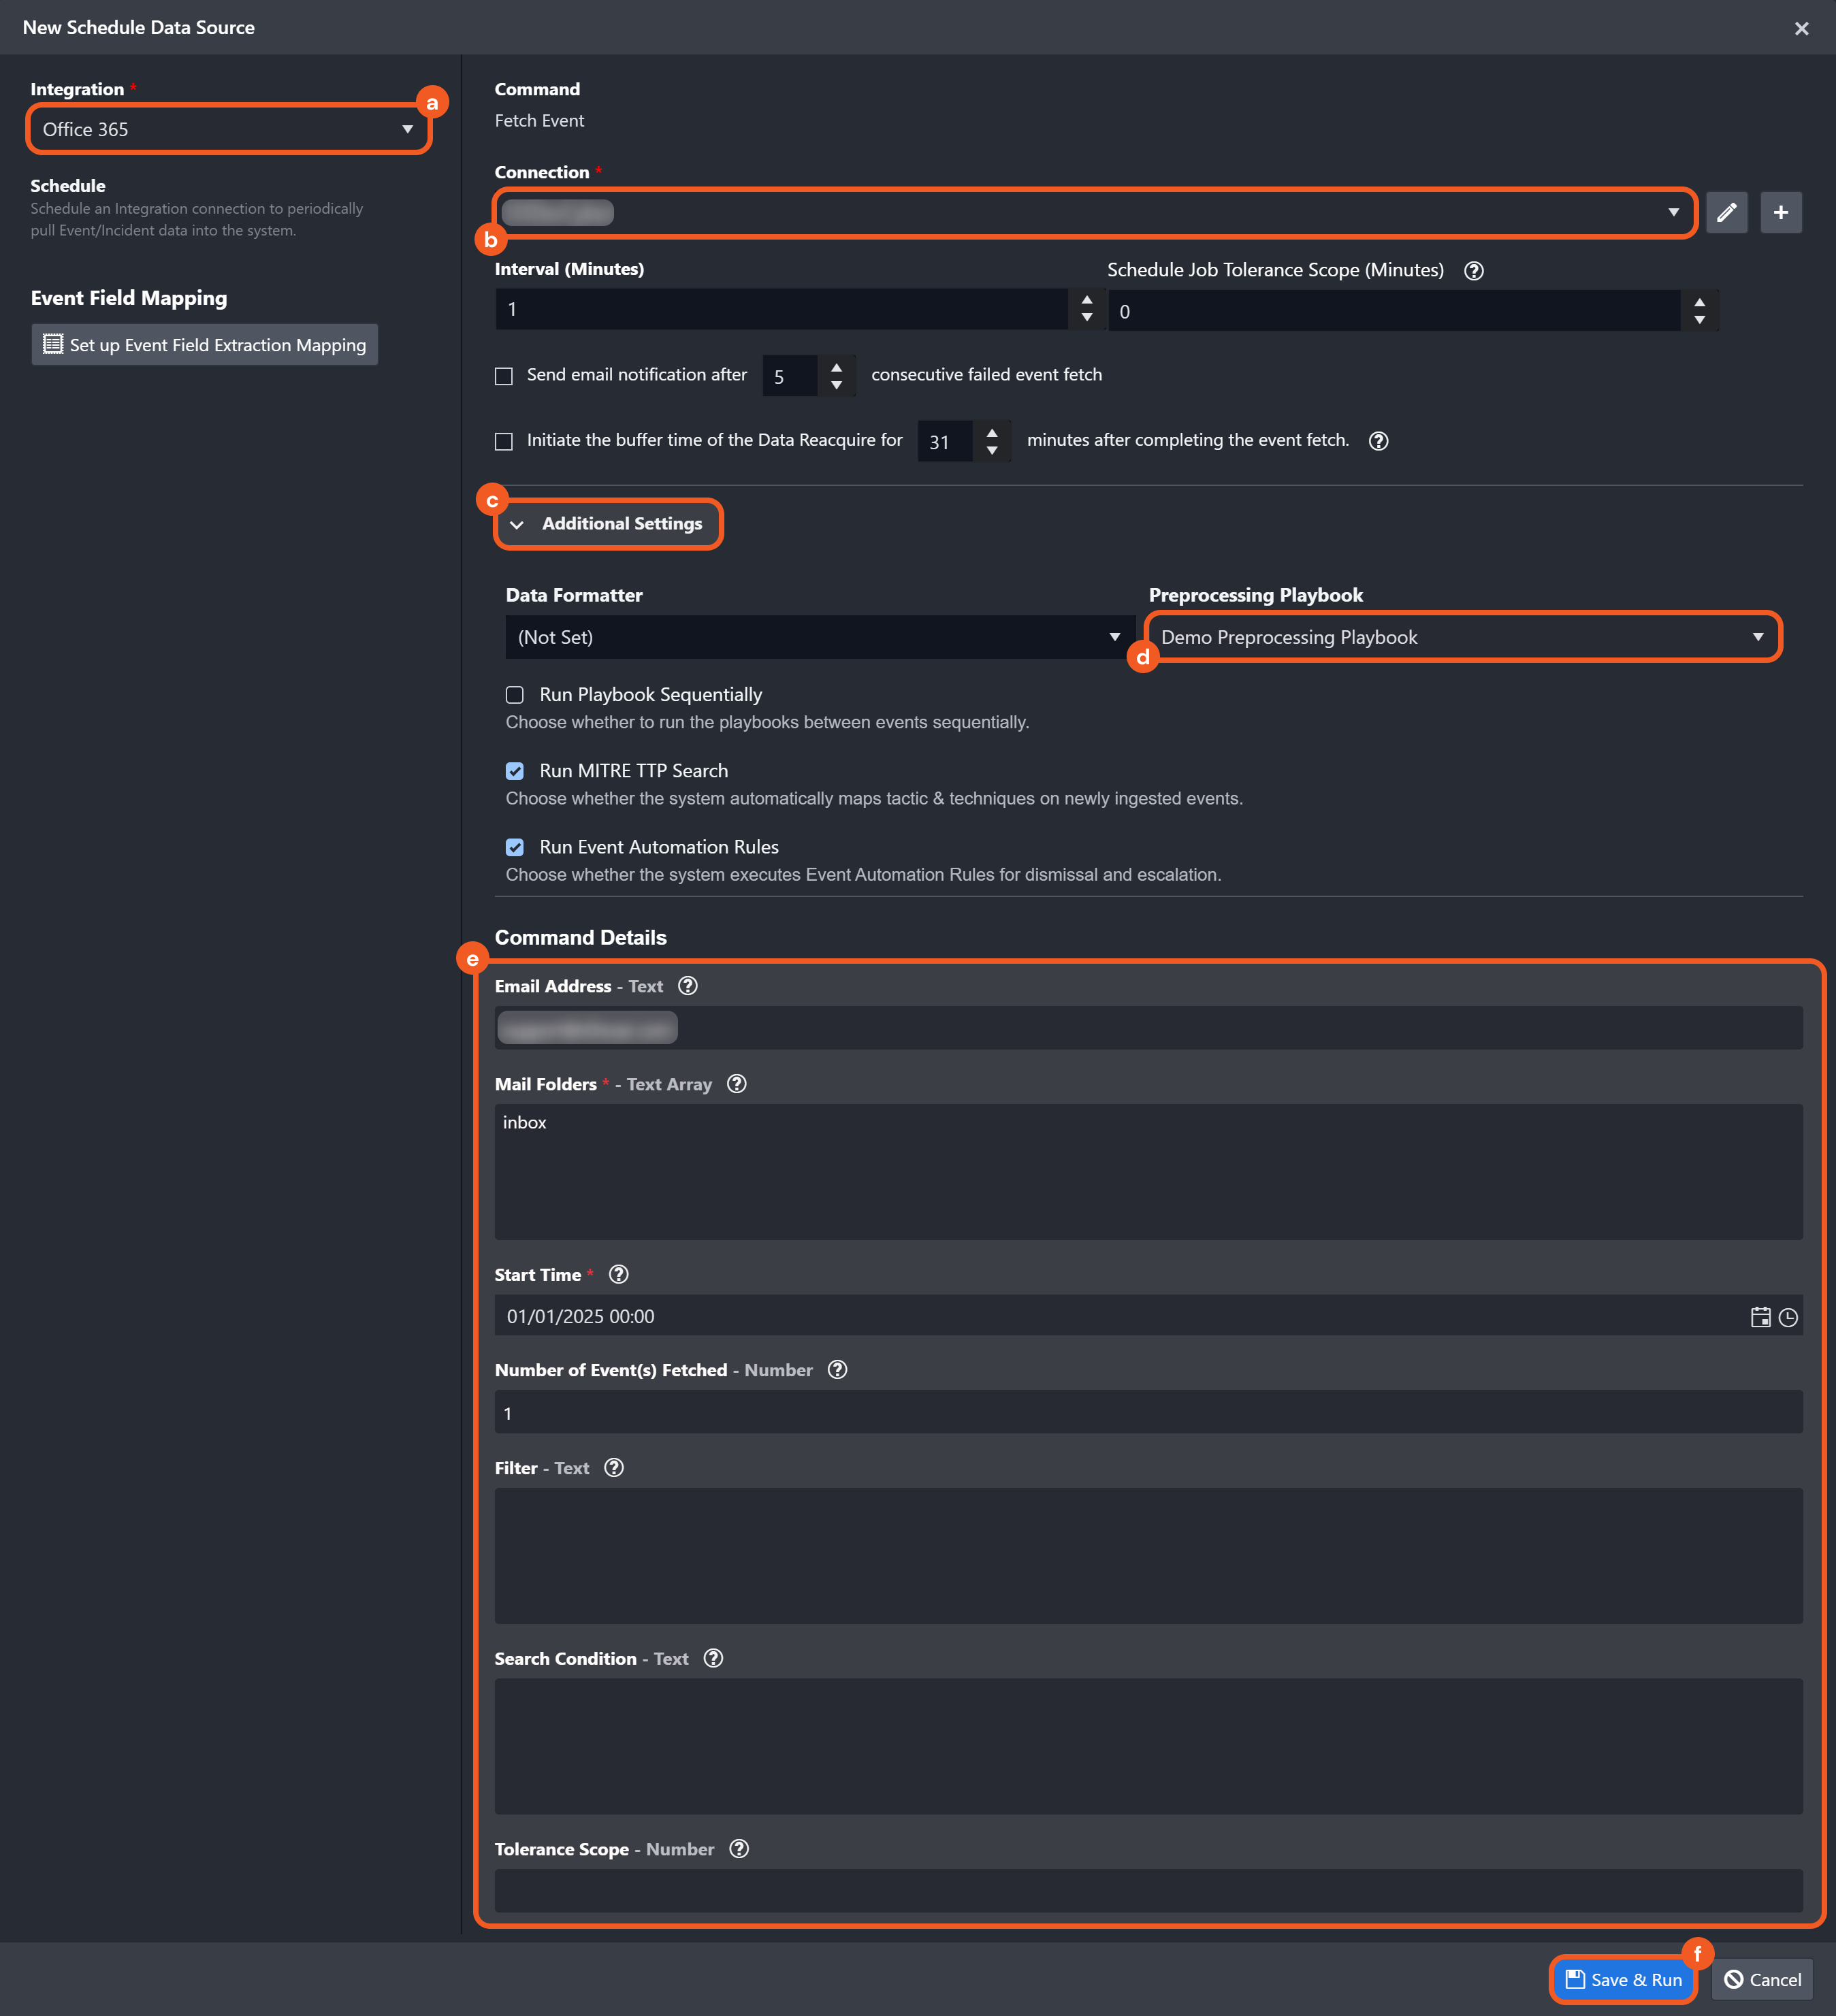
Search for and select the Office 365 integration.
Choose an existing connection or add a new one.
Click on the Additional Settings expandable section.
Select the newly created preprocessing playbook.
Enter values for the command’s input parameters as necessary.
Click on the Save & Run button.
RESULT
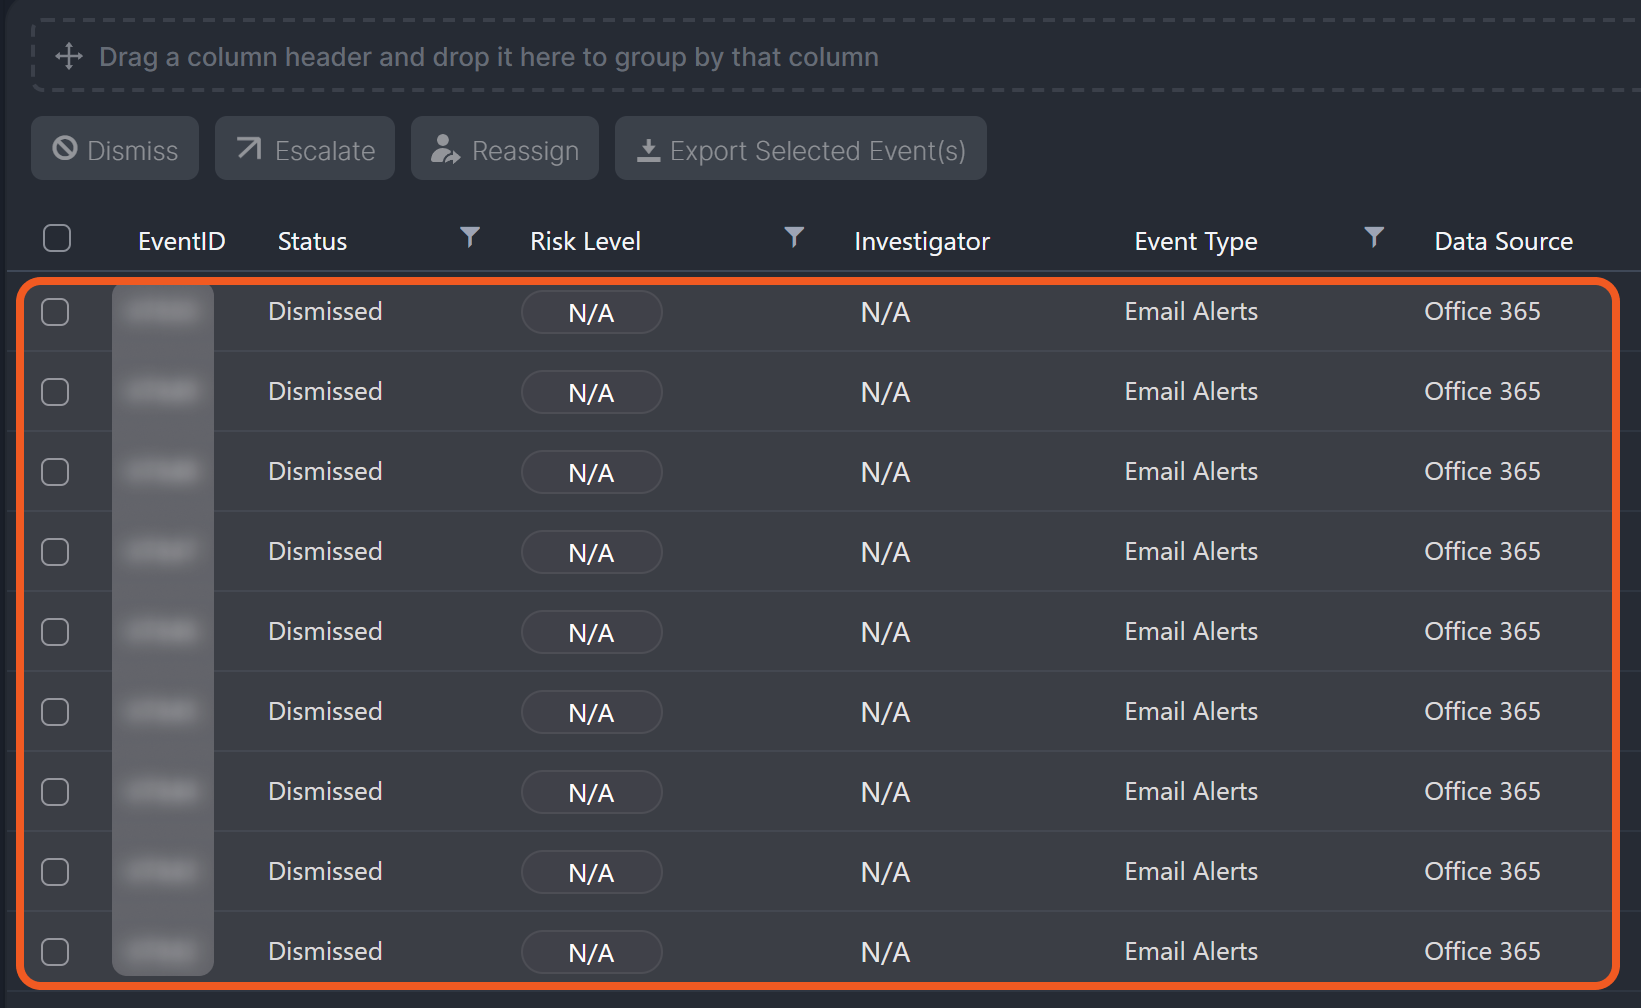
Ingested data is processed by the preprocessing playbook, creating events as needed and automating their escalation to incidents or dismissal. This can be verified in the Investigation Dashboard under Events > All Events.
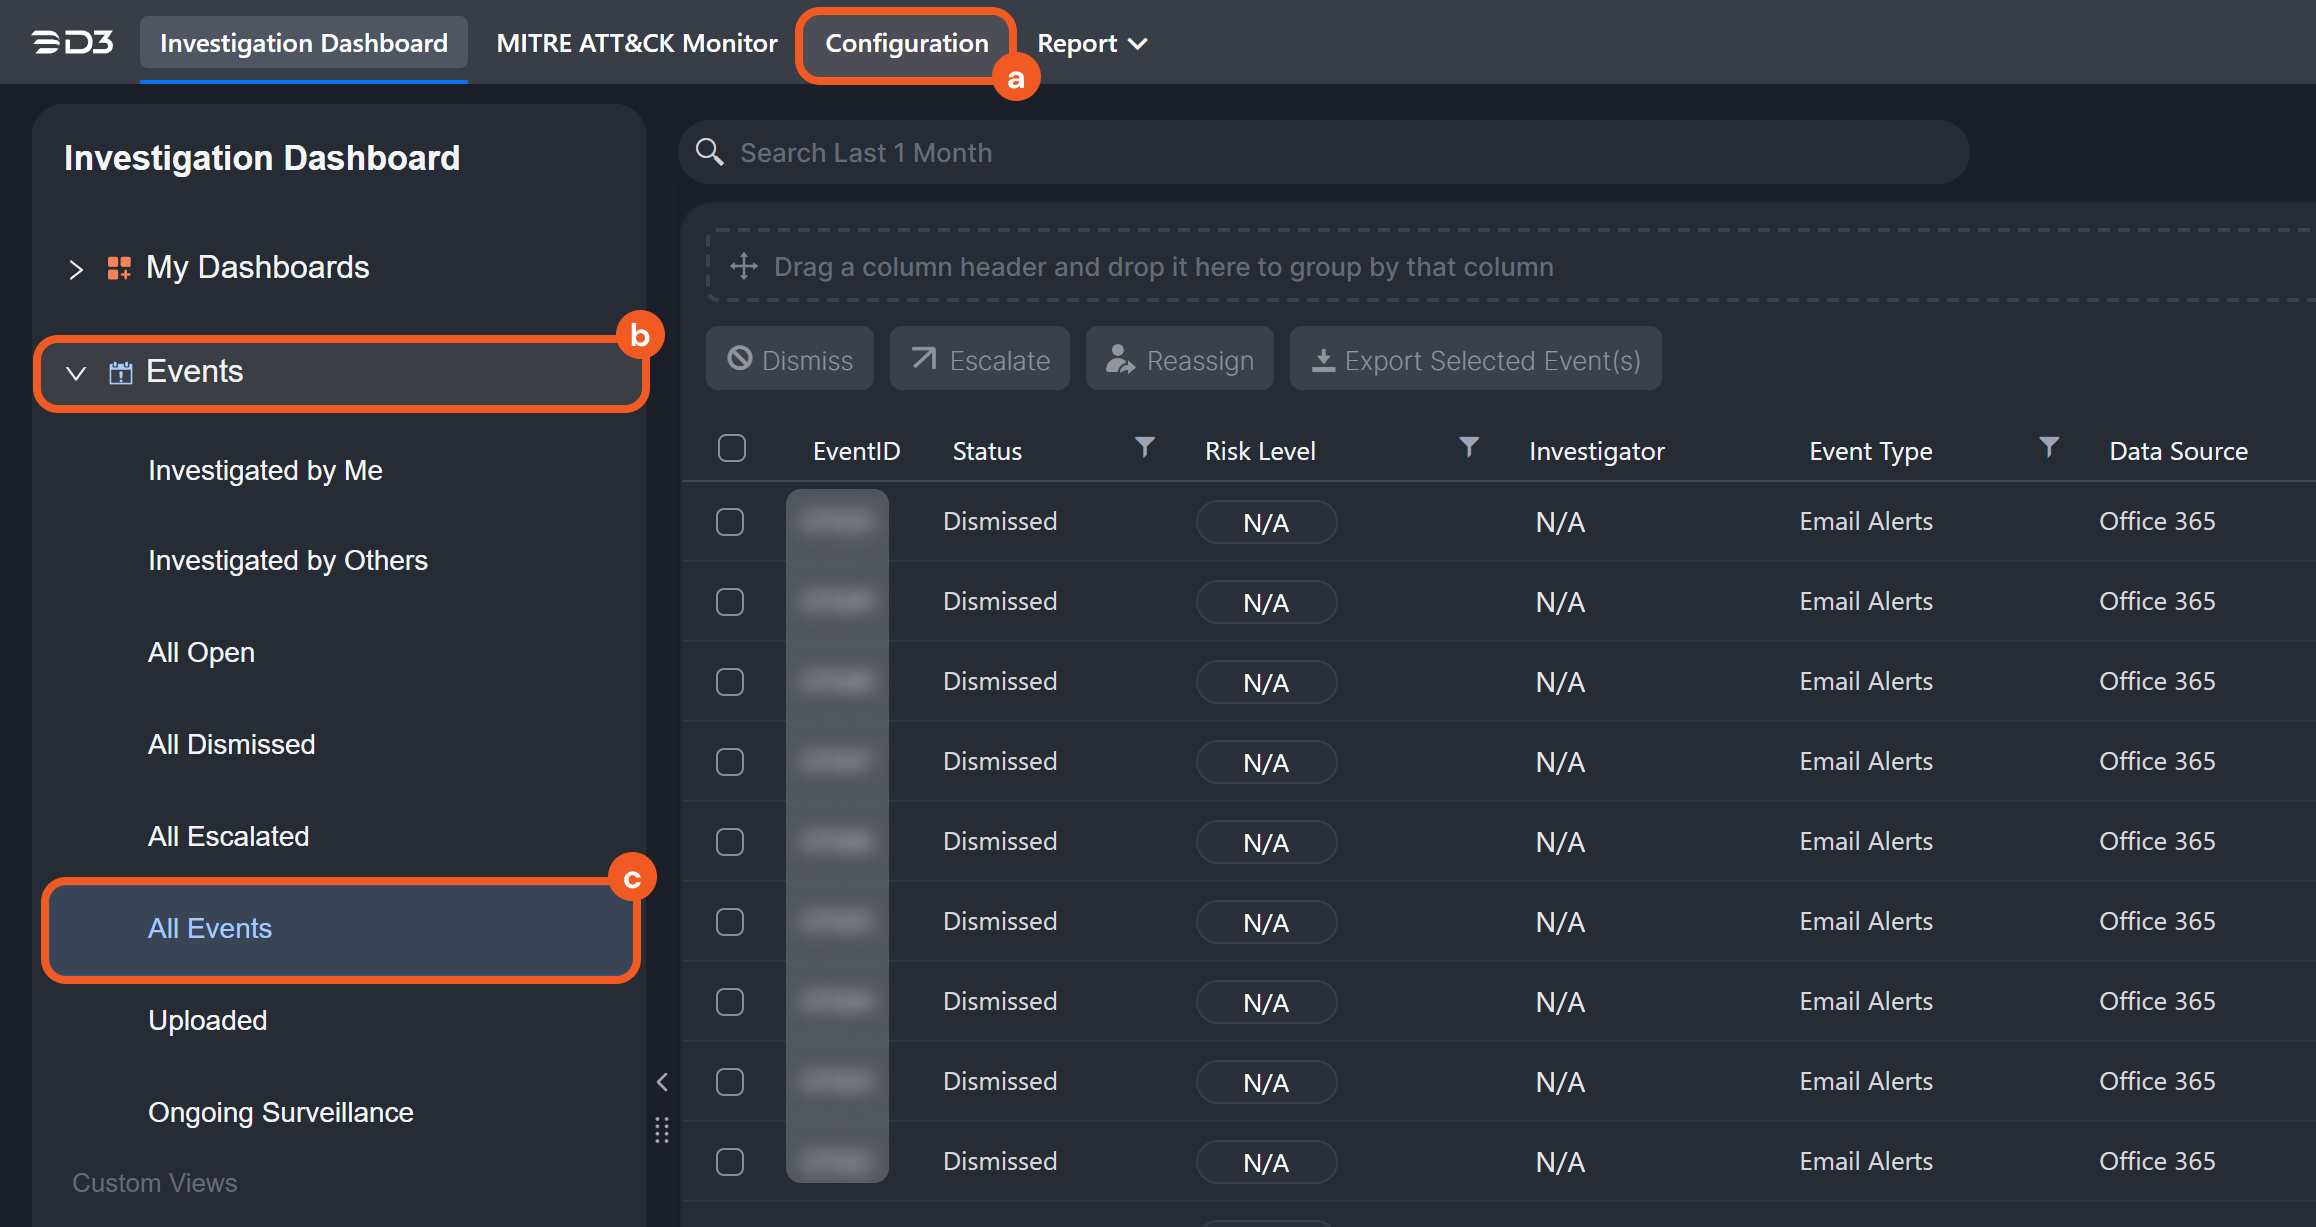
These events have been automatically dismissed because the sender's email address, associated with the emails that triggered the events in D3, contains a whitelisted domain.