Installation on Linux
LAST UPDATED: OCT 21, 2024
Proxy Agent Installation on Linux
Environment Requirement
Hardware (Can be virtual)
Component | Minimum | Recommended |
|---|---|---|
CPU | 4 CPU Cores | 8 CPU Cores |
Memory | 8GB RAM | 16GB RAM |
Host Local Storage | 30GB SSD | 100GB SSD (Raid 1 or 10) |
Operating System
Version | License |
|---|---|
Linux Ubuntu / Red Hat | - |
Firewall Ports
Service | Protocol | Port | Direction | Firewall / Proxy |
|---|---|---|---|---|
D3 SOAR Proxy Agent | TCP | 443 | Outbound to Internet | Allow |
Please Note:
The server for D3 Proxy Agent must be able to communicate with D3 vSOC servers via TCP ports 443.
D3 Proxy Agent must be installed on servers that have direct access to the internal security products, such as firewalls, SIEM, Exchange, etc.
If Web Proxy is enabled in your network environment, Web Proxy IP needs to be provided for docker-compose configuration during the installation.(See Using D3 Proxy Agent with a Web Proxy Server)
Step 1: Install Docker Engine
Example 1: Install Docker on Ubuntu
Follow the instructions from the documentation to install docker using the apt package manager: Install Docker Engine on Ubuntu | Docker Docs
Run the command below to check if Docker is installed:
docker versionAlternatively, you can install from a package with these instructions:

You can find different Ubuntu releases for Docker at https://download.docker.com/linux/ubuntu/dists/
Download and install four .deb packages from <version>/pool/stable/amd64:
docker-ce-cli
docker-ce
http://containerd.io
docker-compose-plugin
Command to install on ubuntu:
sudo dpkg -i /path/to/<replace_with_package>.debCommand to check if docker service is running:
sudo systemctl status dockerExample 2: Install Docker on Red Hat
Follow the instructions from the documentation to install docker using the yum package manager: https://docs.docker.com/engine/install/rhel/
Alternatively, you can install from a package with these instructions:
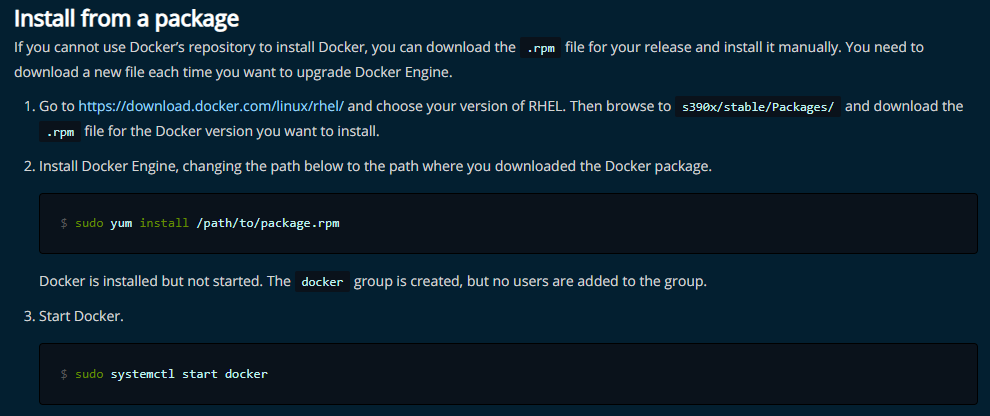
Click here for Red Hat package distributions
Download and install four .rpm packages from <version>/s390x/stable/packages:
docker-ce-cli
docker-ce
http://containerd.io
docker-compose-plugin
Command to install on Red Hat:
sudo yum install /path/to/<replace_with_package>.rpm Command to start docker server:
sudo systemctl start dockerStep 2: Authenticate to Google Container Registry
The D3 Proxy Agent image hosted on Google Container Registry is private. Authenticate to the D3 Google Container Registry to pull and install it.
Contact the D3 account representative to obtain the
service_account_d3soar.jsonfile. Ensure that the file name remains asservice_account_d3soar.jsonwithout any appended parentheses or numbers.Create a directory for the D3 Proxy Agent installation on the Linux host machine:
BASHmkdir D3ProxyAgentChange to the newly created directory:
BASHcd D3ProxyAgentCopy the
service_account_d3soar.jsonfile into the newly created directory.Authenticate to the Google Container Registry using the following command:
BASHsudo docker login -u _json_key --password-stdin https://gcr.io < service_account_d3soar.json
READER NOTE
Successful authentication will result in a “Login Succeeded” message in your terminal.
WARNING
The
service_account_d3soar.jsonfile must be named exactly asservice_account_d3soar.jsonwithout any changes to its name.If you encounter errors, verify the naming and content of your
service_account_d3soar.jsonfile.
(Optional) Test and verify that you can successfully pull an image from the D3 Google Container Registry by running the following command:
BASHsudo docker pull gcr.io/nimble-cortex-285618/d3prod/d3agent:<D3 vSOC version>
READER NOTE
The
<D3 vSOC version>conforms to the following format:#.#.#.#.Eg.
16.8.112.0.
The
<D3 vSOC version>can be found within your D3 vSOC login page.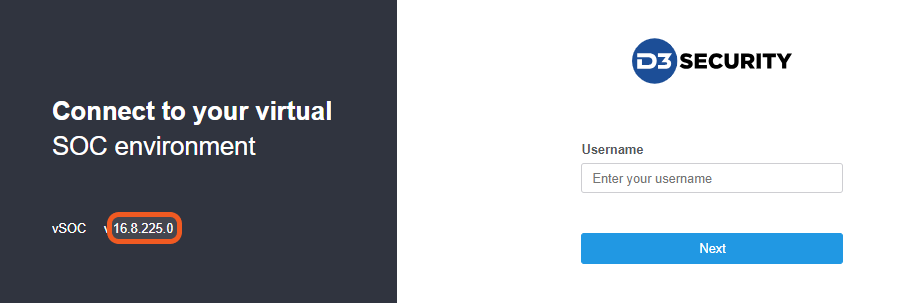
Upon a successful pull, you will see something like the following:
-20241017-001413.png?inst-v=2859b6fa-8eb9-4821-9810-cc803493d96f)
Upon a failed pull, you will see a “Failed to fetch
<D3 vSOC version>from request...” message:-20241017-001646.png?inst-v=2859b6fa-8eb9-4821-9810-cc803493d96f)
Step 3: Run docker-compose to Start the Containers
On the Proxy Agent, we will need to run both the d3executor and the d3agent containers.
Create and edit a
docker-compose.ymlfile and include the following content:YAMLversion: "3.3" services: d3agent: image: "gcr.io/nimble-cortex-285618/d3prod/d3agent:<D3 vSOC version>" restart: always environment: - REMOTE_SERVER_URL=<D3 vSOC URL> - PROXY_IDENTITY=<D3 vSOC Agent Security Token> - PYTHON_REMOTE_URL=http://<Docker Host IP>:<Docker Host Port>/ - PYTHON_REMOTE_GUID=7e036a86dbee40d9913c3794e779eae4 - SERVICE_DISPLAY_NAME=<Proxy Agent Display Name> - DOCKER_GID=<Docker Group ID> - DOCKER_PORT=<Docker Host Port> volumes: - /var/run/docker.sock:/var/run/docker.sock d3executor: image: "gcr.io/nimble-cortex-285618/d3prod/d3executor:<D3 vSOC version>" ports: - "<Docker Host Port>:9090" restart: always environment: - EXECUTOR_GUID=7e036a86dbee40d9913c3794e779eae4
D3 VSOC VERSION – Replace <D3 vSOC version> with your vSOC version, which can be found on the D3 login page. For example, if you are using D3 vSOC release version 16.1.80.0, replace the <D3 vSOC version> placeholders within the d3agent and d3executor services to 16.1.80.0.
D3 VSOC URL – This the the vSOC URL, starting with https or http. For example: https://www.test.d3security.com/VSOC/
D3 VSOC AGENT SECURITY TOKEN – The D3 vSOC Agent Security Tokencan be generated by following these steps:
i. Navigate to the the Configuration navigational tab.
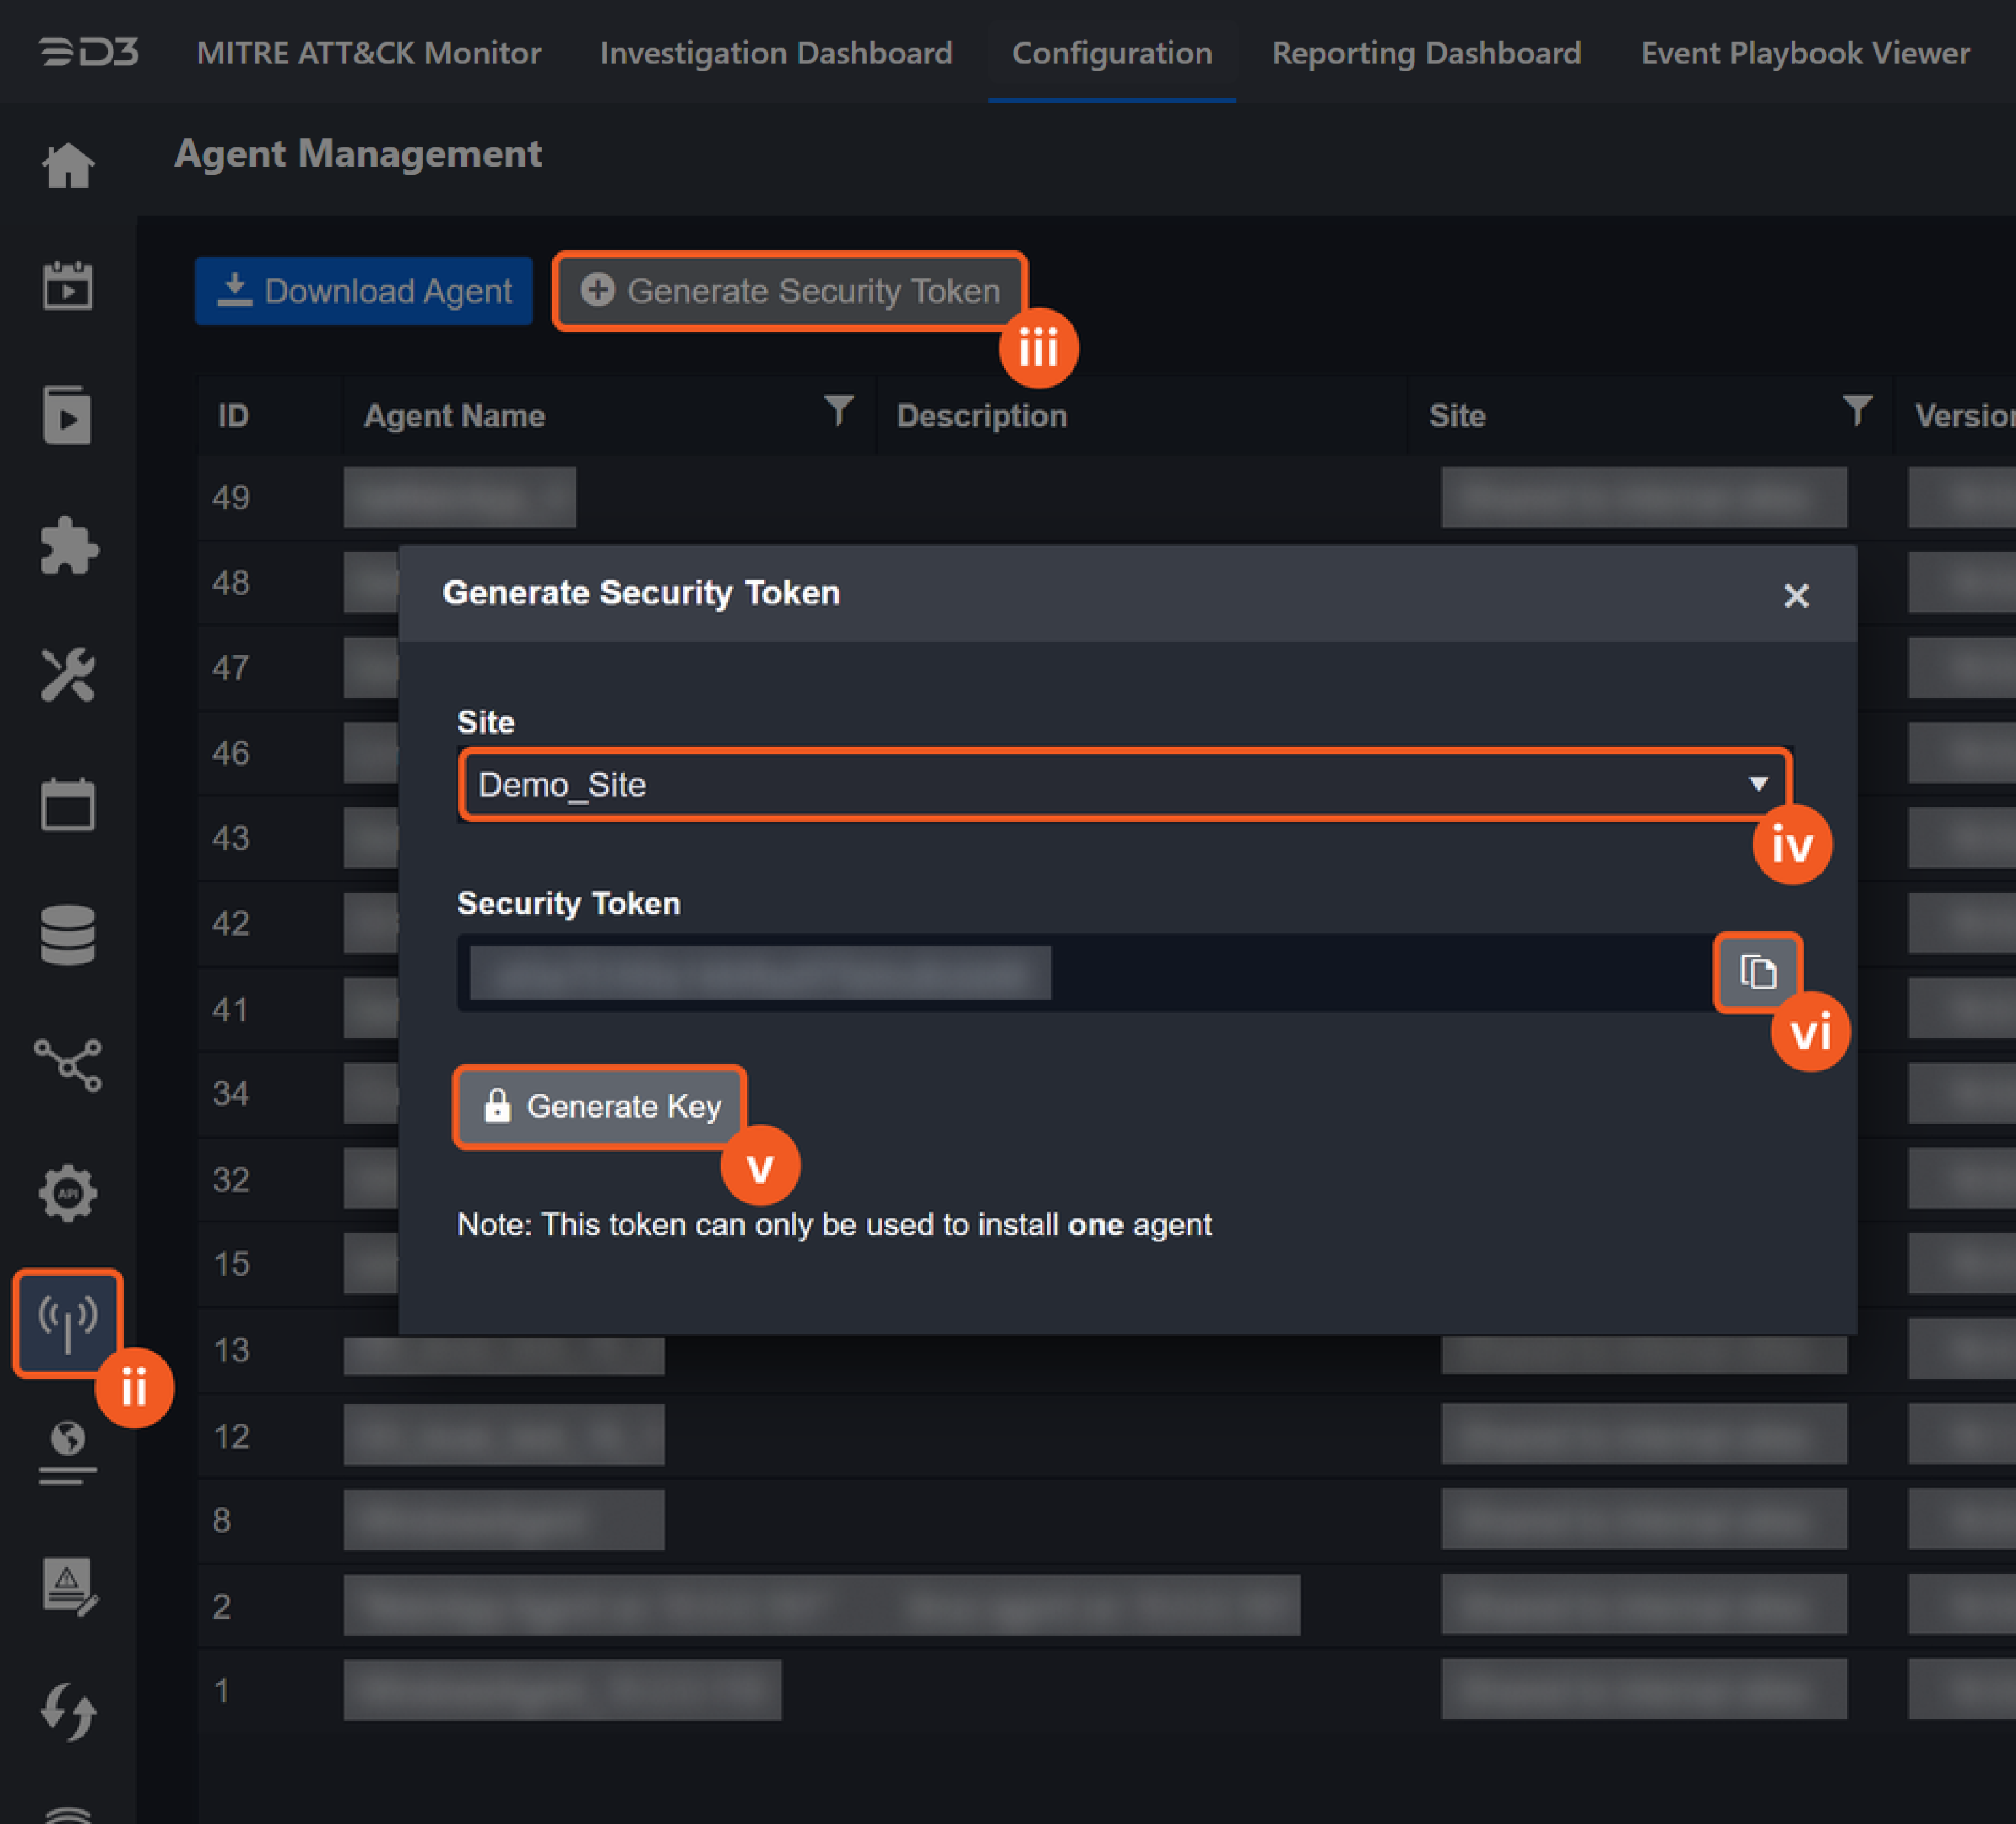
ii. Click on the Agent Management menu item on the left sidebar
iii. Click on the + Generate Security Token button.
iv. Select your site from the dropdown menu.
v. Click on the Generate Key button.
vi. Click on the Copy button, then paste the security token into the docker-compose.yml file.
DOCKER HOST IP – The <Docker Host IP> refers to the private IP address of the Linux machine hosting Docker. You can find this address using the command ip addr show on Linux. Ensure that the port is accessible and not being used by any other program.
DOCKER HOST PORT – The <Docker Host Port> specified in the PYTHON_REMOTE_URL environment variable of the d3agent service must match the <Docker Host Port> specified in the ports mapping of the d3executor service. This ensures proper communication between the d3agent and d3executor services.
PROXY AGENT DISPLAY NAME – Input a describtive name for this Agent, it displayed on vSOC.
DOCKER GROUP ID – Run the following command to obtain the <Docker Group ID>:
getent group docker | cut -d: -f3-20241017-035833.png?inst-v=2859b6fa-8eb9-4821-9810-cc803493d96f)
Open a terminal and navigate to the directory where the
docker-compose.ymlfile. Once there, execute the following command:BASHsudo docker compose up -d
Upon successfully bringing up the Docker Compose services, your terminal will display outputs similar to the following:
-20240709-230040.png?inst-v=2859b6fa-8eb9-4821-9810-cc803493d96f)
Confirm the presence of your new agent.
Navigate to the Configuration page.
Click on the Agent Management module.
Verify that the Agent Name matches the one specified in the docker-compose.yml file.
Check the agent (connection) status and version. The agent version should match your D3 vSOC version.
(Optional) Enter a description for your agent.
Click on the Save button.
-20241017-170711.png?inst-v=2859b6fa-8eb9-4821-9810-cc803493d96f)
(Optional) Troubleshoot via Docker Compose log commands.
-20241017-031517.png?inst-v=2859b6fa-8eb9-4821-9810-cc803493d96f)
DOCKER COMPOSE LOGS To view a complete list of Docker Compose service logs, both logs for the d3executor and d3agent services, run the following command:
BASHsudo docker compose logsIdeally, only d3executor logs display—this confirms successful agent setup.
D3EXECUTOR LOGS To view a list of d3executor service logs, run the following command:BASHsudo docker compose logs d3executor
D3AGENT LOGS To view a list of d3agent service logs, run the following command:BASHsudo docker compose logs d3agent
Firewall Whitelisting for Docker Installation and D3 Proxy Agent Container Image
If all internet traffic is blocked by default, then certain Domains/IPs will need to be whitelisted in order to be able to download the docker package as well as the images hosted on GCR.
Sites that require whitelisting
Docker (for downloading docker package):
GCR (for downloading docker images from GCR):
Example of Checking IP address
Use nslookup to check IP address of the domain that needs to be accessed
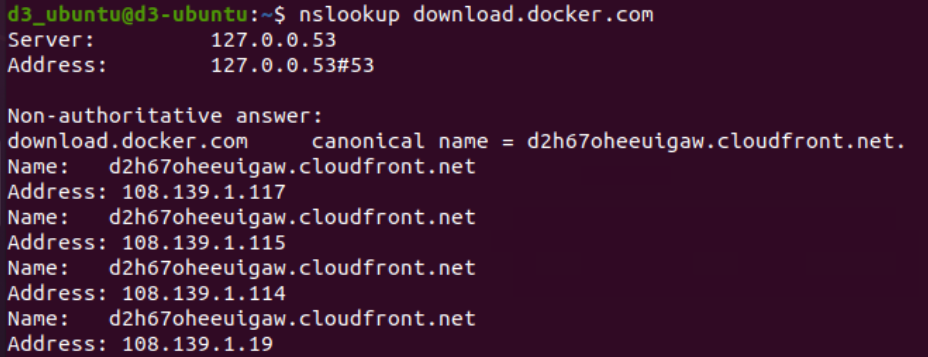
We can see that download.docker.com has a few IP addresses that it uses. We can allow traffic to this domain download.docker.com or to an IP address list that includes all the resolved public IP (the same domain may resolve to different public IP from different regions, if you use IP address for the whitelist, you need to run nslookup to get these IP from your server.)
Using D3 Proxy Agent with a Web Proxy Server
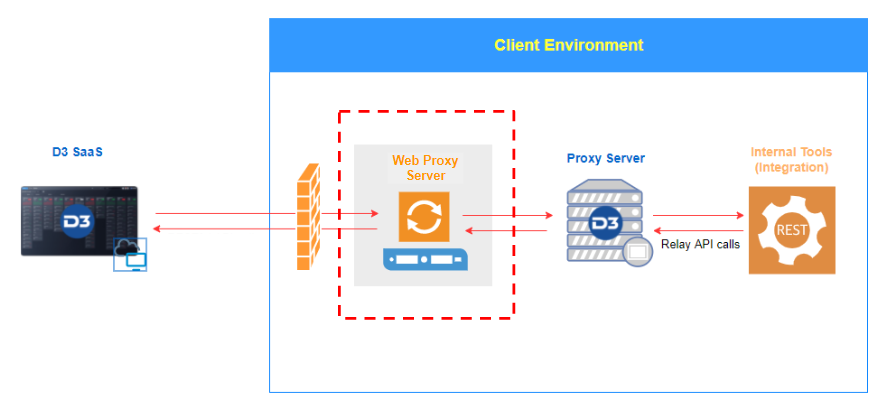
To route D3 Proxy Agent’s outbound internet connections to a web proxy server, make the following configuration changes.
Open docker-compose.yml. Add the following to the Environment section:
HTTP_PROXY=<Web Proxy Server:Port>

HTTPS_PROXY=<Web Proxy Server:Port>

NO_PROXY=localhost,127.0.0.1,<Docker Host IP>,<Other local integration host address,...>
docker-compose.yml
version: "3.3"
services:
  d3agent:
    image: "gcr.io/nimble-cortex-285618/d3prod/d3agent:<D3 vSOC version>"
    restart: always
    environment:
      - REMOTE_SERVER_URL=<D3 vSOC Url>
      - PROXY_IDENTITY=<D3 vSOC Agent Security Token>
      - PYTHON_REMOTE_URL=http://<Docker Host IP>:<Docker Host Port>/
      - PYTHON_REMOTE_GUID=7e036a86dbee40d9913c3794e779eae4
      - SERVICE_DISPLAY_NAME=<Proxy Agent Display Name>
      - DOCKER_GID=<Docker Group ID>
      - DOCKER_PORT=<Docker Host Port>
      - HTTP_PROXY=<Web Proxy Server IP:Port>
      - HTTPS_PROXY=<Web Proxy Server IP:Port>
      - NO_PROXY=localhost,127.0.0.1,<Docker Host IP>,<Other local integration host address,...>
    volumes:
      - /var/run/docker.sock:/var/run/docker.sock

  d3executor:
    image: "gcr.io/nimble-cortex-285618/d3prod/d3executor:<D3 vSOC version>"
    ports:
      - "<Docker Host Port>:9090"
    restart: always
    environment:
      - EXECUTOR_GUID=7e036a86dbee40d9913c3794e779eae4
      - HTTP_PROXY=<Web Proxy Server IP:Port>
      - HTTPS_PROXY=<Web Proxy Server IP:Port>
      - NO_PROXY=localhost,127.0.0.1,<Docker Host IP>,<Other local integration host address,...>
HTTP_PROXY and HTTPS_PROXY are going to be the web proxy server HTTP and HTTPS connections respectively. You will need to add more addresses for the private IP, DNS name, and all other local integrations you want to connect to (i.e. skipping the proxy) to the NO_PROXY.
.png)
-20241019-002047.png?inst-v=2859b6fa-8eb9-4821-9810-cc803493d96f)
-20241019-002138.png?inst-v=2859b6fa-8eb9-4821-9810-cc803493d96f)