
Microsoft Teams Bot Framework
LAST UPDATED: OCTOBER 20, 2025
Overview
Microsoft Teams Bot Framework REST API enables your bot to exchange messages with users on channels.
D3 SOAR is providing REST operations to function with Microsoft Teams Bot Framework.
Microsoft Teams Bot Framework is available for use in:
Connection
To connect to Microsoft Teams Bot Framework from D3 SOAR, follow this part to collect the required information below:
READER NOTE
Azure deprecated Multi-Tenant bot creation after July 31, 2025. Existing D3 connections using Multi-Tenant bots will remain functional, but new Multi-Tenant bots cannot be created in Azure.
Parameter | Description | Example |
Server URL (domain level) | The server URL of the Microsoft Teams Bot Framework API. By default, it is set to https://smba.trafficmanager.net/teams. Alternative server URLs include: | https://smba.trafficmanager.net/teams |
Bot App Type | The Bot Application Type: Tenant ID field is required for Single Tenant bot application. | Multi Tenant |
Client ID | The client ID used to authenticate the API connection. | ***** |
Client Secret | The client secret used to authenticate the API connection. | ***** |
Bot GUID | The Bot ID used to authenticate the API connection. | ***** |
API Version | The version of the API to use for the connection. | v3 |
Integration API Note
For more information about the Microsoft Teams Bot Framework API, refer to the Microsoft Teams Bot Framework API reference.
Configuring Microsoft Teams Bot Framework to work with D3 SOAR
Configuring the Microsoft Teams Bot Framework to integrate with D3 requires setup in Azure, modification of a JSON file, and configuration in the Microsoft Teams. Follow the steps in the sections below to complete the configuration for each component.
Configuring in the Azure Portal
Navigate to the Create an Azure Bot page at https://portal.azure.com/#create/Microsoft.AzureBot.
Create an Azure Bot.
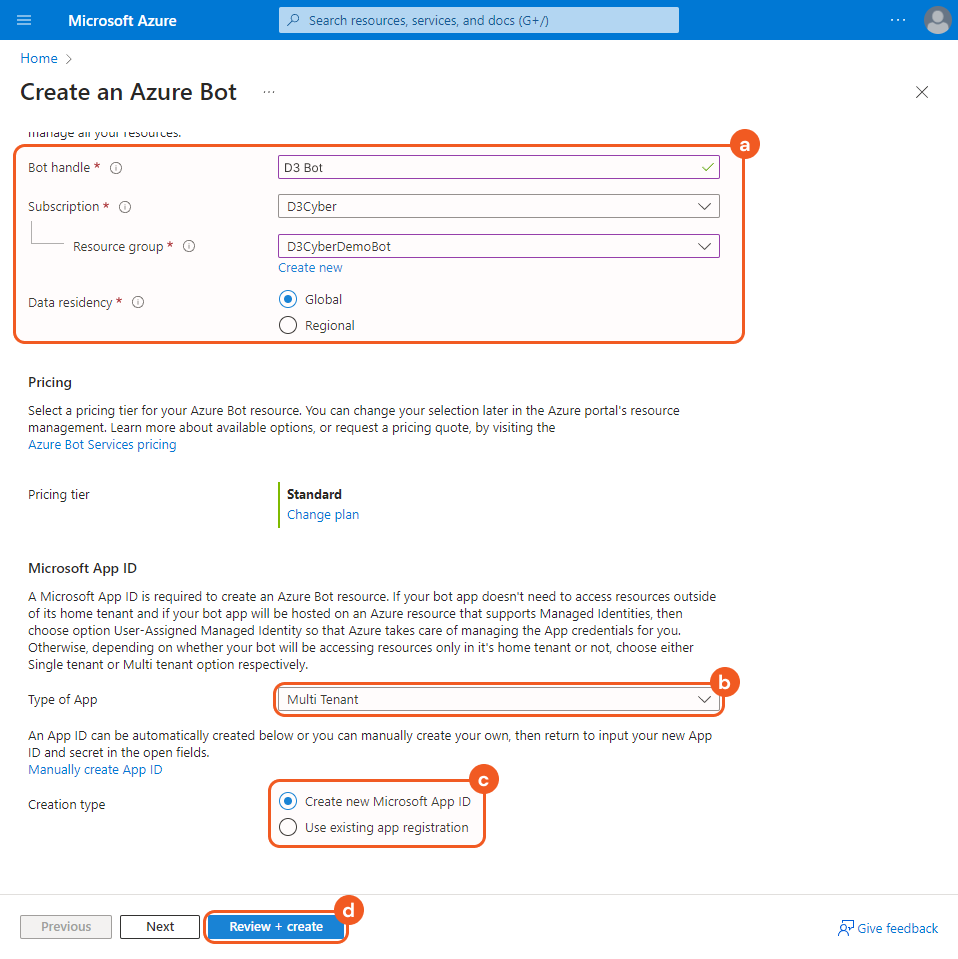
Input the bot handle, subscription and resource group, and the data residency option.
Select the app type (i.e., Single Tenant or Multi Tenant, if available, depending on the Azure subscription).
The app type may already be pre-selected. D3 supports both Multi-Tenant and Single-Tenant apps for Azure bots. However, as of July 31, 2025, Azure has deprecated Multi-Tenant bot creation. Single-Tenant apps require a Tenant ID to connect in D3 (see step 9c).
Choose the Creation type.
Select Create new Microsoft App ID if no app registration exists.
Select Use existing app registration if an existing app exists, and provide the App ID.
Click the Review + Create button.
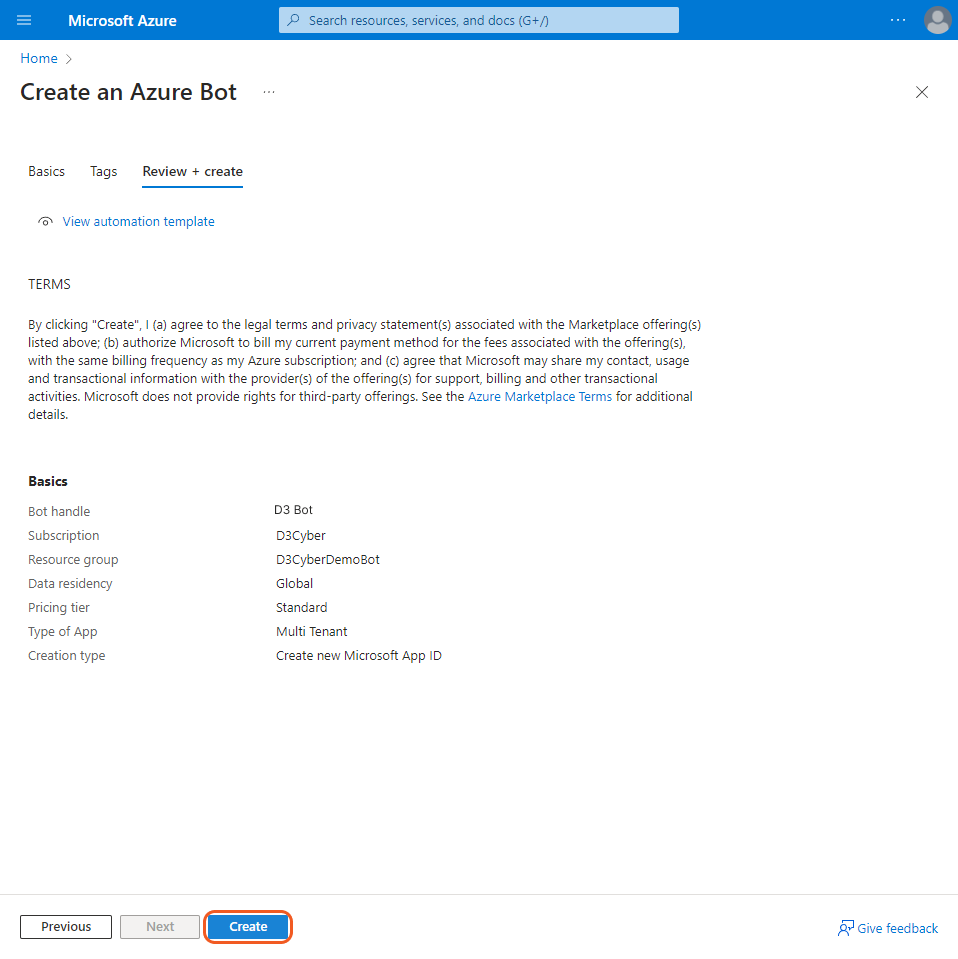
Click the Create button once the bot creation has been validated, and wait for deployment to finish.
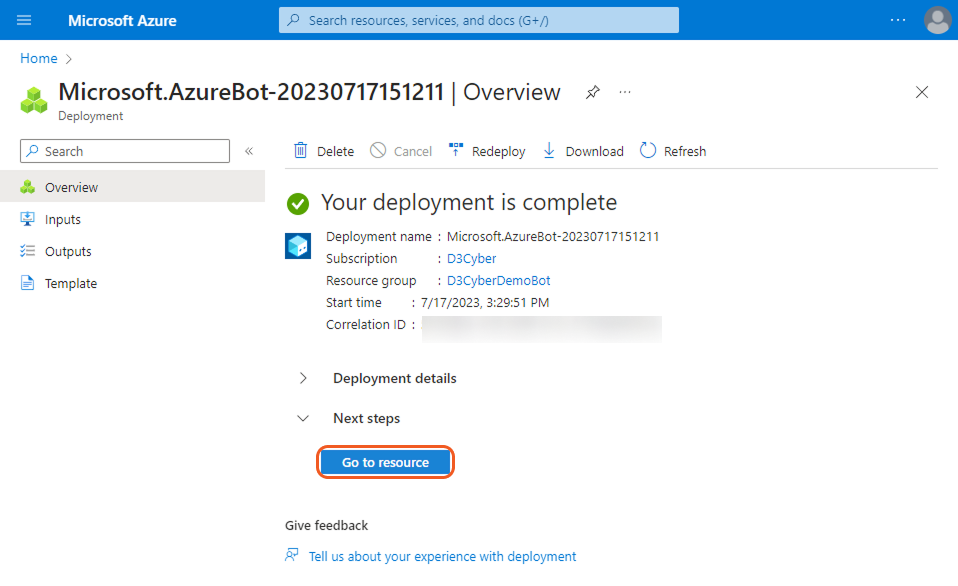
Click the Go to resource button.
Navigate to the Configuration tab, fill the Messaging Endpoint field in the <your url>/api/Teams/Message format, then click the Apply button.

For example, if the vSOC URL is https://abc.d3securityonline.net/MainApp/VSOC/, the messaging endpoint is https://abc.d3securityonline.net/MainApp/VSOC/api/Teams/Message.
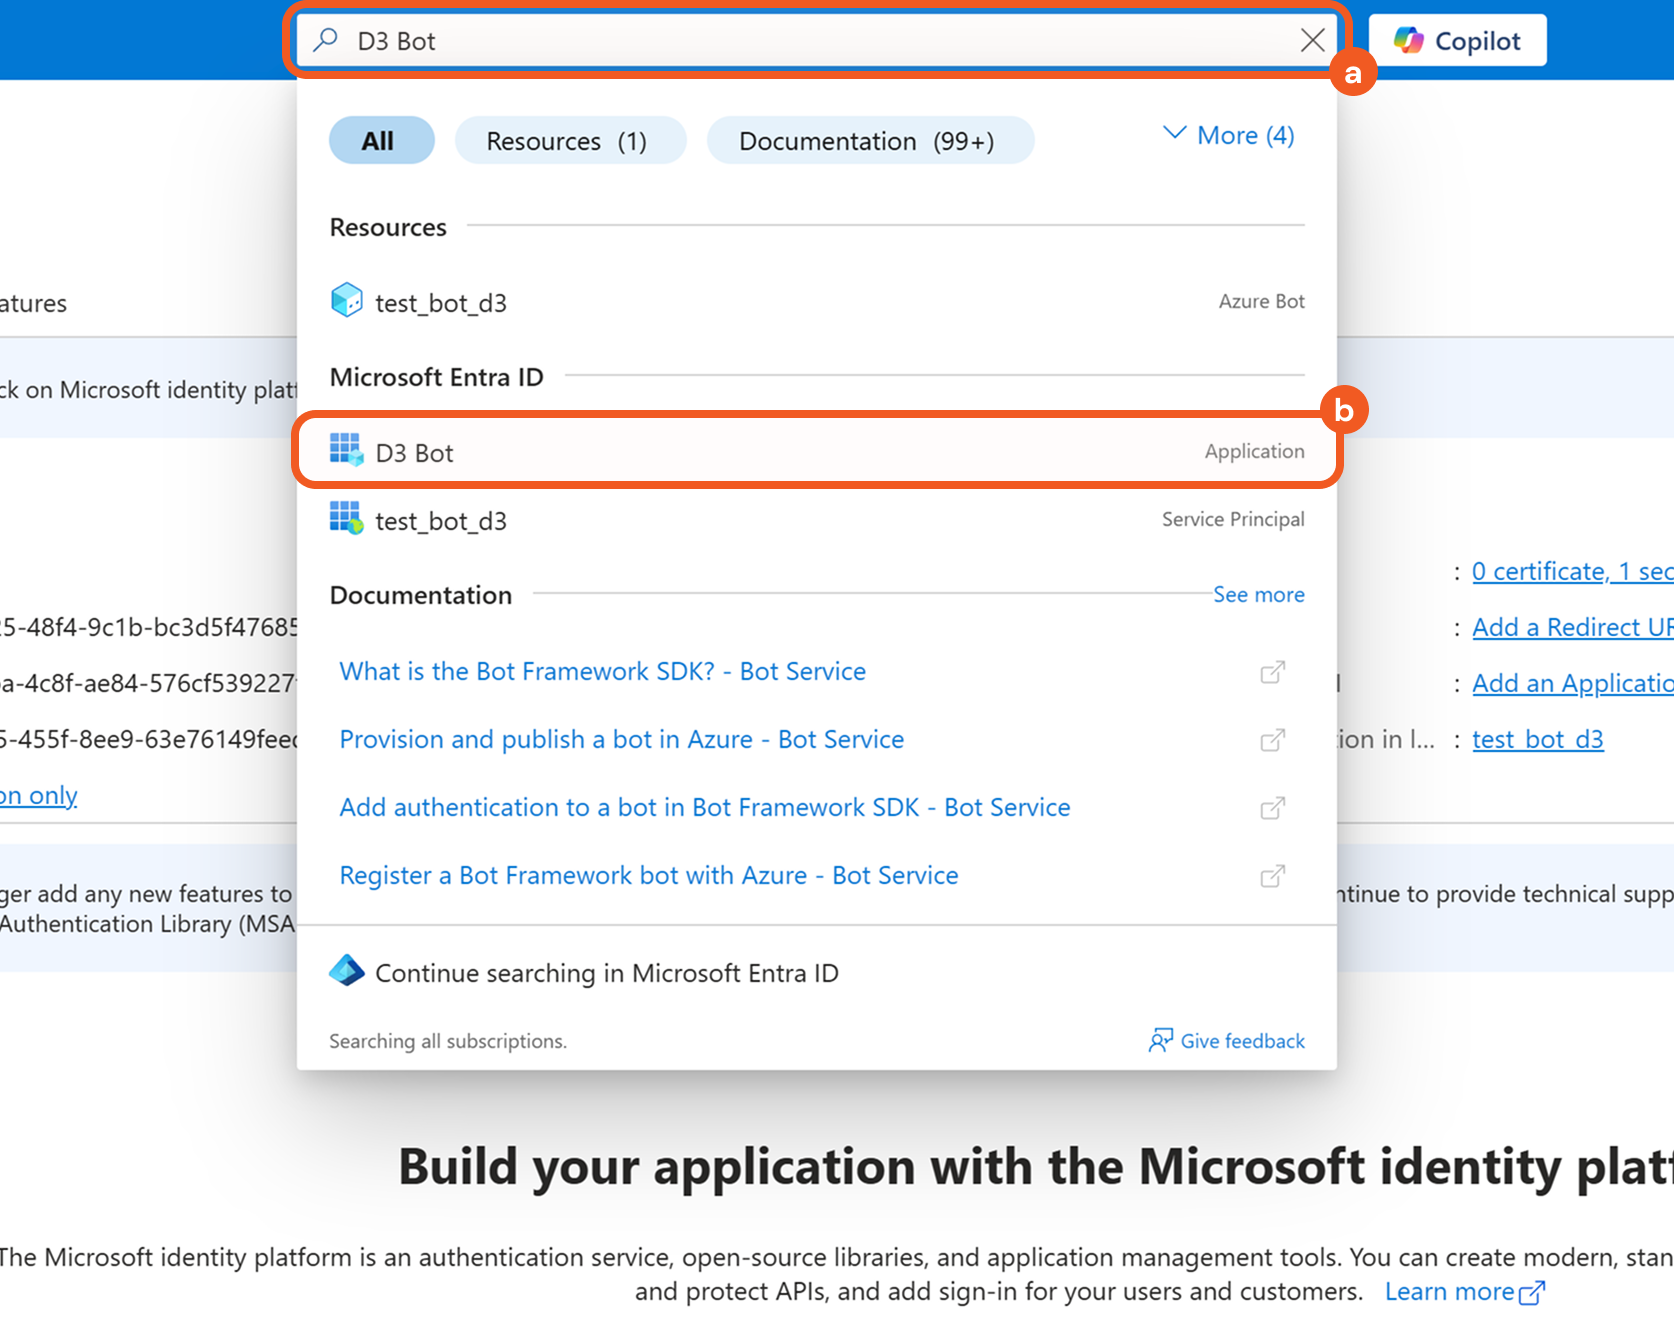
Click the Manage Password link.
.png?inst-v=a9107af0-b04c-4e31-bb5a-938372783868)
Search for and select the newly created bot under the Microsoft Entra ID category.
Add and save the new client secret value.
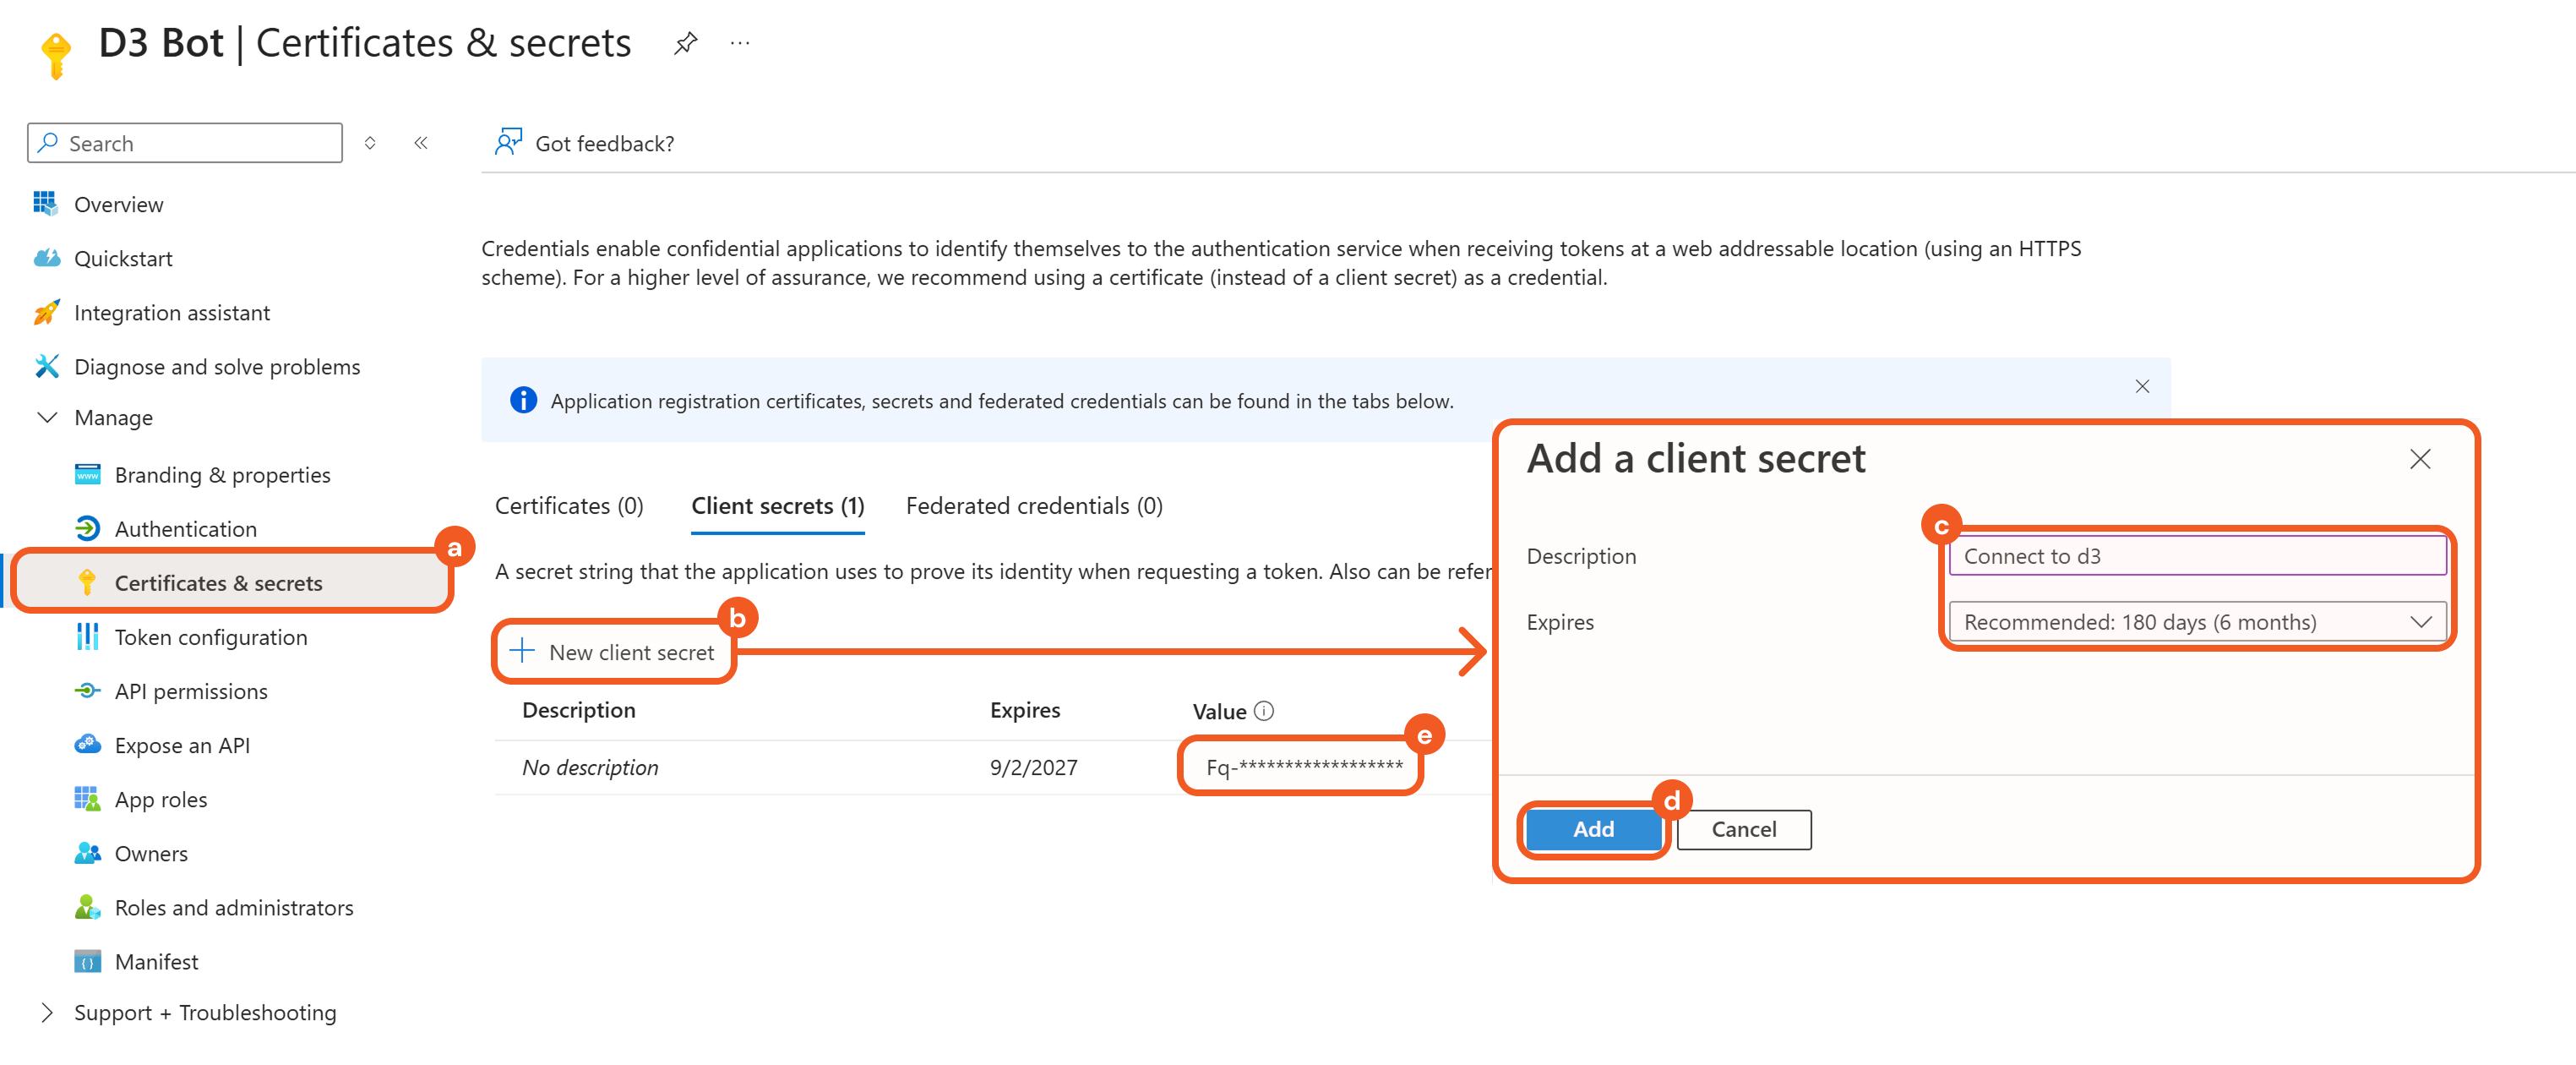
Select the Certificates & secrets tab.
Click the + New client secret button.
Add a description and expiry date as desired.
Click the Add button.
Copy the client secret from the Value field. Refer to sub-step 5 under step 3i in Configuring D3 SOAR to Work with Microsoft Teams Bot Framework.
Obtain the Client ID and Tenant ID.
.png?inst-v=a9107af0-b04c-4e31-bb5a-938372783868)
Select the Overview tab.
Copy and save the Client ID. This is the same as the Bot ID, and it will be used in:
Step 2 in Modifying the manifest.json File
Sub-step 4 and 6 under step 3i in Configuring D3 SOAR to Work with Microsoft Teams Bot Framework.
Copy and save the Tenant ID (for single-tenant connections only).
The Tenant ID is used for the single-tenant Bot App type only. Refer to Sub-step 3 under step 3i in Configuring D3 SOAR to Work with Microsoft Teams Bot Framework.
Select the API permissions tab, click the + Add a permission button, then choose the Microsoft Graph API.
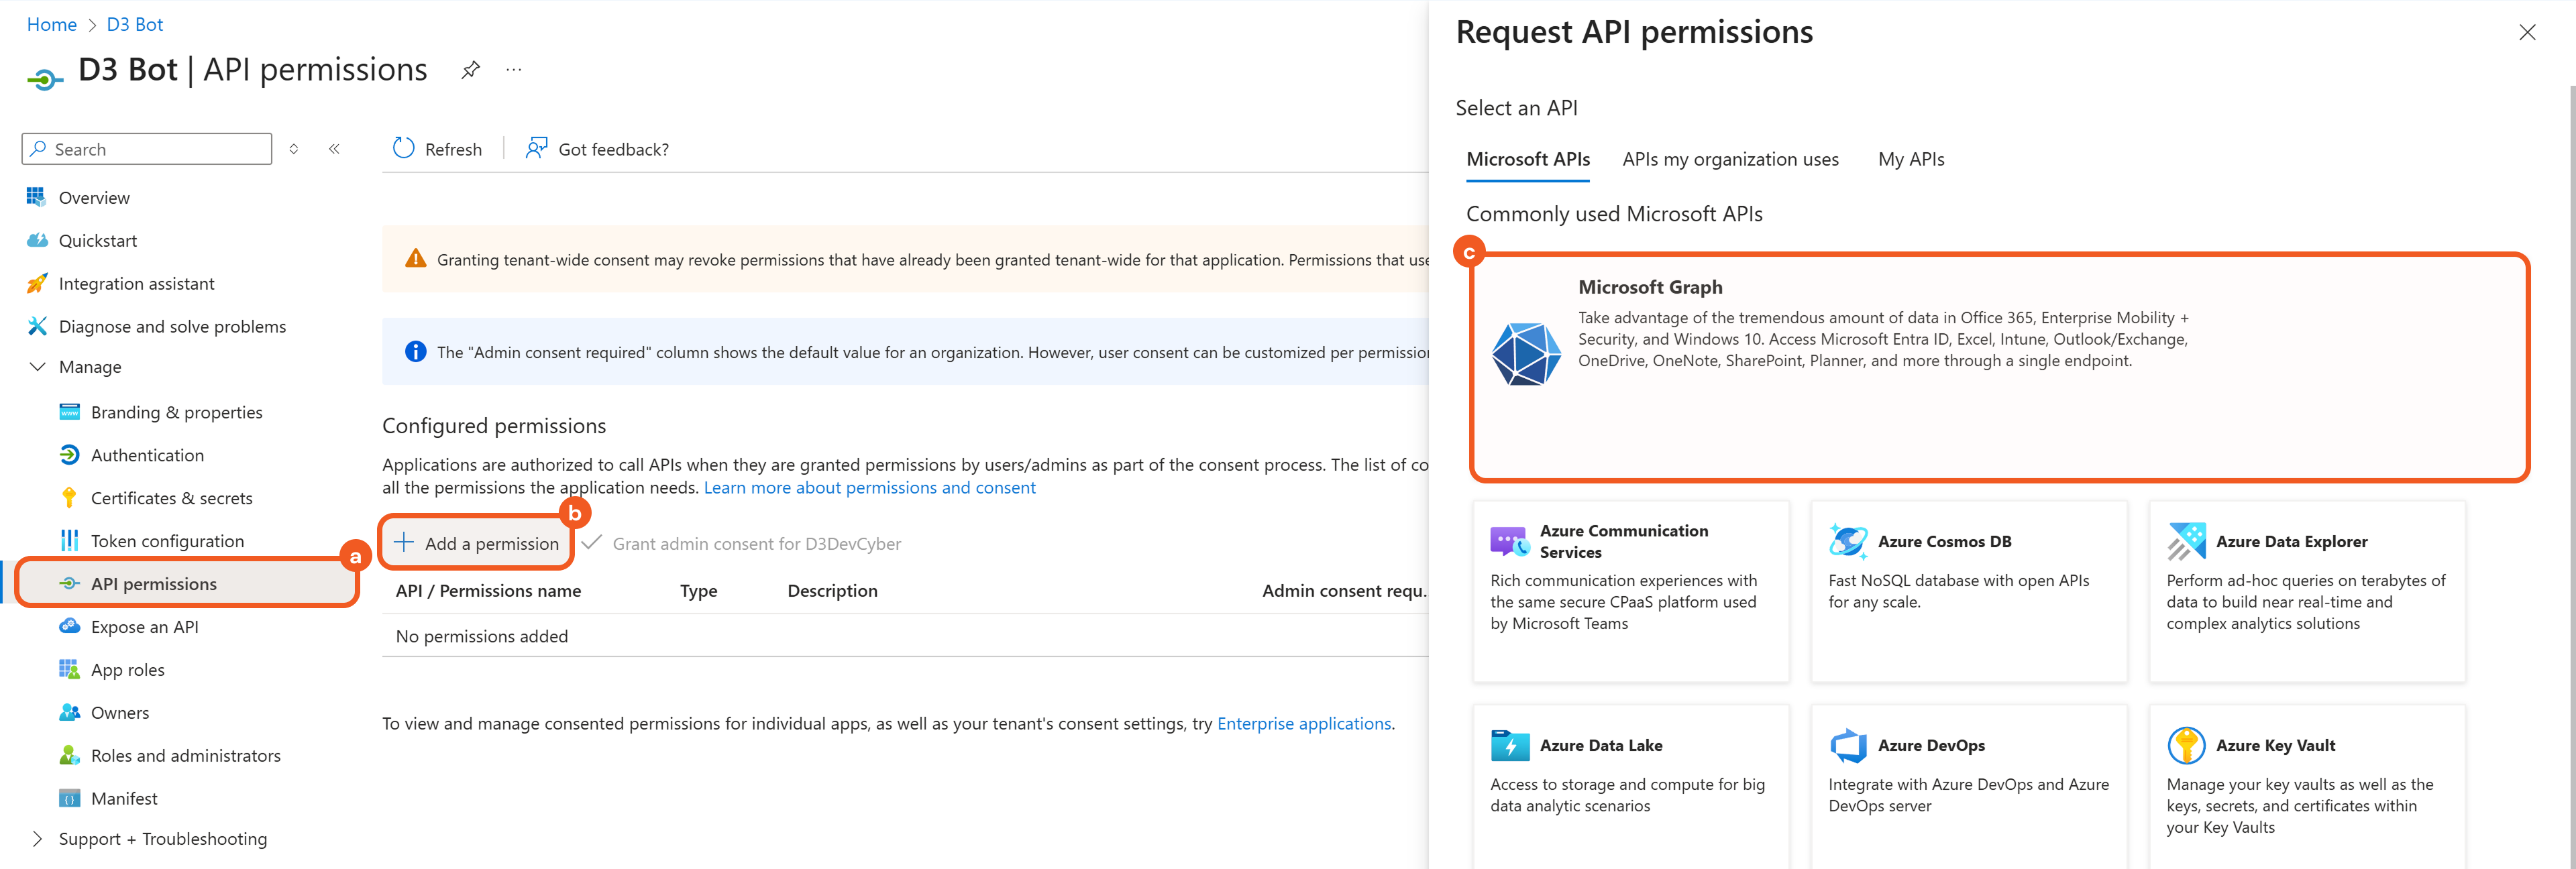
Add the necessary permissions.
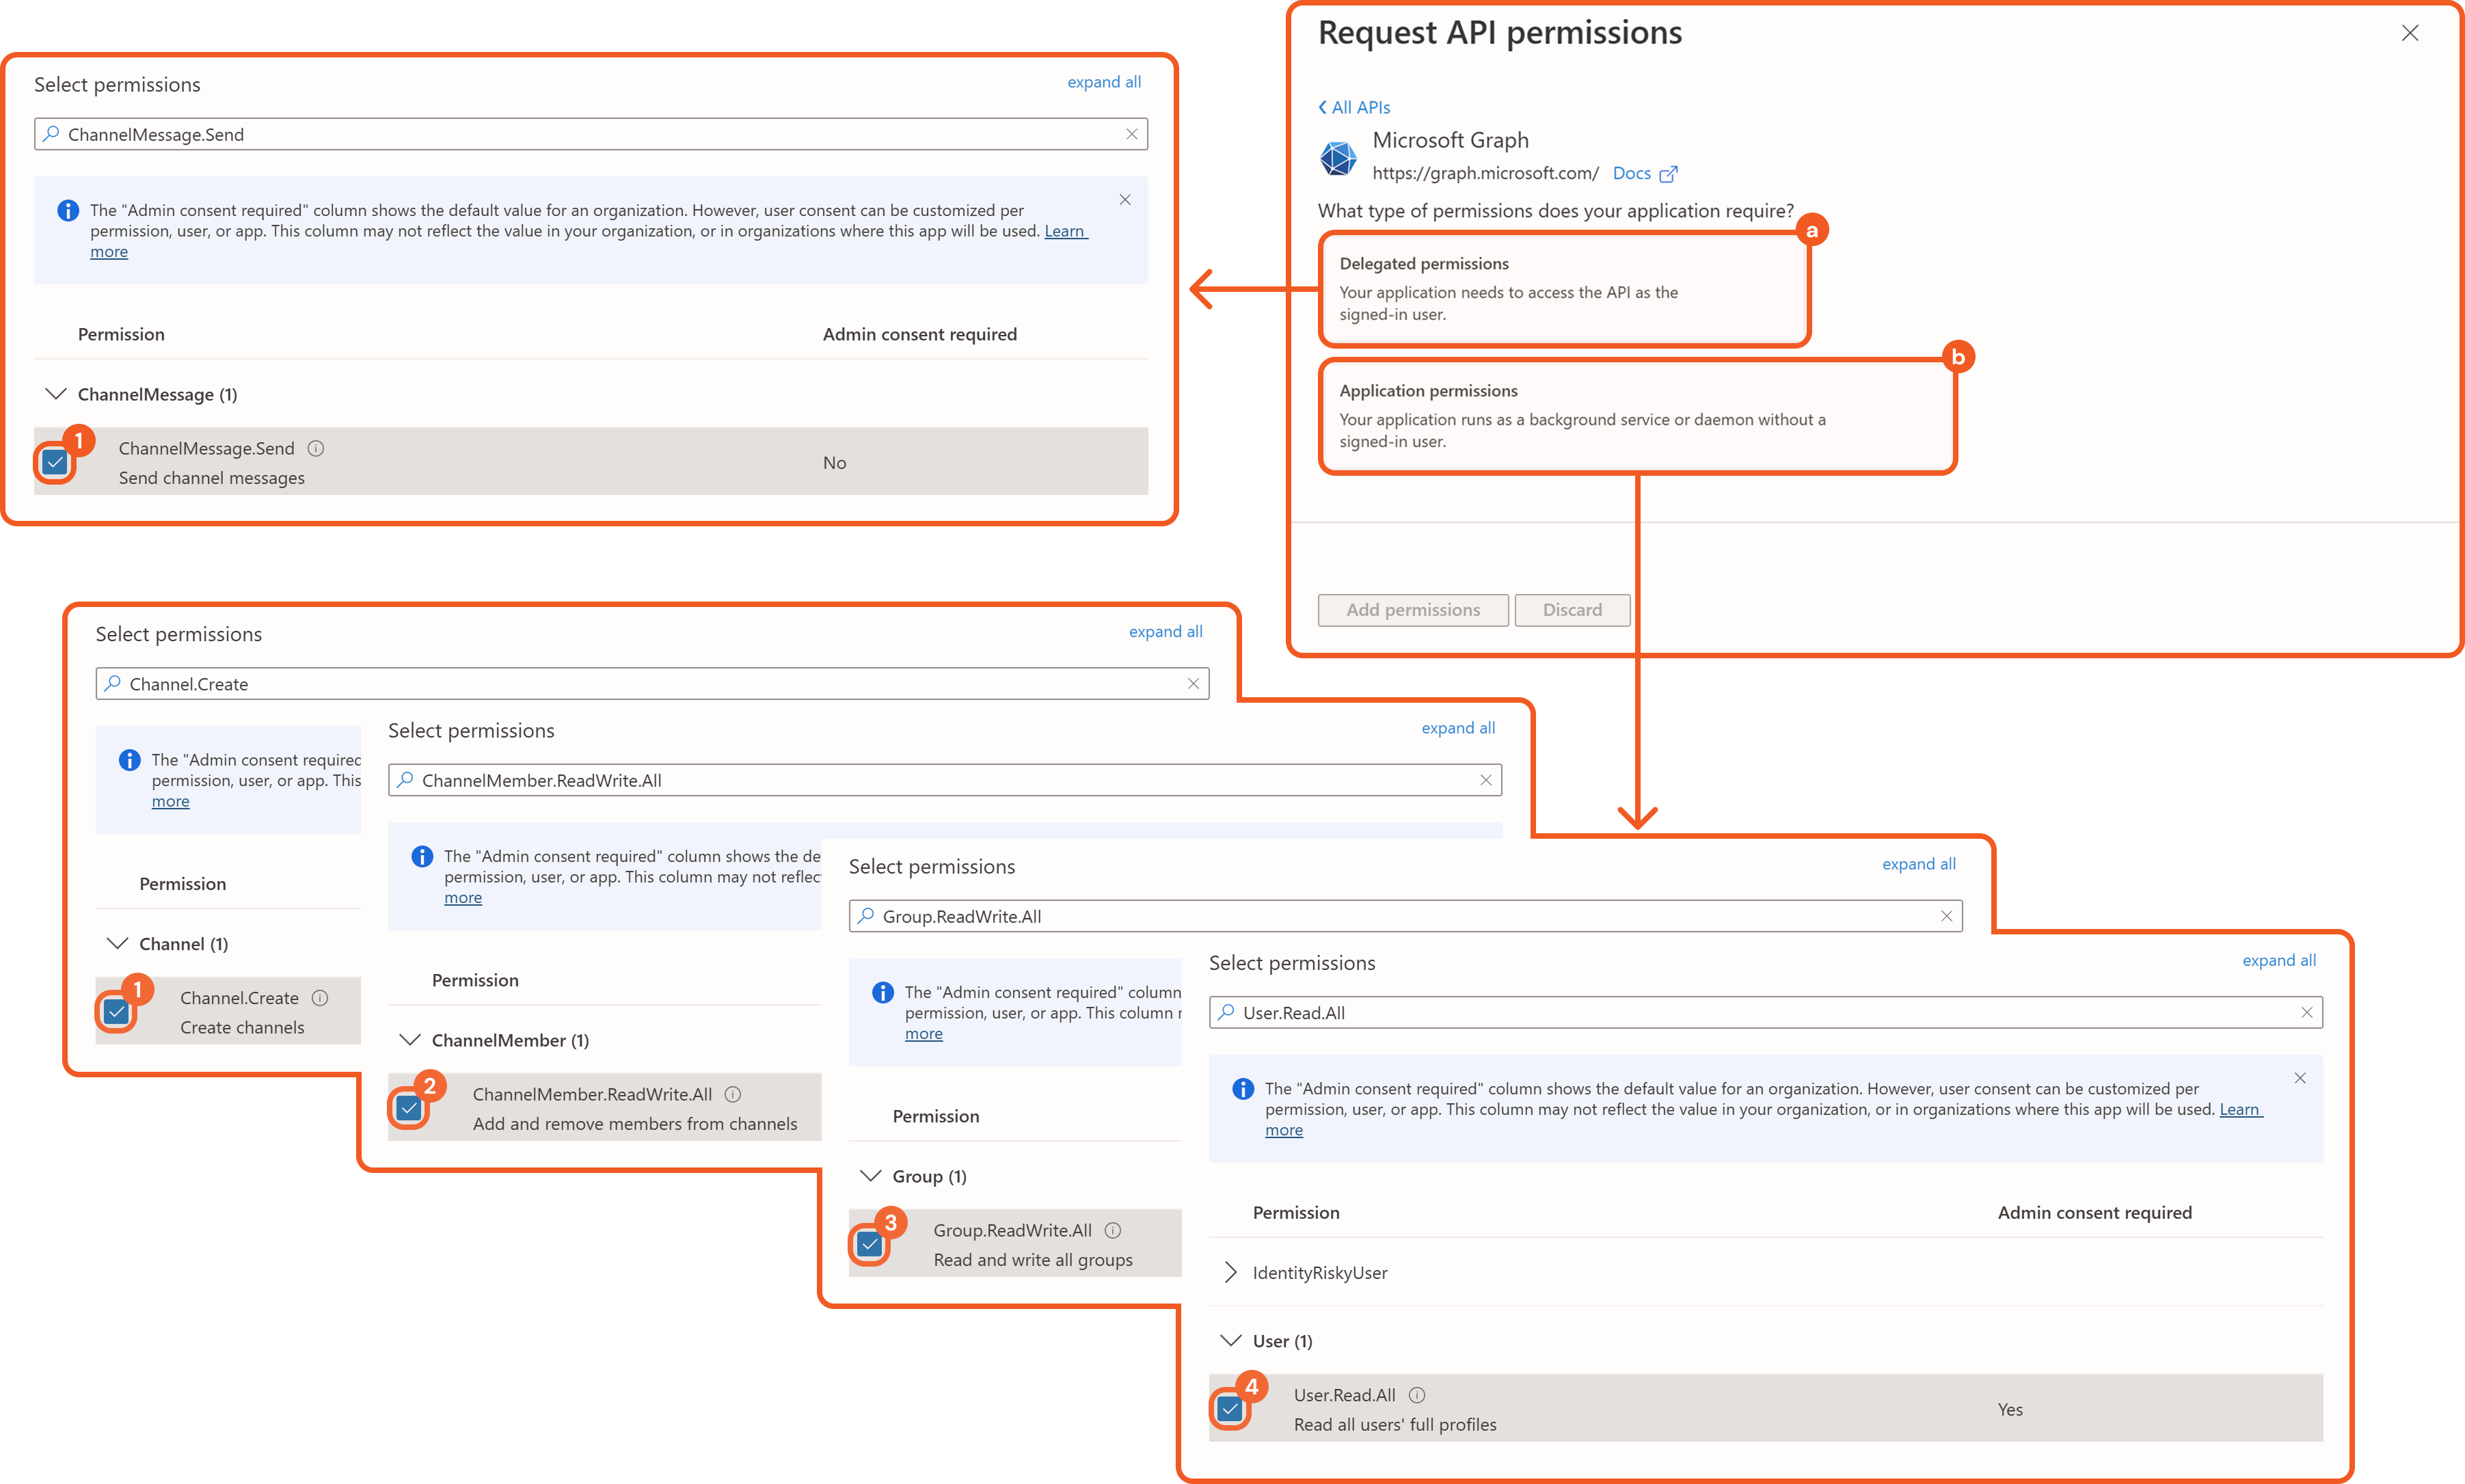
Grant the following Delegated permissions.
1. ChannelMessage.Send
Grant the following Application permissions.
1. Channel.Create
2. ChannelMember.ReadWrite.All
3. Group.ReadWrite.All
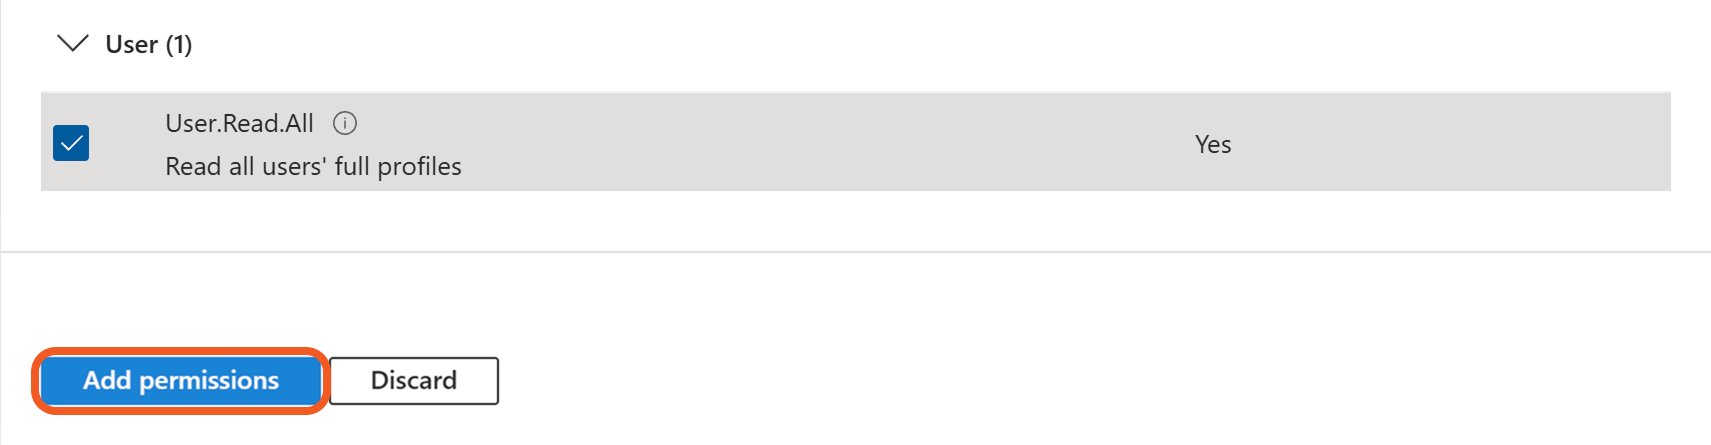
4. User.Read.All
Click the Add permissions button.
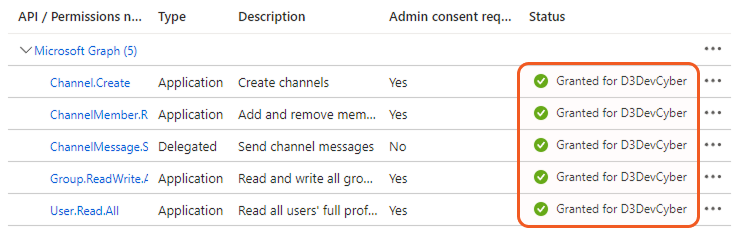
Grant admin consent.
.png?inst-v=a9107af0-b04c-4e31-bb5a-938372783868)
Permissions that are admin-consented display a green checkmark and a note in the Status column.
Navigate back to the Azure Bot page.
.png?inst-v=a9107af0-b04c-4e31-bb5a-938372783868)
Accept the terms of service for Microsoft Teams.
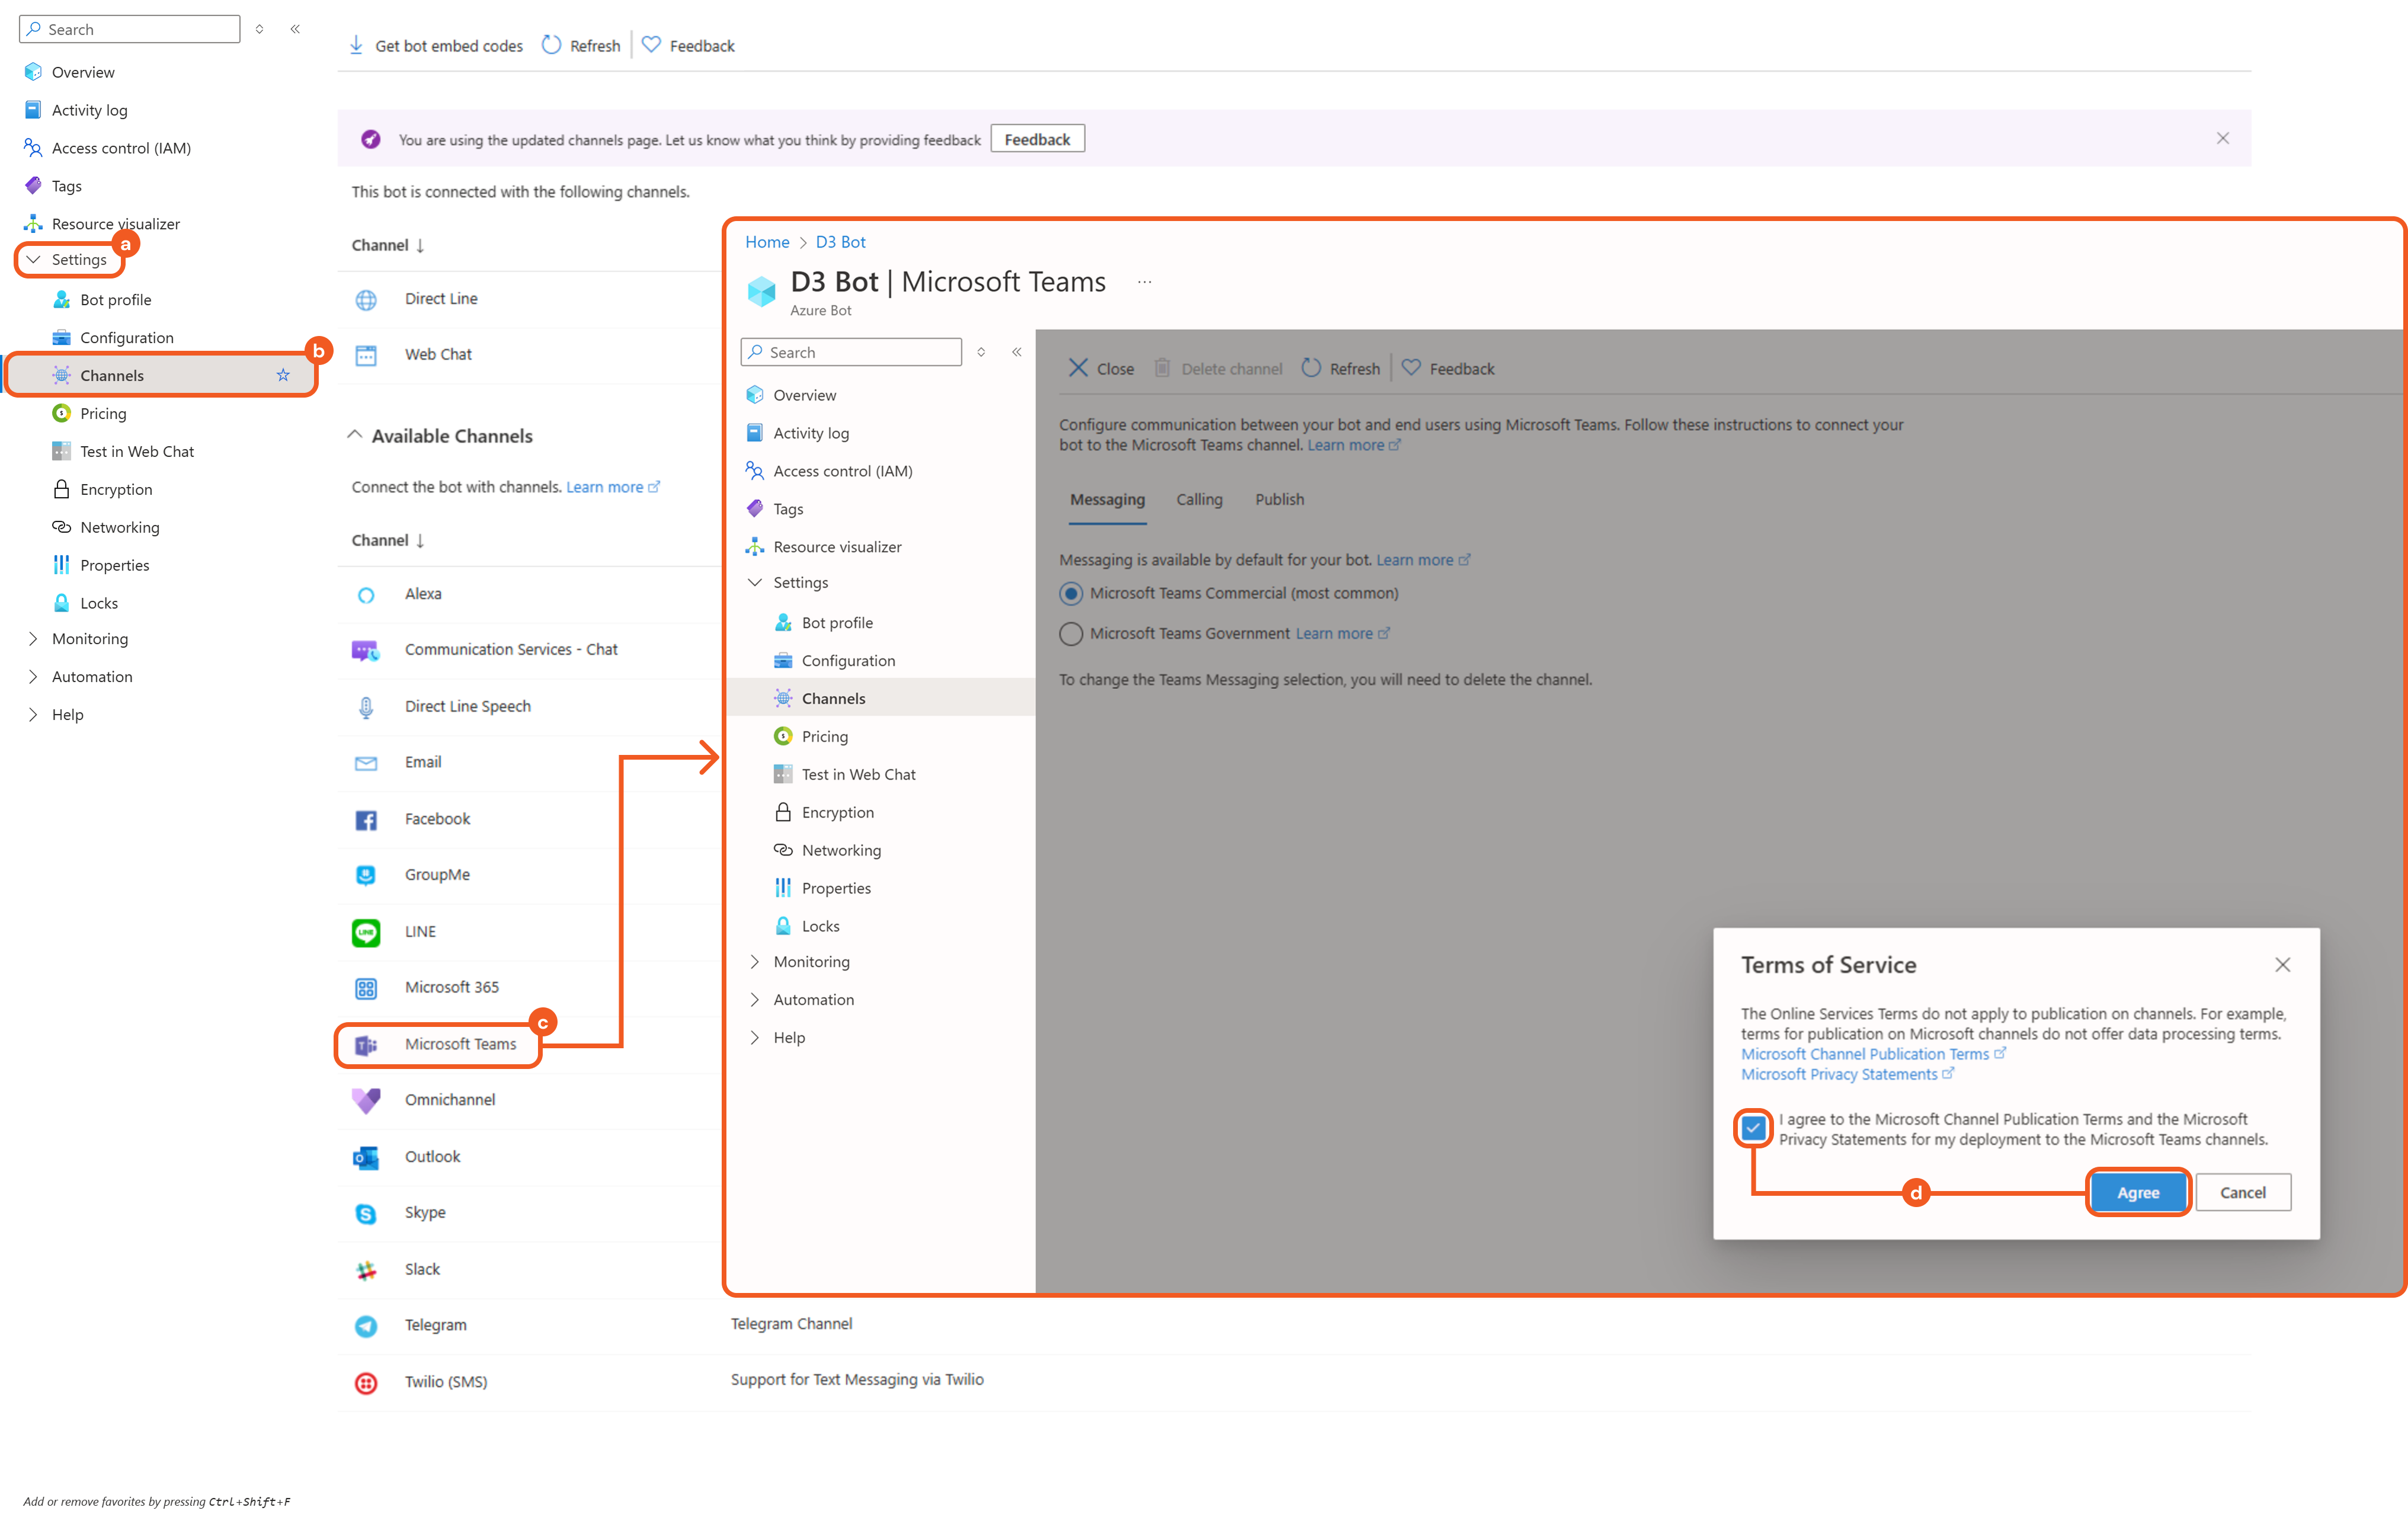
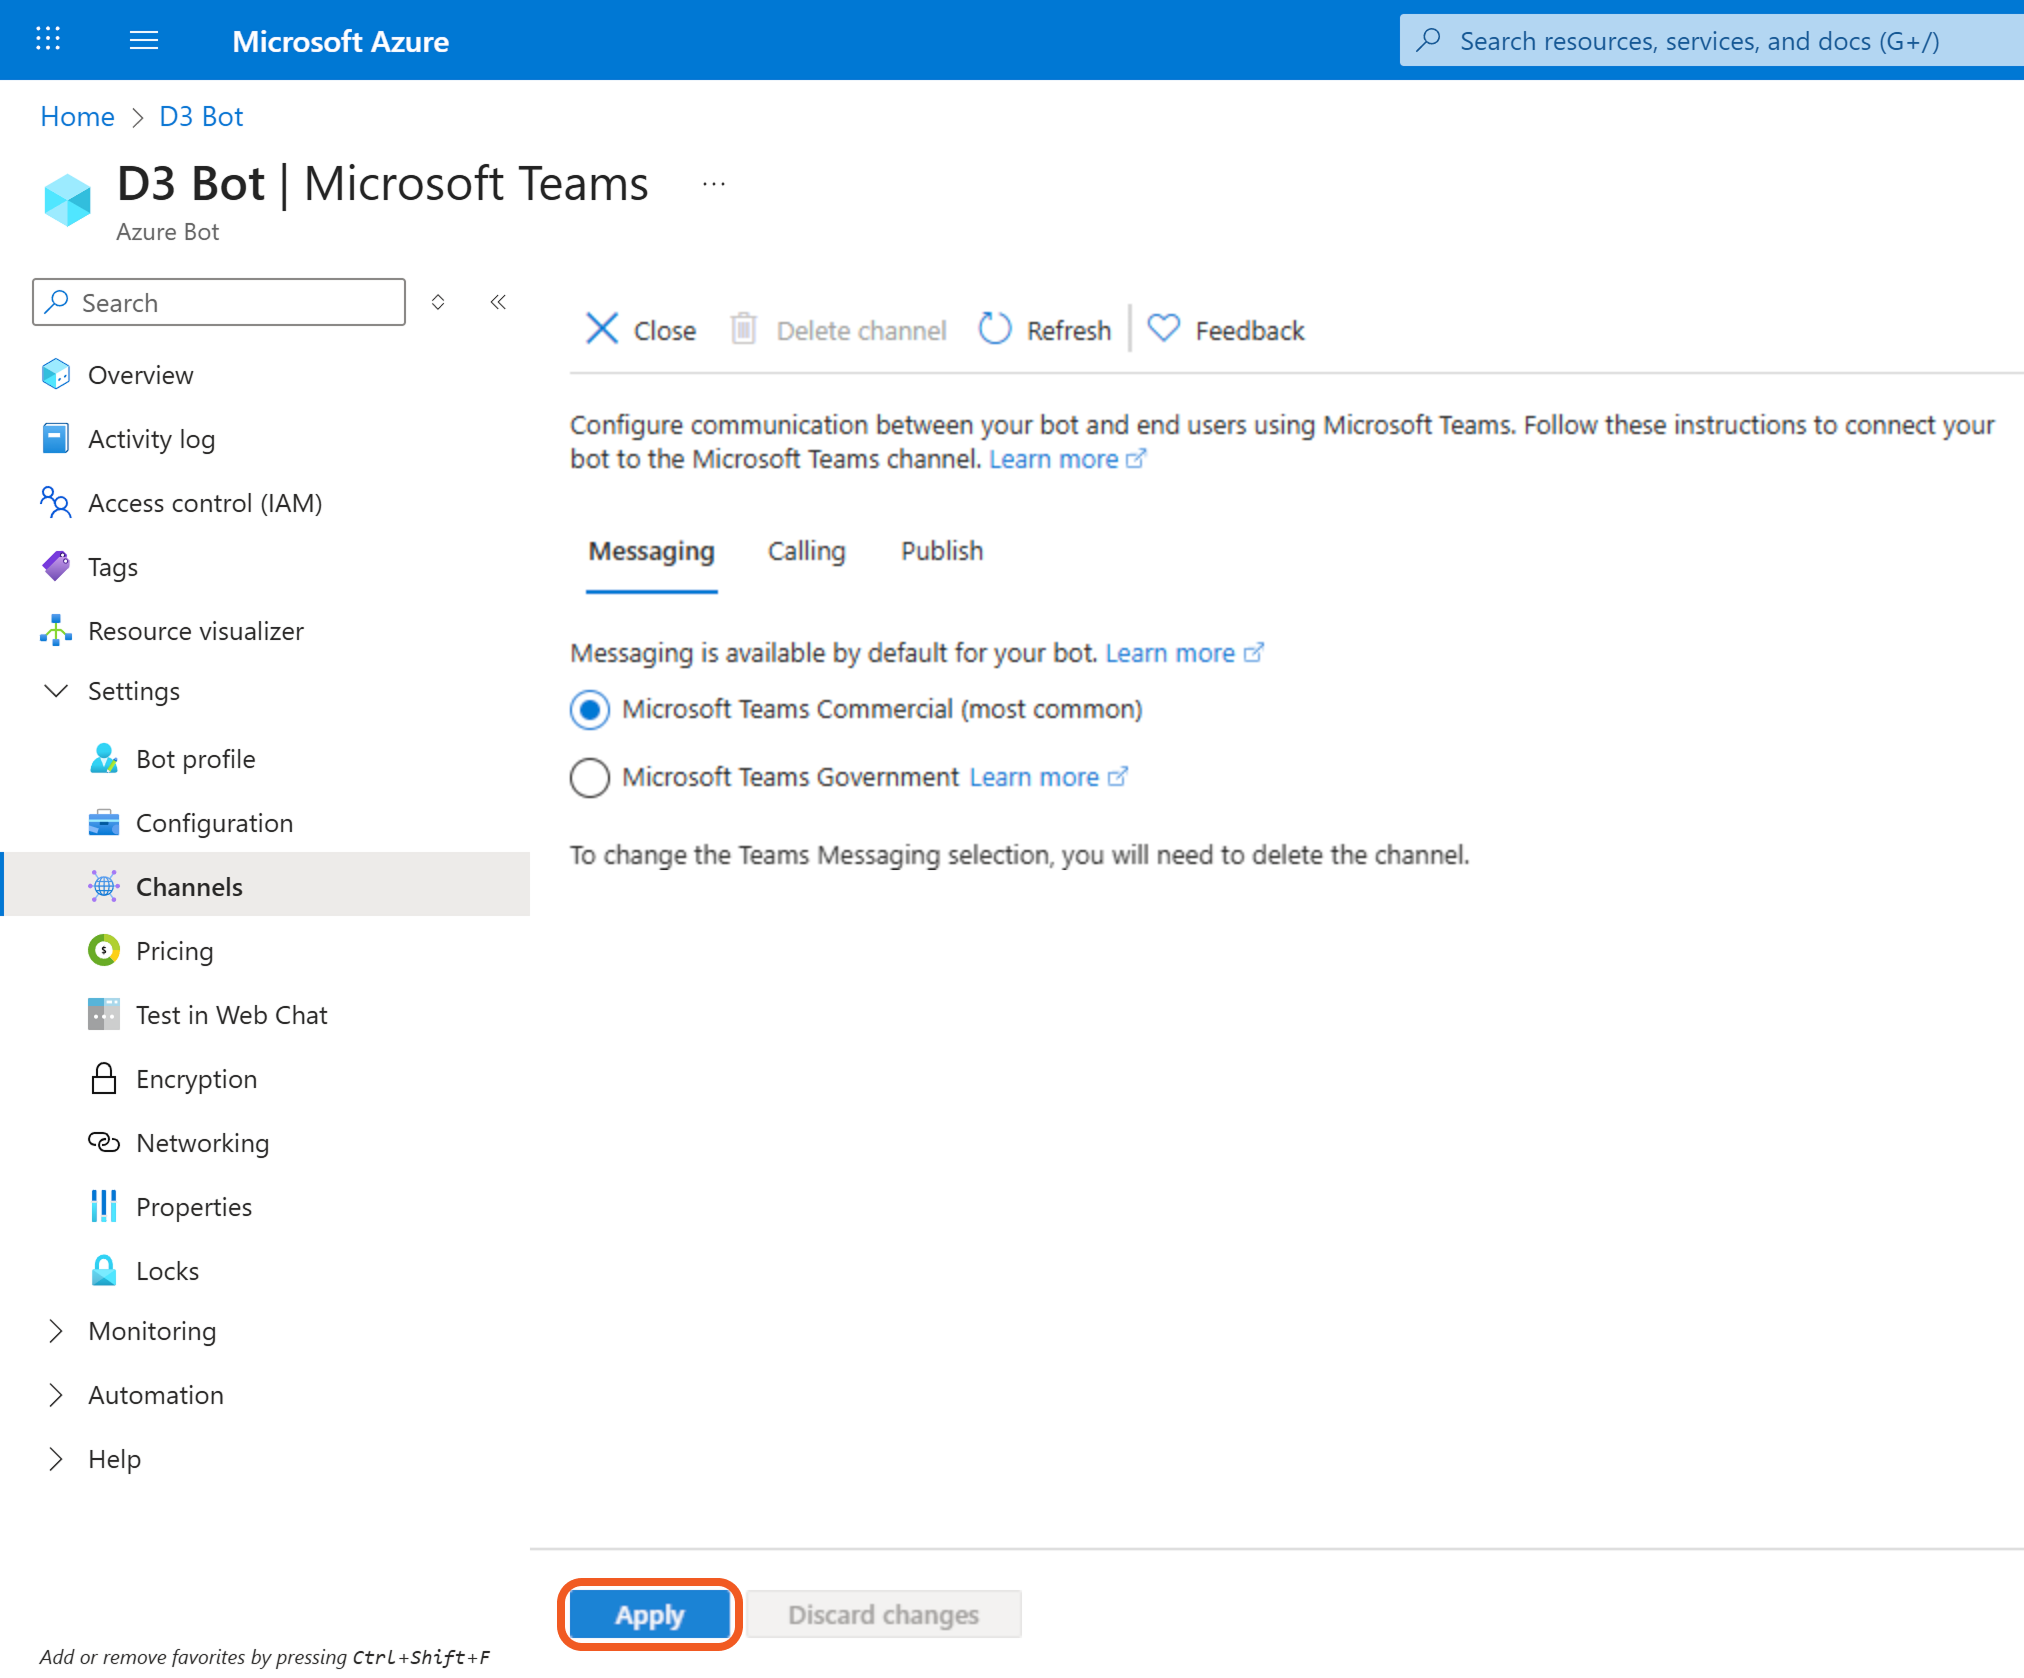
Navigate to the Settings tab.
Select the Channels tab.
Click the Microsoft Teams option.
Agree to the terms of service.
Click the Apply button.
Modifying the manifest.json File
Download and extract this ZIP archive.
There should be three files in the archive: manifest.json, color.png and outline.png.
Open the manifest.json file, then replace the following values with the Bot ID (the same as the Client ID) from step 9b in Configuring in the Azure Portal.

$.id
$.bots[*].botId
$.webApplicationInfo.id
Save the JSON file, then compress all three files into a .zip archive.
Configuring in Microsoft Teams
Upload a custom app in the Microsoft Teams admin centre.
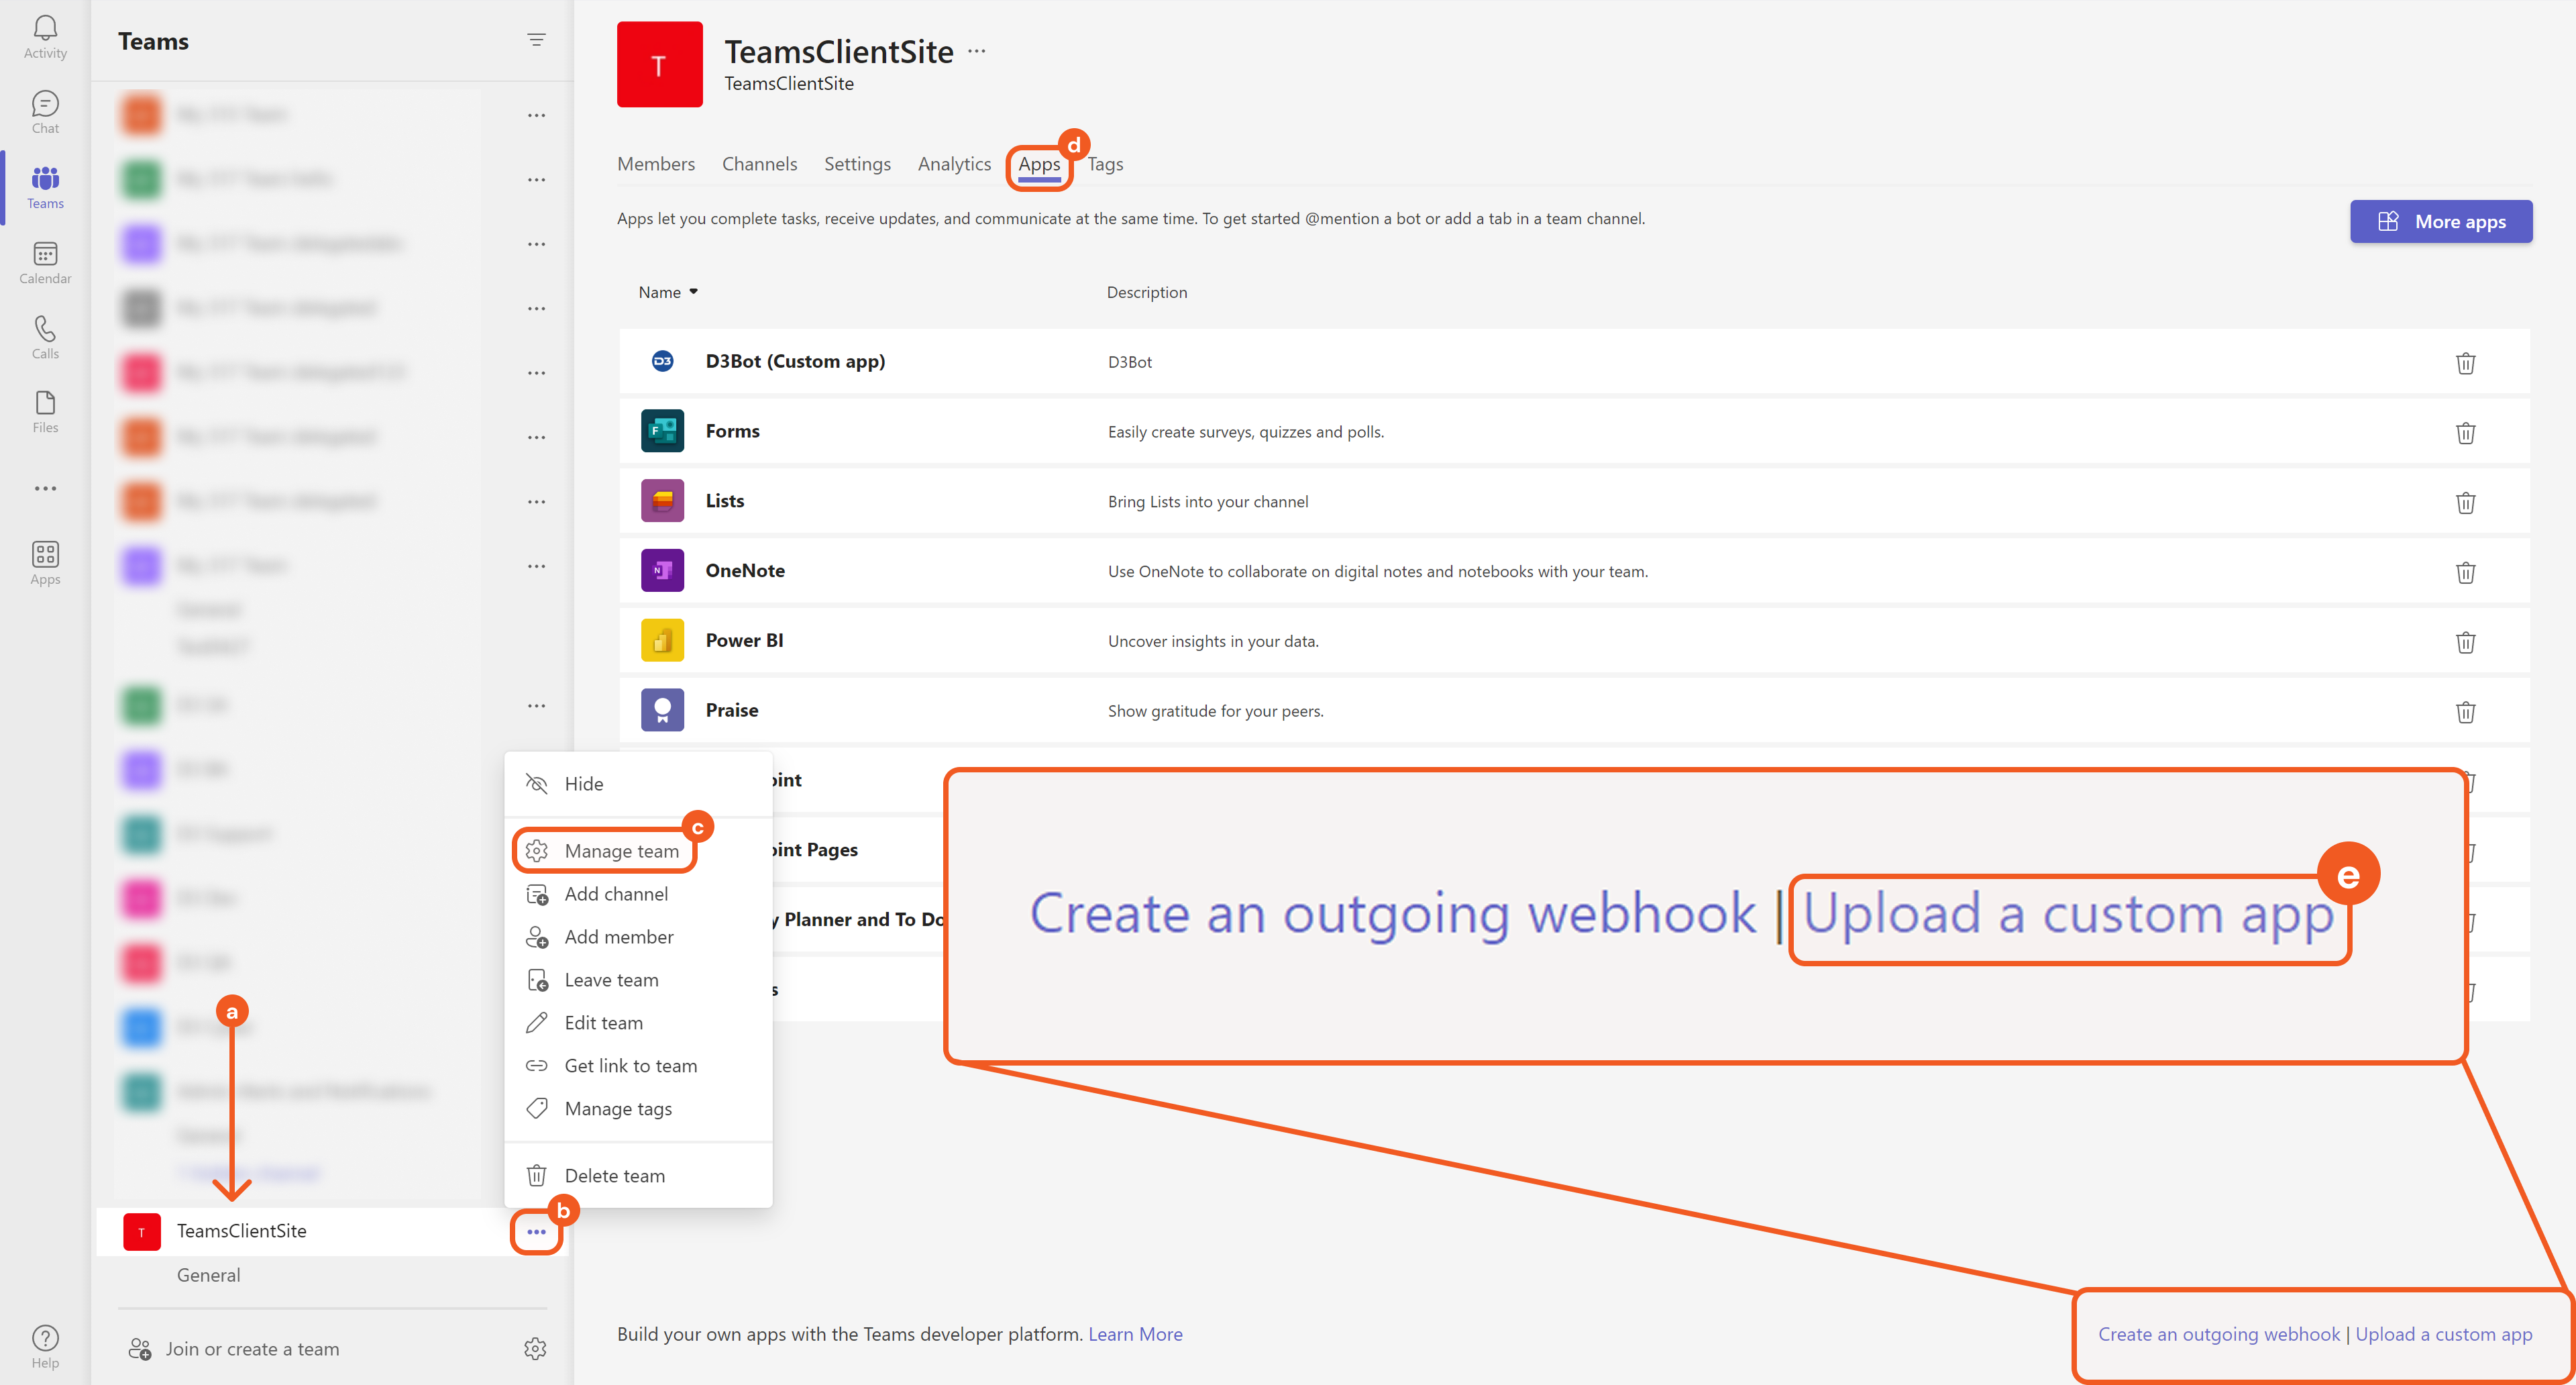
Locate the desired team.
Click the ellipsis button.
Select the Manage team option.
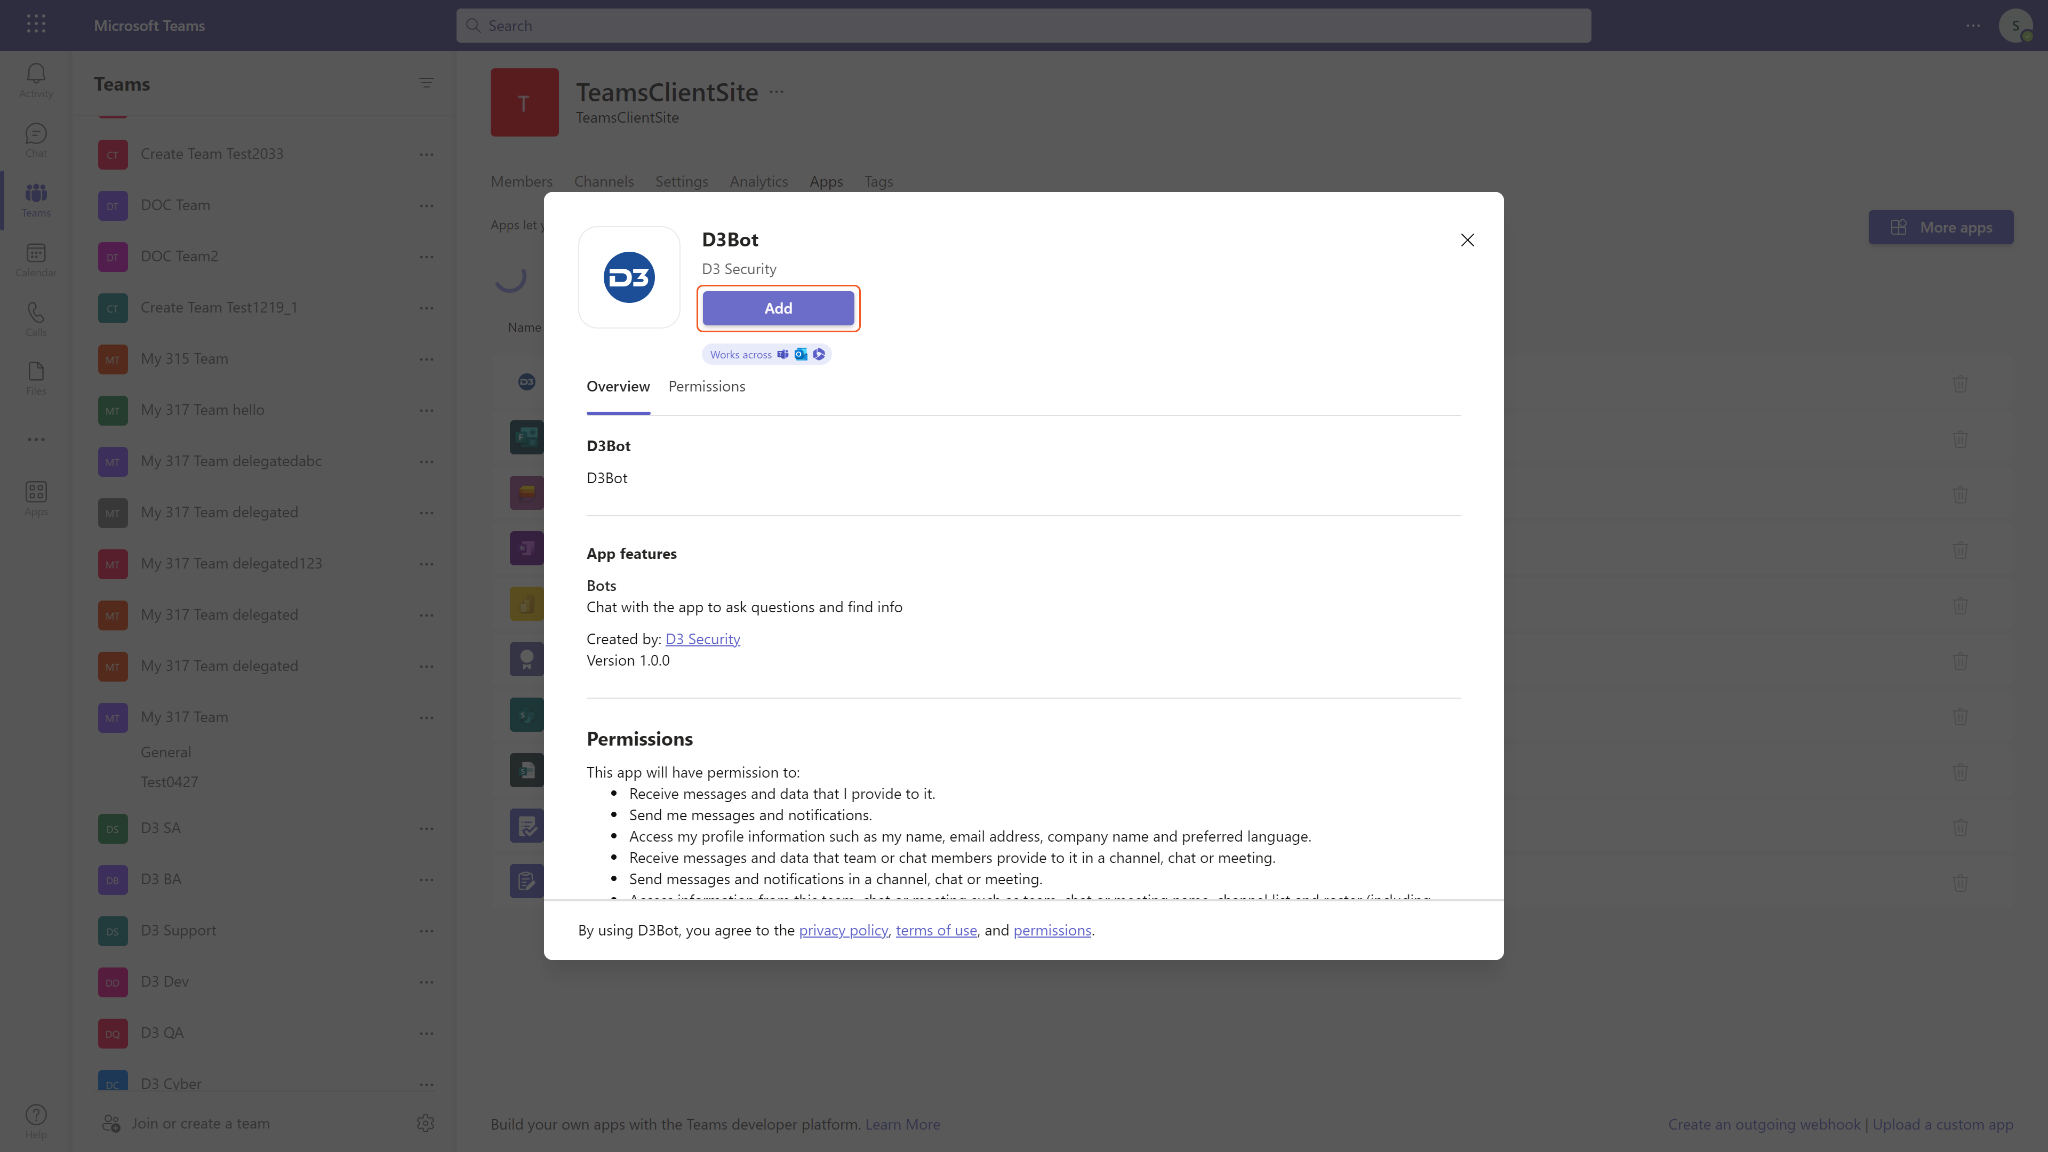
Navigate to the Apps tab.
Click the Upload a custom app button to upload the .zip archive from the preceding section.
Click the Add button to assign the bot to the team.
Configuring D3 SOAR to Work with Microsoft Teams Bot Framework
Log in to D3 SOAR.
Find the Microsoft Teams Bot Framework integration.
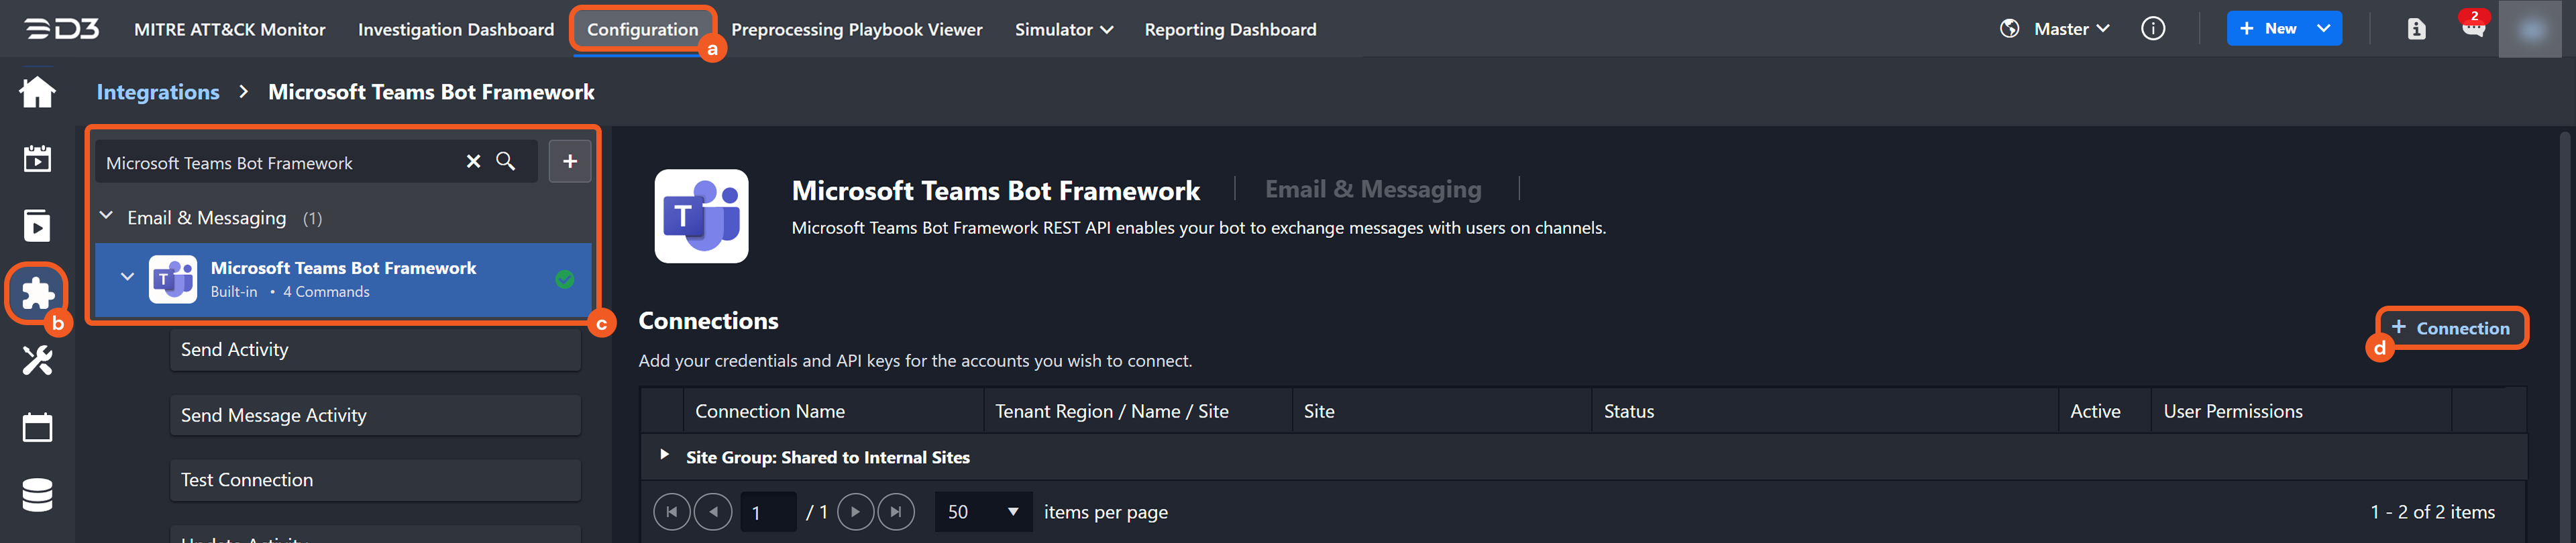
Navigate to Configuration on the top header menu.
Click on the Integration icon on the left sidebar.
Type Microsoft Teams Bot Framework in the search box to find the integration, then click it to select it.
Click + New Connection, on the right side of the Connections section. A new connection window will appear.
Configure the following fields to create a connection to Microsoft Teams Bot Framework.
.png?inst-v=a9107af0-b04c-4e31-bb5a-938372783868)
Connection Name: The desired name for the connection.
Site: The site on which to use the integration connection. Use the drop-down menu to select the site. The Share to Internal Sites option enables all internal sites to use the connection. Selecting a specific site will only enable that site to use the connection.
Recipient site for events from connections Shared to Internal Sites: This field is displayed when Share to Internal Sites is selected for the Site field, allowing selection of the internal site for deploying the integration connection.
Agent Name (Optional): The proxy agent required to build the connection. Use the dropdown menu to select the proxy agent from a list of previously configured proxy agents.
Description (Optional): The description for the connection.
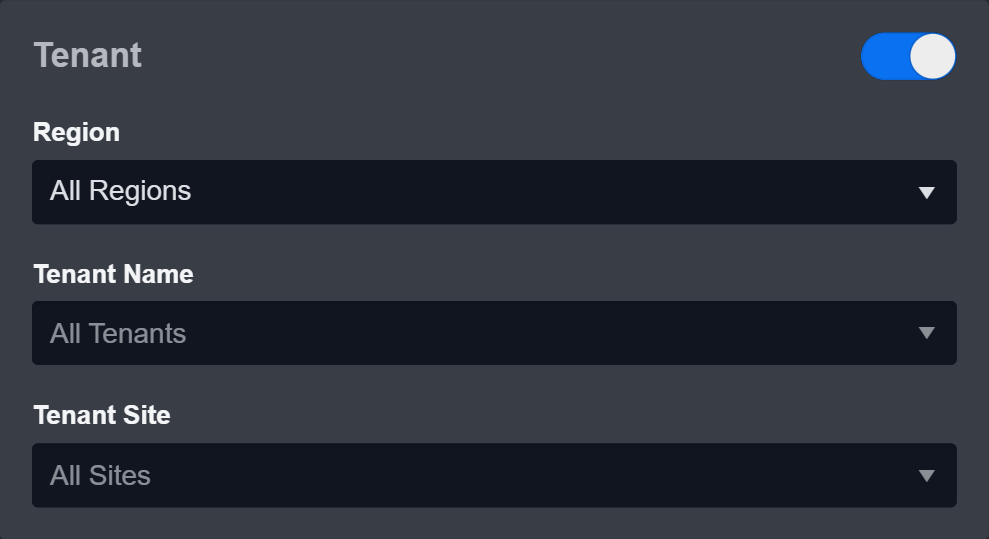
Tenant (Optional): When configuring the connection from a master tenant site, users can choose the specific tenant sites with which to share the connection. Once this setting is enabled, users can filter and select the desired tenant sites from the dropdowns to share the connection.
Configure User Permissions: Defines which users have access to the connection.
Active: The checkbox that enables the connection to be used when selected.
Allow messages to also be sent to Microsoft Teams Bot Framework through this connection:
Selecting the Allow messages to also be sent to Microsoft Teams Bot Framework through this connection checkbox will reveal a dropdown that allows users to select a global list for site and channel mapping.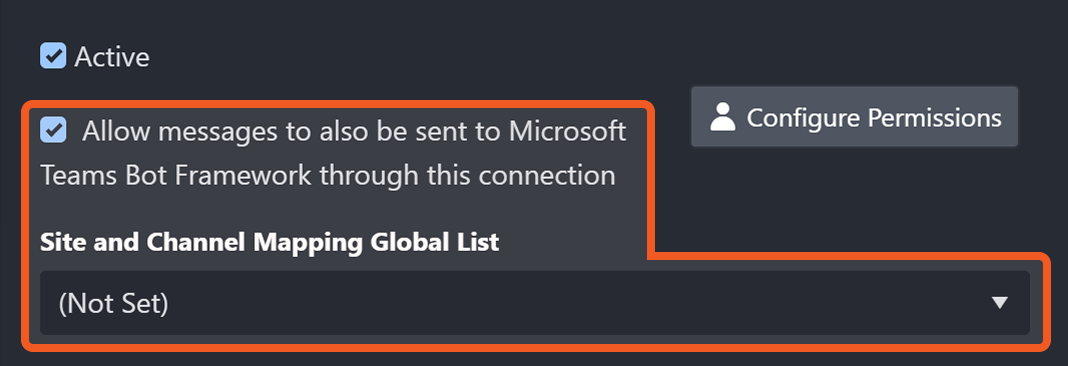
Refer to Setting up a Global List to Send Messages via the Microsoft Teams Bot Framework for more information.
System : This section contains the parameters defined specifically for the integration. These parameters must be configured to create the integration connection.
.png?inst-v=a9107af0-b04c-4e31-bb5a-938372783868)
1. Input the Server URL. The default value is https://smba.trafficmanager.net/teams.
2. Select the Bot App Type. The default value is Multi Tenant. Since Azure deprecated Multi-Tenant bot creation on July 31, 2025, users should select Single Tenant unless they are intending to use a Multi-Tenant bot configured in Azure before that date.
3. (For Single-Tenant Bot App type only) Input the Tenant ID. Refer to step 9c of Configuring in Azure Portal.
4. Input the saved Client ID. Refer to step 9b of Configuring in Azure Portal.
5. Input the saved Client Secret. Refer to step 8e of Configuring in Azure Portal.
6. Input the Bot GUID. This is the same as the Client ID.
7. Input the API Version. The default value is v3.Enable Password Vault: An optional feature that allows users to take the stored credentials from their own password vault. Refer to the password vault connection guide if needed.
Connection Health Check: Periodically checks the connection status by scheduling the Test Connection command at the specified interval (in minutes). Available only for active connections, this feature also allows configuring email notifications for failed attempts.
Test the connection.
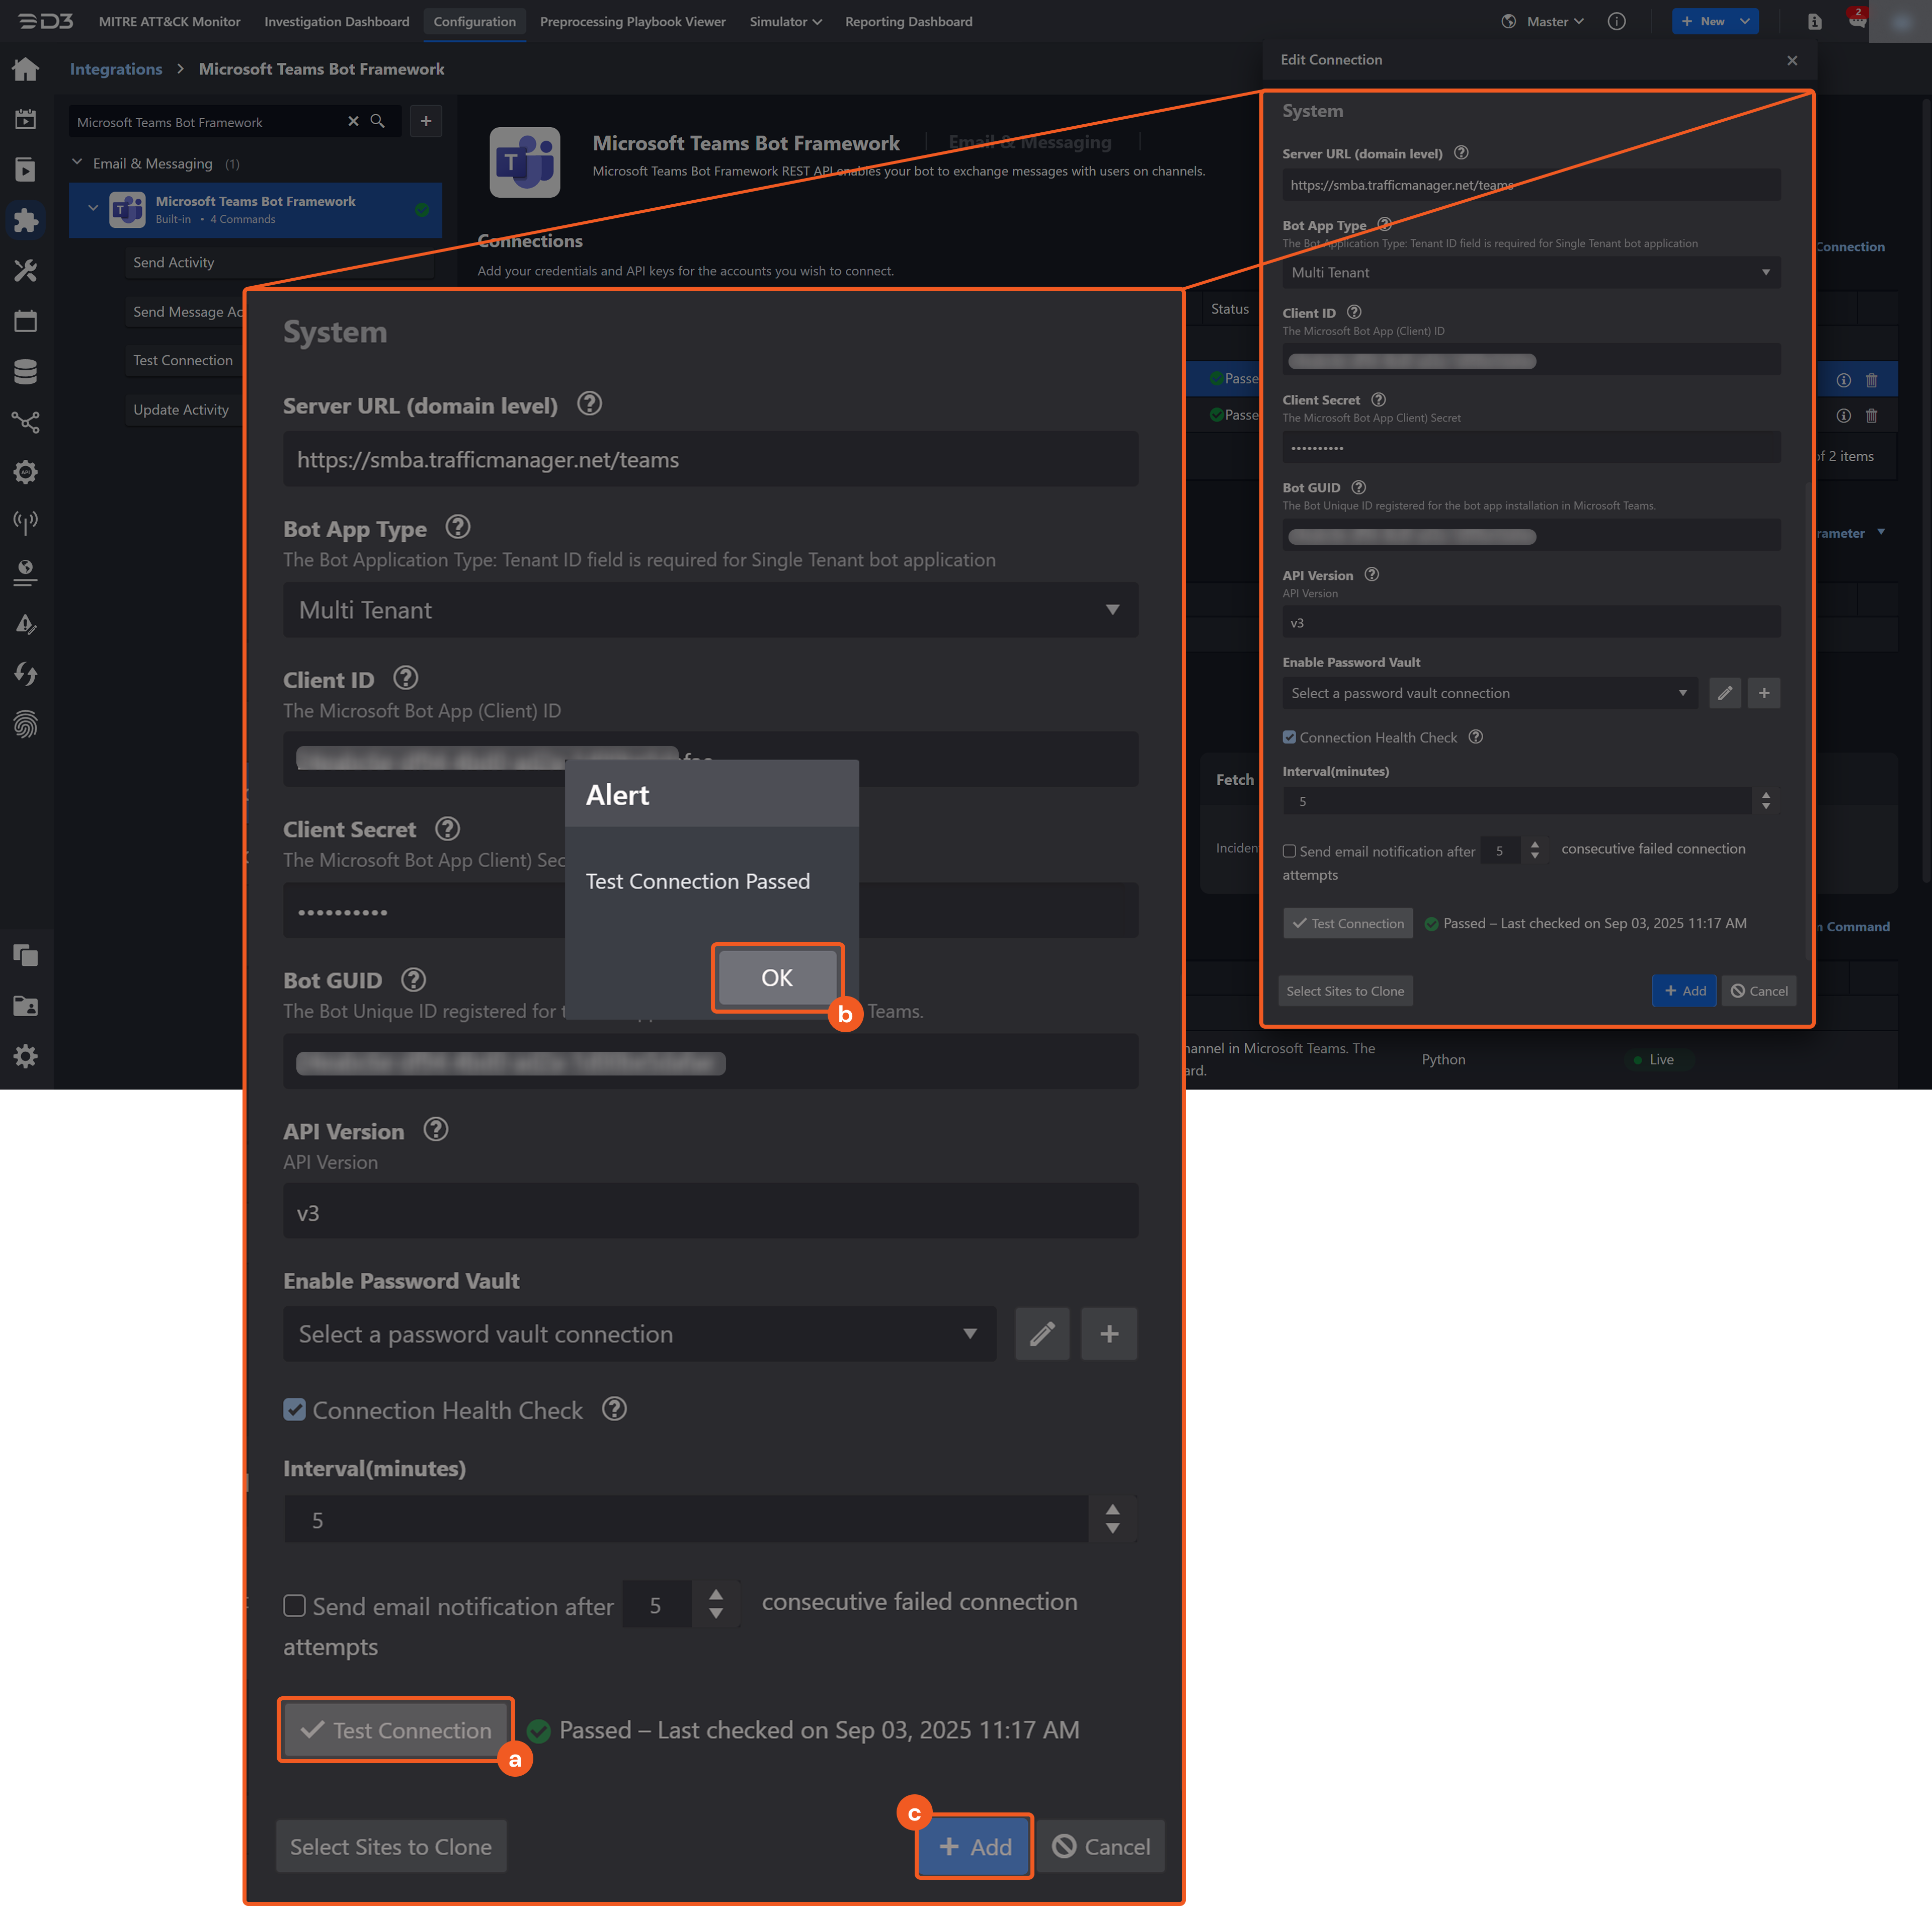
Click on the Test Connection button to verify credentials and connectivity. A success alert displays Passed with a green checkmark. If the connection fails, review the parameters and retry.
Click OK to close the alert window.
Click + Add to create and add the configured connection.
Setting up a Global List to Send Messages via the Microsoft Teams Bot Framework
In D3 SOAR, users can configure a connection via Microsoft Bot Framework to broadcast messages to multiple sites, each associated with a different team and respective channels. Here's a step-by-step guide to set it up:
READER NOTE
For optimal efficiency, users are recommended to use a single connection set to Share to client site or Shared to internal sites. This global list should include only either client or internal sites. Using multiple connectors may lead to misused connectors, which can result in errors.
In D3 SOAR, navigate to Configuration > Global List > New Global List. Provide a name for the global list, then define the global list JSON array using the format below.
JSON[ { "{{Site_Name}}": { "MSTeamConnectionName": "{{connection_name}}", "TeamIdentifier": "{{team_identifier}}", "ChannelIdentifier": "{{channel_identifier}}", "ChannelsToMention": [ "{{channel_to_mention_1}}", "{{channel_to_mention_2}}" ] }, "{{D3 SOAR Site 2}}": { "ChannelIdentifier": "{{channel_identifier}}" } } ]Fields Descriptions:
Site Name: The target D3 SOAR site along with the connection name, team, and channels to auto-mention. Ensure that all sites listed are client or internal only; mixing categories can trigger multiple Microsoft Bot Framework connections and cause issues.
MSTeamConnectionName (Optional): The name of the connector created for the Microsoft Teams integration. The grant type for the connection must be authorization code. To use the @channel function, create a connector with identical credentials for the integration.
Team Identifier (Optional): The ID of the target team in which to send messages (multiple teams per site are not allowed). To obtain the Teams ID, establish a Microsoft Teams integration connection, then the List Teams command.
ChannelIdentifier: The ID of the channel for message delivery (one site corresponds to one channel; private channels are excluded). To obtain the Teams Channel ID, establish a Microsoft Teams integration connection and run the List Channels command.
The input Channel ID must be under the specified Team ID.
If only the "ChannelIdentifier" key is defined in the JSON array, no channels will be automatically mentioned in the sent message.
ChannelsToMention (Optional): The channels to mention in the message. Channels can be specified by either IDs or names.
Here is an example of a defined global list (ensure to define each designated site in its own JSON object within the array):
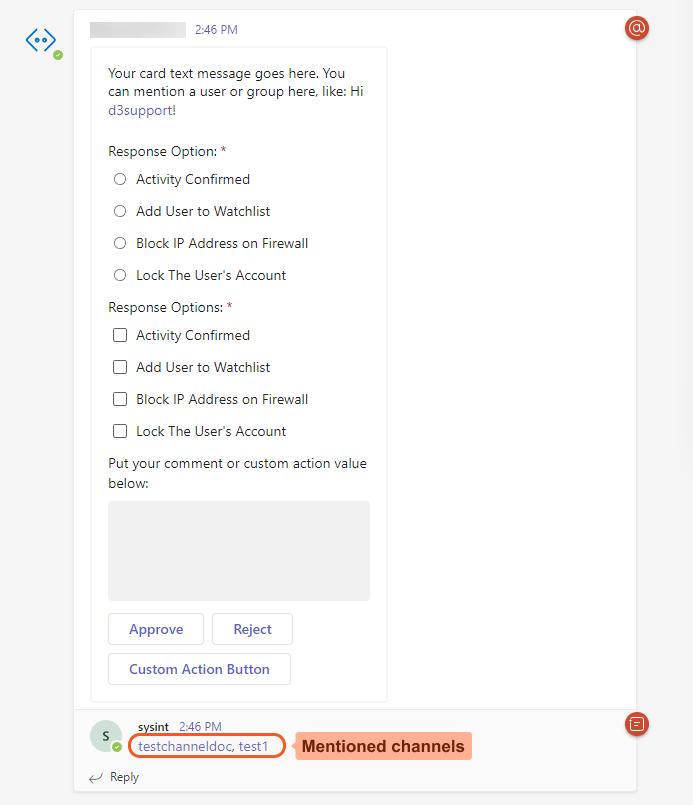
JSON[ { "Client Testing Site 1": { "MSTeamConnectionName": "teams_authorization_code", "TeamIdentifier": "*****", "ChannelIdentifier": "*****", "ChannelsToMention": [ "*****", "test1" ] }, "Client Testing Site 2": { "ChannelIdentifier": "*****" } } ]Each message sent is accompanied by a card (as shown in the screenshot), which shows the selected channels.
Allow the desired sites access to the global list by navigating to the Permission tab and moving them from the Available Sites section to the Shared To section.
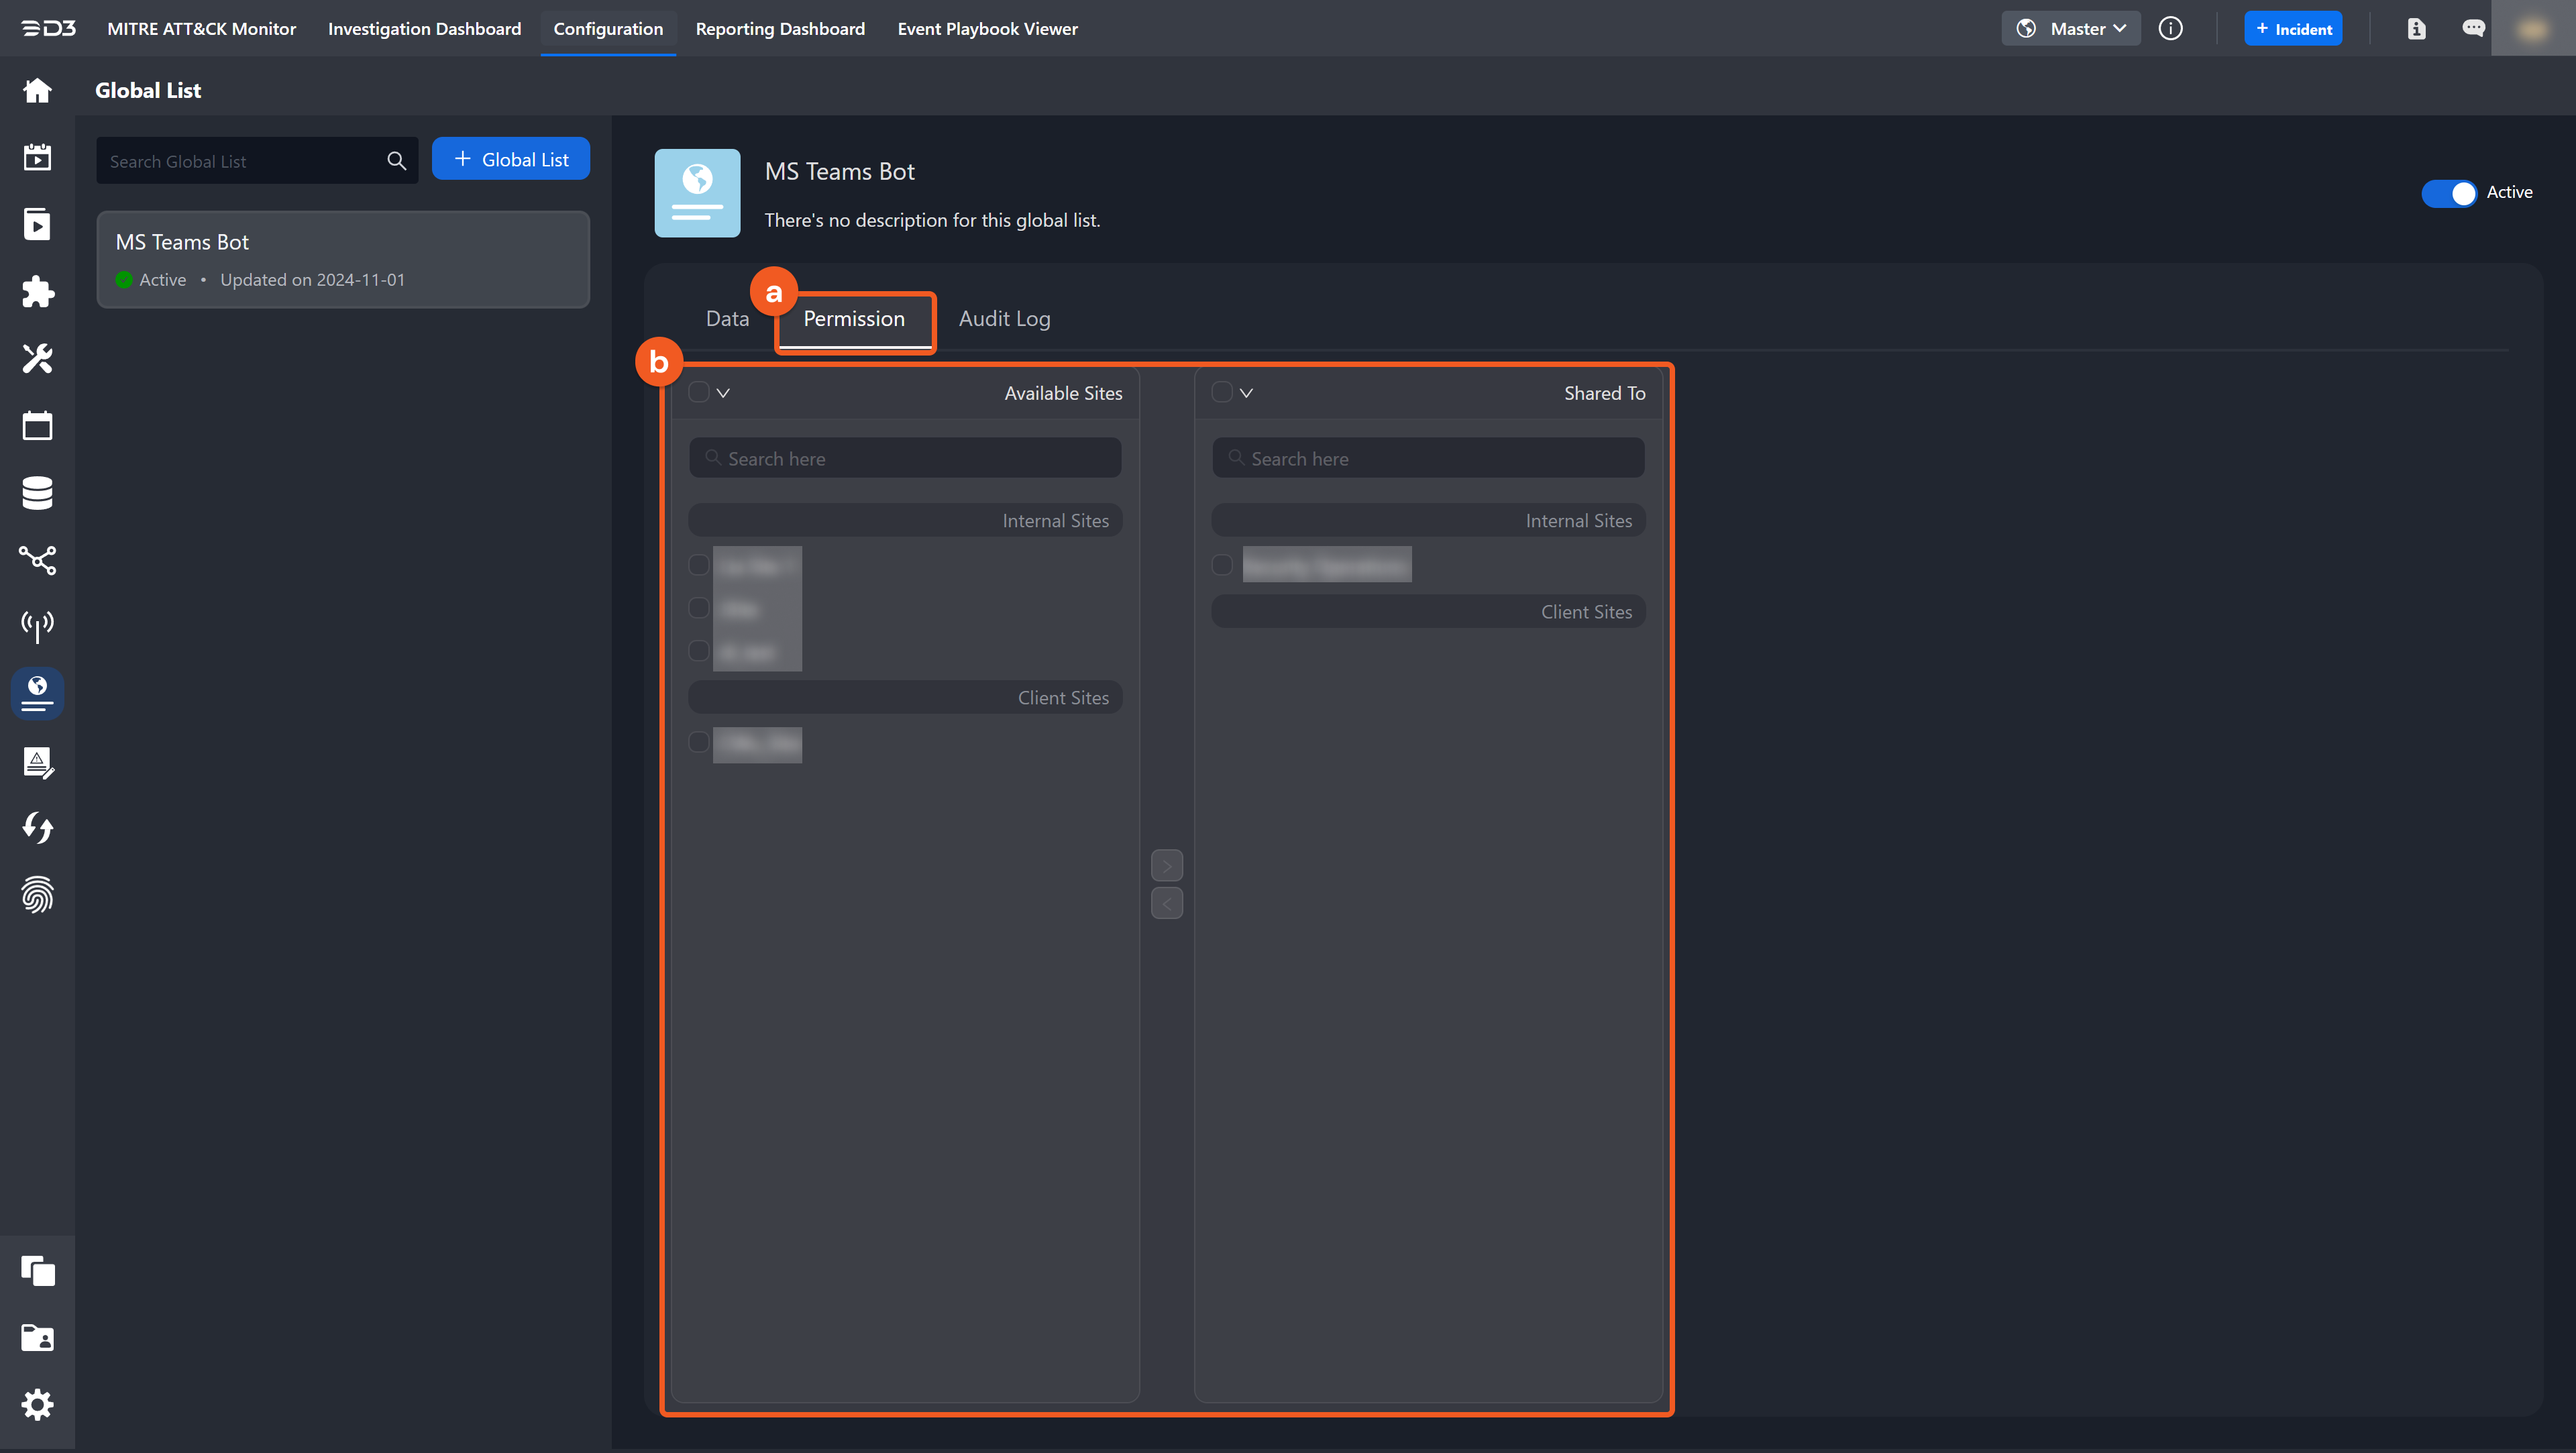
The rest of the steps will work only if the client sites in the global list are also included in the shared sites list.
After creating the global list, refresh the web browser and confirm that it appears in the global list dropdown when configuring the Microsoft Teams Bot Framework integration connection.
Using the "Send Message" Utility Command with the Microsoft Bot Framework in a Playbook
With the global list set up, users can use the Send Message utility command to send messages to the specified Microsoft Teams channels in a playbook.
Follow the instructions in Configuring Microsoft Teams Bot Framework to work with D3 SOAR to create a connection shared to the desired sites. For the Site and Channel Mapping Global List parameter, select the recently created global list.
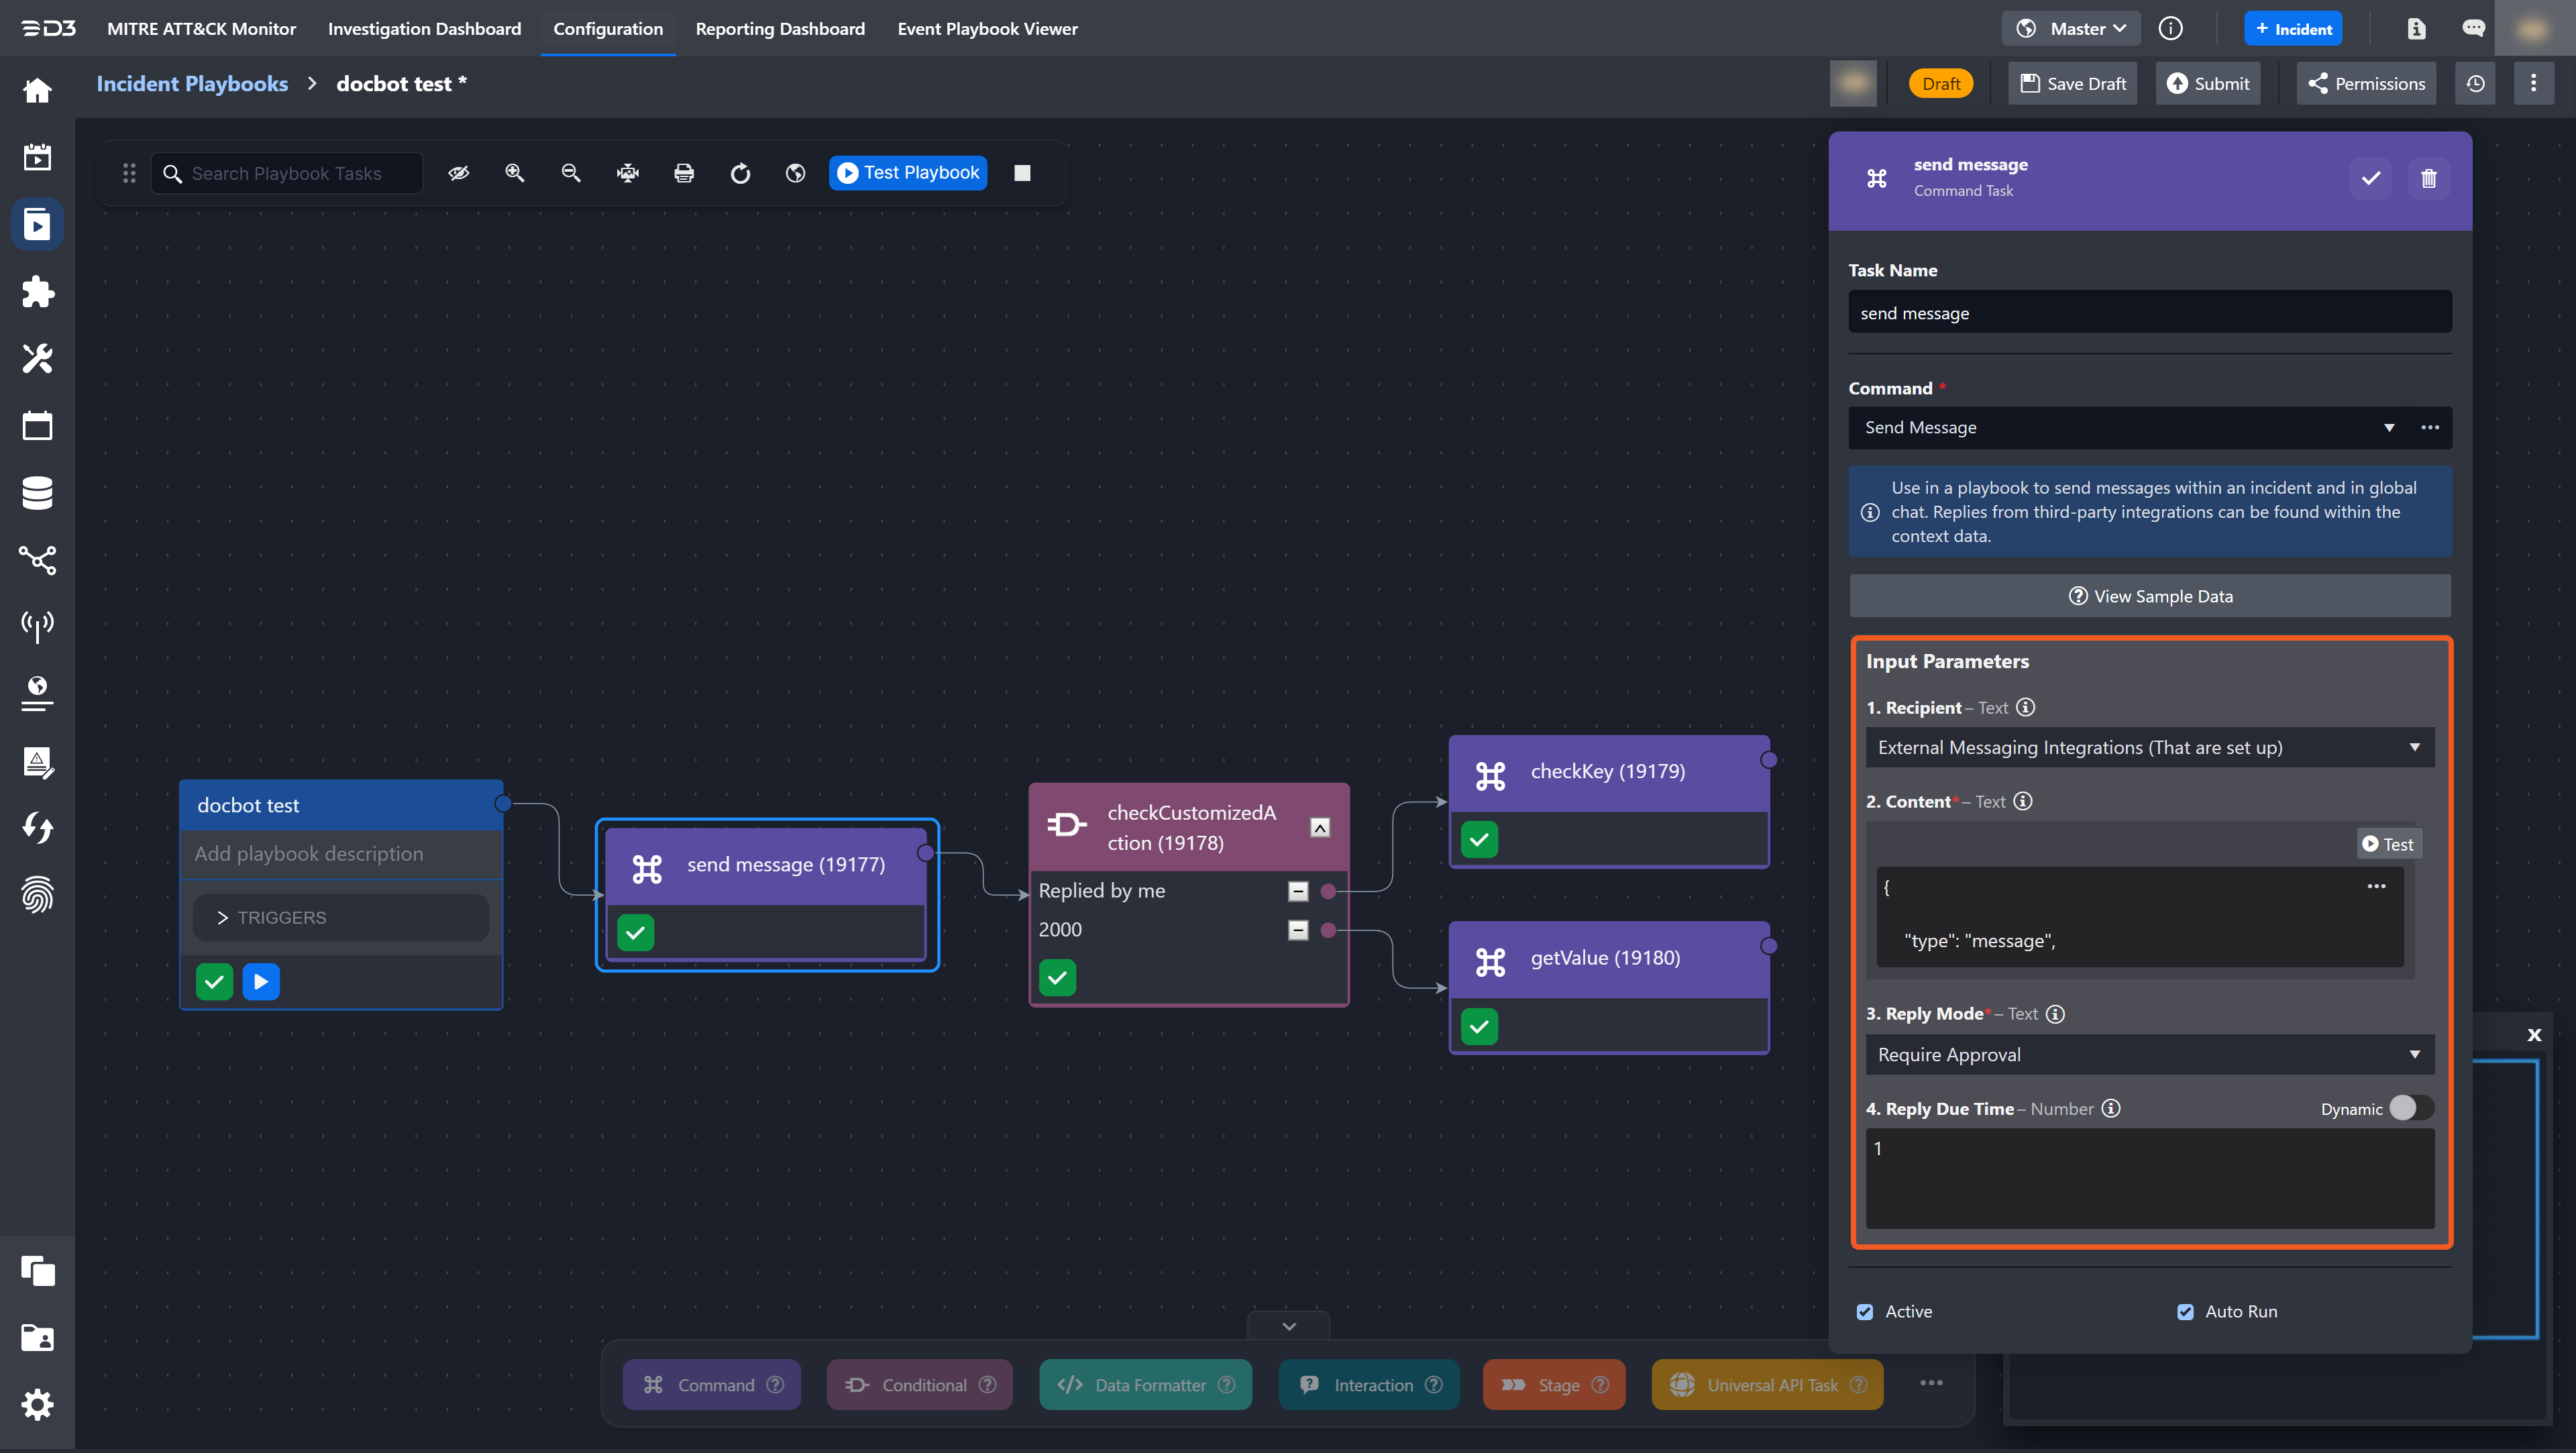
In a playbook, add a new command task with the Send Message utility command.
Configure the Send Message utility command for Microsoft Bot Framework by reviewing the following:
Input Parameter | Required/Optional | Description | Example |
Recipient | Optional | The recipient(s) of this message. To send messages to Microsoft Teams, select the External Messaging Integrations (That are set up) option. | External Messaging Integrations (That are set up) |
Content | Required | The contents of the message. If the reply mode is set to No Action, only simple text is supported. If it is Reply Mode, refer to the expand section below to format messages with custom HTML content. | Test message |
Reply Mode | Required | The mode to determine if this message requires a response or approval. When it is specified as No Action, any external user actions will not be responded to. | Require Approval |
Reply Due Time | Optional | The number of minutes before the message is overdue, if the Reply Mode has been set to Require Approval. This parameter is only used if the message content has card actions. | 100 |
When the Reply Mode is set to No Action, it limits the Content parameter to plain text.
The Require Approval reply mode enables interactive response cards with custom HTML. Refer to the sample data below for an example of how to set the Content parameter. Text between "//" denotes annotations.
{

    "type": "message",

    "text": "this line will be removed",  // The main content of the message goes here. HTML is supported. For @ mentions like "<at>d3support</at>", define details in the "entities" JSON object. Ensure names match those in the entity JSON objects. This text appears in a separate text box; to keep content in the same box, remove this field and define messages in the sections below. //

    "attachments": [{

            "contentType": "application/vnd.microsoft.card.adaptive",

            "content": {

                "type": "AdaptiveCard",

                "version": "1.3",

                "body": [{

                        "type": "TextBlock",

                        "text": "Your card text message goes here. You can mention a user or group here, like: Hi <at>d3support</at>!",   // Text for the response options card. HTML and @ mentions are supported. //

                        "size": "Medium",

                        "wrap": true

                    }, {

                        "type": "Input.ChoiceSet",

                        "id": "*****", // Format: "responsexxx". "response" prefix is mandatory, and "xxx" can be any string. Each id must be unique. //

                        "style": "expanded",

                        "isMultiSelect": "false", // "true" for multiple choices, "false" for single choice. //

                        "isRequired": "true", // Mandatory field: "true" or "false". //

                        "isEnabled": "false", // Field enabled: "true" or "false". //

                        "label": "Response Option:",

                        "choices": [{

                                "title": "Activity Confirmed",

                                "value": "1",

                                "isEnabled": "false",

                            }, {

                                "title": "Add User to Watchlist",

                                "value": "2"

                            }, {

                                "title": "Block IP Address on Firewall",

                                "value": "3"

                            }, {

                                "title": "Lock The User's Account",

                                "value": "4"

                            }

                        ]

                    }, {

                        "type": "Input.ChoiceSet",

                        "id": "*****",

                        "style": "expanded",

                        "isMultiSelect": "true", // "true" for multiple choices, "false" for single choice. //

                        "isRequired": "true",

                        "label": "Response Options:",

                        "choices": [{

                                "title": "Activity Confirmed",

                                "value": "1"

                            }, {

                                "title": "Add User to Watchlist",

                                "value": "2"

                            }, {

                                "title": "Block IP Address on Firewall",

                                "value": "3"

                            }, {

                                "title": "Lock The User's Account",

                                "value": "4"

                            }

                        ]

                    }, {

                        "type": "Input.Text", // Template for comment box. //

                        "style": "text",

                        "isMultiline": true,

                        "label": "Put your comment or custom action value below:", // Description for the comment box. //

                        "id": "responseComment"

                    }

                ],

                "msteams": {

                    "entities": [{   // Example entity object for mentioned tag (e.g., d3support). Follow this template for defining group entities. //

                            "type": "mention",

                            "text": "<at>d3support</at>",

                            "mentioned": {

                                "id": "*****",

                                "name": "d3support",

                                "type": "tag"

                            }

                        }

                    ]

                },

                "actions": [{   // Template for reply actions. //

                        "type": "Action.Submit",

                        "title": "Approve",

                        "data": {

                            "msteams": {

                                "type": "invoke",

                                "displayText": "Approve",

                                "text": "text to bots approve",

                                "value": {

                                    "respUrl": "<<UserActionRequiredURL>>",

                                    "action": 1

                                }

                            }

                        }

                    }, {

                        "type": "Action.Submit",

                        "title": "Reject",

                        "data": {

                            "msteams": {

                                "type": "invoke",

                                "displayText": "Reject",

                                "text": "text to bots decline ",

                                "value": {

                                    "respUrl": "<<UserActionRequiredURL>>",

                                    "action": 2

                                }

                            }

                        }

                    }, {

                        "type": "Action.Submit",

                        "title": "Custom Action Button",

                        "data": {

                            "msteams": {

                                "type": "invoke",

                                "displayText": "Custom Action",

                                "text": "text to bots custom action ",

                                "value": {

                                    "respUrl": "<<UserActionRequiredURL>>",

                                    "customizedAction": "2000",

                                    "action": 3

                                }

                            }

                        }

                    }

                ]

            }

        }

    ]

}
Use the Send Activity integration command's Test Command feature to validate inputs before running the Send Message command in the playbook.
The Send Activity command sends a message or card to the specified Microsoft Teams channel. It returns clearer error messages when failures occur, as the Send Message utility offers limited error handling, particularly for invalid content or cards.
Enter the Channel ID. This is the ID of the channel where the activity should be sent.
Set the Message Type parameter to Message.
Fill the Action Objects parameter with the information intended for the Send Message utility command.
Click the Test Command button.
Review error messages, correct the payload, and retest until delivery succeeds. Successful execution confirms that the object inputted in the Action Objects parameter is valid and can be used with the Send Message utility command.
Test the playbook with the Send Message utility command.
Ensure that the selected site has been added to the global list. Otherwise, the message will not be sent. If the site is not visible, check that the authenticated D3 SOAR user account has access to the site.
READER NOTE
A green check mark on the Send Message command task indicates successful execution.
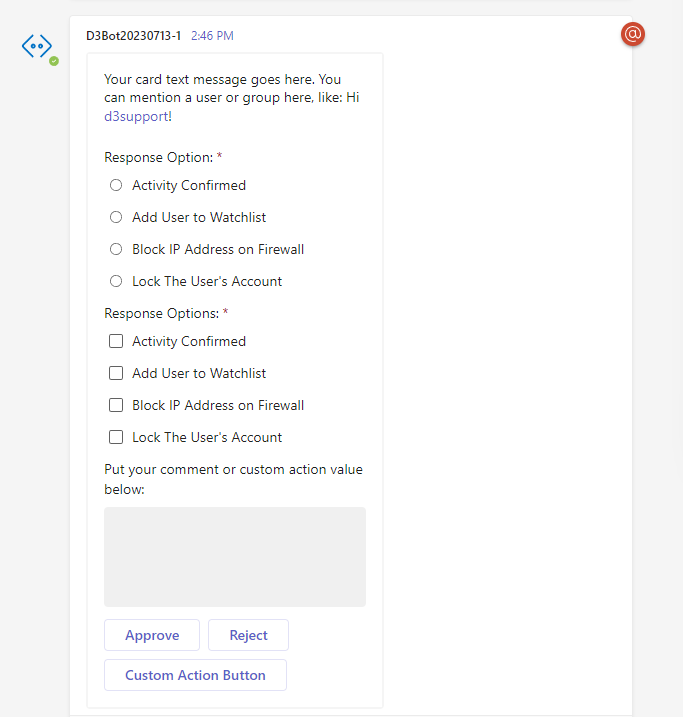
Check that the message is delivered to the specified Microsoft Teams channel.
.png?inst-v=a9107af0-b04c-4e31-bb5a-938372783868)
Retrieving Reply Actions and Comments in a Playbook
After the Send Message command posts a Microsoft Teams message, users can leverage subsequent playbook tasks capture custom-action values and reply to comments. The steps below describe how to configure an approval-request workflow that follows the Send Message command.
Configure the Send Message command as illustrated in the previous example.
The Contents parameter is populated with the sample code in this expand section
Add a conditional task to capture the custom action of the message. Each condition is set to retrieve the action data from specific reply actions.
In this example, the custom action of the Approve and Reject buttons is Reply by me, and the Custom Action Button's custom action is 2000. As such, the conditions are set to Reply by Me and 2000.
Add command tasks for each condition. Use the Get Value from JSON Object String by JSON Path utility command to extract custom-action values and comment replies.
Test run the playbook.
Verify that the message is sent in Microsoft Teams.
Respond to the message within the specified reply due time. Users have the option to add a comment and select a reply action.
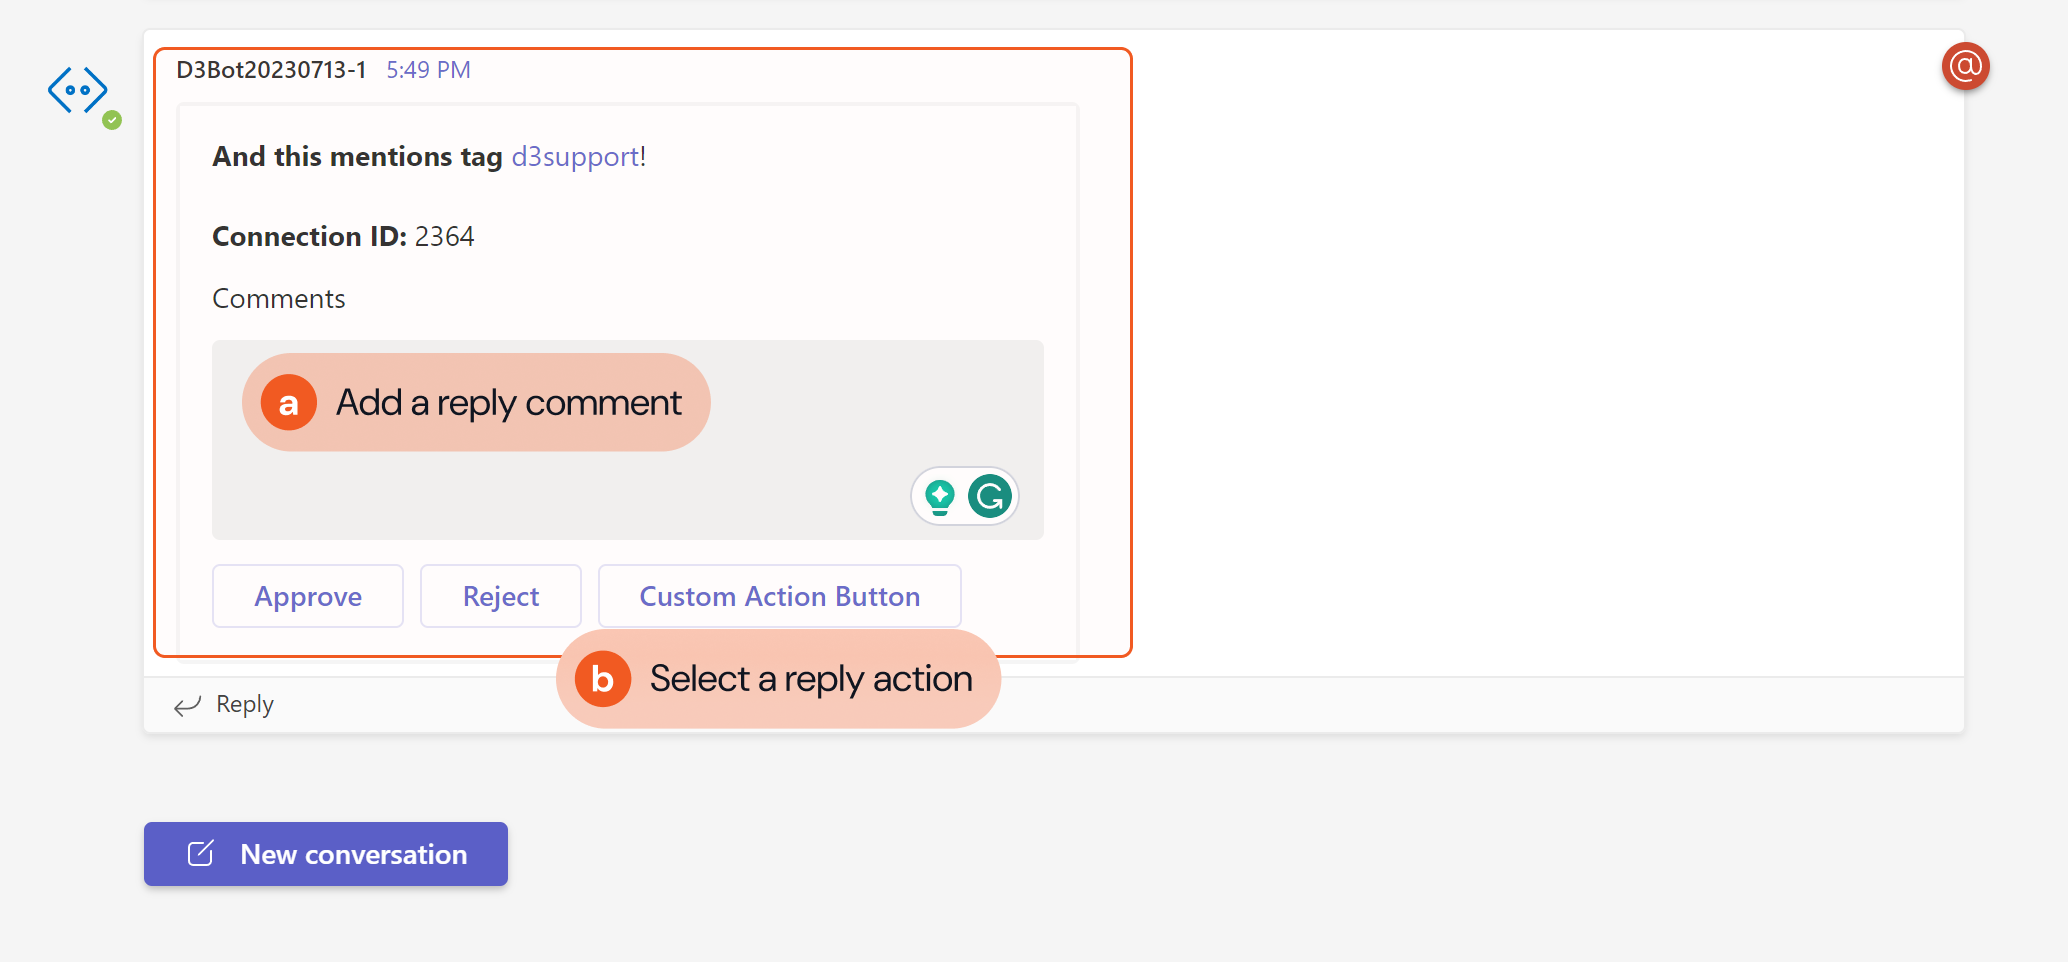
If users respond with Approve or Reject, the playbook will follow the Reply by me path as set in the conditional task.
If users respond by clicking the Custom Action Button, the playbook will follow the 2000 path as set in the conditional task.
Confirm the inputs in the updated message card.
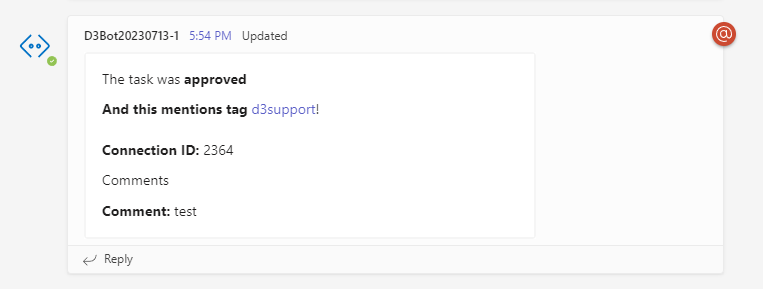
If auto-run is enabled, subsequent playbook tasks execute automatically. Users can then retrieve the output data for downstream actions.