
Password Vault
LAST UPDATED: APR 11, 2025
Overview
D3 SOAR's password vault functionality securely fetches connection credentials from various identity and access management platforms through a REST API. Out of the box, D3 SOAR supports HashiCorp Vault and CyberArk Privileged Access Security. For platforms not directly supported, the "D3 General Password Vault" system integration can be customized to allow integration via REST API.
This guide provides instructions for setting up the password vault feature using HashiCorp Vault and D3 General Password Vault.
Setup Steps:
Integration Connection: Begin by establishing an integration connection with your chosen identity and access management platform (i.e., HashiCorp Vault, CyberArk, or D3 General Password Vault). Test run the Fetch Credential command to verify that the desired credentials can be successfully fetched.
Navigate to Specific Integration: After connecting, go to the specific integration where you wish to fetch saved credentials for a new connection.
Access Saved Credentials: Choose the password vault connector to access and use the stored credentials.
HashiCorp Vault
Configuring a HashiCorp Vault connection in D3 SOAR
In D3 SOAR, navigate to Configuration > Integrations > HashiCorp Vault > + Connection.
Configure the following fields to create a connection to HashiCorp Vault.
Connection Name: The desired name for the connection.
Site: Specifies the site to use the integration connection. Use the drop-down menu to select the site. The Share to Internal Sites option enables all sites defined as internal sites to use the connection. Selecting a specific site will only enable that site to use the connection.
Recipient site for events from connections Shared to Internal Sites: This field appears if you selected Share to Internal Sites for Site to let you select the internal site to deploy the integration connection.
Agent Name (Optional): Specifies the proxy agent required to build the connection. Use the dropdown menu to select the proxy agent from a list of previously configured proxy agents.
Description (Optional): Add your desired description for the connection.
Tenant (Optional): When configuring the connection from a master tenant site, you have the option to choose the specific tenant sites you want to share the connection with. Once you enable this setting, you can filter and select the desired tenant sites from the drop-downs to share the connection.

Configure User Permissions: Defines which users have access to the connection.
Active: Check the tick box to ensure the connection is available for use.
System: This section contains the parameters defined specifically for the integration. These parameters must be configured to create the integration connection.
1. Input the Server URL of your HashiCorp Vault instance.
2. Copy and paste the API Token from HashiCorp Vault.
3. Input the API Version. The default value is v1.Enable Password Vault: An optional feature that allows users to take the stored credentials from their own password vault.
Test the connection.
-20241101-174403.png?inst-v=b3e22cc7-f647-4753-ac50-35b16f082a1a)
Click Test Connection to verify the account credentials and network connection. If the Test Connection Passed alert window appears, the test connection is successful. You will see Passed with a green checkmark appear beside the Test Connection button. If the test connection fails, please check your connection parameters and try again.
Click OK to close the alert window.
Click + Add to create and add the configured connection.
Using HashiCorp Vault Credentials for Integration Connection
In D3 SOAR, navigate to Configuration > Integrations > [Your Desired Integration] > + Connection.
Configure the parameters in the New Connection dialogue accordingly. Under System, click on the + button for the Enable Password Vault parameter.
-20241101-174655.png?inst-v=b3e22cc7-f647-4753-ac50-35b16f082a1a)
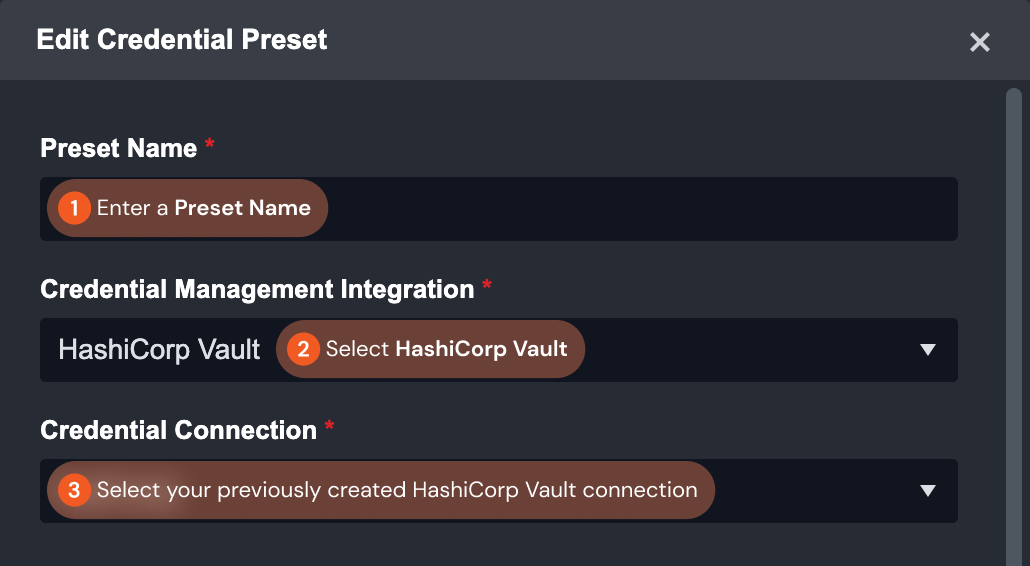
Configure the parameters in the Edit Credential Preset dialogue.
Enter a Preset Name. Choose HashiCorp Vault for the Credential Management Integration and select the previously set up HashiCorp Vault connector for the Credential Connection.
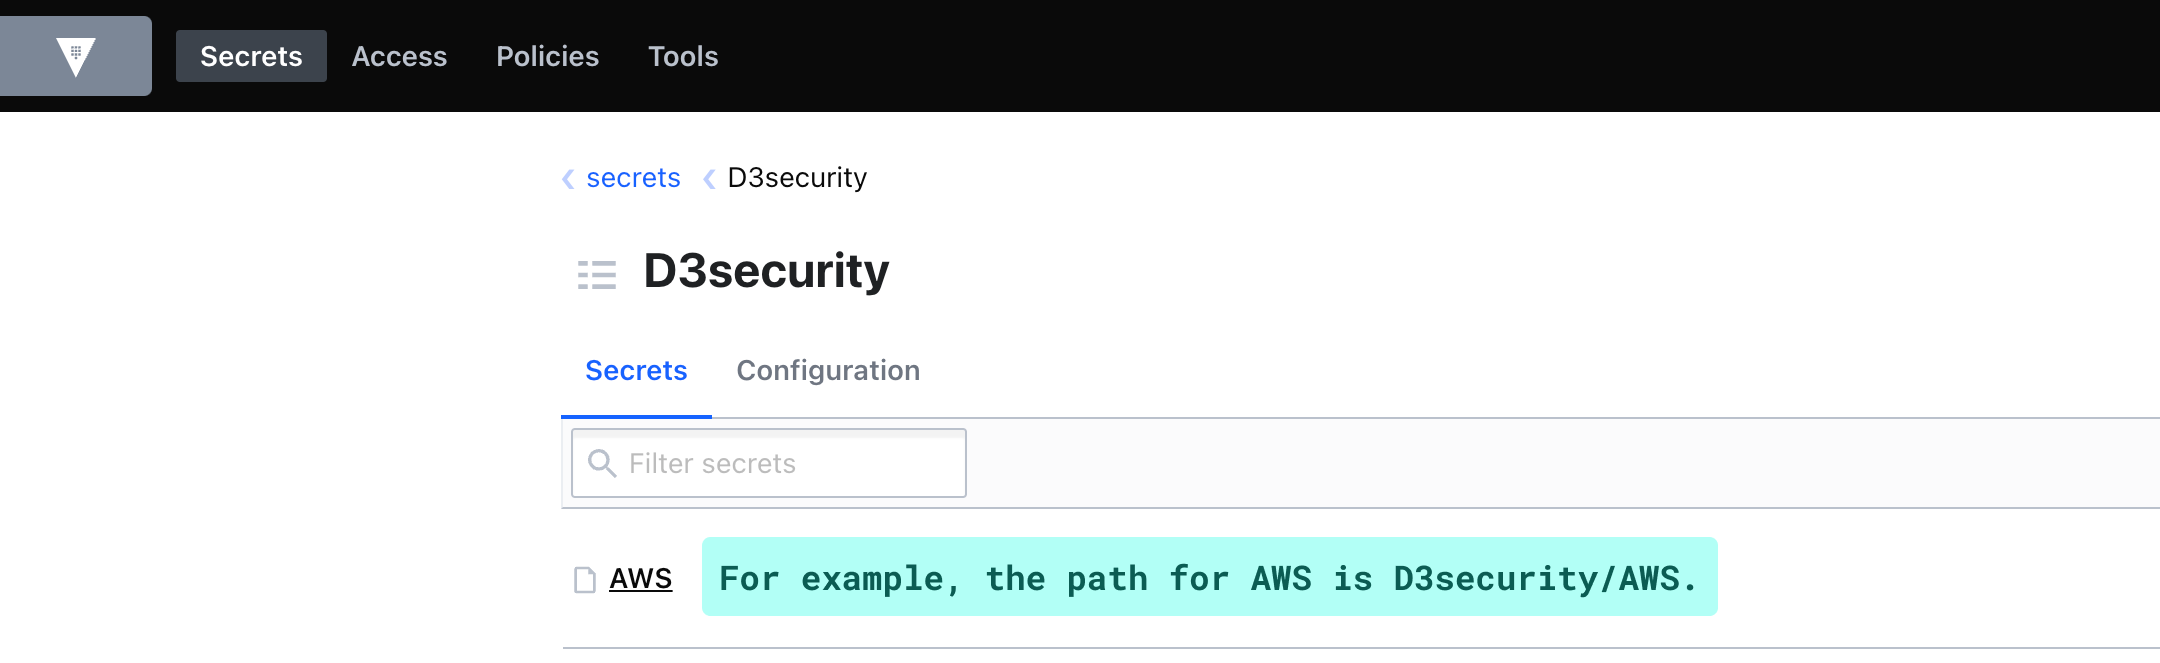
Under Command and Parameters, select Fetch Credential for the Command. Enter the item path from your HashiCorp Secrets Engines for the Path parameter. You can find this path in the HashiCorp Vault web UI. As illustrated in the example screenshot below, the path for the “AWS” secret located under the “D3security” secrets engine would be D3security/AWS.
Click Get Results to view the redacted JSON response from HashiCorp Vault.
Configure the Credentials Field(s) Mapping parameters. These parameters correspond to the required System parameter in the previous New Connection dialogue. If you've already set a value in that dialogue, only configure fields for which you intend to fetch credentials from HashiCorp Vault.
To do this, click on ... within the desired field. You may be prompted to click on the Get Results button first. A window will display the JSON response from HashiCorp Vault. Choose the JSON path containing the credential value you need. This path will then auto-fill in the parameter field.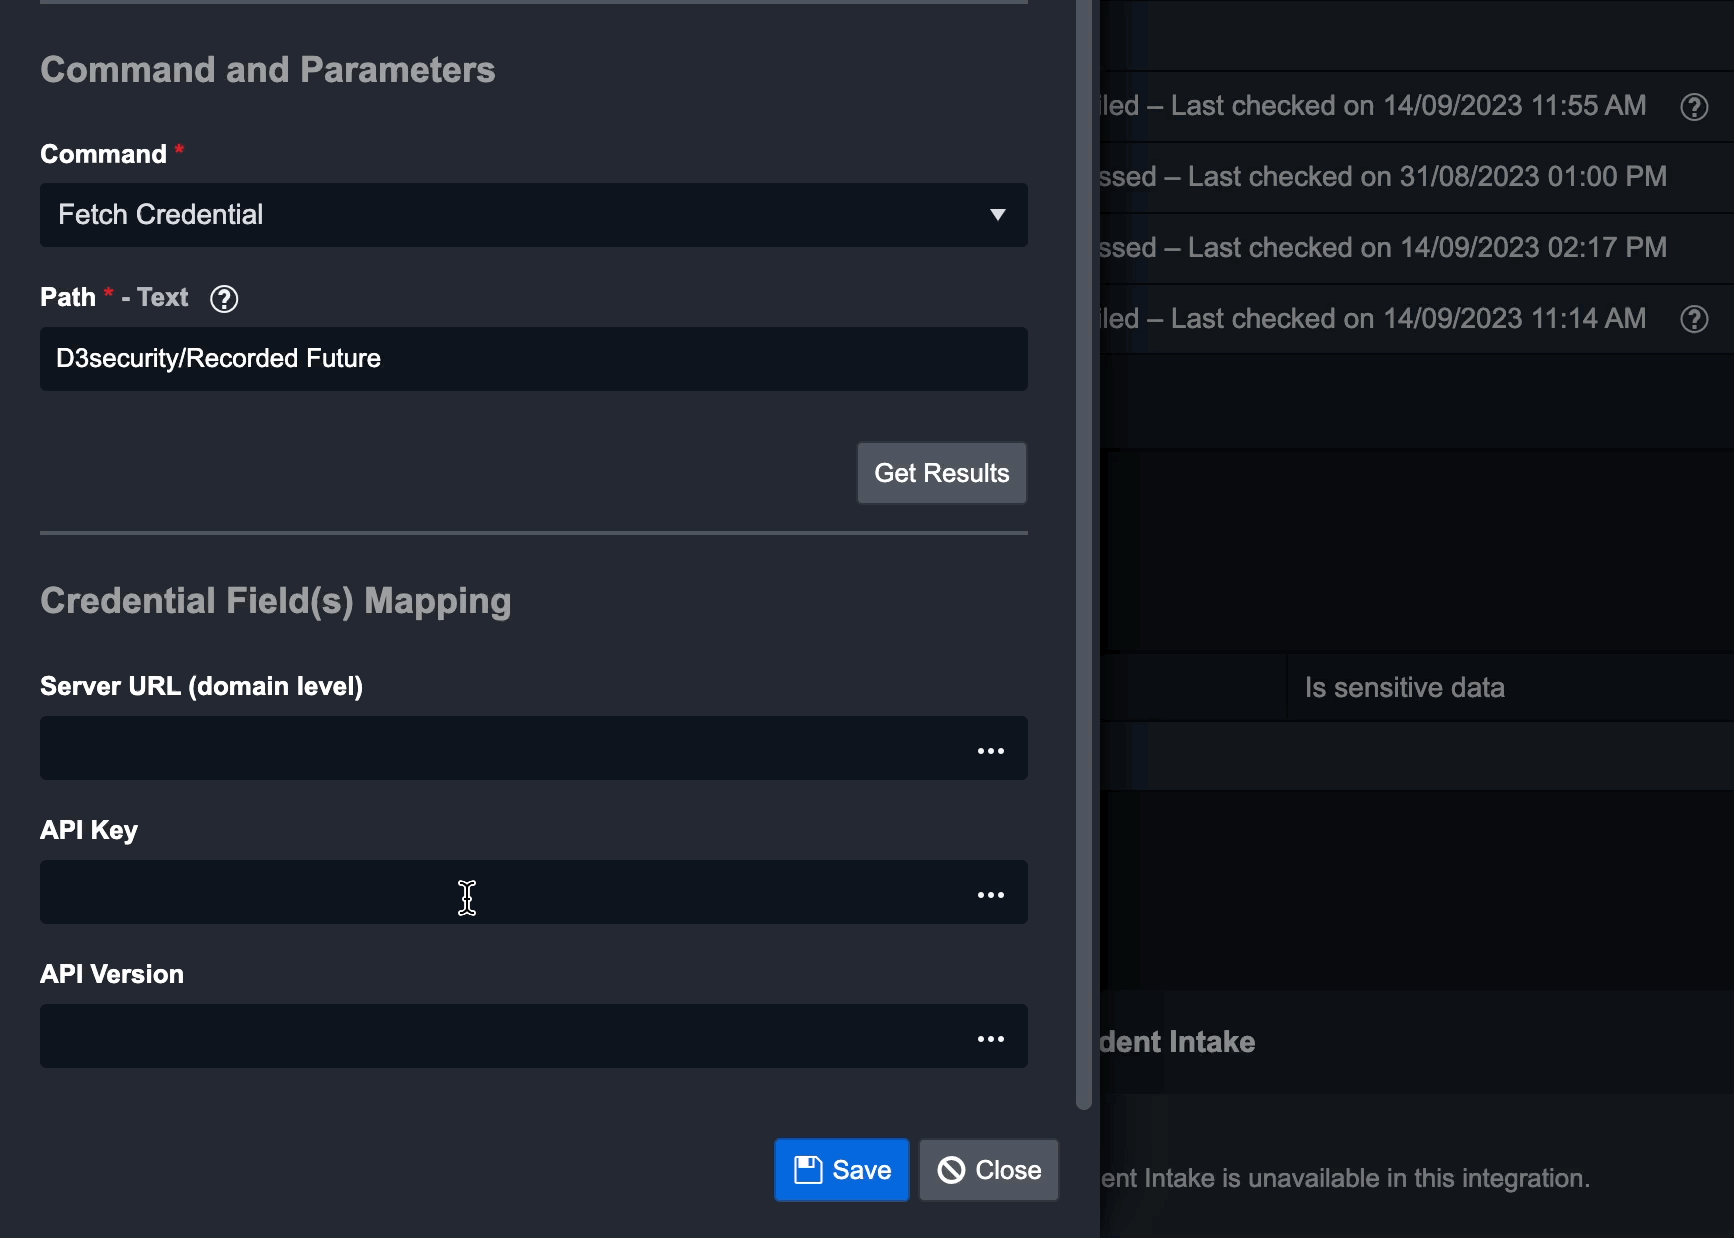
Click Save. You will return to the New Connection dialogue.
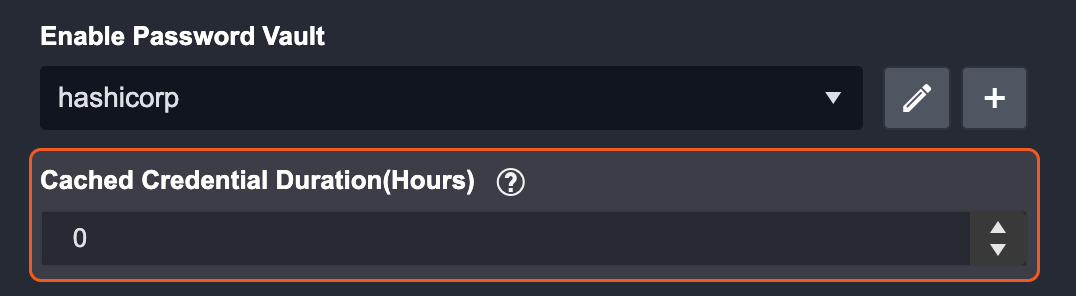
(Optional) Configure the Cached Credential Duration (Hours) parameter. This determines how long the credential remains stored in the system. After the set duration, the system will automatically retrieve the credential again.
Click + Add to create and add the configured connection.
WARNING
Ensure connection parameters configured in the Credential Field(s) Mapping section of the Edit Credential Preset dialogue are left blank in the New Connection dialogue. They will be auto-filled based on your configuration.
D3 General Password Vault
Configuring a D3 General Password Vault connection in D3 SOAR
In D3 SOAR, navigate to Configuration > Integrations > D3 General Password Vault > + Connection.
-20241101-175540.png?inst-v=b3e22cc7-f647-4753-ac50-35b16f082a1a)
Configure the following fields to create a connection to D3 General Password Vault.
-20241101-175651.png?inst-v=b3e22cc7-f647-4753-ac50-35b16f082a1a)
Connection Name: The desired name for the connection.
Site: Specifies the site to use the integration connection. Use the drop-down menu to select the site. The Share to Internal Sites option enables all sites defined as internal sites to use the connection. Selecting a specific site will only enable that site to use the connection.
Recipient site for events from connections Shared to Internal Sites: This field appears if you selected Share to Internal Sites for Site to let you select the internal site to deploy the integration connection.
Agent Name (Optional): Specifies the proxy agent required to build the connection. Use the dropdown menu to select the proxy agent from a list of previously configured proxy agents.
Description (Optional): Add your desired description for the connection.
Tenant (Optional): When configuring the connection from a master tenant site, you have the option to choose the specific tenant sites you want to share the connection with. Once you enable this setting, you can filter and select the desired tenant sites from the drop-downs to share the connection.

Configure User Permissions: Defines which users have access to the connection.
Active: Check the tick box to ensure the connection is available for use.
System: This section contains the parameter to connect to an identity and management platform via REST API. These parameters must be configured to create the integration connection. Begin by selecting the Authentication method for the connection. The supported authentication methods are:
Basic Authentication
Bearer Authentication
API Key
OAuth 1.0
OAuth 2.0
AWS Signature
NTLM Authentication
Each method may require unique parameters. Ensure you configure them based on your specific needs.
Data JSON Path: Use this parameter to define the JSON path from the response data that will be used for the password vault. If you prefer not to specify a path, enter $ to default to the root path.
Mapping Configuration: This parameter allows you to establish a mapping between connection parameters and the JSON path of the response data. Represent this mapping as a JSON array in the format: { "key" : "value" }.
keyrepresents the connection parameter.valueindicates the third-party JSON source path.
READER NOTE
Click the Test Connection button to retrieve an updated list of mapped fields.
Test the connection.
-20241101-175848.png?inst-v=b3e22cc7-f647-4753-ac50-35b16f082a1a)
Click Test Connection to verify the account credentials and network connection. If the Test Connection Passed alert window appears, the test connection is successful. You will see Passed with a green checkmark appear beside the Test Connection button. If the test connection fails, please check your connection parameters and try again.
Click OK to close the alert window.
Click + Add to create and add the configured connection.
Using D3 General Password Vault Credentials for Integration Connection
In D3 SOAR, navigate to Configuration > Integrations > [Your Desired Integration] > + Connection.
Configure the parameters in the New Connection dialogue accordingly. Under System, you’ll find the Enable Password Vault parameter. Click the + button.
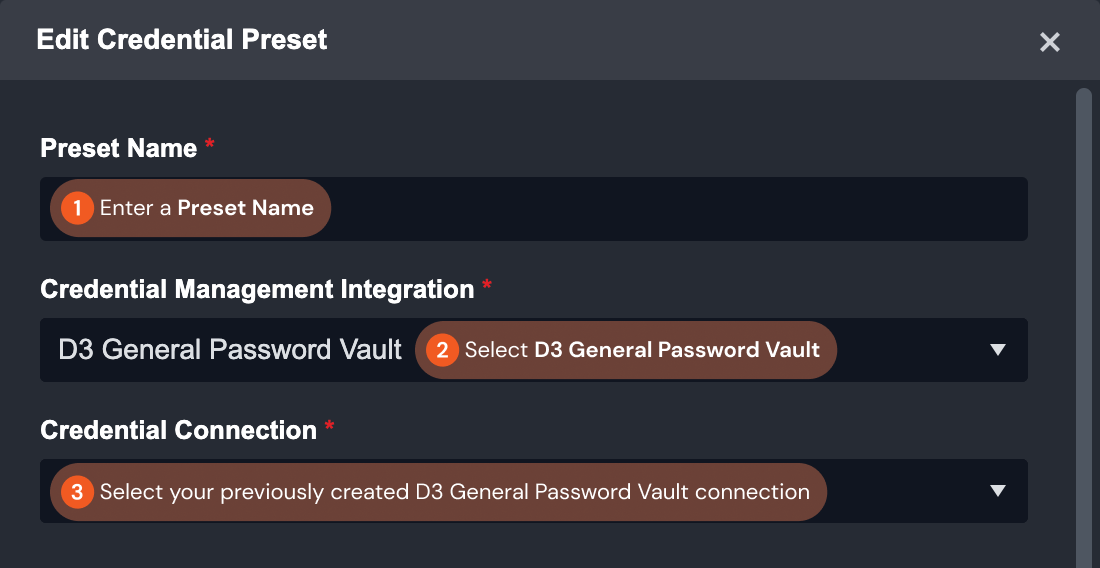
Configure the parameters in the Edit Credential Preset dialogue.
Enter a Preset Name. Choose D3 General Password Vault for the Credential Management Integration and select the previously set up connector for the Credential Connection.
Under Command and Parameters, select Fetch Credential for the Command. Click Get Results to view the redacted JSON response from your D3 General Password Vault connection.
Under Command and Parameters, select Fetch Credential for the Command. Click Get Results to view the redacted JSON response from your D3 General Password Vault connection.
Configure the Credentials Field(s) Mapping parameters. These parameters correspond to the required System parameter in the previous New Connection dialogue. If you've already set a value in that dialogue, only configure fields for which you intend to fetch credentials from the connected identity and access management platform.
To do this, click on ... within the desired field. You may be prompted to click on the Get Results button first. A window will display the JSON response from the configured identity and access management platform. Choose the JSON path containing the credential value you need. This path will then auto-fill in the parameter field..gif?inst-v=b3e22cc7-f647-4753-ac50-35b16f082a1a)
Note: The JSON response will vary depending on the connected identity and access management platform with the D3 General Password Vault.
Click Save. You will return to the New Connection dialogue.
WARNING
Ensure connection parameters configured in the Credential Field(s) Mapping section of the Edit Credential Preset dialogue are left blank in the New Connection dialogue. They will be auto-filled based on your configuration.
(Optional) Configure the Cached Credential Duration (Hours) parameter. This determines how long the credential remains stored in the system. After the set duration, the system will automatically retrieve the credential again.

Click + Add to create and add the configured connection.