
Microsoft Purview eDiscovery V2
LAST UPDATED: OCTOBER 30, 2025
Overview
Microsoft Purview eDiscovery V2 (formerly known as Microsoft 365 eDiscovery) is a comprehensive solution designed to help organizations locate, preserve, collect, and review electronically stored information (ESI) for compliance, legal, and investigative purposes. It is part of Microsoft's Purview suite of tools, which provide security, compliance, and risk management for organizations using Microsoft 365. This integration works with Microsoft Purview eDiscovery (Premium).
D3 SOAR is providing REST operations to function with Microsoft Purview eDiscovery V2.
Microsoft Purview eDiscovery V2 is available for use in:
Connection
Gather the following information to connect D3 SOAR to Microsoft Purview eDiscovery V2.
Parameter | Description | Example |
Default | ||
Tenant ID | The tenant ID to authenticate the API connection. | f621*****feed |
Grant Type | The grant type to authenticate the API connection. By default, the value is set to Client Credentials. | Client Credentials |
Client ID | The client ID to authenticate the API connection. | dbd1*****c533 |
Client Secret | The client secret to authenticate the API connection. | LMr8*****xb9n |
Authorization Code | ||
Authentication Code | The authorization code for OAuth2.0 authentication. Click the Get Authorization button on the Connection form to automatically generate an authorization code. | 1.AX*****9ZzQ |
Callback URL | The callback URL used for the Authentication Code grant type. Add this URL to the Azure app’s Redirect URIs. | https://*****/VSOC/Auth2Callback |
Refresh Token | The refresh token for authentication used for the Authentication Code grant type. After obtaining an authorization code on the Connection form, click the Get Refresh Token button to generate it automatically. | ***** |
API Version | The version of the API to use for the connection. | v1.0 |
READER NOTE
The prerequisite for using this guide is access to eDiscovery (Premium).
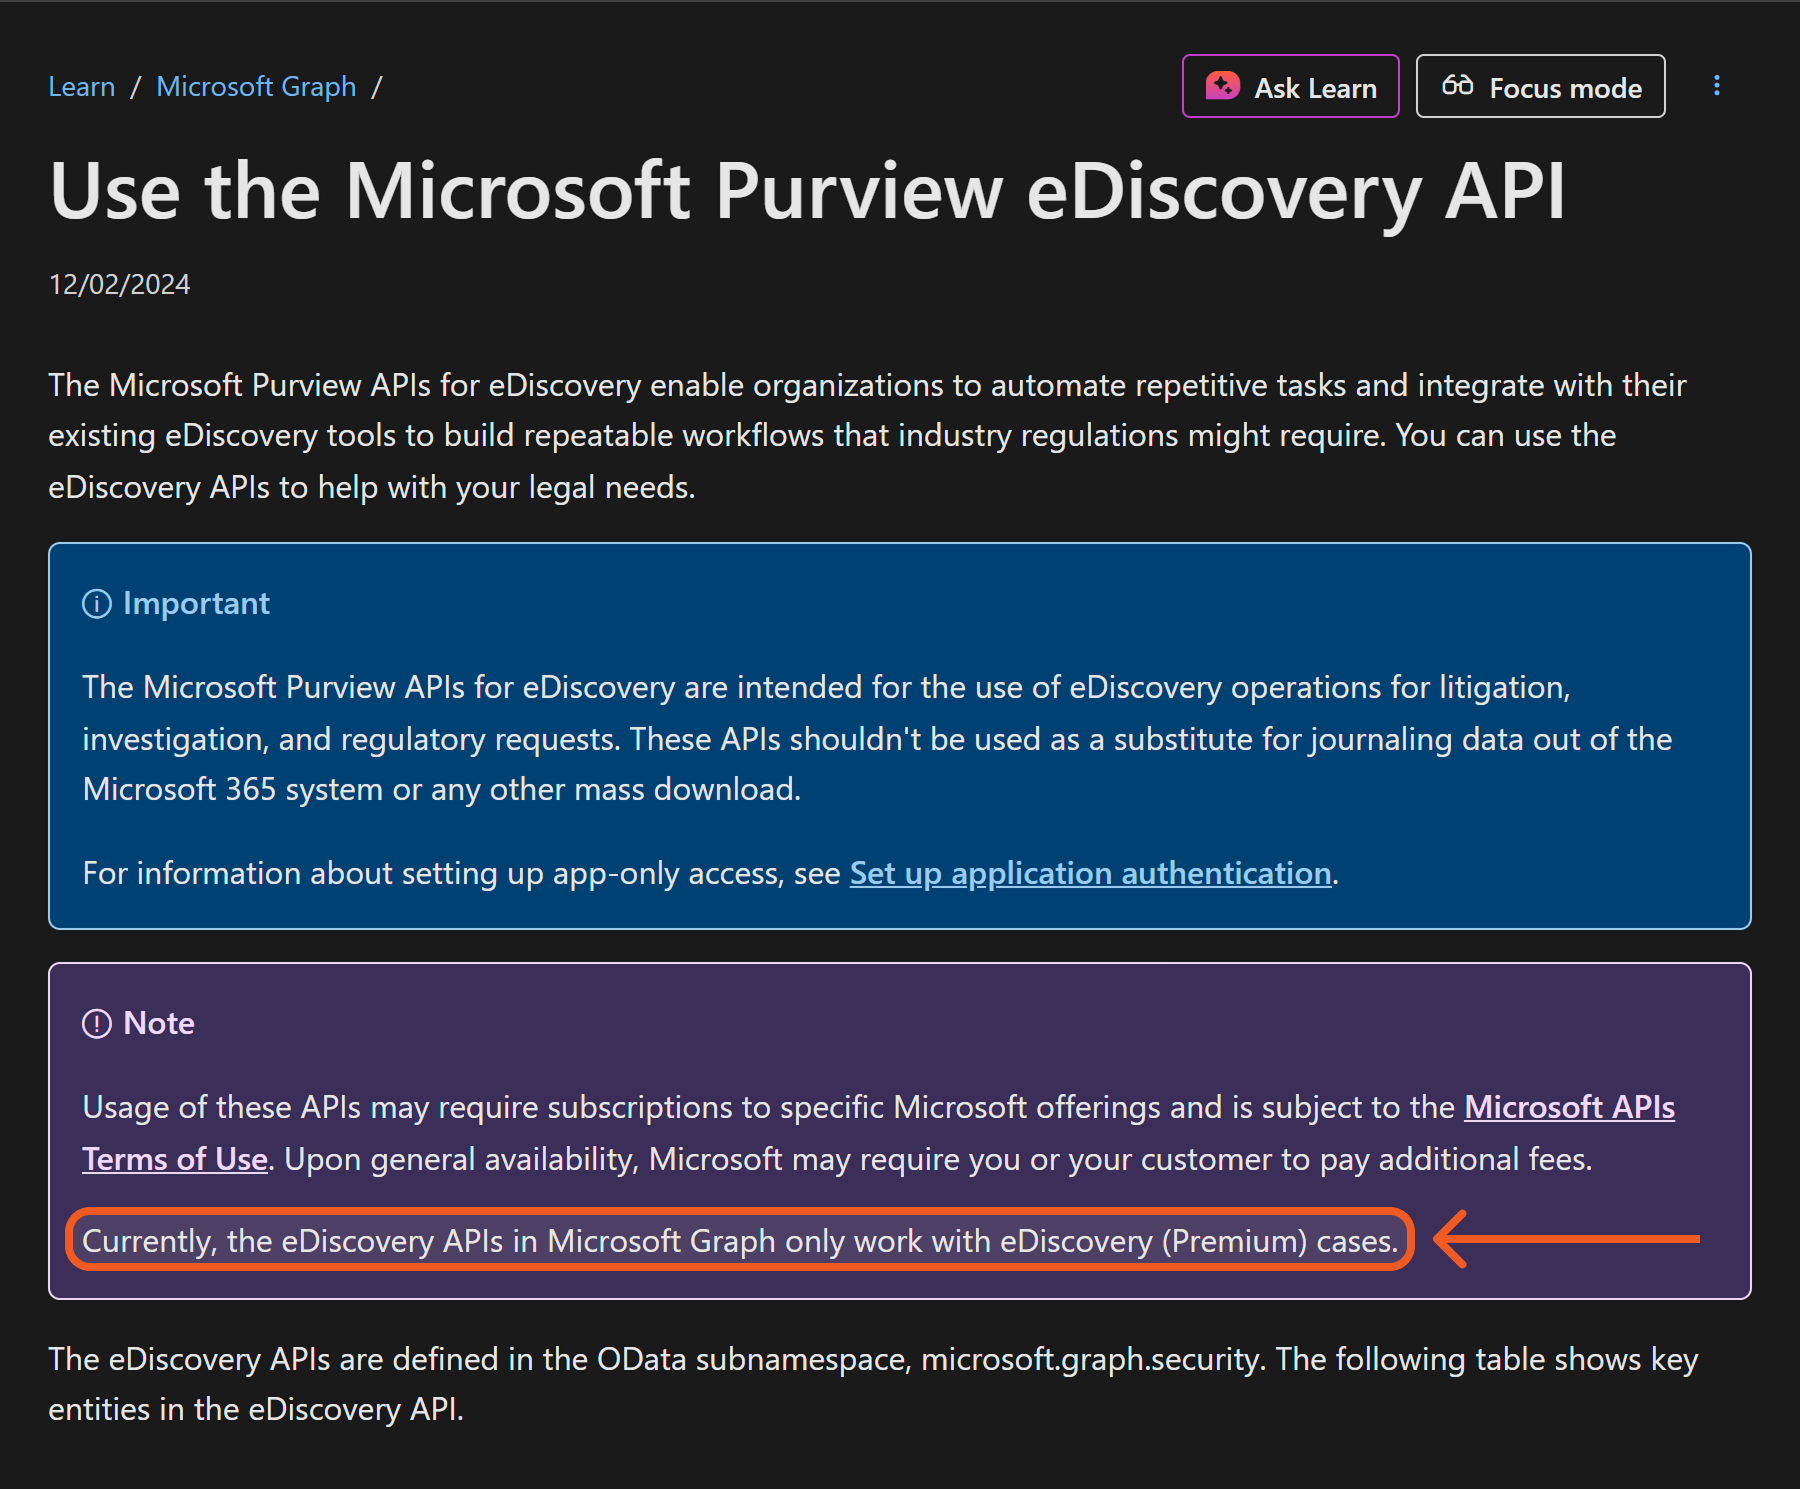
Refer to Use the Microsoft Purview eDiscovery API for more information.
Permission Requirements
Each endpoint in the Microsoft Purview eDiscovery V2 API requires a certain permission scope. The following are required scopes for the commands in this integration:
Command | Delegated | Application |
|---|---|---|
Test Connection |
|
|
Create Case |
|
|
List eDiscovery Cases |
|
|
Create eDiscovery Email Search |
|
|
Purge Emails |
|
|
READER NOTE
All API permissions must be granted admin consent on the Azure Portal.
Purview Roles refer to individual permission sets that form the basis of built-in and custom role groups.
When using application permissions, assign the role group to the service principal using PowerShell, not through the UI.
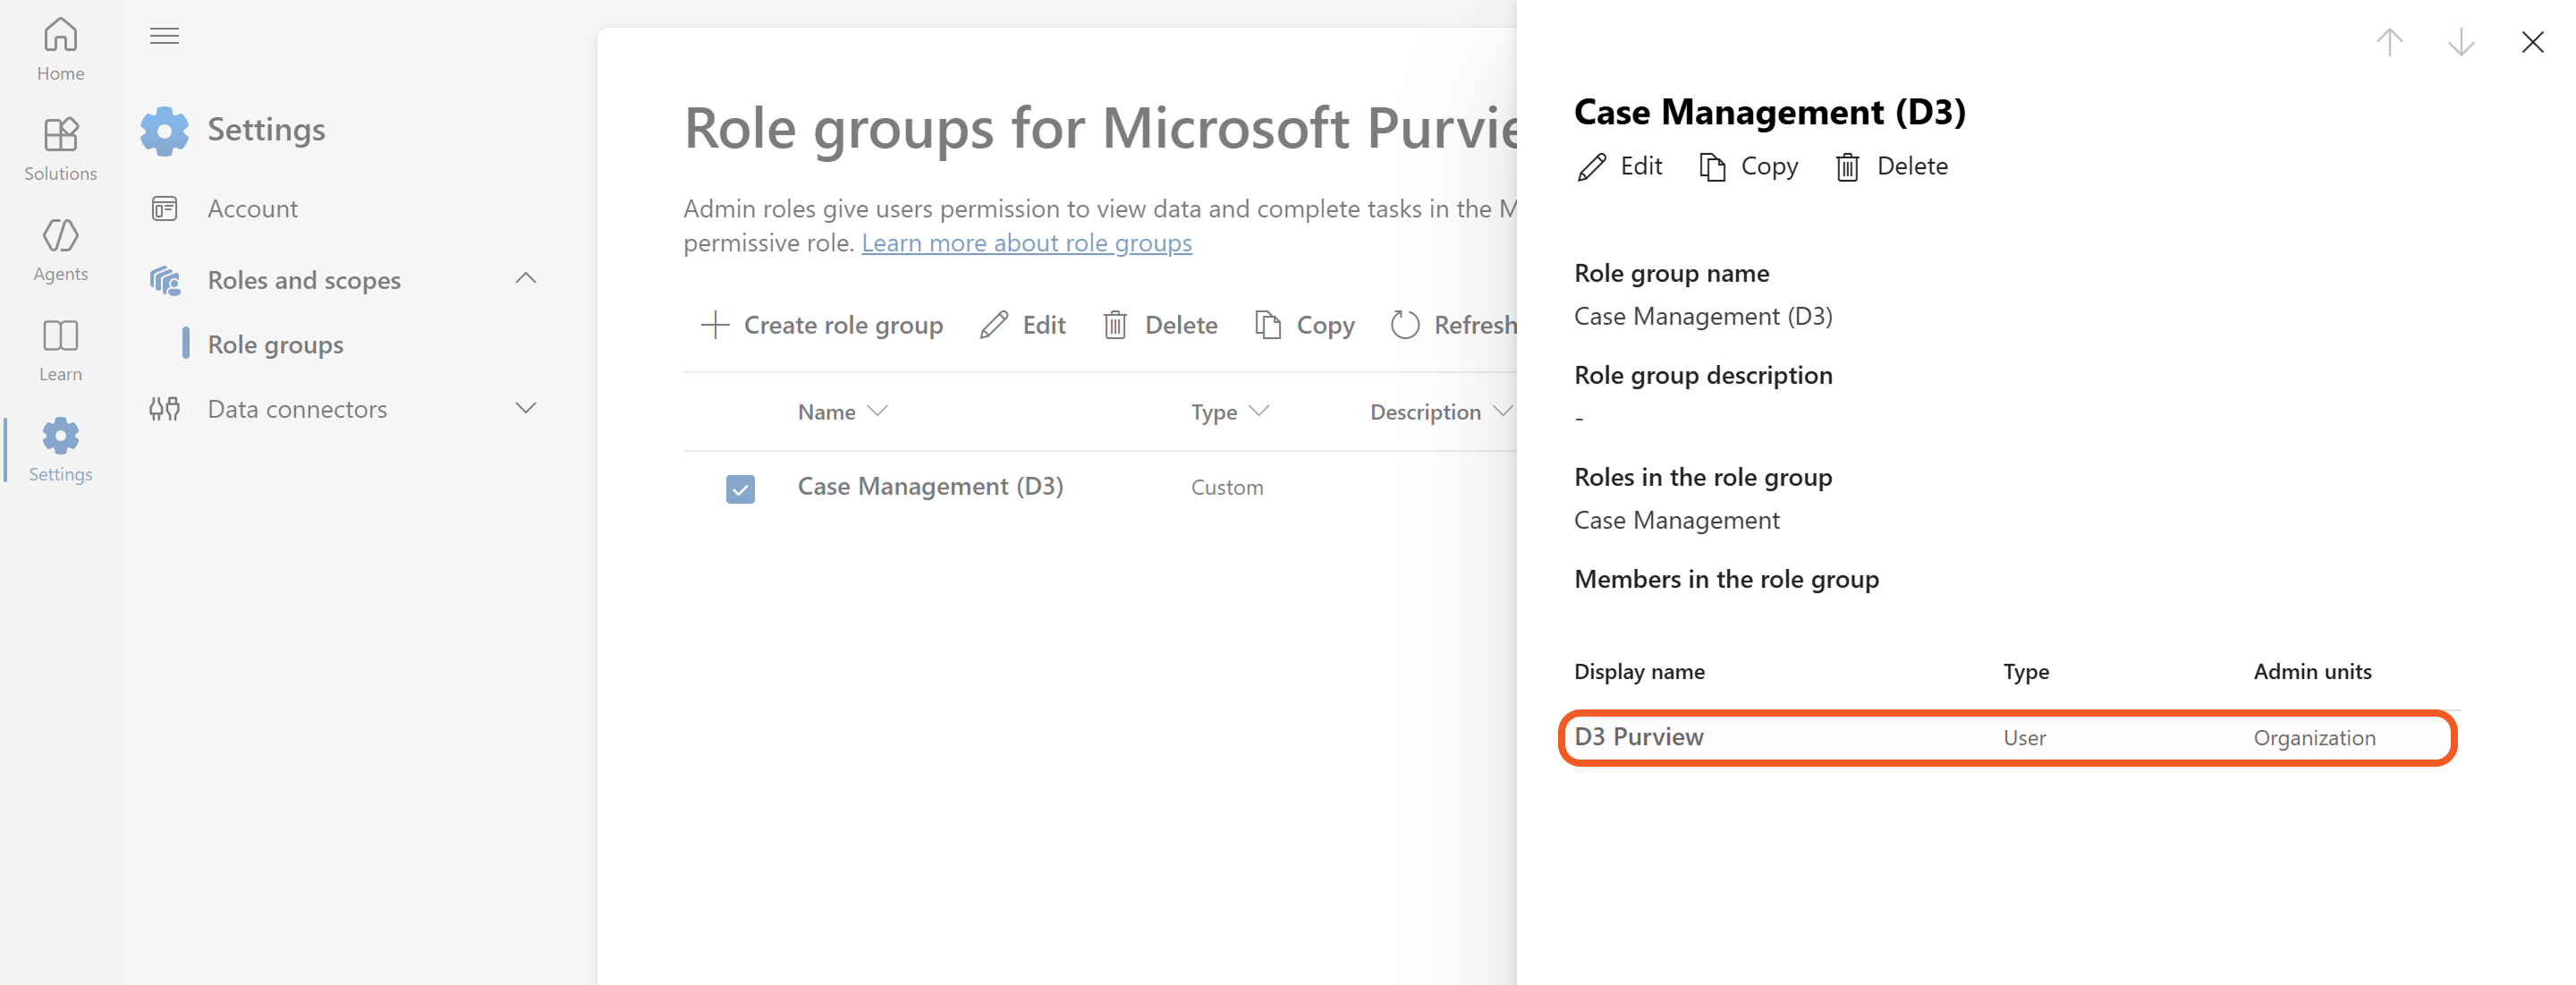
After assigning the service principal through PowerShell, the assignment will be visible in the Microsoft Purview UI.
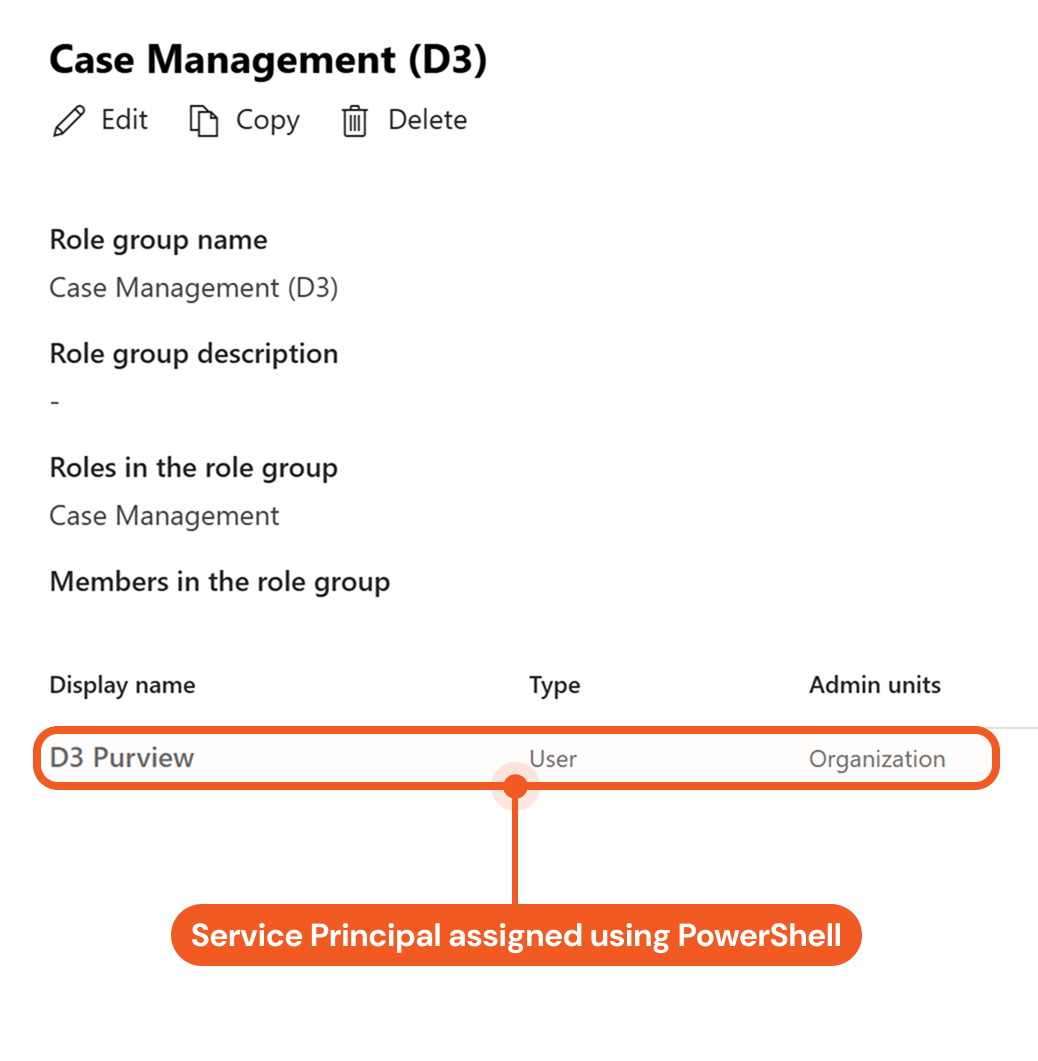
Although the Type column lists the value as User, the entry represents a service principal.
Users can access and modify only the cases they own. To grant permission to manage all cases, add them to the built-in eDiscovery Administrator sub-group.
Configuring Microsoft Purview eDiscovery V2 to Work with D3 SOAR
Setting up the Microsoft Purview eDiscovery v2 integration with D3 involves several key steps. The process varies slightly depending on whether Delegated (Grant Type: Authorization Code) or Application (Grant Type: Client Credentials) permissions are used.
The table below compares the configuration steps required for Delegated and Application permissions.
Delegated Permissions (Authorization Code) | Application Permissions (Client Credentials) |
|---|---|
Configure custom role groups that follow the principle of least privilege, then assign the user account associated with the D3 connection to them. | Configure custom role groups that follow the principle of least privilege. These role groups will be assigned to service principals using PowerShell. |
Register an application in Azure and obtain the credentials needed per the connection form in D3. | |
Add the callback URI provided in the D3 connection form to the Azure app’s Web Redirect URIs list. | — |
Assign the application the appropriate Microsoft Graph API delegated permissions and grant admin consent. | Assign the application the appropriate Microsoft Graph API application permissions and grant admin consent. |
— | Run PowerShell as an administrator to create a service principal from the Azure enterprise application and assign it to the appropriate Microsoft Purview custom role group. Avoid assigning the service principal through the UI, as this may cause errors. As a best practice, use the UI only to assign user accounts to role groups. |
Users should review the detailed instructions below carefully to ensure successful execution of commands in this integration.
Creating a Custom Role Group in Microsoft Purview
PREREQUISITES
To create or manage role groups in Microsoft Purview, users must sign in with an account assigned to a role group with the Role Management role.
To view Roles and scopes > Role groups in Microsoft Purview, use an account assigned to the built-in Organization Management role group (refer to Permissions in the Microsoft Purview portal for details). This group includes the Role Management role, among others, which allows users to:
Create custom, least-privilege role groups that provide the granular access required to run the commands in this integration.
Successfully execute the PowerShell steps when using application permissions.
.png?inst-v=a9107af0-b04c-4e31-bb5a-938372783868)
Create a custom role group.
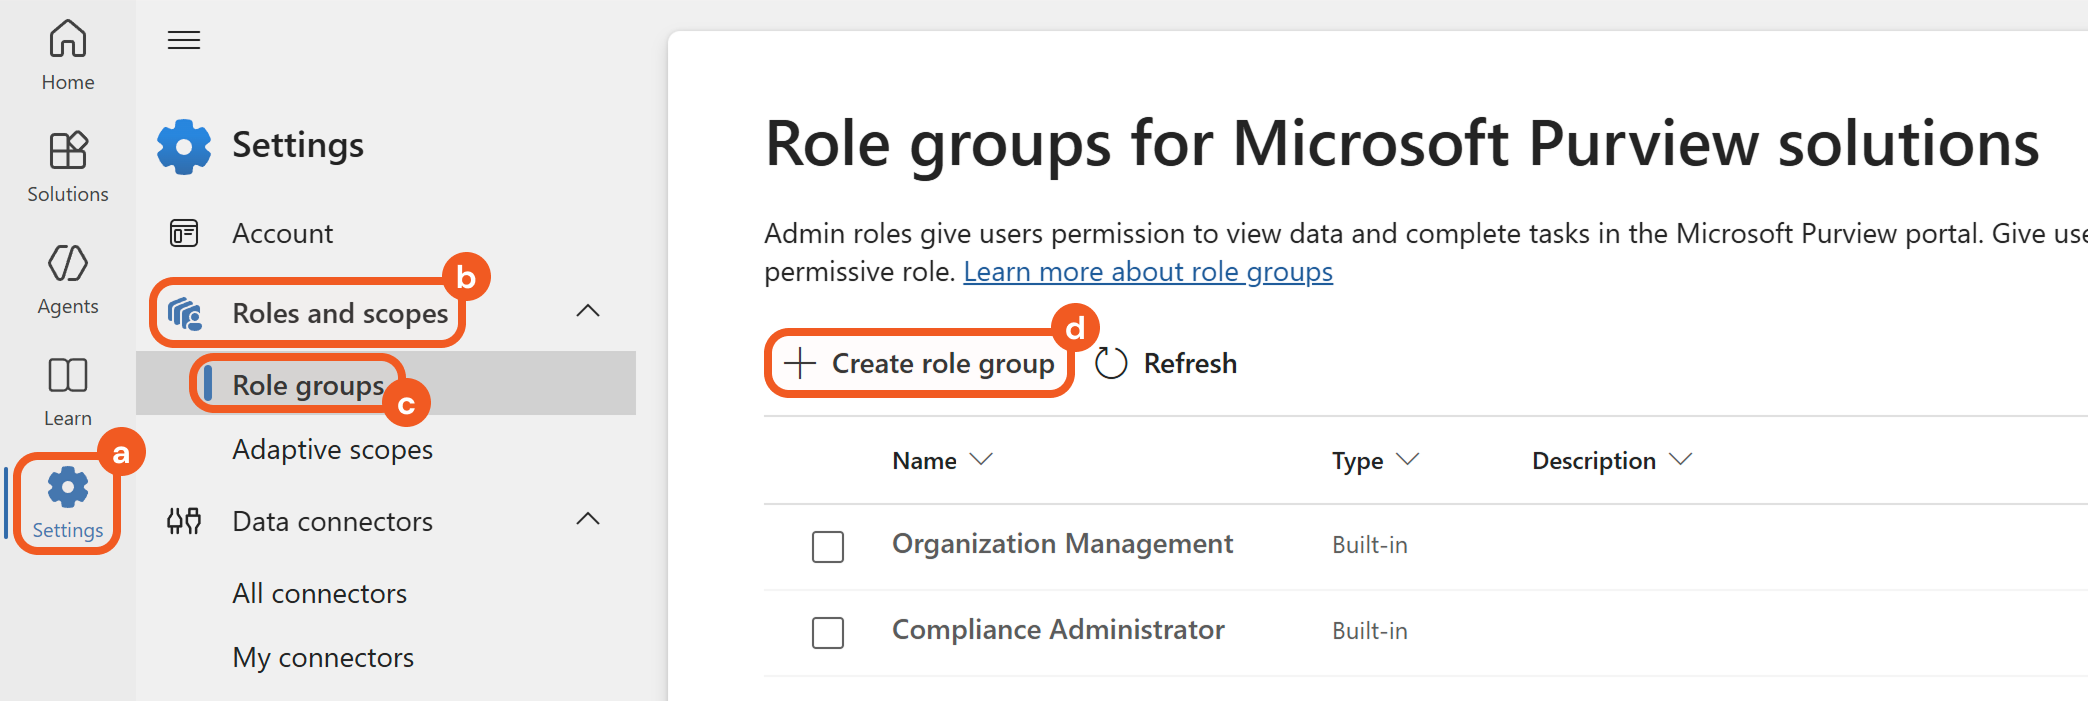
Navigate to the Settings page.
Open the Role and Scopes accordion.
Click the Role groups option.
Click the + Create role group button.
Enter a descriptive name for the role group and click the Next button.
.png?inst-v=a9107af0-b04c-4e31-bb5a-938372783868)
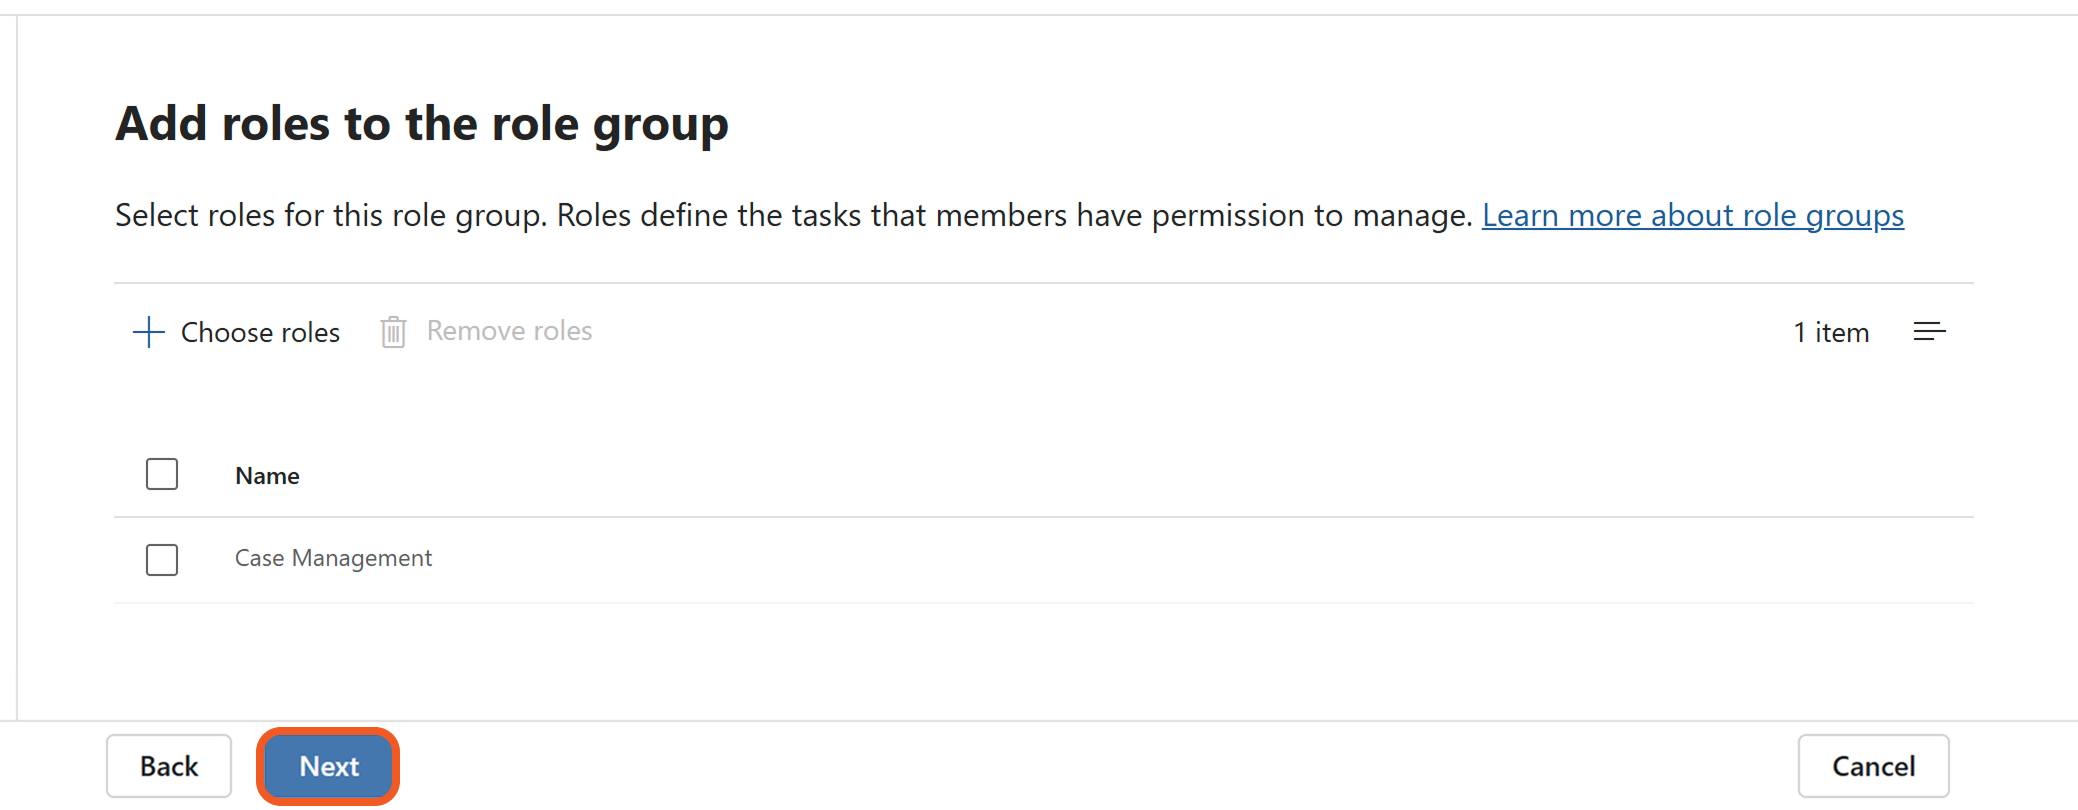
Click the Choose roles button, then select the appropriate roles according to the Permission Requirements table.
.png?inst-v=a9107af0-b04c-4e31-bb5a-938372783868)
Click the Next button.
(Delegated permissions only) Assign the user account associated with the D3 connection to the custom role group.
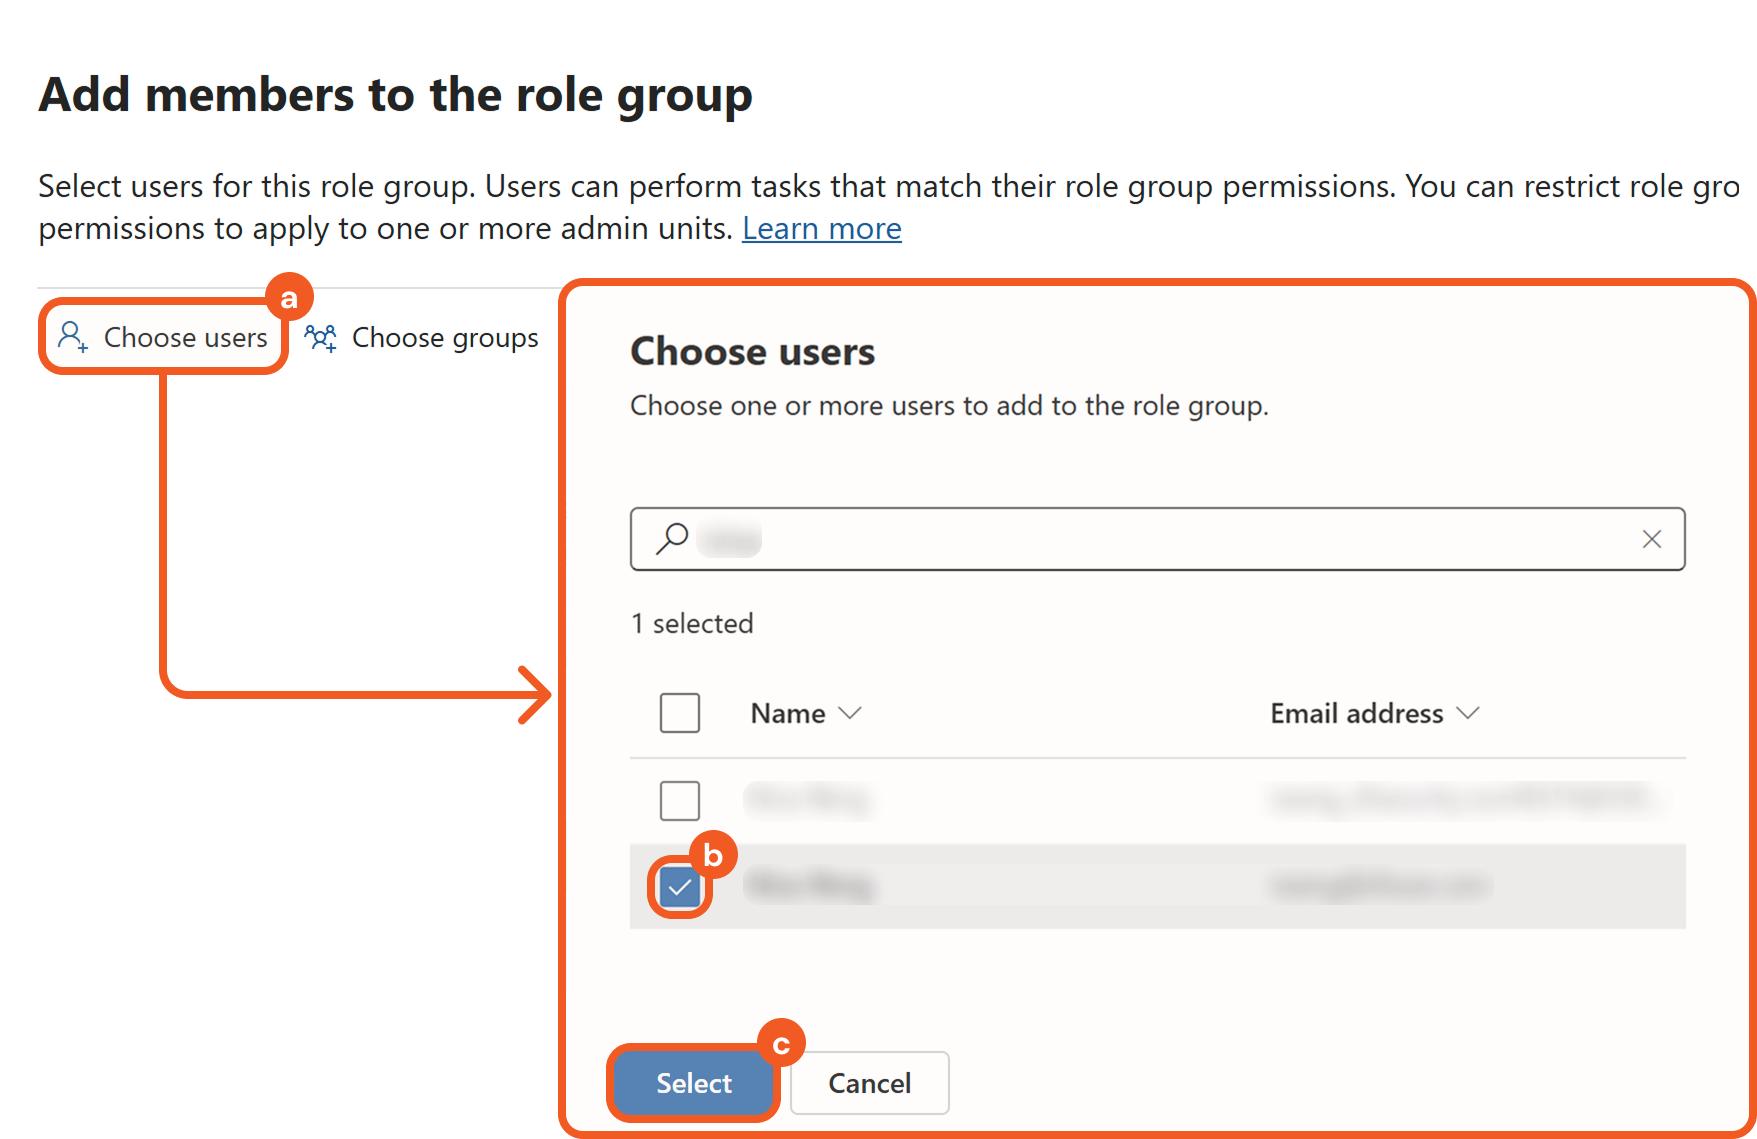
Click the Choose users button.
Search for and select the appropriate user to be used for the D3 connection.
Click the Select button.
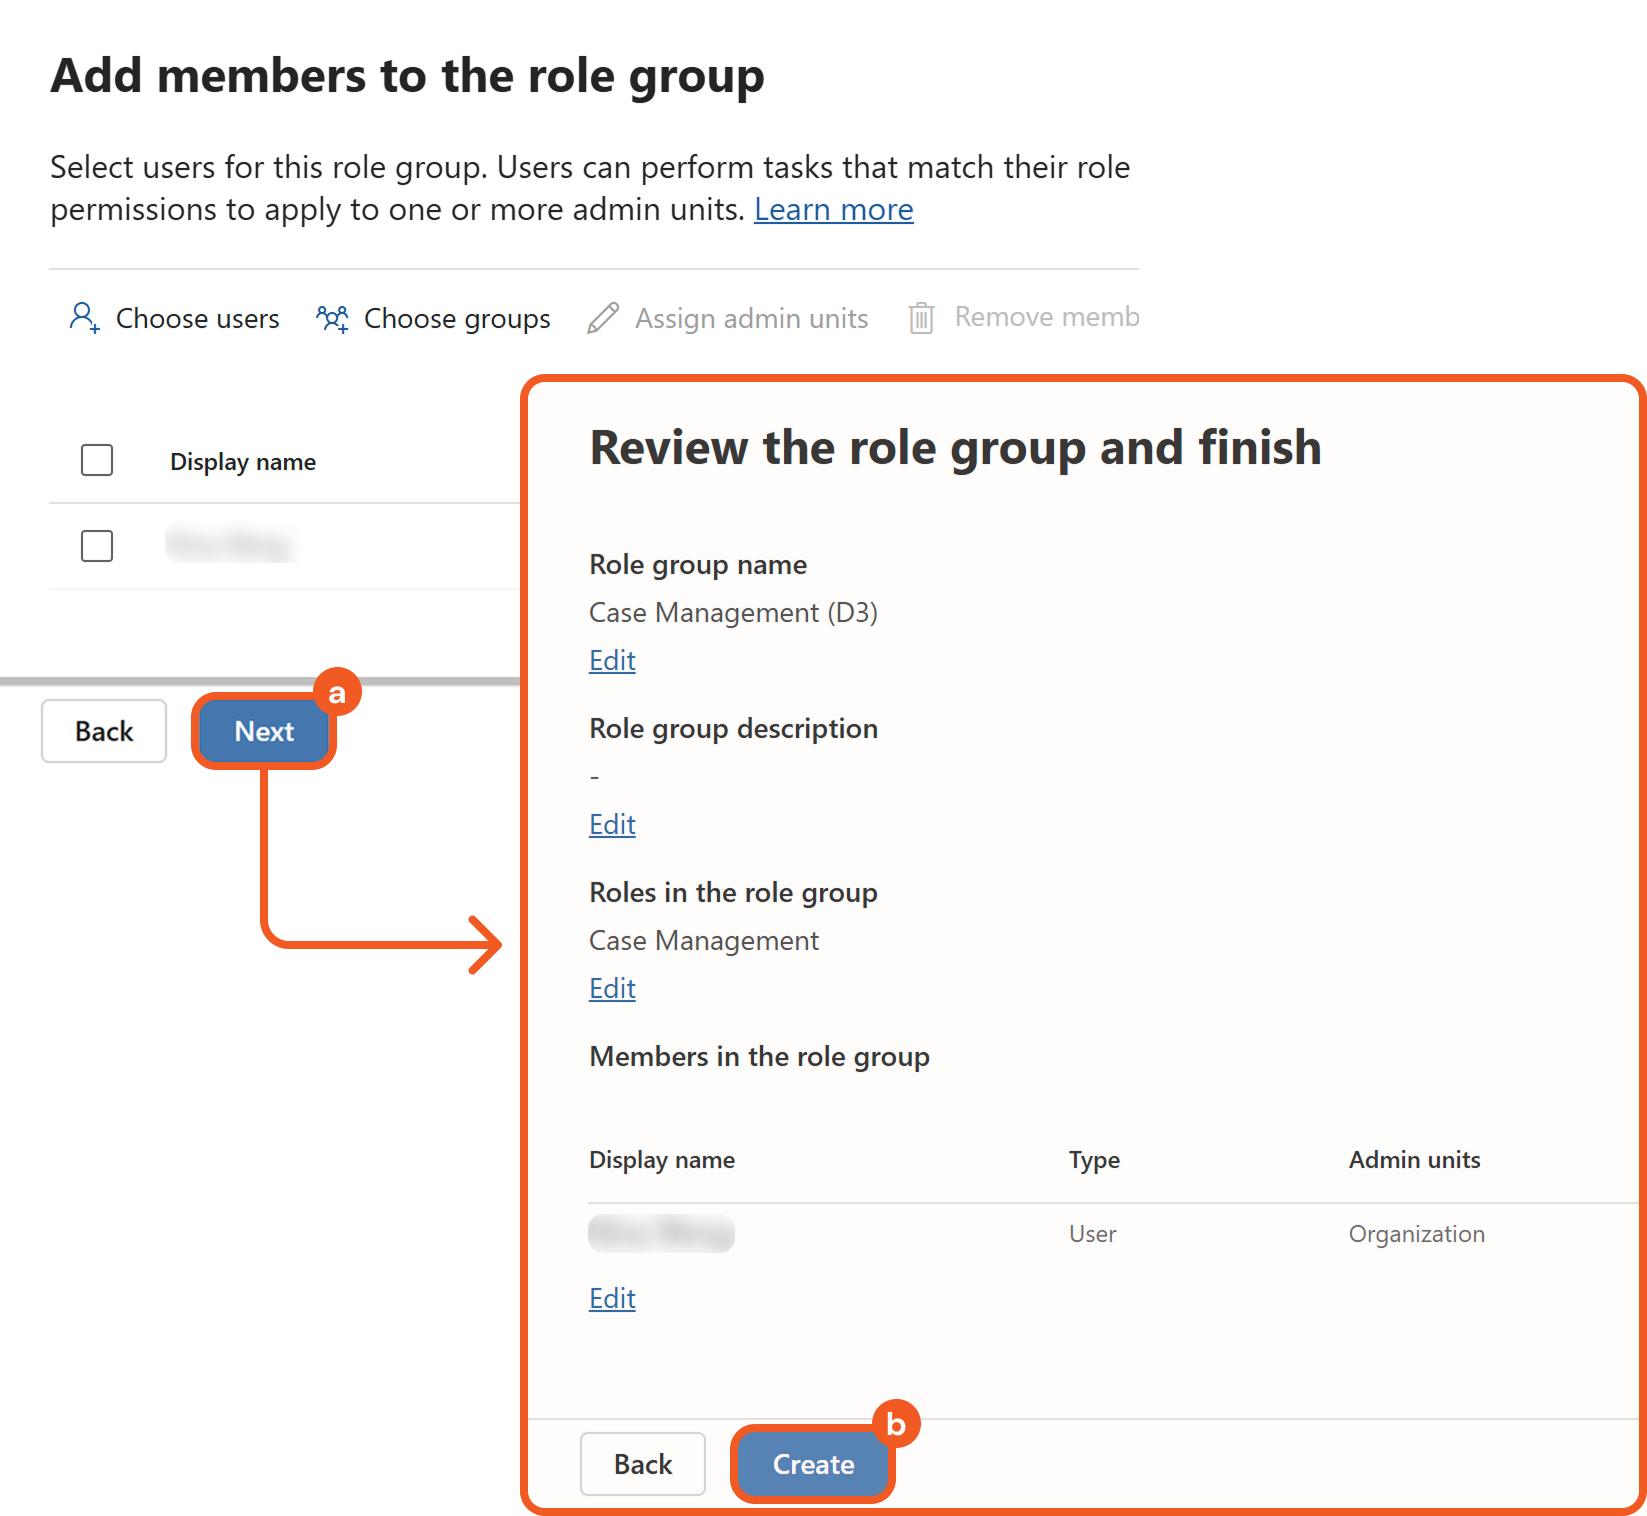
Click the Next button, then click the Create button.
READER NOTE
Users in the Organization Management role group can optionally create a custom role group that includes the Role Management role to:
Delegate the ability to create and manage role groups.
Allow another user to perform the PowerShell steps for application permissions if that user does not already belong to a role group that includes the Role Management role.
WARNING
If authenticating with application permissions, do not assign the service principal associated with the D3 connection to the custom role group through the Microsoft Purview UI, even if it appears selectable. This assignment must be completed later using PowerShell. Assigning it at this stage can cause errors.
Registering an Azure App and Collecting Credentials
Log into Azure portal using the credentials of the user to be associated with the D3 connection.
Register a new application.
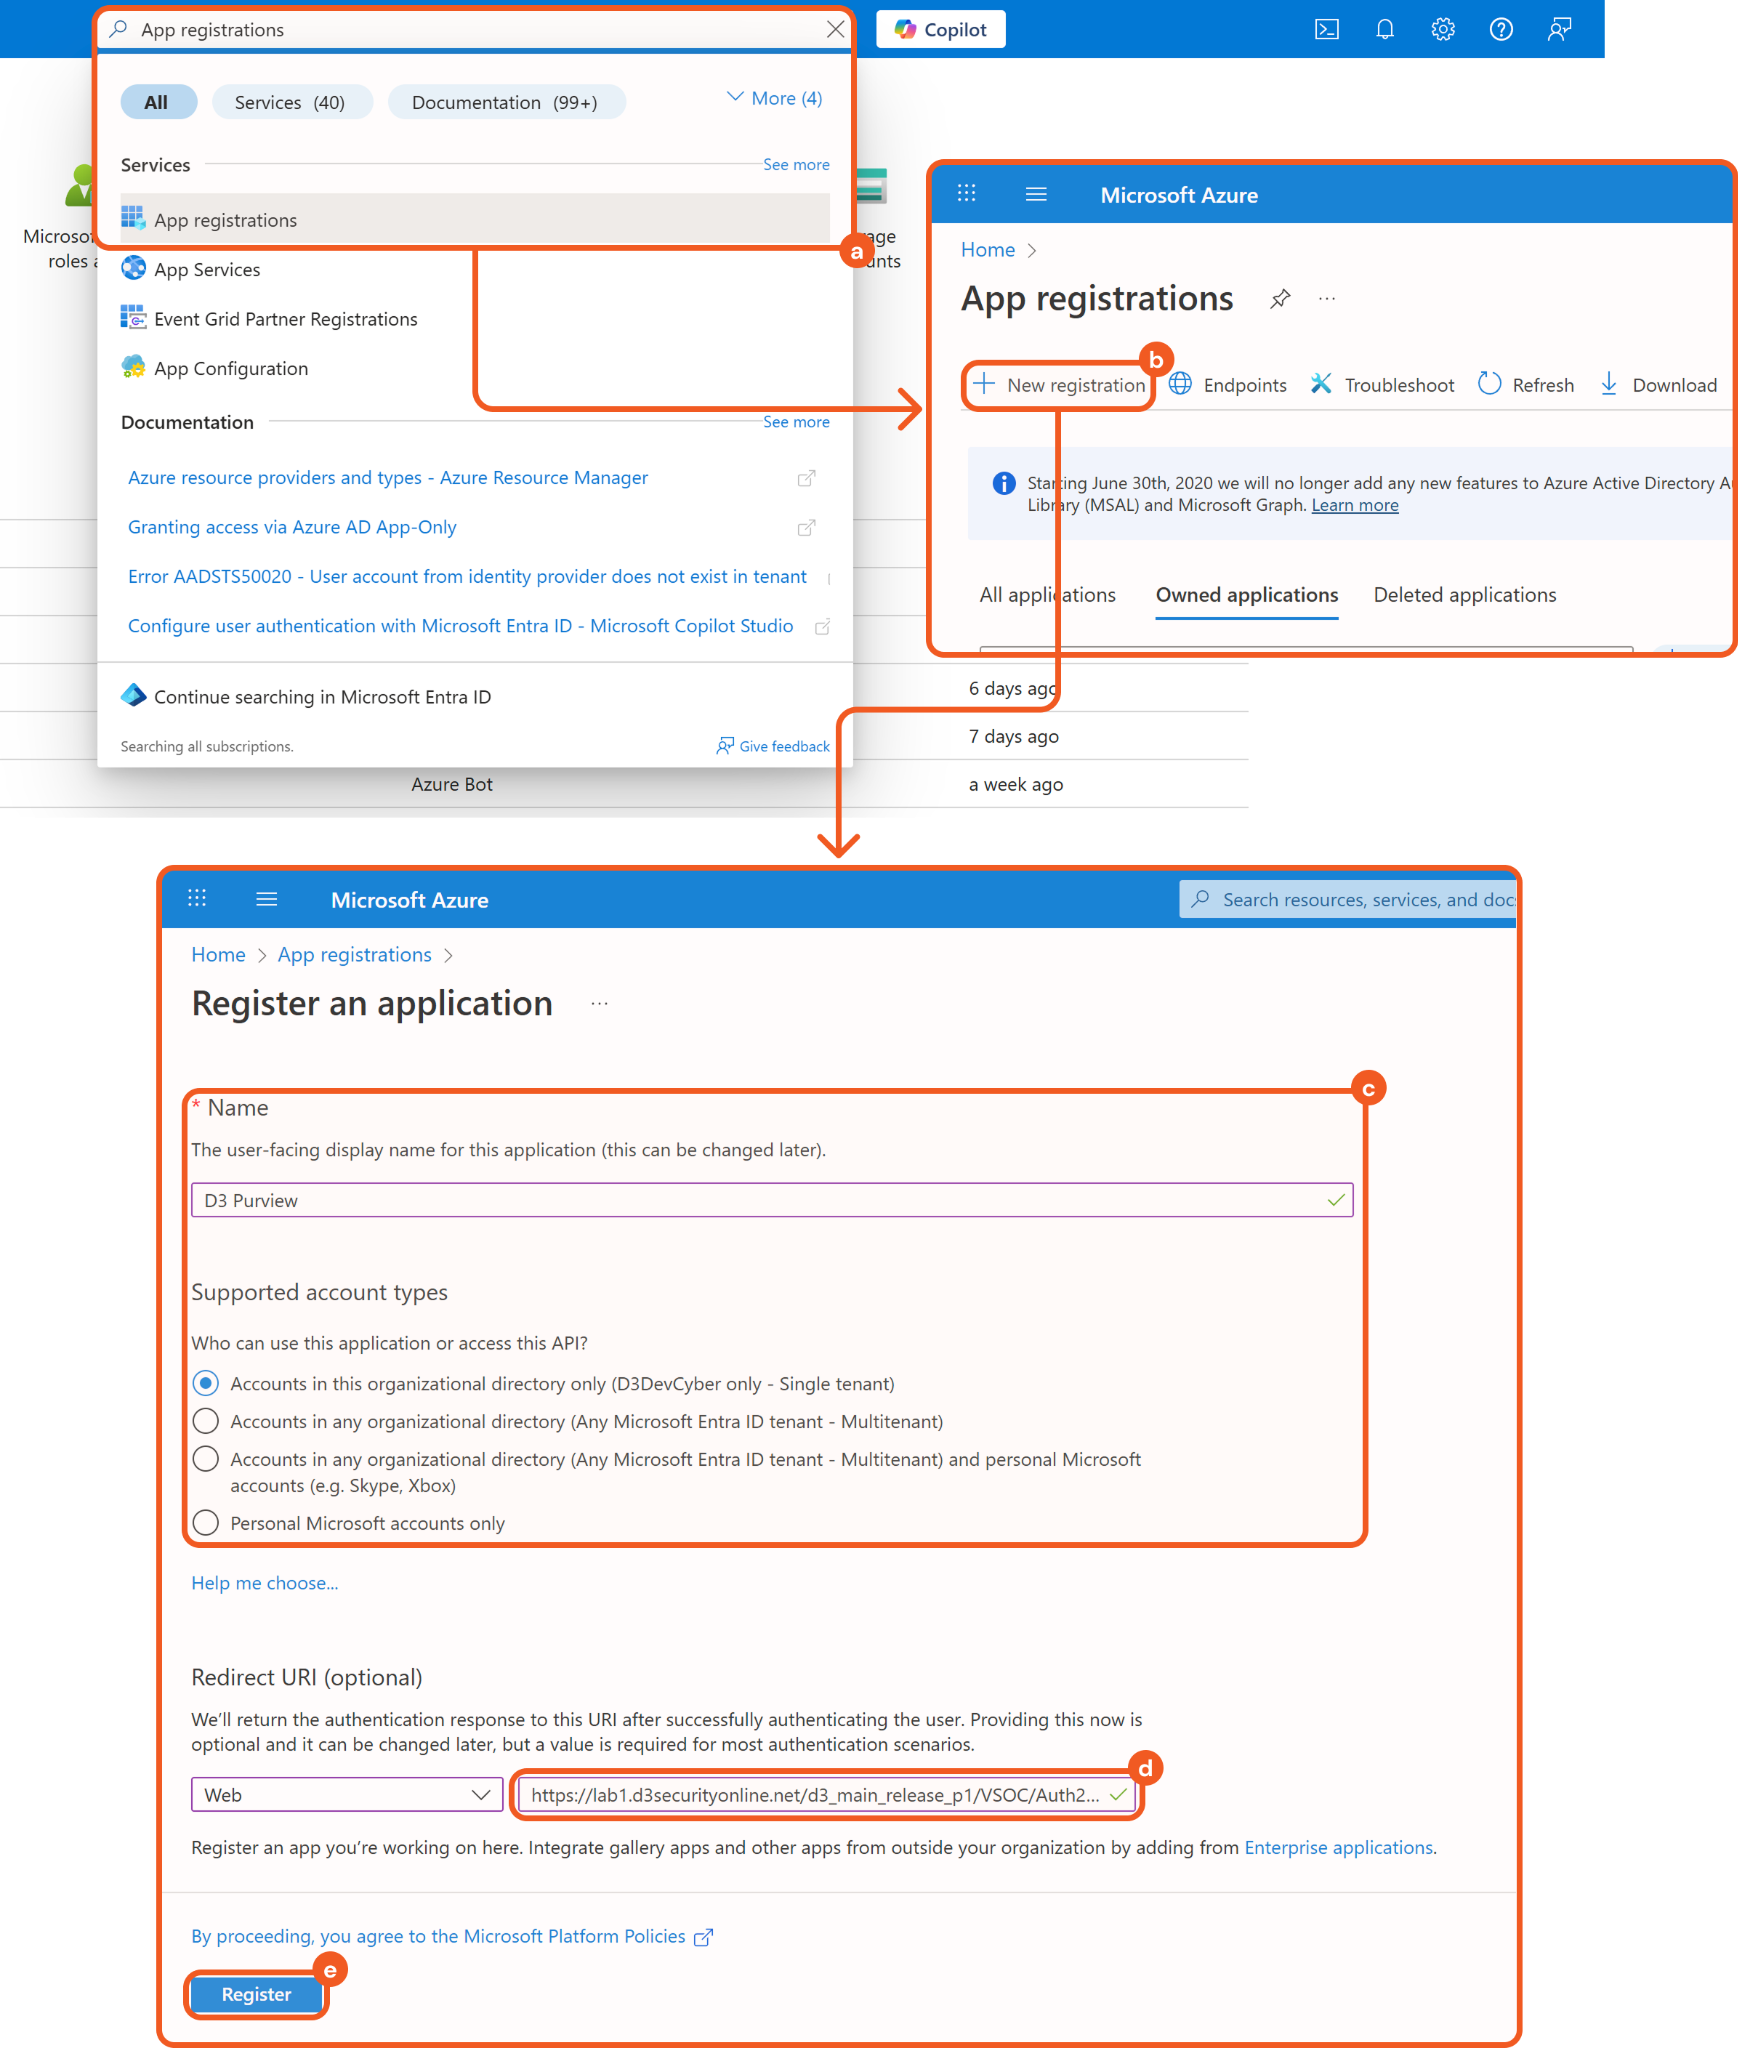
Search for and select the App registrations option.
Click the + New registration button.
Enter a unique name and select a supported account type.
(Delegated permissions only) Paste the callback URL from vSOC.
Refer to 3.i.7 in Configuring D3 SOAR to Work with Microsoft Purview eDiscovery V2.
Click the Register button.
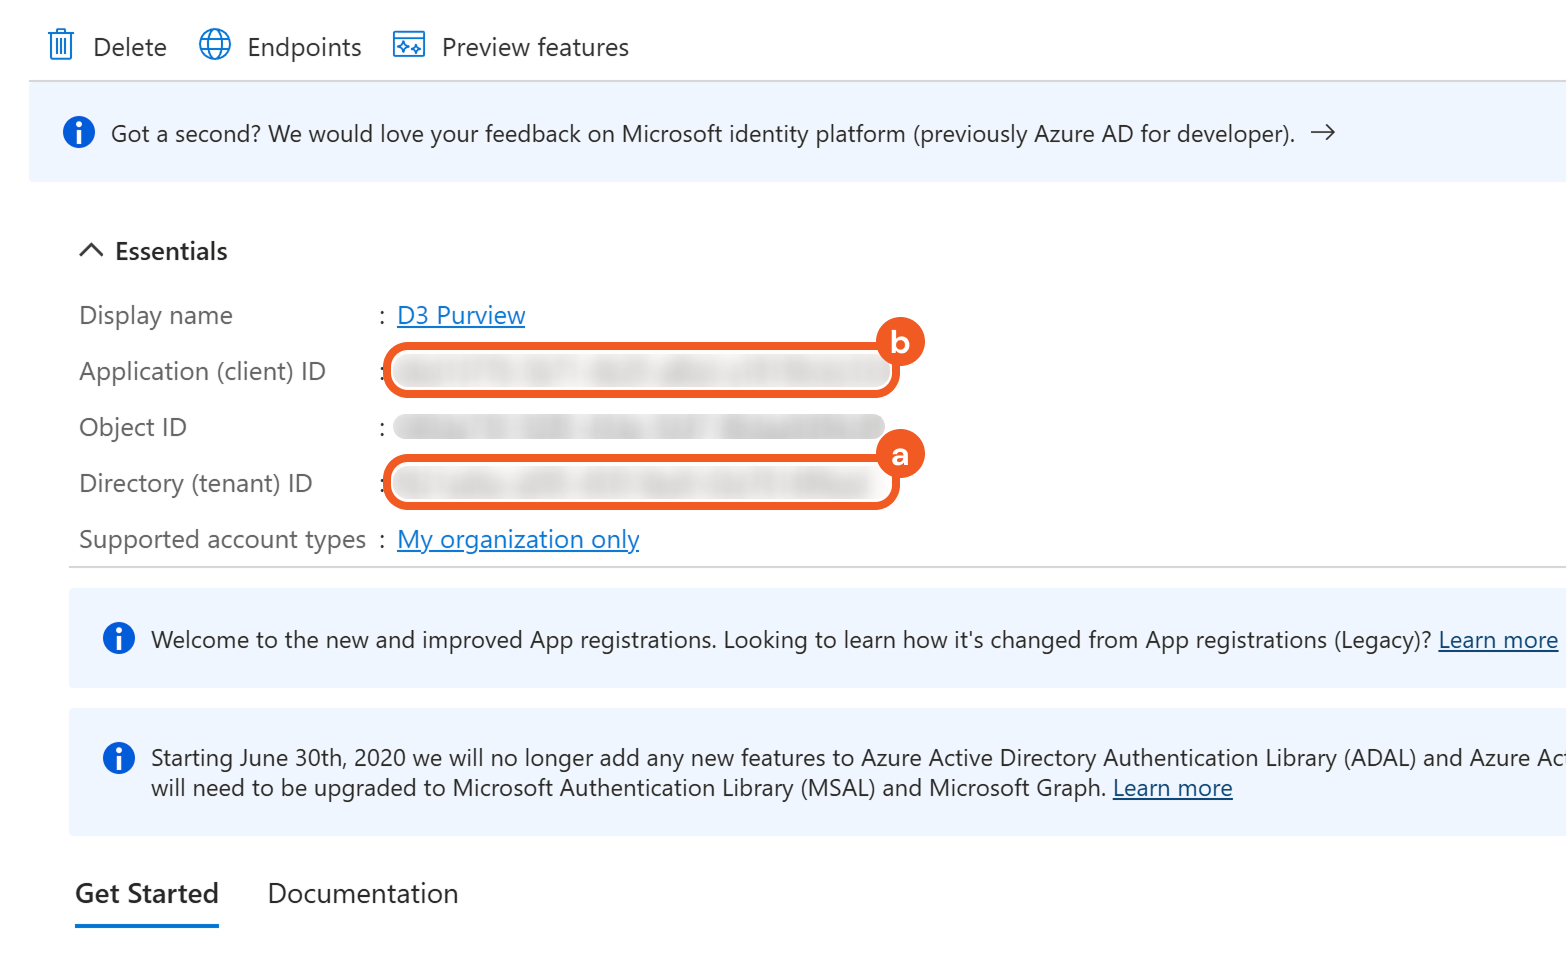
Copy the Tenant ID and Client ID. Refer to 3.i.1 and 3.i.3 in Configuring D3 SOAR to Work with Microsoft Purview eDiscovery V2.
Create the Client Secret.

Navigate to the Certificates & secrets tab.
Click the + New client secret button.
Add a description and configure the expiry time.
Click the Add button.
Save the client secret Value in a secure location. Refer to 3.i.4 in Configuring D3 SOAR to Work with Microsoft Purview eDiscovery V2.
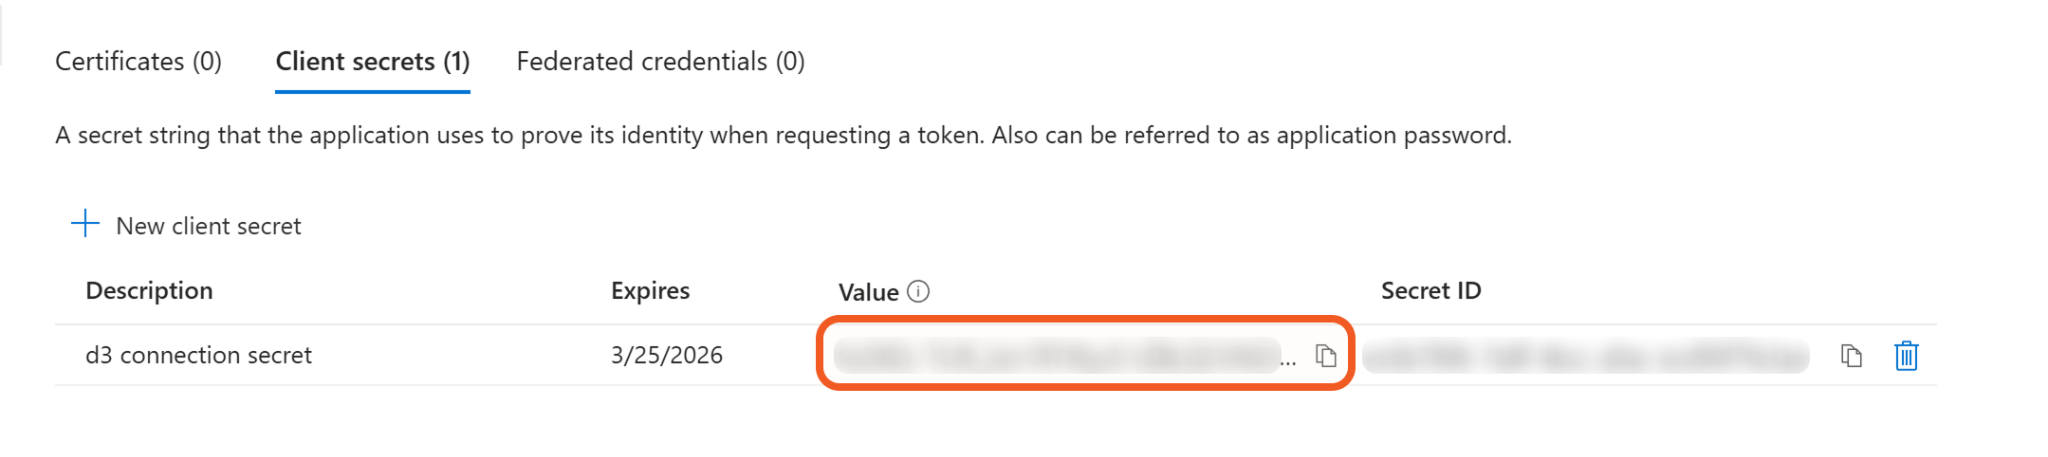
After leaving this page, the client secret value will no longer be accessible.
Granting API Permissions
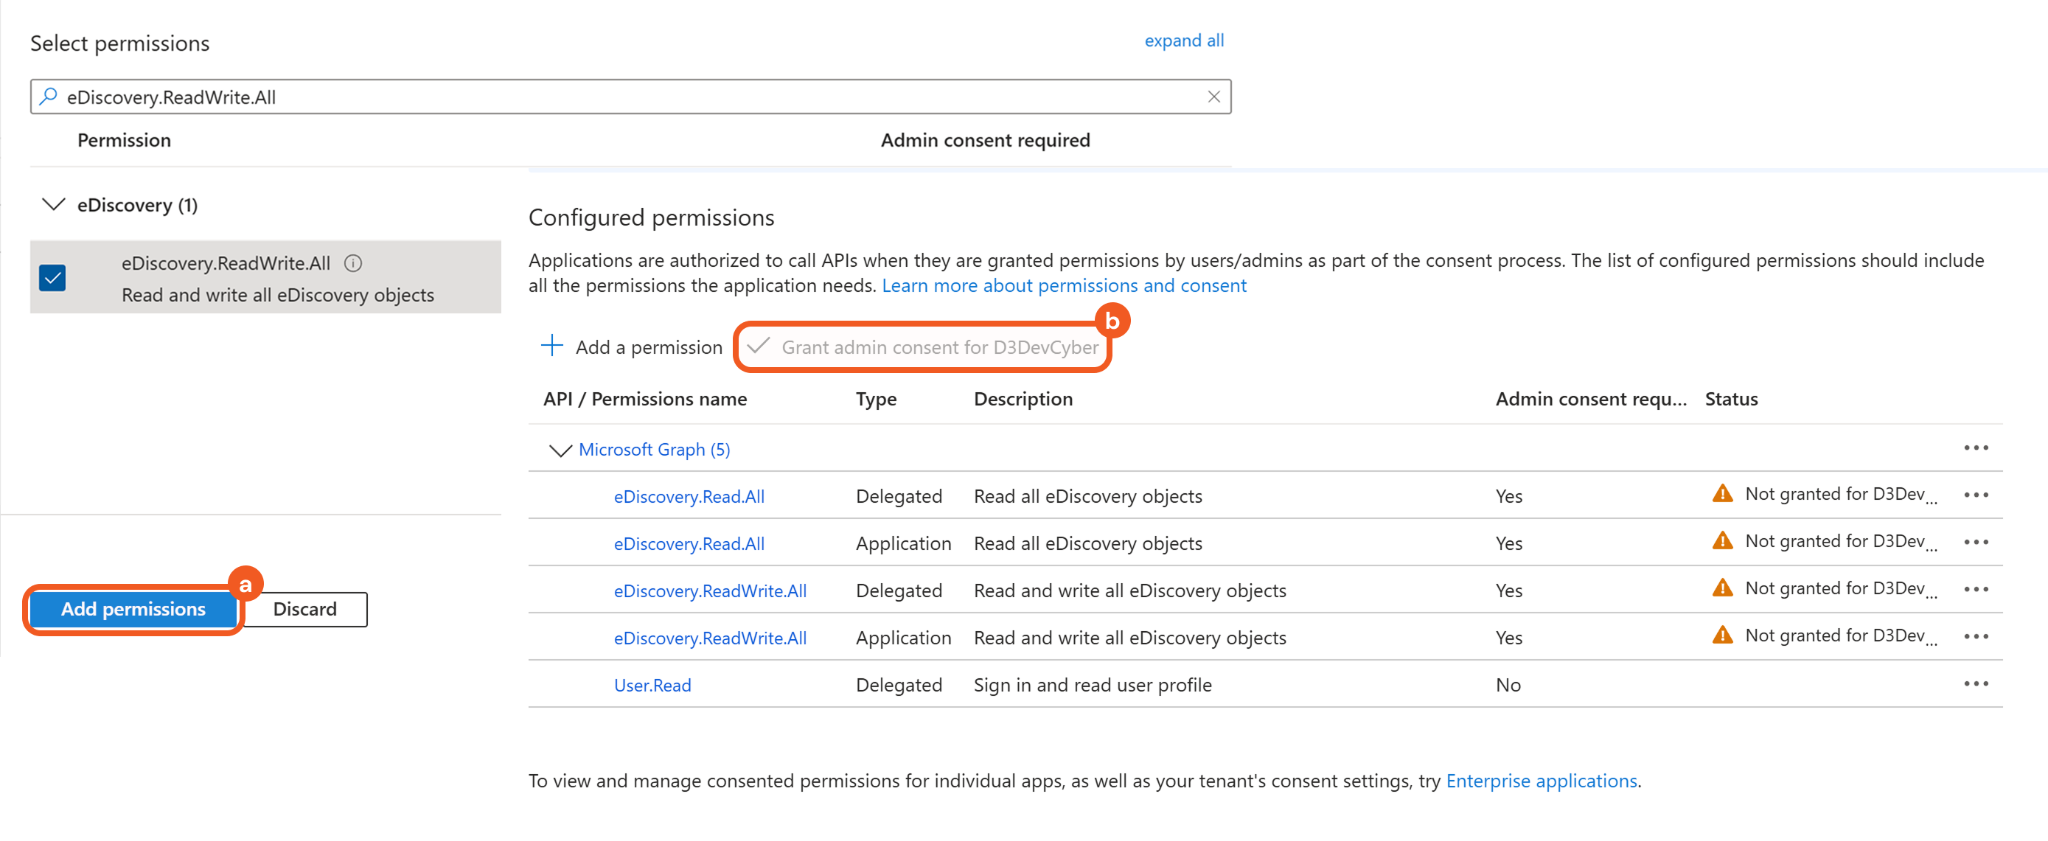
Navigate to the API permissions tab, click the + Add a permission button, then select the Microsoft Graph option.
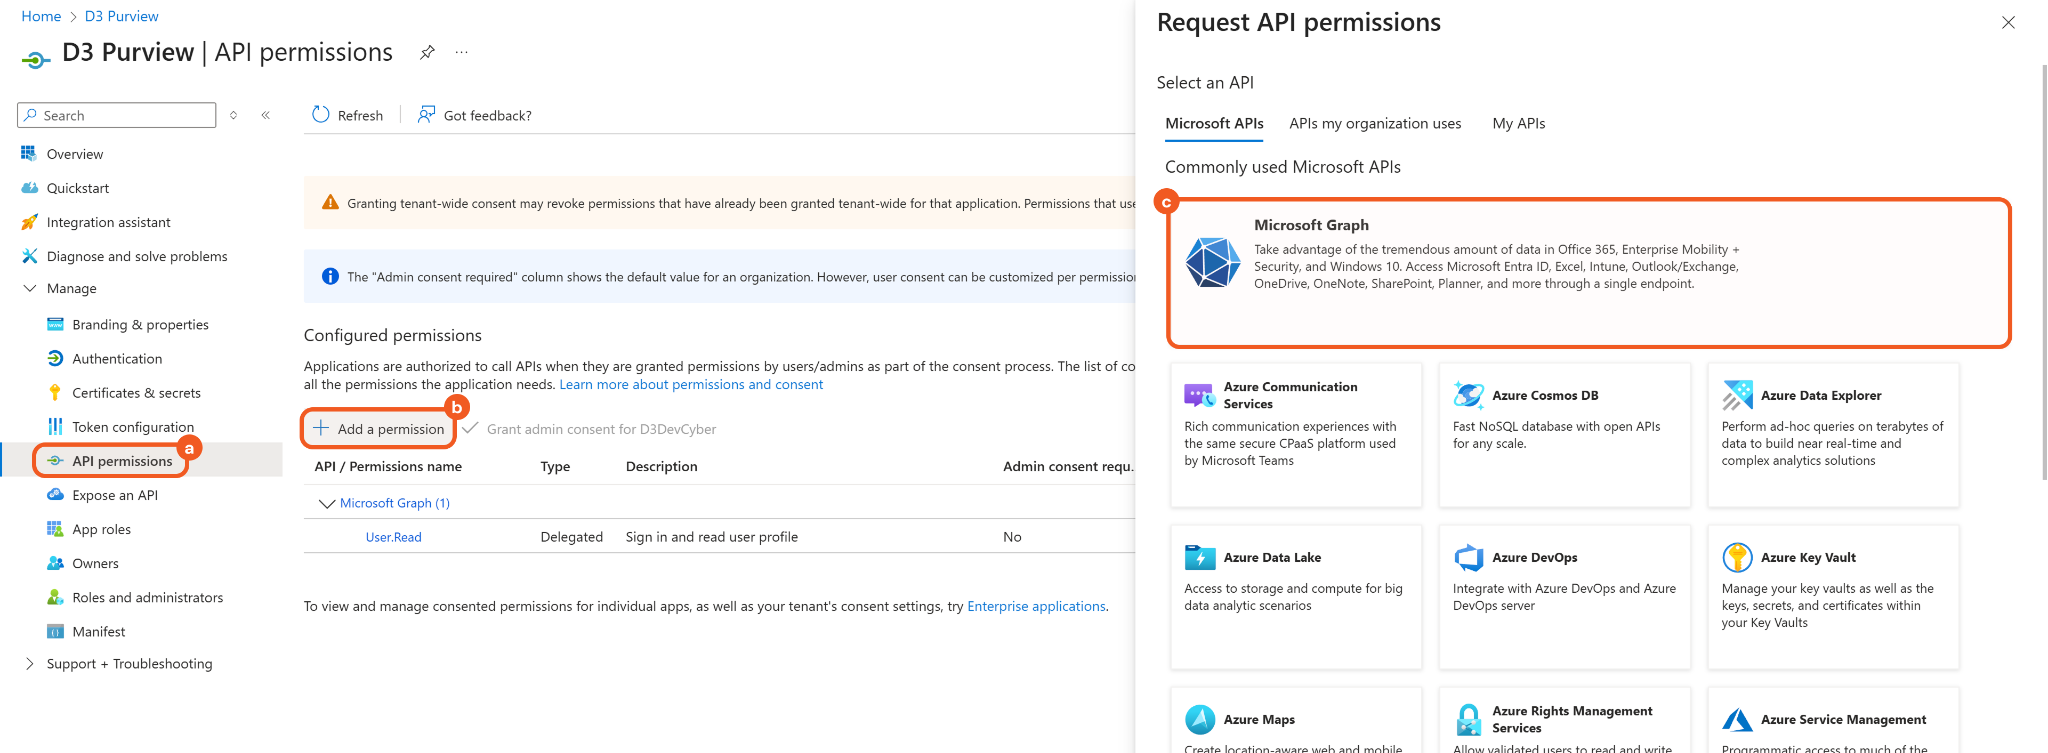
Add the necessary delegated or application permissions.
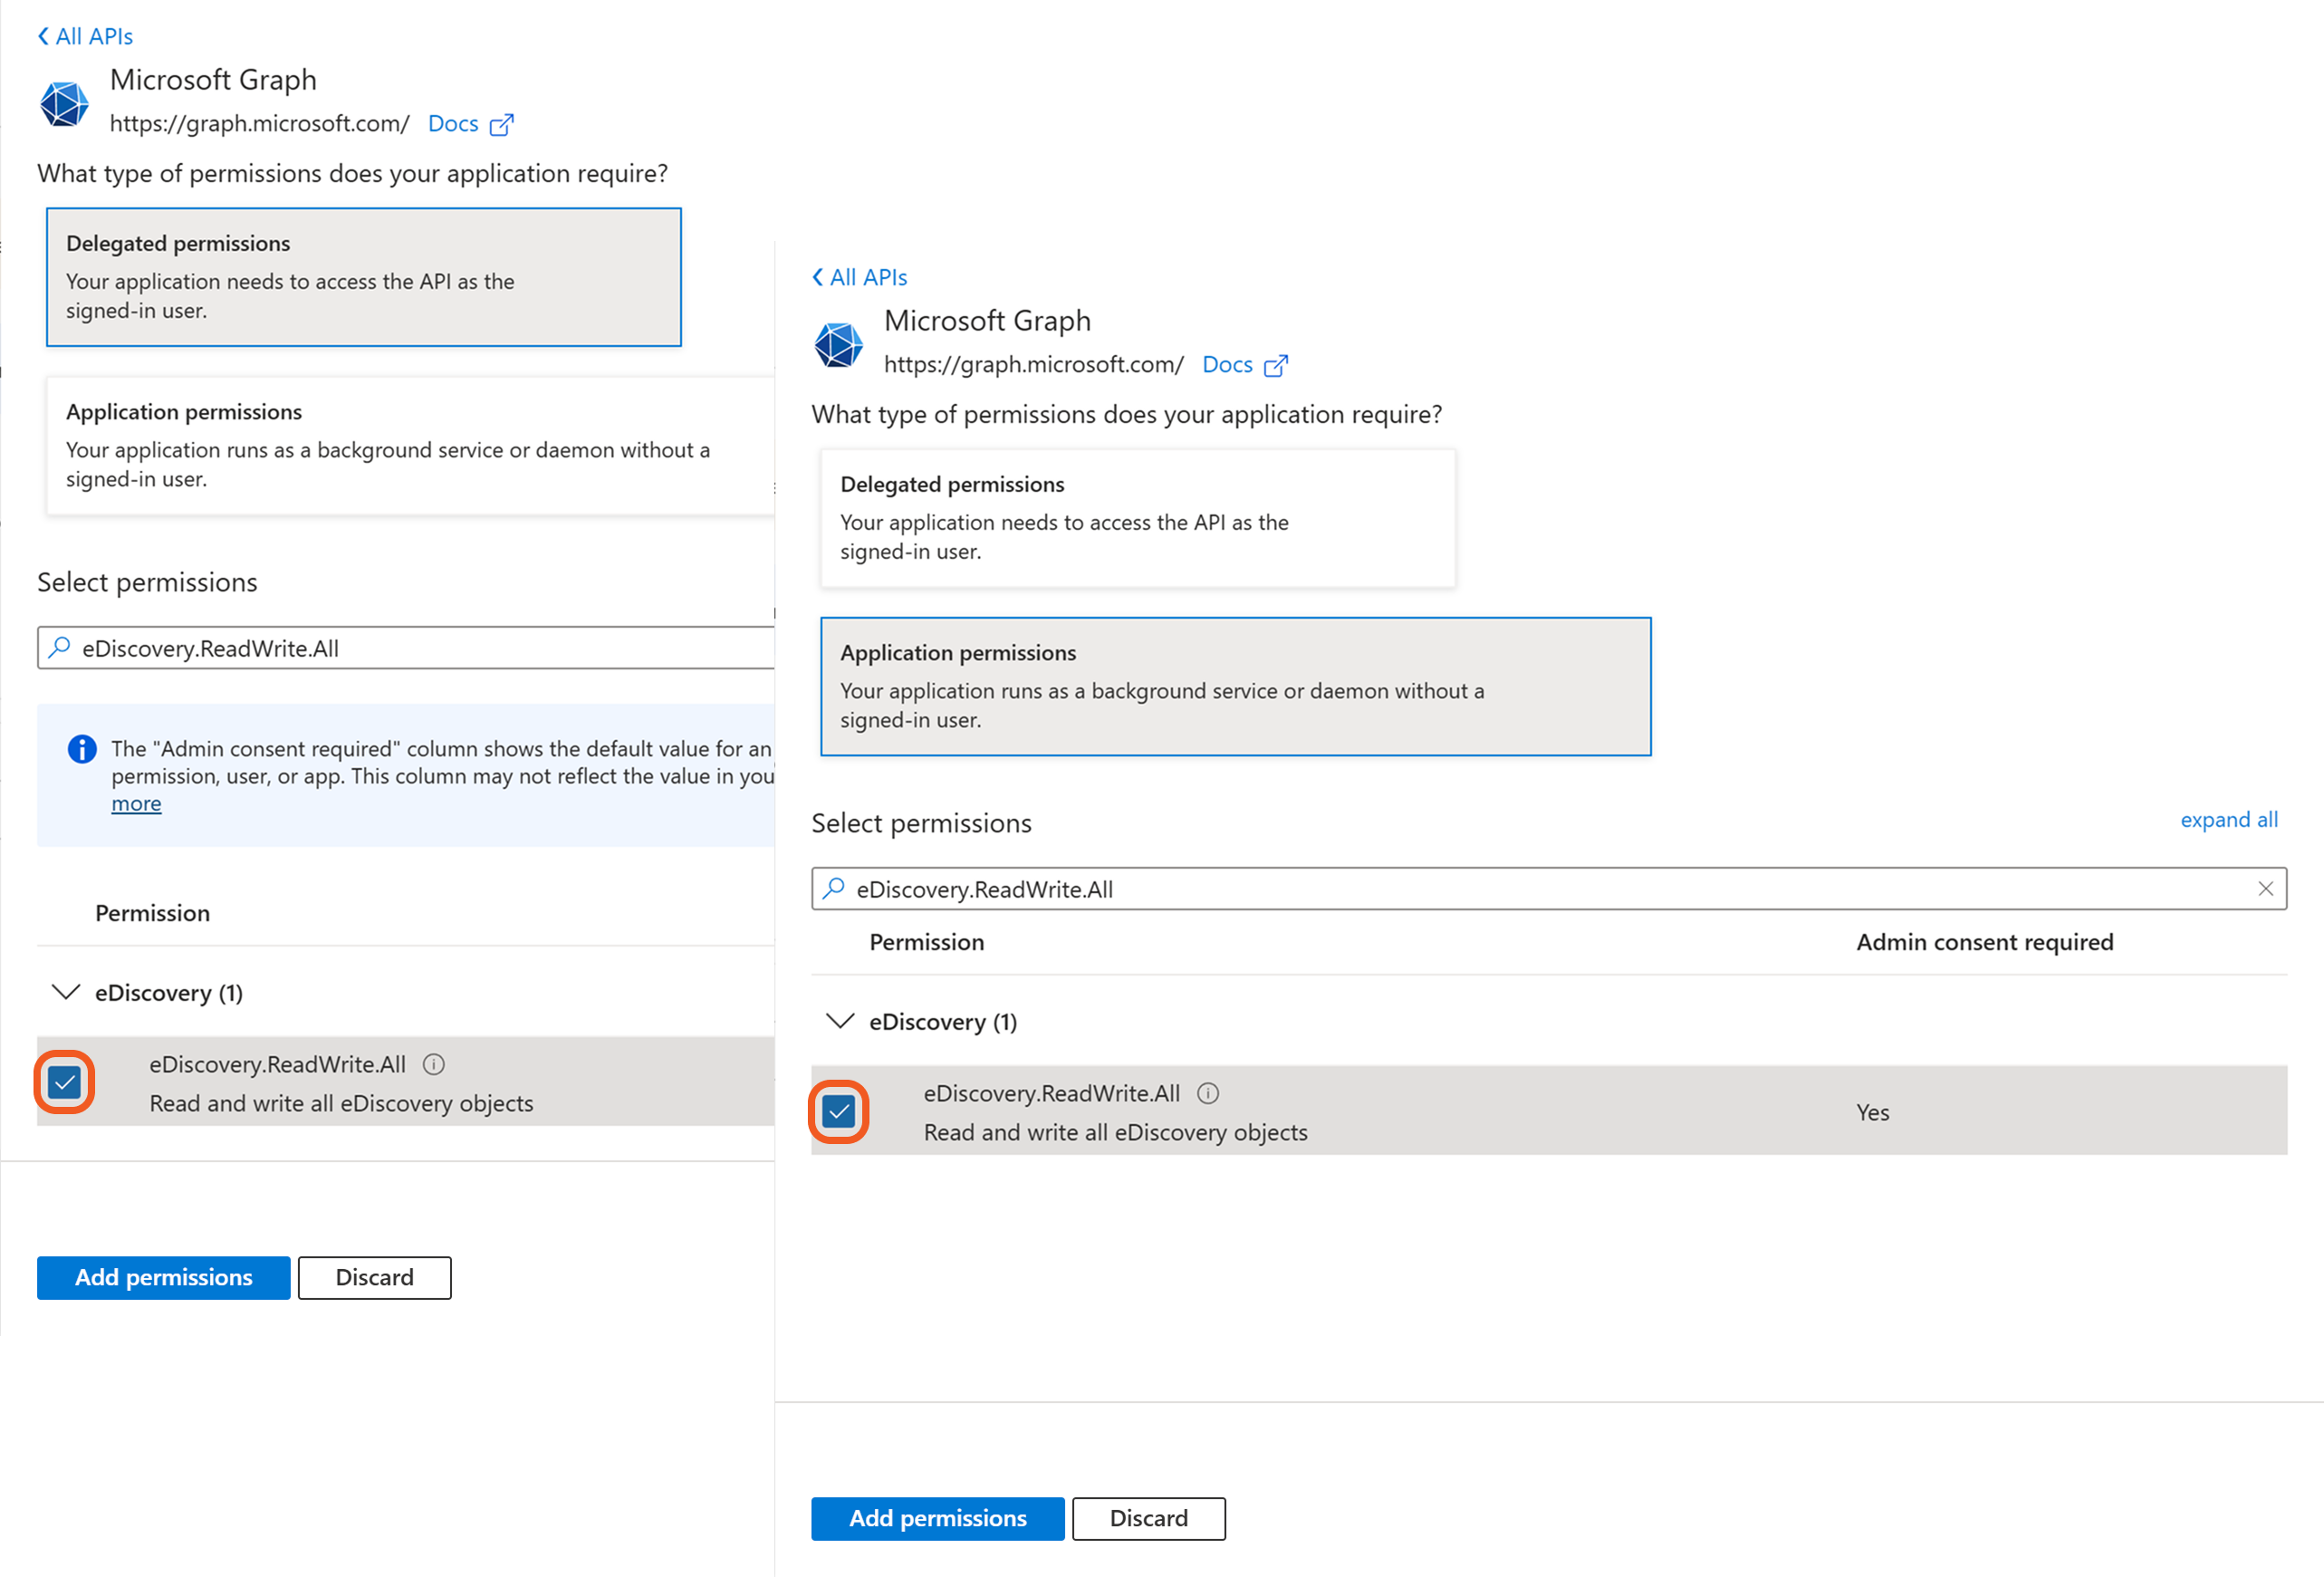
Click the Add permissions button, then click the Grant admin consent for <tenant-name> button on the API Permissions page.
READER NOTE
Only privileged role administrators (e.g., Global Administrator or Privileged Role Administrators) can grant admin consent.
Setting Up a Service Principal Using PowerShell
This section applies only to users who are authenticating using application permissions.
Navigate to Enterprise applications, then search for and select the registered app.
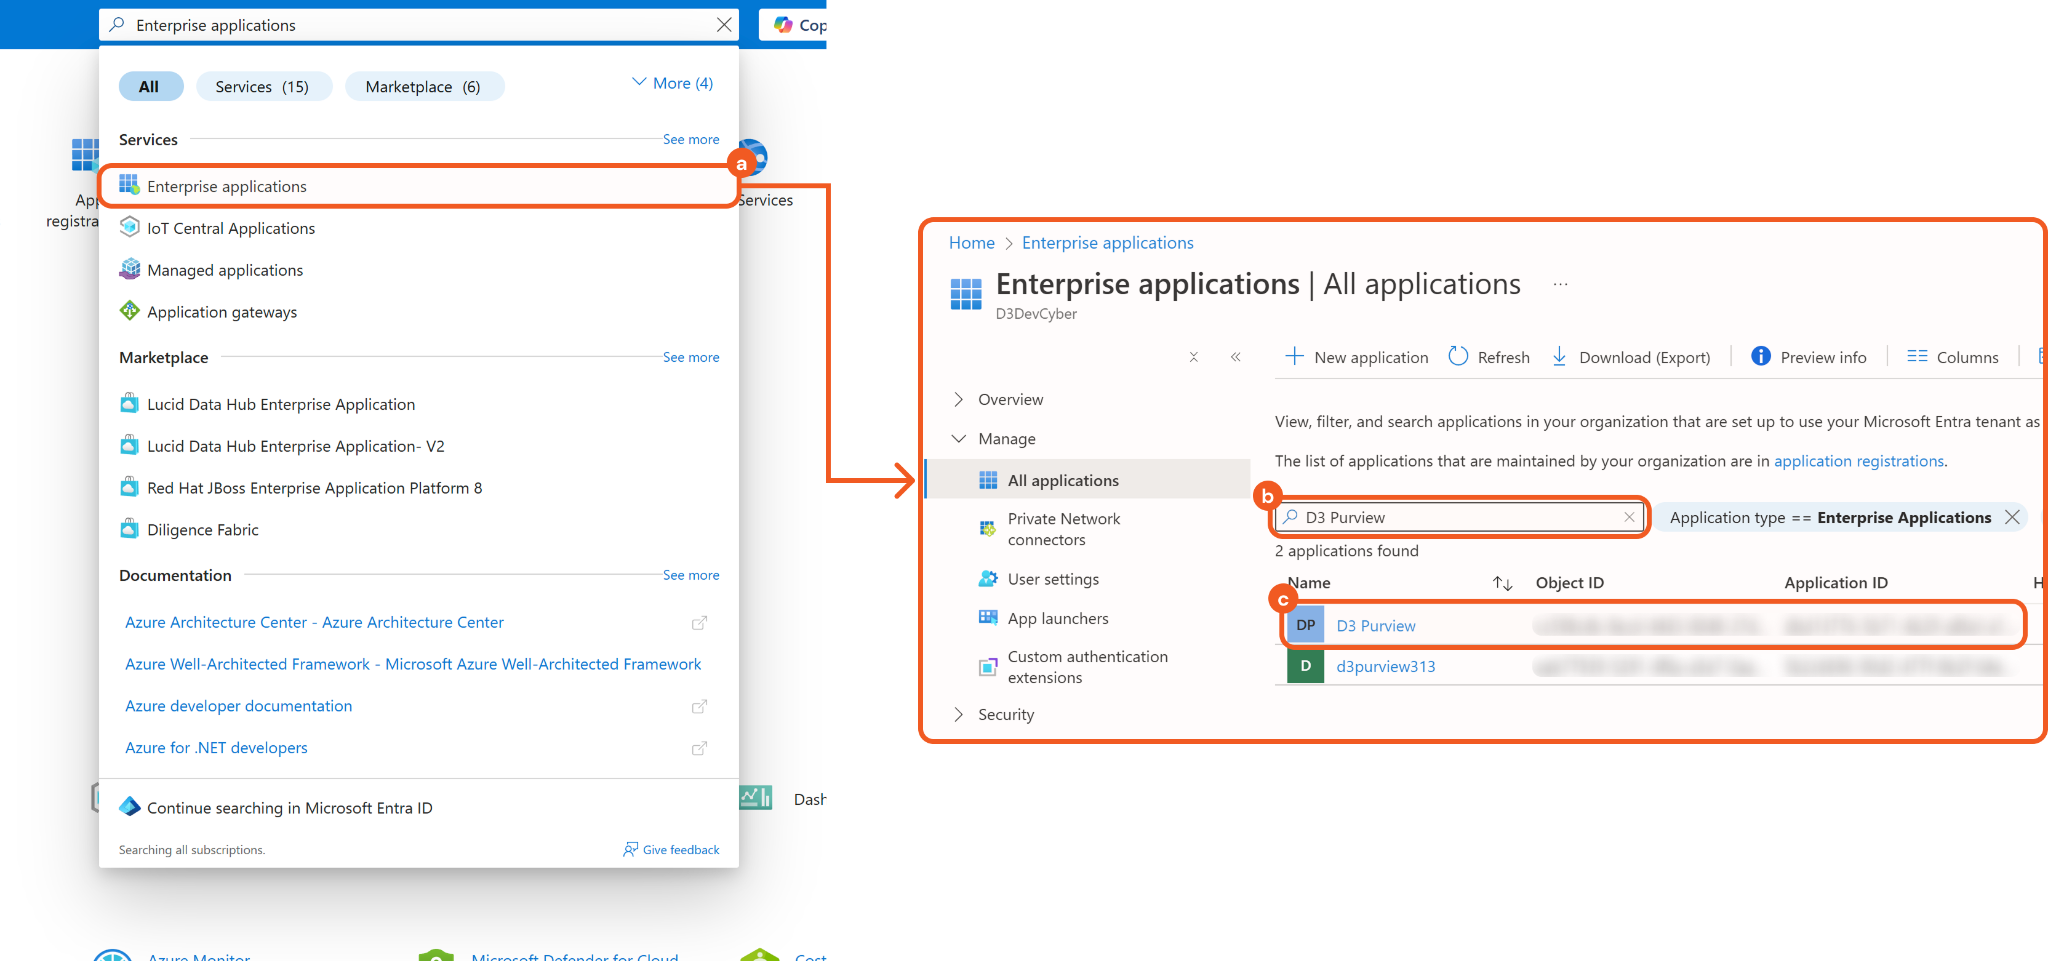
Copy and save the following values in a secure location:
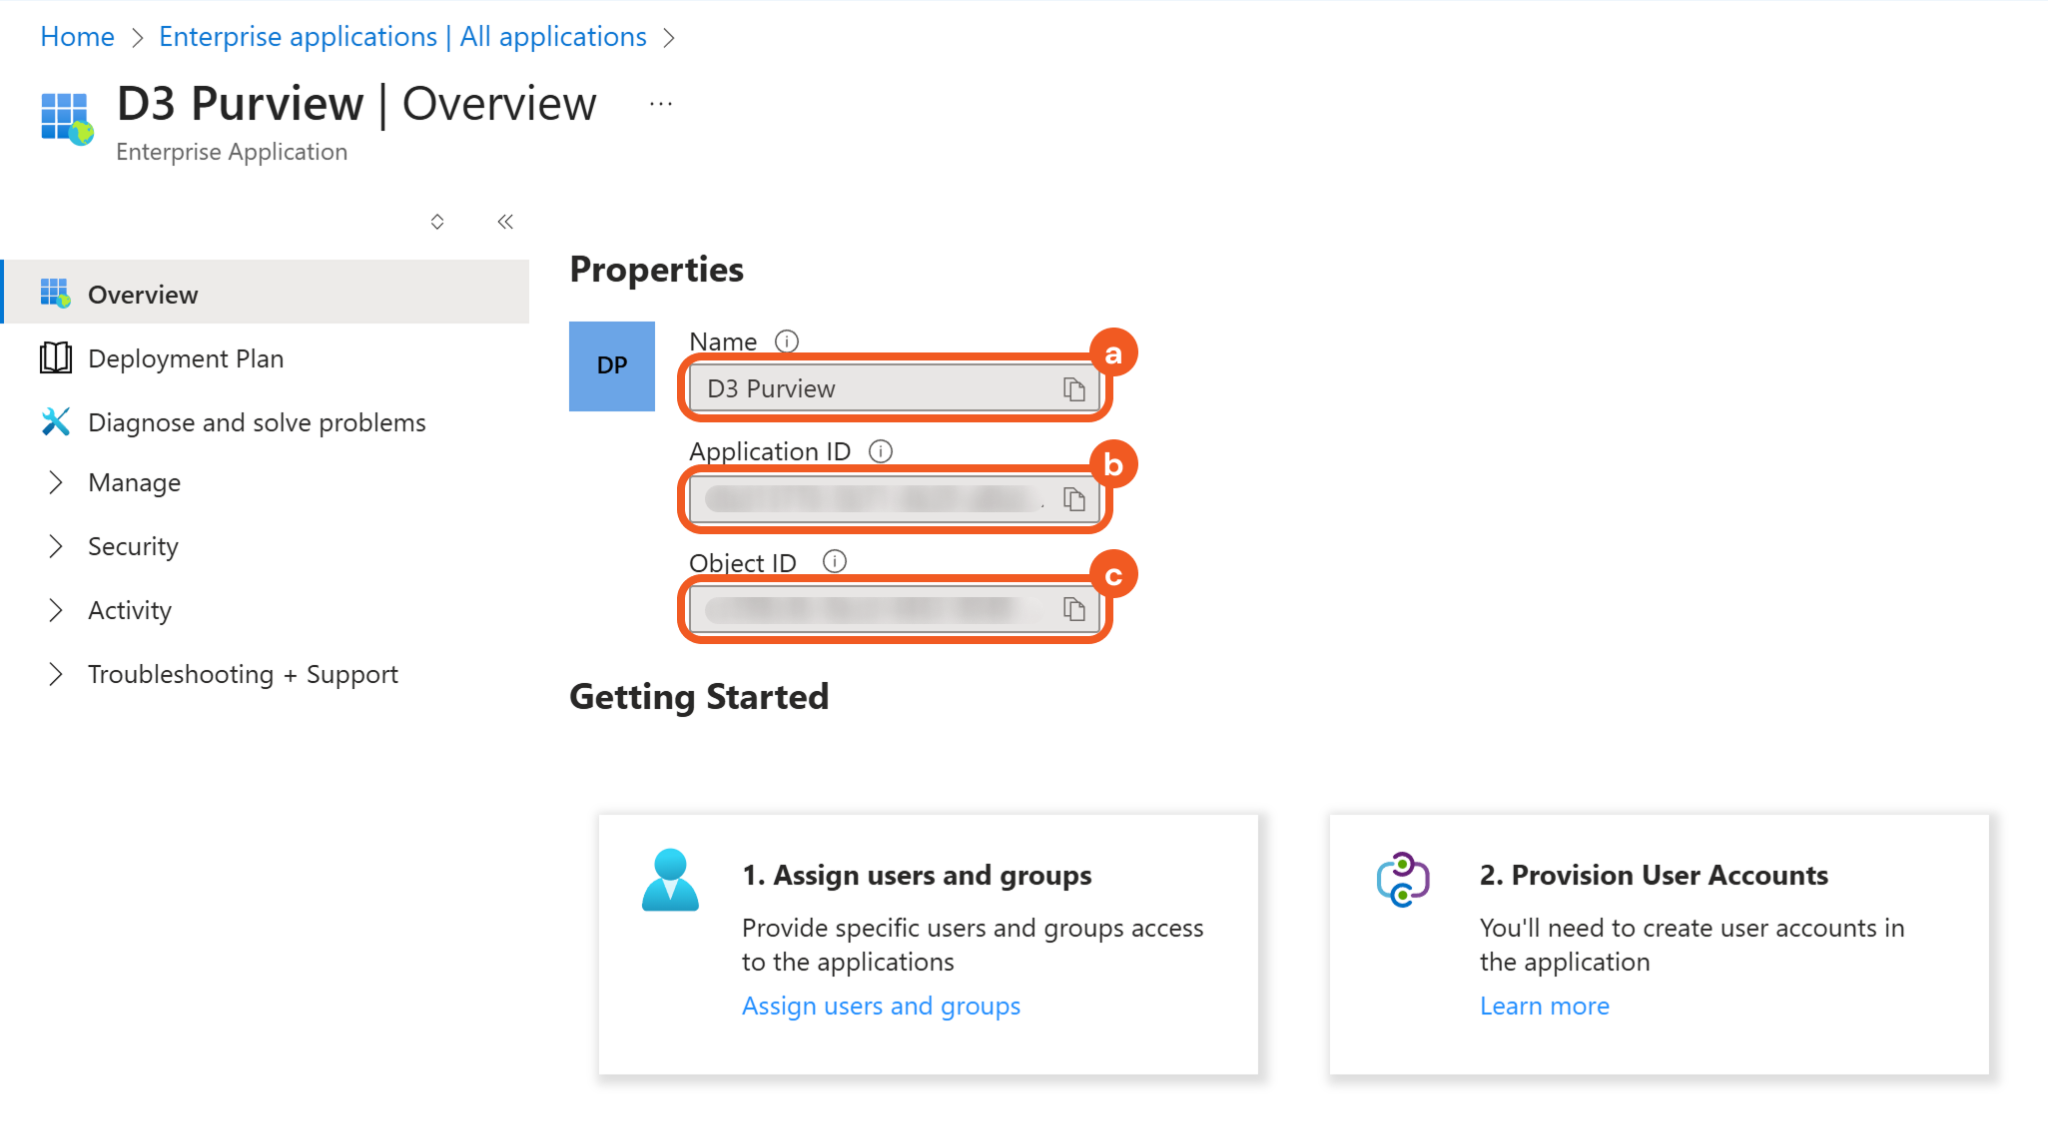
Application display name
Application ID
Object ID (ID of the service principal)
IMPORTANT It is essential that users obtain the Object ID from Enterprise applications and not App registrations, as the two values represent different objects. The Object ID in Enterprise applications refers to the service principal, while the one in App registrations refers to the application object.
.png?inst-v=a9107af0-b04c-4e31-bb5a-938372783868)
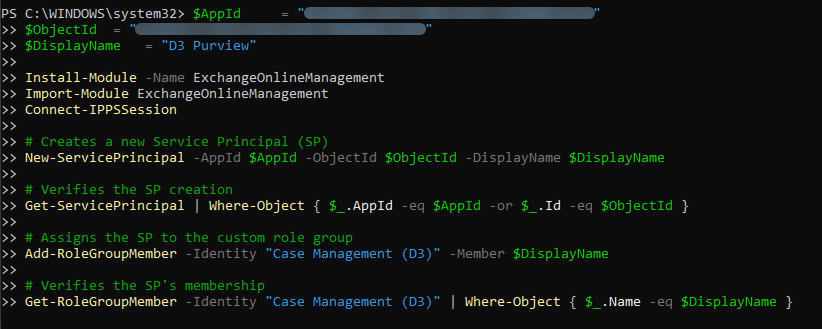
Copy the following PowerShell cmdlets to a text editor, then replace each placeholder in angle brackets (<...>) with the appropriate values.
POWERSHELL$AppId = "<paste-the-application-id>" $ObjectId = "<paste-the-object-id>" $DisplayName = "<enter-the-application-display-name>" Install-Module -Name ExchangeOnlineManagement Import-Module ExchangeOnlineManagement Connect-IPPSSession # Creates a new Service Principal (SP) New-ServicePrincipal -AppId $AppId -ObjectId $ObjectId -DisplayName $DisplayName # Verifies the SP creation Get-ServicePrincipal | Where-Object { $_.AppId -eq $AppId -or $_.Id -eq $ObjectId } # Assigns the SP to the custom role group Add-RoleGroupMember -Identity "<custom-role-group-name>" -Member $DisplayName # Verifies the SP's membership Get-RoleGroupMember -Identity "<custom-role-group-name>" | Where-Object { $_.Name -eq $DisplayName }$AppId: Paste the Application ID from the previous step.
$ObjectId: Paste the Object ID from the previous step.
$DisplayName = Paste the application Name from the previous step.
<custom-role-group-name>: Enter the custom role group name exactly as it appears in the Microsoft Purview UI.
Refer to step 2 of Creating a Custom Role Group in Microsoft Purview.
(Optional) Replace lines 15 to 19 in the previous snippet (starting at the comment "# Assigns the SP…" and ending with the line that finishes with "-eq $DisplayName)" with the following code to assign the authenticated user to the eDiscovery Administrator sub-group, and then confirm their role membership.
POWERSHELL# Assigns the SP to the eDiscovery Administrator sub-group Add-eDiscoveryCaseAdmin -User $ObjectId # Verifies the SP's membership Get-eDiscoveryCaseAdmin | Where-Object { $_.Name -eq $ObjectId }eDiscovery Administrators can manage all cases.
Run Windows PowerShell as an administrator.
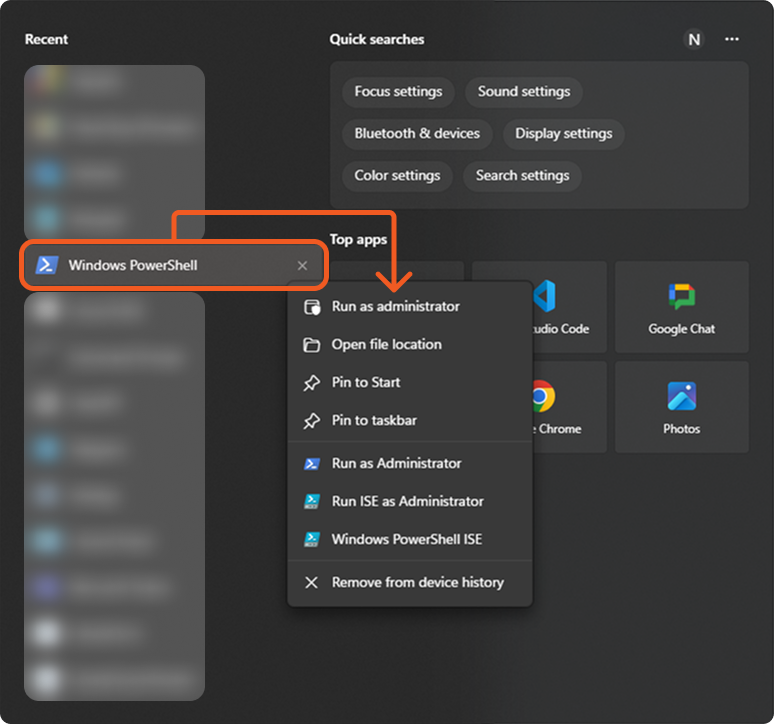
Paste the code snippet from Step 3 into PowerShell and execute it.
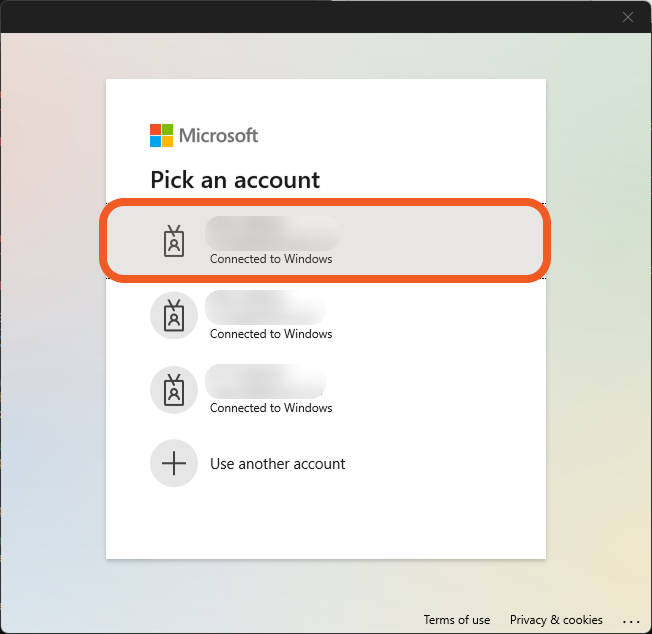
Log in when the Azure pop-up window appears, then wait for the cmdlets to complete execution.
If a different account is used from the one that performed the steps in Creating a Custom Role Group in Microsoft Purview, ensure that the signed-in user in this step belongs to a role group that includes the Role Management role.
Confirm that the service principal is now assigned to the custom role group in Microsoft Purview.
If an error occurs while adding the service principal to the custom role group, users can troubleshoot by executing these cmdlets from Step 3 one line at a time:
POWERSHELLAdd-RoleGroupMember -Identity "<custom-role-group-name>" -Member $DisplayName Get-RoleGroupMember -Identity "<custom-role-group-name>" | Where-Object { $_.Name -eq $DisplayName }
READER NOTE
To log in as another Azure user in PowerShell, first run Disconnect-ExchangeOnline -Confirm:$false 2>$null to end the current session, then run Connect-IPPSSession to initiate a new login.
EXAMPLE
Disconnect-ExchangeOnline -Confirm:$false 2>$null
Connect-IPPSSession
Configuring D3 SOAR to Work with Microsoft Purview eDiscovery V2
Log in to D3 SOAR.
Find the Microsoft Purview eDiscovery V2 integration.
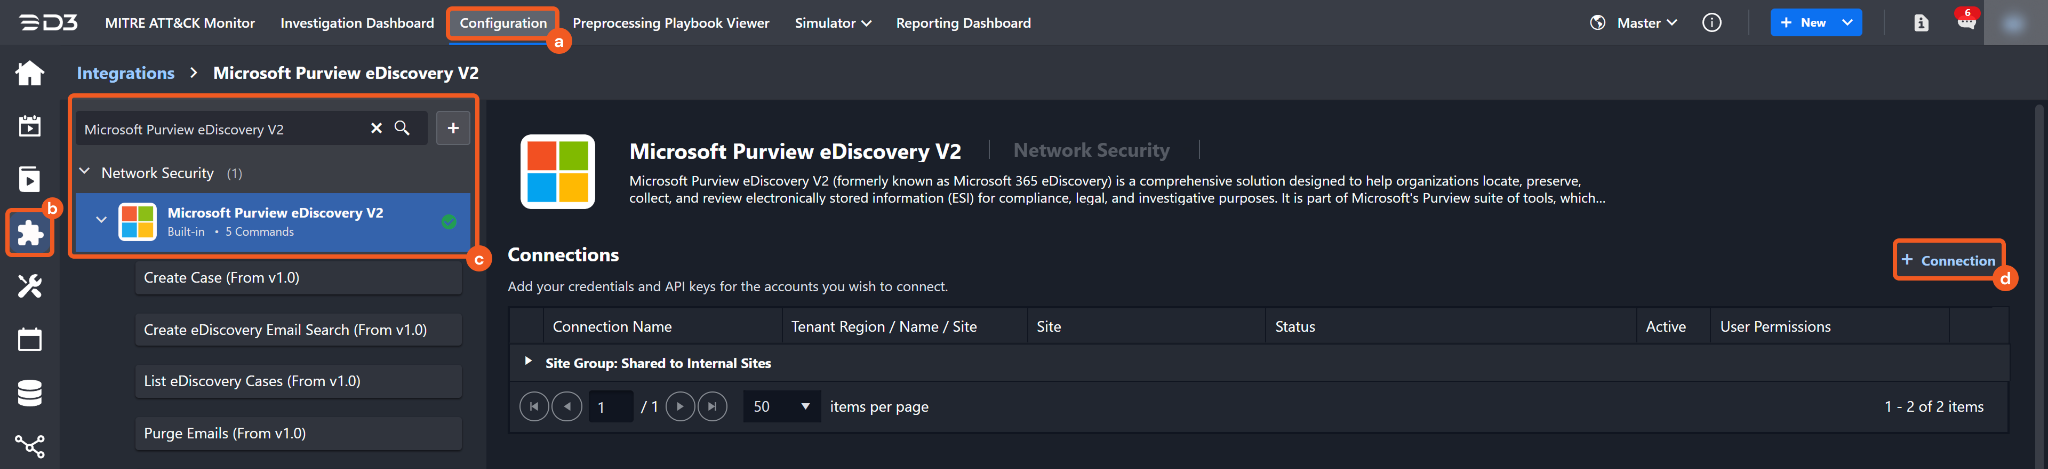
Navigate to Configuration on the top header menu.
Click on the Integration icon on the left sidebar.
Type Microsoft Purview eDiscovery V2 in the search box to find the integration, then click it to select it.
Click on the + Connection button on the right side of the Connections section. A new connection window will appear.
Configure the following fields to create a connection to Microsoft Purview eDiscovery V2.
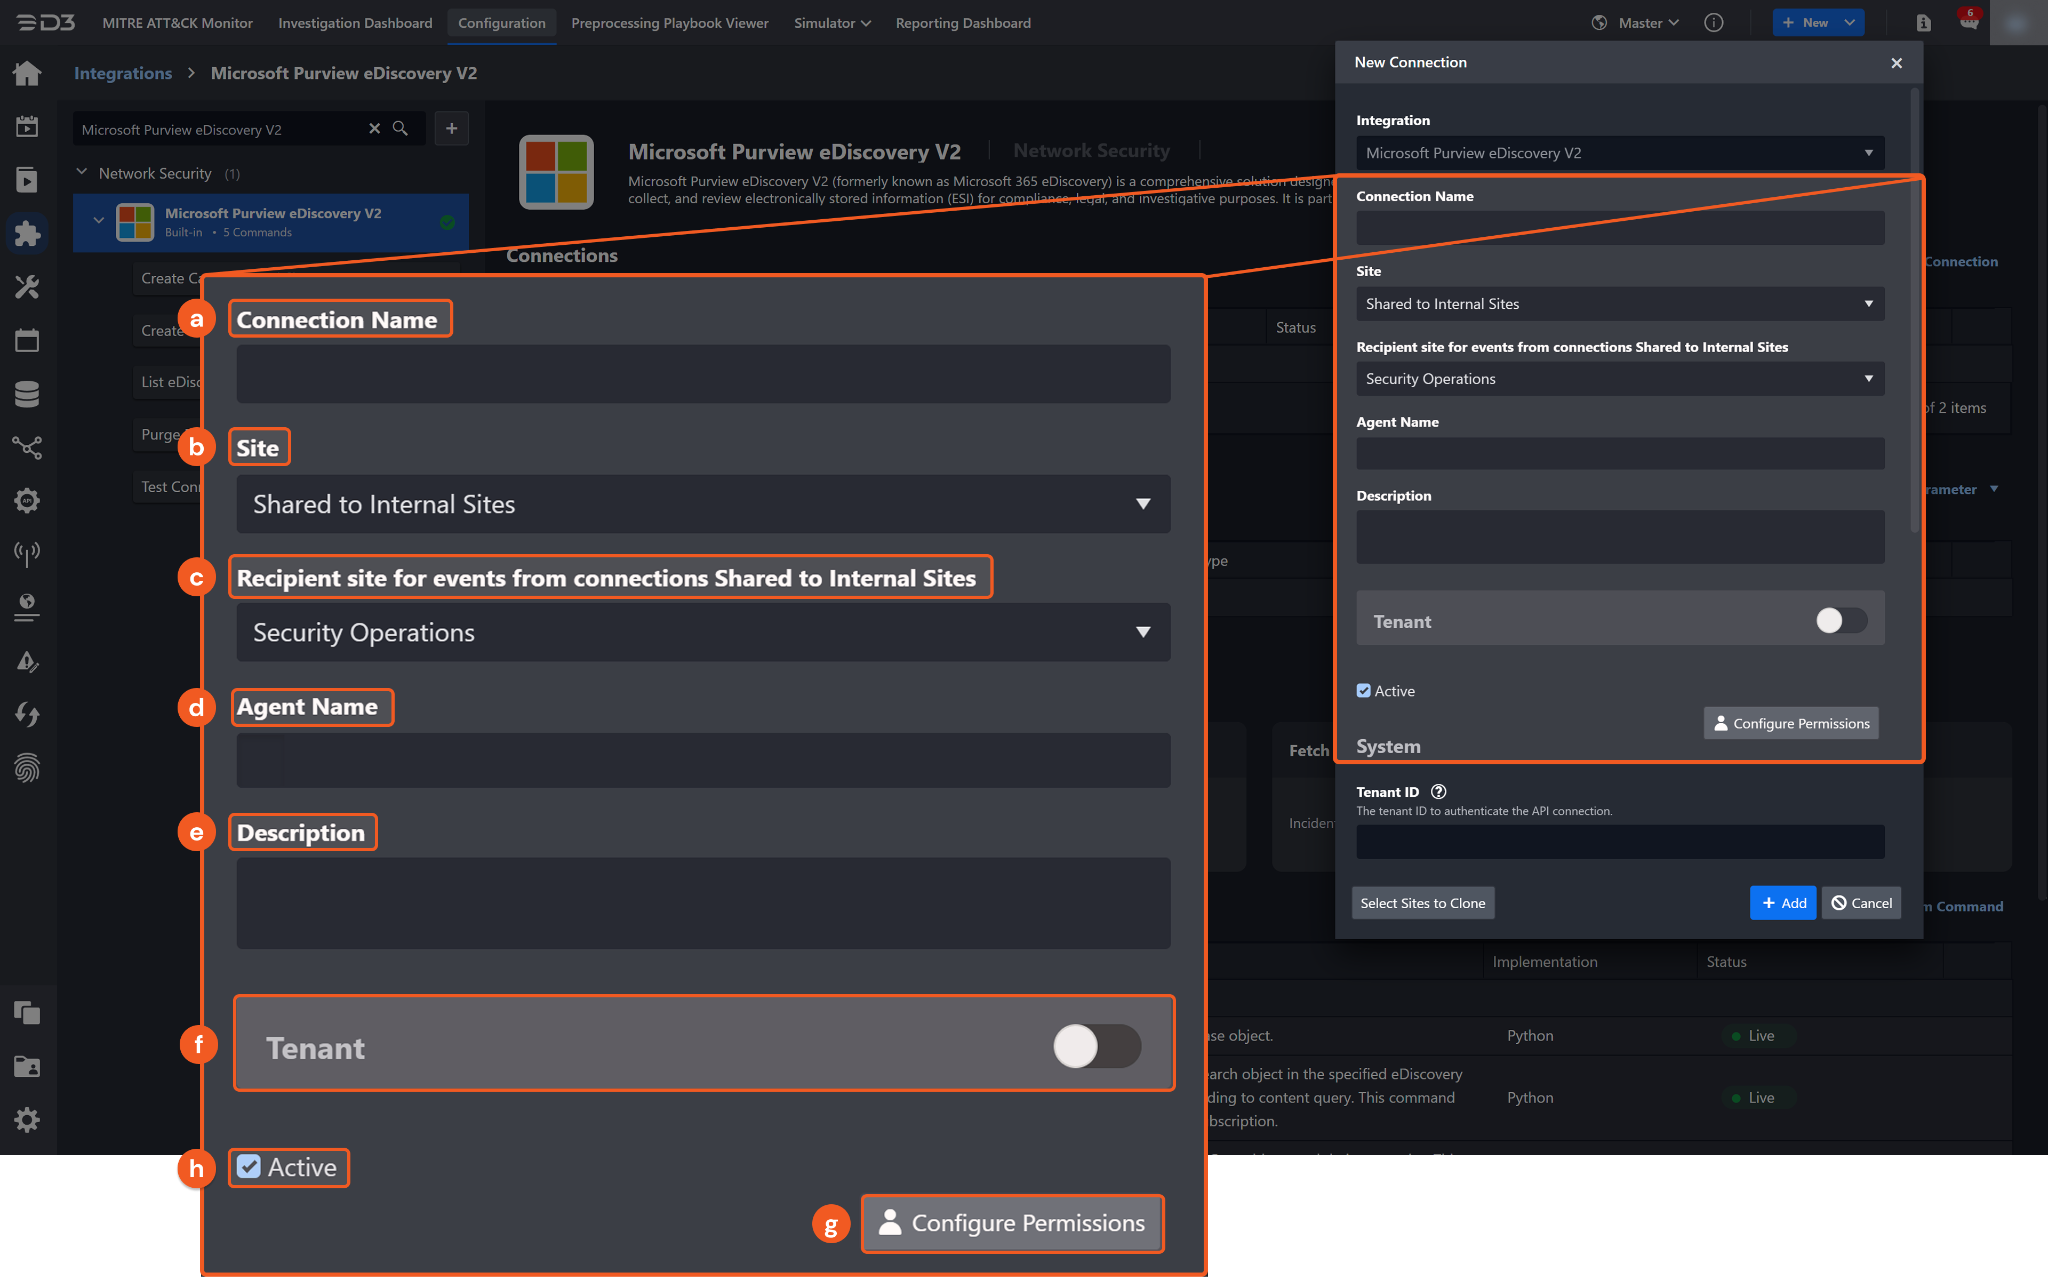
Connection Name: The desired name for the connection.
Site: The site on which to use the integration connection. Use the drop-down menu to select the site. The Share to Internal Sites option enables all internal sites to use the connection. Selecting a specific site will only enable that site to use the connection.
Recipient site for events from connections Shared to Internal Sites: This field is displayed when Share to Internal Sites is selected for the Site field, allowing selection of the internal site for deploying the integration connection.
Agent Name (Optional): The proxy agent required to build the connection. Use the dropdown menu to select the proxy agent from a list of previously configured proxy agents.
Description (Optional): The description for the connection.
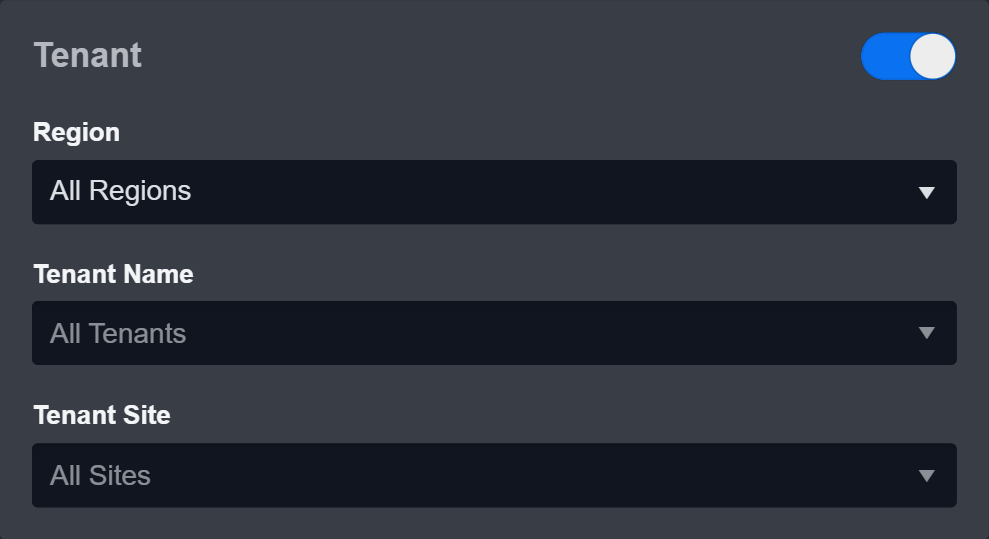
Tenant (Optional): When configuring the connection from a master tenant site, users can choose the specific tenant sites with which to share the connection. Once this setting is enabled, users can filter and select the desired tenant sites from the dropdowns to share the connection.
Configure User Permissions: Defines which users have access to the connection.
Active: The checkbox that enables the connection to be used when selected.
System: This section contains the parameters defined specifically for the integration. These parameters must be configured to create the integration connection.
Grant Type: Client Credentials
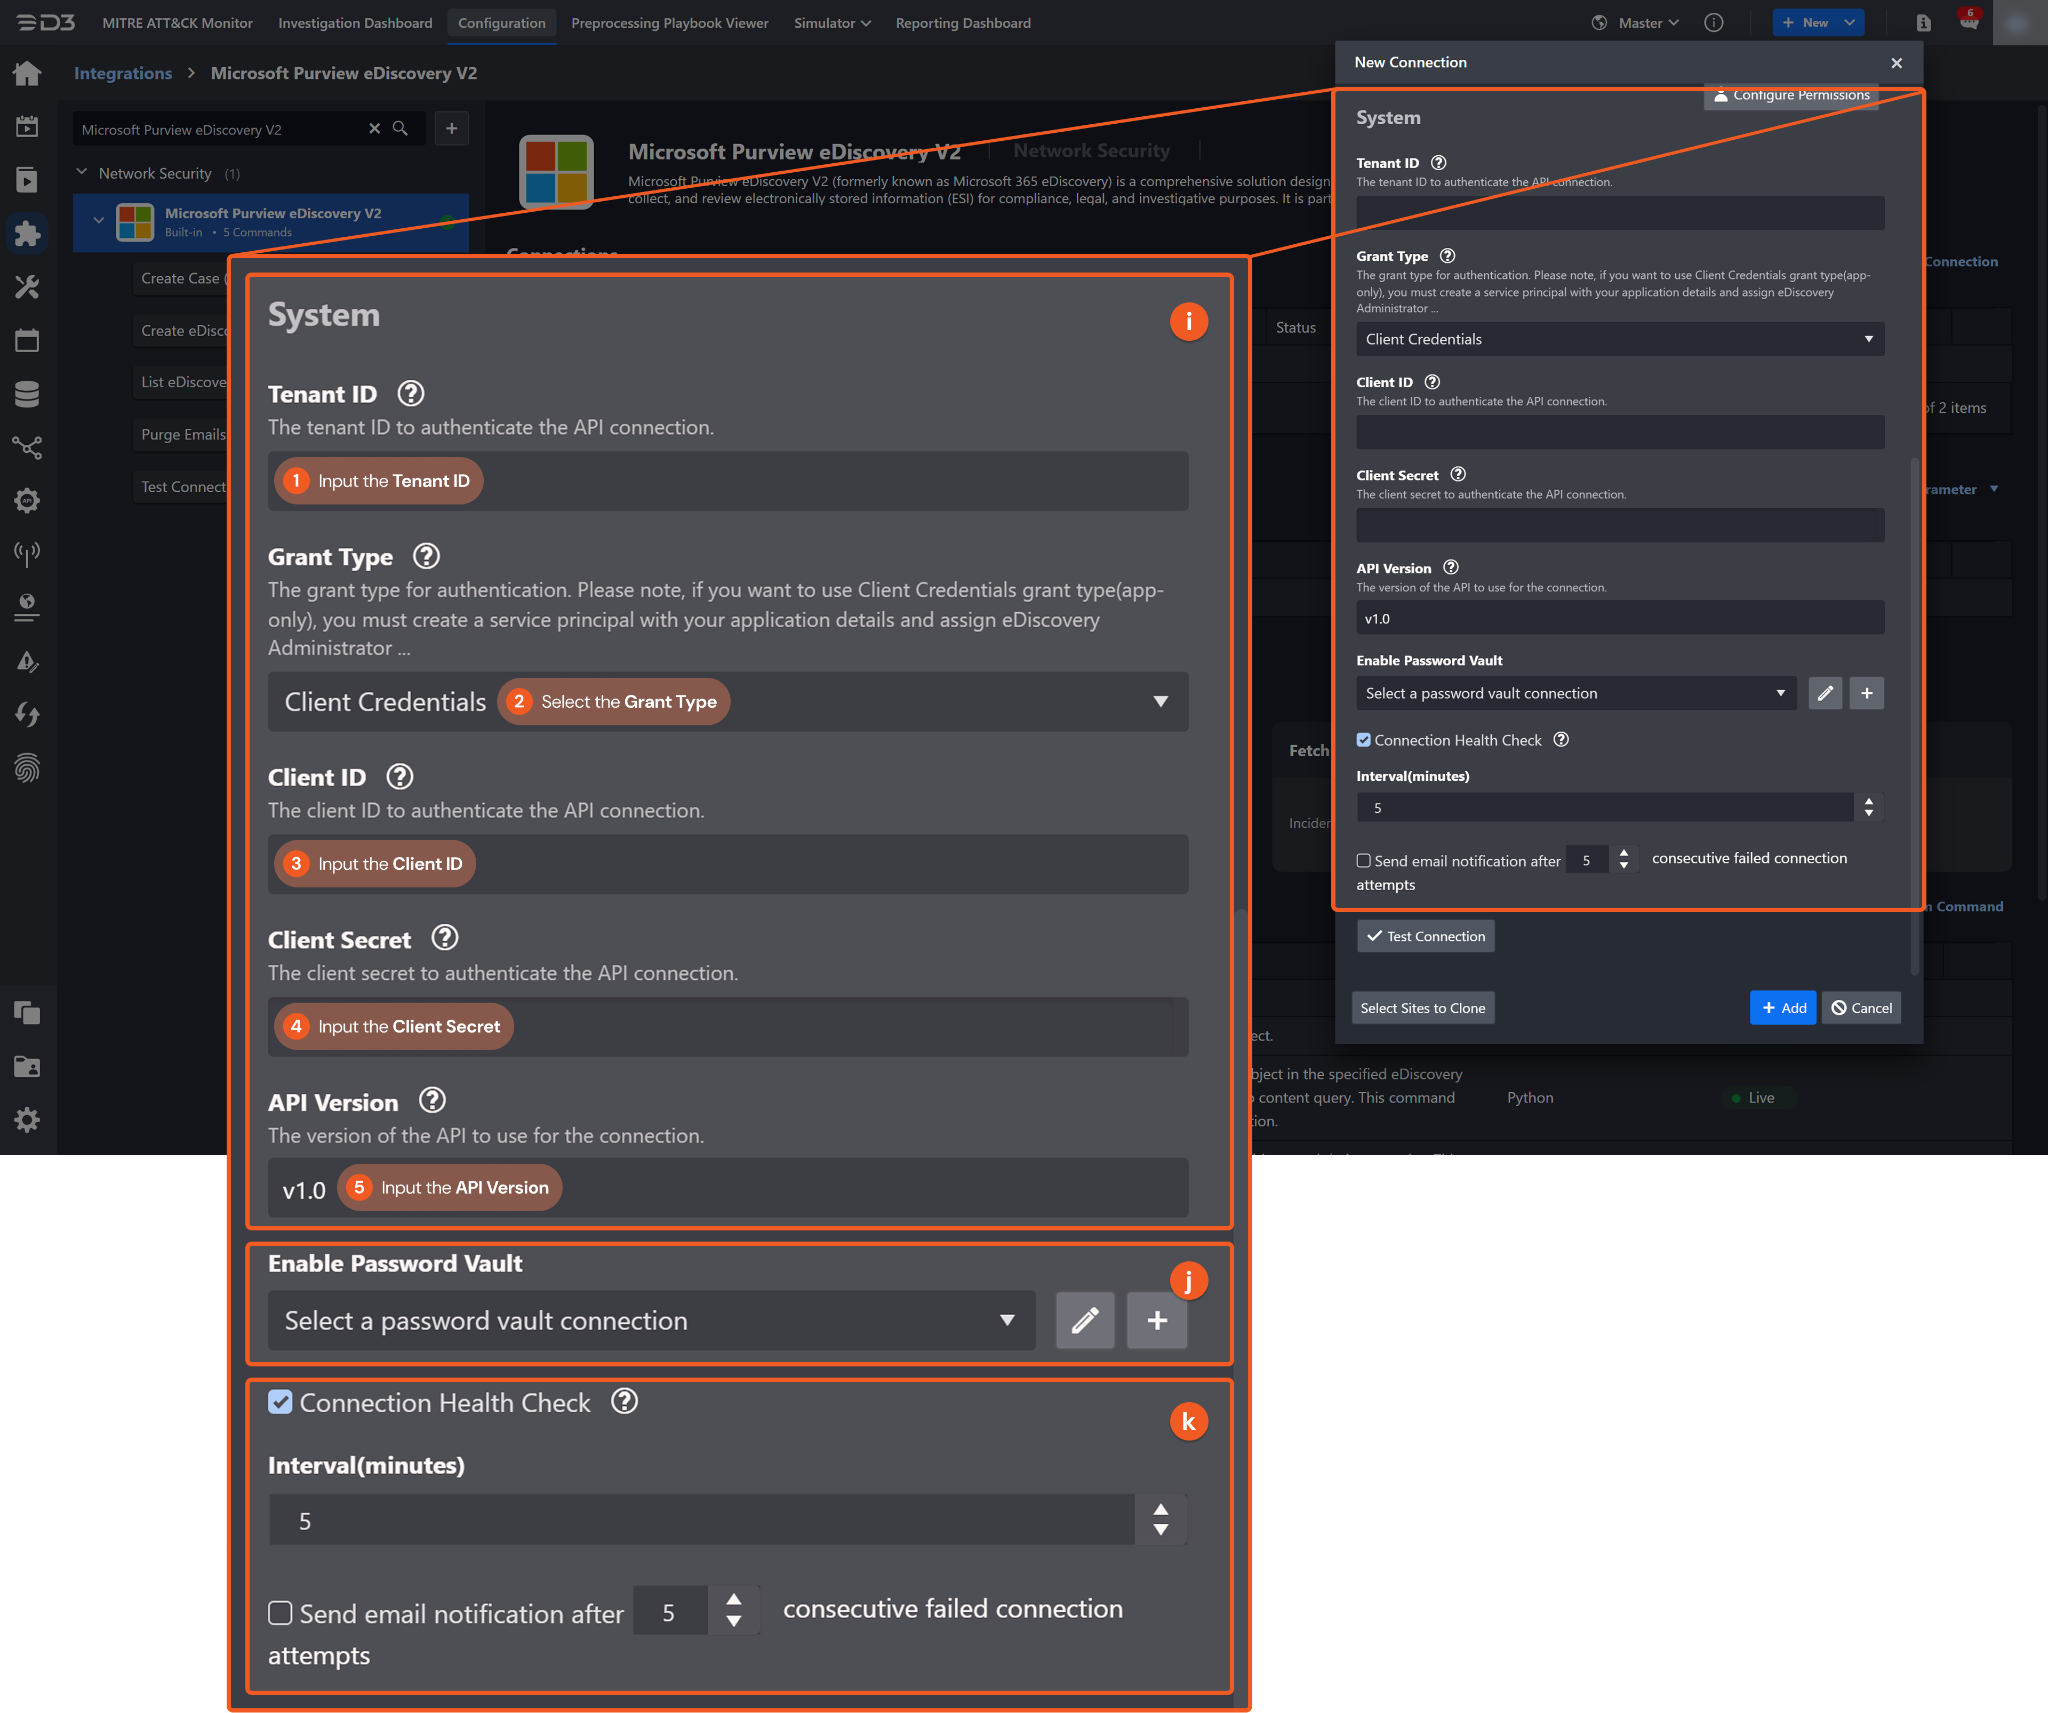
Use the Client Credentials grant type when authenticating with application permissions.
1. Input the Tenant ID. Refer to step 3 of Registering an Azure App and Collecting Credentials.
2. Select the Grant Type.
3. Input the Client ID. Refer to step 3 of Registering an Azure App and Collecting Credentials.
4. Input the Client Secret. Refer to step 5 of Registering an Azure App and Collecting Credentials.
5. Input the API Version. The default value is v1.0.
Grant Type: Authorization Code
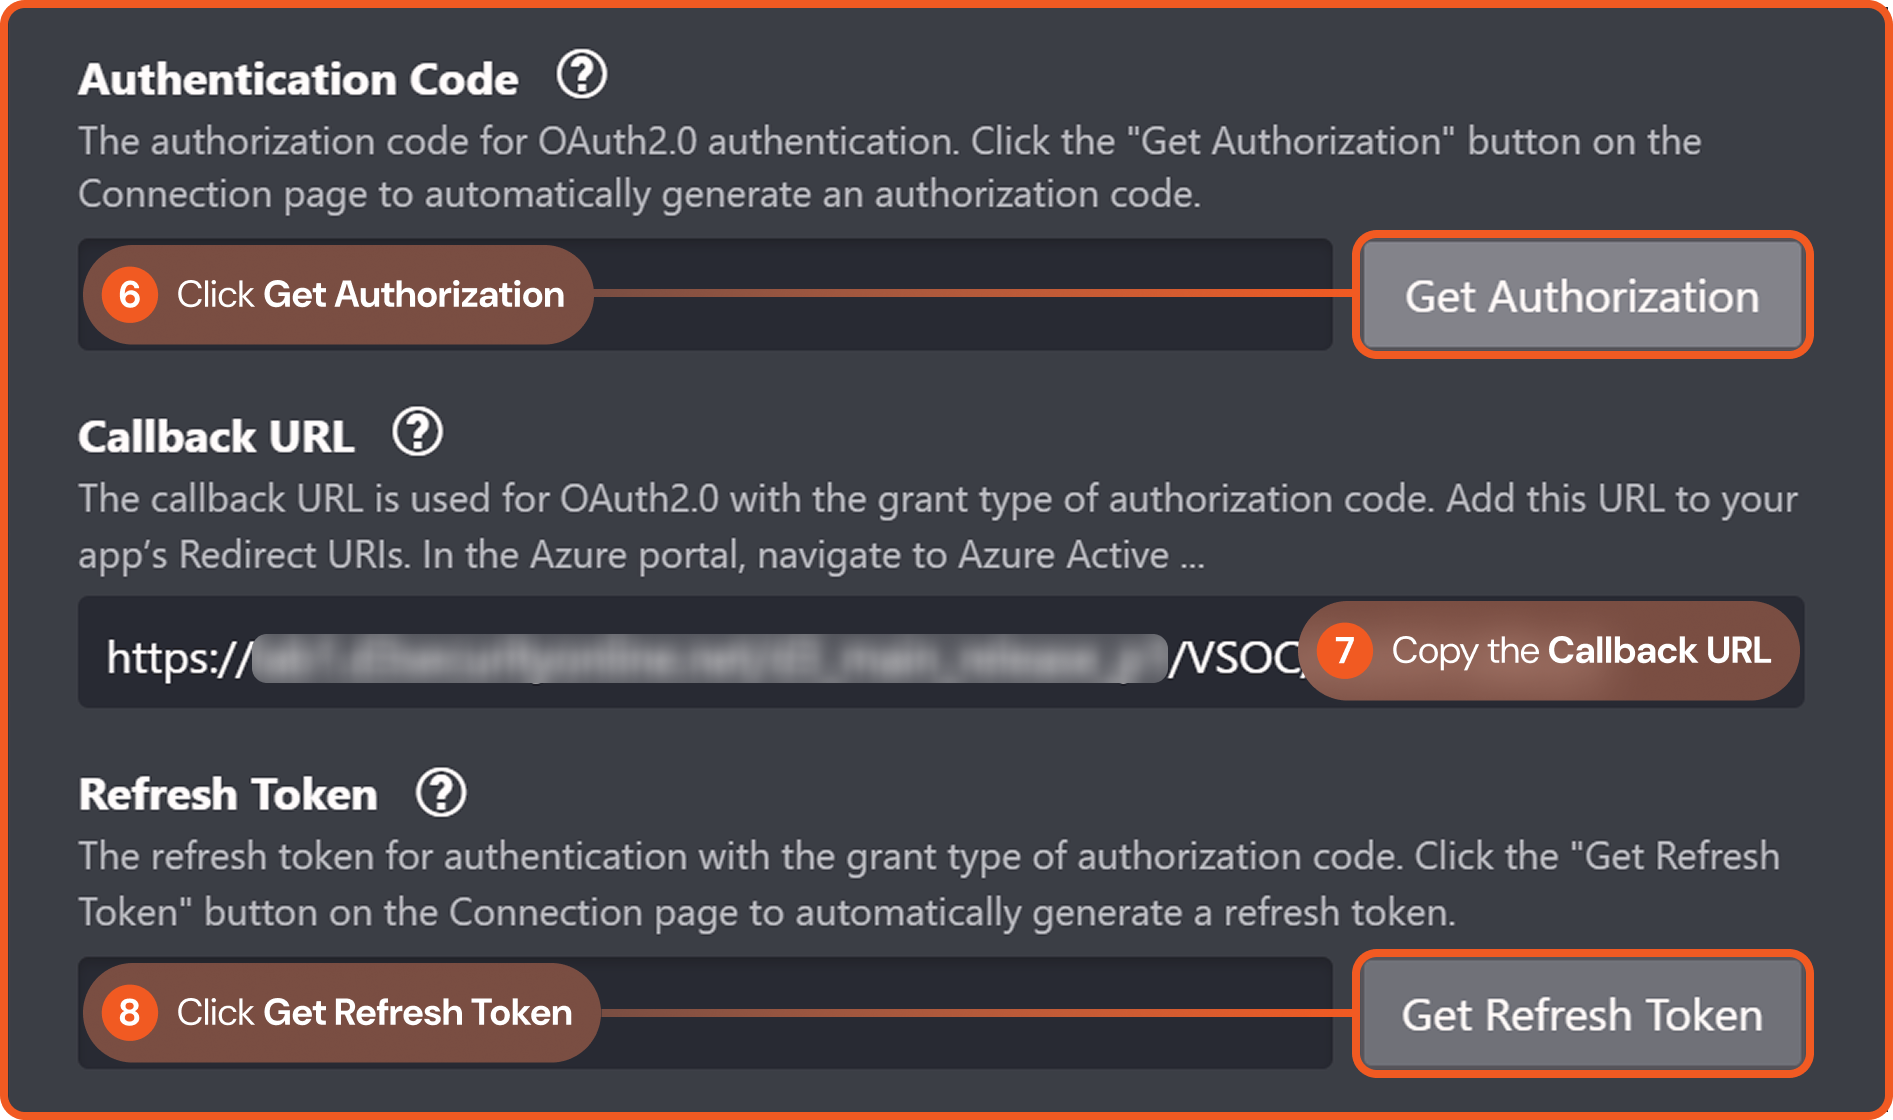
Use the Authorization Code grant type when authenticating with delegated permissions. For this grant type, complete the same steps required for Grant Type: Client Credentials, plus the following additional steps.
6. Click Get Authorization to automatically retrieve the authorization code and populate the field.
7. Copy the Callback URL. Refer to step 2d in Registering an Azure App and Collecting Credentials.
8. Click the Get Refresh Token button.
Enable Password Vault: An optional feature that allows users to take the stored credentials from their own password vault. Refer to the password vault connection guide if needed.
Connection Health Check: Periodically checks the connection status by scheduling the Test Connection command at the specified interval (in minutes). Available only for active connections, this feature also allows configuring email notifications for failed attempts.
Test the connection.
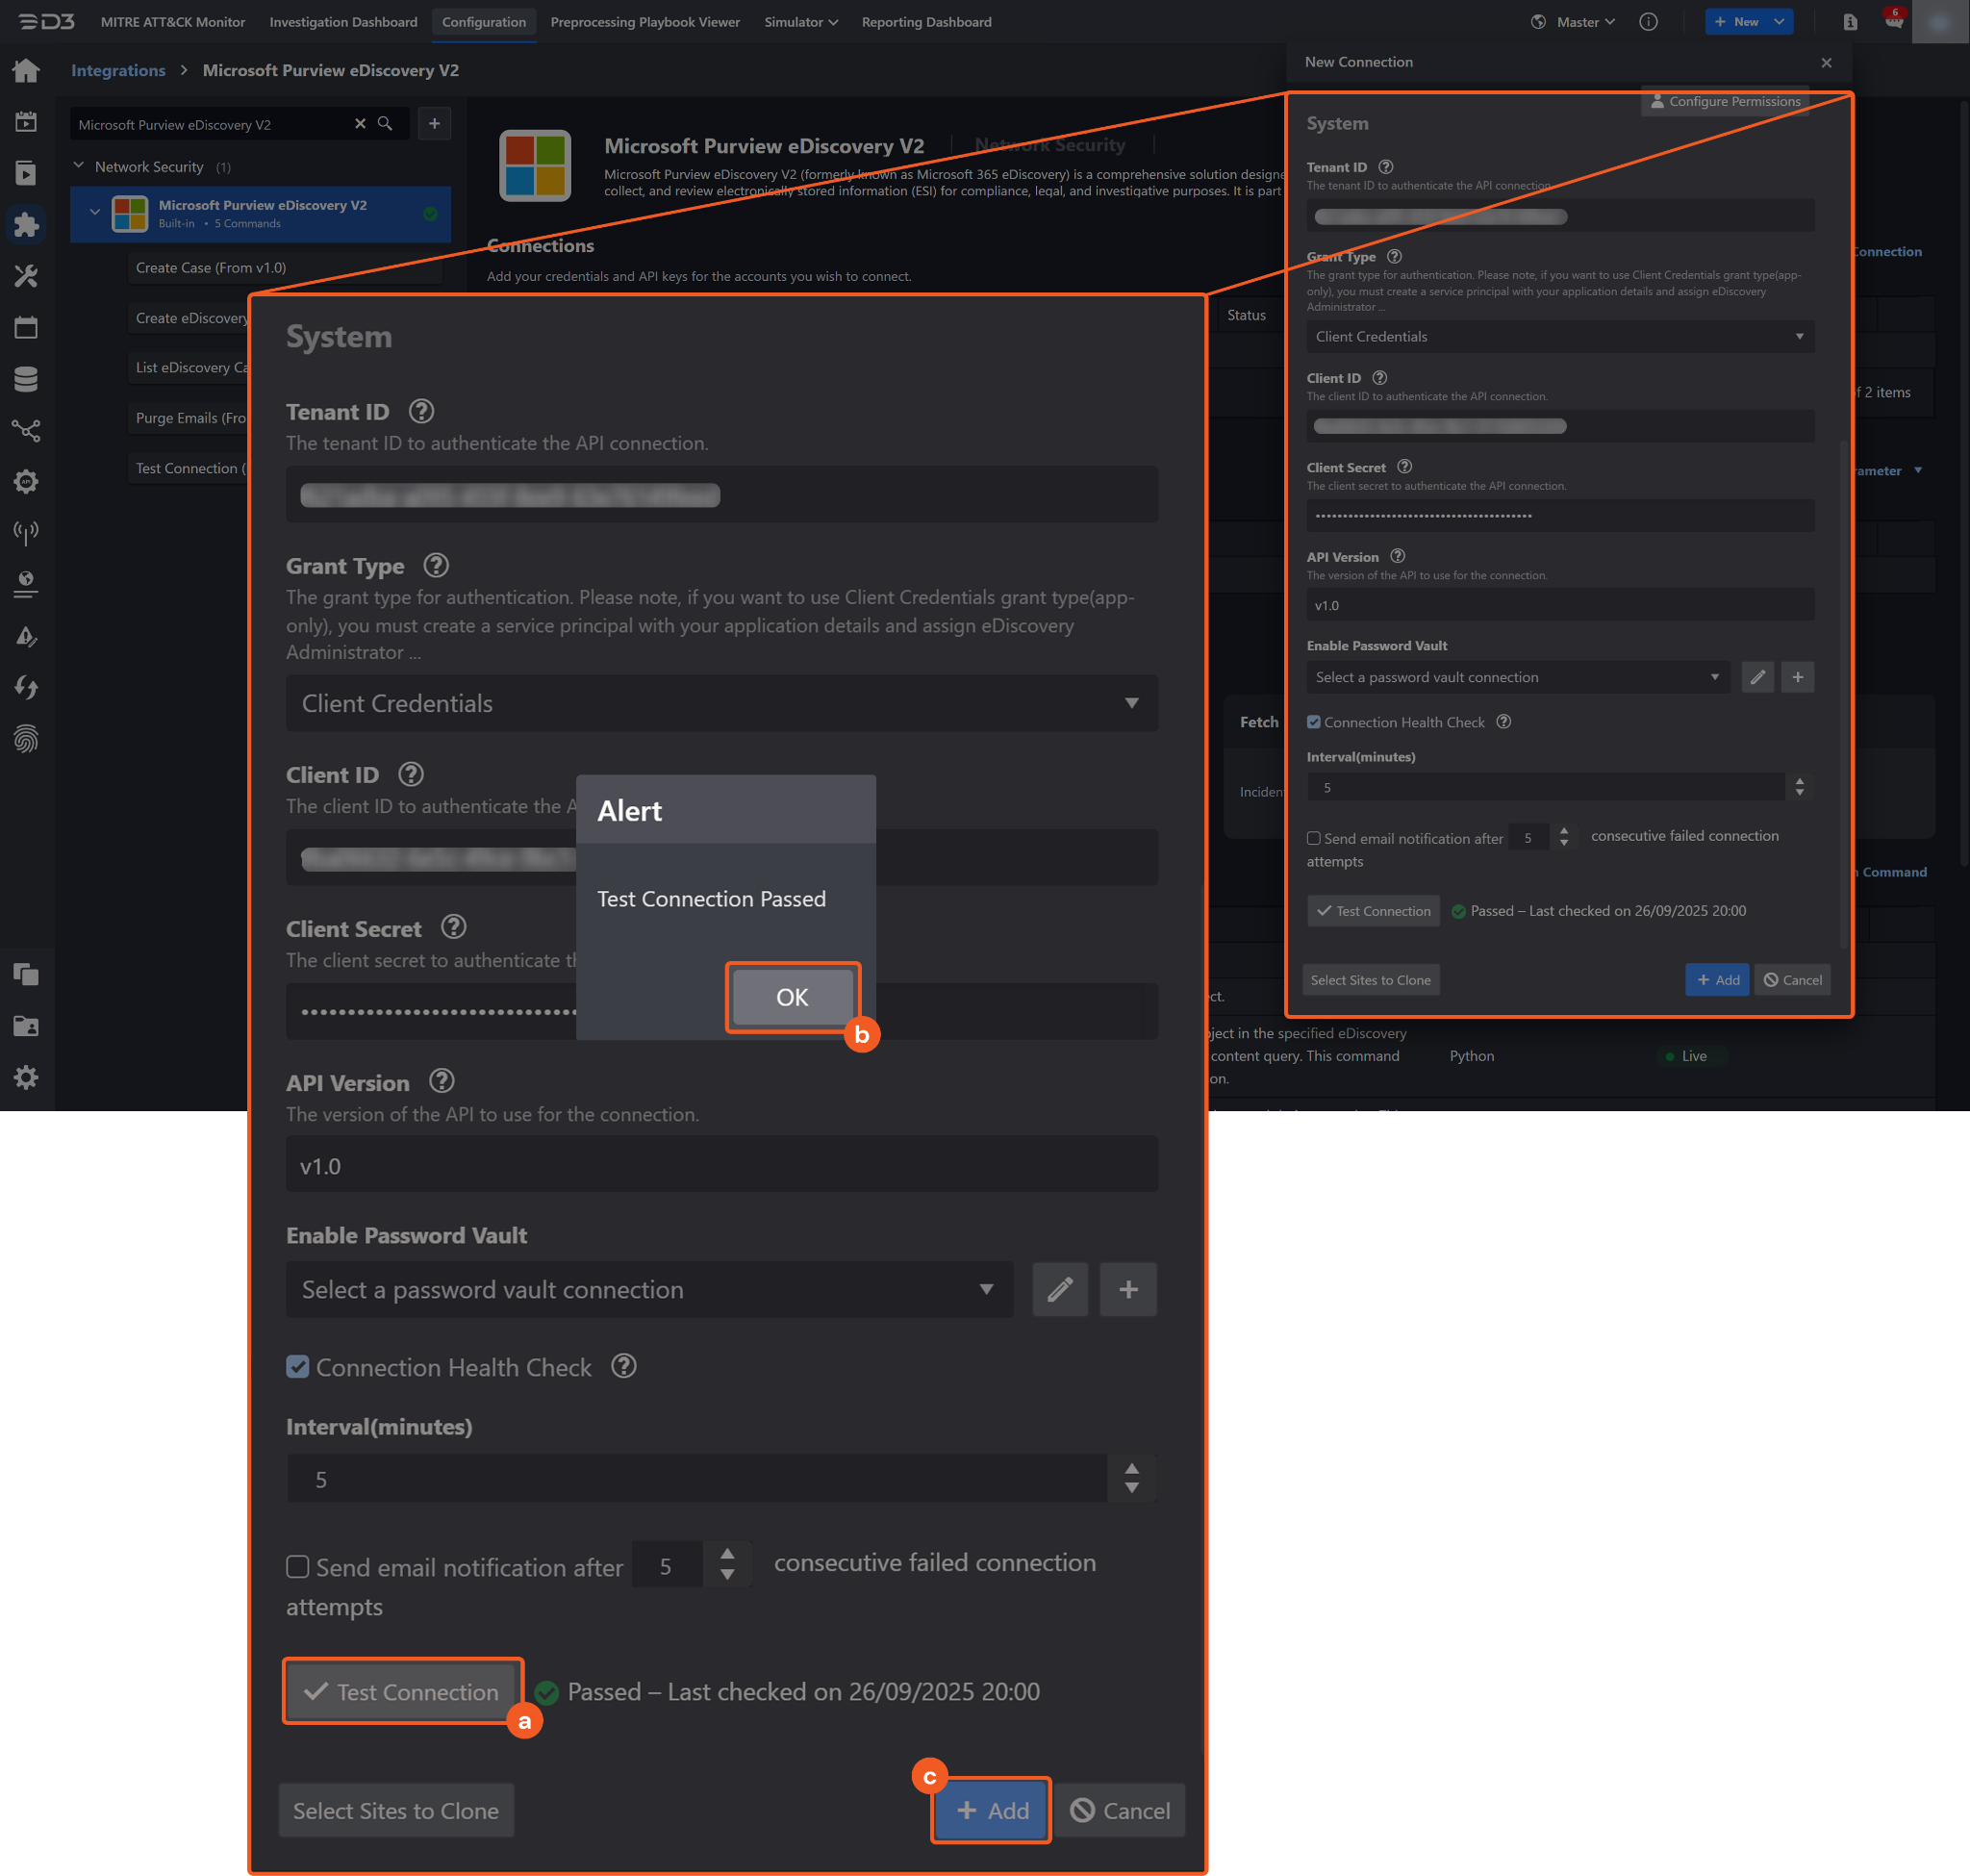
Click on the Test Connection button to verify credentials and connectivity. A success alert displays Passed with a green checkmark. If the connection fails, review the parameters and retry.
Click OK to close the alert window.
Click + Add to create and add the configured connection.
Commands
Microsoft Purview eDiscovery V2 includes the following executable commands for users to set up schedules or create playbook workflows. With the Test Command function, users can execute these commands independently for playbook troubleshooting.
Integration API Note
For more information about the Microsoft Purview eDiscovery V2 API, refer to the Microsoft Purview eDiscovery V2 API reference.
READER NOTE
Certain permissions are required for each command. Refer to the Permission Requirements and Configuring Microsoft Purview eDiscovery V2 to Work with D3 SOAR sections for details.
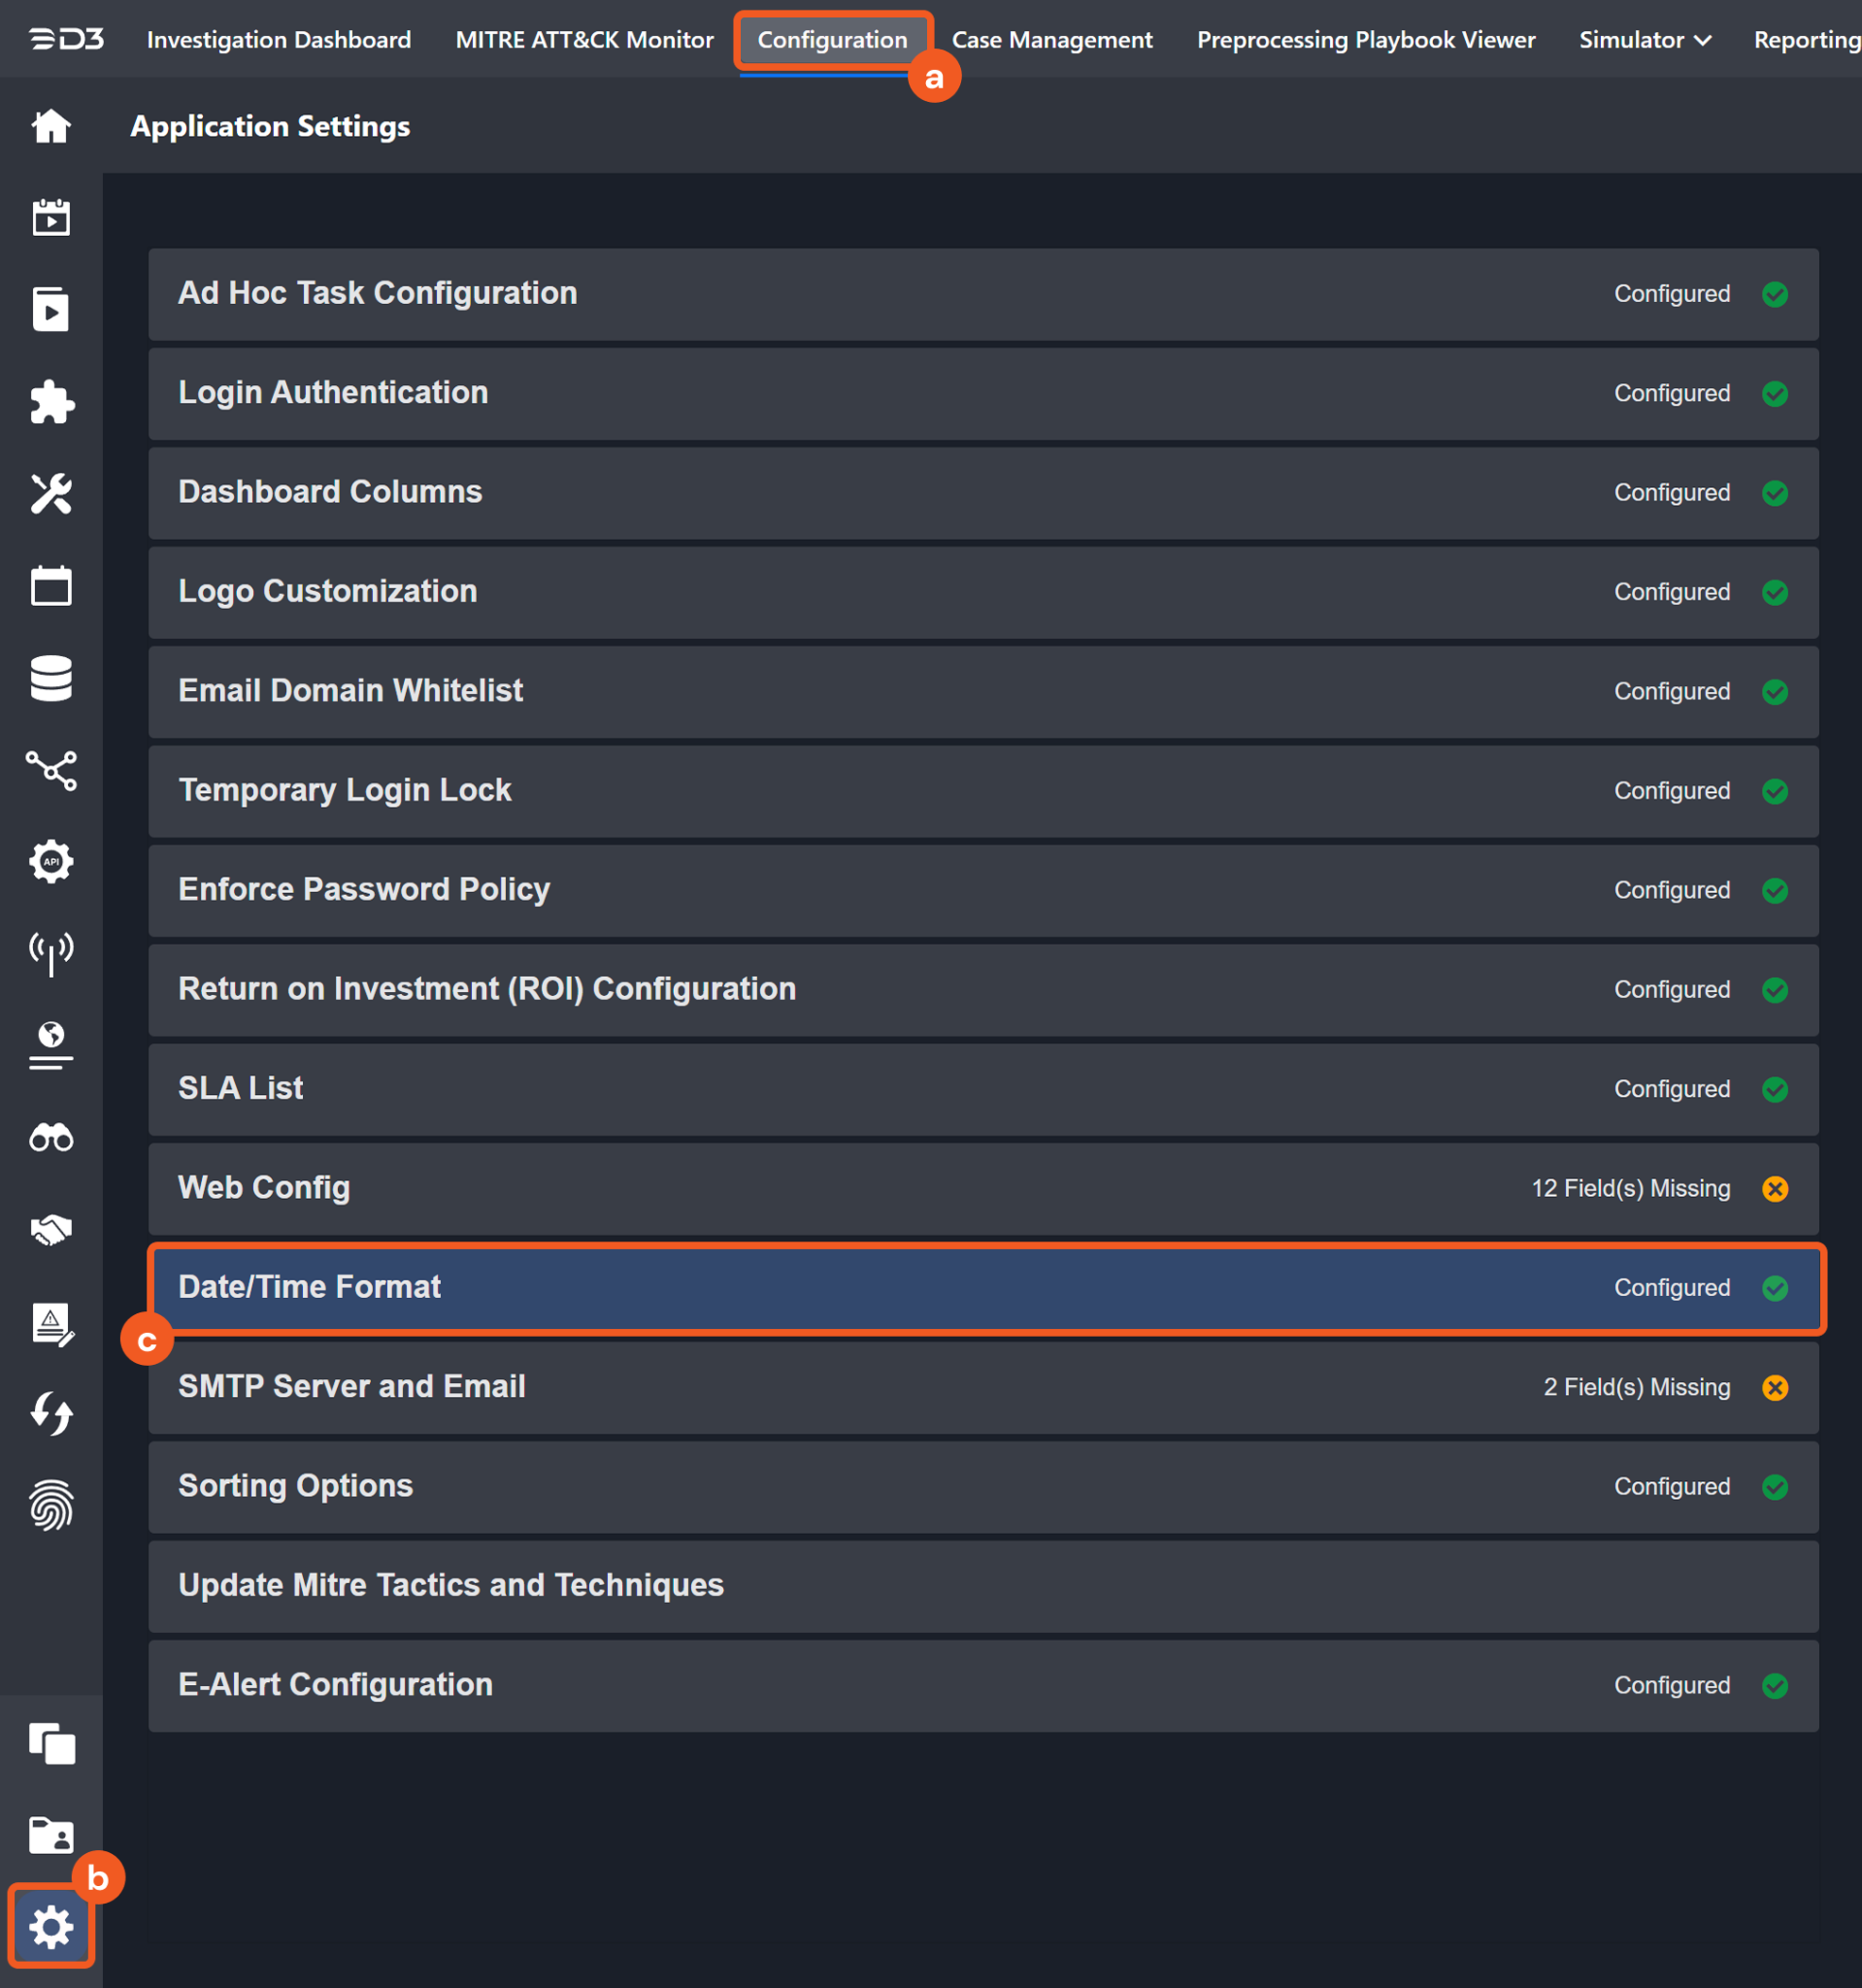
Note for Time-related parameters
The input format of time-related parameters may vary based on user account settings, which may cause the sample data in commands to differ from what is displayed. To adjust the time format, follow these steps:
Navigate to Configuration > Application Settings. Select Date/Time Format.
Choose the desired date and time format, then click on the Save button.
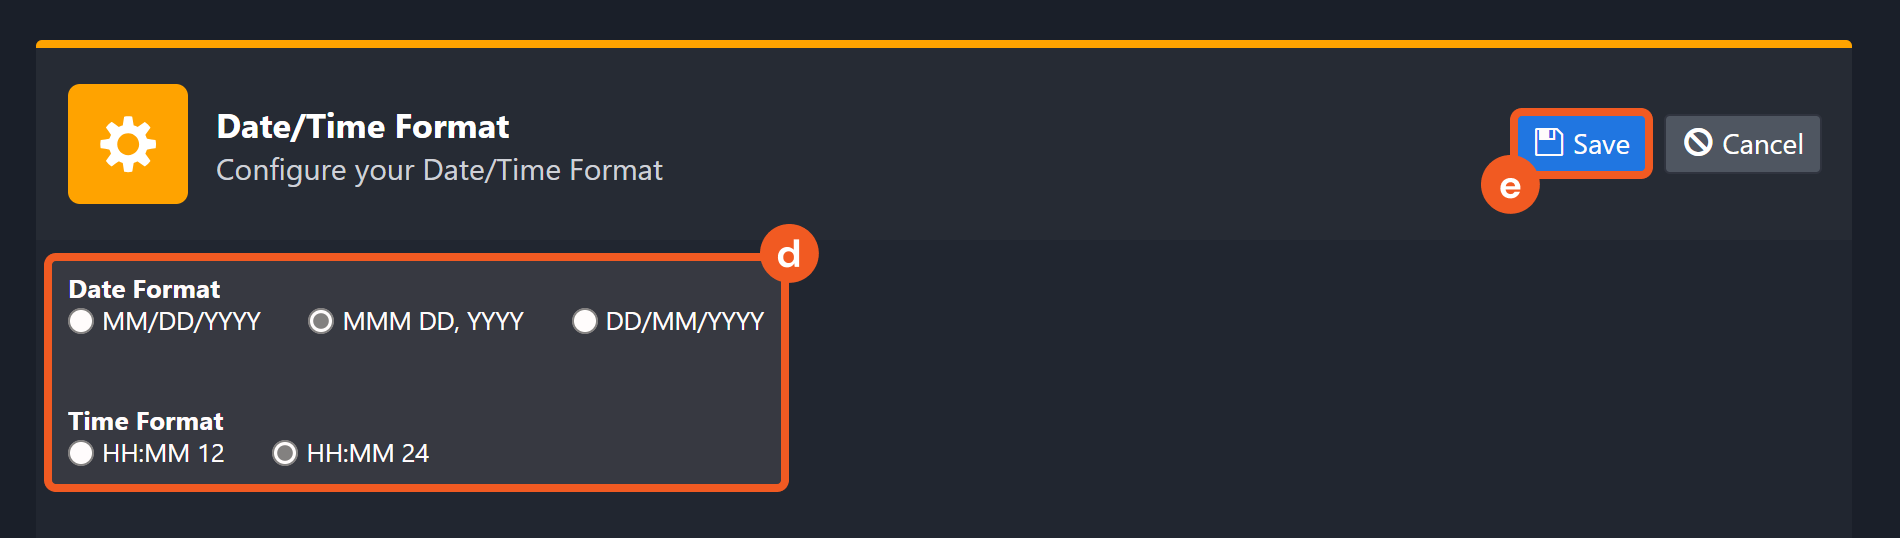
The selected time format will now be visible when configuring Date/Time command input parameters.
Create Case
Creates a new eDiscovery Case object.
Input
Input Parameter | Required/Optional | Description | Example |
Case Display Name | Required | The unique display name for the case to be created. | TEST LITIGATION-005 |
Description | Optional | A descriptive summary of the case. | Project abc |
Output
To view the sample output data for all commands, refer to this article.
Error Handling
If the Return Data displays Failed, an Error tab will appear in the Test Result window.
The error tab contains the details responded from D3 SOAR or third-party API calls, including Failure Indicator, Status Code, and Message. This can help locate the root cause of a command failure.
Parts in Error | Description | Example |
Failure Indicator | Indicates the command failure that happened at a specific input and/or API call. | Create Case failed. |
Status Code | The response code issued by the third-party API server or the D3 SOAR system that can be used to locate the corresponding error category. For example, if the returned status code is 401, the selected connection is unauthorized to run the command. The user or system support would need to check the permission setting in the Microsoft Purview eDiscovery V2 portal. Refer to the HTTP Status Code Registry for details. | Status Code: 409. |
Message | The raw data or captured key error message from the integration API server about the API request failure. | Message: case with same name another test is available with case type - AdvancedEdiscovery. please try with some other name. |
Error Sample Data Create Case failed. Status Code: 409. Message: case with same name another test is available with case type - AdvancedEdiscovery. please try with some other name. |
Create eDiscovery Email Search
Creates a new eDiscovery Search object within a specified eDiscovery case to search emails based on a content query. This command is often paired with the Purge Emails command to identify messages for removal. Ensure to narrow the search with parameters, as broad queries can result in errors when Purge Email is executed.
READER NOTE
Case ID is a required parameter to run this command.
Run the List eDiscovery Cases command to obtain the Case ID. Case IDs can be found in the raw data at $.value[*].id.
Input
Input Parameter | Required/Optional | Description | Example |
Case ID | Required | The ID of the eDiscovery case in which the search will be created. Case ID can be obtained using the List eDiscovery Cases command. | 31bc*****3a6a |
Search Name | Required | The display name of the search. | Phishing Email Search 20241119-A |
Description | Optional | A description of the search. | Search for suspicious phishing emails |
Sender Email Address | Optional | Filters results by sender email address. | *****@*****.***** |
Subject | Optional | Filters results by email subject. | Reset Password |
Start Time | Optional | Returns emails received after this time. By default, the value is 30 days before End Time. | 2024-05-31T00:35:00Z |
End Time | Optional | Returns emails received before this time. By default, the value is the current time. | 2024-06-01T00:00:00Z |
Output
To view the sample output data for all commands, refer to this article.
Error Handling
If the Return Data displays Failed, an Error tab will appear in the Test Result window.
The error tab contains the details responded from D3 SOAR or third-party API calls, including Failure Indicator, Status Code, and Message. This can help locate the root cause of a command failure.
Parts in Error | Description | Example |
Failure Indicator | Indicates the command failure that happened at a specific input and/or API call. | Create eDiscovery Email Search failed. |
Status Code | The response code issued by the third-party API server or the D3 SOAR system that can be used to locate the corresponding error category. For example, if the returned status code is 401, the selected connection is unauthorized to run the command. The user or system support would need to check the permission setting in the Microsoft Purview eDiscovery V2 portal. Refer to the HTTP Status Code Registry for details. | Status Code: 409. |
Message | The raw data or captured key error message from the integration API server about the API request failure. | Message: An entity with the same name already exists. |
Error Sample Data Create eDiscovery Email Search failed. Status Code: 409. Message: An entity with the same name already exists. |
List eDiscovery Cases
Retrieves a list of eDiscovery case objects and their properties.
Input
Input Parameter | Required/Optional | Description | Example |
Case Display Name | Optional | Filters results by case display name. Enter a full or partial display name. By default, all cases are returned. | LITIGATION-201 |
Output
To view the sample output data for all commands, refer to this article.
Error Handling
If the Return Data displays Failed, an Error tab will appear in the Test Result window.
The error tab contains the details responded from D3 SOAR or third-party API calls, including Failure Indicator, Status Code, and Message. This can help locate the root cause of a command failure.
Parts in Error | Description | Example |
Failure Indicator | Indicates the command failure that happened at a specific input and/or API call. | List eDiscovery Cases failed. |
Status Code | The response code issued by the third-party API server or the D3 SOAR system that can be used to locate the corresponding error category. For example, if the returned status code is 401, the selected connection is unauthorized to run the command. The user or system support would need to check the permission setting in the Microsoft Purview eDiscovery V2 portal. Refer to the HTTP Status Code Registry for details. | Status Code: 401. |
Message | The raw data or captured key error message from the integration API server about the API request failure. | Message: AA*****15: Invalid client secret provided. Ensure the secret being sent in the request is the client secret value, not the client secret ID, for a secret added to app '9ba0*****2d36'. Trace ID: 5738*****3300 Correlation ID: 9747*****f39e Timestamp: 2025-09-26 21:51:46Z. |
Error Sample Data List eDiscovery Cases failed. Status Code: 401. Message: Message: AA*****15: Invalid client secret provided. Ensure the secret being sent in the request is the client secret value, not the client secret ID, for a secret added to app '9ba0*****2d36'. Trace ID: 5738*****3300 Correlation ID: 9747*****f39e Timestamp: 2025-09-26 21:51:46Z. |
Purge Emails
Deletes Exchange mailbox items returned in a specified eDiscovery search result. A maximum of 100 email items per mailbox can be purged at once. Carefully review the eDiscovery search results before running this command.
READER NOTE
Case ID and Search ID are required parameters to run this command.
Run the Create eDiscovery Email Search command to obtain the Case ID and Search ID. Case IDs and Search IDs can be found in the raw data at:
$.CaseID (Case ID)
$.SearchID (Search ID)
Input
Input Parameter | Required/Optional | Description | Example |
Case ID | Required | The ID of the eDiscovery case in which the purge will be executed. Case ID can be obtained using the Create eDiscovery Email Search command. | 31bc*****3a6a |
Search ID | Required | The ID of the eDiscovery search whose results will be purged. Search ID can be obtained using the Create eDiscovery Email Search command. | d572*****da18 |
Purge Type | Optional | The type of purge action. Valid options are:
Soft Delete makes the content recoverable, while Hard Delete permanently removes it. By default, the value is set to Soft Delete. | Hard Delete |
Output
To view the sample output data for all commands, refer to this article.
Error Handling
If the Return Data displays Failed, an Error tab will appear in the Test Result window.
The error tab contains the details responded from D3 SOAR or third-party API calls, including Failure Indicator, Status Code, and Message. This can help locate the root cause of a command failure.
Parts in Error | Description | Example |
Failure Indicator | Indicates the command failure that happened at a specific input and/or API call. | Purge Emails failed. |
Status Code | The response code issued by the third-party API server or the D3 SOAR system that can be used to locate the corresponding error category. For example, if the returned status code is 401, the selected connection is unauthorized to run the command. The user or system support would need to check the permission setting in the Microsoft Purview eDiscovery V2 portal. Refer to the HTTP Status Code Registry for details. | Status Code: 401. |
Message | The raw data or captured key error message from the integration API server about the API request failure. | Message: Unauthorized. |
Error Sample Data Purge Emails failed. Status Code: 401. Message: Unauthorized. |
Test Connection
Allows users to perform a health check on an integration connection. Users can schedule a periodic health check by selecting Connection Health Check when editing an integration connection.
Input
N/A
Output
Output Type | Description | Return Data Type |
Return Data | Indicates one of the possible command execution states: Successful or Failed. The Failed state can be triggered by any of the following errors:
More details about an error can be viewed in the Error tab. | String |
Error Handling
If the Return Data displays Failed, an Error tab will appear in the Test Result window.
The error tab contains the details responded from D3 SOAR or third-party API calls, including Failure Indicator, Status Code, and Message. This can help locate the root cause of a command failure.
Parts in Error | Description | Example |
Failure Indicator | Indicates the command failure that happened at a specific input and/or API call. | Test Connection failed. Failed to check the connector. |
Status Code | The response code issued by the third-party API server or the D3 SOAR system that can be used to locate the corresponding error category. For example, if the returned status code is 401, the selected connection is unauthorized to run the command. The user or system support would need to check the permission setting in the Microsoft Purview eDiscovery V2 portal. Refer to the HTTP Status Code Registry for details. | Status Code: 401. |
Message | The raw data or captured key error message from the integration API server about the API request failure. | Message: AA*****15: Invalid client secret provided. Ensure the secret being sent in the request is the client secret value, not the client secret ID, for a secret added to app '9ba0*****2d36'. Trace ID: 5738*****3300 Correlation ID: 9747*****f39e Timestamp: 2025-09-26 21:51:46Z. |
Error Sample Data Test Connection failed. Failed to check the connector. Status Code: 401. Message: Message: AA*****15: Invalid client secret provided. Ensure the secret being sent in the request is the client secret value, not the client secret ID, for a secret added to app '9ba0*****2d36'. Trace ID: 5738*****3300 Correlation ID: 9747*****f39e Timestamp: 2025-09-26 21:51:46Z. |