
Docker
LAST UPDATED: APR 11, 2025
Overview
Docker allows developers to easily pack, ship, and run any application as a lightweight, portable, self-sufficient container.
D3 SOAR is providing REST operations to function with Docker.
Docker is available for use in:
D3 SOAR | V14.0.57.0+ |
Category | ITSM |
Deployment Options |
Known Limitations
When you issue a pull request and you are over the limit for your account type, Docker Hub will return a 429 response code with the following body when the manifest is requested:
You have reached your pull rate limit. You may increase the limit by authenticating and upgrading: https://www.docker.com/increase-rate-limits
Limits | Anonymous Usage | Free Account | Docker Pro | Team Account |
Image pull rate limit | 100 container image requests per six hours per IP address | 200 container image requests per six hours | Up to 5,000 pulls in a 24 hour period | Up to 5,000 pulls in a 24 hour period |
Please refer to Download rate limit and Understanding Docker Hub Rate Limiting for detailed information.
Connection
To connect Docker from D3 SOAR, please follow this part to collect the required information below:
Parameter | Description | Example |
Default | ||
Docker Server Address | The IP address with the port number of the remote docker server. | 192.****:2375 |
Remote Registry Type | The provider of remote container registry to login. | Azure Container Registry (ACR) |
If you choose Azure Container Registry (ACR) of Remote Registry Type, input parameters will be Username, Password, and Registry URI. | ||
Username | The username for remote registry authentication. The username is set when creating a registry in the Azure portal. | D3**** |
Password | The password for remote registry authentication. The password is set when creating a registry in the Azure portal. | m2D*****WSm |
Registry URI | The URI of Azure Container Registry. You can find the registry URI from the portal of the container registry provider. Format: username.azurecr.io | d3****.****.io |
If you choose Google Container Registry (GCR) of Remote Registry Type, input parameters will be Service Account JSON and Registry URI. | ||
Service Account JSON | The content of the service account JSON file. Regarding how to get the service account JSON file, please refer to Using OAuth 2.0 for Server to Server Applications | Google Identity. | { "type": "****", "project_id": "****", "private_key_id": "****", "private_key":”****”, "client_email": "****, "client_id": "****", "auth_uri": "****", "token_uri": "****", "auth_provider_x509_cert_url": "****, "client_x509_cert_url": "****" } |
Registry URI | The URI of Google Container Registry. You can find the registry URI from the portal of the container registry provider. Format: gcr.io/PROJECT-ID | gcr.io/****-****-**** |
Permission Requirement
Each endpoint in the Docker API requires a certain permission scope. The following scopes are required scopes for each command in this integration:
Command | Required Permission | |
Push Docker Image | ACR | GCR |
AcrPush Role: Microsoft.ContainerRegistry/registries/pull/read Microsoft.ContainerRegistry/registries/push/write | Storage Legacy Bucket Writer Role: storage.buckets.get storage.multipartUploads.abort storage.multipartUploads.create storage.multipartUploads.list storage.multipartUploads.listParts storage.objects.create storage.objects.delete storage.objects.list | |
READER NOTE
The execution of the remaining commands, Test Connection, Build Docker, Build Docker Image From Text, List Docker Images, does not need Remote Registry which means those commands have no dedicated permission requirement but the correct Docker server address.
Configuring Docker to Work with D3 SOAR
Docker installation on the remote server or the local server is required.
Configuring Azure Container Registry (ACR)
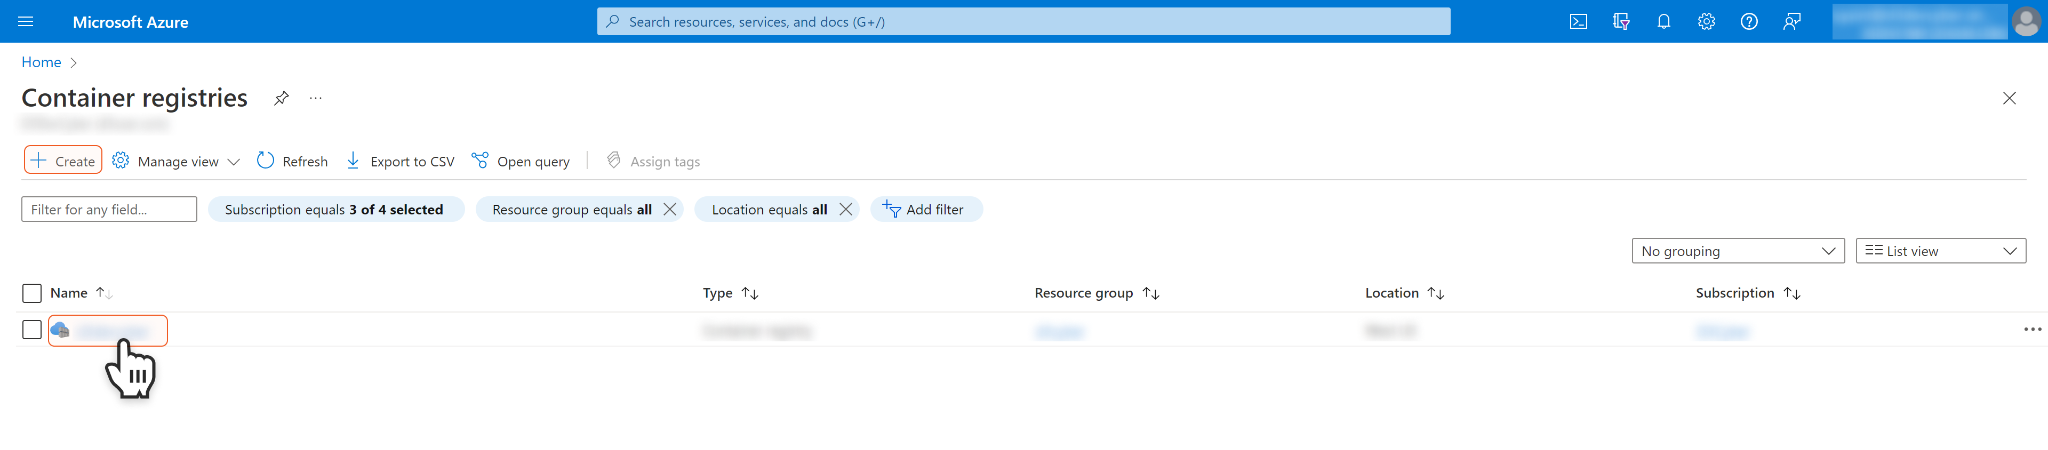
Open Microsoft Azure Portal and sign in. Select Container registries.

Create or select a registry.
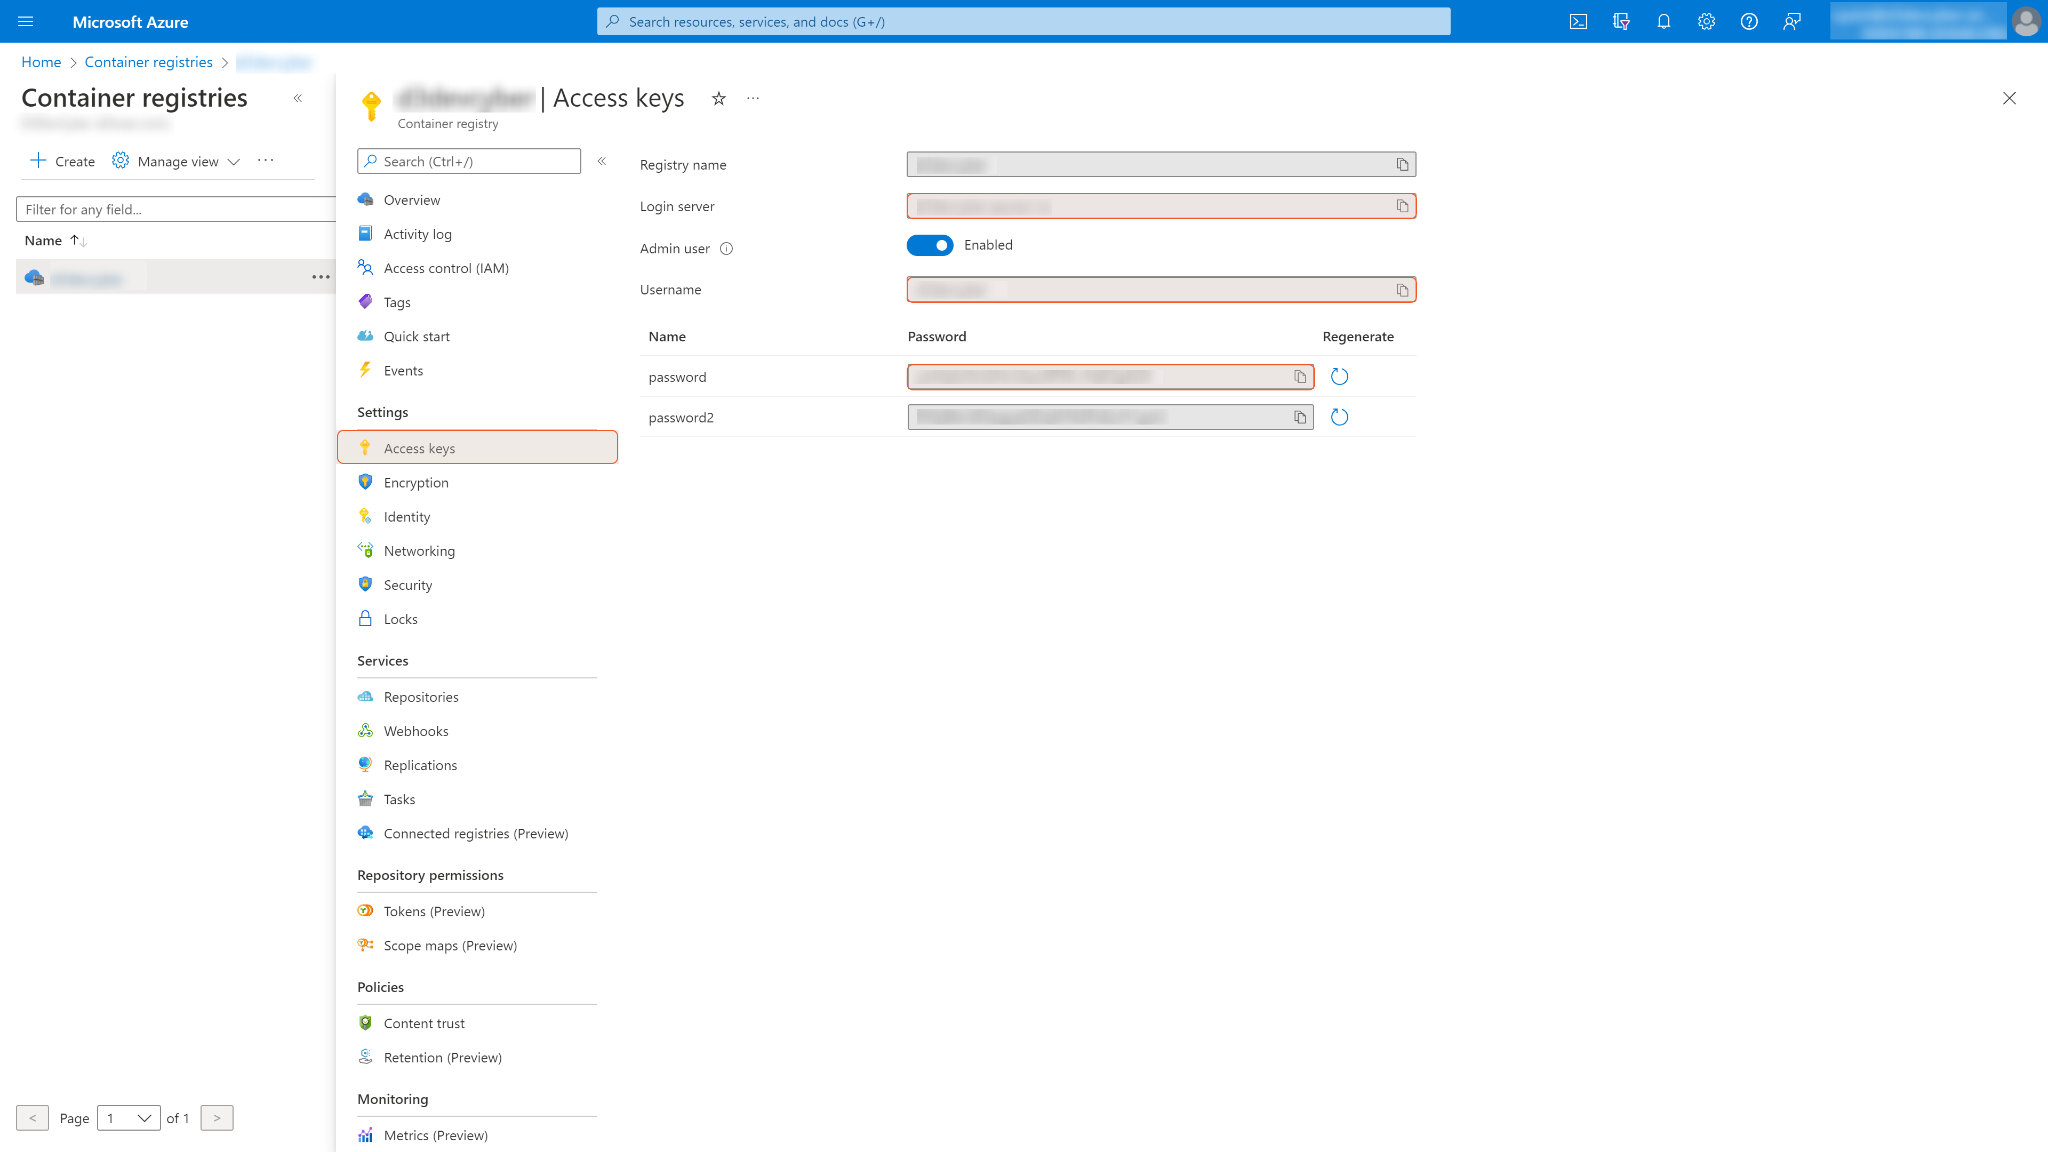
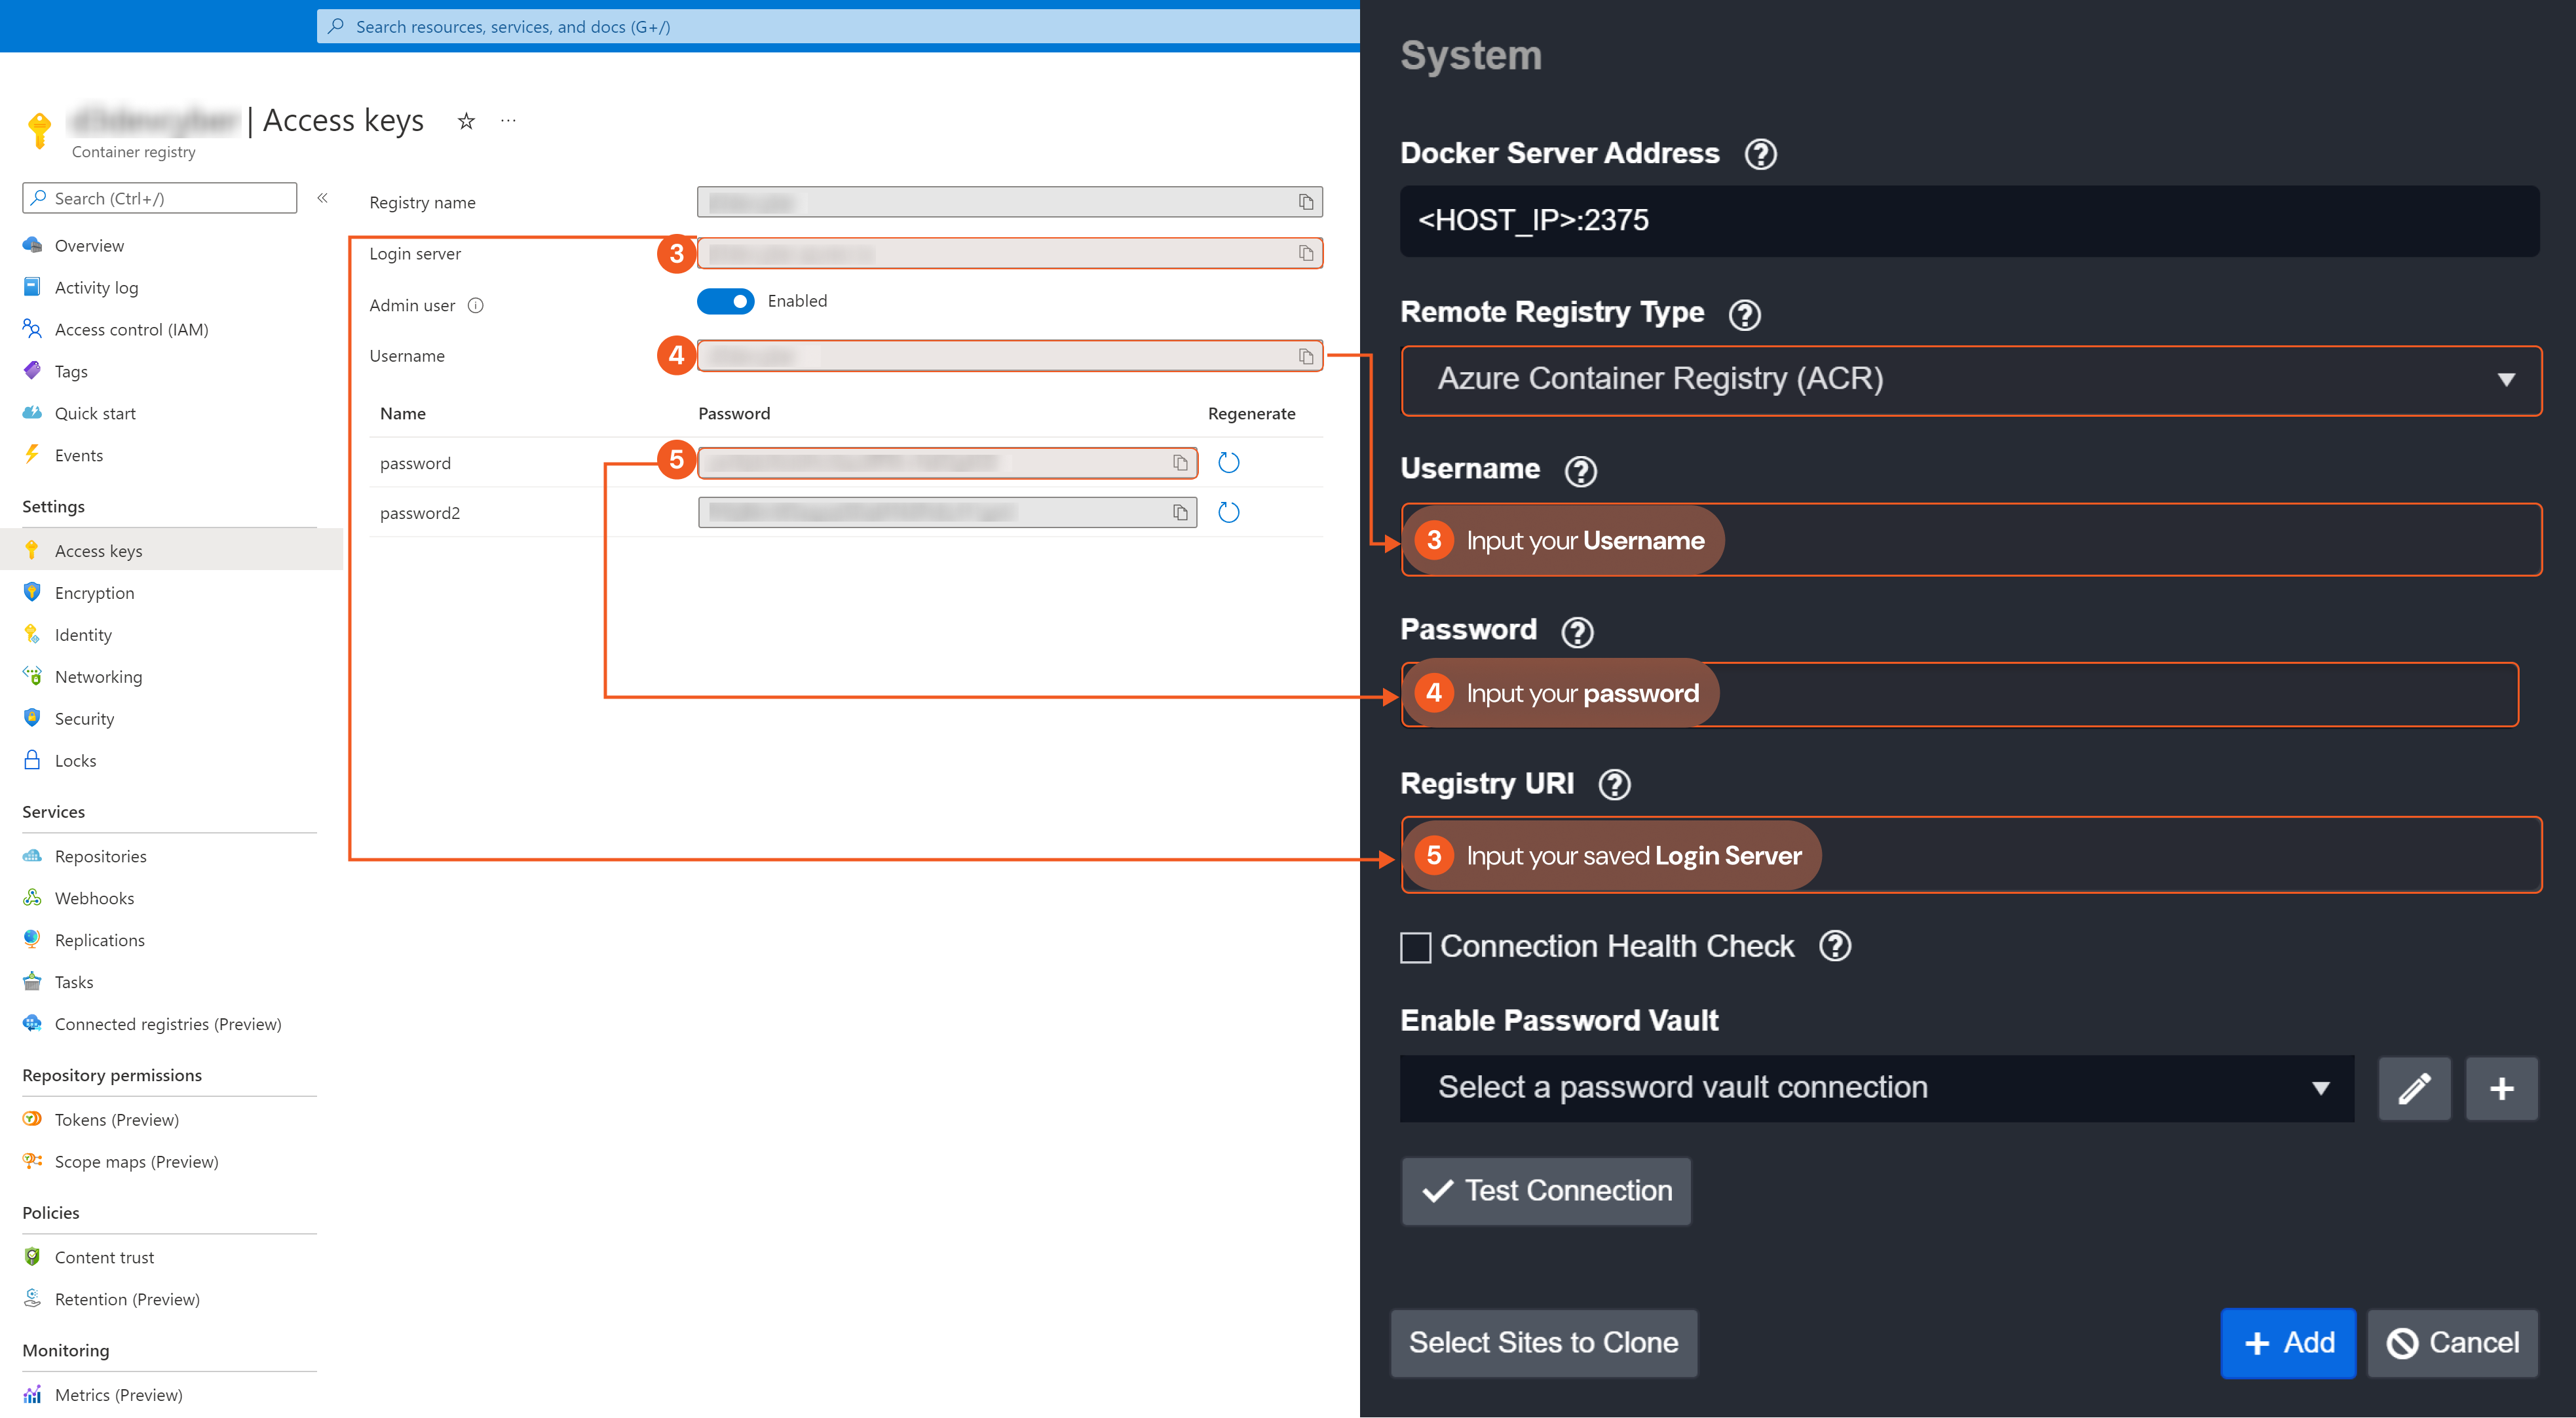
Under your selected registry, click Access keys. You will see the Login server, Username, and Password fields on the right.
Configuring Google Container Registry (GCR)
To connect with Google Container Registry, we need to get the Service Account JSON and Registry URI.
Step 1: Follow the Obtaining the Service Account JSON section to obtain the Service Account JSON file.
Step 2: The registry URI format is: gcr.io/PROJECT-ID. Follow the Obtaining the Project ID section to obtain the registry URI.
Obtaining the Service Account JSON
In order to connect Google Kubernetes Engine with D3 SOAR, we need to configure the Service Account JSON file. Log in to the Google Cloud Platform(GCP) console with admin credentials.
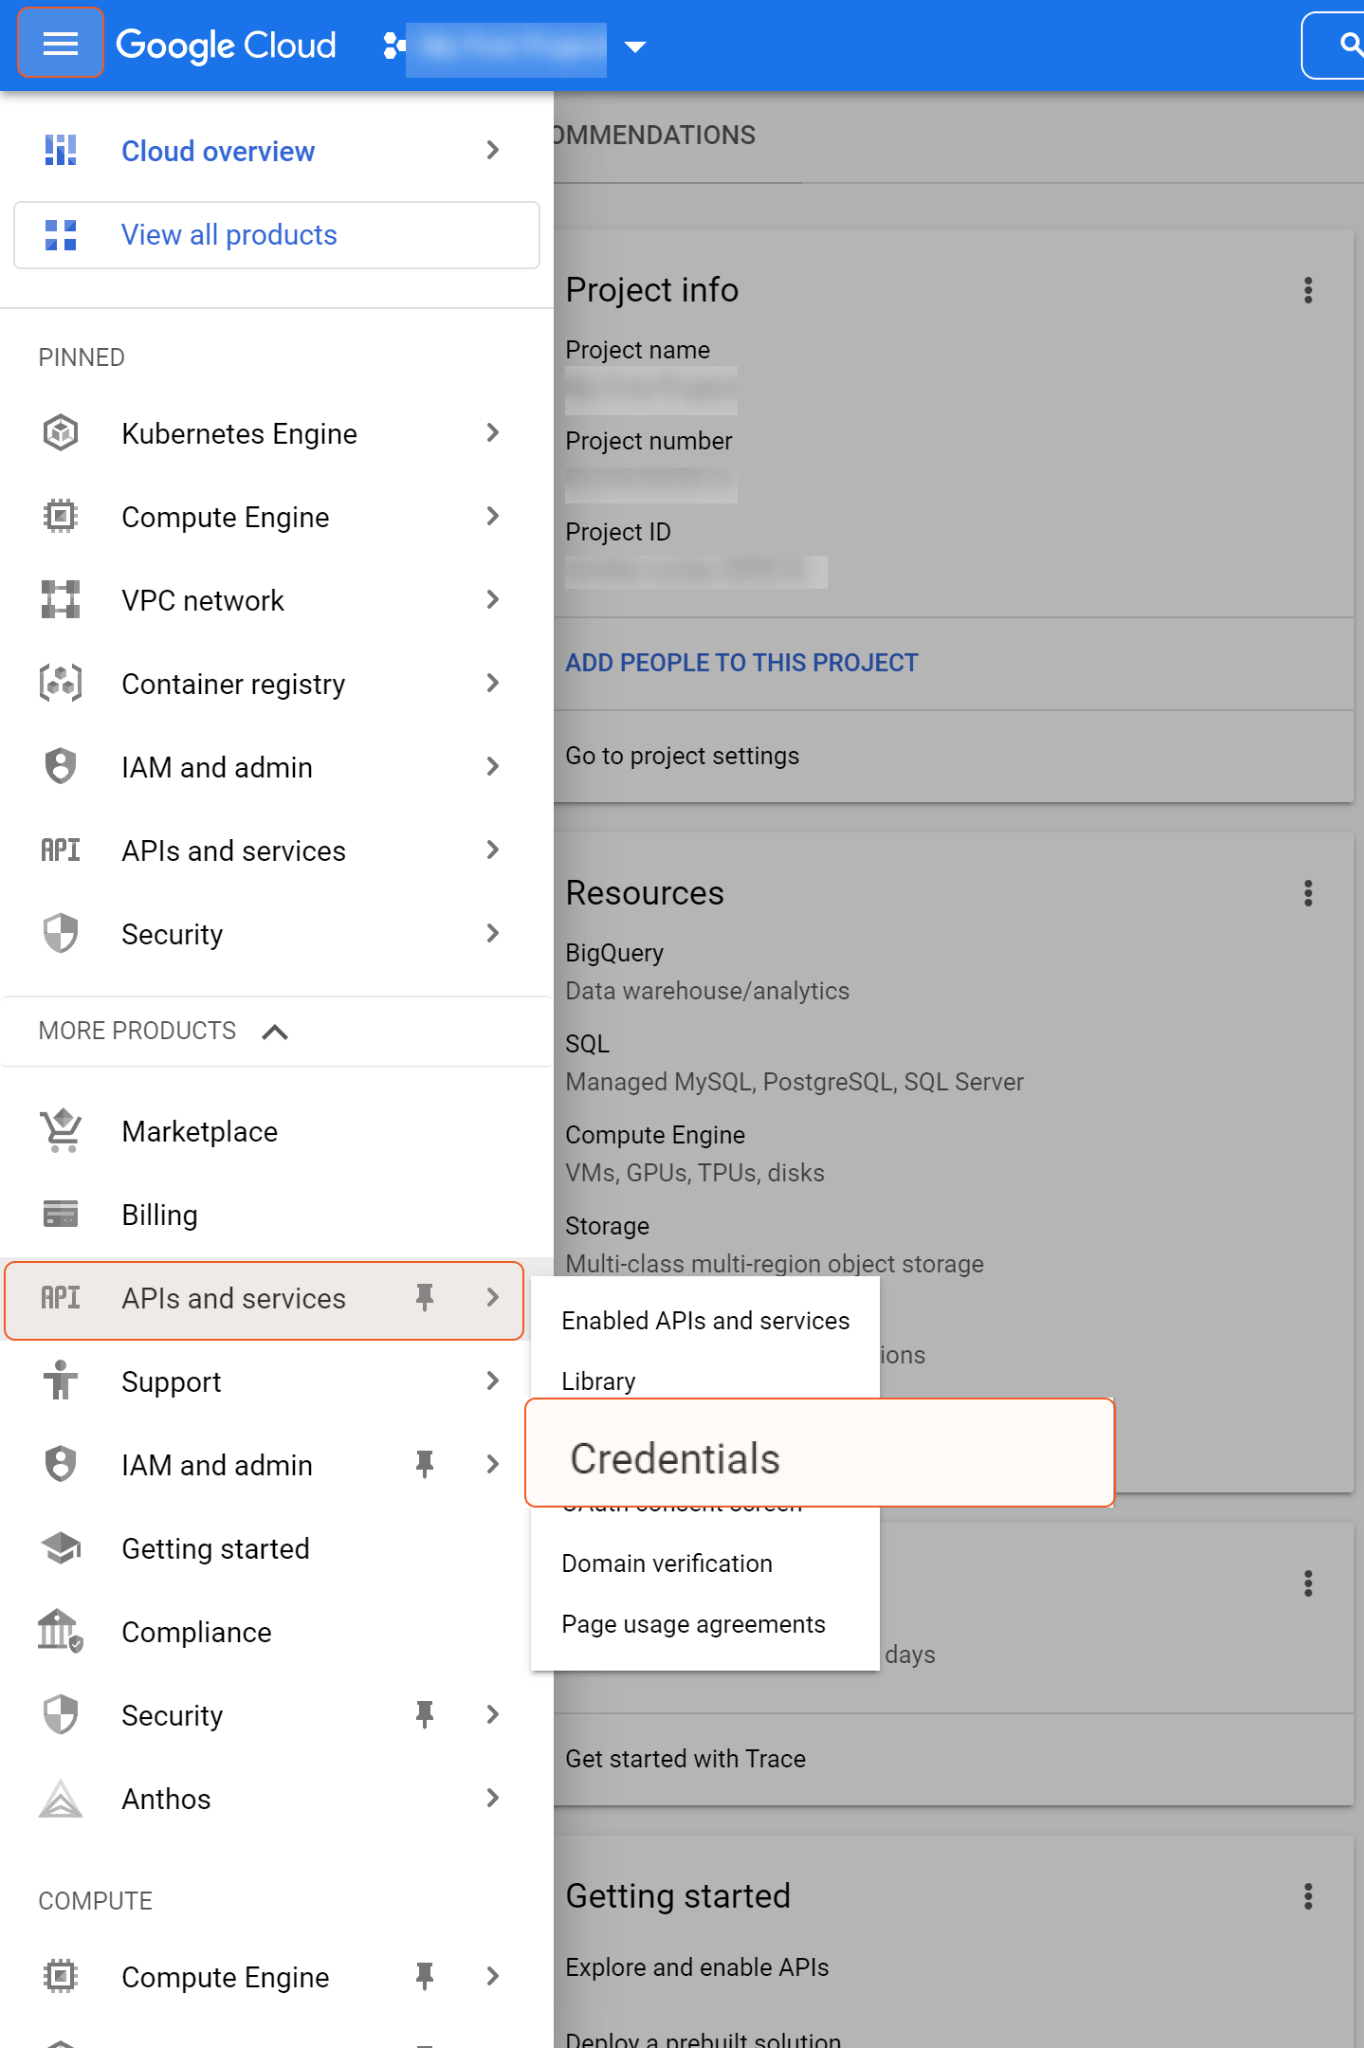
Click the Hamburger Menu in the top left corner to reveal the sidebar menu. Navigate to APIs and services, in its submenu, select Credentials.
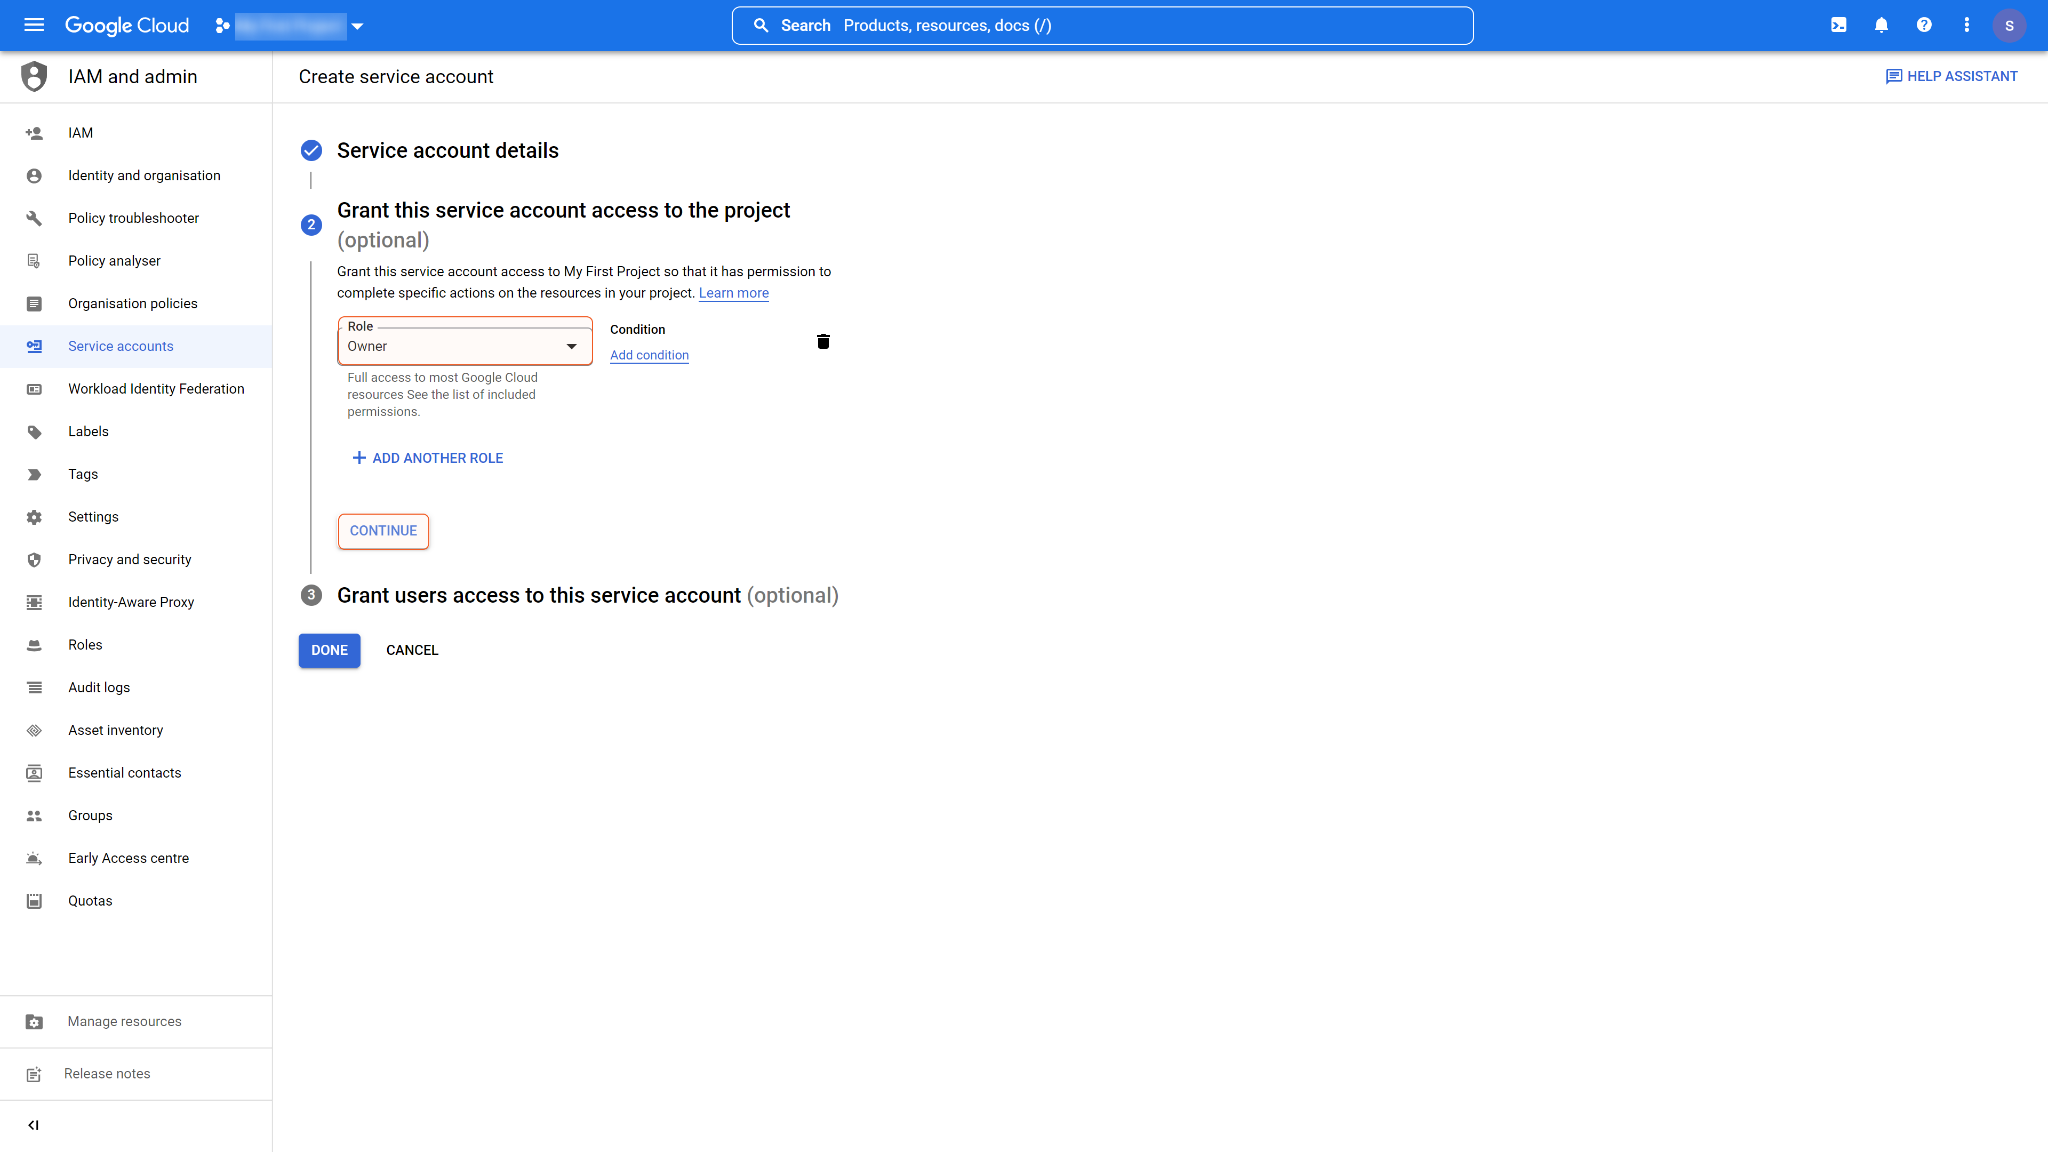
Click + CREATE CREDENTIALS, and select Service account.

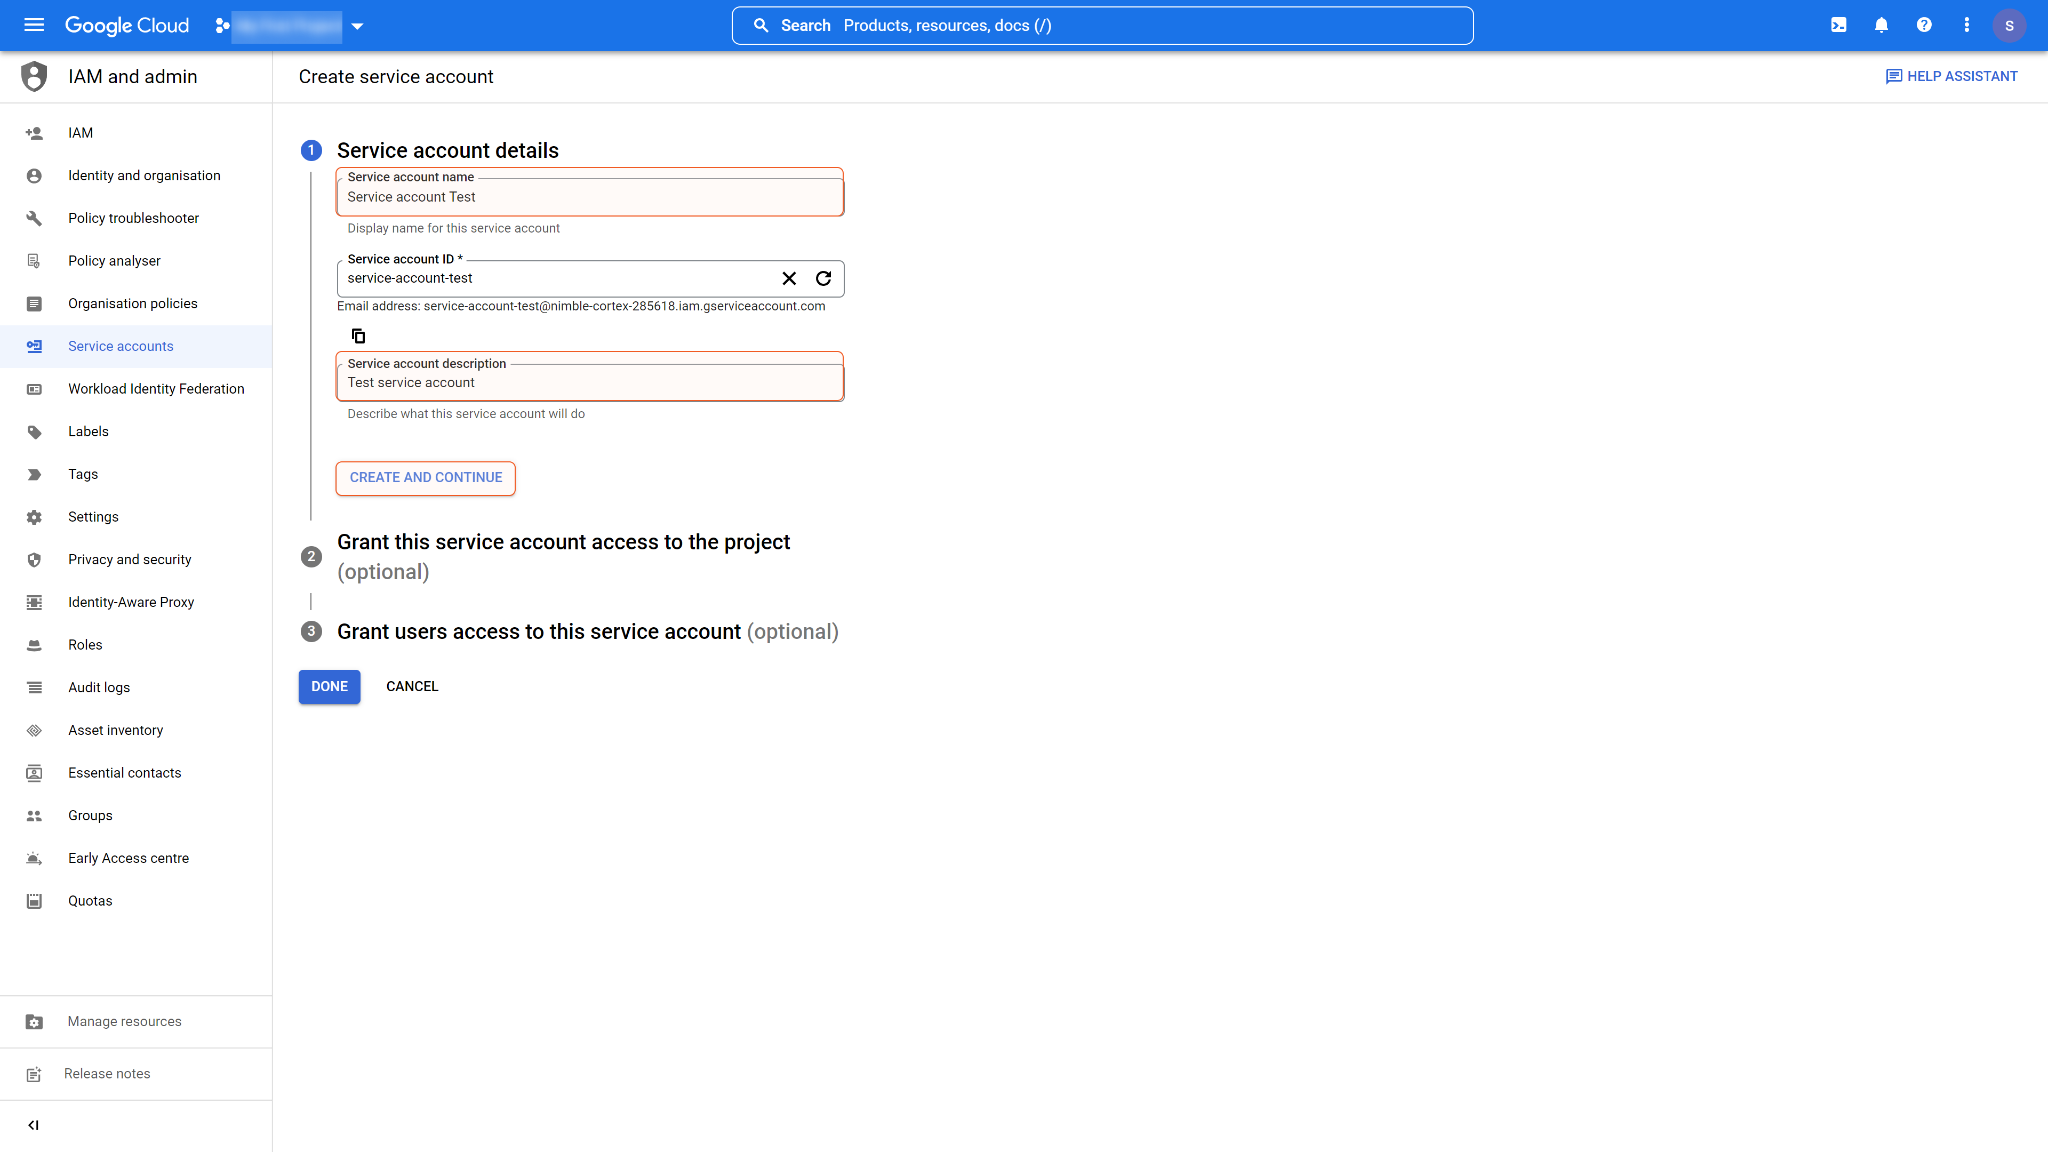
Input the Service account name and description, and click CREATE AND CONTINUE.
Assign a role to the service account, such as owner, then click CONTINUE.
READER NOTE
You can narrow down the service account’s access permissions by assigning the following roles according to your request:
Kubernetes Engine Admin
Kubernetes Engine Cluster Admin
Kubernetes Engine Cluster Viewer,
Kubernetes Engine Developer
Kubernetes Engine Host Service Agent User
Kubernetes Engine Viewer
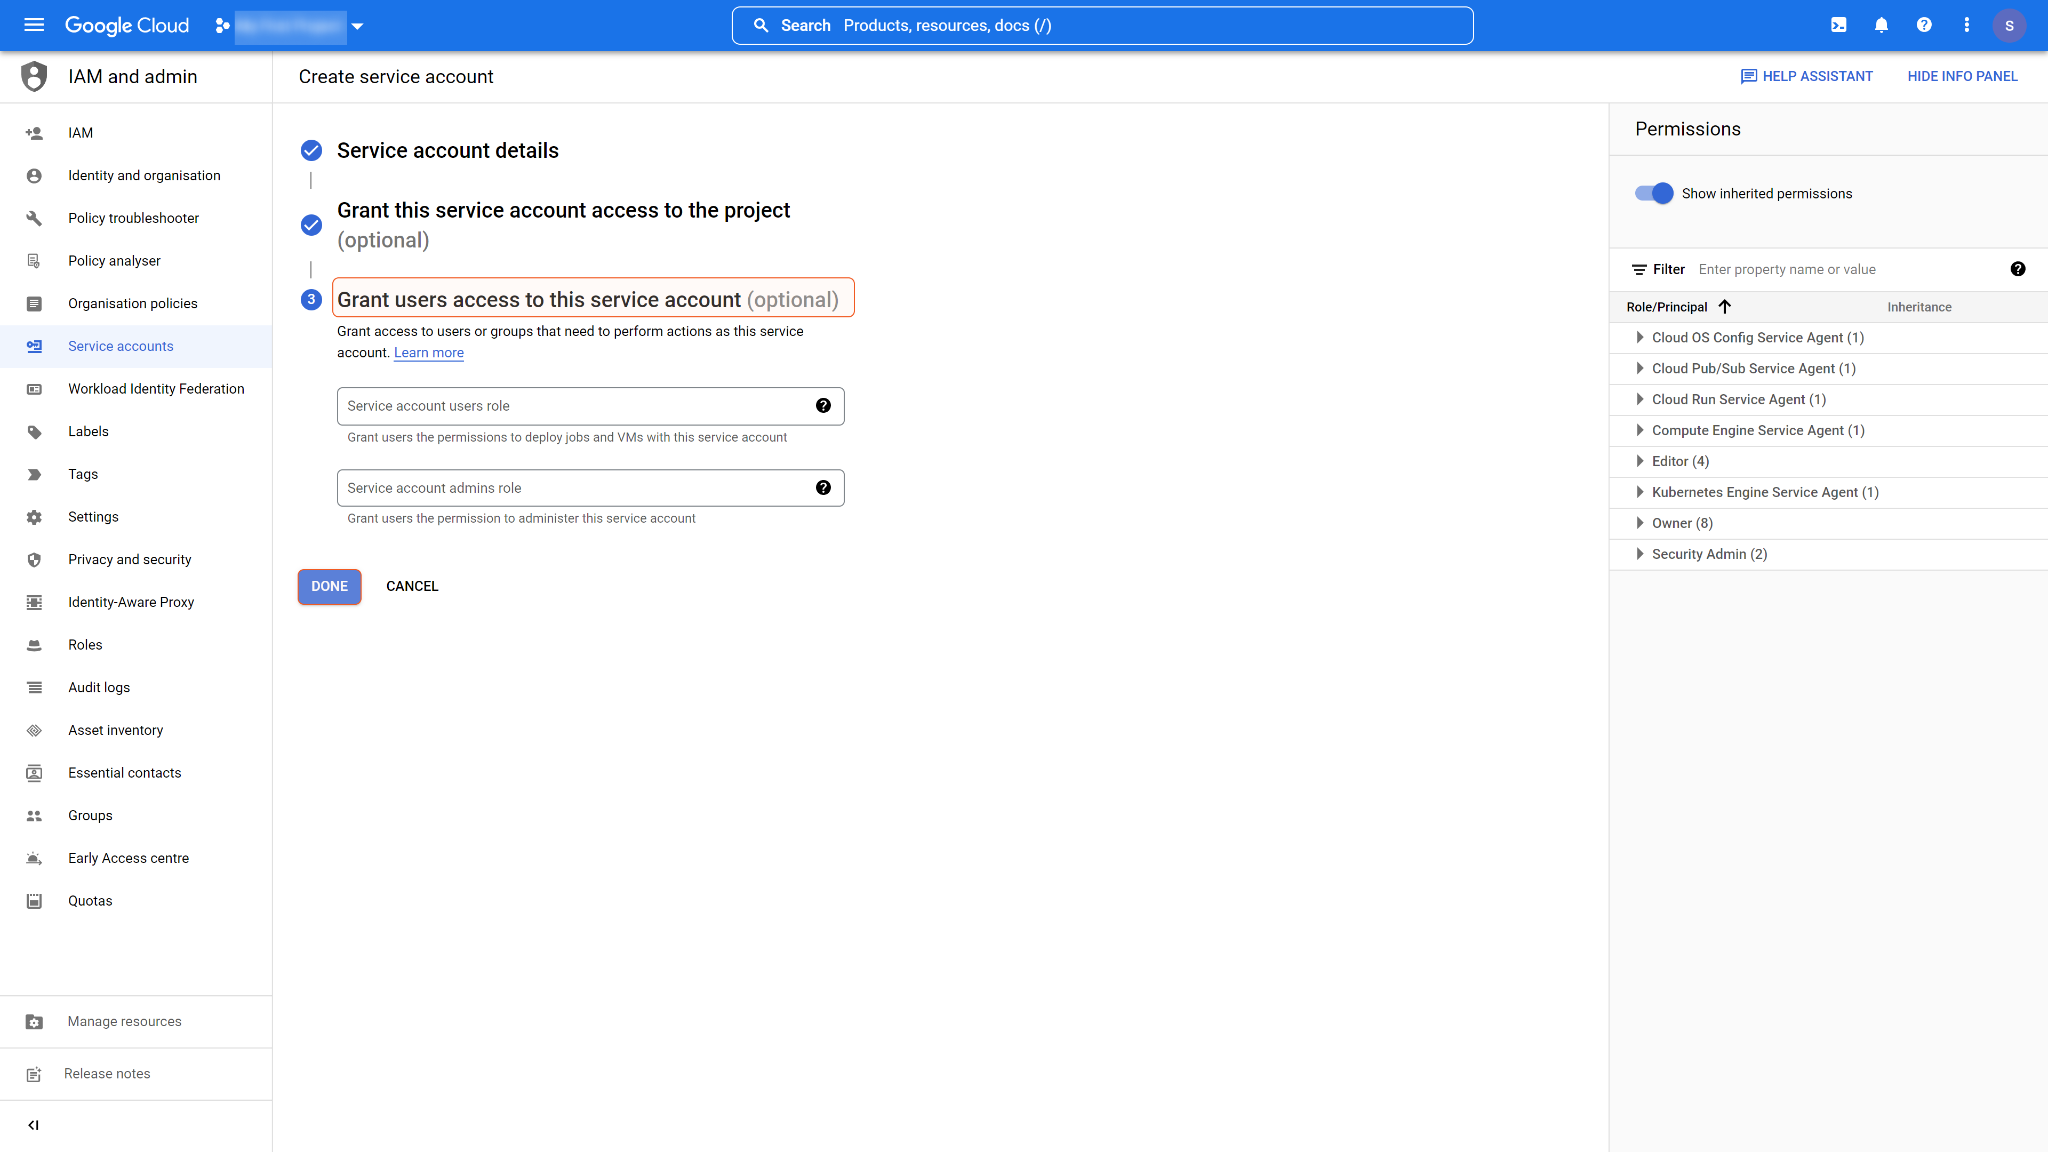
You can opt to grant users access to this service account. Click DONE to confirm your configurations.
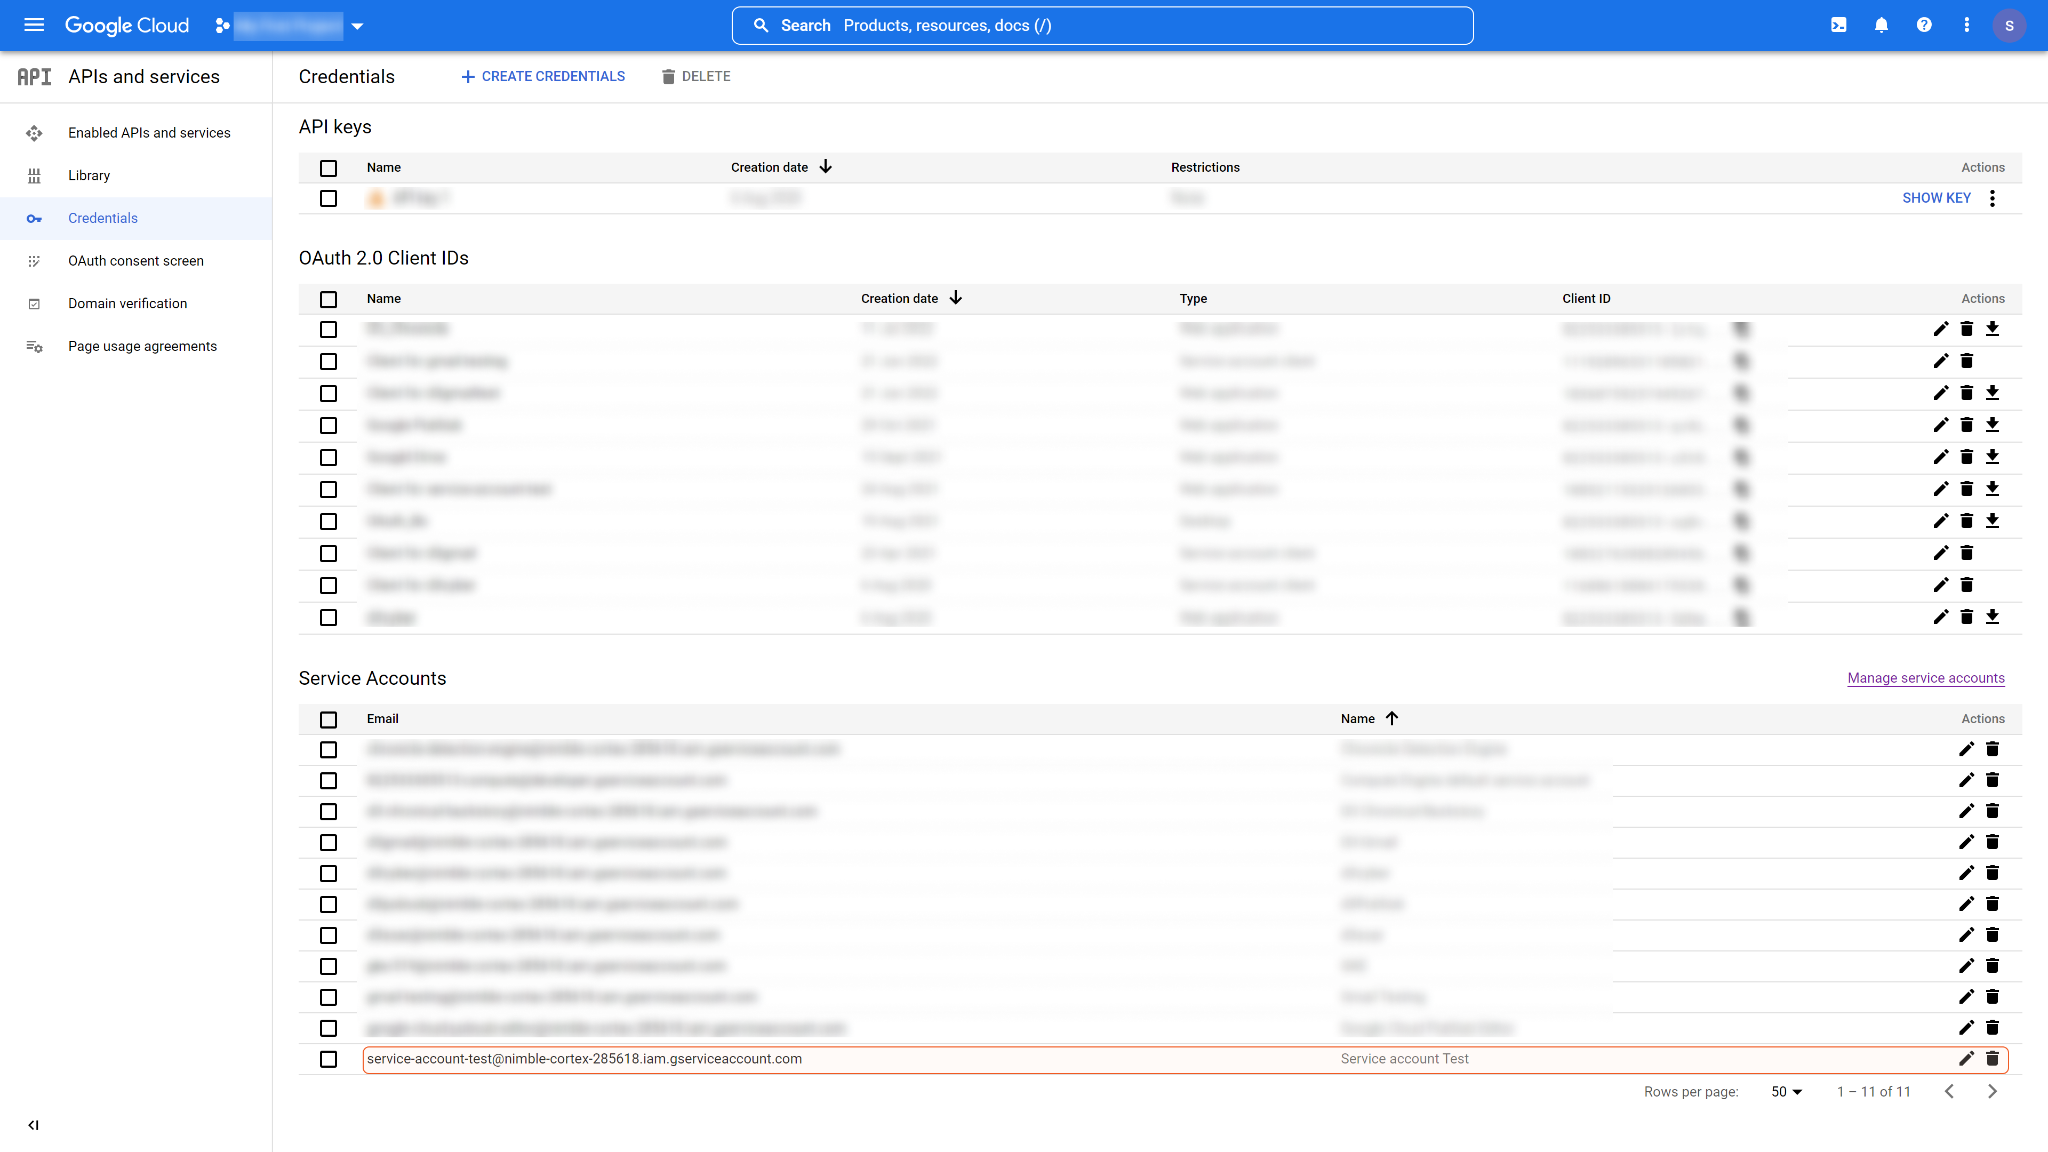
You will find the service account you have just created on the credentials page. Click and open the service account.
In the KEYS tab, click ADD KEY, then select Create new key.
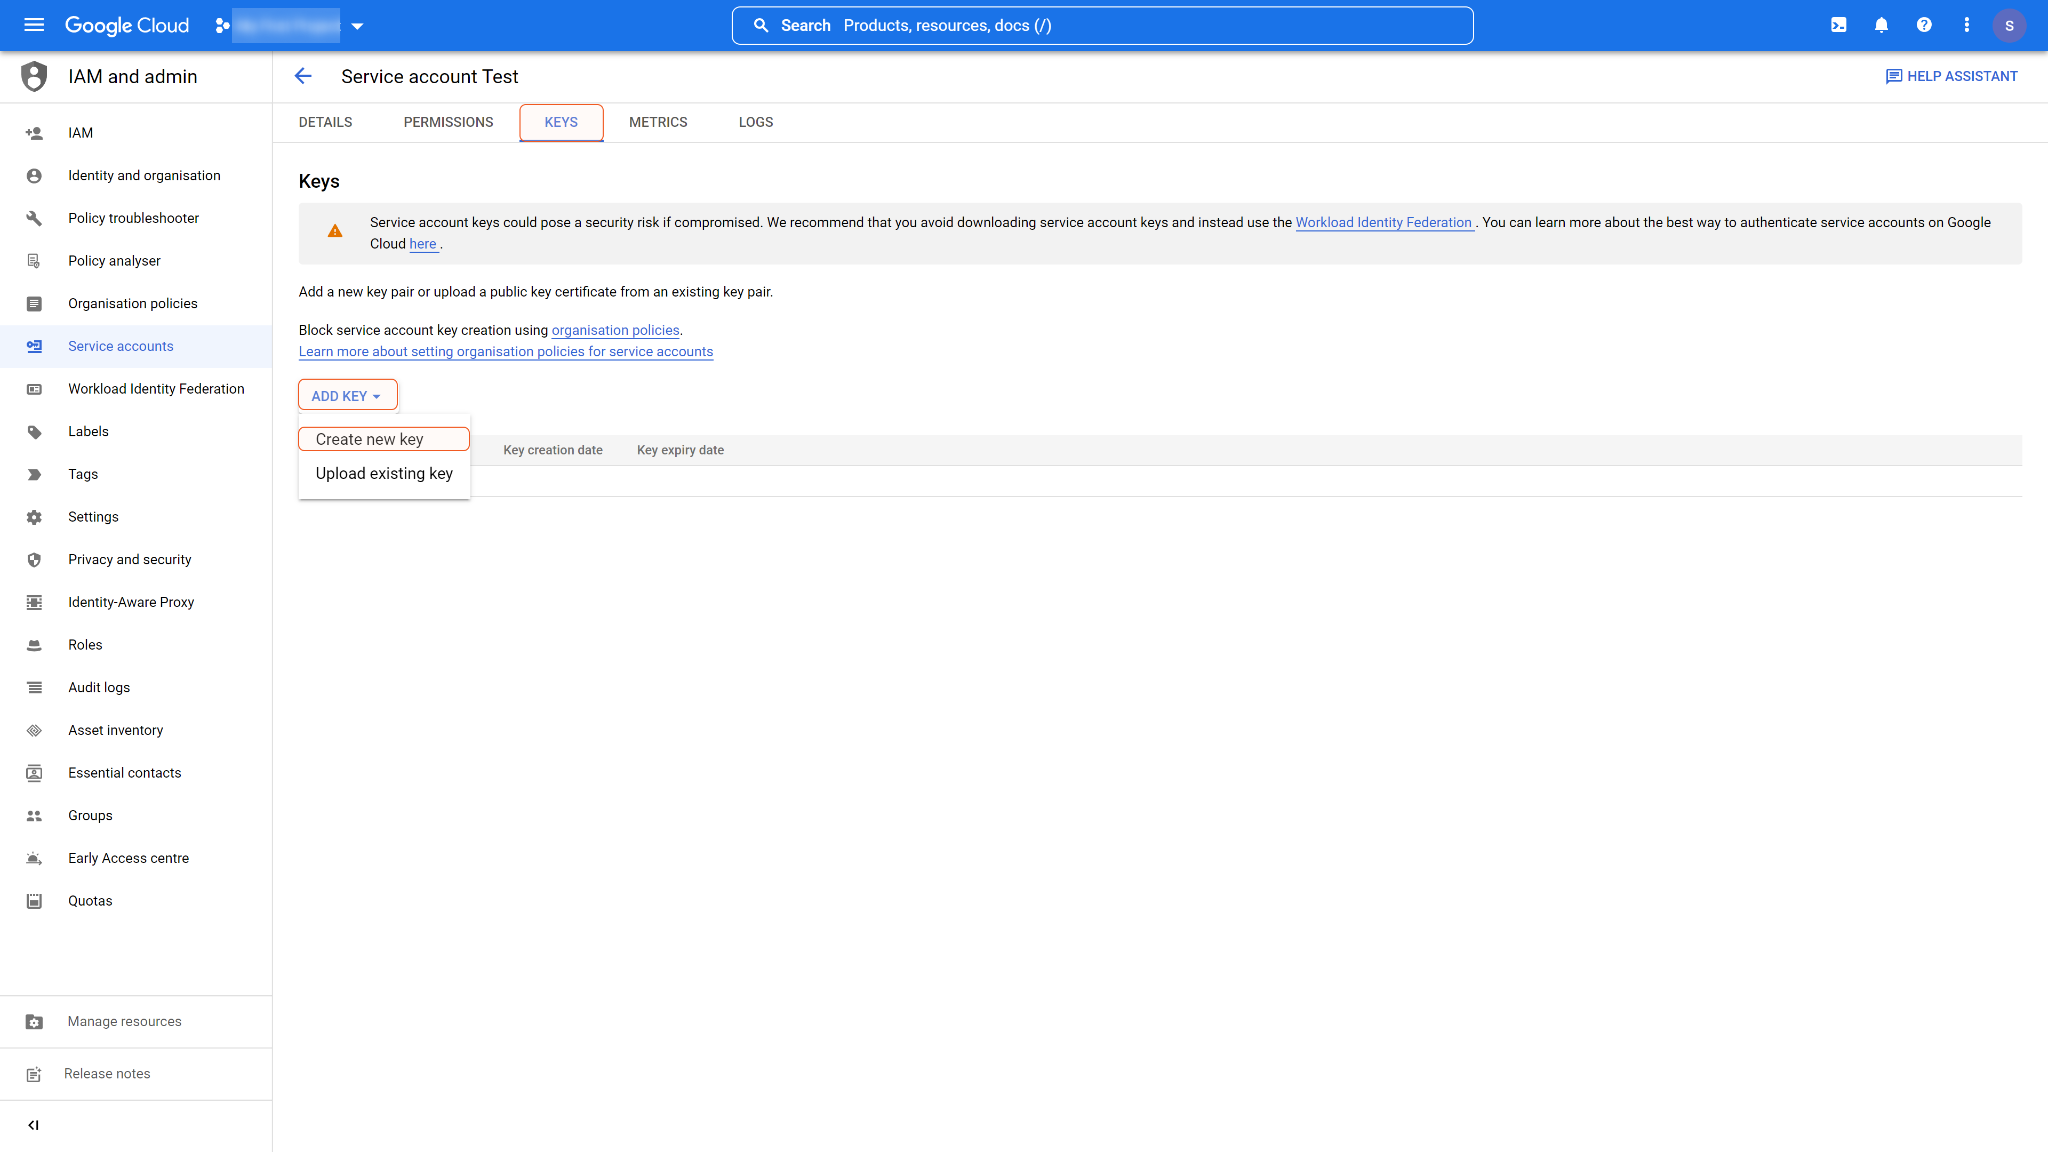
Choose JSON as the key type, then click CREATE.
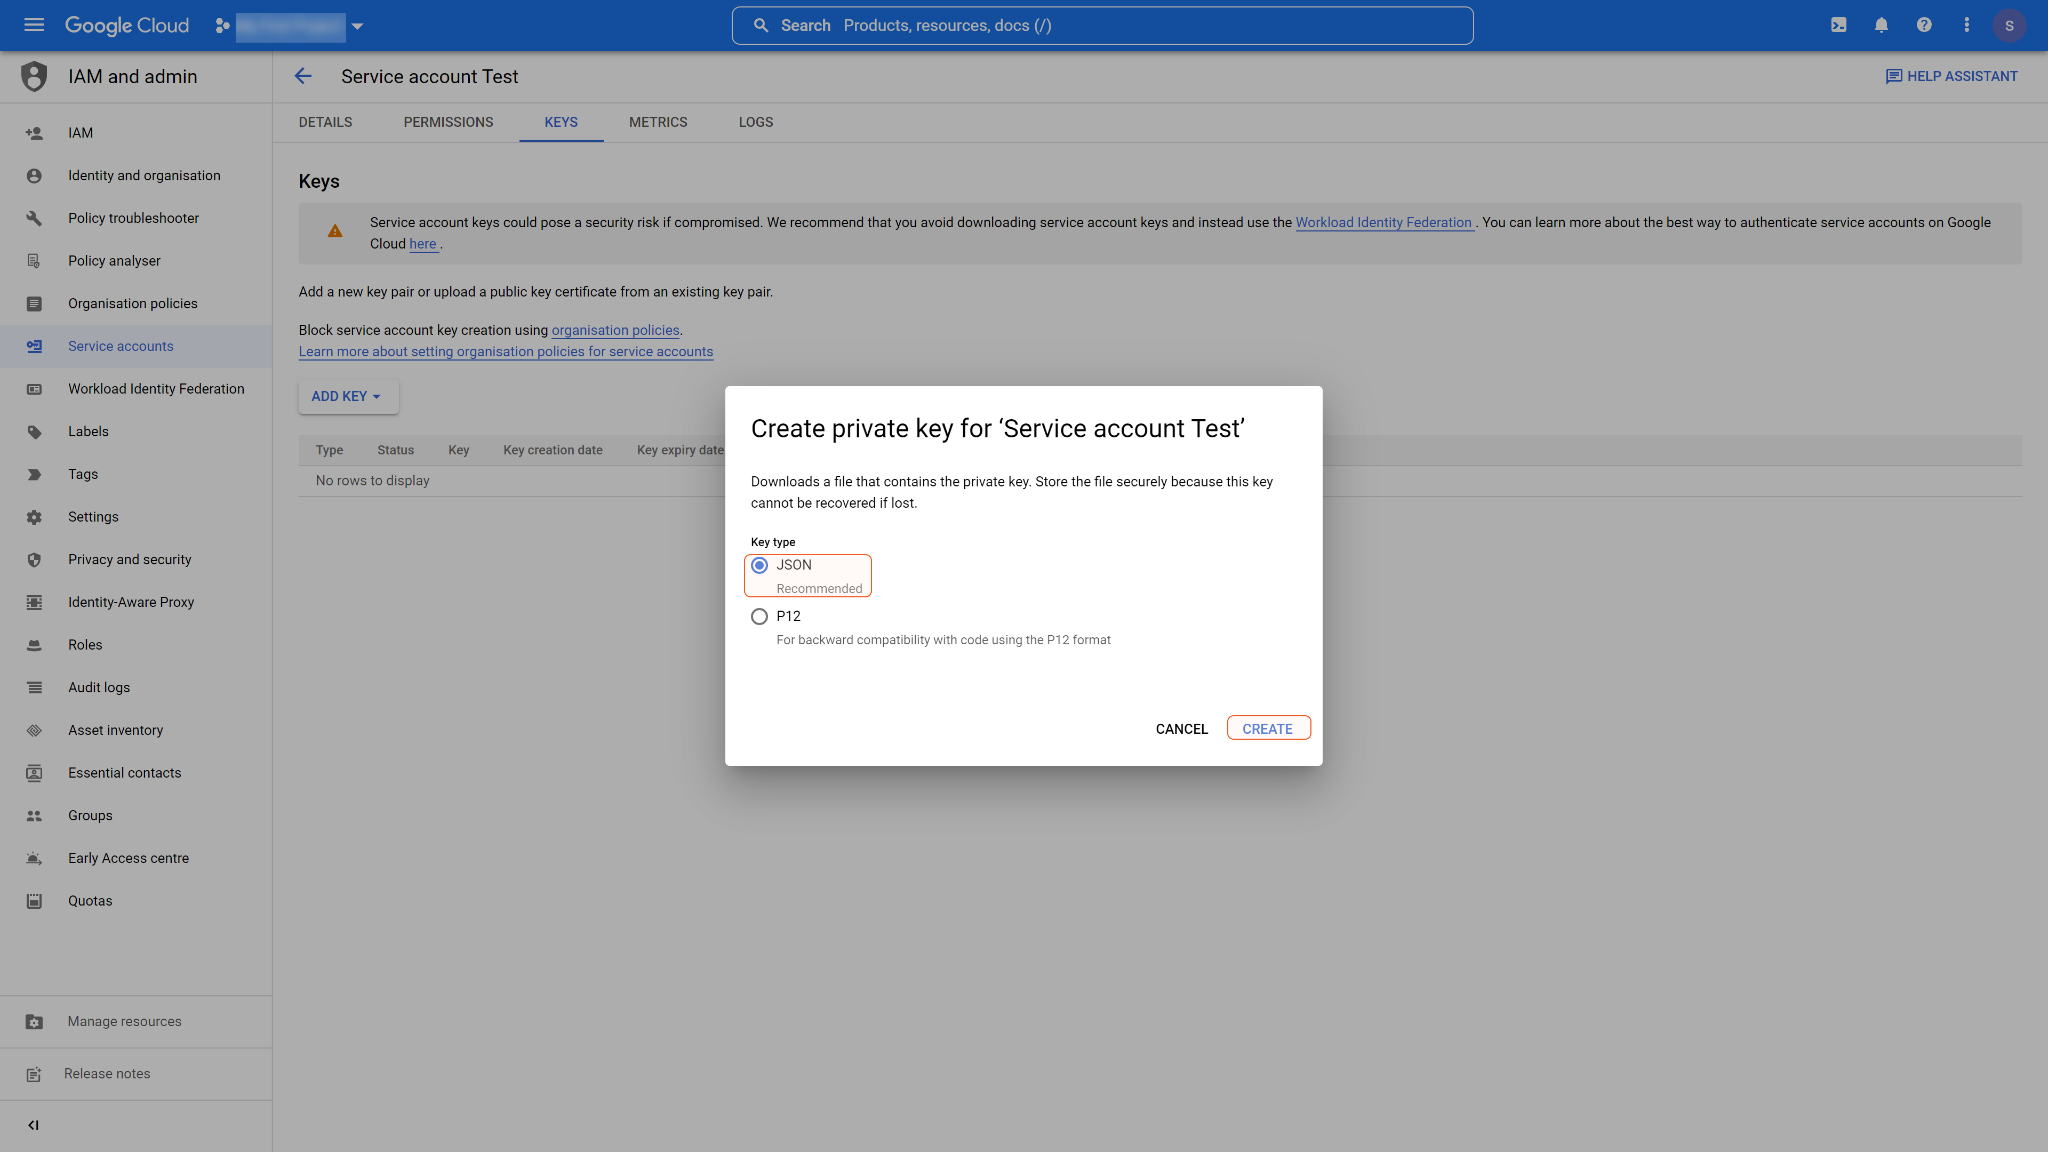
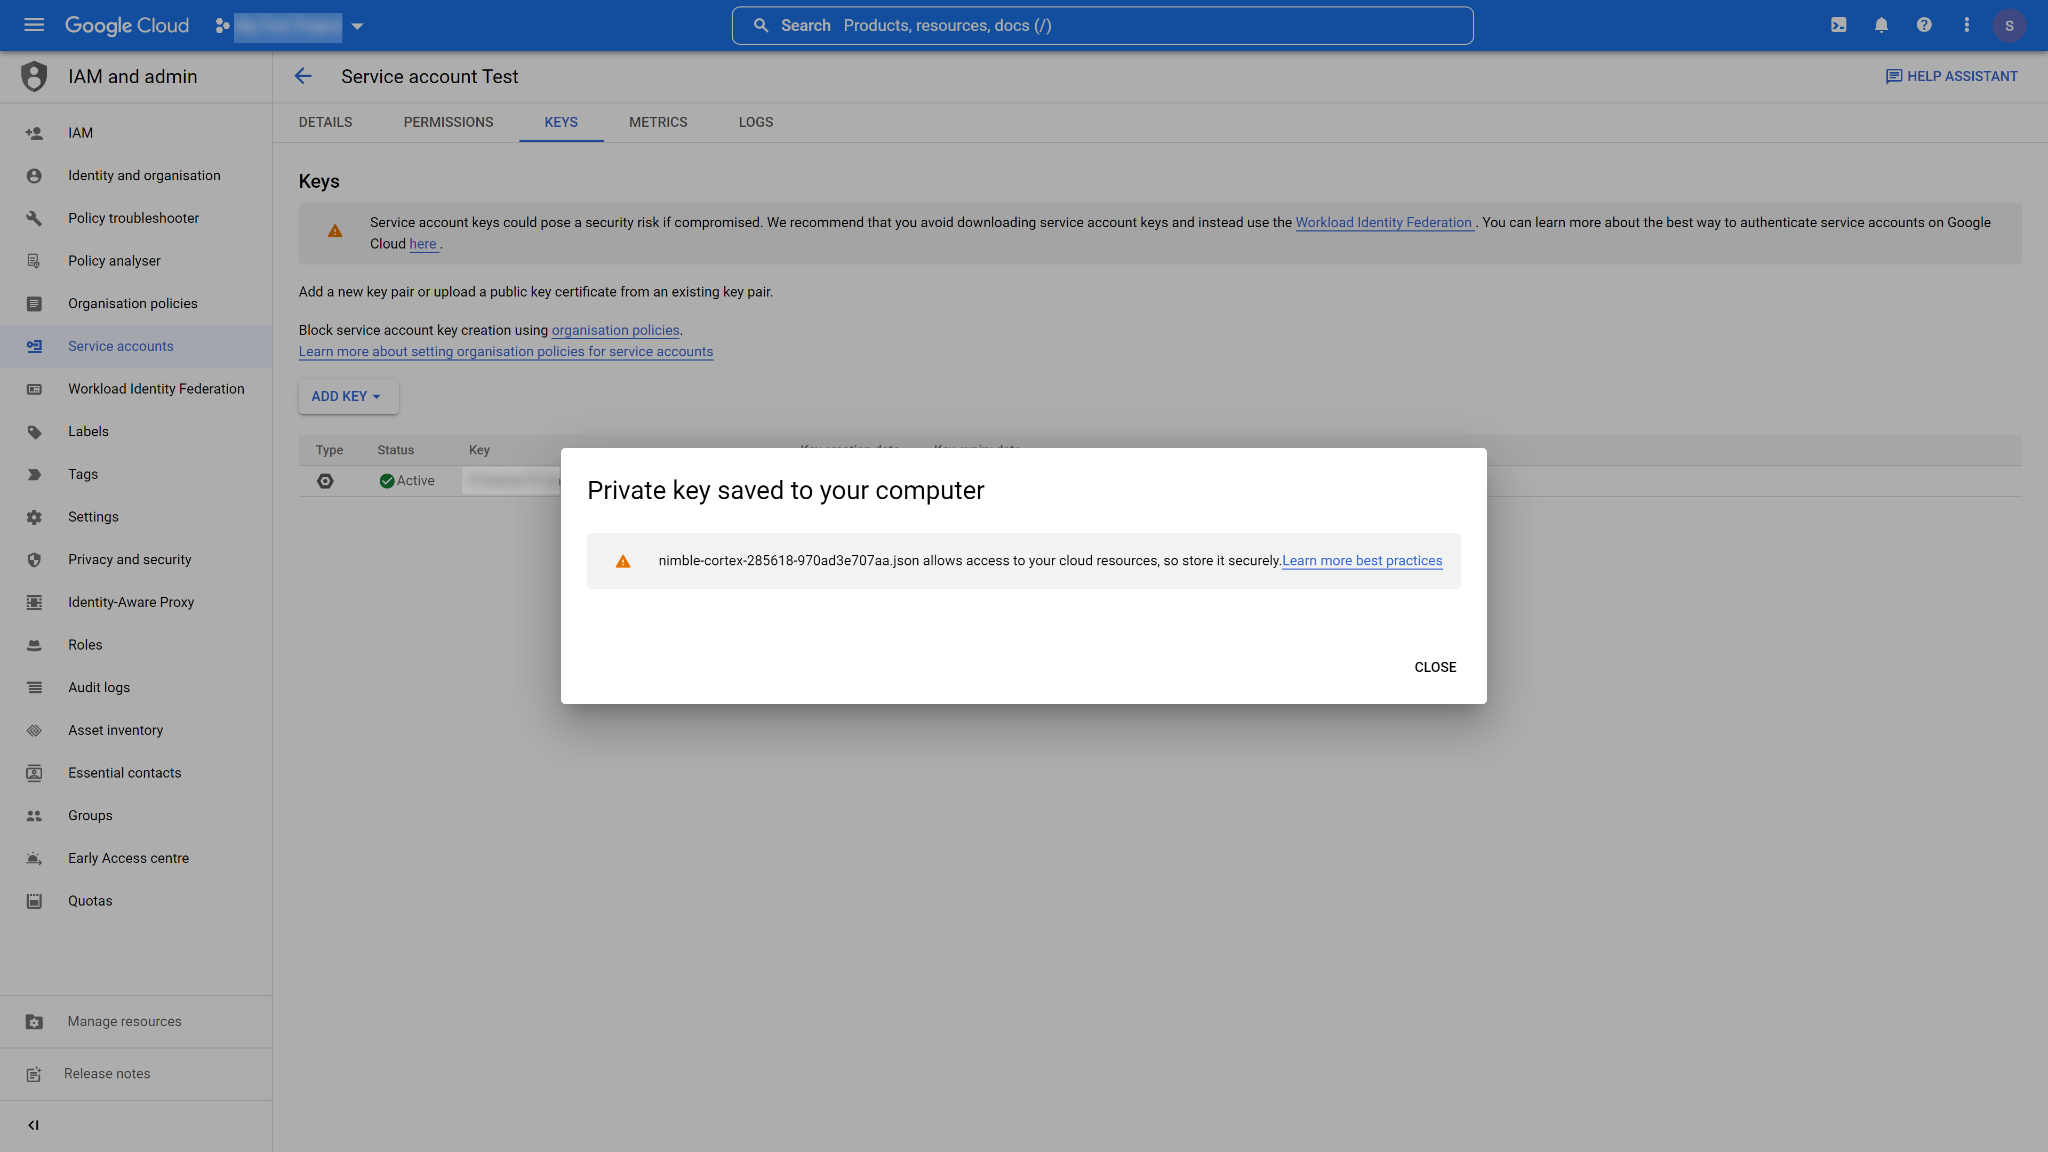
The Service Account JSON file (Private key) will be downloaded to your computer automatically.
READER NOTE
Please refer to Using OAuth 2.0 for Server to Server Applications | Google Identity for more details.
Configuring the Service Account Domain-wide Delegation
You also need to enable Google Workspace domain-wide delegation for your created service account, please follow the steps below.
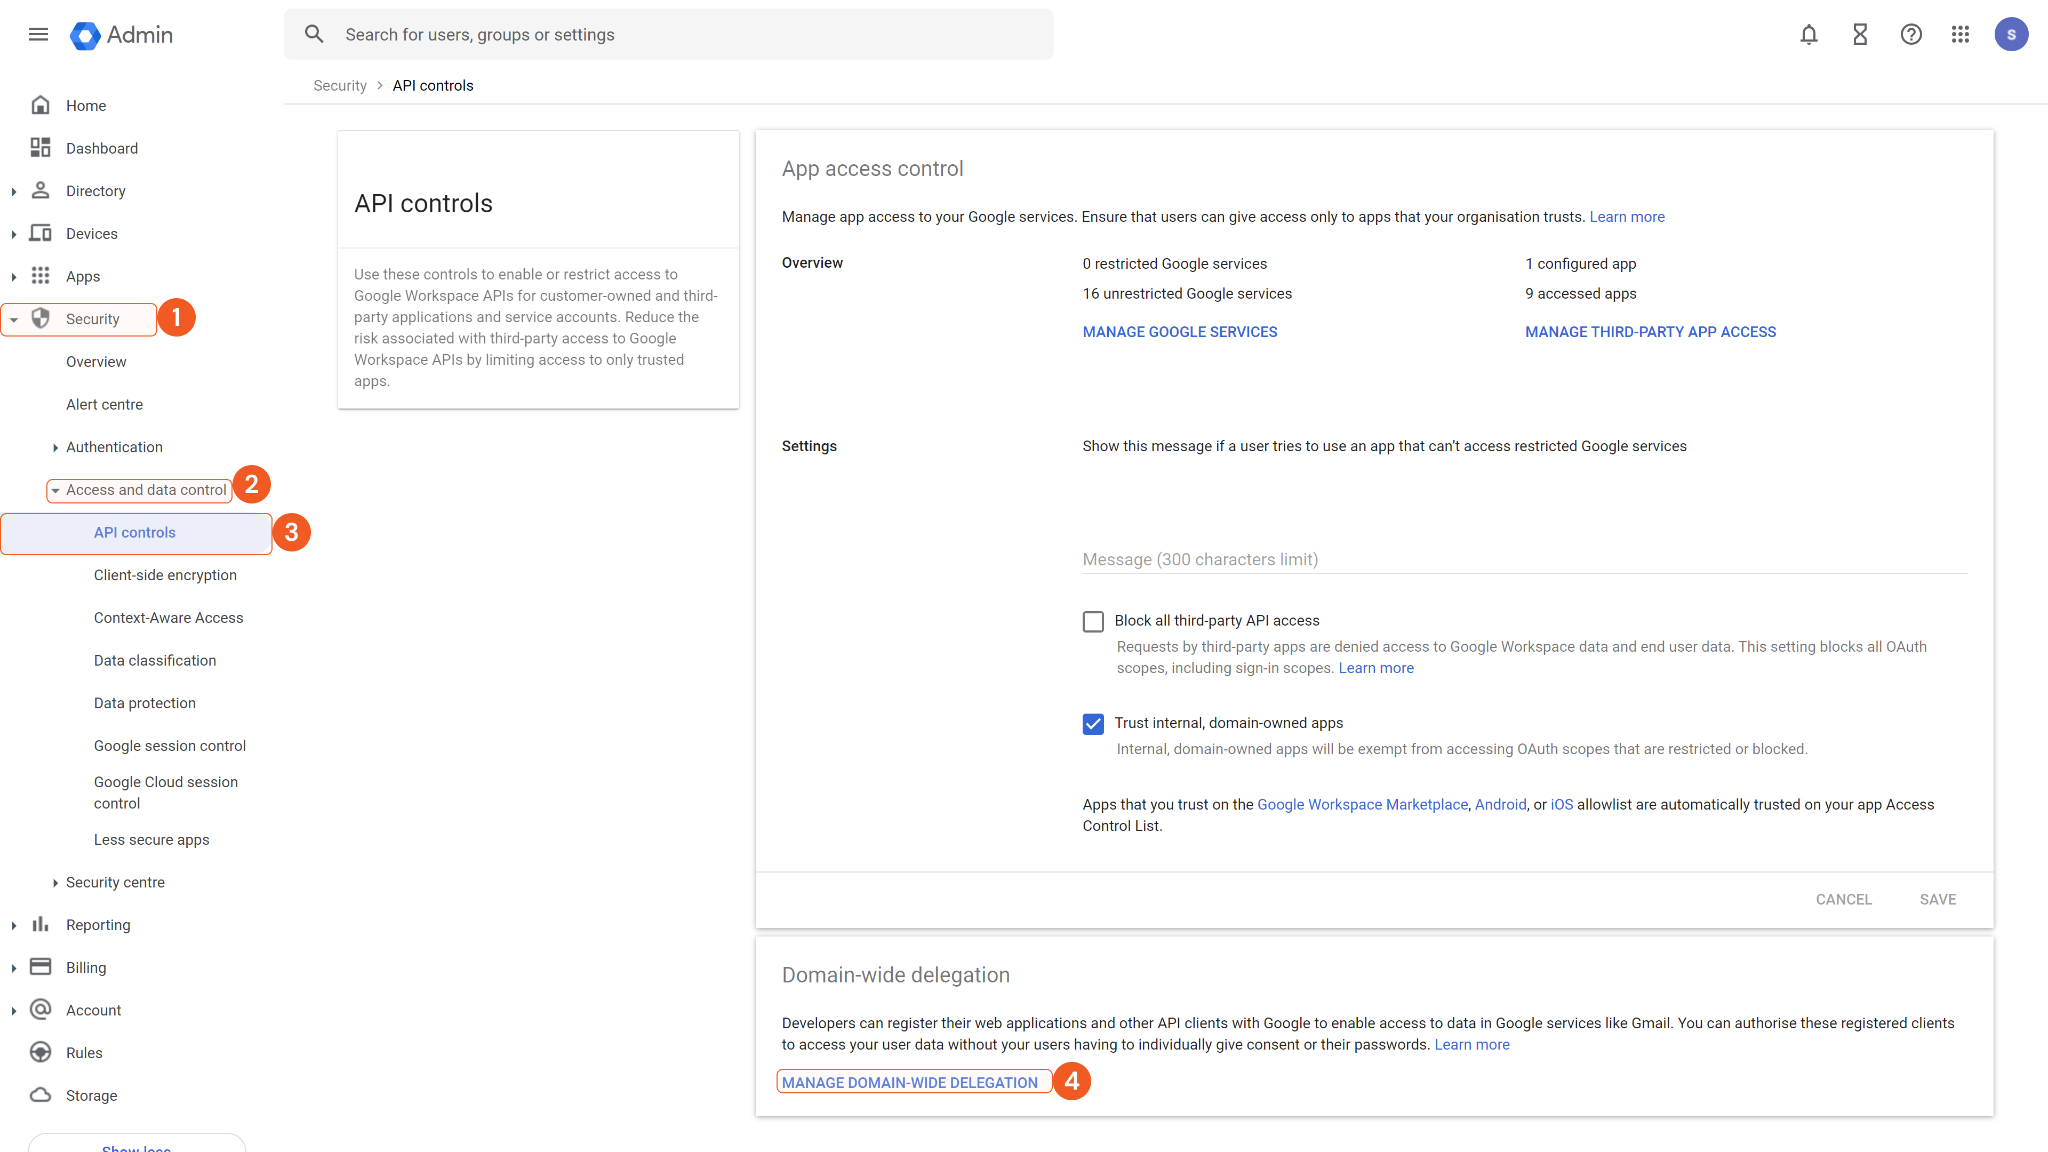
Login Google Workspace Admin Console with admin credentials. Click Security > Access and data control > API controls. Scroll down and click MANAGE DOMAIN-WIDE DELEGATION.
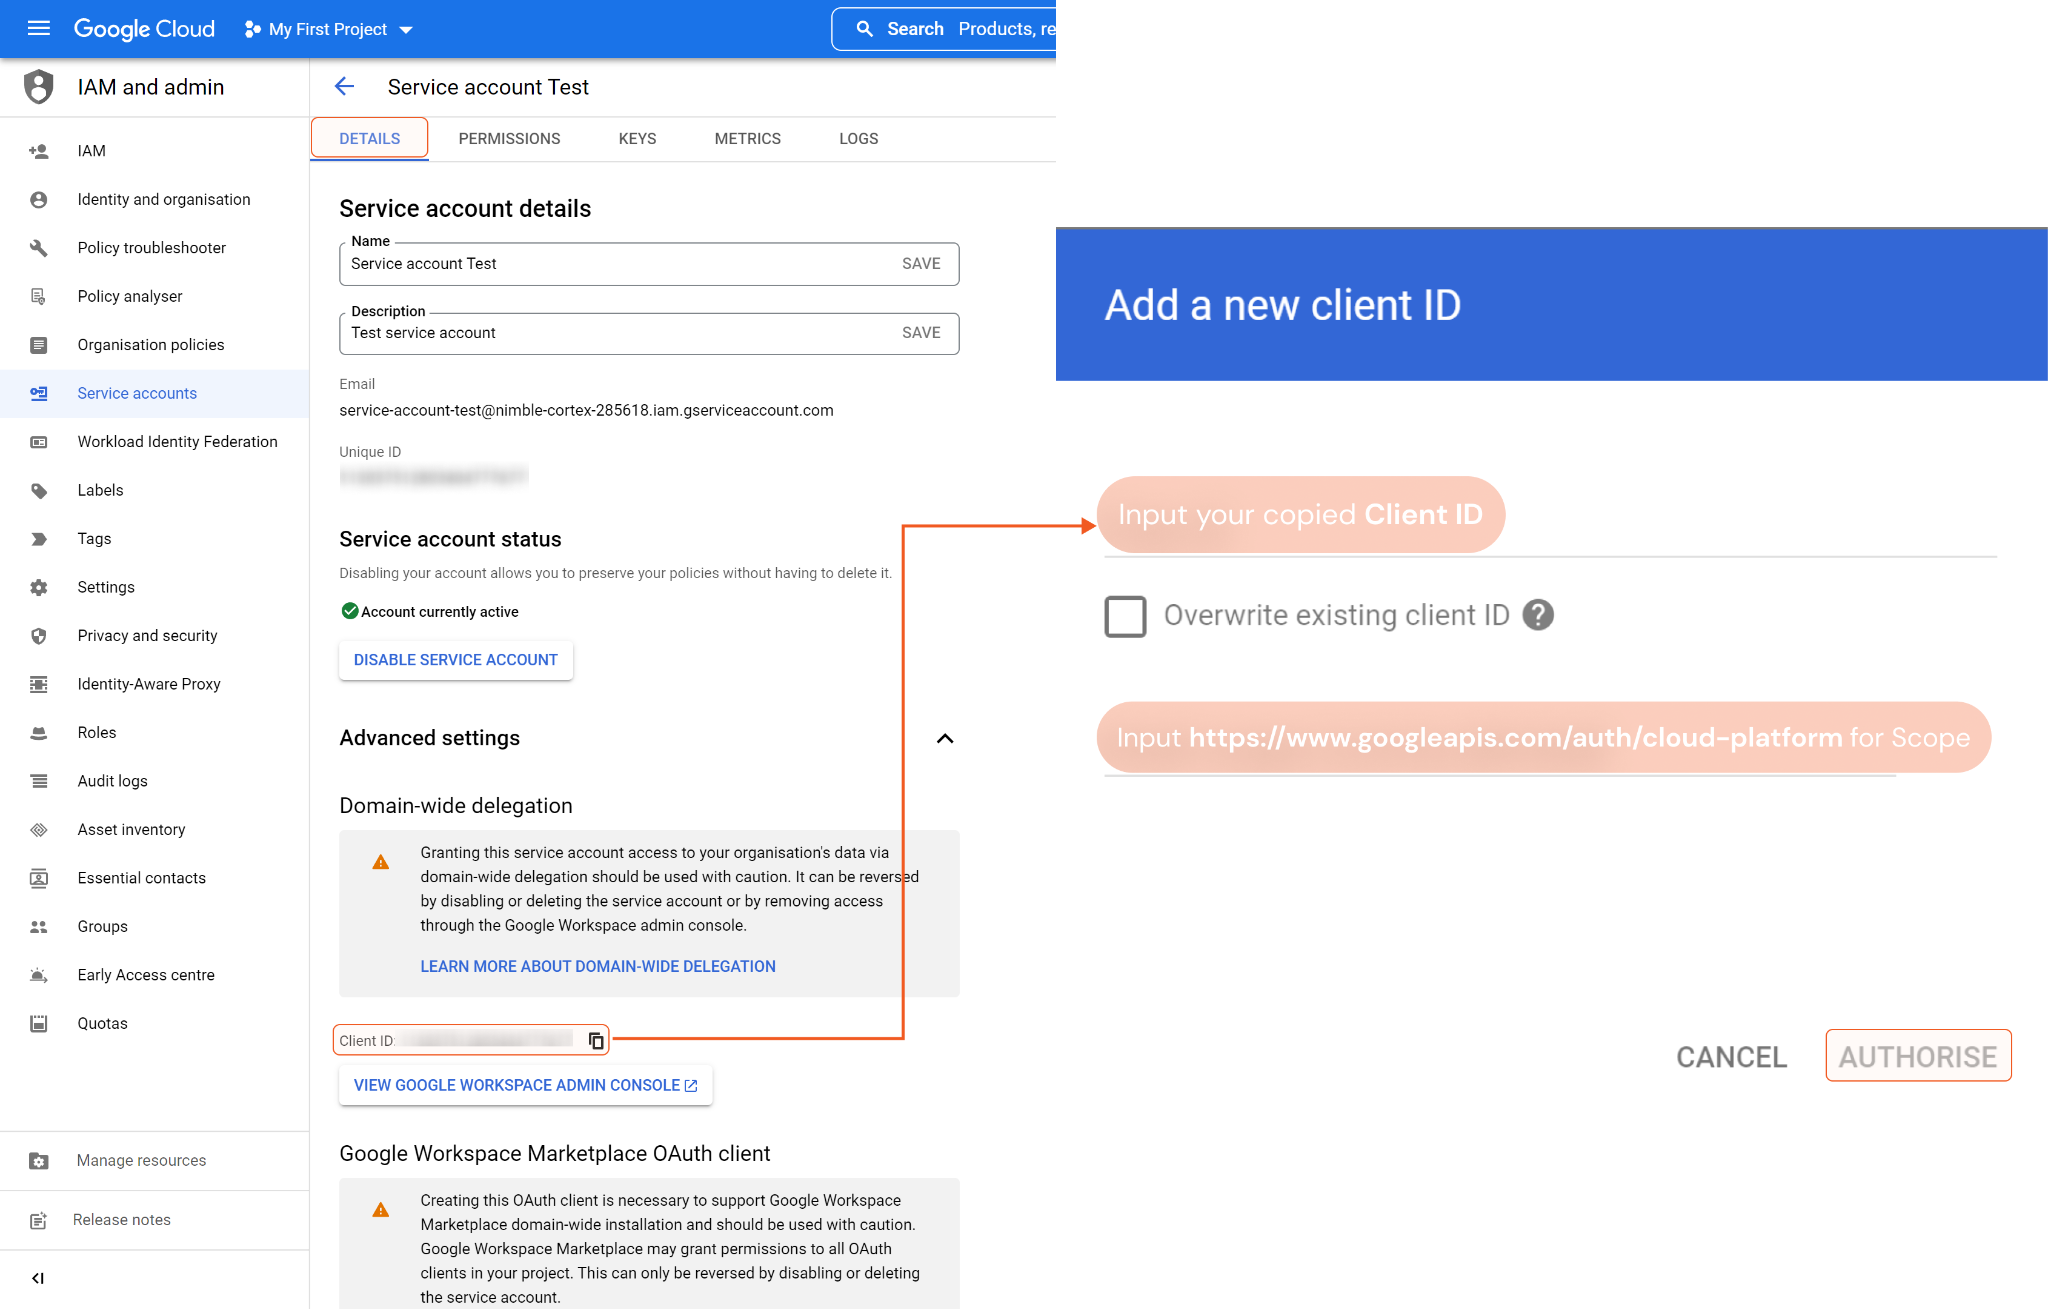
Click Add new to add a new API client.
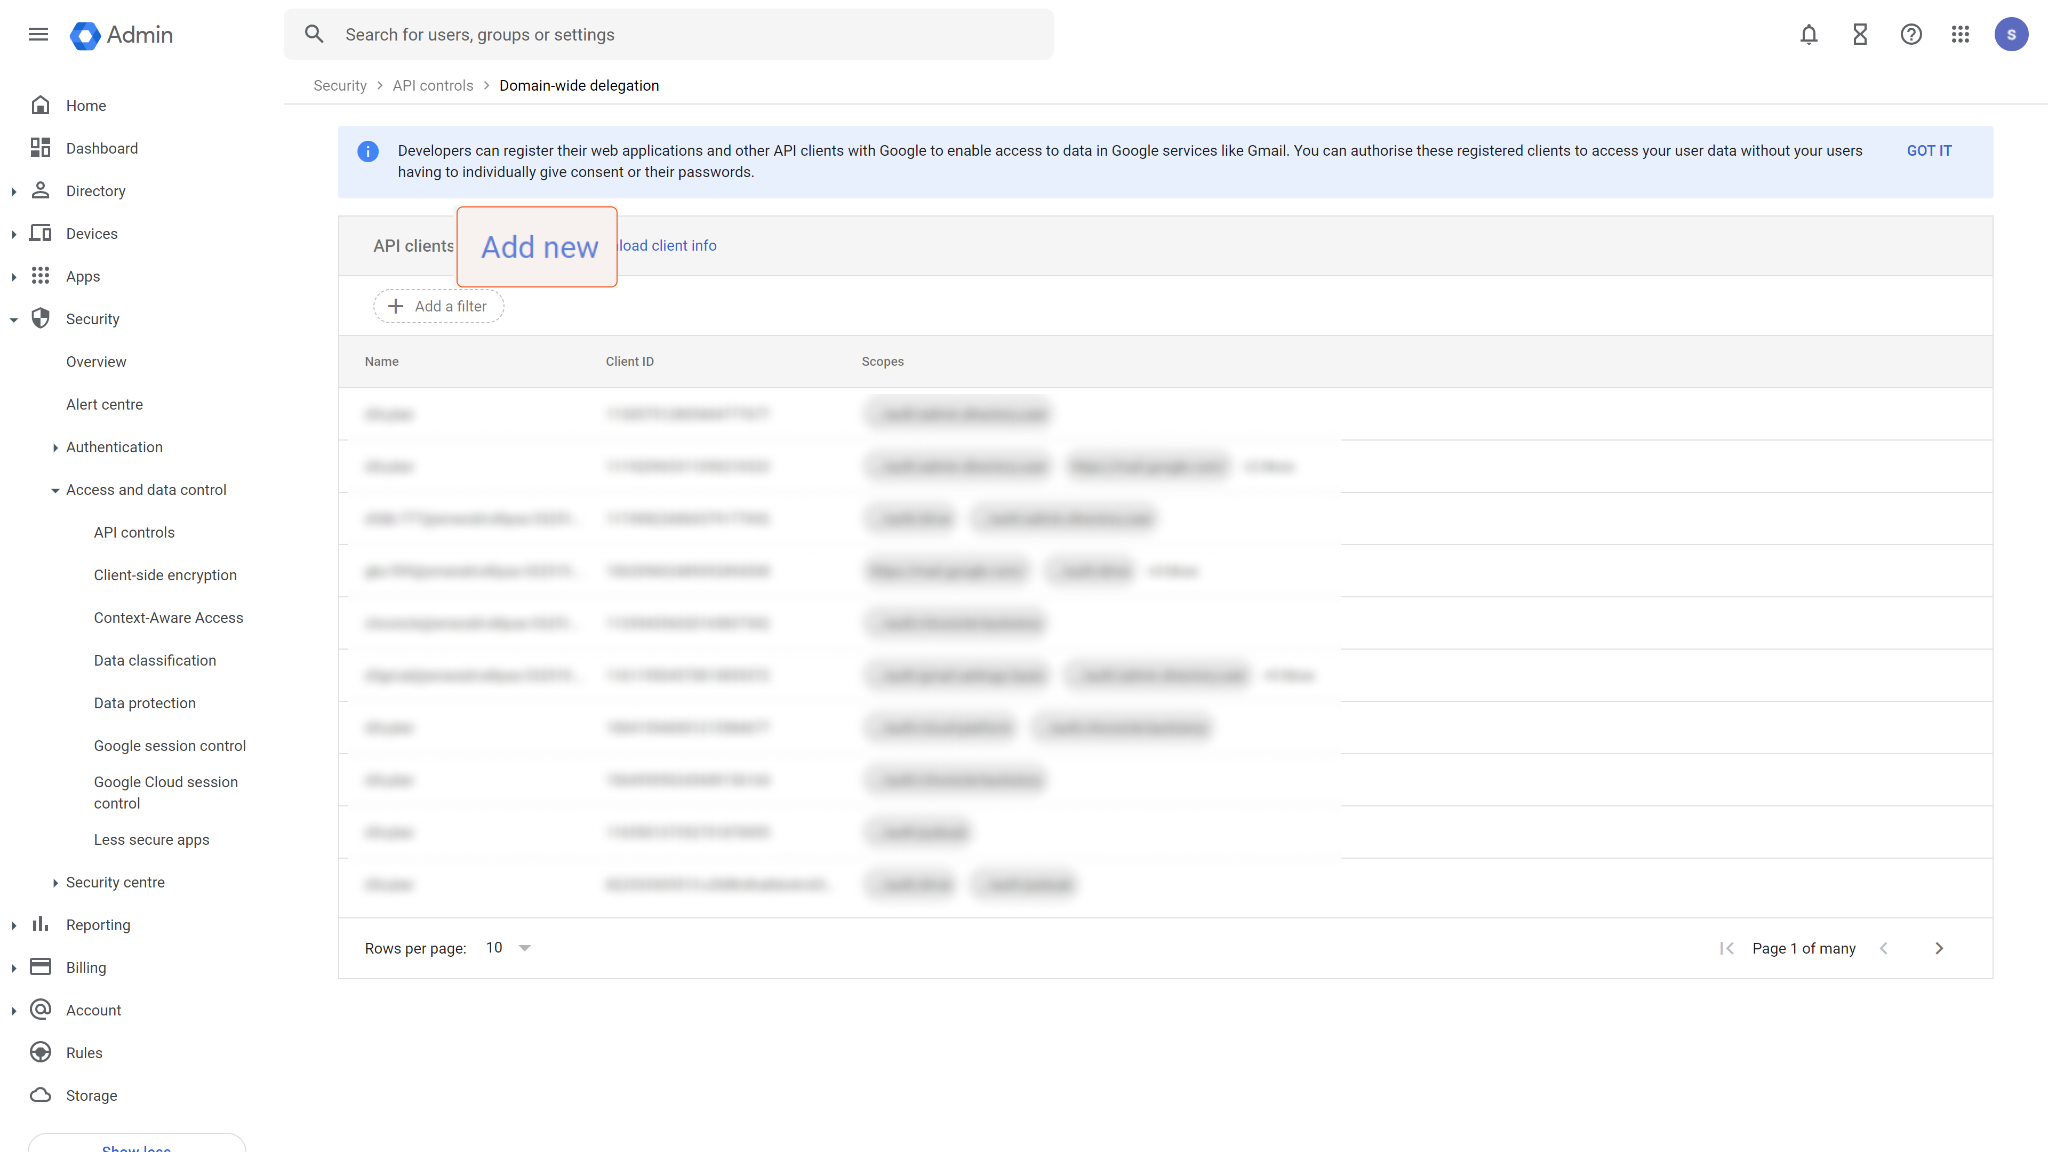
Find your Client ID in the service account you created and paste it into the Client ID field. Input https://www.googleapis.com/auth/cloud-platform into the OAuth scopes field, then click AUTHORISE.
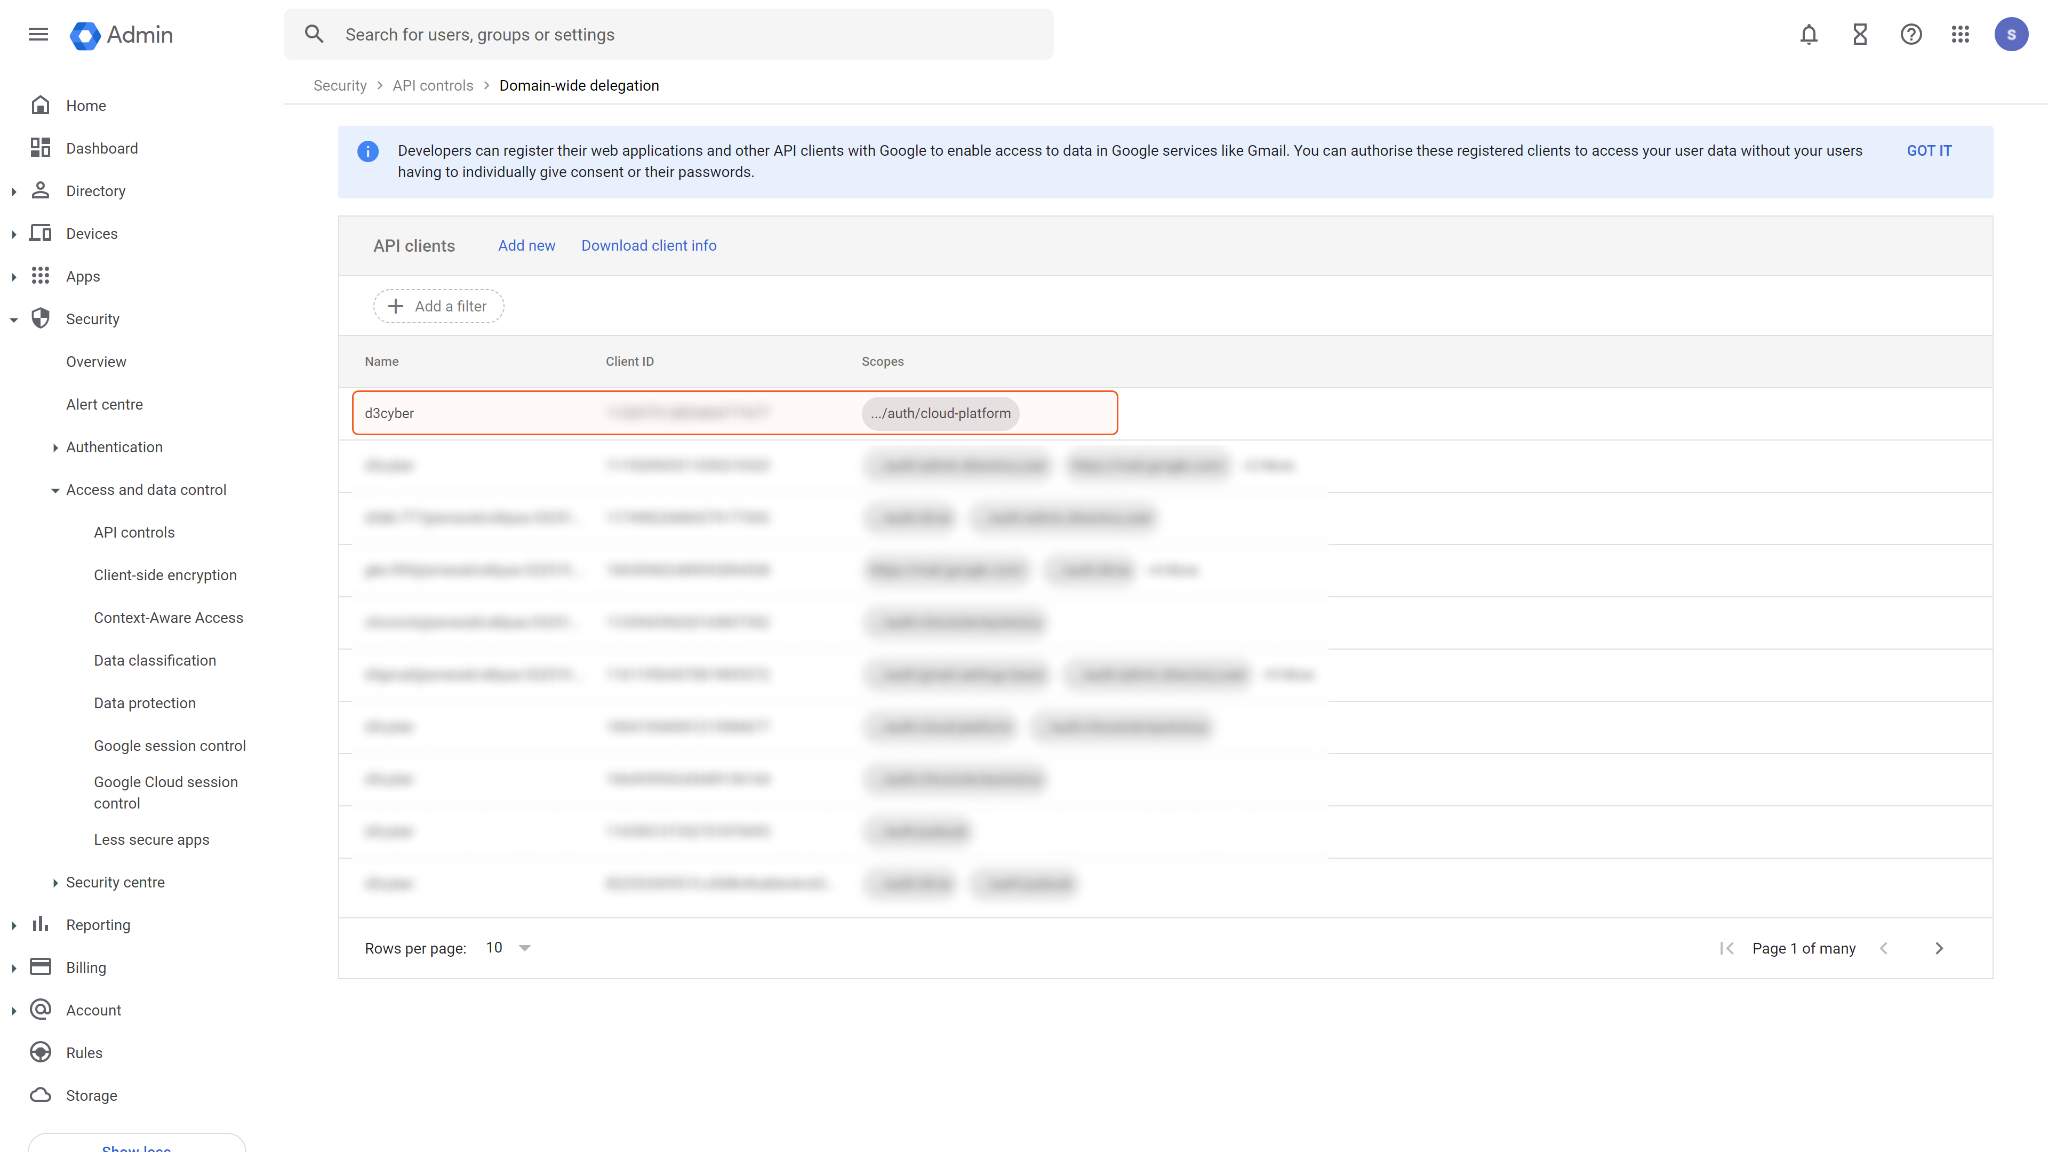
Finally, the service account domain-wide delegation is found on the API controls page. Your created service account is now ready to use.
Obtaining the Project ID
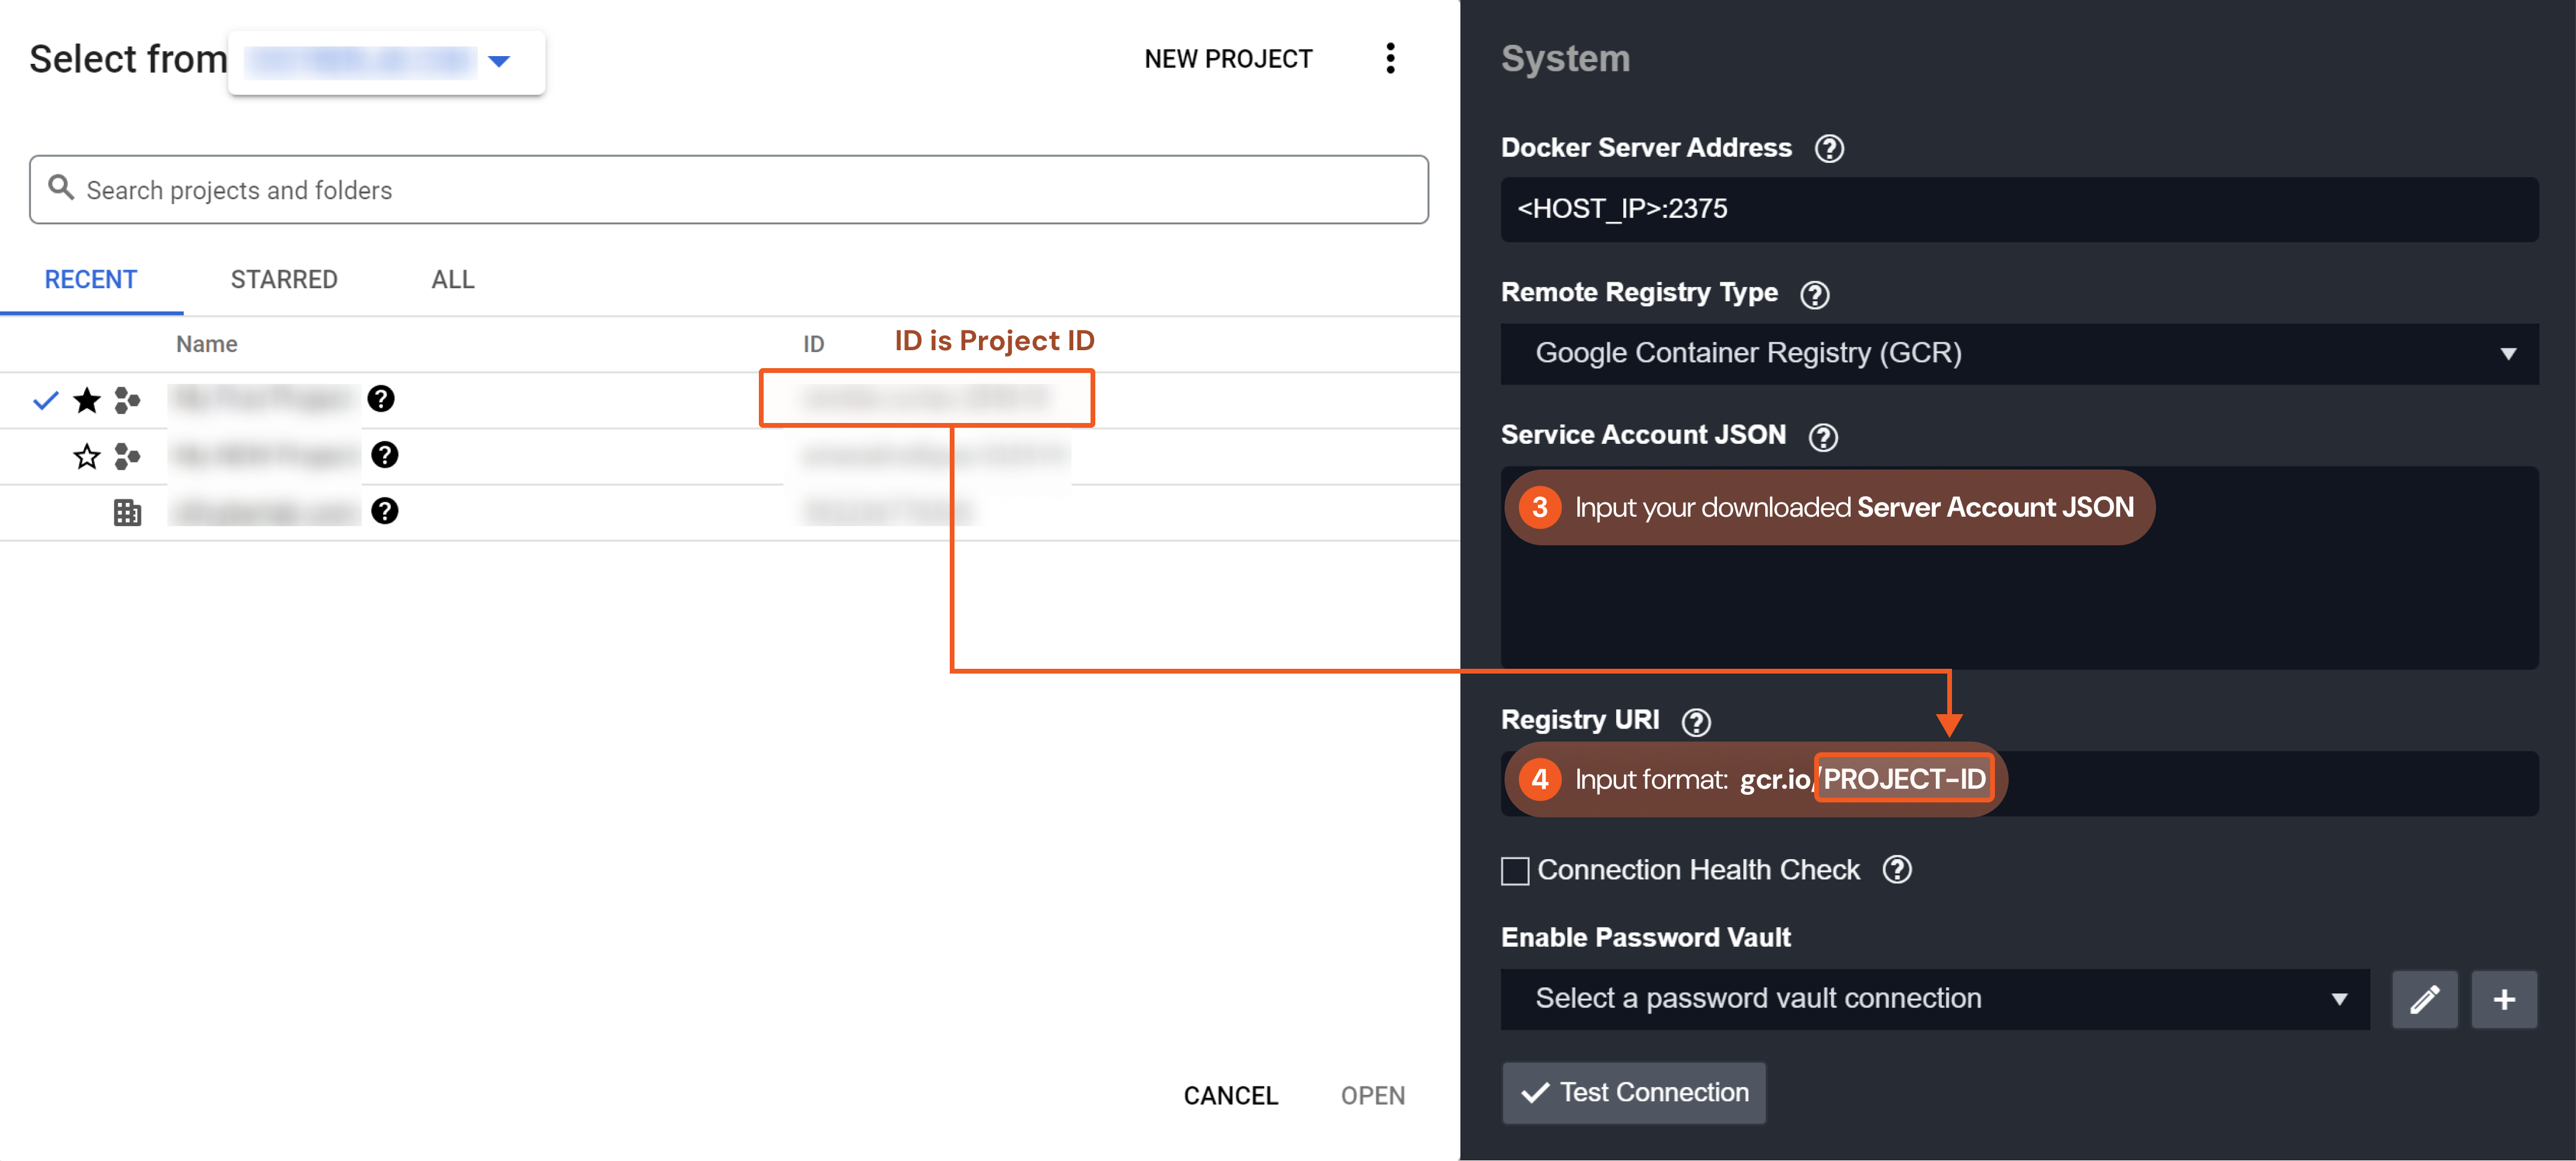
Log in to Google Cloud Platform Portal.
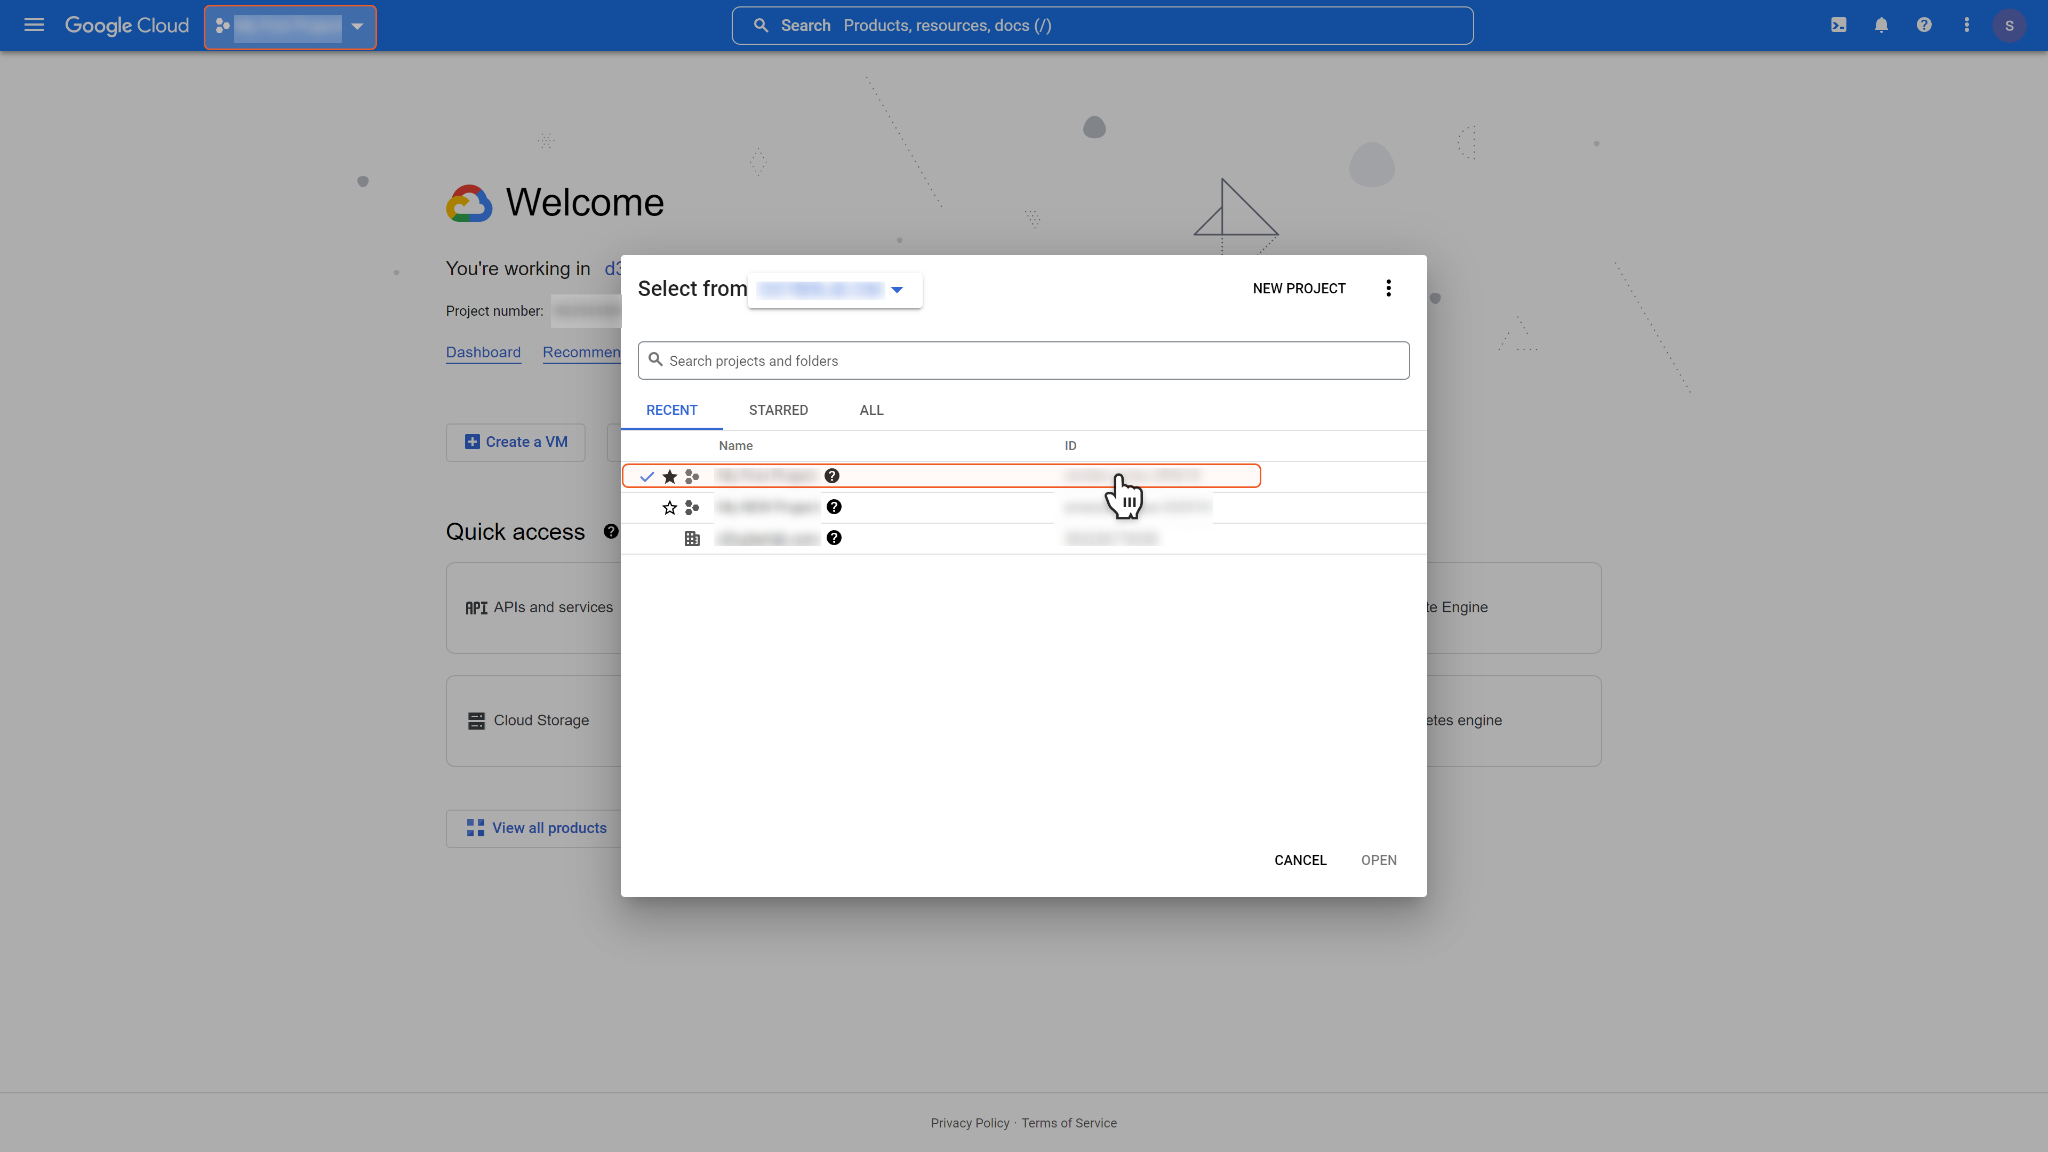
Click “My First Project” on the top bar menu.
A pop-up window wil appear. Select a project, e.g. "My First Project", or create a new project by clicking NEW PROJECT on the top right corner of the window.
Copy the ID next to the project name.
Configure Docker Integration on D3 SOAR
Log in to D3 SOAR.
Find the Docker integration.
.png?inst-v=a9107af0-b04c-4e31-bb5a-938372783868)
Navigate to Configuration on the top header menu.
Click on the Integration icon on the left sidebar.
Type Docker in the search box to find the integration, then click it to select it.
Click New Connection, on the right side of the Connections section. A new connection window will appear.
Configure the following fields to create a connection to Docker.
.png?inst-v=a9107af0-b04c-4e31-bb5a-938372783868)
Connection Name: The desired name for the connection.
Site: Specifies the site to use the integration connection. Use the drop-down menu to select the site. The Share to Internal Sites option enables all sites defined as internal sites to use the connection. Selecting a specific site will only enable that site to use the connection.
Recipient site for events from connections Shared to Internal Sites: This field appears if you selected Share to Internal Sites for Site to let you select the internal site to deploy the integration connection.
Agent Name (Optional): Specifies the proxy agent required to build the connection. Use the dropdown menu to select the proxy agent from a list of previously configured proxy agents.
Description (Optional): Add your desired description for the connection.
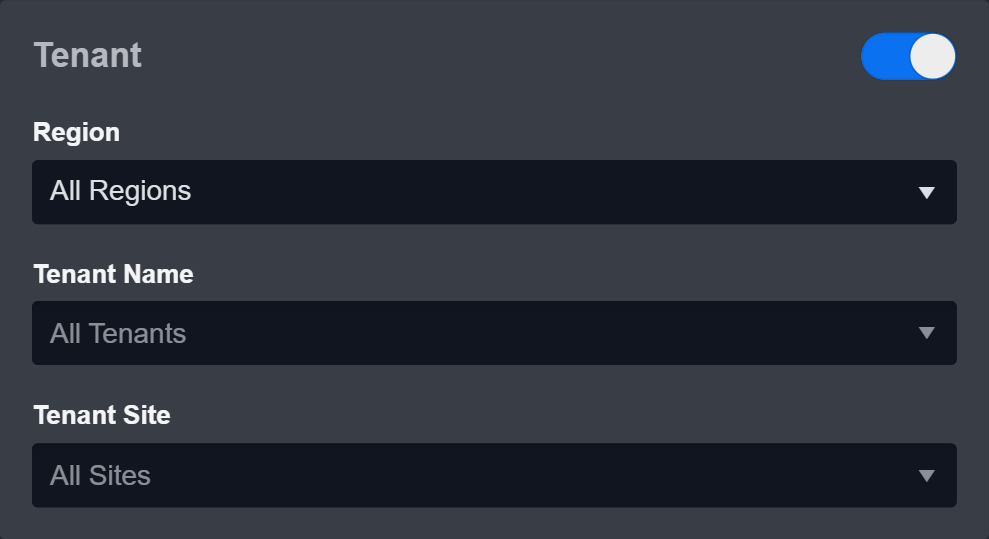
Tenant (Optional): When configuring the connection from a master tenant site, you have the option to choose the specific tenant sites you want to share the connection with. Once you enable this setting, you can filter and select the desired tenant sites from the dropdowns to share the connection.
Configure User Permissions: Defines which users have access to the connection.
Active: Check the tick box to ensure the connection is available for use.
System: This section contains the parameters defined specifically for the integration. These parameters must be configured to create the integration connection.
Remote Registry Type: Azure Container Registry (ACR)
.png?inst-v=a9107af0-b04c-4e31-bb5a-938372783868)
1. Input the Docker Server Address. The format is “IP Address:2375”.
2. Select Azure Container Registry (ACR) for Remote Registry Type.
3. Input the saved Username in Username field.
4. Input the saved password in Password field.
5. Input the saved Login server in Registry URI field.
Please refer to Configuring Docker to Work with D3 SOAR>Configuring Azure Container Registry (ACR) for more details on how to get the required information.
Remote Registry Type: Google Container Registry (GCR)
.png?inst-v=a9107af0-b04c-4e31-bb5a-938372783868)
1. Input the Docker Server Address. The format is “IP Address:2375”.
2. Select Google Container Registry (GCR) for Remote Registry Type.
3. Input your downloaded Service Account JSON.
4. Input the Registry URI. The format is gcr.io/PROJECT-ID. Retrieve your project ID by referring to Obtaining project ID.
Please refer to Configuring Docker to Work with D3 SOAR>Configuring Google Container Registry (GCR) for more details on how to get the required information.
Enable Password Vault: An optional feature that allows users to take the stored credentials from their own password vault. Please refer to the password vault connection guide if needed.
Connection Health Check: Updates the connection status you have created. A connection health check is done by scheduling the Test Connection command of this integration. This can only be done when the connection is active.
To set up a connection health check, check the Connection Health Check tickbox. You can customize the interval (minutes) for scheduling the health check. An email notification can be set up after a specified number of failed connection attempts.
Test the connection.
a. Click Test Connection to verify the account credentials and network connection. If the Test Connection Passed alert window appears, the test connection is successful. You will see Passed with a green checkmark appear beside the Test Connection button. If the test connection fails, please check your connection parameters and try again.
b. Click OK to close the alert window.
c. Click Add to create and add the configured connection.
Commands
Docker includes the following executable commands for users to set up schedules or create playbook workflows. With the Test Command, you can execute these commands independently for playbook troubleshooting.
Integration API Note
For more information about the Docker API, please refer to the Docker API reference.
READER NOTE
Certain permissions are required for each command. Please refer to the Permission Requirement and Configuring Docker to Work with D3 SOAR for details.
Build Docker Image
Builds a docker image with a tar file which is stored in the D3 SOAR system.
Only a Docker File is accepted to build Docker Image. The wrong file type will cause a command execution failure. Please ensure the selected file is a Docker file. Refer to the Docker file reference from Docker’s documentation for more details.
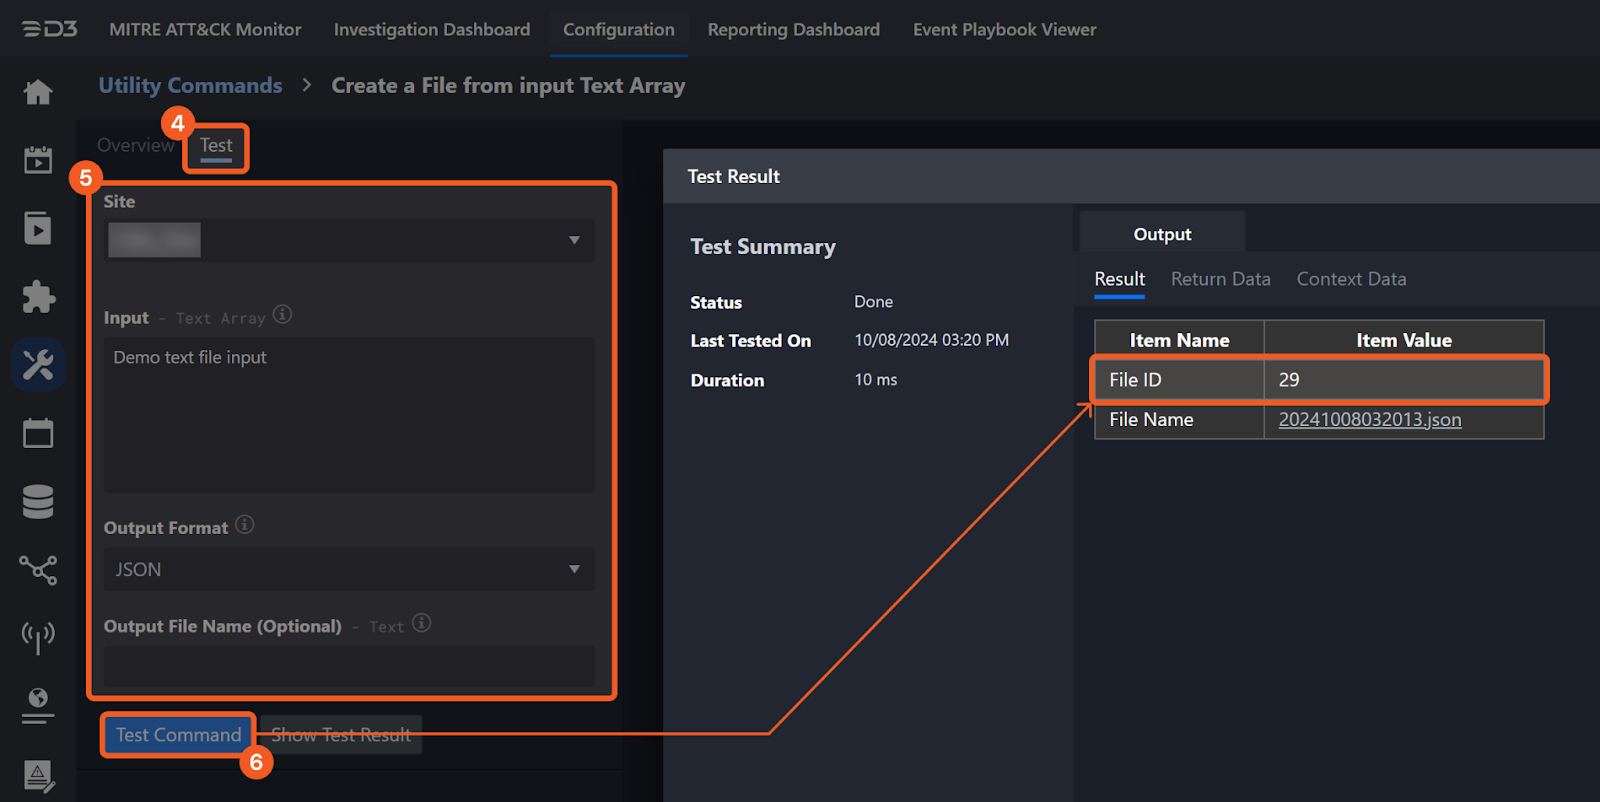
It is not recommended to use the Test Command feature with the Build Docker Image command as it is designed for dynamic input files in Playbooks, Incident Attachments, and Artifact Attachments. There is a simple workaround to test the command:
Navigate to Configuration on the top bar menu.
Click on Utility Commands on the left sidebar menu.
Use the search box to find and select the Create a File from input Text Array command.
Click on the Test tab.
Input the required information for the parameters.
Click on the Test Command button. A D3 File ID will appear in the output data after the file has been successfully created. The D3 File Source of the created file will be Playbook File.
Input
Input Parameter | Required/Optional | Description | Example |
D3 File ID | Required | The file path of the file source. | 304 |
D3 File Source | Required | The file source of the file to send. The options for file sources are: Incident Attachment File: Manually uploaded file from Incident Playbook File: Output from another Task Artifact File: Ingested Artifact in an Event | Playbook File |
Image and Tag | Required | The image name with a tag to build. The image name is typically the same as the repository name. The format is {RepositoryName}:{Tag}. For example: demo:latest. | demo:latest |
Output
Error Handling
If the Return Data is Failed, an Error tab will appear in the Test Result window.
The error tab contains the details responded from D3 SOAR or third-party API calls, including Failure Indicator, Status Code, and Message. This can help you locate the root cause of a command failure.
Parts in Error | Description | Example |
Failure Indicator | Indicates the command failure that happened at a specific input and/or API call. | Build Docker Image failed. |
Status Code | The response code issued by the third-party API server or the D3 SOAR system that can be used to locate the corresponding error category. For example, if the returned status code is 401, the selected connection is unauthorized to run the command. The user or system support would need to check the permission setting in the Docker portal. Refer to the Docker Error Code List for details. | Status Code: 404 |
Message | The raw data or captured key error message from the integration API server about the API request failure. | Message: File does not exist. |
Error Sample Data Build Docker Image failed. Status Code: 404 Message: File does not exist. |
Build Docker Image From Text
Builds a docker image with the specified content of a docker file.
Input
Input Parameter | Required/Optional | Description | Example |
Docker File Content | Required | The content of the docker file. | FROM python:3.8.4 EXPOSE 9090/tcp |
Image and Tag | Required | The image name with a tag to build. The image name is typically the same as the repository name. The format is {RepositoryName}:{Tag}. For example, demo:latest. In this example, “demo” will be the image name and “latest” will be the image tag. | demo:latest |
Output
Error Handling
If the Return Data is Failed, an Error tab will appear in the Test Result window.
The error tab contains the details responded from D3 SOAR or third-party API calls, including Failure Indicator, Status Code, and Message. This can help you locate the root cause of a command failure.
Parts in Error | Description | Example |
Failure Indicator | Indicates the command failure that happened at a specific input and/or API call. | Build Docker Image From Text failed. |
Status Code | The response code issued by the third-party API server or the D3 SOAR system that can be used to locate the corresponding error category. For example, if the returned status code is 401, the selected connection is unauthorized to run the command. The user or system support would need to check the permission setting in the Docker portal. Refer to the Docker Error Code List for details. | Status Code: 404 |
Message | The raw data or captured key error message from the integration API server about the API request failure. | Message: Invalid reference format, repository name must be lowercase. |
Error Sample Data Build Docker Image From Text failed. Status Code: 404 Message: Invalid reference format, repository name must be lowercase. |
List Docker Images
Returns a list of images on the Docker server.
Input
N/A
Output
Error Handling
If the Return Data is Failed, an Error tab will appear in the Test Result window.
The error tab contains the details responded from D3 SOAR or third-party API calls, including Failure Indicator, Status Code, and Message. This can help you locate the root cause of a command failure.
Parts in Error | Description | Example |
Failure Indicator | Indicates the command failure that happened at a specific input and/or API call. | List Docker Images failed. Failed to establish a new connection. |
Status Code | The response code issued by the third-party API server or the D3 SOAR system that can be used to locate the corresponding error category. For example, if the returned status code is 401, the selected connection is unauthorized to run the command. The user or system support would need to check the permission setting in the Docker portal. Refer to the Docker Error Code List for details. | Status Code: 404 |
Message | The raw data or captured key error message from the integration API server about the API request failure. | Message: A connection attempt failed because the connected party did not properly respond after a period of time, or established connection failed because the connected host has failed to respond. |
Error Sample Data List Docker Images failed. Failed to establish a new connection. Status Code: 404 Message: A connection attempt failed because the connected party did not properly respond after a period of time, or established connection failed because the connected host has failed to respond. |
Push Docker Image
Pushes a docker image to a repository in the remote registry (Azure container registry or Google container registry).
READER NOTE
Image and Tag is a required parameter to run this command.
Run the List Docker Images command to obtain Image and Tag. Image and Tag can be found in the returned raw data at the path $[*].RepoTags[*].
Input
Input Parameter | Required/Optional | Description | Example |
Image and Tag | Required | The local image name with a tag to push. When building a docker image, you must first specify an image name with a tag. After the image is built successfully, then you can use this image with a tag to push the image to the remote container registry. The image name is typically the same as the repository name. The format is {RepositoryName}:{Tag}. For example, demo:latest. In the example shown, “demo” will be the image name and “latest” will be the image tag. The Image and Tag can be obtained using the List Docker Images command. | demo:latest |
Output
Error Handling
If the Return Data is Failed, an Error tab will appear in the Test Result window.
The error tab contains the details responded from D3 SOAR or third-party API calls, including Failure Indicator, Status Code, and Message. This can help you locate the root cause of a command failure.
Error Sample Data Push Docker Image failed. Status Code: 404. Message: The Registry Not Found. |
Test Connection
Allows you to perform a health check on an integration connection. You can schedule a periodic health check by selecting Connection Health Check when editing an integration connection.
Input
N/A
Output
Error Handling
If the Return Data is Failed, an Error tab will appear in the Test Result window.
The error tab contains the details responded from D3 SOAR or third-party API calls, including Failure Indicator, Status Code, and Message. This can help you locate the root cause of a command failure.
Parts in Error | Description | Example |
Failure Indicator | Indicates the command failure that happened at a specific input and/or API call. | Test Connection failed. Failed to establish a new connection. |
Status Code | The response code issued by the third-party API server or the D3 SOAR system that can be used to locate the corresponding error category. For example, if the returned status code is 401, the selected connection is unauthorized to run the command. The user or system support would need to check the permission setting in the Docker portal. Refer to the Docker Error Code List for details. | Status Code: 400. |
Message | The raw data or captured key error message from the integration API server about the API request failure. | Message: No connection could be made because the target server actively refused it. |
Error Sample Data Test Connection failed. Failed to establish a new connection. Status Code: 400. Message: No connection could be made because the target server actively refused it. |