
Cisco Adaptive Security Appliance
LAST UPDATED: SEPTEMBER 18, 2025
Overview
The Cisco ASA family of security devices protects corporate networks of all sizes. It provides users with highly secure access to data - anytime, anywhere, using any device.
D3 SOAR is providing REST operations to function with Cisco Adaptive Security Appliance.
Cisco Adaptive Security Appliance is available for use in:
D3 SOAR | V12.7.124.0+ |
Category | Network Security |
Deployment Options |
Connection
To connect to Cisco Adaptive Security Appliance from D3 SOAR, follow this part to collect the required information below:
Parameter | Description | Example |
Server URL |
| https://<ReplaceMe> |
Username | The Username of Cisco Adaptive Security Appliance. | admin |
Password | The Password of Cisco Adaptive Security Appliance. | ******** |
Permission Requirements
Each endpoint in the Cisco Adaptive Security Appliance API requires a certain permission scope. The following are required scopes for the commands in this integration:
Command | Required Permission |
Block IPs | Full Access with Privilege Level 15 |
Block URLs | Full Access with Privilege Level 15 |
Get Network Object | Full Access with Privilege Level 5 and above |
Run Commands | Full Access with Privilege Level 15. Depending on the command to be executed, a lower privilege level can be assigned. Zero-level access restricts the user to just five commands: logout, enable, disable, help, and exit. The user level (level 1) grants restricted read-only access to the router, while the privileged level (level 15) provides users with comprehensive control over the router. |
Unblock IPs | Full Access with Privilege Level 15 |
Unblock URLs | Full Access with Privilege Level 15 |
Test Connection | Full Access with Privilege Level 5 and above |
Refer to Creating Users and Granting Privileges with the Command Interface in Windows to create or modify users and their privilege level and Configuring Local Command Authorization with the Command Interface in Windows to (re)assign the command privilege level.
Configuring Cisco Adaptive Security Appliance to Work with D3 SOAR
Configuring Cisco Adaptive Security Appliance (Cisco ASA) to work with D3 requires the following steps:
Setting the enable password to allow access to privileged EXEC mode.
Allowing privileged users to enter EXEC mode automatically on login.
Creating a user and assign a privilege level using the GUI or CLI.
Enabling local command authorization to enforce privilege-based access.
Applying the necessary configuration when using the REST API or HTTP interface.
Setting the Enable Password Using the GUI
The enable password controls access to privileged EXEC mode on Cisco ASA. Users must enter this password after issuing the enable command from user EXEC mode (> prompt) to access configuration-level commands (# prompt). Setting an enable password is recommended to prevent unauthorized access to administrative functions and system-level configuration.
Users can configure the global enable password in the following steps:
Log in to the Cisco ASA GUI with a user that has privilege level 15.
.png?inst-v=98144c3d-76ae-458a-9ca9-3e308e46059b)
To configure enable passwords for specific privilege levels, refer to step 5 in Configuring Local Command Authorization with the Command Interface in Windows.
Click the Tools item from the menu bar, then select the Command Line Interface… option.
.png?inst-v=98144c3d-76ae-458a-9ca9-3e308e46059b)
Choose the Multiple Line mode, then enter the following:
.png?inst-v=98144c3d-76ae-458a-9ca9-3e308e46059b) NONE
NONEconfigure terminal enable password NewStrongPassword write memoryReplace NewStrongPassword with a secure password.
Click the Send button to set the enable password.
.png?inst-v=98144c3d-76ae-458a-9ca9-3e308e46059b)
For information on setting the enable password with the command interface in Windows, refer to Access the Console for the Command-Line Interface for instructions.
Allowing Privileged Users to Enter EXEC Mode on Login
Enabling Allow privileged users to enter into EXEC mode on login ensures that users with privilege level 15 are automatically in privileged EXEC mode (# prompt) upon login. This prevents access issues when running the Run Commands command with an SSH connection type.
Users can enable this using the GUI by following these steps:
Navigate to Configuration > Device Management > Users/AAA > AAA Access, then select the Authorization tab.
.png?inst-v=98144c3d-76ae-458a-9ca9-3e308e46059b)
Select the Allow privileged users to enter into EXEC mode on login checkbox.
.png?inst-v=98144c3d-76ae-458a-9ca9-3e308e46059b)
Click the Apply button to apply the changes, then click the Save button to save the configuration.
.png?inst-v=98144c3d-76ae-458a-9ca9-3e308e46059b)
Adding a User to the Local Database Using the GUI
READER NOTE
Cisco ASA offers several access levels:
Full Access (ASDM, Telnet, SSH, and Console)
Grants access to all management interfaces: ASDM, SSH, Telnet, and the console port.
If authentication is enabled, users may also enter global configuration mode.
Privilege Level
Sets the user’s privilege level for ASDM and local command authorization.
Range: 0 (least privilege) to 15 (unrestricted admin access).
Example values used by ASDM predefined roles:
15 – Admin
5 – Read Only
3 – Monitor Only (restricts users to the Home and Monitoring panes)
CLI login prompt for SSH, Telnet and console (no ASDM access)
Grants access via SSH, Telnet, and console port, but blocks ASDM configuration (if HTTP authentication is configured).
ASDM monitoring remains accessible.
If enable authentication is also configured, users cannot access global configuration mode.
No ASDM, SSH, Telnet, or console access
Blocks access to all authenticated management interfaces configured on the ASA, except the serial port, which remains accessible.
For further reading, refer to step 6 in Add a User Account to the Local Database in the Cisco ASA documentation.
Navigate to Configuration > Device Management > Users/AAA > User Accounts, then click the Add button.
.png?inst-v=98144c3d-76ae-458a-9ca9-3e308e46059b)
Configure the user.
.png?inst-v=98144c3d-76ae-458a-9ca9-3e308e46059b)
Enter a username.
Enter a password and confirm it.
Set the access restriction.
Refer to the reader note for more information on the access levels.Click the OK button to save the user.
Confirm that the user has been added on the User Accounts page.
.png?inst-v=98144c3d-76ae-458a-9ca9-3e308e46059b)
Click the Apply button to apply the changes, then click the Save button to save the configuration.
.png?inst-v=98144c3d-76ae-458a-9ca9-3e308e46059b)
Creating Users and Granting Privileges with the Command Interface in Windows
Users can also create accounts and assign privilege levels through the CLI instead of the GUI.
Open the Command Prompt by pressing Windows + R, typing cmd, and then pressing Enter.
Type ssh <username>@<your IP Address>, then press enter.
.png?inst-v=98144c3d-76ae-458a-9ca9-3e308e46059b)
Example: ssh admin@192.123.45.67.
READER NOTE*
If users see the “no matching host key type found. their offer: ssh-rsa” error, it indicates that the SSH client no longer supports ssh-rsa by default.
.png?inst-v=98144c3d-76ae-458a-9ca9-3e308e46059b)
To resolve this, append -o HostKeyAlgorithms=+ssh-rsa to the SSH command, as shown:
ssh -o HostKeyAlgorithms=+ssh-rsa <username>@<IP address>. For example:
ssh -o HostKeyAlgorithms=+ssh-rsa admin@192.123.45.67
Upon entering ssh -o HostKeyAlgorithms=+ssh-rsa admin@192.123.45.67, users will be prompted to enter their password.
.png?inst-v=98144c3d-76ae-458a-9ca9-3e308e46059b)
Input the password when prompted.
.png?inst-v=98144c3d-76ae-458a-9ca9-3e308e46059b)
If the login is successful, the system displays session or login information.
.png?inst-v=98144c3d-76ae-458a-9ca9-3e308e46059b)
(If the prompt shows ciscoasa> instead of ciscoasa#) Type enable, then enter the enable password set in Setting the Enable Password when prompted.
.png?inst-v=98144c3d-76ae-458a-9ca9-3e308e46059b)
This occurs when the user logs in but has not yet entered privileged EXEC mode. To allow privilege level 15 users to enter privileged EXEC mode upon login, refer to Allowing Privileged Users to Enter EXEC Mode on Login.
Enter config t in the cmd.

Enter the username <your desired username> password <the desired password> privilege <the desired privilege level> command to create a new user and assign their privilege level.
.png?inst-v=98144c3d-76ae-458a-9ca9-3e308e46059b)
For example, enter username demo_user password ****** privilege 15 to create credentials for a privilege level 15 user with the username demo_user and the specified password. Refer to this reader note for available privilege levels.
Enter copy running-config startup-config to confirm the source file name, then press enter again to save the current active configuration.

READER NOTE
To modify a user’s credentials and privileges, refer to step 6. For example, username demo_user password AnotherStrongPassword privilege 3 updates both the password and privilege level for demo_user.
The copy running-config startup-config and write memory commands both save the current running configuration to the startup configuration in persistent memory.
Configuring Local Command Authorization with the Command Interface in Windows
Local command authorization enables the assignment of commands to privilege levels ranging from 0 to 15. Each user can be configured with a specific privilege level and may execute any command at that level or lower.
For example, a user assigned privilege level 5 can run commands at levels 0 through 5, but cannot execute commands at level 6 or higher.
Follow these steps to configure a command's privilege level:
Log in as a user assigned privilege level 15 and enter privileged EXEC mode.
.png?inst-v=98144c3d-76ae-458a-9ca9-3e308e46059b)
If the prompt displays ciscoasa>, enter enable and provide the enable password (if configured) to access privileged EXEC mode.
Enter config t to access global configuration mode, then run the aaa authorization command LOCAL command to enable local command authorization.
.png?inst-v=98144c3d-76ae-458a-9ca9-3e308e46059b)
Define which commands are permitted at each privilege level using the following commands:
Enter the following to grant access to a command:
privilege show level <user privilege level> command <command name> (e.g. privilege show level 5 command filter).png?inst-v=98144c3d-76ae-458a-9ca9-3e308e46059b)
The privilege show command assigns the specified command (i.e., the filter command) to the given privilege level (i.e., level 5), making it accessible to users at that level or higher.
Enter the following to revoke access to a command:
privilege clear level <user privilege level> command <command name> (e.g. privilege clear level 5 command filter).png?inst-v=98144c3d-76ae-458a-9ca9-3e308e46059b)
The privilege clear command removes this assignment and restores the command to its default privilege level.
(Optional) Create a new user and assign them a privilege level of 5 to verify that local command authorization is functioning as expected.
.png?inst-v=98144c3d-76ae-458a-9ca9-3e308e46059b)
Refer to step 6 in Creating Users and Granting Privileges with the Command Interface in Windows for more information.
(Optional) Define an enable password for the privilege level using the command enable password <password> level <privilege level> (e.g. enable password 5555 level 5) to allow lower-level users to escalate to that level.
.png?inst-v=98144c3d-76ae-458a-9ca9-3e308e46059b)
Lower-level users must use the corresponding enable password to escalate and access commands at a higher privilege level.
Enter copy running-config startup-config to confirm the source file name, then press enter again to save the current active configuration.
.png?inst-v=98144c3d-76ae-458a-9ca9-3e308e46059b)
Configuring the Connection Method
To use this integration, users may connect to Cisco ASA through one of the following methods:
REST API and HTTP access require additional configuration, as outlined below.
For the HTTP Interface for Automation and SSH connection methods, only the Test Connection and Run Commands actions are supported. Therefore, tasks such as blocking or unblocking IPs and URLs must be performed using Run Commands, as detailed in this section.
READER NOTE
Some devices run ASA on top of FXOS (Firepower eXtensible Operating System) instead of directly on hardware. This architecture can affect feature availability and configuration steps.
Before proceeding, users should verify their ASA deployment compatibility:
HTTP Interface for Automation
Before proceeding, users should verify that the HTTP interface is compatible with the device hardware. Refer to Cisco Secure Firewall ASA HTTP Interface for Automation for detailed information.
Open the command prompt and log in using a user account assigned privilege level 15.
Refer to steps 2 and 3 in Creating Users and Granting Privileges with the Command Interface in Windows for more information.Enter privileged EXEC mode.
Run show run http to check if HTTP access is enabled.
.png?inst-v=98144c3d-76ae-458a-9ca9-3e308e46059b)
Users can also run the show running-config all http command to check all running HTTP configurations.
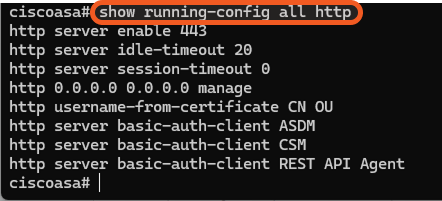
Enable HTTP access by entering the following commands:
.png?inst-v=98144c3d-76ae-458a-9ca9-3e308e46059b) CODE
CODEconf t aaa authentication http console LOCAL http server enable http 0.0.0.0 0.0.0.0 manageIn the command http 0.0.0.0 0.0.0.0 manage, manage specifies the interface name. Users can retrieve the correct interface name by running the show interface command.
Save the configuration by running the write memory (or copy running-config startup-config) command.
REST API
Before proceeding, users should verify that the REST API is supported on their models. Refer to ASA REST API Compatibility for detailed information.
Users can enable the REST API agent by following these steps:
Open the command prompt and log in using a user account assigned privilege level 15.
Refer to steps 2 and 3 in Creating Users and Granting Privileges with the Command Interface in Windows for more information.Enter privileged EXEC mode.
Verify the software version by running the show version command.
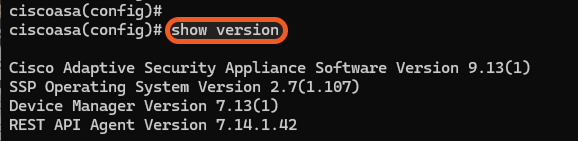
Check if the REST API agent is enabled by running the show rest-api agent command.

Confirm that the correct ASA software image is installed by running the show run | include rest-api command.

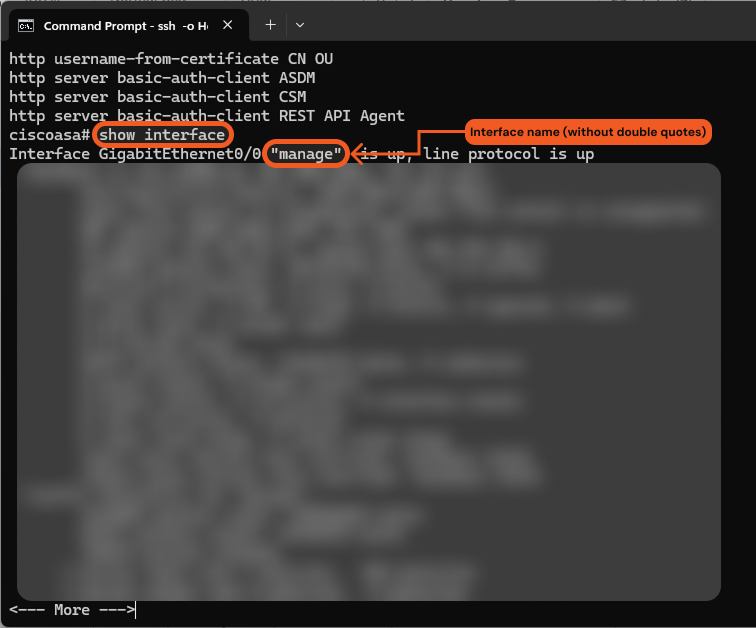
Retrieve the correct interface name by running the show interface command.
.png?inst-v=98144c3d-76ae-458a-9ca9-3e308e46059b)
In this case, the correct interface name is manage.

Enter configuration mode by running the config t command.
.png?inst-v=98144c3d-76ae-458a-9ca9-3e308e46059b)
Enable the HTTP server and allow API clients to connect by running the following commands:
.png?inst-v=98144c3d-76ae-458a-9ca9-3e308e46059b)
http server enable
http 0.0.0.0 0.0.0.0 <interface>
For demonstration purposes, the http 0.0.0.0 0.0.0.0 manage command is run.
Configure HTTP authentication and define a static route for API traffic by running:
.png?inst-v=98144c3d-76ae-458a-9ca9-3e308e46059b)
aaa authentication http console LOCAL
route <interface> 0.0.0.0 0.0.0.0 <gateway_ip> 1
For example, the command may appear as route manage 0.0.0.0 0.0.0.0 192.123.45.1 1.
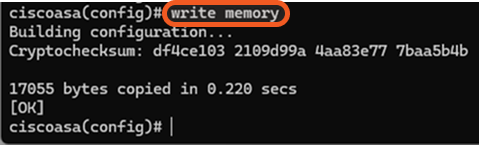
Enable the REST API agent by running the rest-api agent command, then save the configuration by running the write memory (or copy running-config startup-config) command.
.png?inst-v=98144c3d-76ae-458a-9ca9-3e308e46059b)
Configuring D3 SOAR to Work with Cisco Adaptive Security Appliance
Log in to D3 SOAR.
Find the Cisco Adaptive Security Appliance integration.
.png?inst-v=98144c3d-76ae-458a-9ca9-3e308e46059b)
Navigate to Configuration on the top header menu.
Click on the Integration icon on the left sidebar.
Type Cisco Adaptive Security Appliance in the search box to find the integration, then click it to select it.
Click + Connection, on the right side of the Connections section. A new connection window will appear.
Configure the following fields to create a connection to Cisco Adaptive Security Appliance.
.png?inst-v=98144c3d-76ae-458a-9ca9-3e308e46059b)
Connection Name: The desired name for the connection.
Site: The site on which to use the integration connection. Use the drop-down menu to select the site. The Share to Internal Sites option enables all internal sites to use the connection. Selecting a specific site will only enable that site to use the connection.
Recipient site for events from connections Shared to Internal Sites: This field is displayed when Share to Internal Sites is selected for the Site field, allowing selection of the internal site for deploying the integration connection.
Agent Name (Optional): The proxy agent required to build the connection. Use the dropdown menu to select the proxy agent from a list of previously configured proxy agents.
An agent may be required to connect to the API, depending on the user environment. Refer to the Agent Management documentation and its sub-pages for instructions on installing a D3 agent.Description (Optional): The description for the connection.
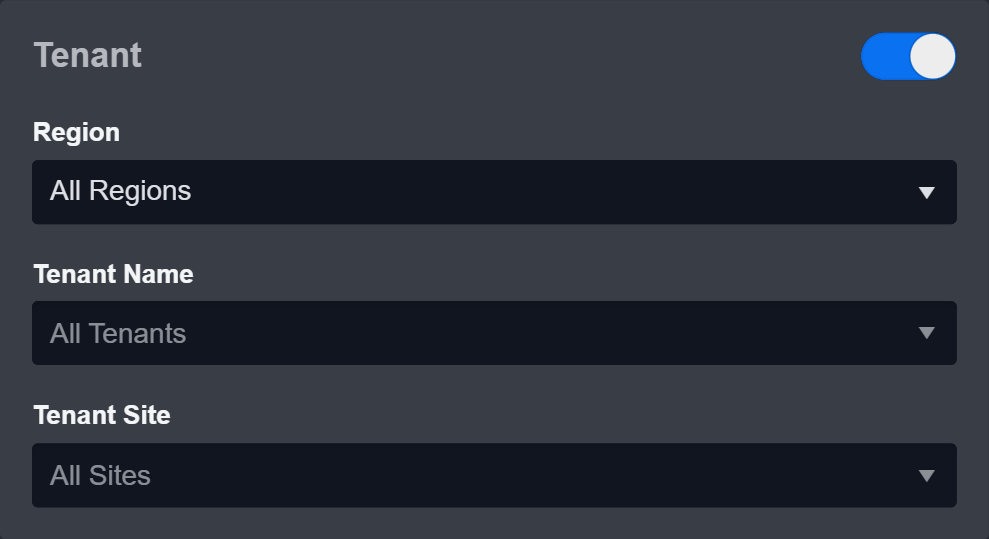
Tenant (Optional): When configuring the connection from a master tenant site, users can choose the specific tenant sites with which to share the connection. Once this setting is enabled, users can filter and select the desired tenant sites from the dropdowns to share the connection.
Configure User Permissions: Defines which users have access to the connection.
Active: The checkbox that enables the connection to be used when selected.
System: This section contains the parameters defined specifically for the integration. These parameters must be configured to create the integration connection.
.png?inst-v=98144c3d-76ae-458a-9ca9-3e308e46059b)
1. Input the domain level Server URL of the Cisco ASA environment. Users may use the HTTPS (e.g., https://192.168.1.1) or SSH (ssh://192.168.1.1) scheme, depending on how their Cisco ASA instance is configured.
2. Input the Cisco ASA account Username.
3. Input the Cisco ASA account Password.Enable Password Vault: An optional feature that allows users to take the stored credentials from their own password vault. Refer to the password vault connection guide if needed.
Connection Health Check: Periodically checks the connection status by scheduling the Test Connection command at the specified interval (in minutes). Available only for active connections, this feature also allows configuring email notifications for failed attempts.
Test the connection.
.png?inst-v=98144c3d-76ae-458a-9ca9-3e308e46059b)
Click on the Test Connection button to verify credentials and connectivity. A success alert displays Passed with a green checkmark. If the connection fails, review the parameters and retry.
Click OK to close the alert window.
Click + Add to create and add the configured connection.
READER NOTE
If users are unable to pass the connection test after configuring the required settings through the GUI and/or Command Prompt, attempt the connection using an agent and retest the connection.

Commands
Cisco Adaptive Security Appliance includes the following executable commands for users to set up schedules or create playbook workflows. With the Test Command function, users can execute these commands independently for playbook troubleshooting.
Integration API Note
For more information about the Cisco Adaptive Security Appliance API, refer to the Cisco Adaptive Security Appliance API reference at <Your domain level server url>/doc/ (e.g. https://111.1.1.1/doc/).
READER NOTE
Certain permissions are required for each command. Refer to the Permission Requirements and Configuring Cisco Adaptive Security Appliance to Work with D3 SOAR for details.
Block IPs
Adds IP addresses to the specified blocklist group via the ASA Rest API service.
READER NOTE
Group is a required parameter to run this command.
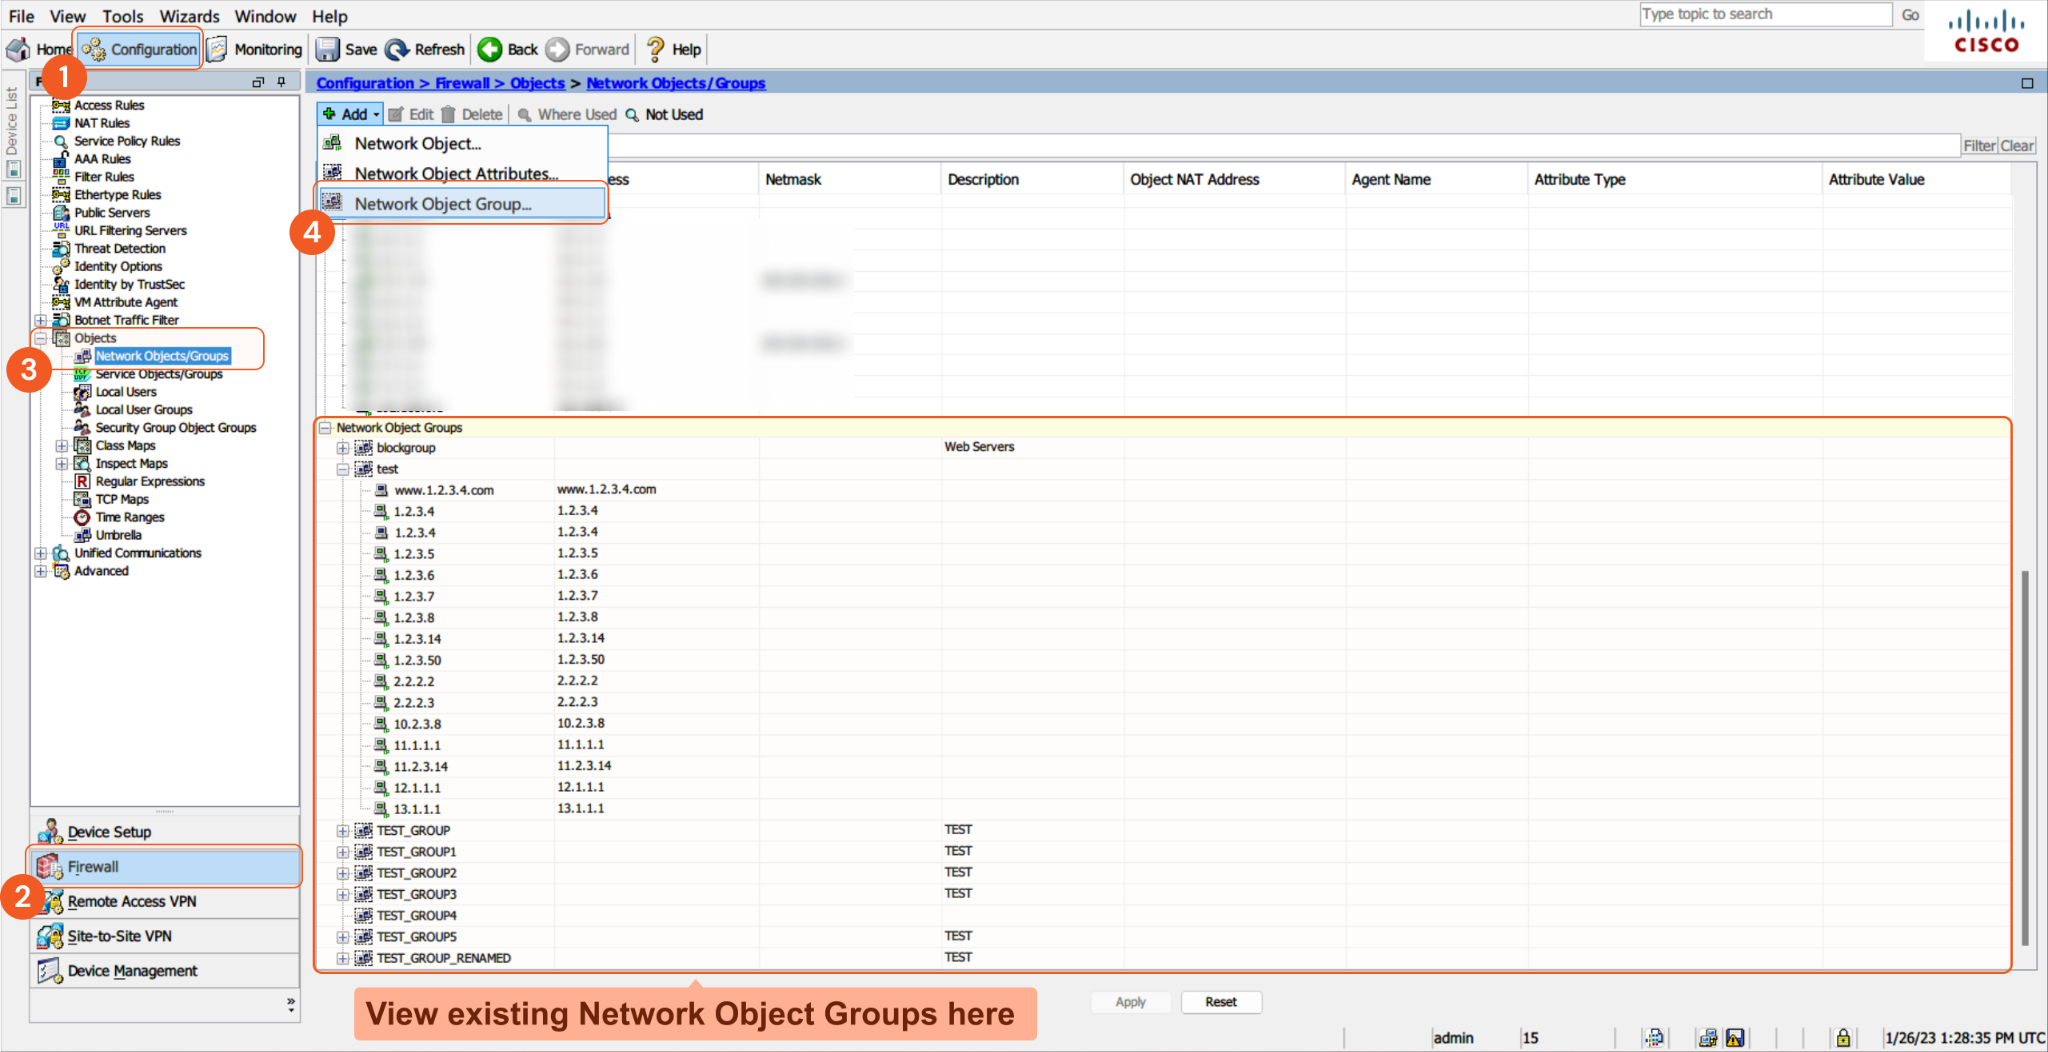
To view the list of blocklist groups, navigate to Configuration > Firewall > Objects > Network Objects/Groups from the Cisco ASA user interface. To add a group, click Add Network Object Group.To view the IP addresses within a group, navigate to the Network Object Groups section at the bottom, and expand the desired group by clicking the "+" sign.

Input
Input Parameter | Required/Optional | Description | Example |
IPs | Required | The array of IP addresses to add to the specified blocklist group. |
JSON
|
Group | Required | The name of the blocklist group to which the specified IP addresses will be added. | TEST_GROUP3 |
Output
To view the sample output data for all commands, refer to this article.
Error Handling
If the Return Data is Partially Successful or Failed, an Error tab will appear in the Test Result window.
The error tab contains the details responded from D3 SOAR or third-party API calls, including Failure Indicator, Status Code, and Message. This can help you locate the root cause of a command failure.
Parts in Error | Description | Example |
Failure Indicator | Indicates the command failure that happened at a specific input and/or API call. | Block IPs failed. |
Status Code | The response code issued by the third-party API server or the D3 SOAR system that can be used to locate the corresponding error category. For example, if the returned status code is 401, the selected connection is unauthorized to run the command. The user or system support would need to check the permission setting in the Cisco Adaptive Security Appliance portal. Refer to the HTTP Status Code Registry for details. | Status Code: 400. |
Message | The raw data or captured key error message from the integration API server about the API request failure. | Message: Item was already blocked before. |
Error Sample Data Block IPs failed. Status Code: 400. Message: Item was already blocked before. |
Block URLs
Adds URLs to the specified blocklist group via the ASA Rest API service.
READER NOTE
Group is a required parameter to run this command.
To view the list of blocklist groups, navigate to Configuration > Firewall > Objects > Network Objects/Groups from the Cisco ASA user interface. To add a group, click Add Network Object Group.To view the URLs within a group, navigate to the Network Object Groups section at the bottom, and expand the desired group by clicking the "+" sign.

Input
Input Parameter | Required/Optional | Description | Example |
URLs | Required | The array of URLs to add to the specified blocklist group. |
JSON
|
Group | Required | The name of the blocklist group to which the specified URLs will be added. | TEST_GROUP3 |
Output
To view the sample output data for all commands, refer to this article.
Error Handling
If the Return Data is Partially Successful or Failed, an Error tab will appear in the Test Result window.
The error tab contains the details responded from D3 SOAR or third-party API calls, including Failure Indicator, Status Code, and Message. This can help you locate the root cause of a command failure.
Parts in Error | Description | Example |
Failure Indicator | Indicates the command failure that happened at a specific input and/or API call. | Block URLs failed. |
Status Code | The response code issued by the third-party API server or the D3 SOAR system that can be used to locate the corresponding error category. For example, if the returned status code is 401, the selected connection is unauthorized to run the command. The user or system support would need to check the permission setting in the Cisco Adaptive Security Appliance portal. Refer to the HTTP Status Code Registry for details. | Status Code: 400. |
Message | The raw data or captured key error message from the integration API server about the API request failure. | Message: Item was already blocked before. |
Error Sample Data Block URLs failed. Status Code: 400. Message: Item was already blocked before. |
Get Network Object
Retrieves information on the specified network objects via the ASA Rest API service.
Input
Input Parameter | Required/Optional | Description | Example |
Object IDs | Required | The name or names of the objects from which to retrieve information. |
JSON
|
Output
To view the sample output data for all commands, refer to this article.
Error Handling
If the Return Data is Partially Successful or Failed, an Error tab will appear in the Test Result window.
Parts in Error | Description | Example |
Failure Indicator | Indicates the command failure that happened at a specific input and/or API call. | Get Network Object failed. |
Status Code | The response code issued by the third-party API server or the D3 SOAR system that can be used to locate the corresponding error category. For example, if the returned status code is 401, the selected connection is unauthorized to run the command. The user or system support would need to check the permission setting in the Cisco Adaptive Security Appliance portal. Refer to the HTTP Status Code Registry for details. | Status Code: 404. |
Message | The raw data or captured key error message from the integration API server about the API request failure. | Message: RESOURCE-NOT-FOUND. |
The error tab contains the details responded from D3 SOAR or third-party API calls, including Failure Indicator, Status Code, and Message. This can help you locate the root cause of a command failure.
Error Sample Data Get Network Object failed. Status Code: 404. Message: RESOURCE-NOT-FOUND. |
Run Commands
Runs the specified commands on the ASA using the REST API, HTTP Automation Interface, or SSH tunnel. Commands executed over an SSH tunnel are run in privileged mode.
Input
Input Parameter | Required/Optional | Description | Example |
Commands List | Required | The commands to run. Refer to the Commands List Values section for available input values. |
JSON
|
Show Commands Output in Custom Log | Optional | Whether to display the ASA command output in D3's custom log tab to simulate console-style output. By default, this is disabled. | False |
Commands List Values
The following outlines the available input values for the Commands List parameter. Ensure to replace placeholders enclosed in angle brackets (e.g., <name>) with actual values, such as show run object network | begin corp_app_netgroup for the Show Specific Object Network command.
Show All Object Network Group:
show run object-group networkShow All Object Network:
show run object networkShow Specific Object Network:
show run object network | begin <name>Create an IP Object
conf t
object network <hostobjectname>
host <ip>
exit
write memory # This saves the current configuration to persistent memory
Create a URL Object
conf t
object network <fqdnobjectname>
fqdn <url>
exit
write memory # This saves the current configuration to persistent memory
Block IPs
conf t
object-group network <objectgroup>
network-object object <hostobjectname>
exit
write memory # This saves the current configuration to persistent memory
Block URLs:
conf t
object-group network <objectgroup>
network-object object <fqdnobjectname>
exit
write memory # This saves the current configuration to persistent memory
Unblock IPs
conf t
object-group network <objectgroup>
no network-object object <hostobjectname>
exit
write memory # This saves the current configuration to persistent memory
Unblock URLs
conf t
object-group network <objectgroup>
no network-object object <fqdnobjectname>
exit
write memory # This saves the current configuration to persistent memory
Output
To view the sample output data for all commands, refer to this article.
Error Handling
If the Return Data is Partially Successful or Failed, an Error tab will appear in the Test Result window.
The error tab contains the details responded from D3 SOAR or third-party API calls, including Failure Indicator, Status Code, and Message. This can help you locate the root cause of a command failure.
Parts in Error | Description | Example |
Failure Indicator | Indicates the command failure that happened at a specific input and/or API call. | Run Commands failed. |
Status Code | The response code issued by the third-party API server or the D3 SOAR system that can be used to locate the corresponding error category. For example, if the returned status code is 401, the selected connection is unauthorized to run the command. The user or system support would need to check the permission setting in the Cisco Adaptive Security Appliance portal. Refer to the HTTP Status Code Registry for details. | Status Code: 400. |
Message | The raw data or captured key error message from the integration API server about the API request failure. | Message: Invalid input detected at '^' marker. |
Error Sample Data Run Commands failed. Status Code: 400. Message: Invalid input detected at '^' marker. |
Unblock IPs
Removes IP addresses from the specified blocklist group via the ASA Rest API service.
READER NOTE
IPs and Groups are required parameters to run this command.
The input IPs you must be in your designated input group. If they are not, the error message "Item was not found in blocked item array," will return. To view the list of blocklist groups, navigate to Configuration > Firewall > Objects > Network Objects/Groups from the Cisco ASA user interface. To add a group, click Add Network Object Group. To view the IP addresses within a group, navigate to the Network Object Groups section at the bottom, and expand the desired group by clicking the "+" sign.

Input
Input Parameter | Required/Optional | Description | Example |
IPs | Required | The array of IP addresses to remove from the specified blocklist group. |
JSON
|
Group | Required | The name of the blocklist group from which the specified IP addresses will be removed. | TEST_GROUP3 |
Output
To view the sample output data for all commands, refer to this article.
Error Handling
If the Return Data is Partially Successful or Failed, an Error tab will appear in the Test Result window.
The error tab contains the details responded from D3 SOAR or third-party API calls, including Failure Indicator, Status Code, and Message. This can help you locate the root cause of a command failure.
Parts in Error | Description | Example |
Failure Indicator | Indicates the command failure that happened at a specific input and/or API call. | Unblock IPs failed. |
Status Code | The response code issued by the third-party API server or the D3 SOAR system that can be used to locate the corresponding error category. For example, if the returned status code is 401, the selected connection is unauthorized to run the command. The user or system support would need to check the permission setting in the Cisco Adaptive Security Appliance portal. Refer to the HTTP Status Code Registry for details. | Status Code: 404. |
Message | The raw data or captured key error message from the integration API server about the API request failure. | Message: Item was not found in blocked item array. |
Error Sample Data Unblock IPs failed. Status Code: 404. Message: Item was not found in blocked item array. |
Unblock URLs
Removes URLs from the specified blocklist group via the ASA Rest API service.
READER NOTE
URLs and Groups are required parameters to run this command.
The input URLs you must be in your designated input group. If they are not, the error message "Item was not found in blocked item array," will return. To view the list of blocklist groups, navigate to Configuration > Firewall > Objects > Network Objects/Groups from the Cisco ASA user interface. To add a group, click Add Network Object Group. To view the URLs within a group, navigate to the Network Object Groups section at the bottom, and expand the desired group by clicking the "+" sign.
Input
Input Parameter | Required/Optional | Description | Example |
URLs | Required | The array of URLs to remove from the specified blocklist group. |
JSON
|
Group | Required | The name of the blocklist group from which the specified IP addresses will be removed. | TEST_GROUP3 |
Output
To view the sample output data for all commands, refer to this article.
Error Handling
If the Return Data is Partially Successful or Failed, an Error tab will appear in the Test Result window.
The error tab contains the details responded from D3 SOAR or third-party API calls, including Failure Indicator, Status Code, and Message. This can help you locate the root cause of a command failure.
Parts in Error | Description | Example |
Failure Indicator | Indicates the command failure that happened at a specific input and/or API call. | Unblock URLs failed. |
Status Code | The response code issued by the third-party API server or the D3 SOAR system that can be used to locate the corresponding error category. For example, if the returned status code is 401, the selected connection is unauthorized to run the command. The user or system support would need to check the permission setting in the Cisco Adaptive Security Appliance portal. Refer to the HTTP Status Code Registry for details. | Status Code: 404. |
Message | The raw data or captured key error message from the integration API server about the API request failure. | Message: Item was not found in blocked item array. |
Error Sample Data Unblock URLs failed. Status Code: 404. Message: Item was not found in blocked item array. |
Test Connection
Allows users to perform a health check on an integration connection. Users can schedule a periodic health check by selecting Connection Health Check when editing an integration connection.
Input
N/A
Output
Output Type | Description | Return Data Type |
Return Data | Indicates one of the possible command execution states: Successful or Failed. The Failed state can be triggered by any of the following errors:
More details about an error can be viewed in the Error tab. | String |
Error Handling
If the Return Data is Failed, an Error tab will appear in the Test Result window.
The error tab contains the details responded from D3 SOAR or third-party API calls, including Failure Indicator, Status Code, and Message. This can help you locate the root cause of a command failure.
Parts in Error | Description | Example |
Failure Indicator | Indicates the command failure that happened at a specific input and/or API call. | Test Connection failed. |
Status Code | The response code issued by the third-party API server or the D3 SOAR system that can be used to locate the corresponding error category. For example, if the returned status code is 401, the selected connection is unauthorized to run the command. The user or system support would need to check the permission setting in the Cisco Adaptive Security Appliance portal. Refer to the HTTP Status Code Registry for details. | Status Code: 400. |
Message | The raw data or captured key error message from the integration API server about the API request failure. | Message: failed to get the access token, please check the connection Username and Password. |
Error Sample Data Test Connection failed. Failed to check the connector. Status Code: 400. Message: failed to get the access token, please check the connection Username and Password. |
FAQ
Question 1
Why am I encountering a test connection error with the REST API or HTTP method?
Answer: Confirm that the configuration steps specific to the applicable connection method—REST API or HTTP Interface for Automation—have been properly followed.
Question 2
I have completed the configuration for the REST API or HTTP method, but the test connection still fails. What should I do?
Answer: Install an agent and apply it to the integration connection. If the issue continues, contact D3 Support for assistance.
Question 3
Why am I unable to execute the Run Commands command when using an SSH connection type?
Answer: Ensure that the Allow privileged users to enter into EXEC mode on login option is enabled, as demonstrated here.