
AWS Security Hub
LAST UPDATED: SEPTEMBER 18, 2025
Overview
AWS Security Hub collects security data from across AWS accounts and services, and helps to analyze security trends to identify and prioritize the security issues across an AWS environment.
D3 SOAR is providing REST operations to function with AWS SecurityHub.
For example, Security Hub can be used to collect and centralize security events from all AWS Accounts into one single spot on AWS.
AWS SecurityHub is available for use in:
Known Limitations
Region Control
Security Hub API requests are executed only in the Amazon Web Services Region that is currently active, or in the specific Amazon Web Services Region specified in the request. Any configuration or settings change resulting from the operation is applied only to that region.
Throttling Limits
The following throttling limits apply when using Security Hub API operations:
BatchEnableStandards
RateLimit of 1 request per second
BurstLimit of 1 request per second
GetFindings
RateLimit of 3 requests per second
BurstLimit of 6 requests per second
BatchImportFindings
RateLimit of 10 requests per second
BurstLimit of 30 requests per second
BatchUpdateFindings
RateLimit of 10 requests per second
BurstLimit of 30 requests per second
UpdateStandardsControl
RateLimit of 1 request per second
BurstLimit of 5 requests per second
All other operations
RateLimit of 10 requests per second
BurstLimit of 30 requests per second
Refer to AWS Security Hub quotas for detailed information.
Connection
To connect to AWS SecurityHub from D3 SOAR, follow this part to collect the required information below:
Parameter | Description | Example |
Region Name | The AWS region name. | Canada (Central) |
Access Key | The access key for authentication. Check the Policy Permission for this access key in the AWS Management Console and ensure that this access key includes the GetFindings permission. | AKIA*****4CYL |
Secret Key | The secret key for authentication. | Xdwc*****XSdH |
Default Role ARN | The Amazon Resource Name (ARN) of the IAM role to assume from the AWS console. The role must have required permissions and trust the connection account. Refer to Switching to an IAM role (AWS API) - AWS Identity and Access Management. | arn:aws:iam::391*****688:role/d3securityhubrole |
Default Role Session Name | The identifier for the assumed role session. Use a unique name to distinguish sessions, especially when the same role is used by different principals or purposes. Valid characters include alphanumerics, underscores, and =,.@-. If unspecified, D3 auto-generates a name when a Default Role ARN is provided. | d3securityhubrole_Session1 |
Default Session Duration Time | The duration of the role session in seconds. Valid values range from 900 (15 minutes) to the role's maximum session duration of 3600 (1 hour). By default, the value is 3600. | 1800 |
Permission Requirements
Each endpoint in the AWS SecurityHub API requires a certain permission scope. The following are required scopes for the commands in this integration:
Command | Policy | |
Service | Access level (Actions) | |
Fetch Event | SecurityHub | GetFindings |
Configuring AWS SecurityHub to Work with D3 SOAR
Access Key Retrieval for Users Without Policy Configuration
If the login user does not require policy configuration, follow the steps below to retrieve the access key and secret key.
Sign in to the AWS console.
Click the account icon, then select Security Credentials.
Under the AWS IAM credentials tab, click the Create access key button to create a new Access Key and Secret Key.
READER NOTE
Contact the organization administrator if the login user lacks permission to read or create an access key.
Copy the Access key ID and the Secret access key to use for connecting with D3 SOAR.
READER NOTE
The secret access key is viewable or downloadable only once. Promptly download the .csv file and store it securely. Lost or forgotten keys cannot be recovered. To replace a lost key, create a new access key and deactivate the old one. A maximum of two access keys (active or inactive) is allowed per user.
Configuring Limited API Access
To configure limited API access for role-based access control, complete the following sections in the order presented.
Creating a Policy
Navigate to Services > IAM.
Navigate to Access management > Policies, then click the Create Policy button.
Select Service, then click Choose a service. Refer to the Permission Requirements for the selected service. Click Next to continue.
Search and assign using the search bar in the Actions allowed section. For example, search for GetFindings in the search box, and use the tick box underneath it to select this action. Refer to Permission Requirements for the necessary Access level (Actions). It is possible to specify multiple permissions under the same policy. Cick Next to continue.
Enter a name in the text box under Policy name, then click Create policy.
Creating a User
Locate the Users tab, then enter a user name into the User details field. Click Next.
Select the desired permissions under Permissions options. It is recommended to link directly to the created policy. Refer to Creating Policy for more information.
Alternatively, create a role with the desired permissions. Refer to Adding a Role and Trusted Entities for creating user roles. Once the role is created, it is not required to assign the role directly to the user. Instead, assign the role through the D3 connection or D3 commands. Refer to AssumeRole - AWS Security Token Service for details.
Click Next.
Review the details, and click Create user.
Find the newly created user, then copy the User ARN.
Adding a Role and Trusted Entities
Sign in to the AWS IAM console using administrator credentials.
Select Roles, then click the Create role button.
Select AWS account under Trusted entity type. Select the appropriate account under An AWS account based on the request, then click Next.
Search for the policy name, add the required permissions, then click Next.
Enter the Role name, and click Create role.
Navigate to Roles, and select the newly created role. Click Create rule.
Navigate to Roles and select the Trust relationships tab. Click Edit trust policy.
Return to Edit trust policy in another browser tab/window. Paste the following code to the trust policy, paste the copied user ARN (refer to step 5 of Creating User for retrieving the user ARN) in the "AWS" field in the code. Click Update policy.
JSON{ "Version": "2012-10-17", "Statement": [ { "Sid": "", "Effect": "Allow", "Principal": { "AWS": "arn:aws:iam::******:user/DOC_User", "Service": "securityhub.amazonaws.com" }, "Action": "sts:AssumeRole" } ] }
RESULT
The Role ARN is ready to use.
Retrieving the Access Key and Secret Key
Find the newly created user, then select it to access the details.
Under the Security credentials tab, click Create access key.
Create an access key and save the details. Click Done after saving these credentials.
Configuring D3 SOAR to Work with AWS SecurityHub
Log in to D3 SOAR.
Find the AWS SecurityHub integration.

Navigate to Configuration on the top header menu.
Click on the Integration icon on the left sidebar.
Type AWS SecurityHub in the search box to find the integration, then click it to select it.
Click + Connection, on the right side of the Connections section. A new connection window will appear.
Configure the following fields to create a connection to AWS SecurityHub.
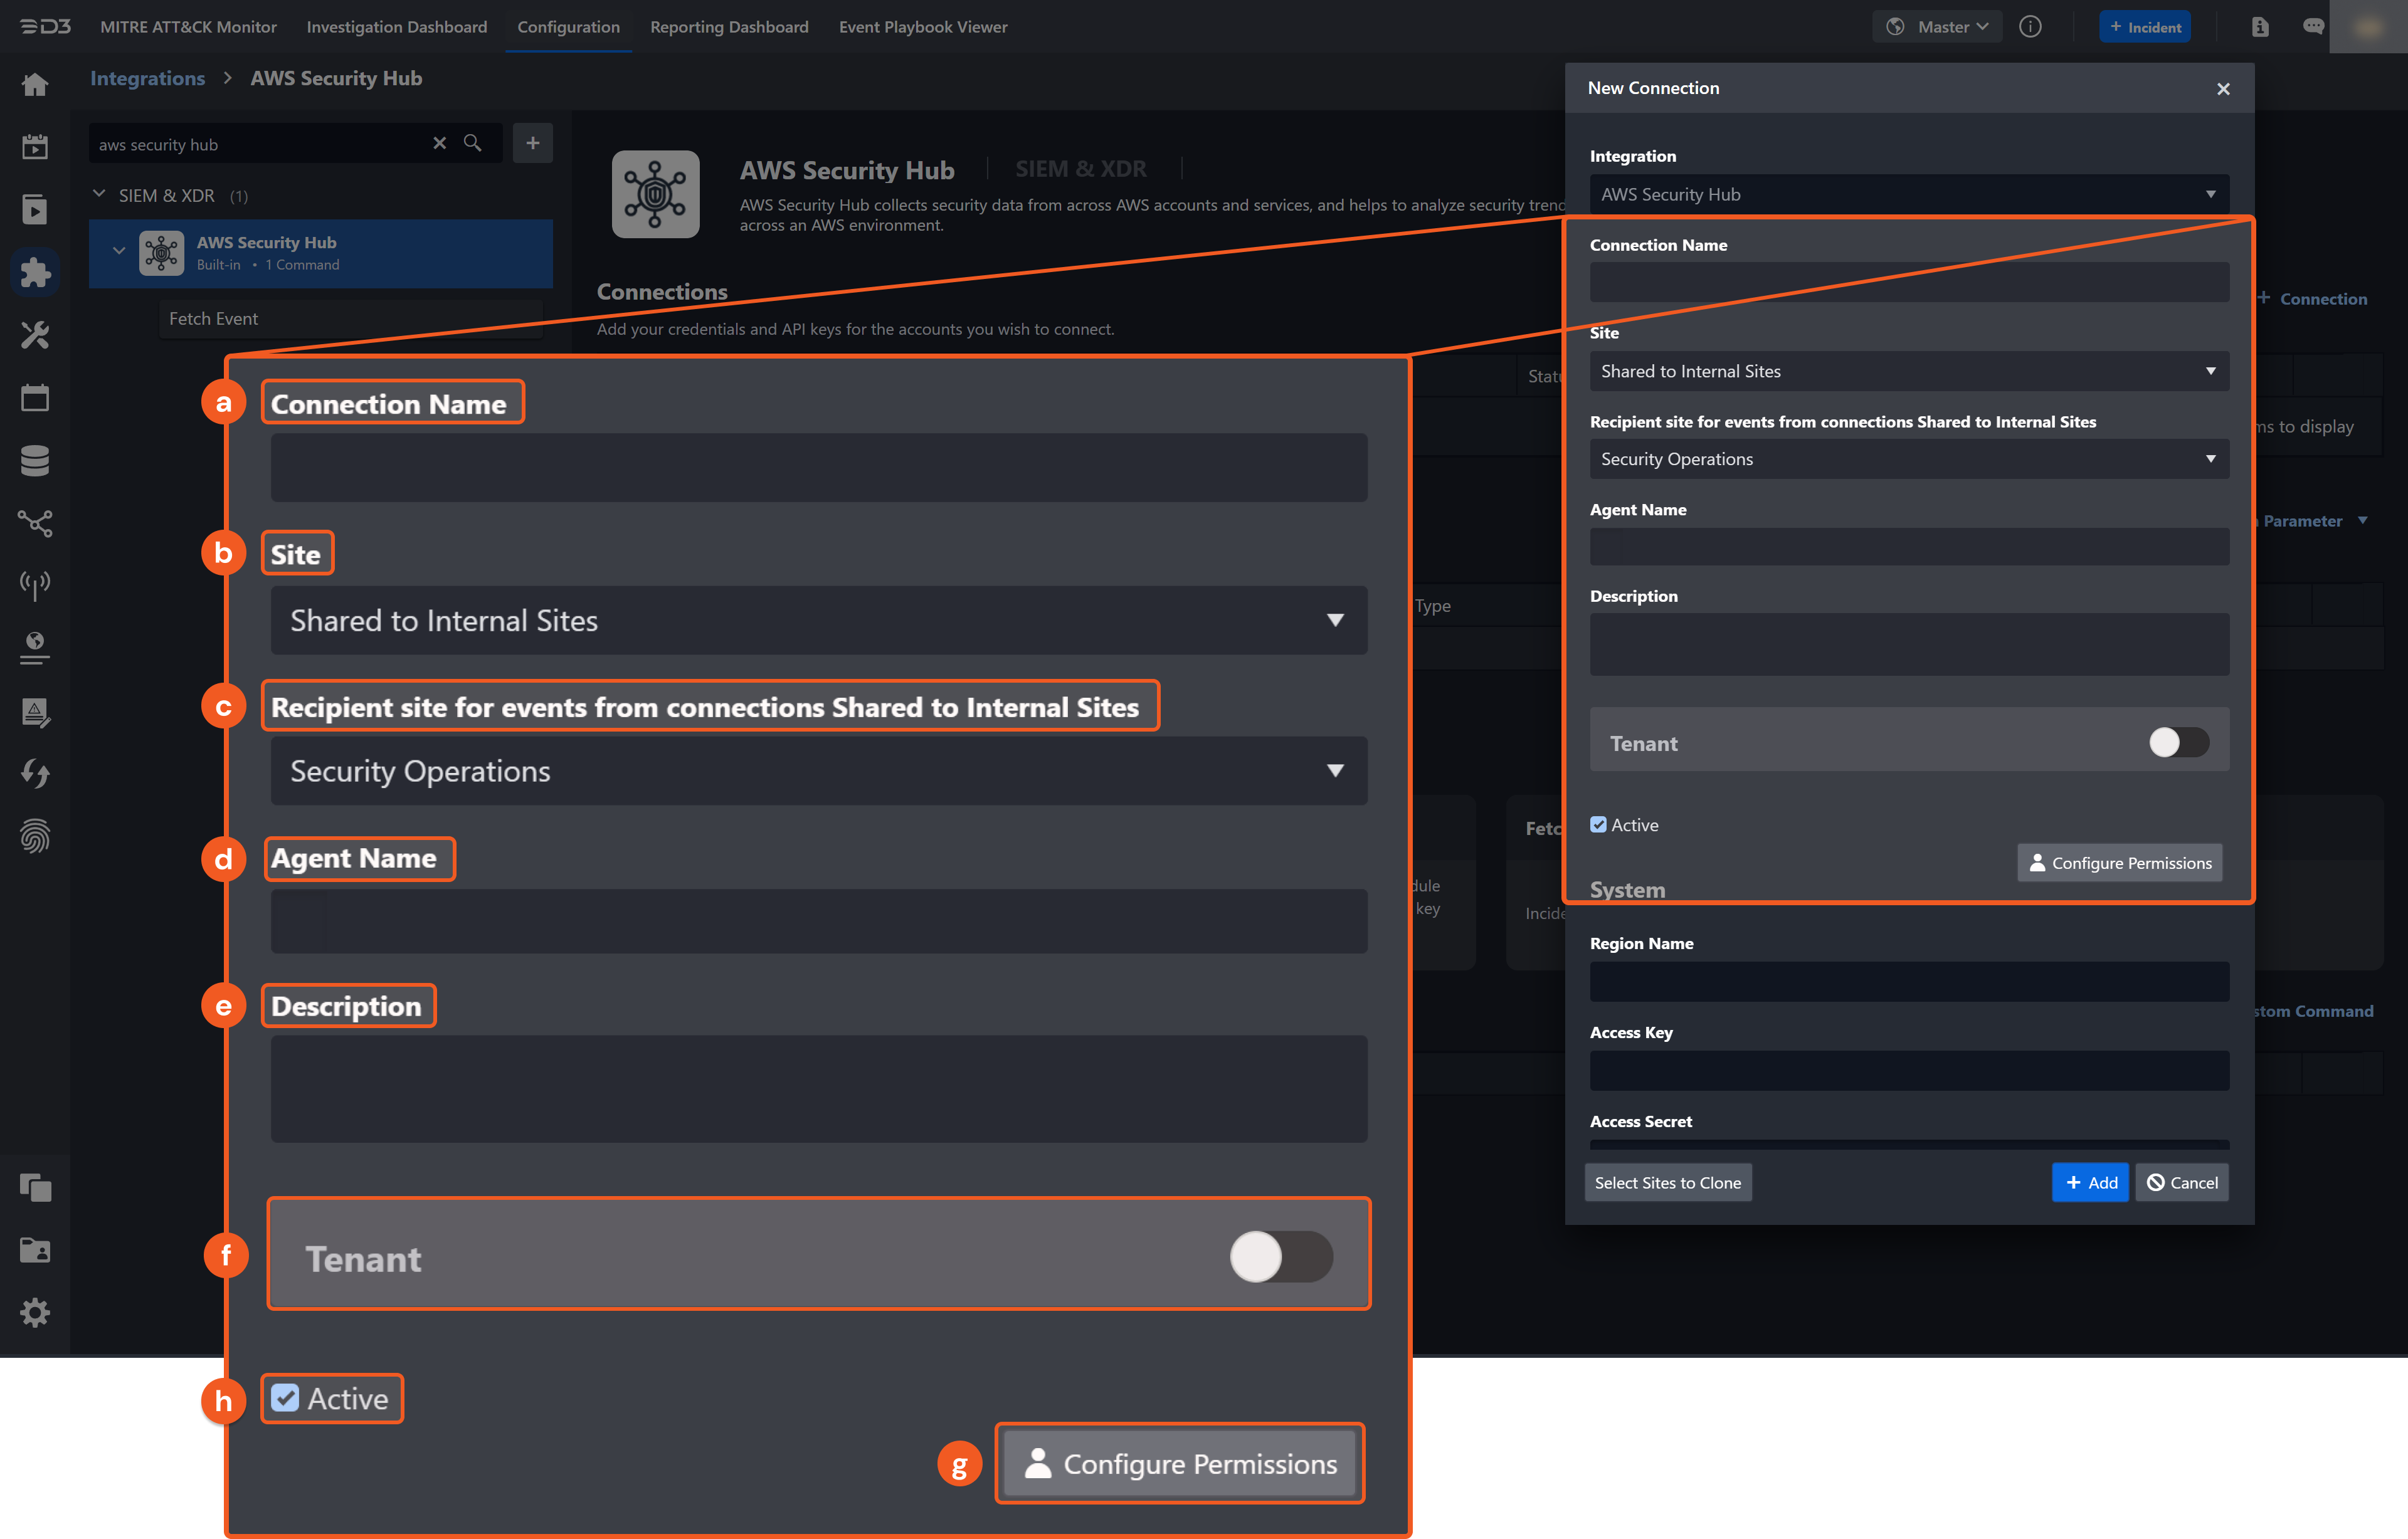
Connection Name: The desired name for the connection.
Site: The site on which to use the integration connection. Use the drop-down menu to select the site. The Share to Internal Sites option enables all internal sites to use the connection. Selecting a specific site will only enable that site to use the connection.
Recipient site for events from connections Shared to Internal Sites: This field is displayed when Share to Internal Sites is selected for the Site field, allowing selection of the internal site for deploying the integration connection.
Agent Name (Optional): The proxy agent required to build the connection. Use the dropdown menu to select the proxy agent from a list of previously configured proxy agents.
Description (Optional): The description for the connection.
Tenant (Optional): When configuring the connection from a master tenant site, users can choose the specific tenant sites with which to share the connection. Once this setting is enabled, users can filter and select the desired tenant sites from the dropdowns to share the connection.
Configure User Permissions: Defines which users have access to the connection.
Active: The checkbox that enables the connection to be used when selected.
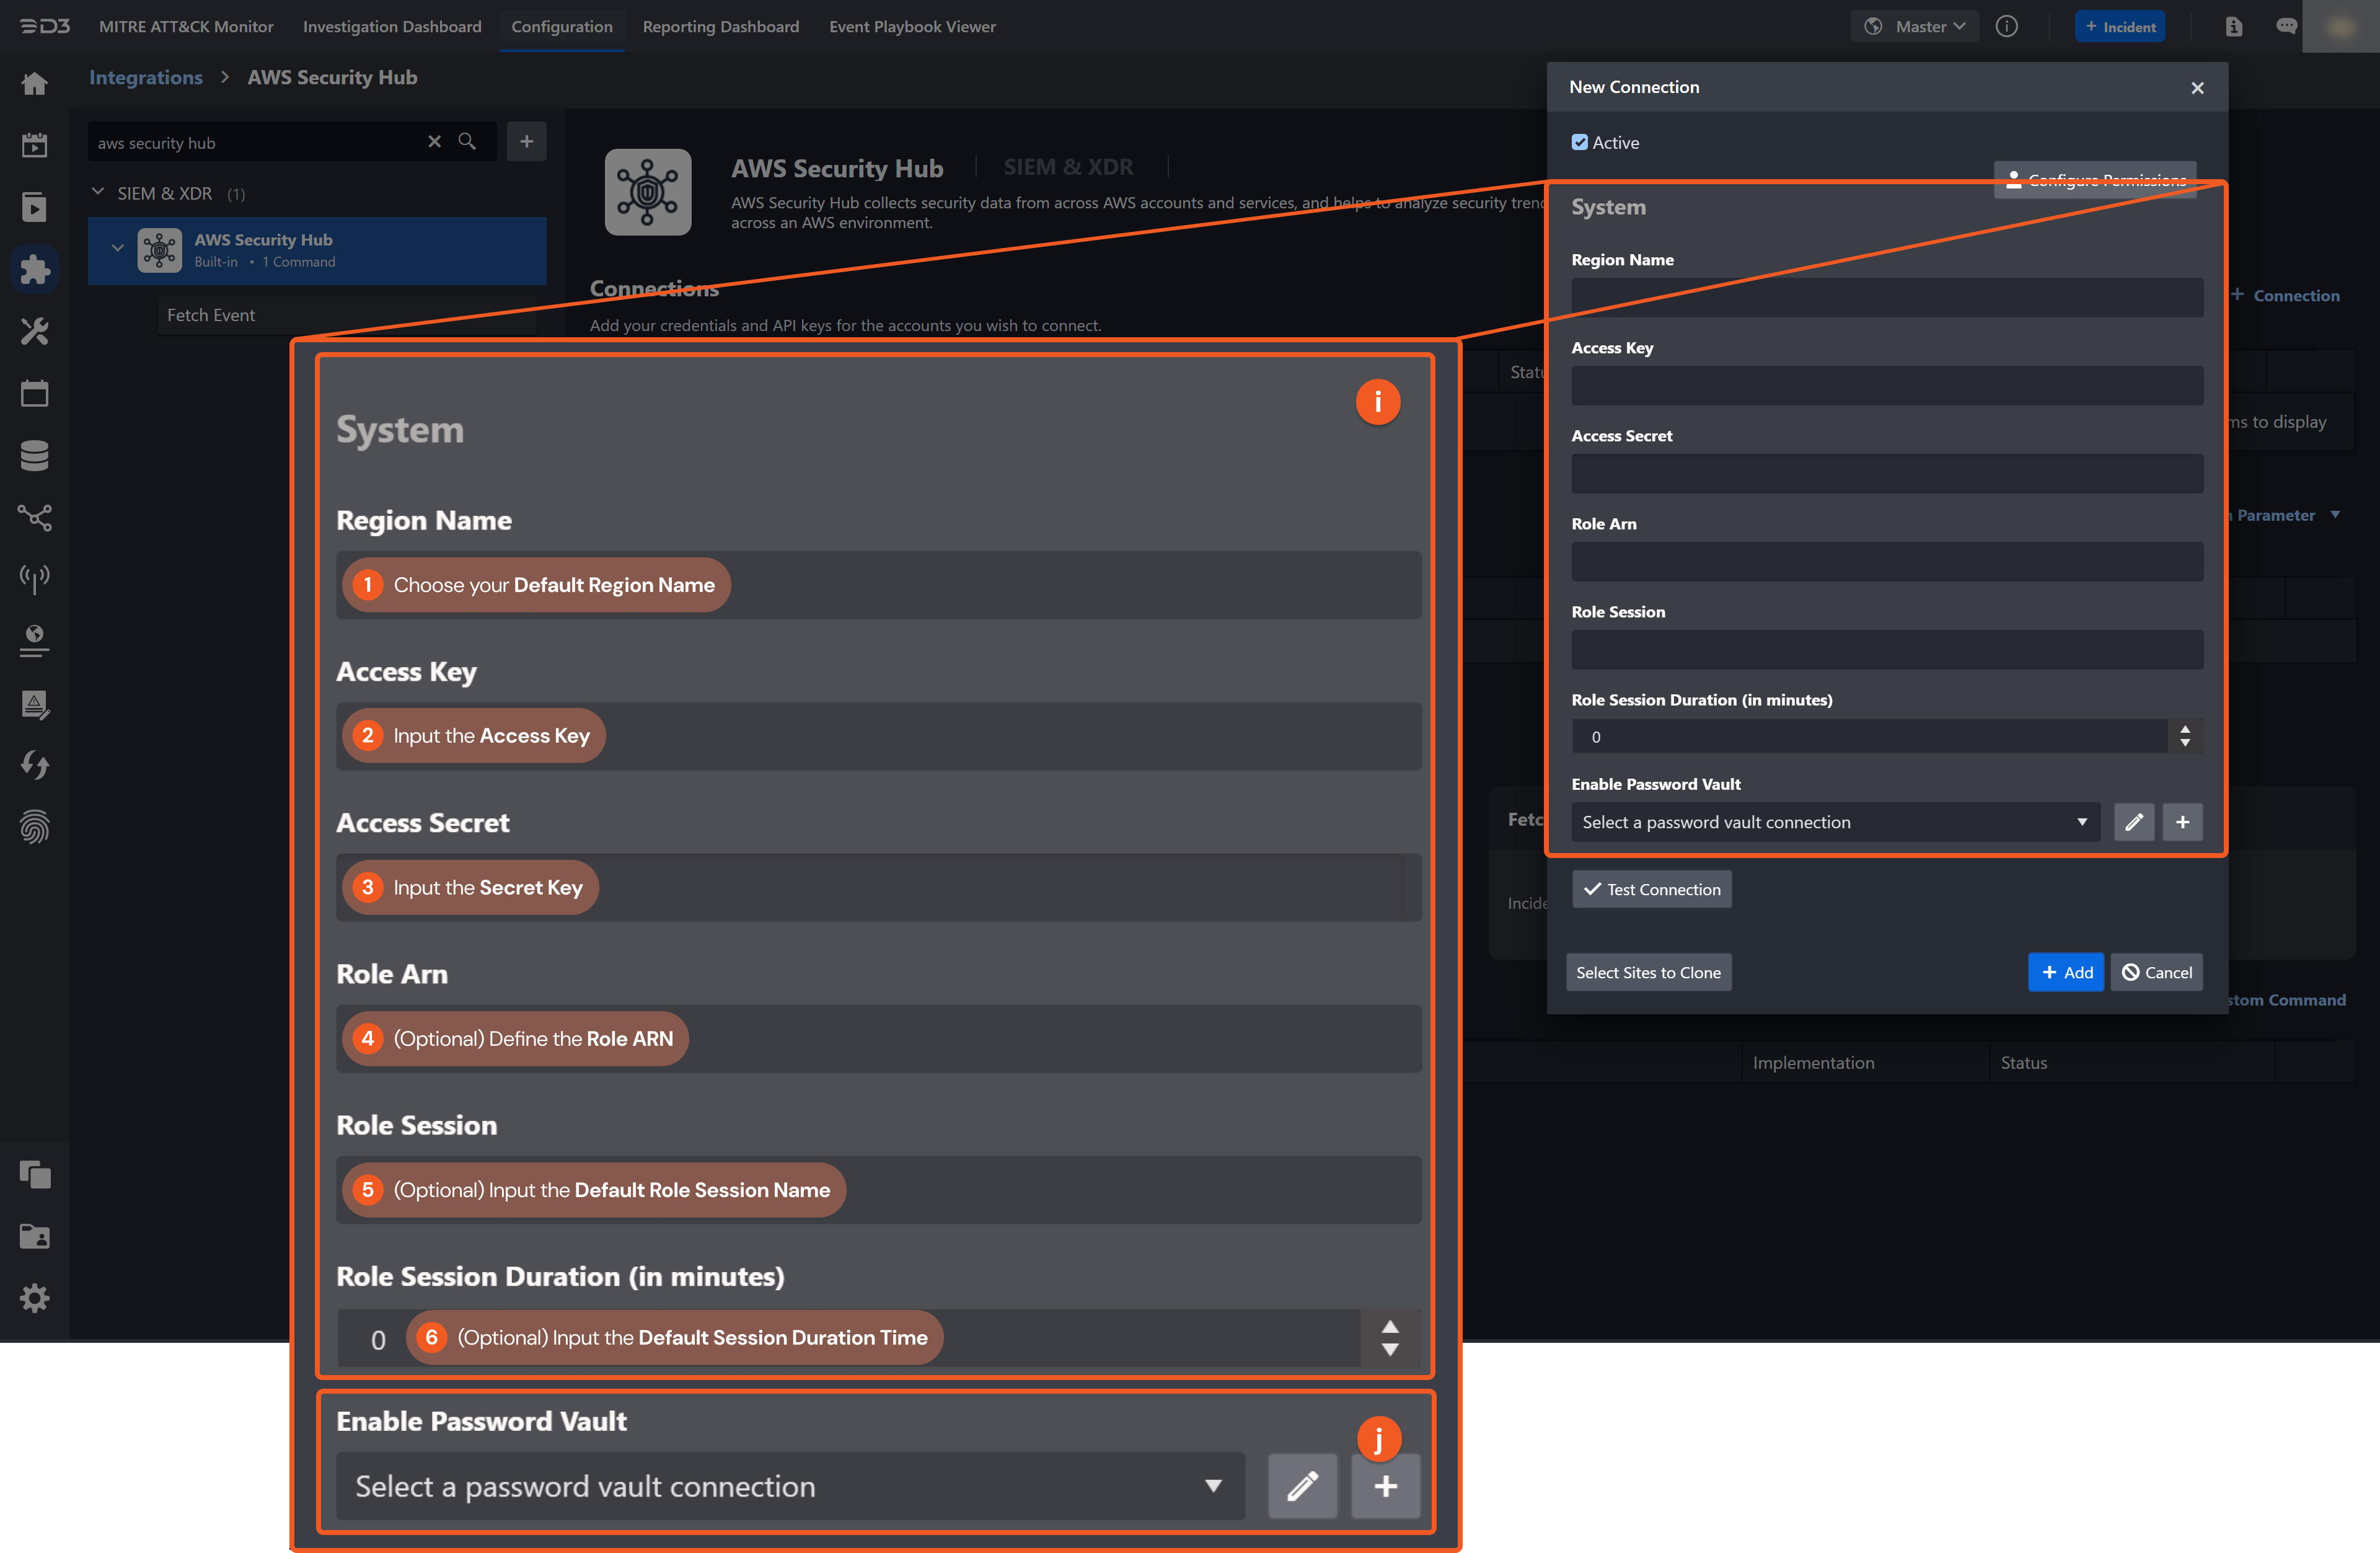
System: This section contains the parameters defined specifically for the integration. These parameters must be configured to create the integration connection.
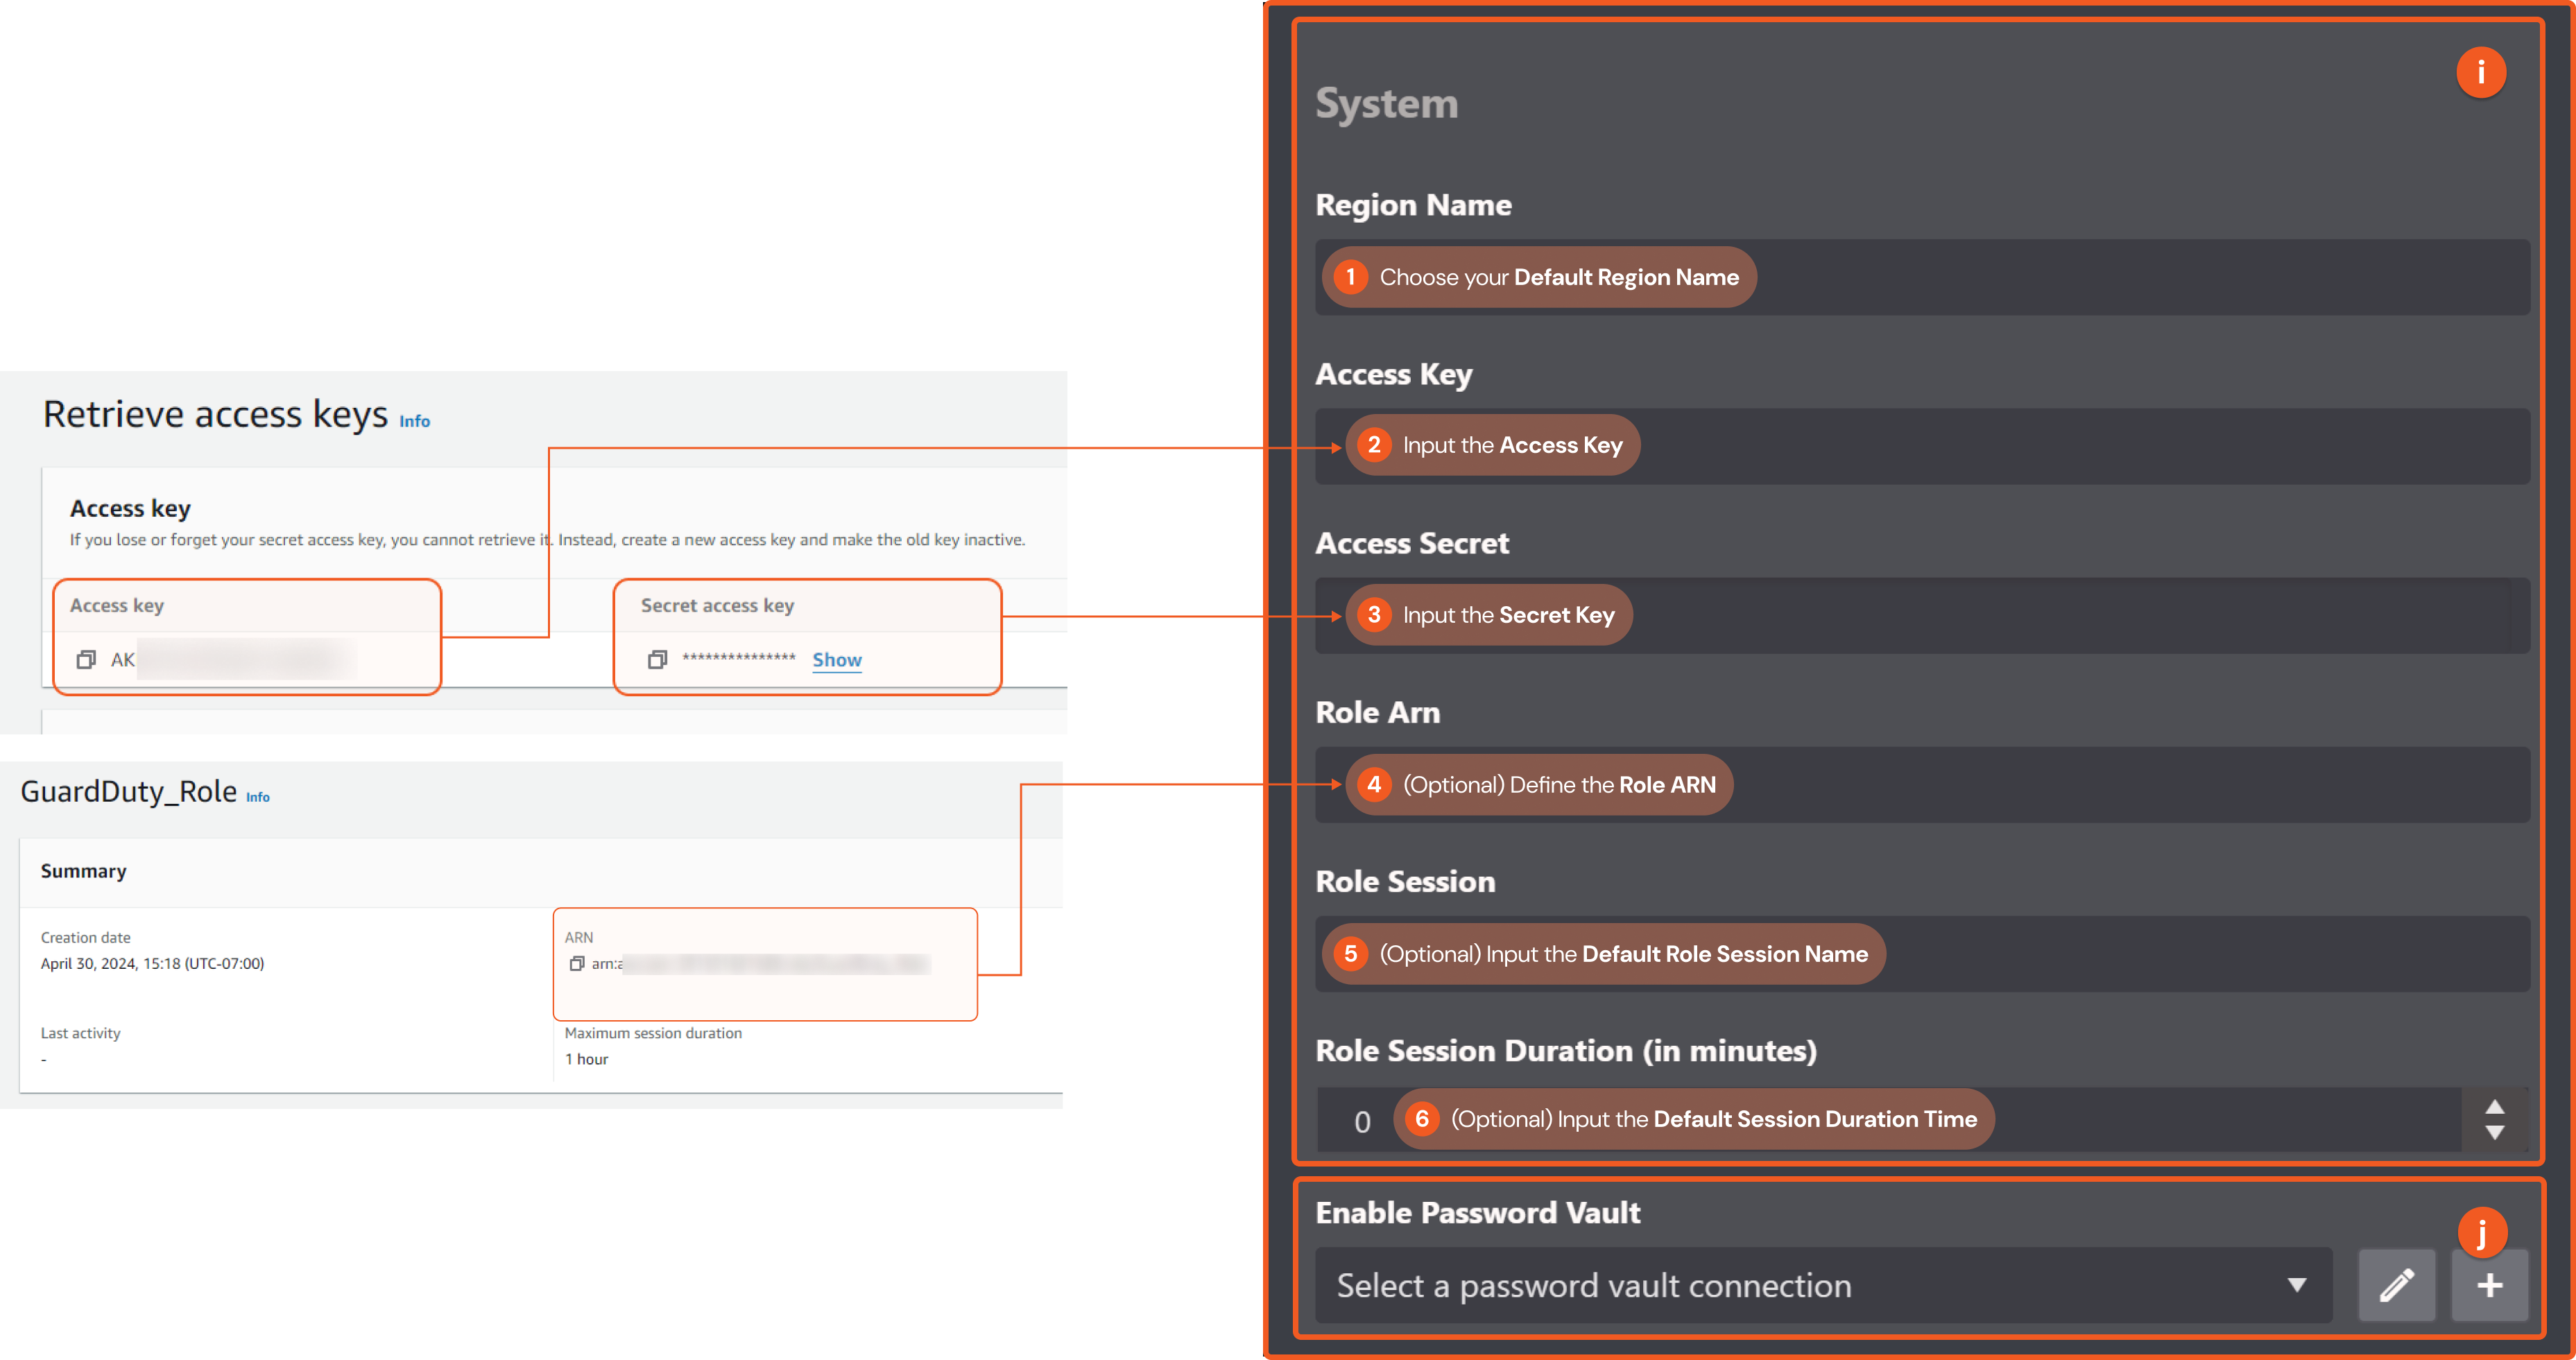
1. Choose the Default Region Name.
2. Copy the Access Key from the AWS Console platform. Refer to step 3 of Access Key and Secret Key.
3. Copy the Secret Key from the AWS console platform. Refer to step 3 of Access Key and Secret Key.
4. (Optional) Define the Role ARN from the AWS Console platform. Refer to step 9 of Adding a Role and Trusted Entities.
5. (Optional) Input the Default Role Session Name.
6. (Optional) Input the Default Session Duration Time.Enable Password Vault: An optional feature that allows users to take the stored credentials from their own password vault. Refer to the password vault connection guide if needed.
Test the connection.
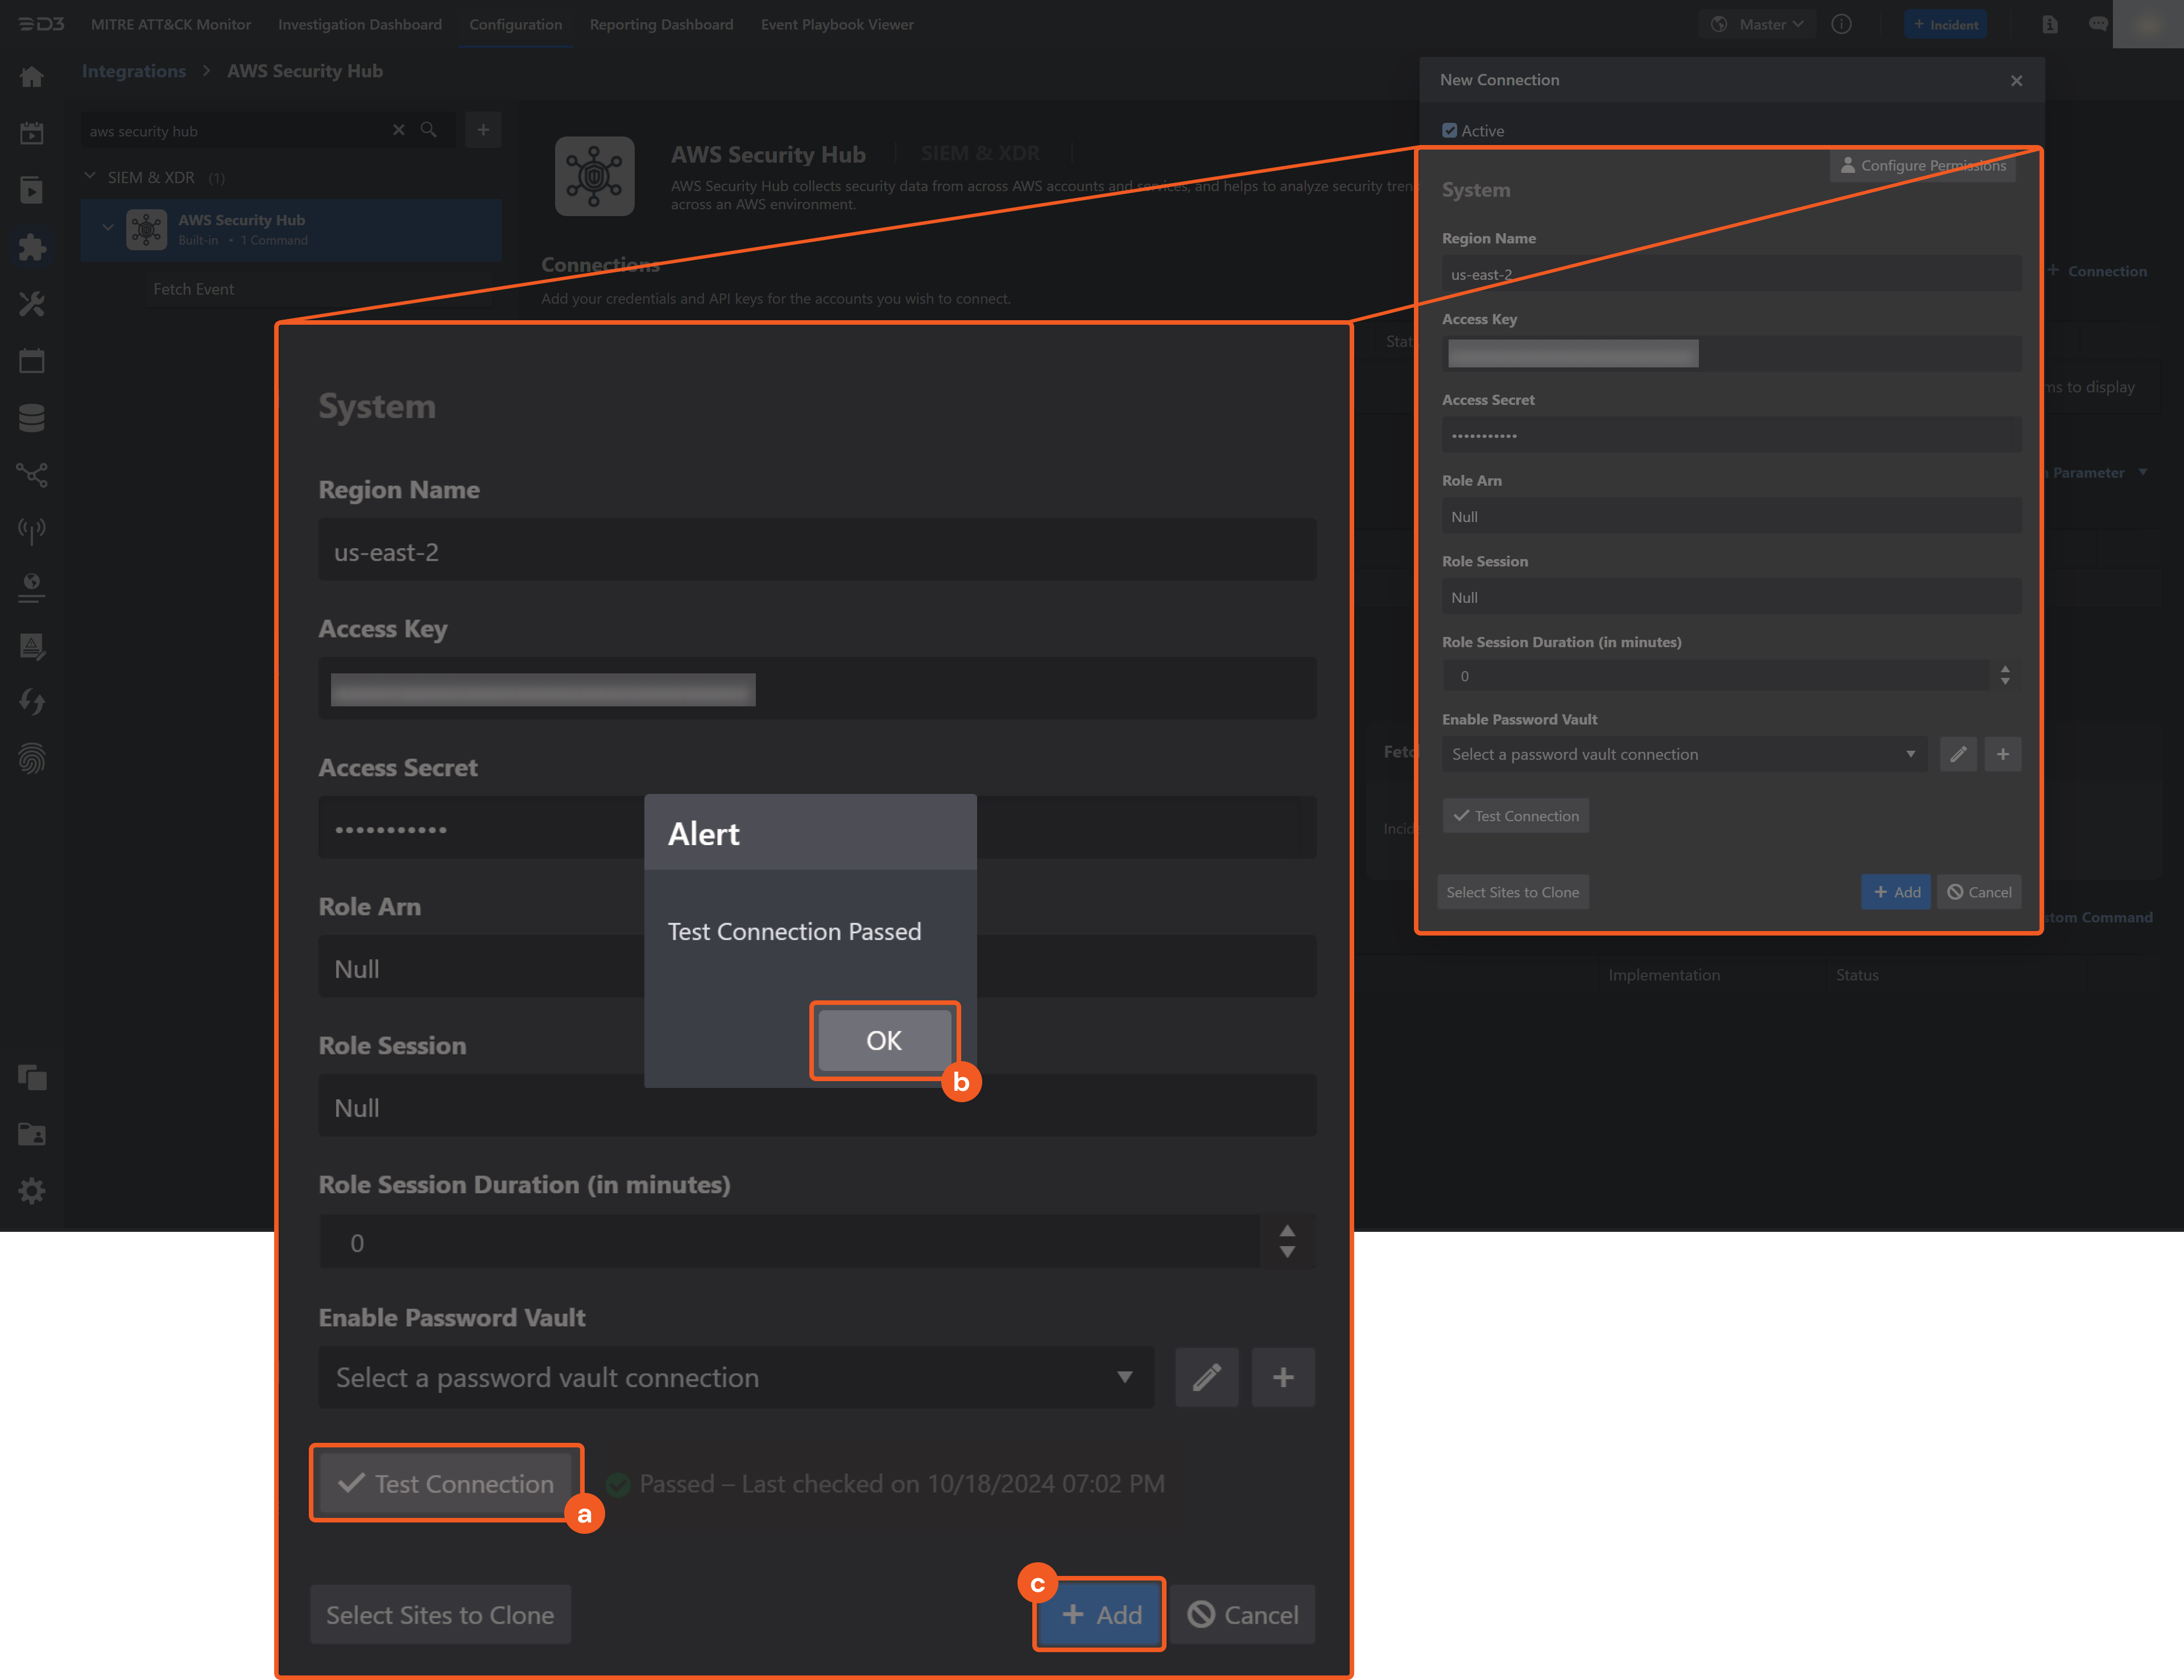
Click on the Test Connection button to verify credentials and connectivity. A success alert displays Passed with a green checkmark. If the connection fails, review the parameters and retry.
Click OK to close the alert window.
Click + Add to create and add the configured connection.
Commands
AWS SecurityHub includes the following executable commands for users to set up schedules or create playbook workflows. With the Test Command, users can execute these commands independently for playbook troubleshooting.
Integration API Note
For more information about the AWS SecurityHub API, refer to the AWS SecurityHub API reference.
READER NOTE
Certain permissions are required for each command. Refer to the Permission Requirements and Configuring AWS SecurityHub to Work with D3 SOAR for details.
Note for Time-related parameters
The input format of time-related parameters may vary based on user account settings, which may cause the sample data in commands to differ from what is displayed. To adjust the time format, follow these steps:
Navigate to Configuration > Application Settings. Select Date/Time Format.
-20241017-192013.png?inst-v=9d16beaf-952a-4ae4-8fe8-e35f7a3745da)
Choose the desired date and time format, then click on the Save button.
-20241017-192025.png?inst-v=9d16beaf-952a-4ae4-8fe8-e35f7a3745da)
The selected time format will now be visible when configuring Date/Time command input parameters.
Batch Update Findings
READER NOTE
Finding IDs and Product ARN are required parameters to run this command.
Run the Fetch Event command to obtain the Finding IDs. Finding IDs can be found in the raw data at $.Findings[*].Id.
Run the Fetch Event command to obtain the Product ARN. Product ARNs can be found in the raw data at $.Findings[*].ProductArn.
Used by Security Hub administrators and members to update investigation details for a finding. Administrator accounts can update findings for their own account and member accounts. Member accounts can update findings only for their own account.
Input
Input Parameter | Required/Optional | Description | Example |
Region Name | Optional | The AWS region for accessing resources. By default, the value is derived from the Default Region Name connection parameter. | Canada (Central): ca-central-1 |
Role ARN | Optional | The Amazon Resource Name (ARN) of the role to assume. By default, the value is derived from the Default Role ARN connection parameter. The assumed role must have the necessary permissions to execute related commands and must trust the connection account. For trust policy configuration, refer to AWS Edit Trust Policy. | arn:aws:iam::391501681688:role/d3securityhubrole |
Role Session Name | Optional | The identifier for the assumed role session. Use a unique name to distinguish sessions. Valid characters include upper- and lower-case alphanumerics, underscores, and =,.@-. By default, a session name is auto-generated when Role ARN is specified. | d3securityhubrole_Session1 |
Session Duration Time | Optional | The duration of the assumed role session in seconds. Valid values range from 900 to the maximum session duration of 3600. If this parameter is omitted but the Role ARN parameter is provided, the default value of 3600 is used. | 1800 |
Finding IDs | Required | The list of findings to update. A maximum of 100 findings can be updated in a single request. All findings must be generated by the same product. To update findings from different products, run the command separately for each ARN. Finding IDs can be obtained using the Fetch Event command. |
JSON
|
Product ARN | Required | The ARN of the product that generates the findings. This may refer to a third-party product integrated with Security Hub or a custom integration. Product ARN can be obtained using the Fetch Event command. | arn:aws:securityhub:us-east-2::product/aws/securityhub |
Note Text | Optional | The updated note text. If a value is provided for this field, the Note Updated By parameter becomes required. | Note text on 715 |
Note Updated By | Optional | The principal who updated the note. If a value is provided for this field, the Note Text parameter becomes required. | jdoe |
Normalized Severity | Optional | The normalized severity score for the finding. This attribute is deprecated in favour of Severity Label. Valid values range from 0 to 100. If this value is provided without Severity Label, the system automatically assigns a label: 0 = INFORMATIONAL, 1–39 = LOW, 40–69 = MEDIUM, 70–89 = HIGH, 90–100 = CRITICAL. | 50 |
Product Severity | Optional | The native severity as defined by the Amazon Web Services service or integrated partner product that generated the finding. | 50.0 |
Severity Label | Optional | The severity label of the finding. Available options are:
| MEDIUM |
Verification State | Optional | The veracity of the finding. Available options are:
| FALSE_POSITIVE |
Confidence | Optional | The updated confidence score for the finding. Confidence represents the likelihood that the finding accurately identifies the intended behavior or issue. The score uses a ratio scale from 0 to 100, where 0 means zero percent confidence and 100 means 100 percent confidence. | 90 |
Criticality | Optional | The updated score indicating the importance of the resources related to the finding. A score of 0 indicates no operational impact, while a score of 100 represents maximum critical importance. | 70 |
Finding Types | Optional | The classification types assigned to the finding. The format must be namespace/category/classifier. Valid namespace values are: Software and Configuration Checks, TTPs, Effects, Unusual Behaviors, and Sensitive Data Identifications. |
JSON
|
User Defined Fields | Optional | A list of name/value string pairs associated with the finding. These are custom, user-defined fields added to a finding. |
JSON
|
Workflow Status | Optional | The status of the investigation into the finding. Available options are:
This value applies only to the individual finding and does not affect the generation of future findings. For example, setting the status to SUPPRESSED or RESOLVED does not prevent new findings for the same issue. | NOTIFIED |
Related Findings | Optional | A list of findings related to the updated finding. Related Findings can be obtained using the Fetch Event command. Each related finding must be an object containing both “ProductArn” and “Id”. Refer to the sample data for the required format. |
JSON
|
Output
To view the sample output data for all commands, refer to this article.
Error Handling
If the Return Data displays Partially Successful or Failed, an Error tab will appear in the Test Result window.
The error tab contains the details responded from D3 SOAR or third-party API calls, including Failure Indicator, Status Code, and Message. This can help locate the root cause of a command failure.
Parts in Error | Description | Example |
Failure Indicator | Indicates the command failure that happened at a specific input and/or API call. | Batch Update Findings failed. |
Status Code | The response code issued by the third-party API server or the D3 SOAR system that can be used to locate the corresponding error category. For example, if the returned status code is 401, the selected connection is unauthorized to run the command. The user or system support would need to check the permission setting in the AWS Security Hub portal. Refer to the HTTP Status Code Registry for details. | Status Code: 400. |
Message | The raw data or captured key error message from the integration API server about the API request failure. | Message: The value for parameter (Related Findings) is invalid. |
Error Sample Data Batch Update Findings failed. Status Code: 400. Message: The value for parameter (Related Findings) is invalid. |
Fetch Event
Returns a list of findings that match the specified criteria.
Input
Input Parameter | Required/Optional | Description | Example |
Start Time | Optional | Returns only events that occur at or after the specified start time (in UTC) based on the selected Query Time Type. | 2022-07-15 00:00 |
End Time | Optional | Returns only events that occur before the specified end time (in UTC) based on the selected Query Time Type. | 2022-07-16 00:00 |
Query Time Type | Required | The time field used for querying. Available options are:
By default, the value is set to Last Observed Time. | First Observed Time |
Number of Event(s) Fetched | Optional | The number of most recent events to retrieve. By default, the value is 100. Retrieving a large number of results may impact system performance, so it is recommended to define an appropriate limit to control the maximum number of returned results. | 5 |
Search Condition | Optional | The finding attributes used to filter returned results. Up to 10 finding attributes can be defined, each supporting up to 20 filter values. Attribute names and values are case-sensitive. For more information, refer to AwsSecurityFindingFilters - AWS Security Hub. If the search condition includes time fields (FirstObservedAt, LastObservedAt, CreatedAt, or UpdatedAt) that match the selected Query Time Type, the Start Time and End Time parameters override the specified values. |
JSON
|
Output
To view the sample output data for all commands, refer to this article.
Fetch Event Field Mapping
See Field Mappings.
The AWS SecurityHub system integration includes pre-configured field mappings for the default event source.
The Default Event Source is the default system-provided set of field mappings applied when the fetch event command is executed. It includes a Main Event JSON Path, which is the JSONPath expression that points to the base array of event objects. The source field path continues from this array to locate the required data.
The Main Event JSON Path can be viewed by clicking on the Edit Event Source button.
.png?inst-v=9d16beaf-952a-4ae4-8fe8-e35f7a3745da)
Main Event JSON Path: $.Findings
The Findings array contains the event objects. Within each object, the key Types denotes the Event Type field. As such, the full JSONPath expression to extract the Event Type is $.Findings.Types.
The pre-configured field mappings are detailed below:
Field Name | Source Field |
actionType | .ProductFields.action/actionType |
d3CompositeType | .d3CompositeType |
Description | .Description |
Destination NT domain | .Network.DestinationDomain |
Destination port | .Network.DestinationPort |
Destination translated IP address | .Network.DestinationIpV4 |
Device volume | .Resources[?(@['Type']=='AwsEc2Instance')].Id |
Event name | .Title |
Event Type | .Types |
Packet Direction | .Network.Direction |
Severity | .Severity.Normalized |
Source MAC address | .Network.SourceMac |
Source port | .Network.SourcePort |
Source translated IP address | .Resources[?(@['Type']=='AwsEc2Instance')].Details.AwsEc2Instance.IpV4Addresses |
Source vendor product name | .ProductFields.aws/securityhub/ProductName |
Start Time | .UpdatedAt |
Transport layer protocol | .Network.Protocol |
Unique Event Key | .uniqueId |
URL | .ProductFields.action/dnsRequestAction/domain |
UtcEventTime | .UpdatedAt |
WMI filter query | .ProductFields.action/dnsRequestAction/domain |
Error Handling
If the Return Data is Partially Successful or Failed, an Error tab will appear in the Test Result window.
The error tab contains the details responded from D3 SOAR or third-party API calls, including Failure Indicator, Status Code, and Message. This can help locate the root cause of a command failure.
Parts in Error | Description | Example |
Failure Indicator | Indicates the command failure that happened at a specific input and/or API call. | Fetch Event failed. |
Status Code | The response code issued by the third-party API server or the D3 SOAR system that can be used to locate the corresponding error category. For example, if the returned status code is 401, the selected connection is unauthorized to run the command. The user or system support would need to check the permission setting in the AWS SecurityHub portal. Refer to the AWS Security Hub API Reference Common Errors for details. | Status Code: 401. |
Message | The raw data or captured key error message from the integration API server about the API request failure. | Message: An error occurred (AccessDeniedException) when calling the GetFindings operation: User is not authorized to perform: securityhub:GetFindings on resource. |
Error Sample Data Fetch Event failed. Status Code: 401. Message: An error occurred (AccessDeniedException) when calling the GetFindings operation: User is not authorized to perform: securityhub:GetFindings on resource. |