last updated: july 15, 2025
Overview
The Inident Form Builder allows users to create forms for manually capturing incident details within the incident workspace. Each incident type supports one form, structured with a root node linked to one or more section nodes. Section nodes contain activity and info activity nodes, where users configure the form inputs.
.png?cb=2d6761e80d25ef6116adcc48844844be)
Filling Out the Incident Form During an Investigation
Users can fill out the incident form within the incident workspace when the active workspace layout includes the Incident Form widget.
Creating an Incident Form
To create an incident form, navigate to the Incident Form Builder tab.
.png?cb=a28e7153a7abf3c254c9ca07f1c933cf)
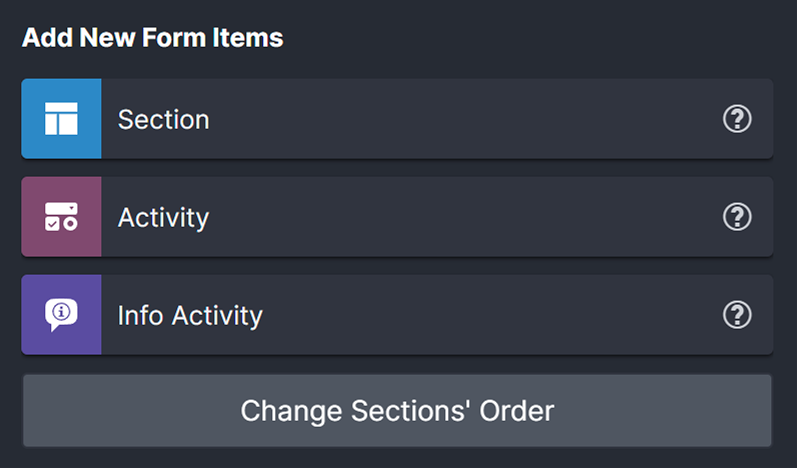
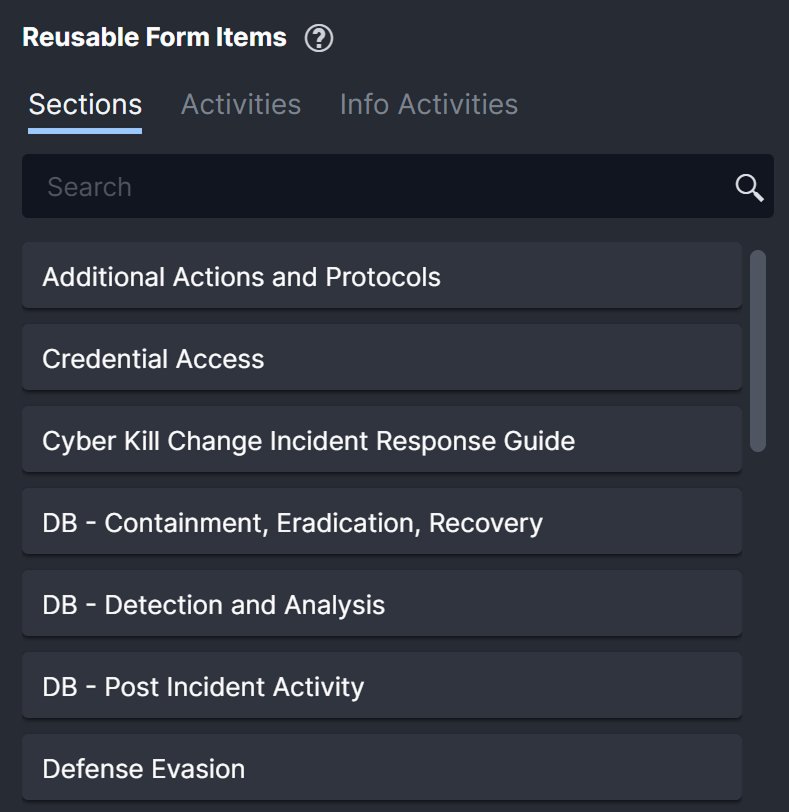
The Incident Form Builder includes the following components:
.png?cb=bcd38c557d8dae00e514f8b5ed949822)
-
Add New Form Items: Provides options for users to add new section, activity, and info activity nodes to the incident form.
-
All sections must be connected to the root node.

-
-
Reusable Form Items: Enables users to drag and drop section, activity, and info activity nodes created previously. All section, activity, and info activity nodes added to the editing canvas automatically become reusable form items.
-
Editing Canvas: Serves as the workspace where users configure the form's section, activity, and info activity nodes.
.png?cb=afe155a105573295b4c2d66171bad58c)
Adding a Section Node
.png?cb=4fc95c6f235f3686684aba31120464e2)
An incident type form must include at least one section node. Each section node acts as a container for activity and info activity nodes, grouping related form fields for structured data collection.
To add a section node, drag a Section form item to the root node.
.png?cb=6c4ade2d2a024c7932ac4aecf8cbdfa8)
Users can assign a more descriptive name to the section node in the configuration popup.
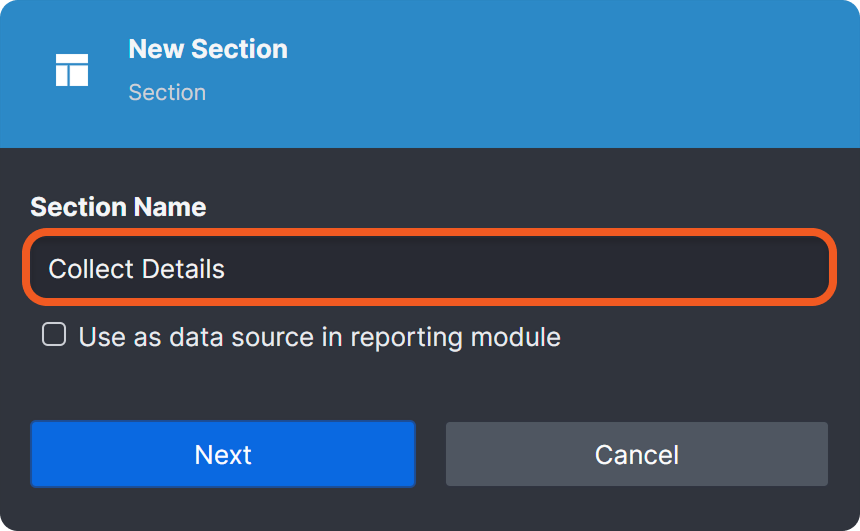
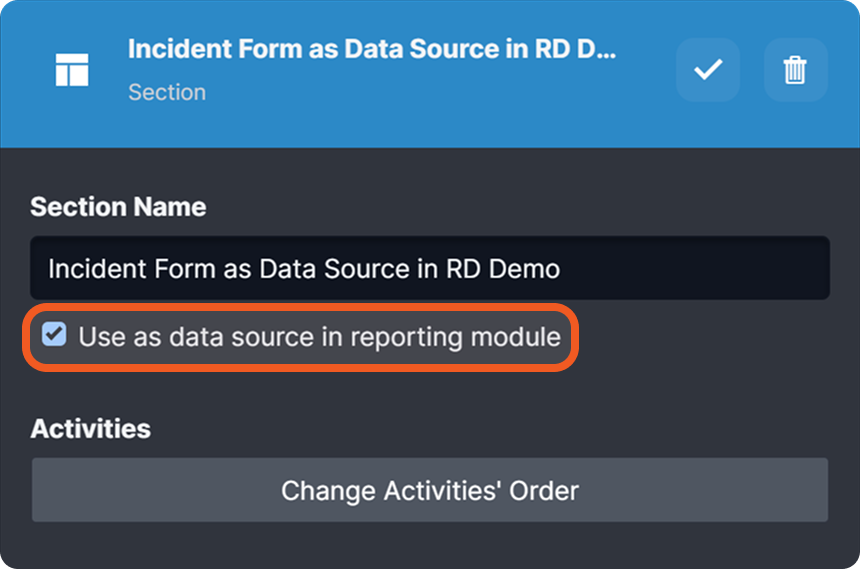
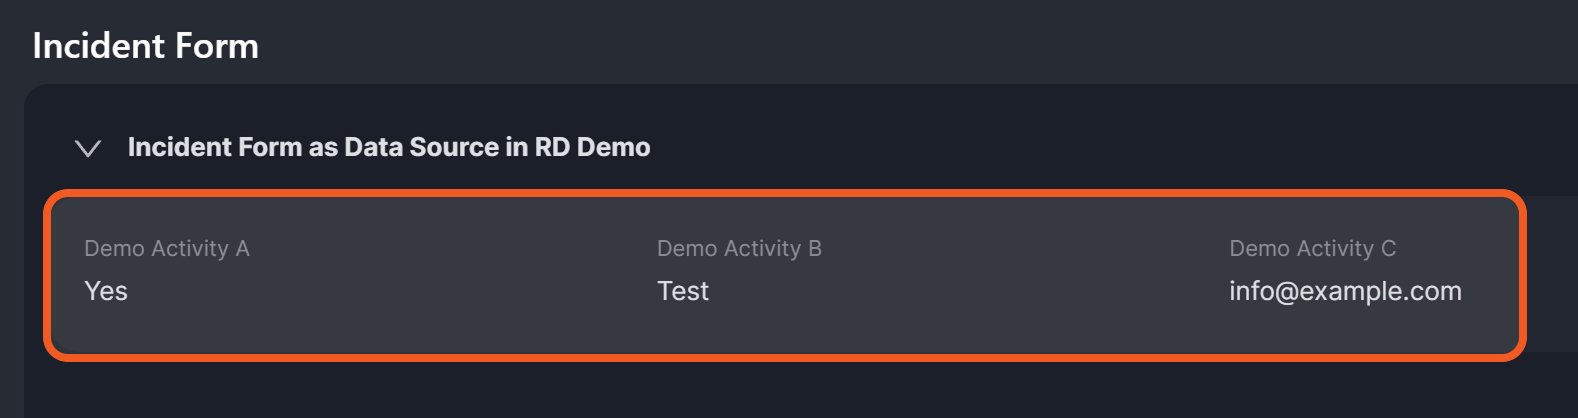
Use as Data Source in Reporting Module
To use inputs from activity and info activity nodes as query fields in a Reporting Dashboard widget, see the example below.
-
Select the Use as data source in reporting module checkbox.
-
Ensure that the incident form contains data.
-
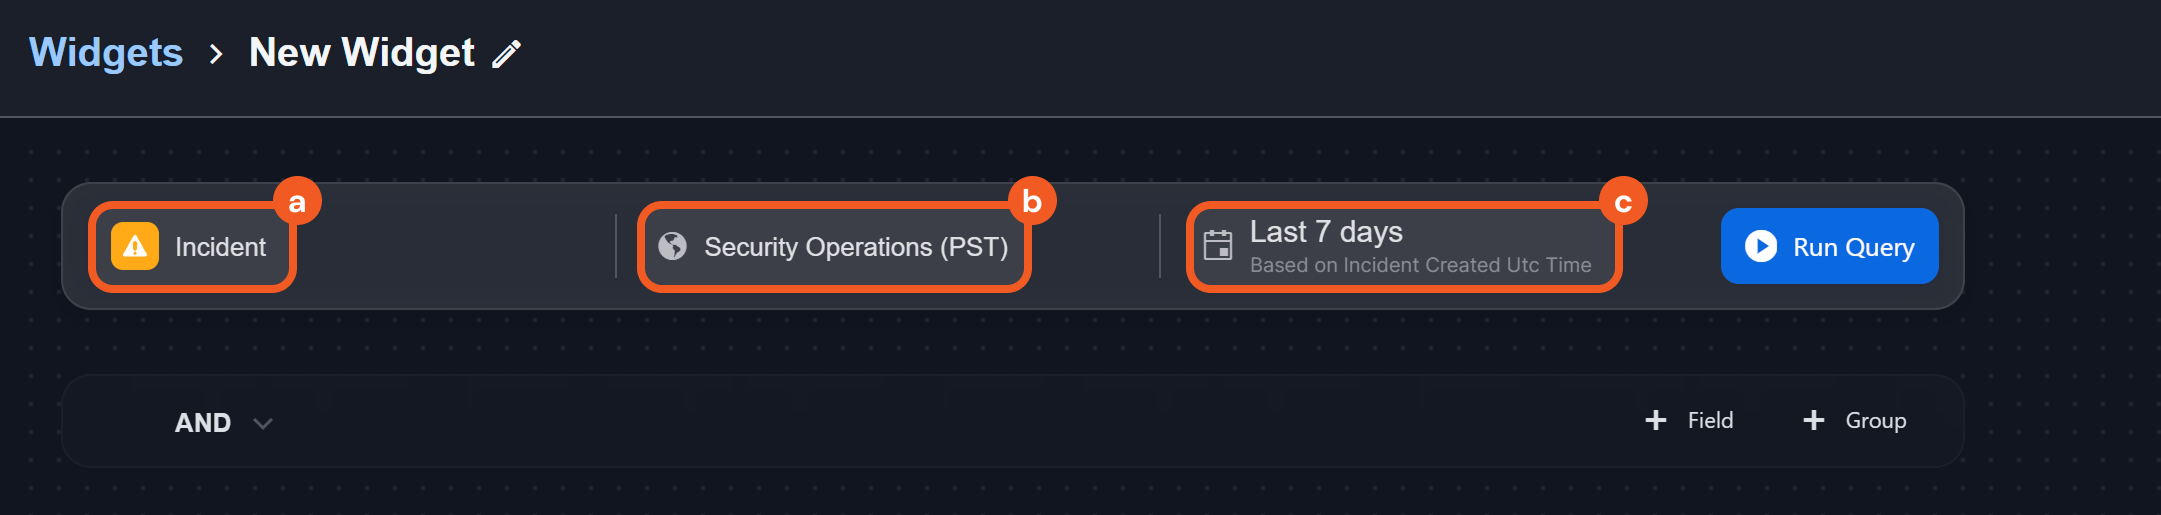
Navigate to Reporting Dashboard > Widgets, then click the + New button.

-
Select Incident as the Data Source, a site, and a date range.
-
Click the + Field button, then choose the incident form field to use as a filter for the queried data.
.png?cb=28c376b9b2144ccebcb981da30155d91)
-
Continue with the rest of the Reporting Dashboard widget configuration.
When a form contains multiple section nodes, users can reorder them by clicking the Change Sections' Order button, dragging a row to the desired position, and clicking the Done button.
.png?cb=6e9d9d6f9bfec672211c4e4ab344cc56)
Adding an Activity Node
.png?cb=9f07fe2fa6f7ba5b692743b3662ace37)
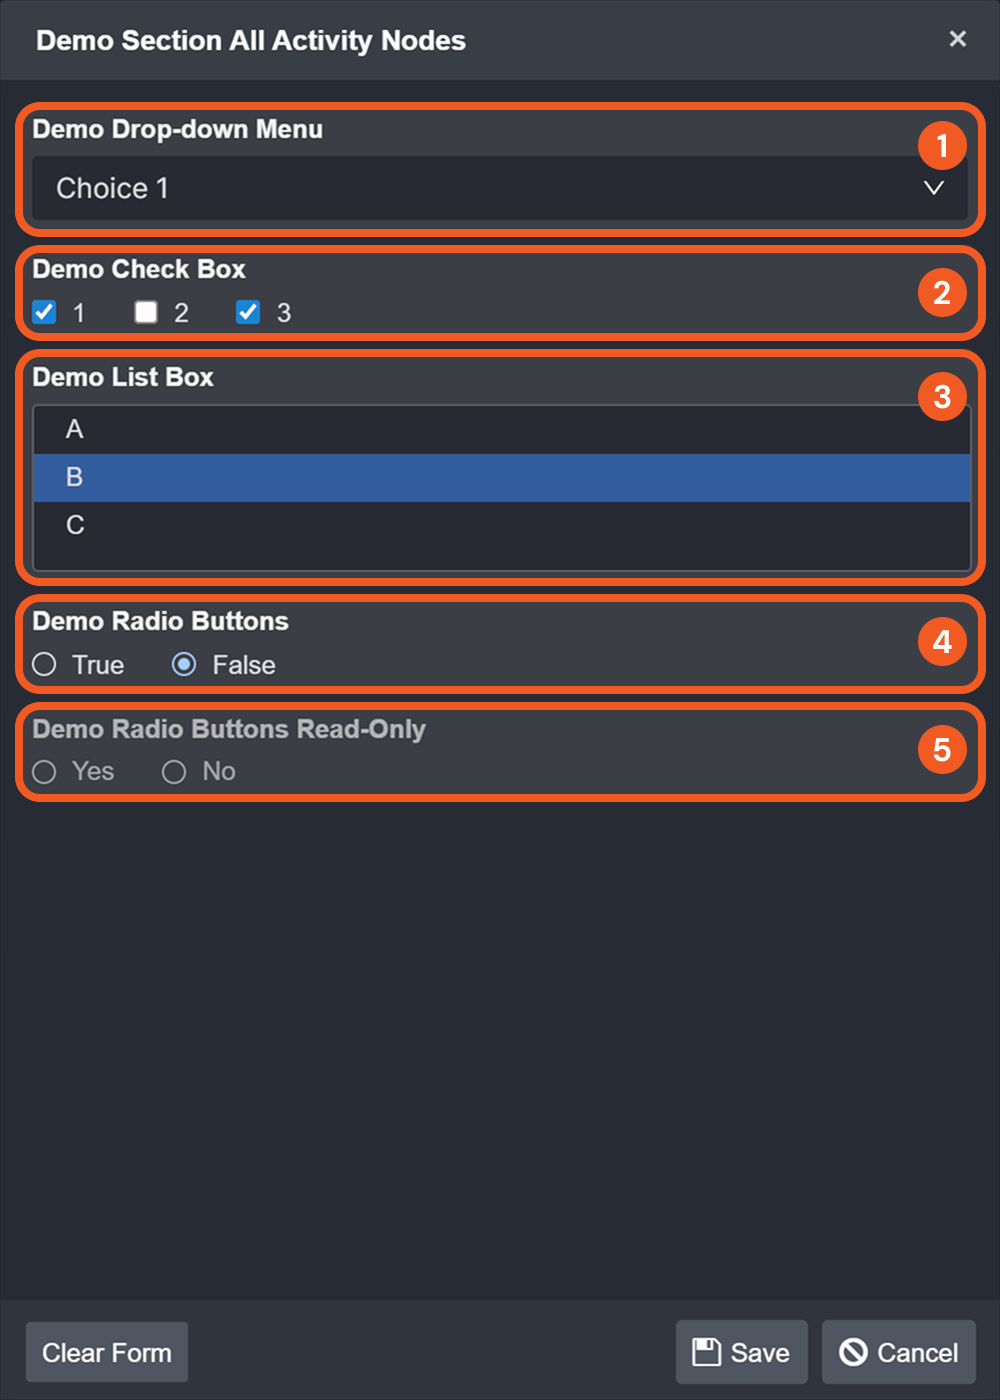
Activity nodes are form field types that provide predefined input options, such as checkboxes, dropdown menus, and radio buttons, enabling users to select from specified choices.
To add an activity node, drag an Activity form item to a section node.
.png?cb=611ed0d5dc674102eb0aebf6318b24ef)
In the configuration popup window, enter the activity name and select its type. For all available activity types, expand the accordion below.
.png?cb=0b2dffef041417e9b2841962d54bfc43)
All Available Activity Types
All available activity types are listed below:
-
Check Box: Enables users to check one or more boxes.
-
Drop-down Menu: Enables users to select a single option from a dropdown list.
-
List Box: Enables users to select a single row from a list.
-
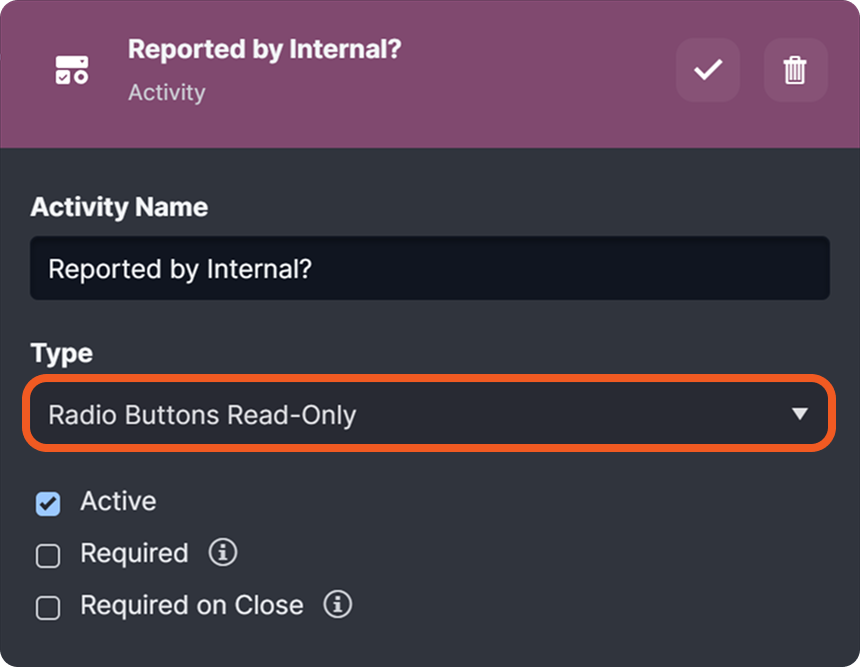
Radio Buttons: Enables users to select a single option from a set of radio buttons.
-
Radio Buttons Read-Only: Displays radio button options in a read-only format.
Users can populate read-only fields using utility commands.
After selecting a type, click the Next button, then the Add Option button to add activity options.
.png?cb=676f77cacd3e58091b238429a1224b3b)
.png?cb=54da3532e346cebd8aff58546c186f67)
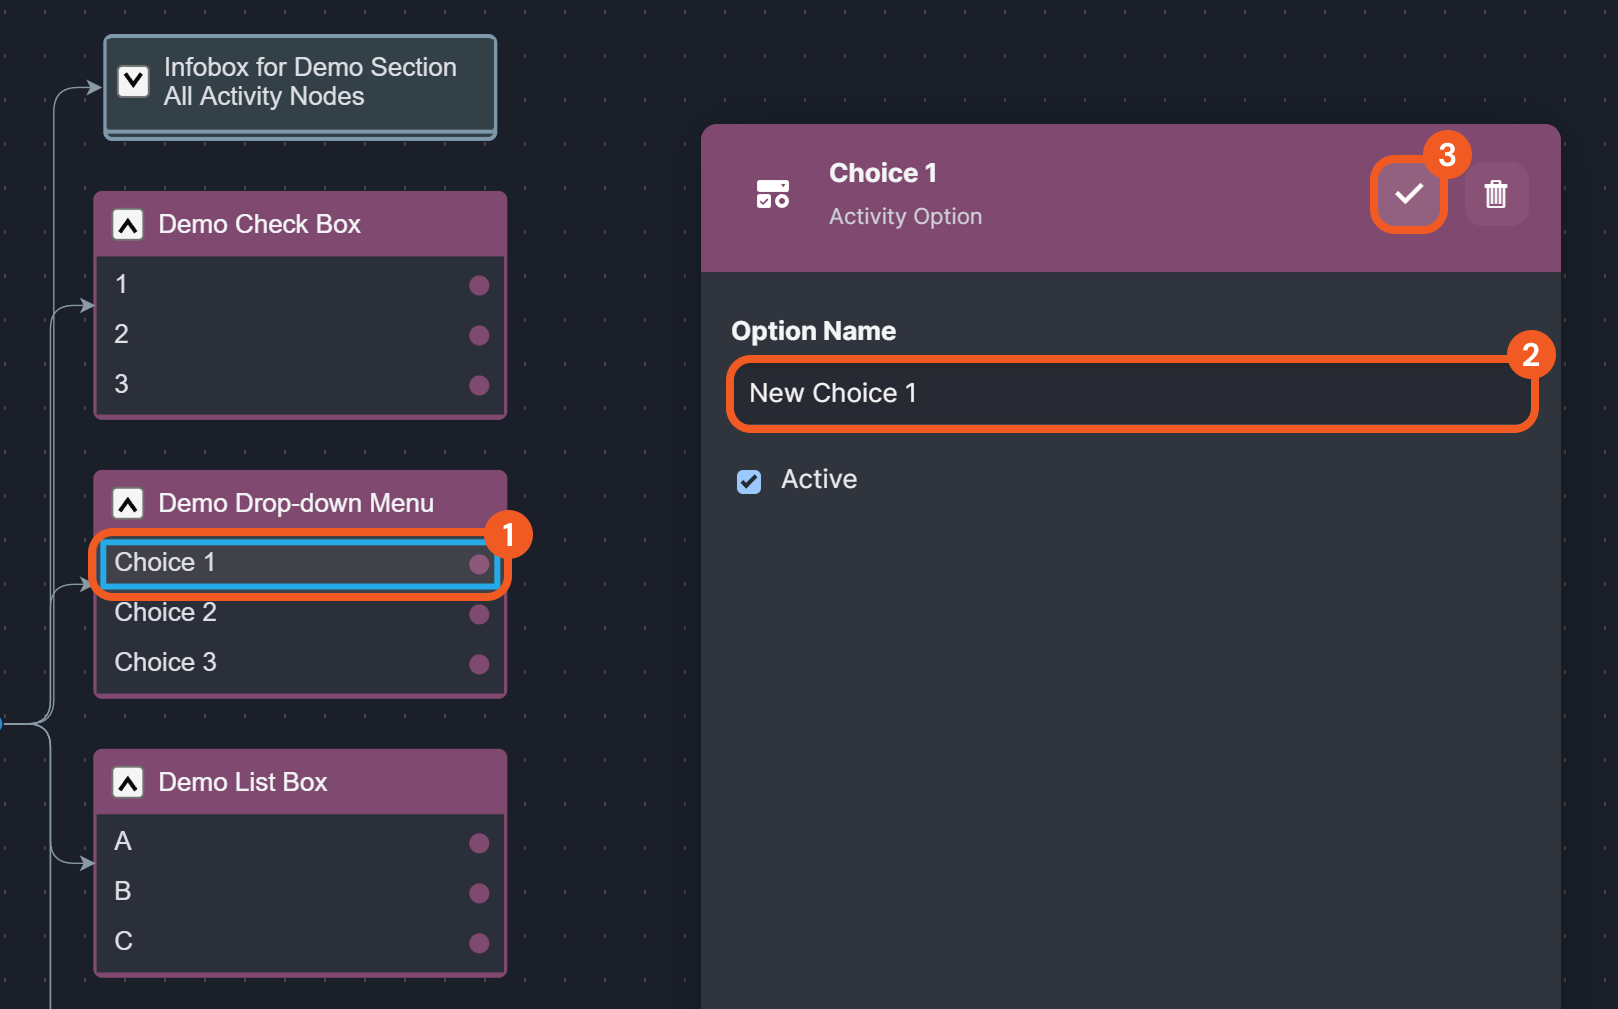
In the next page, enter the option name, then click the Next button. Option names must be unique and are case insensitive.
When multiple options are configured, users can reorder them by selecting the activity node and clicking the Change Options' Order button.
.png?cb=59a9ecf460988b952f21f11e0832a087)
Adding an Info Activity Node
.png?cb=e8fe2f917148a4abc30454061c3e6663)
Info activity nodes are form field types that allow users to enter information freely using inputs such as text boxes and number boxes.
To add an info activity node, drag an Info Activity form item to a section node.
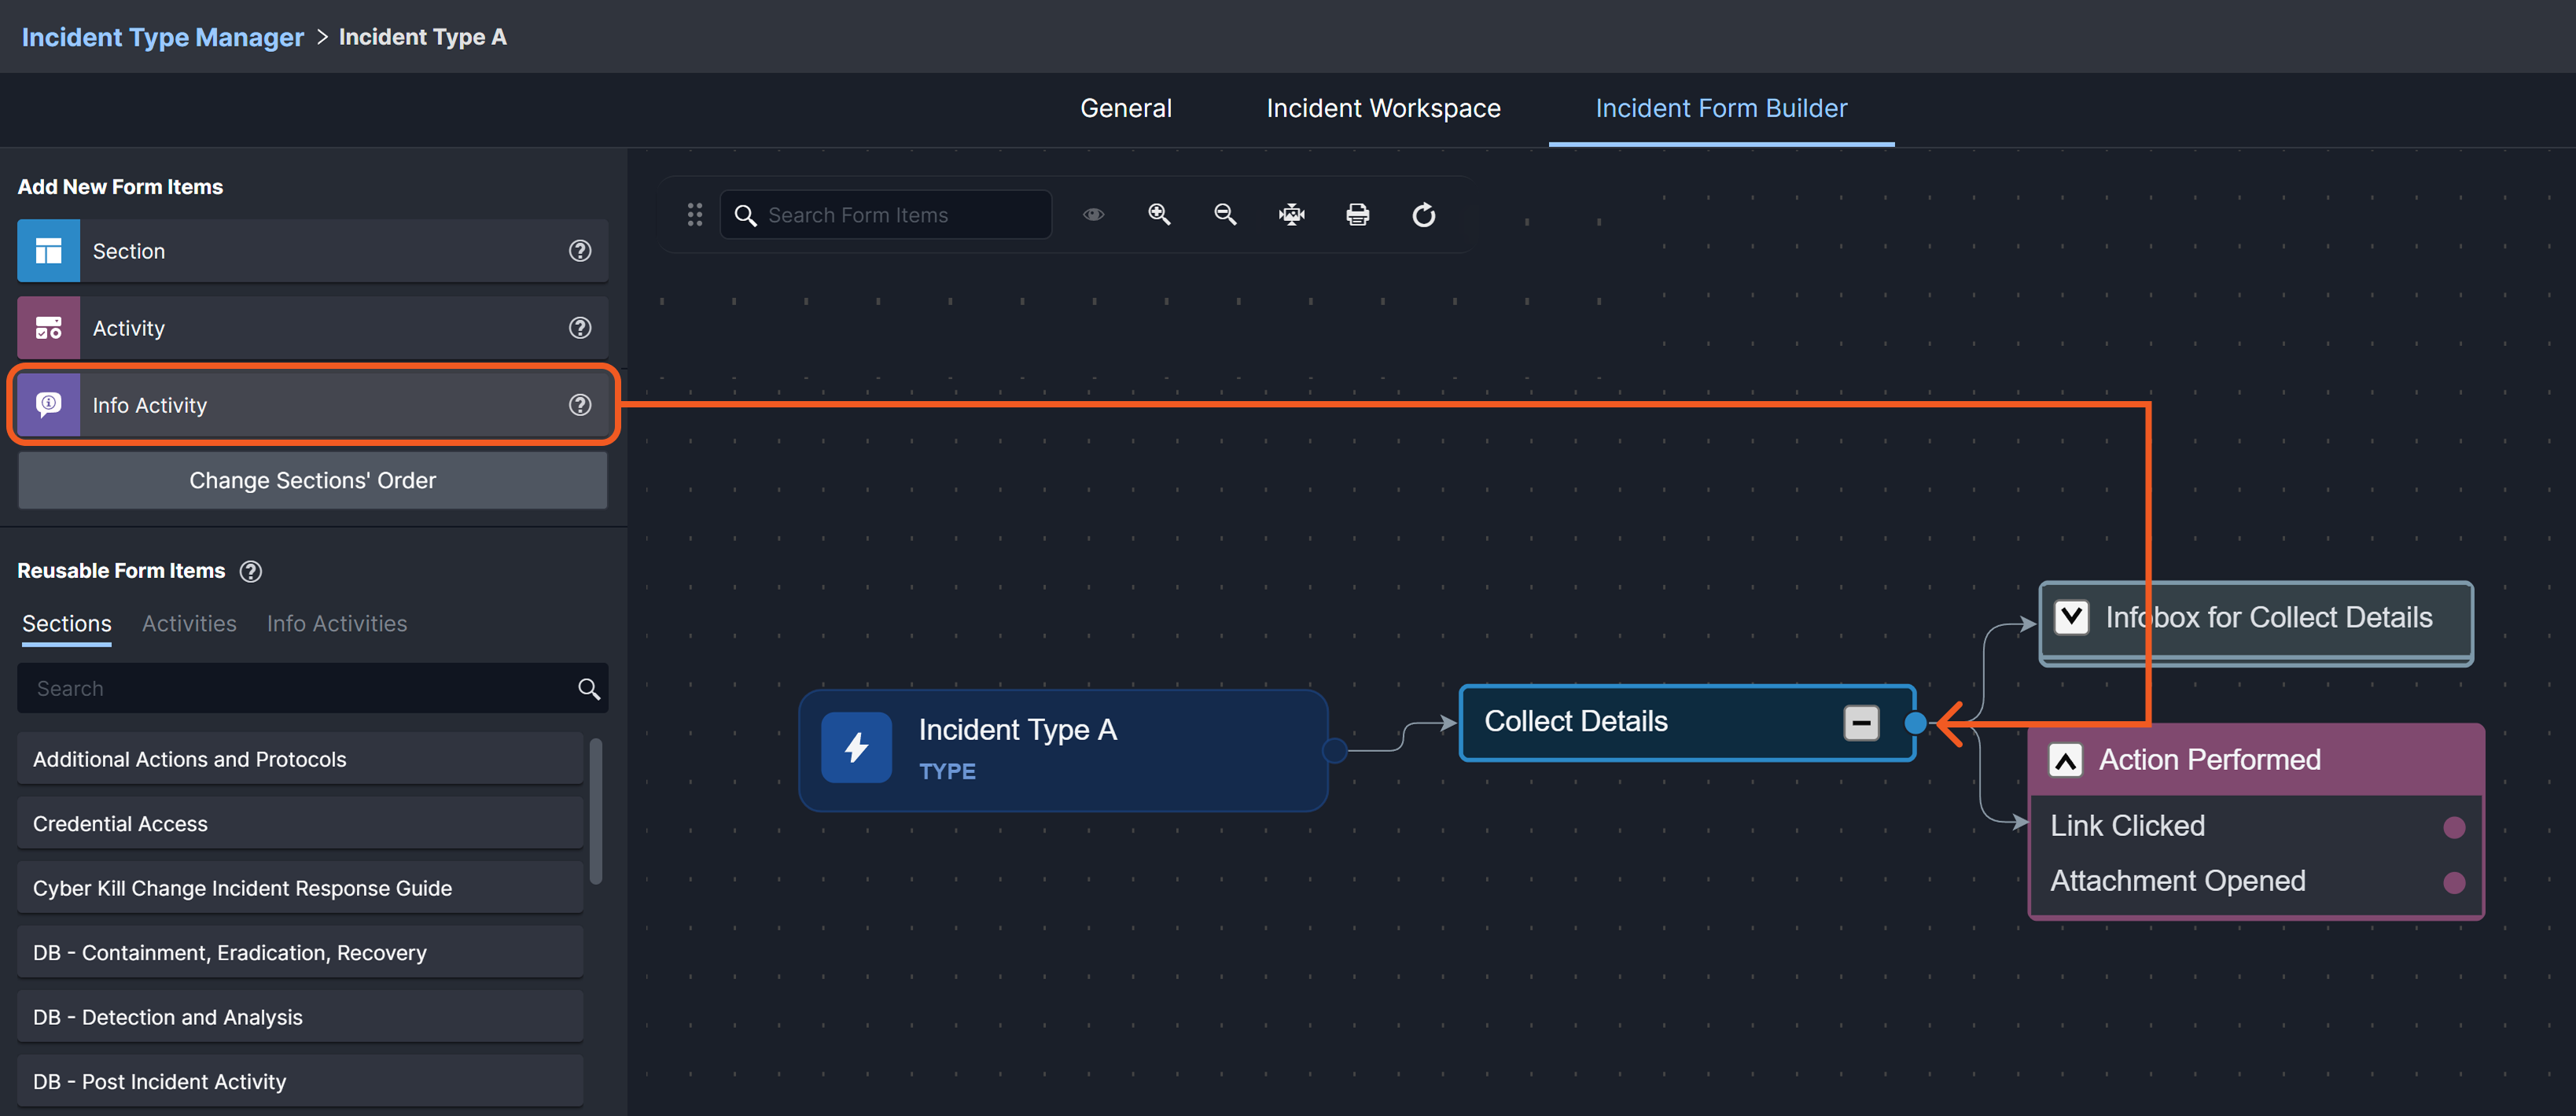
In the configuration popup window, enter the info activity name, select its type, then click the Next button to add the info activity. For all available info activity types, expand the accordion below.
.png?cb=3d01367e3618ab7dcdf7b9889c379a27)
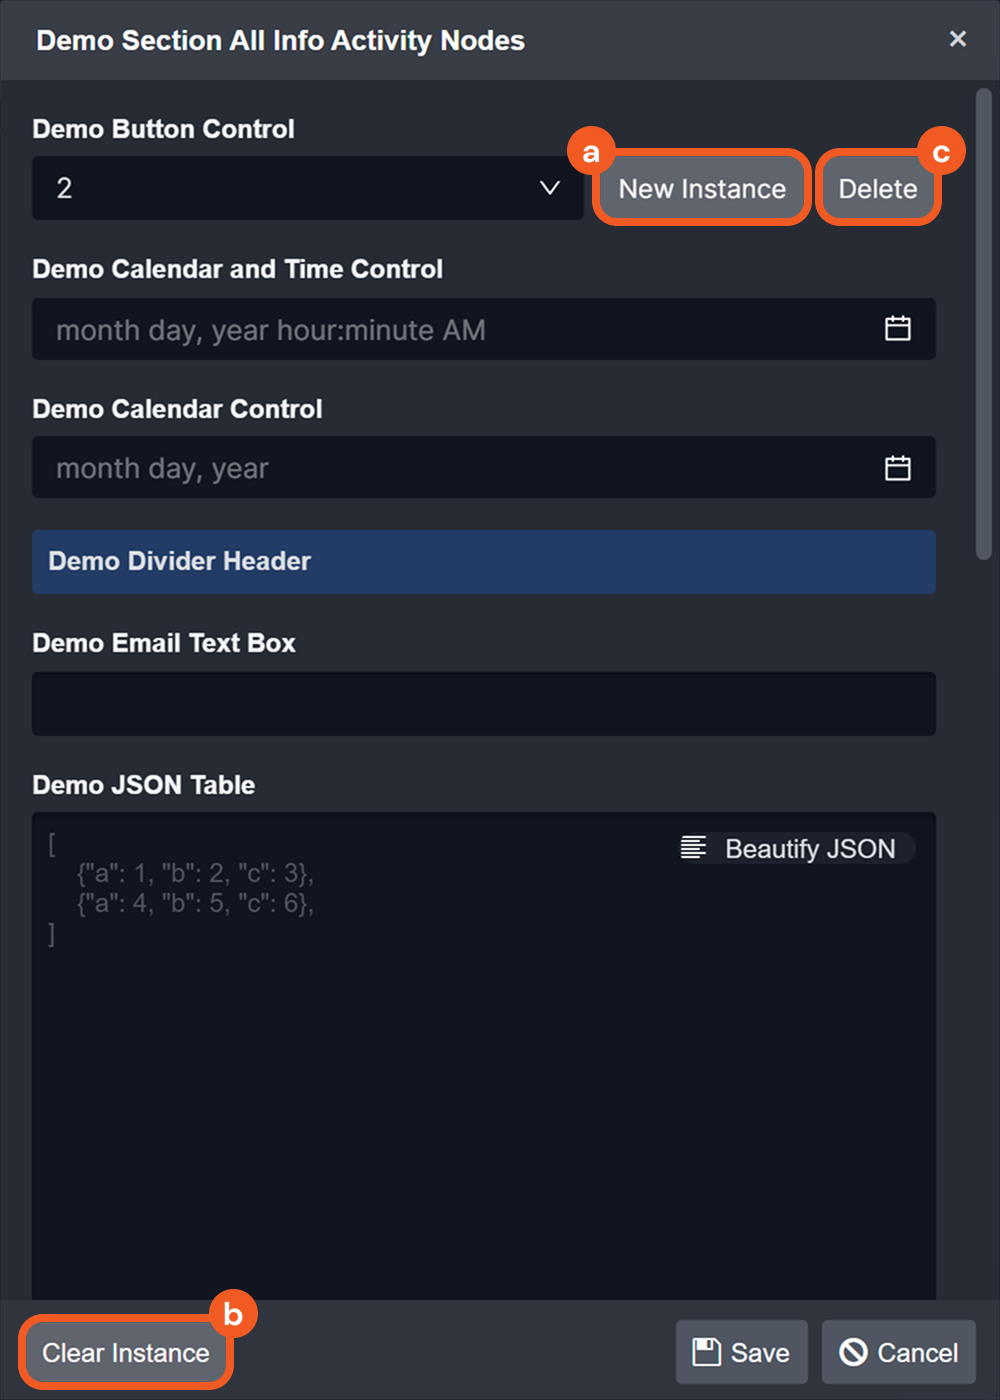
All Available Info Activities
All available info activity types are listed below:

-
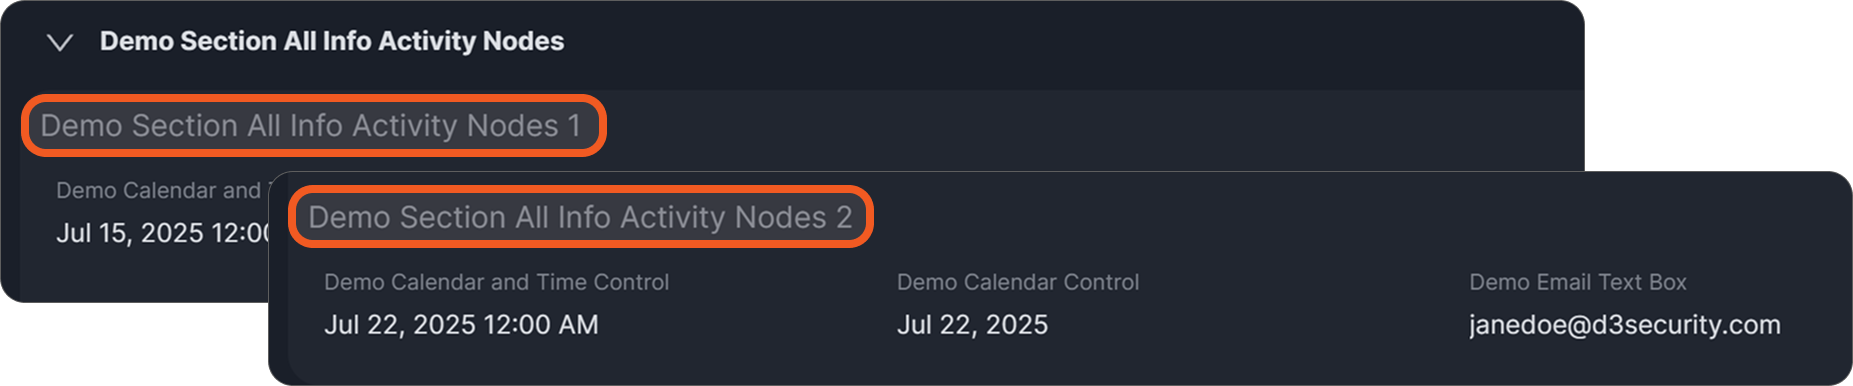
Button Control: Allows users to create and switch between multiple instances of the incident form section.
-
Click the New Instance button to create another instance of the section.
-
Click the Clear Instance button to clear the contents of the current instance.
-
Click the Delete button to permanently remove the current instance.
Different form instances are distinguished by the section name followed by a number (e.g., Demo Section All Info Activity Nodes 1 and 2).
-
-
Calendar and Time Control: Enables users to enter a date and time.
-
Calendar Control: Enables users to enter a date.
-
Divider Header: Allows users to insert a divider in the form.
-
Email Text Box: Allows users to enter an email address validated by regex.
-
JSON Table: Allows users to create a table using JSON data.
-
JSON Table Read-Only: Allows users to view a preconfigured JSON table without editing.
-
Numeric Text Box: Allows users to enter numeric values only.
-
Text Area: Allows users to enter multiple lines of text using a text or HTML editor.
-
Text Area Read-Only: Allows users to view a preconfigured multi-line text value without editing.
-
Text Box: Allows users to enter a single line of text using a text or HTML editor.
-
Text Box Read-Only: Allows users to view a preconfigured single-line text value without editing.
-
Time Control: Enables users to enter a time.
Users can populate read-only fields using utility commands.
Additional Information on Activity and Info Activity Nodes
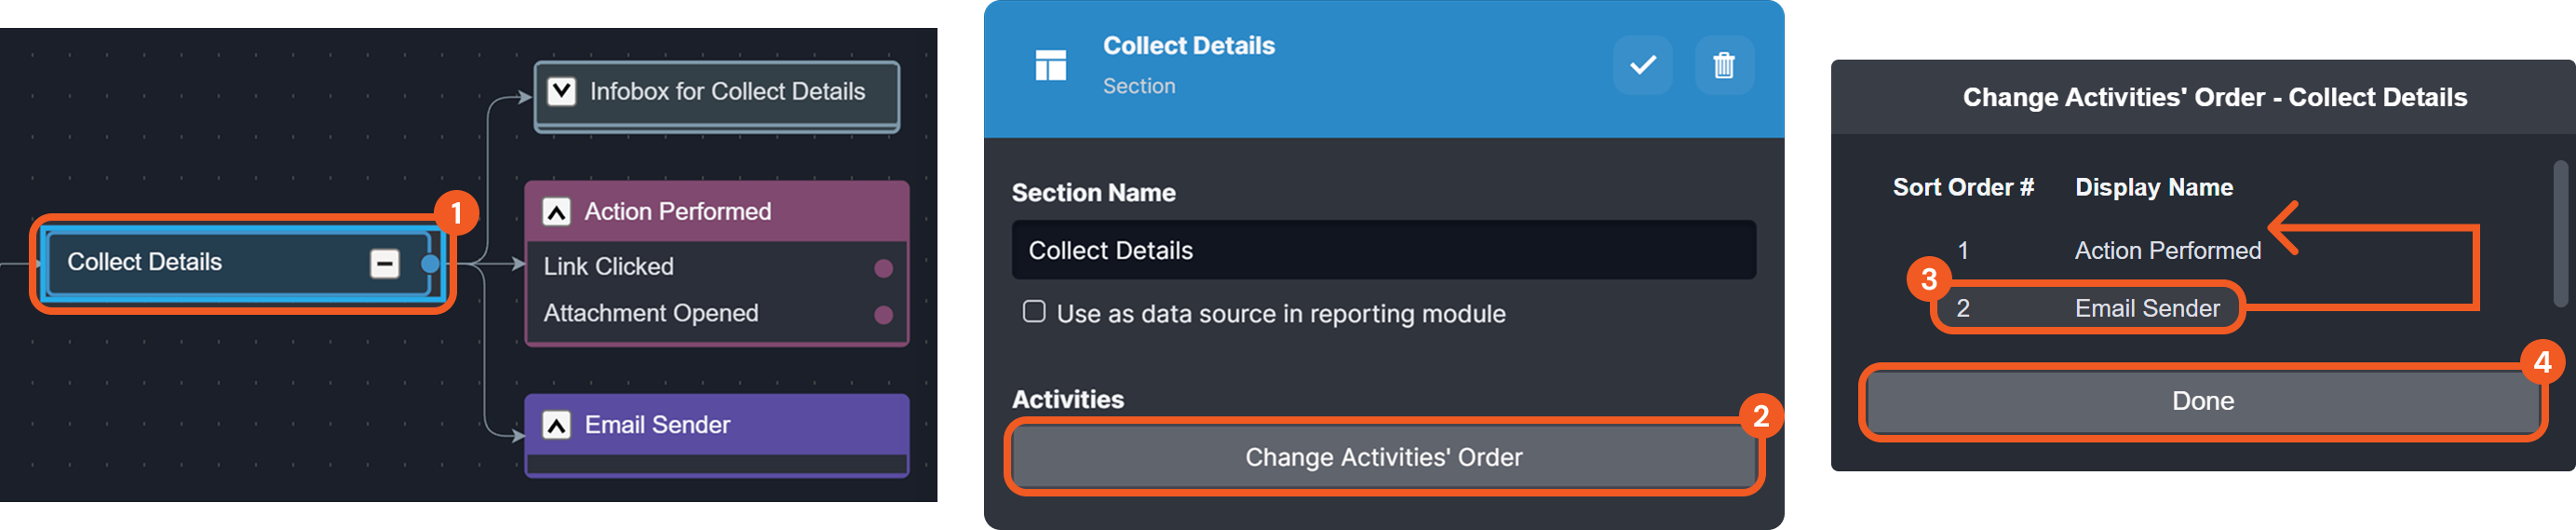
Rearranging Nodes
Users can rearrange activity and info activity nodes as needed within the form layout:
-
Select the parent section node.
-
Click the Change Activities' Order button.
-
Drag each activity to the desired position.
-
Click the Done button.
Renaming Node Options
To rename options for input types like checkboxes and drop-down menus, select the option within the node, enter the new name, and click the 
Active Setting
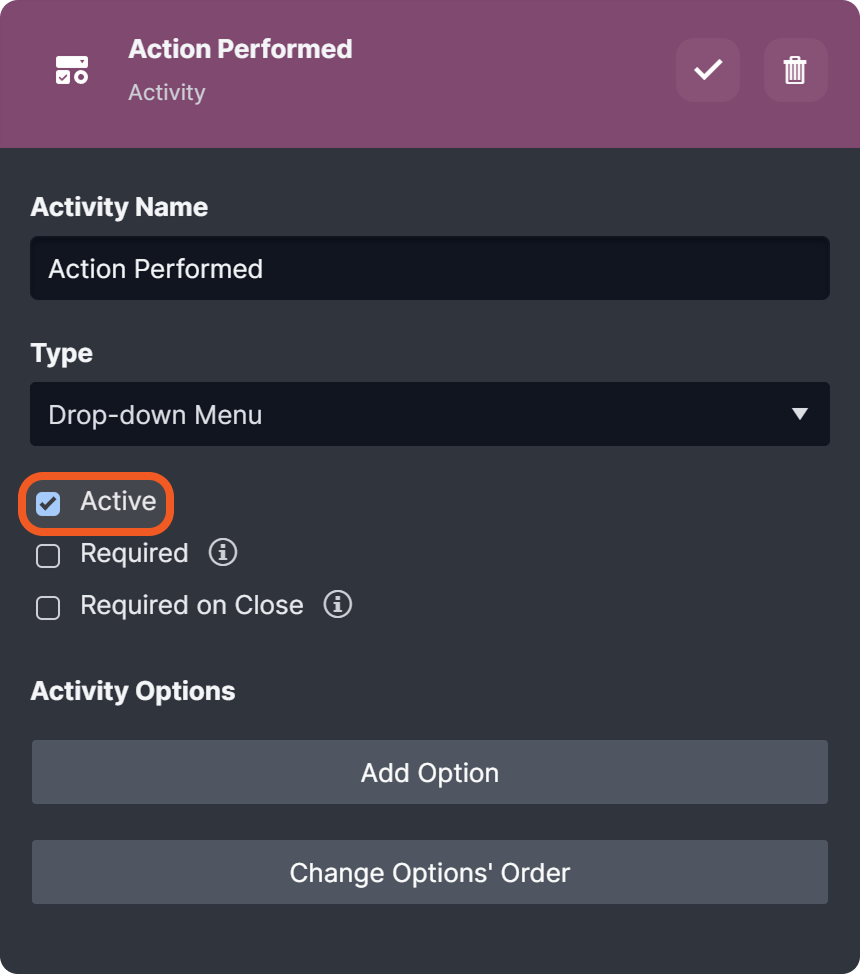
The Active checkbox determines whether the form field is visible in the incident form within the incident workspace. By default, nodes are active. Users can uncheck this checkbox to make the node inactive.
Required Setting
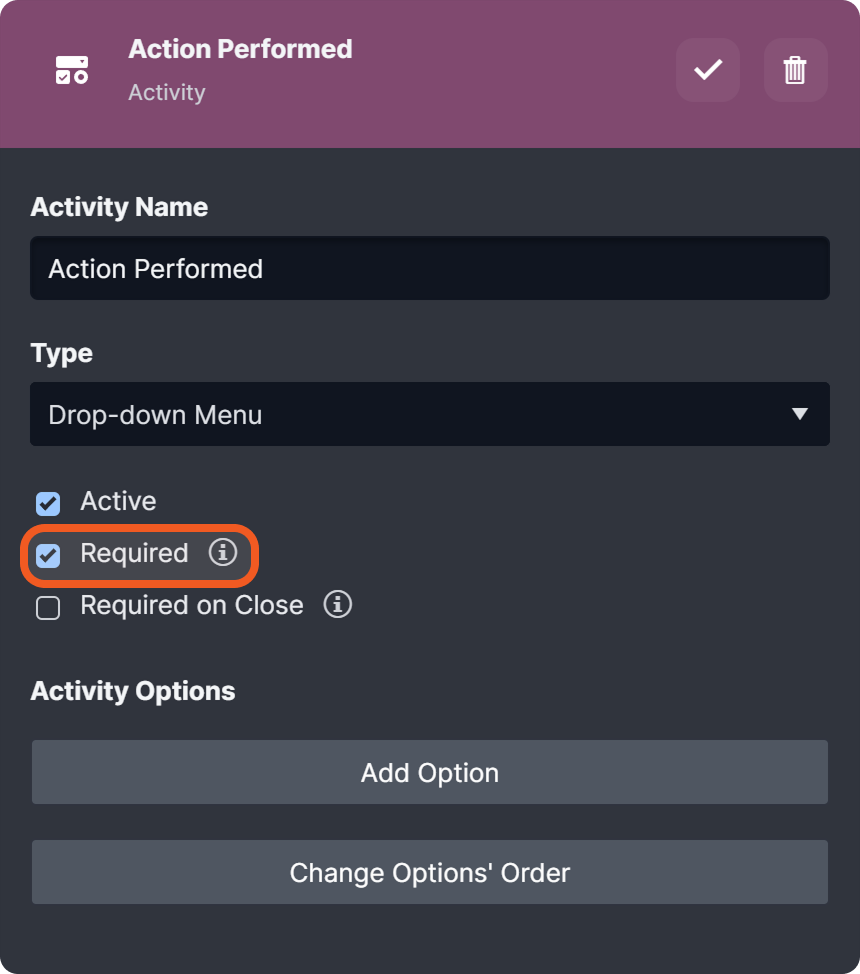
The Required checkbox, when checked, ensures that the activity or info activity must be completed before saving the form, as long as other form fields contain data.
Required on Close Setting
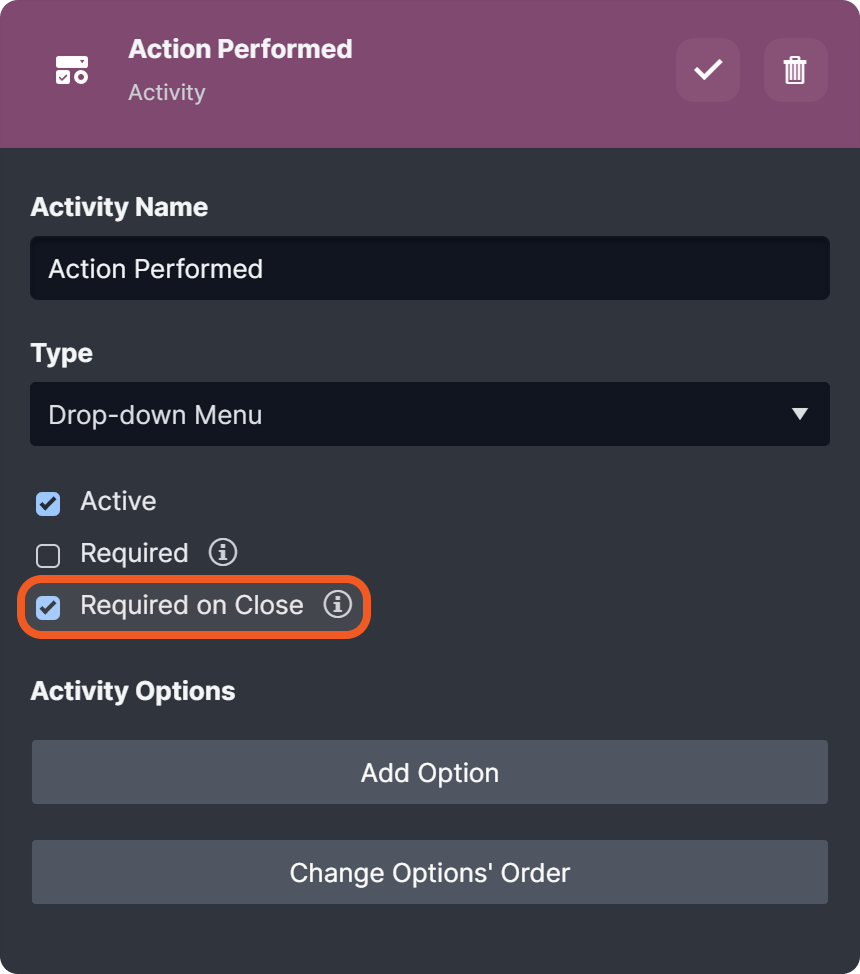
The Required on Close checkbox, when checked, ensures the activity or info activity must be completed before closing an incident.
Setting Incident Field Values with Utility Commands
The following commands enable users to set or update incident fields to support automation and to populate read-only fields:
READER NOTE
Other utility commands available for retrieving or modifying incident form data include:
For additional details, refer to the respective utility command pages.
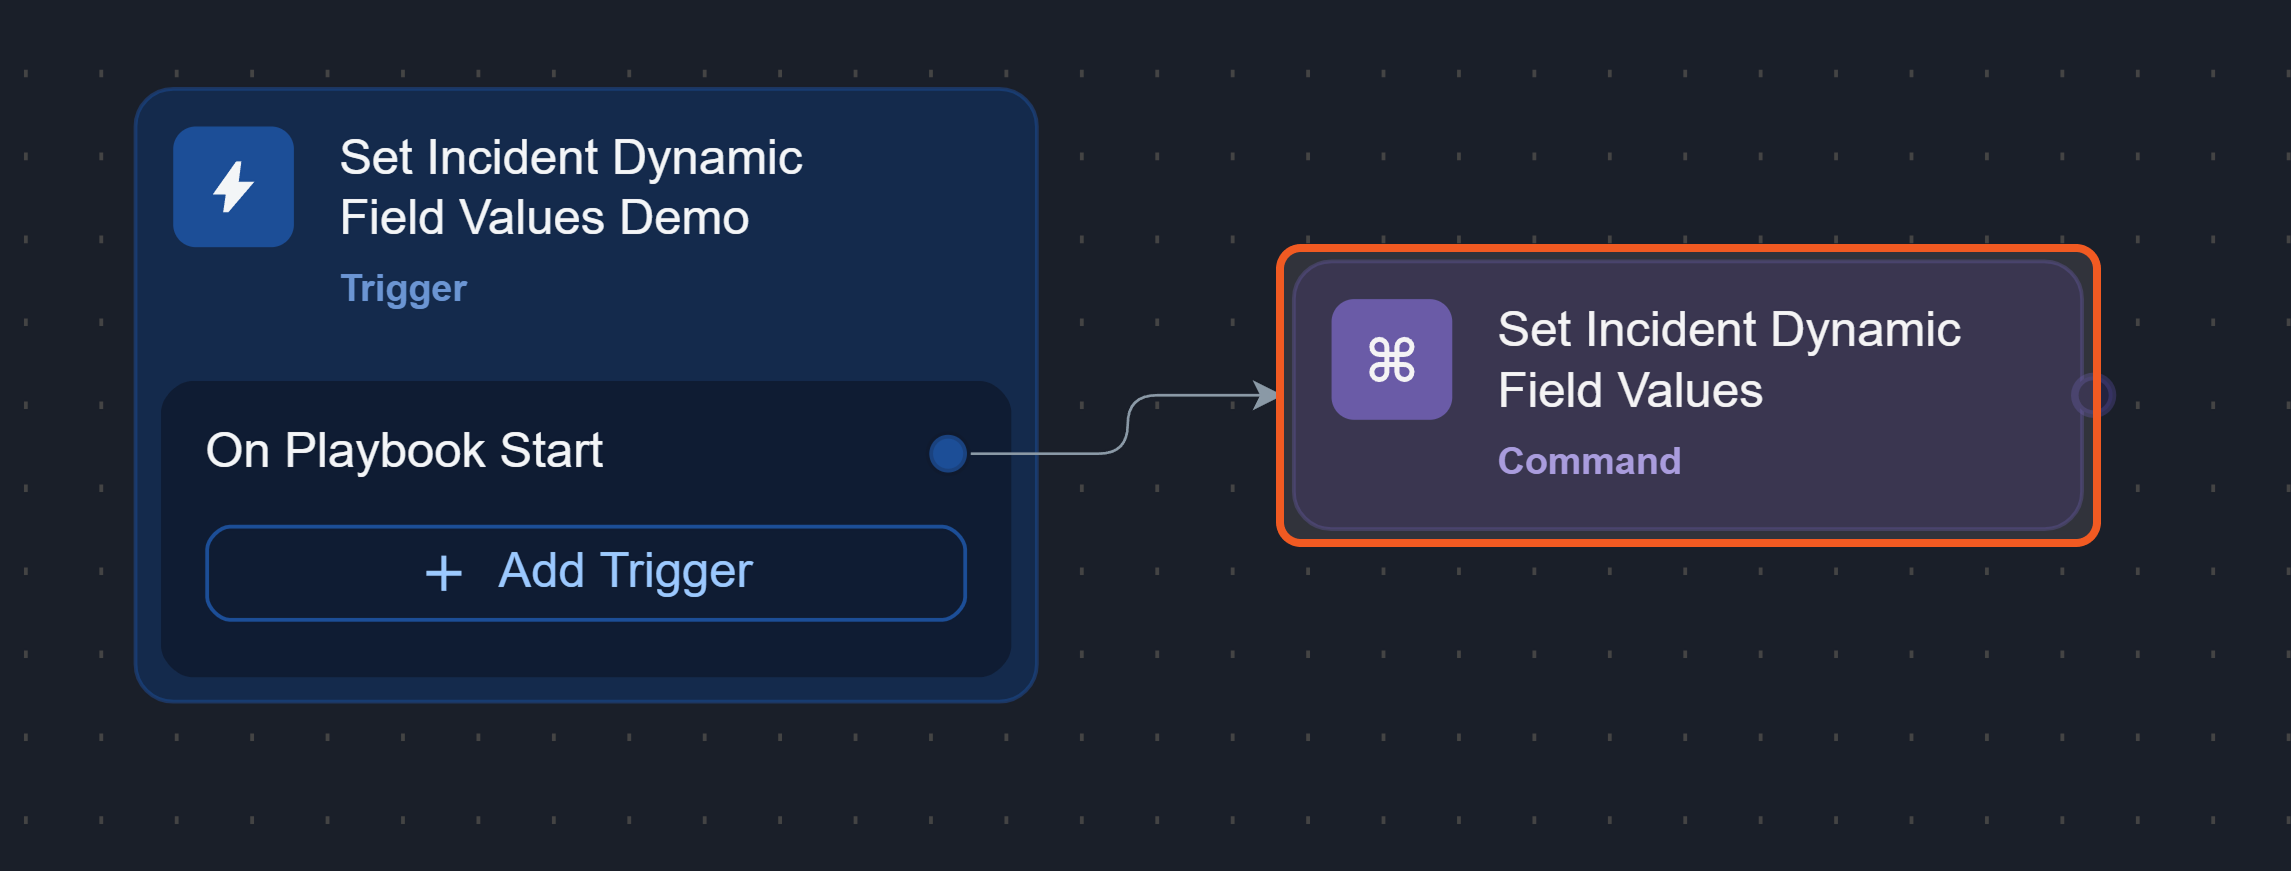
This demonstration uses the Set Incident Dynamic Field Values command. To follow along, complete the following steps within an investigation playbook:
-
Add a Set Incident Dynamic Field Values utility command task.
-
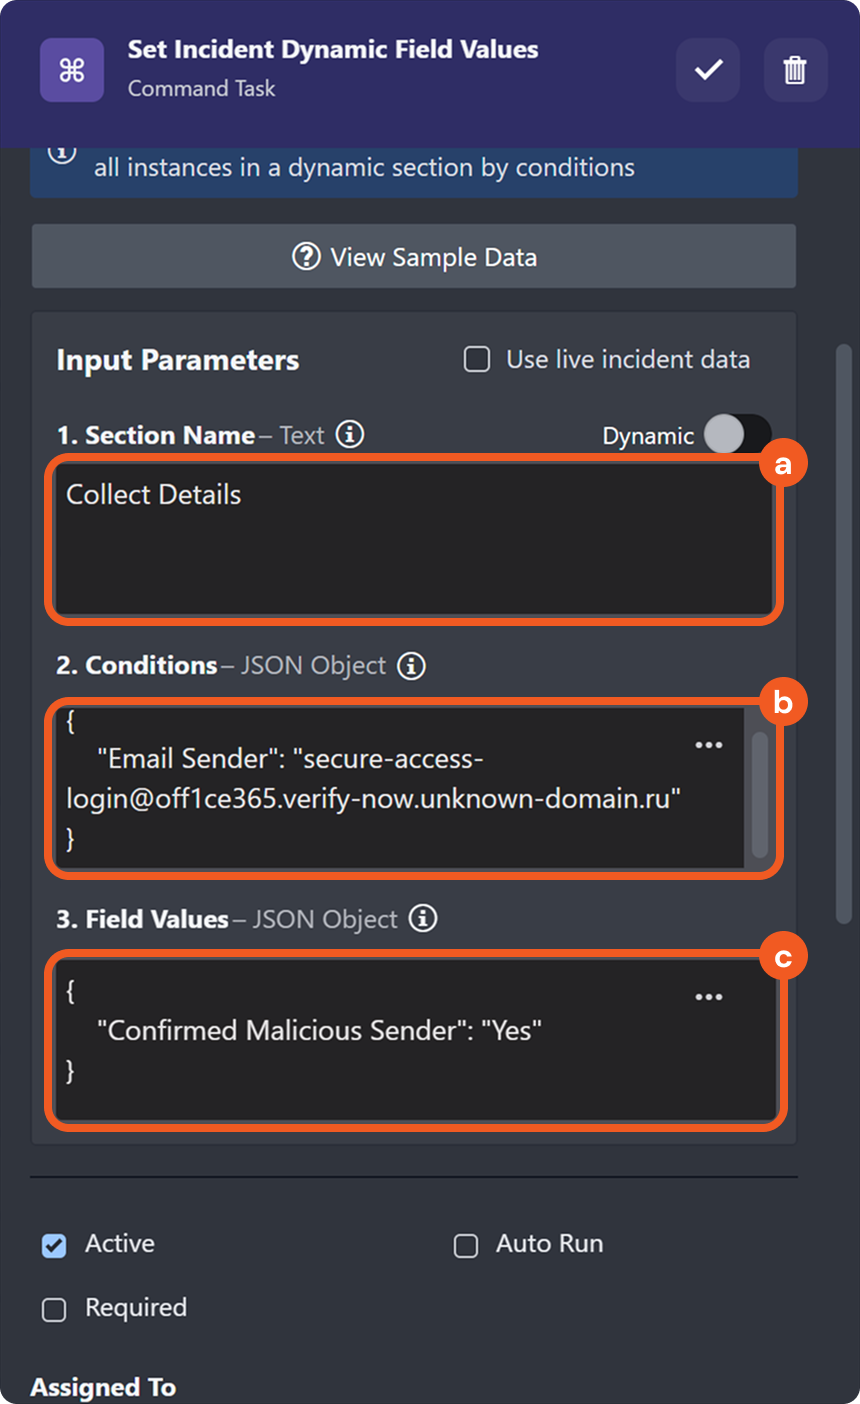
Configure the input parameters:
-
Enter the exact name of the section.
This can be a dynamic value as well (i.e., $.DataSource.incident["Dynamic fields"][*].sectionName).
-
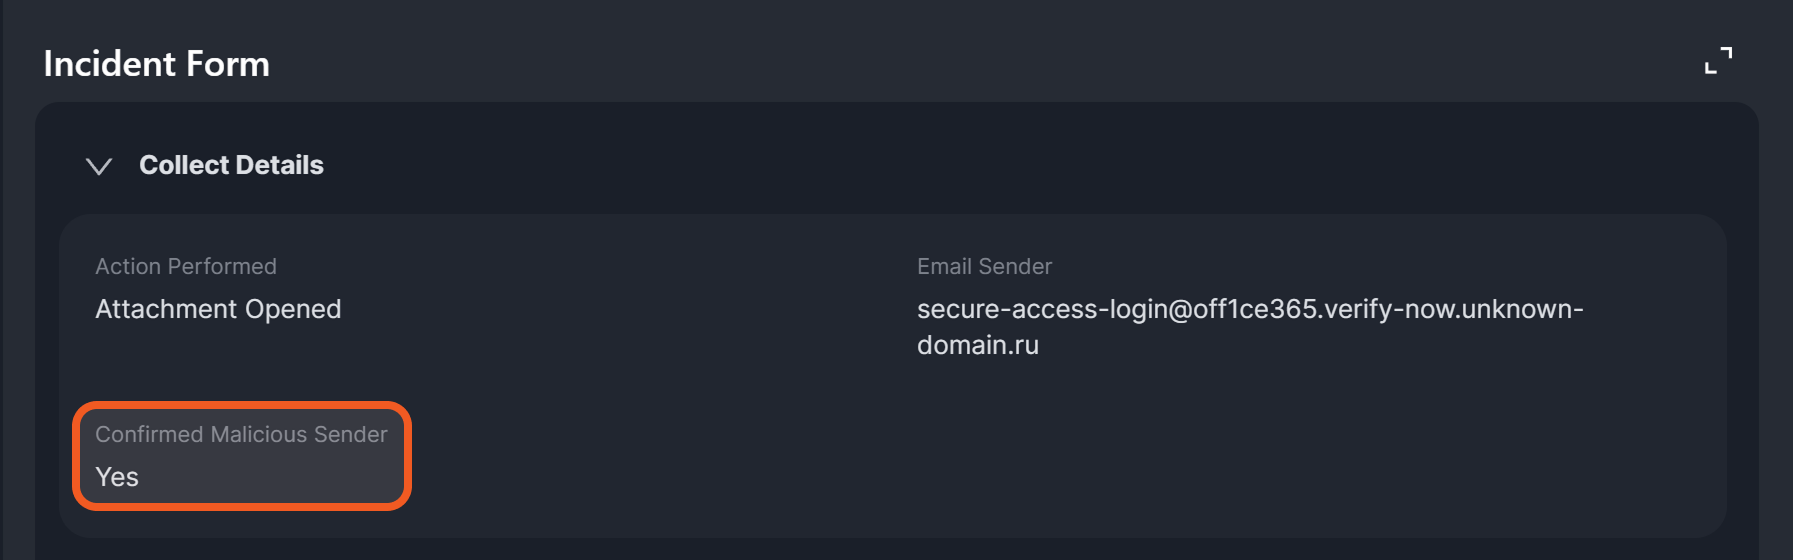
Defines filters for form instances within the specified section using key-value conditions. Incident field values will be set only when these conditions are met.
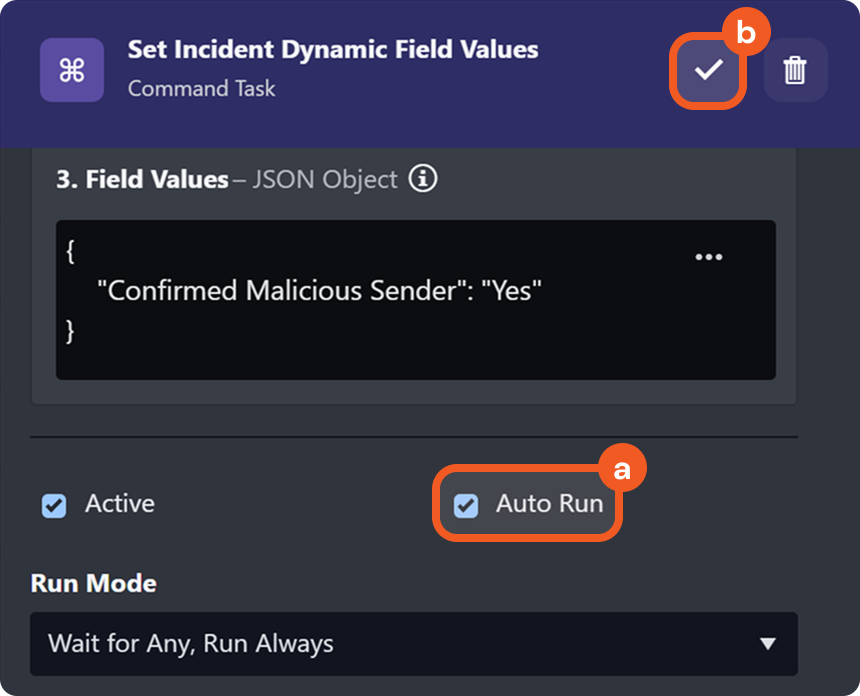
The example specifies that the new field values will be set only if the Email Sender field is secure-access-login@off1ce365.verify-now.unknown-domain.ru.
-
Input the key-value pairs (in JSON format) to update the incident form.
The example indicates that the Confirmed Malicious Sender field value should be set to Yes.
-
-
Set this task to Auto Run, then click the

-
Submit and publish the playbook to the desired sites.
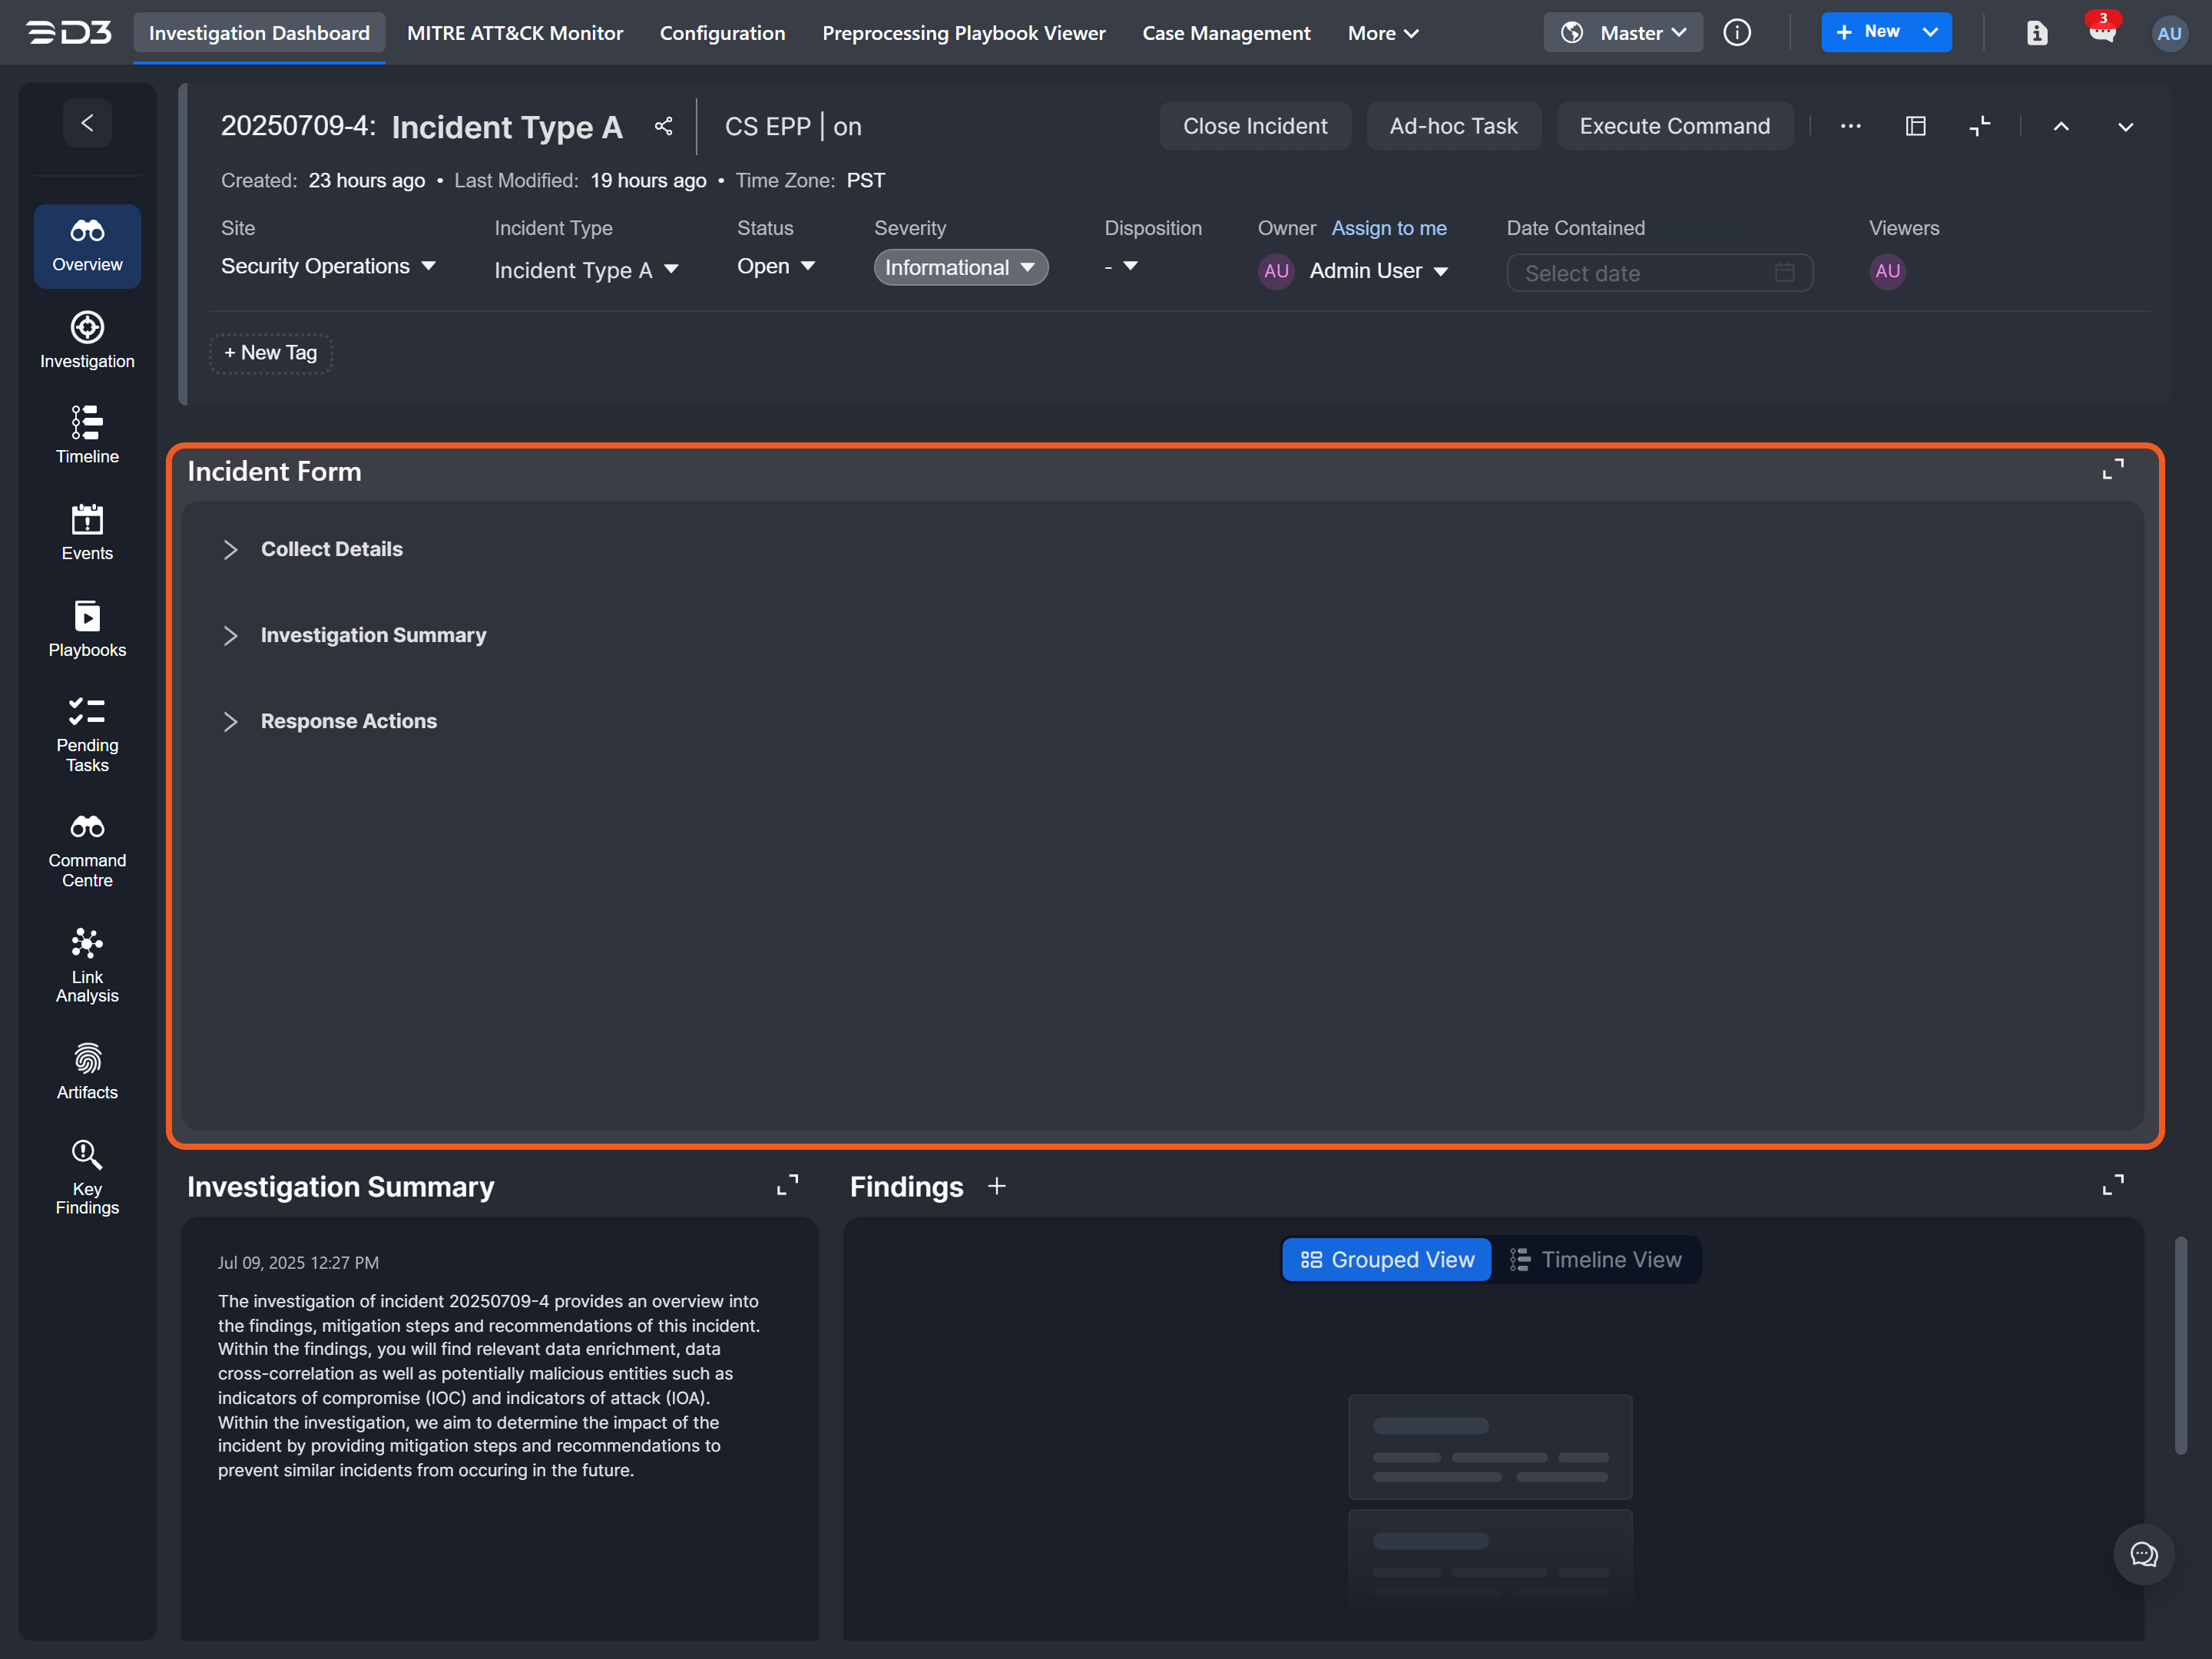
When the configured investigation playbook is associated with an incident, the incident form will be updated according to the settings defined in the Set Incident Dynamic Field Values utility command.
Before the configured investigation playbook ran
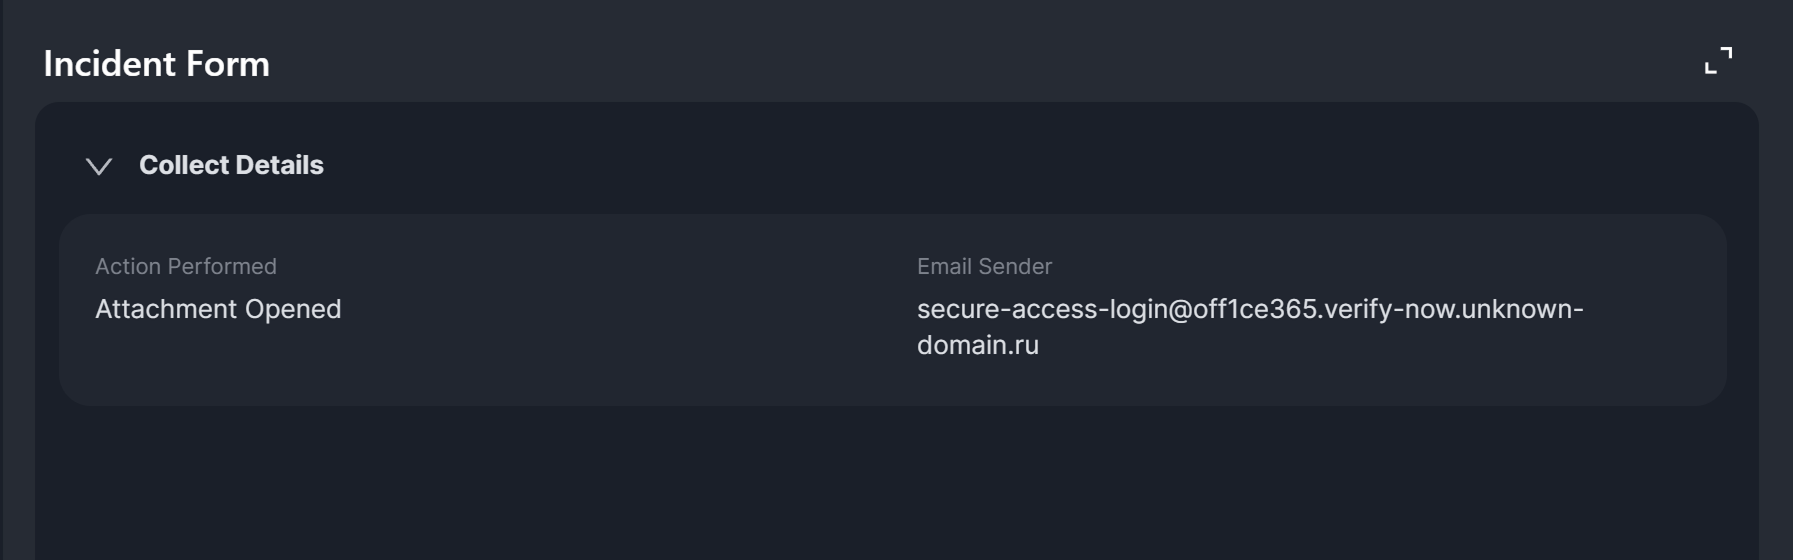
After the configured investigation playbook ran