
Using Quick Actions
LAST UPDATED: NOVEMBER 6, 2025
Overview
Quick actions are interactive buttons located in the header panel of the Overview tab within the Incident Workspace. They allow users to execute any D3 command on an incident directly within the Incident Workspace, using customized display names and parameters.
.png?inst-v=ac03748f-4f37-47aa-ac40-90d201191274)
For example, quick actions can allow an analyst to quickly send an email related to the active incident without leaving their workspace or using the .png?inst-v=ac03748f-4f37-47aa-ac40-90d201191274) button, which requires them to manually search for the desired command. This approach saves time and reduces repetition during frequent tasks.
button, which requires them to manually search for the desired command. This approach saves time and reduces repetition during frequent tasks.
Quick actions are managed using the following utility commands:
Add Quick Actions to the Incident Overview
Delete Quick Actions from the Incident Overview
Update Quick Actions on the Incident Overview
Refer to Command Details for detailed command descriptions.
Quick Start
By default, the Incident Workspace does not contain any quick actions. This quick start guide explains how to create meta quick actions—special quick actions that manage other quick actions directly within the incident workspace.
CONTEXT
Meta quick actions are quick actions for the Add Quick Actions to the Incident Overview, Delete Quick Actions from the Incident Overview, and Update Quick Actions on the Incident Overview commands. Adding them as quick actions streamlines management by eliminating the need to leave the incident workspace when creating, modifying, or deleting quick actions.
.png?inst-v=ac03748f-4f37-47aa-ac40-90d201191274)
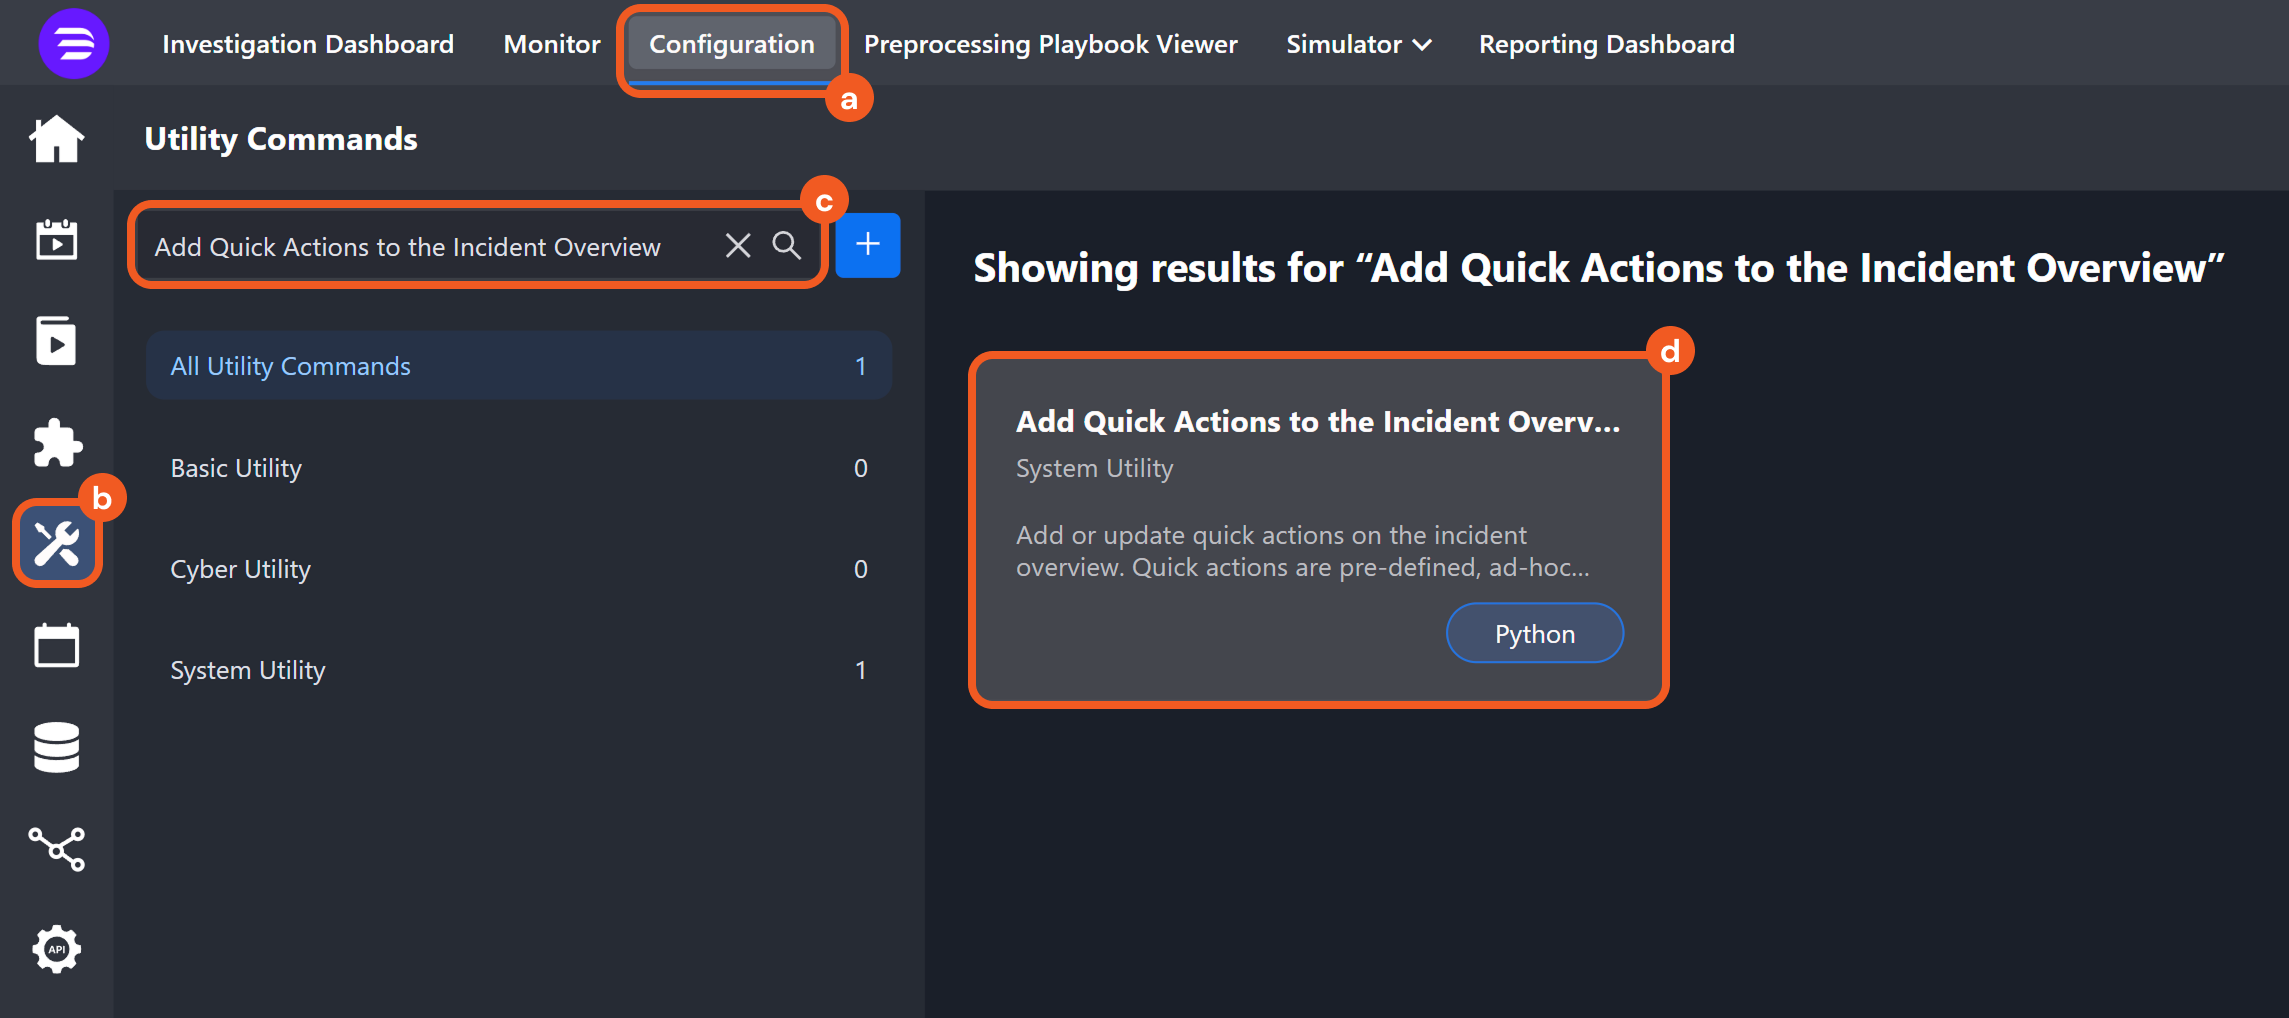
Navigate to Configuration > Utility Commands, then search for and select the Add Quick Actions to the Incident Overview command.
Ensure that the Ad-hoc Command option under Settings > Features is enabled. This option must be enabled for any commands intended for use as Quick Actions.
.png?inst-v=ac03748f-4f37-47aa-ac40-90d201191274)
For certain built-in commands, this option is permanently enabled, ensuring they are always available for use as quick actions.
.png?inst-v=ac03748f-4f37-47aa-ac40-90d201191274)
For custom commands, manually check this option to use them as quick actions.
Add these commands as meta quick actions:
Add Quick Actions to the Incident Overview
Delete Quick Actions from the Incident Overview
Update Quick Actions on the Incident Overview
.png?inst-v=ac03748f-4f37-47aa-ac40-90d201191274)
Select the site where the incident is located.
Enter the incident number of the workspace where the meta quick actions will be added.
Paste the following code snippet in the Quick actions parameter:
JSON[ { "ActionName": "Add quick action", "CommandName": "AddQuickActionsToTheIncidentOverview", "CommandParameters": { "Incident number": "<target-incident-number>" } }, { "ActionName": "Delete quick action", "CommandName": "DeleteQuickActionsToTheIncidentOverview", "CommandParameters": { "Incident number": "<target-incident-number>" } }, { "ActionName": "Update quick action", "CommandName": "UpdateQuickActionsToTheIncidentOverview", "CommandParameters": { "Incident number": "<target-incident-number>" } } ]IMPORTANT Ensure to replace <target-incident-number>.
Click the Test Command button to add the meta quick actions.
Navigate to the specified incident and confirm that the meta quick action buttons are present in the header panel of the Overview tab.
.png?inst-v=ac03748f-4f37-47aa-ac40-90d201191274)
Not all commands are eligible for use as quick actions. If the Ad Hoc Command option is deselected and greyed out for a command, it cannot be used as a quick action.
.png?inst-v=ac03748f-4f37-47aa-ac40-90d201191274)
Example: The Absolute utility command cannot be added as a quick action.
Command Details
Add Quick Actions to the Incident Overview
The Add Quick Actions to the Incident Overview utility command allows users to add any command—utility or integration, custom or built-in—to the header panel in the Overview tab of an incident workspace.
The command includes two required parameters: Incident number and Quick actions.
.png?inst-v=ac03748f-4f37-47aa-ac40-90d201191274)
Incident number: Identifies the workspace of the incident to which quick actions are added.
Quick actions: The commands to add as quick actions in a JSON array.
Quick Actions Parameters
The Quick actions parameter is a JSON array containing one or more objects, each of which represents a single command. Each command object can include the ActionName, CommandName, CommandParameters, IntegrationName, and ConnectionName fields.
.png?inst-v=ac03748f-4f37-47aa-ac40-90d201191274)
Field | Required/Optional | Description | Sample Data |
|---|---|---|---|
ActionName | Required | The customizable display name of the quick action. | Send Slack Message to John |
CommandName | Required | The internal name of the command to be added as a quick action. | SendInteractivity |
CommandParameters | Optional | Defines default or placeholder values for specified command parameters. Users can omit this parameter if no such values are needed. |
JSON
|
IntegrationName | Optional | The display name of the integration. This parameter is required for integration commands. Some integration commands share names with other integration or utility commands (e.g., Send Message exists for Slack, Telegram, and as a utility command). Omitting this field may not trigger an error but can result in the wrong command being added as a quick action. | Slack |
ConnectionName | Optional | The integration connection that is preselected for use with this quick action. This parameter applies only to integration commands. | slack_connection_1 |
READER NOTE
A command’s internal name can be obtained from Configuration > Utility Commands or Integration Commands, in the Command Name section under the command’s display name field.
.png?inst-v=ac03748f-4f37-47aa-ac40-90d201191274)
Quick Actions Parameter Template
Users can copy the template below and paste it into the Quick actions parameter to create multiple quick actions at once. Replace all fields and values enclosed in angled brackets (<>), and remove any optional parameters that are not required.
[
  {
    "ActionName": "<action-display-name-1>",
    "CommandName": "<command-name-1>",
    "CommandParameters": {
      "<command-parameter-1>": "<command-parameter-1-value>",
      "<command-parameter-2>": "<command-parameter-2-value>",
      "<command-parameter-3>": "<command-parameter-3-value>"
    },
    "IntegrationName": "<integration-name-1>",
    "ConnectionName": "<connection-name-1>"
  },
  {
    "ActionName": "<action-display-name-2>",
    "CommandName": "<command-name-2>",
    "CommandParameters": {
      "<command-parameter-1>": "<command-parameter-1-value>",
      "<command-parameter-2>": "<command-parameter-2-value>",
      "<command-parameter-3>": "<command-parameter-3-value>"
    },
    "IntegrationName": "<integration-name-2>",
    "ConnectionName": "<connection-name-2>"
  }
]PREREQUISITE
Ensure that the Add Quick Actions to the Incident Overview command has been added to the target incident workspace.
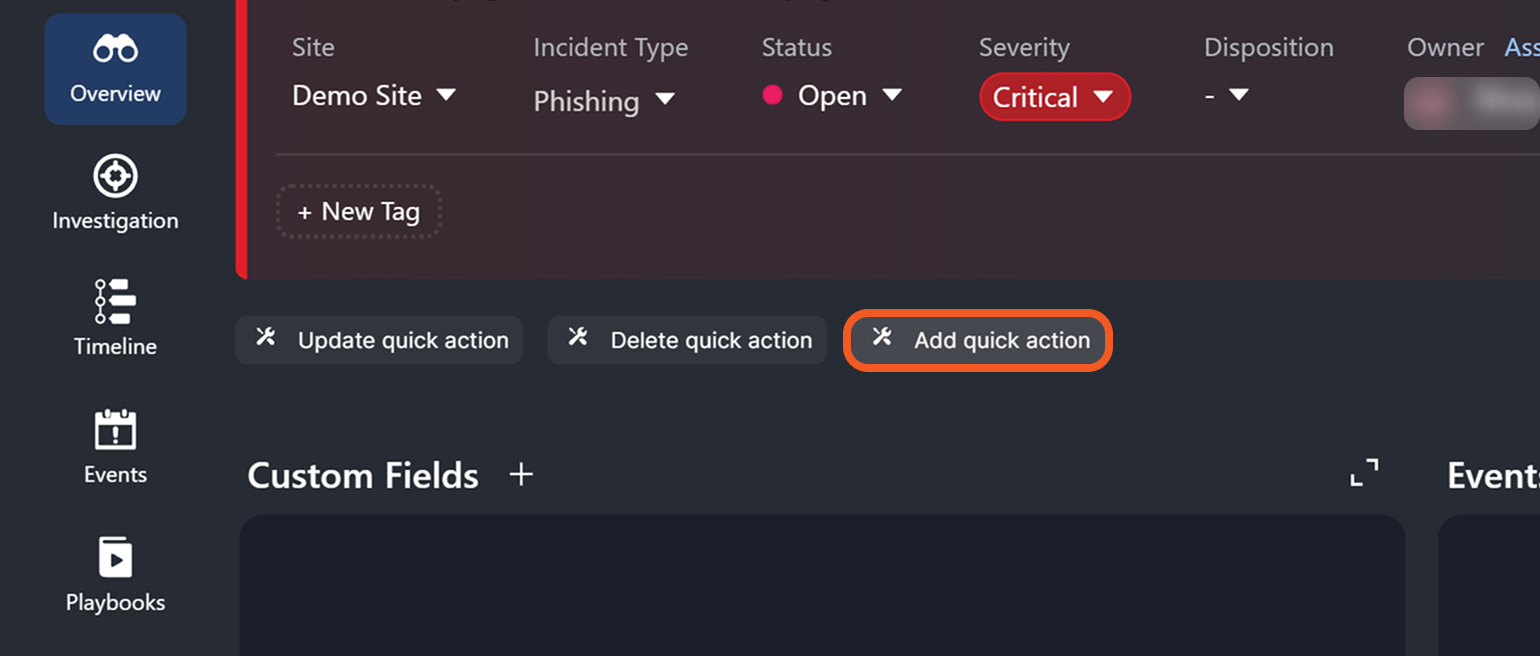
Click the Add quick actions meta quick action button.
Enter the current incident number if it is not prefilled.
.png?inst-v=ac03748f-4f37-47aa-ac40-90d201191274)
Configure the Quick actions parameter as required.
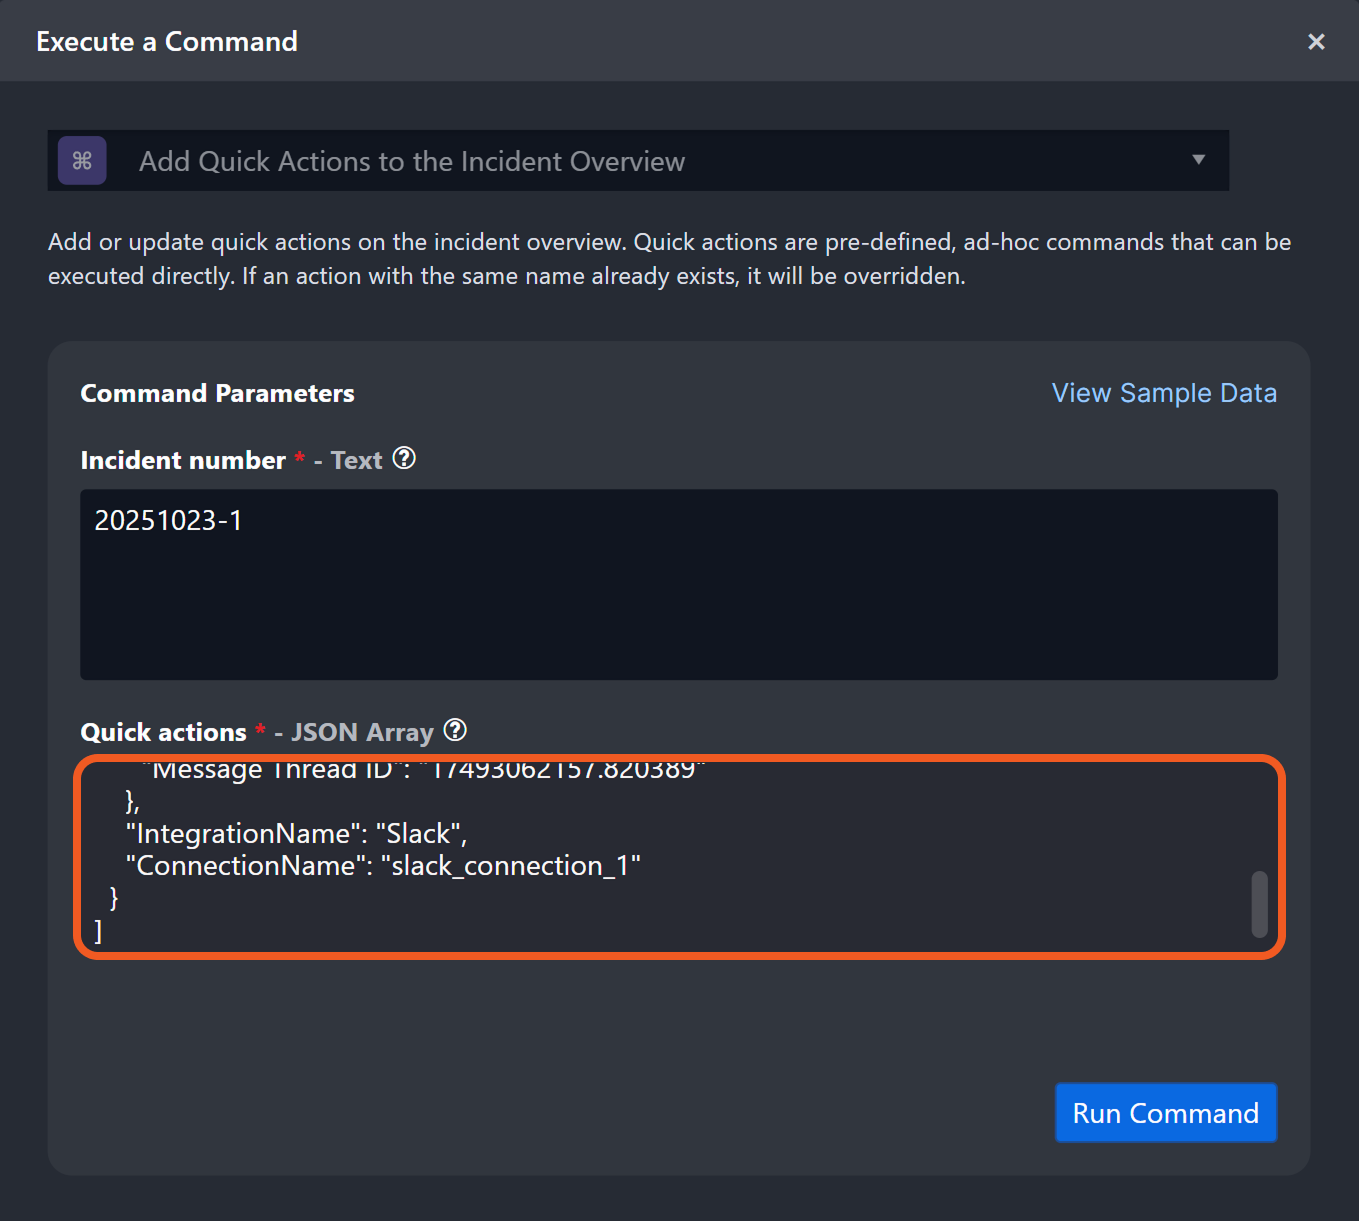
The Quick actions parameter may appear as follows for Slack’s Send Interactivity command:
JSON[ { "ActionName": "Send Slack Message to John", "CommandName": "SendInteractivity", "CommandParameters": { "Channel or User ID": "C06R5E0UVDJ", "Message Thread ID": "17493062157.820389" }, "IntegrationName": "Slack", "ConnectionName": "slack_connection_1" } ]Click the Run Command button to add the quick action.
.png?inst-v=ac03748f-4f37-47aa-ac40-90d201191274)
RESULT
After the Send Interactivity command has been added as a quick action, users can execute it directly from the incident workspace.
.png?inst-v=ac03748f-4f37-47aa-ac40-90d201191274)
Based on the quick action configuration, the Channel or User ID and Message Thread ID parameters are prefilled, and the appropriate connection is preselected.
.png?inst-v=ac03748f-4f37-47aa-ac40-90d201191274)
Left: Execution modal for the Send Interactivity quick action. Right: Configuration of the quick action.
READER NOTE
Adding another quick action with the same ActionName and CommandName replaces the existing one with the latest configuration.
If users do not see their changes after creating, updating, or deleting a quick action, refresh the workspace by clicking the Overview tab.

Delete Quick Actions from the Incident Overview
The Delete Quick Actions from the Incident Overview command lets users remove one or multiple quick actions from an incident workspace.
The command includes two required parameters: Incident number and Action name.
.png?inst-v=ac03748f-4f37-47aa-ac40-90d201191274)
Incident number: Identifies the workspace of the incident from which quick actions are removed.
Action name: The display names of the quick actions to remove.
EXAMPLE The Action name parameter can be configured as follows to remove quick actions titled Update Jira Tickets and Send Email to L1 Analyst.
[
  "Update Jira tickets",
  "Send Email to L1 Analyst"
]
Running the Delete Quick Actions from the Incident Overview command with Action name set to the value above removes those quick actions from the specified incident workspace.
.png?inst-v=ac03748f-4f37-47aa-ac40-90d201191274)
Before: The Update Jira tickets and Send Email to L1 Analyst quick actions are present.
.png?inst-v=ac03748f-4f37-47aa-ac40-90d201191274)
After: The quick actions have been removed after executing the command.
Update Quick Actions on the Incident Overview
Users who need to modify existing quick actions can use the Update Quick Actions on the Incident Overview command. Similar to the Add Quick Actions to the Incident Overview command, it requires two parameters: Incident number and Quick actions. For detailed information on using the Quick actions parameter, refer to the Add Quick Actions to the Incident Overview section.