
Custom Connection Parameters
LAST UPDATED: JUNE 25, 2025
Custom integrations, like built-in integrations, typically rely on a defined set of custom connection parameters to establish connectivity with the D3 platform. These parameters may include server URL, access token, API version, username, password, client secret, or others, depending on the specific requirements of the integration.
Custom Connection Parameter Interface
Configuring custom connection parameters modifies the connection setup modal to include input fields, where users can enter values for the defined parameters.
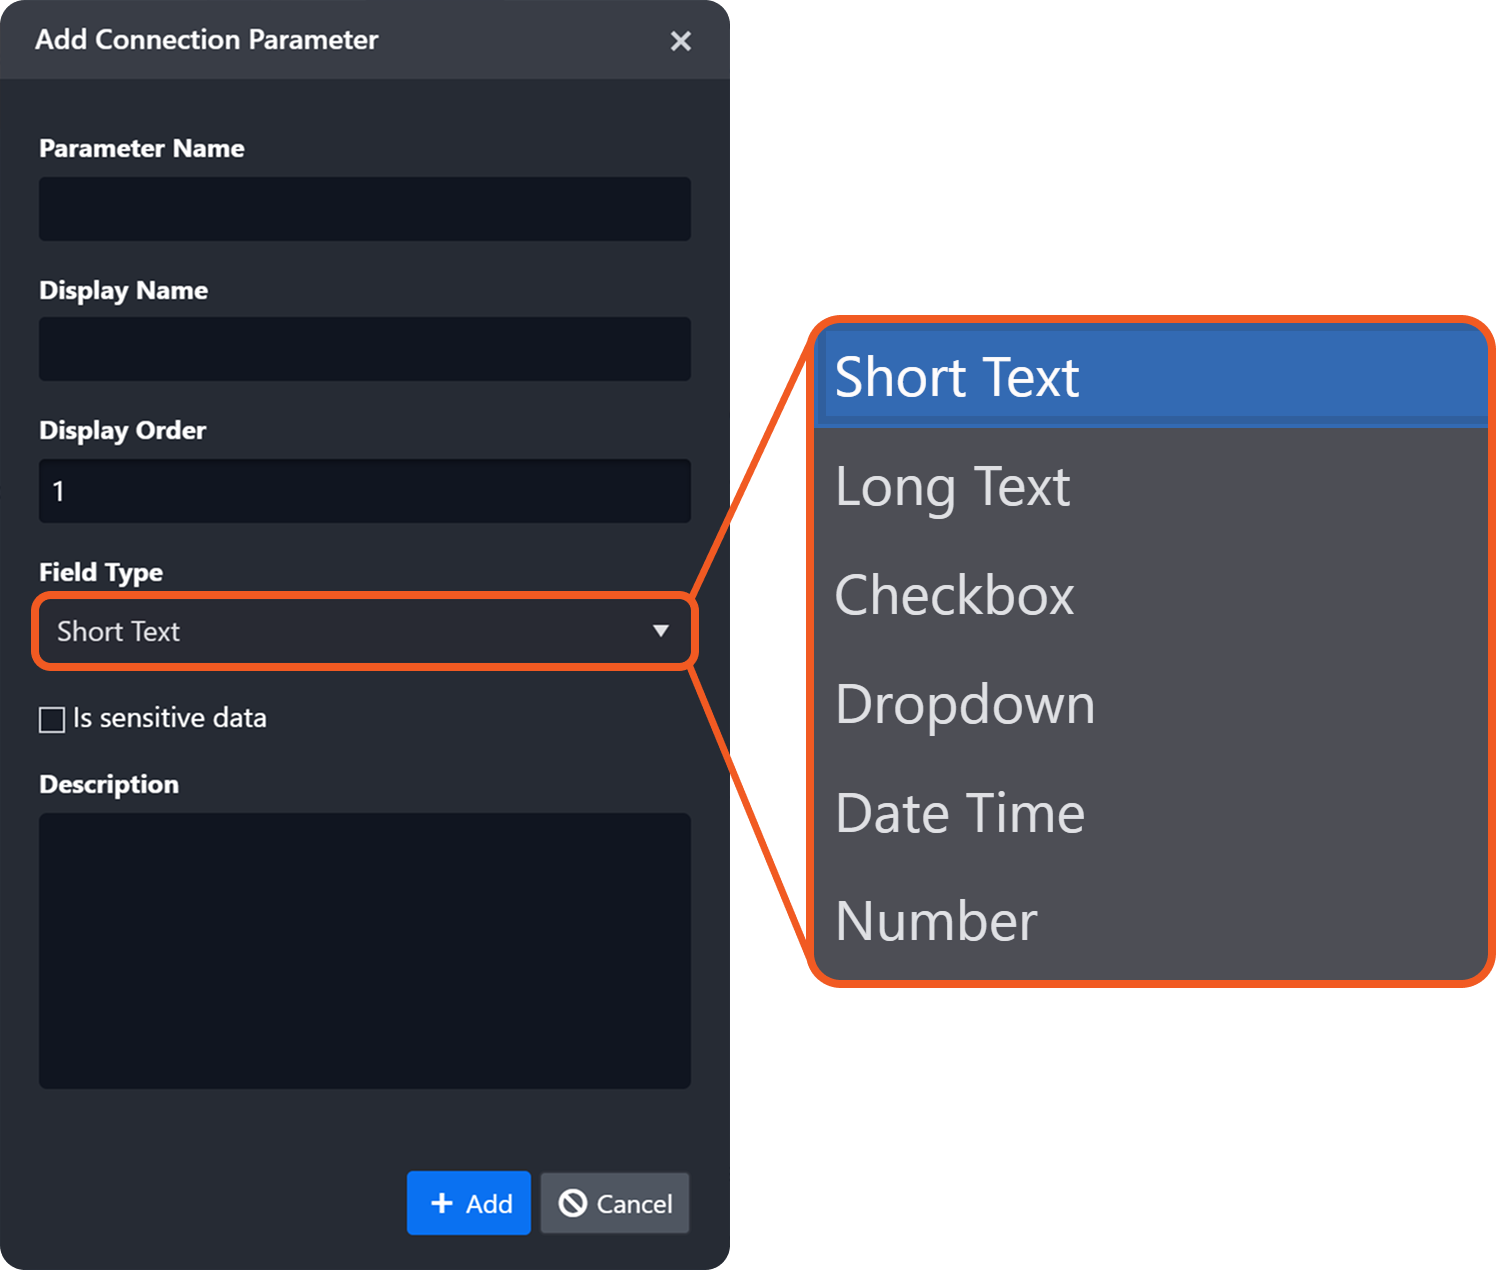
FORMATTING REQUIREMENT
Use only lowercase letters in the Parameter Name field.
Before Creating Custom Connection Parameters
-20250623-222844.png?inst-v=14315ac1-e236-4137-b3db-d5c917e51e5f)
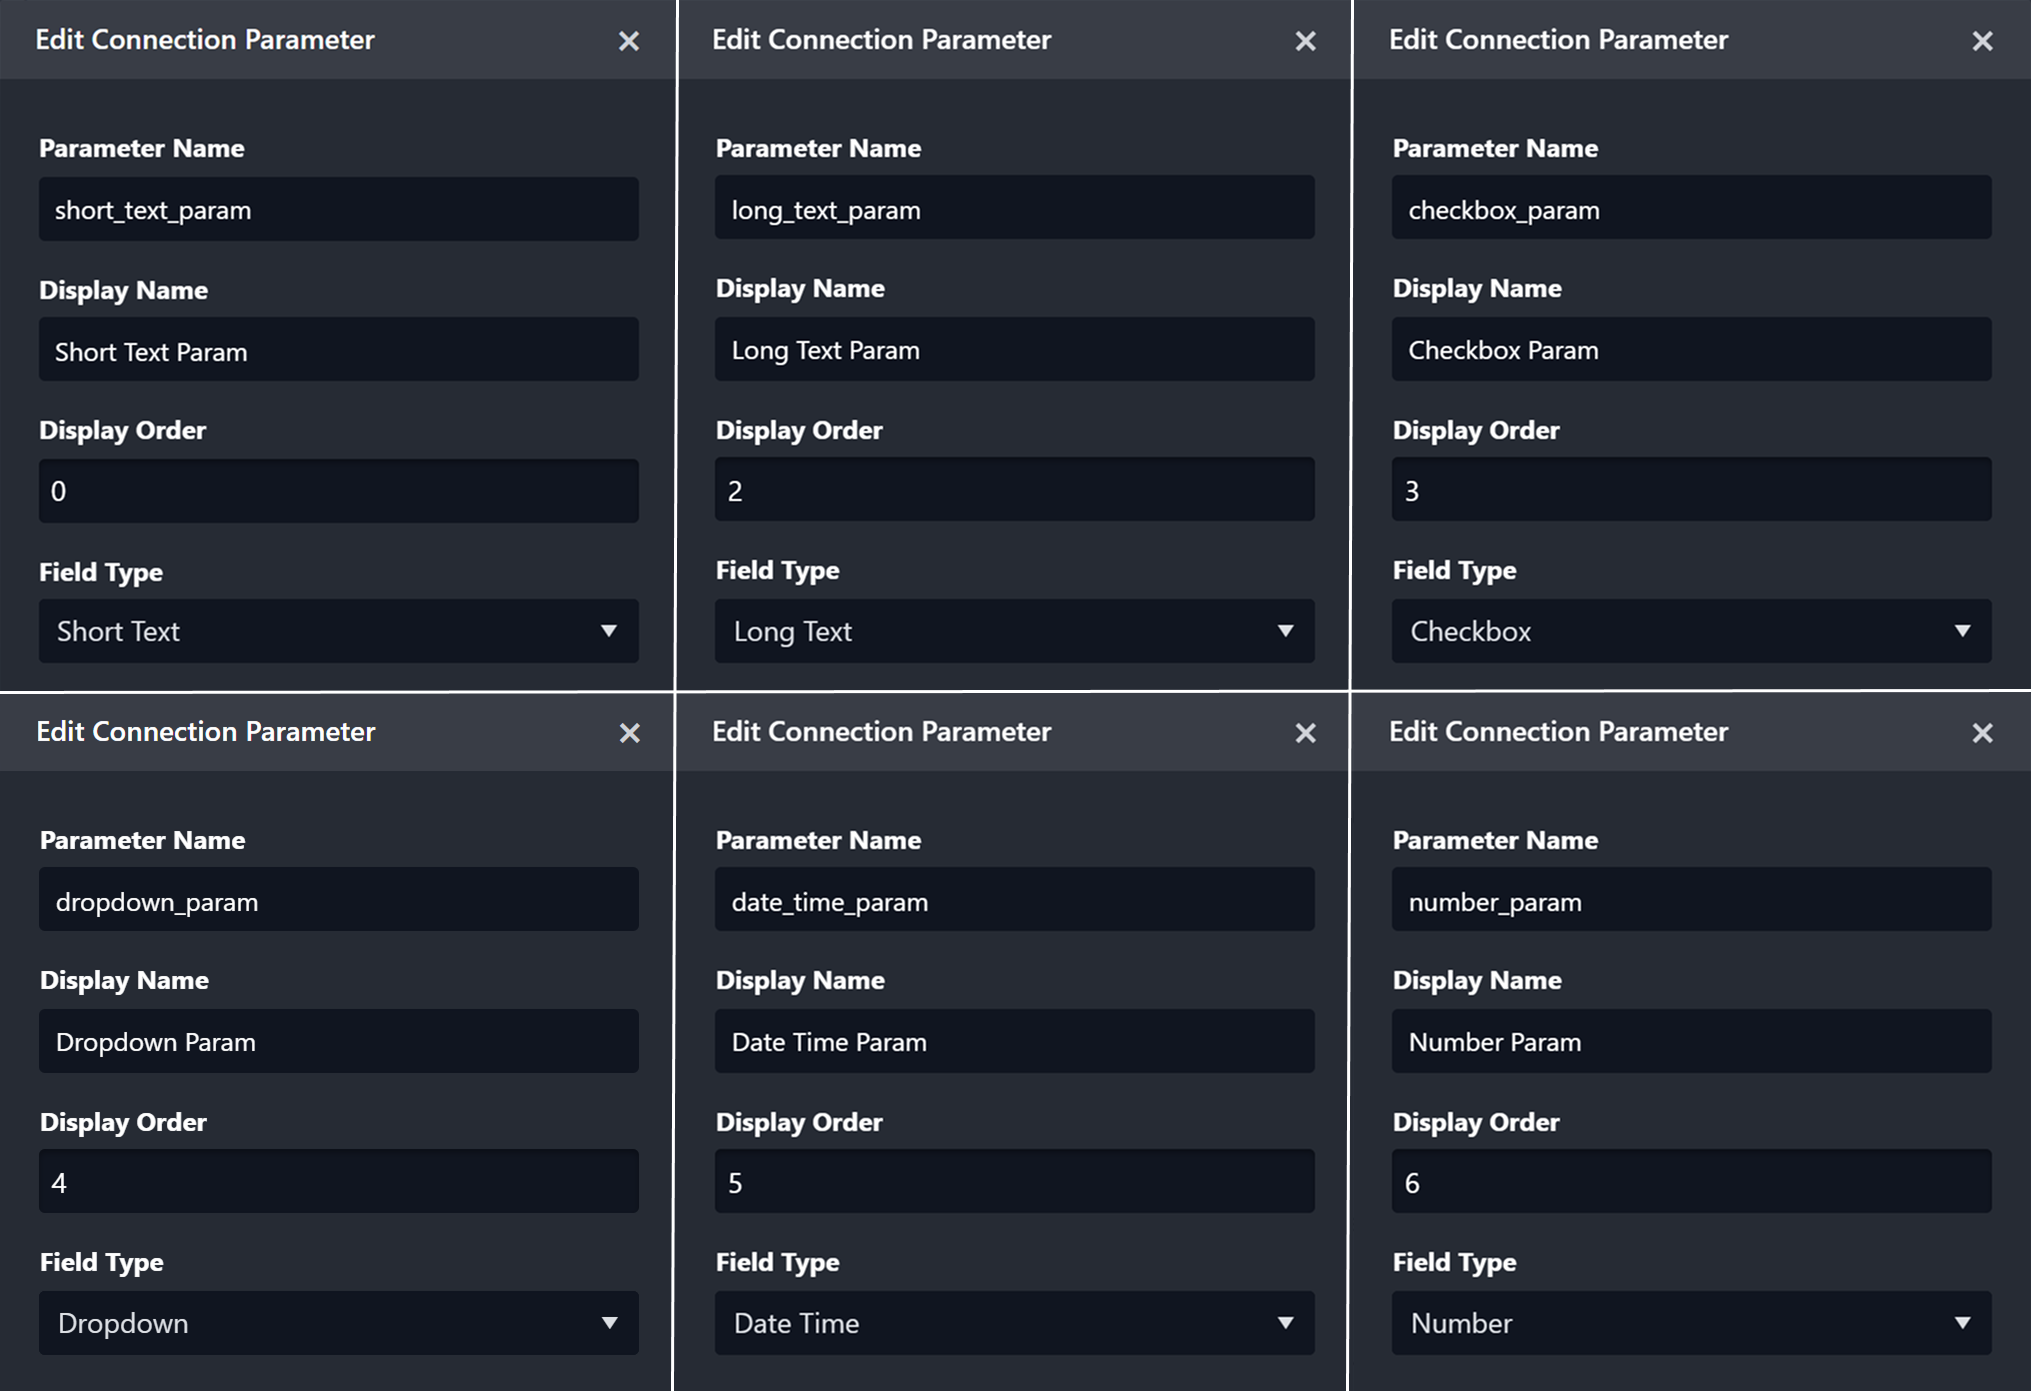
After Creating One of Each Type of Custom Connection Parameter
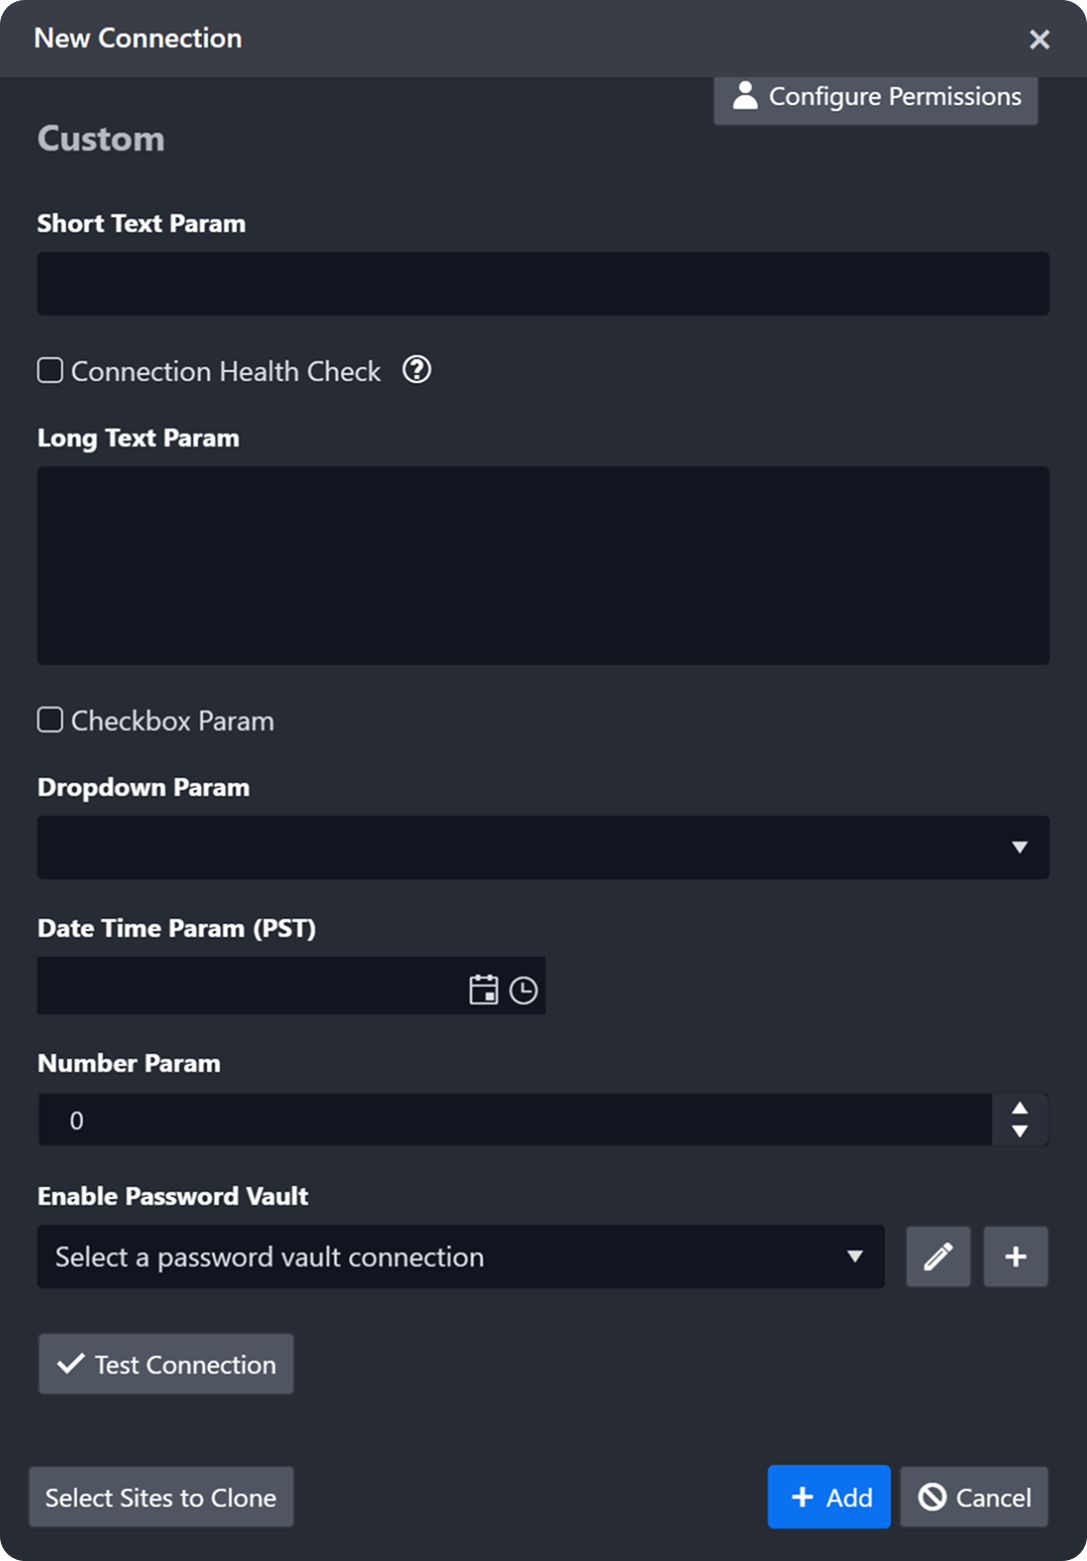
READER NOTE
The Connection Health Check checkbox is included by default.
Using Custom Connection Parameters
OBJECTIVE – Learn to use custom connection parameters in a custom Python script.
Create and save one of each type of custom connection parameter.
Create a custom Python command.
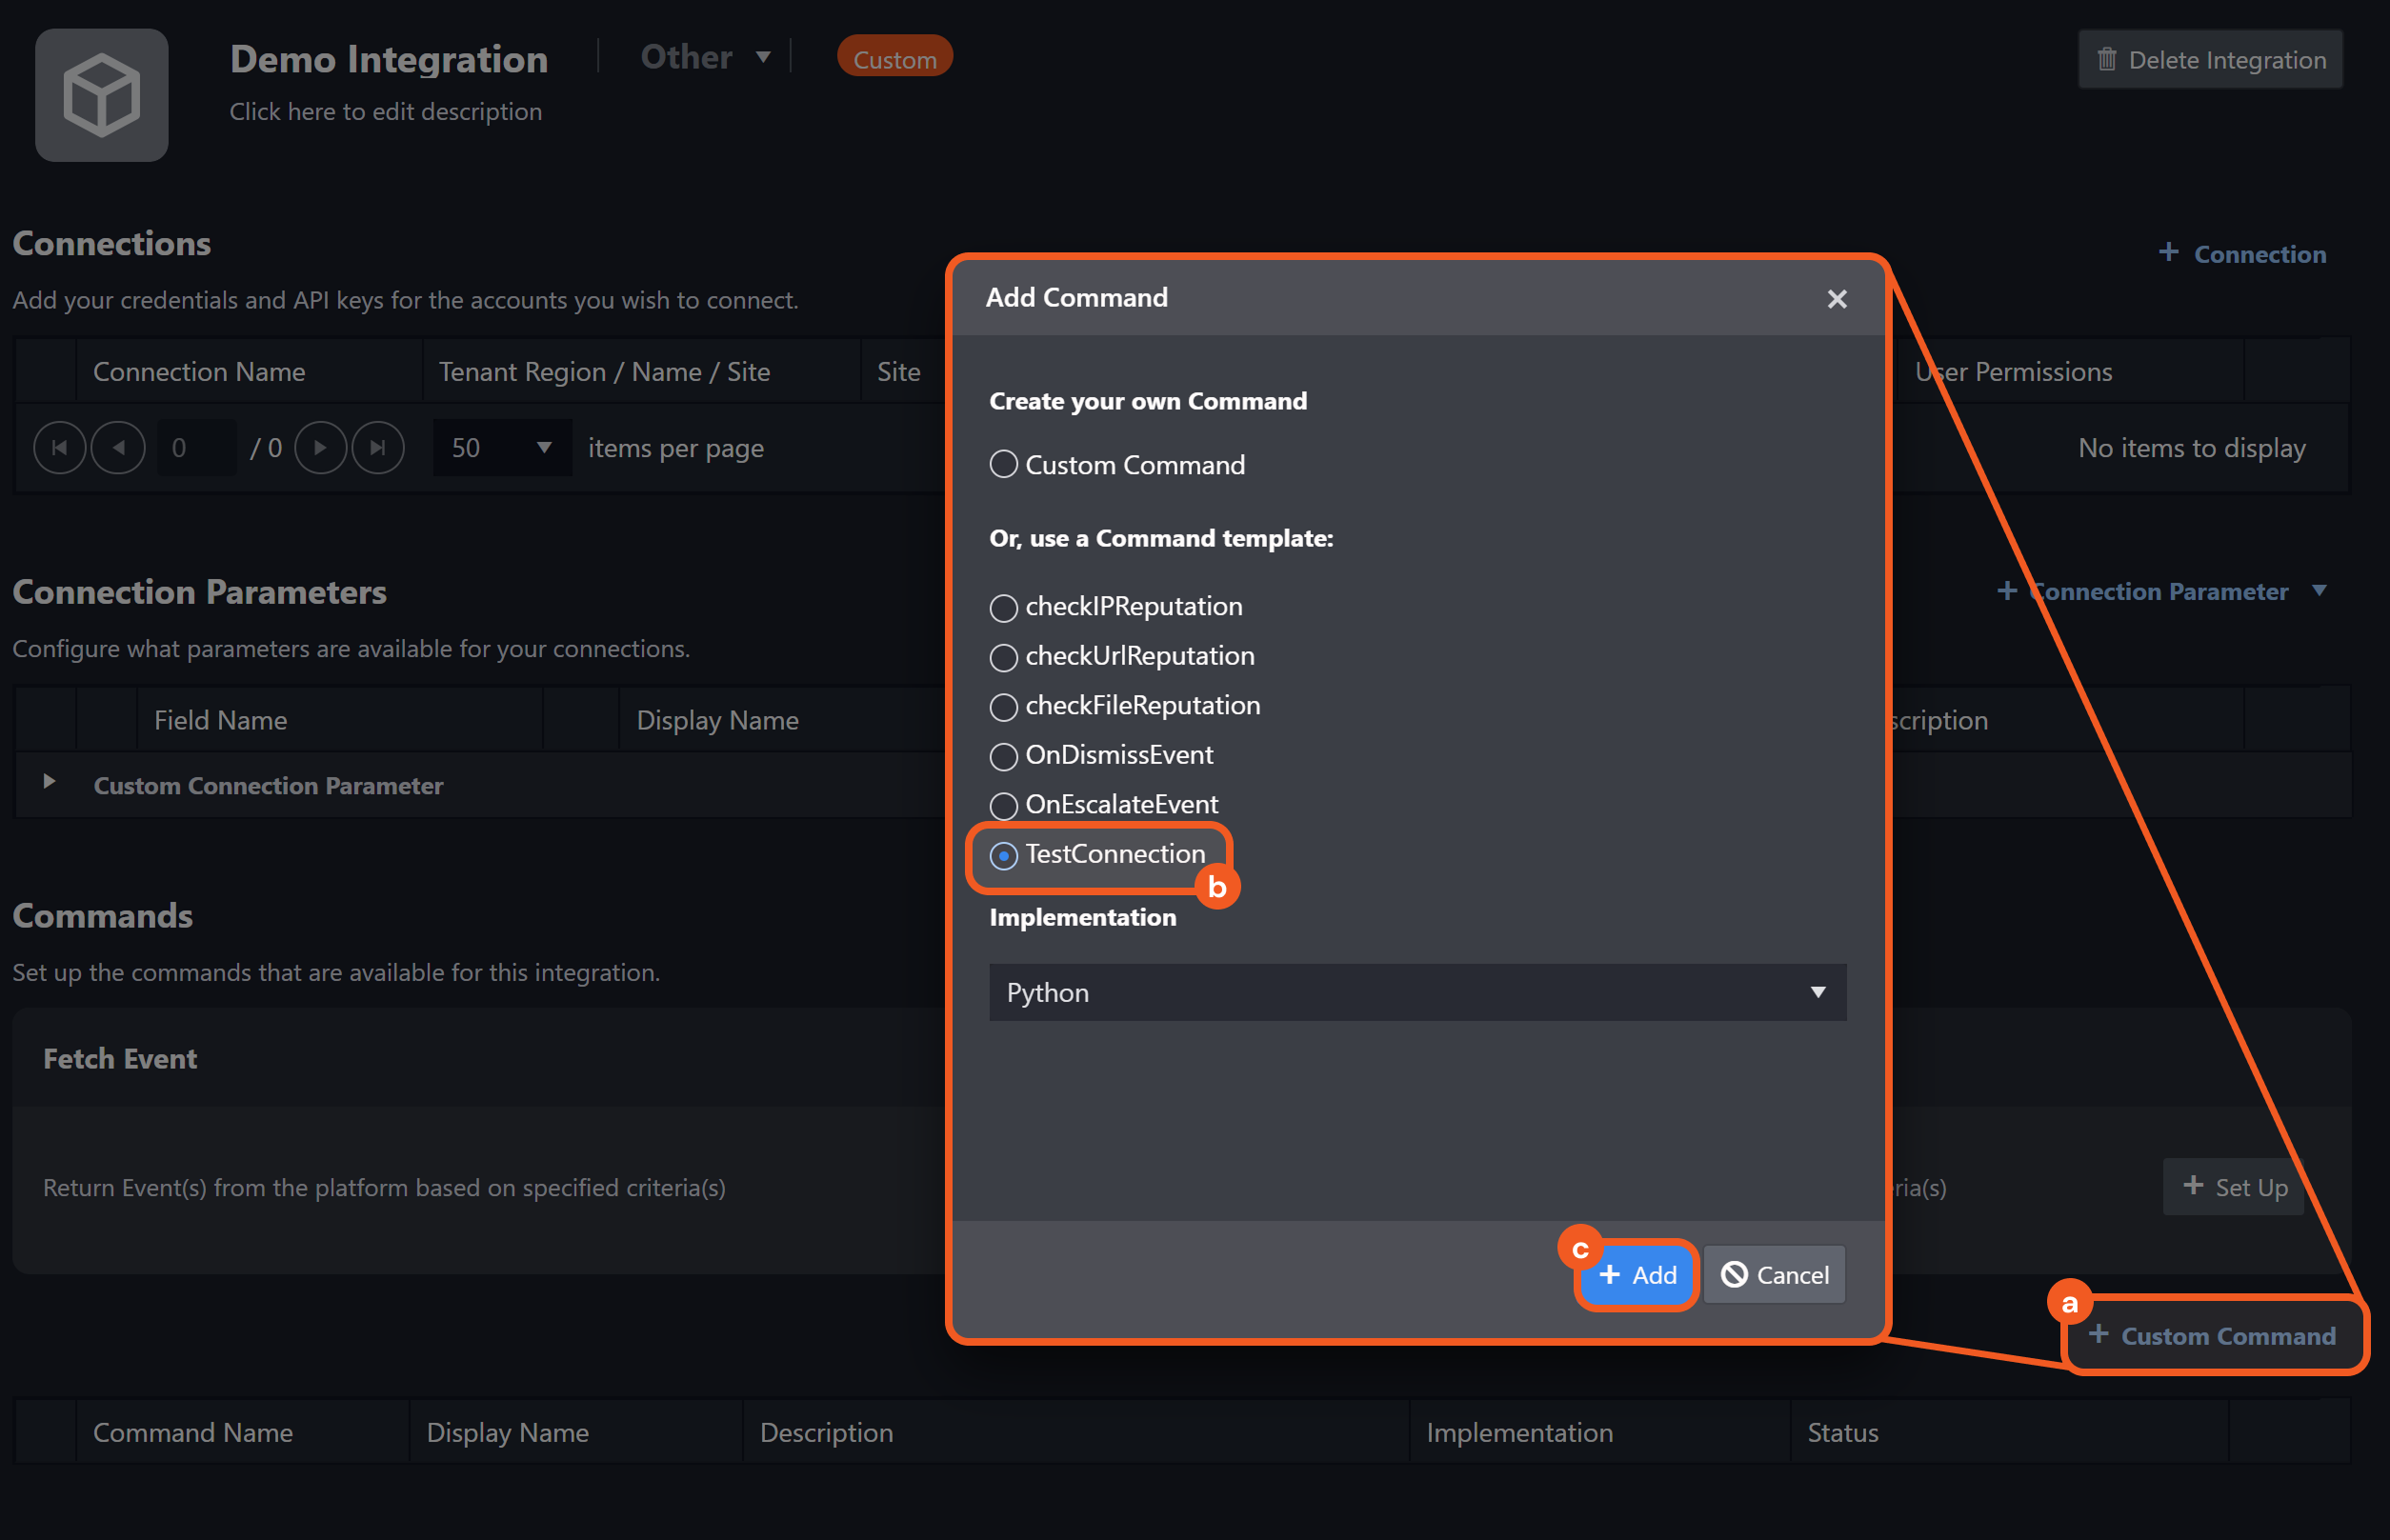
Navigate to the Test tab, click on the
%201-20250624-003750.png?inst-v=14315ac1-e236-4137-b3db-d5c917e51e5f) button, input custom values for the custom connect parameters configured in step 1, then click on the
button, input custom values for the custom connect parameters configured in step 1, then click on the %201-20250415-182338.png?inst-v=14315ac1-e236-4137-b3db-d5c917e51e5f) button.
button.-20250624-003328.png?inst-v=14315ac1-e236-4137-b3db-d5c917e51e5f)
Input the following code into the editor, then click on the
%202-20250624-004316.png?inst-v=14315ac1-e236-4137-b3db-d5c917e51e5f) button.PY
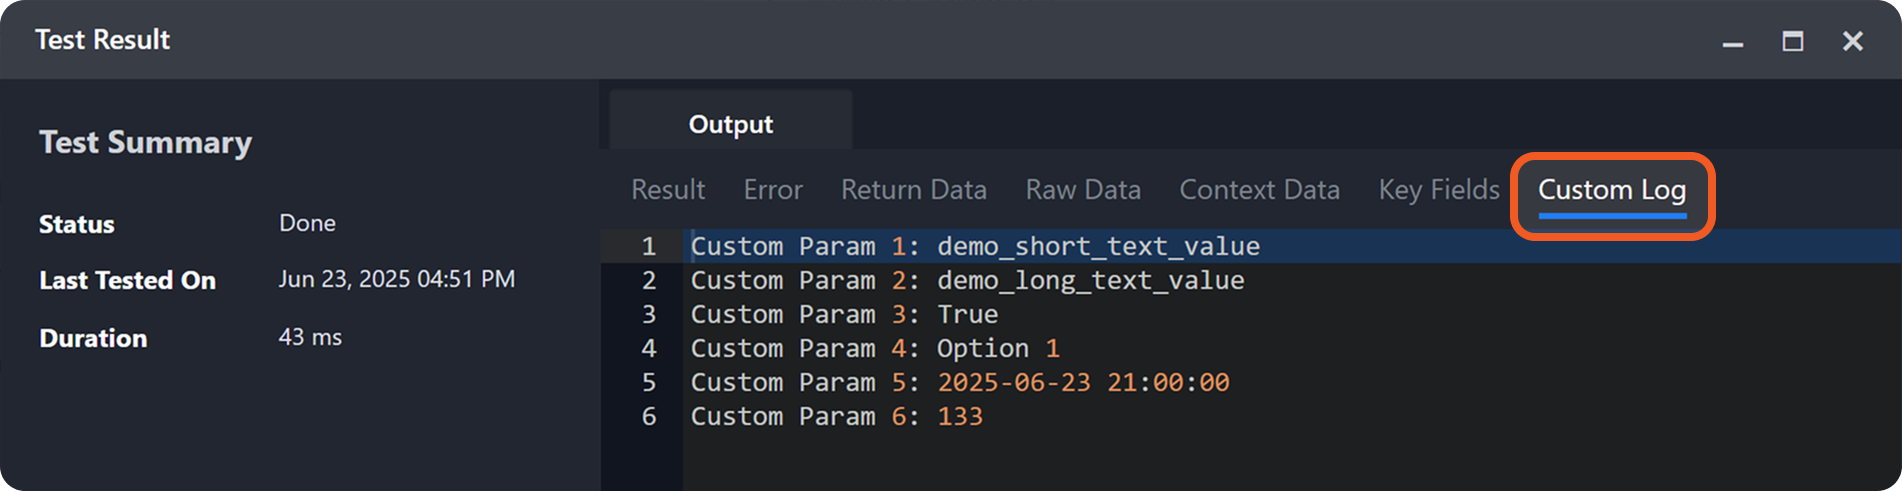
button.PYdef TestConnection(): connector = runtime["connector"] custom_param_stp = connector.get("short_text_param") custom_param_ltp = connector.get("long_text_param") custom_param_cp = connector.get("checkbox_param") custom_param_dp = connector.get("dropdown_param") custom_param_dtp = connector.get("date_time_param") custom_param_np = connector.get("number_param") pb.log(f"Custom Param 1: {custom_param_stp}") pb.log(f"Custom Param 2: {custom_param_ltp}") pb.log(f"Custom Param 3: {custom_param_cp}") pb.log(f"Custom Param 4: {custom_param_dp}") pb.log(f"Custom Param 5: {custom_param_dtp}") pb.log(f"Custom Param 6: {custom_param_np}") rawData = "placeholder_value" resultData = "placeholder_value" returnData = "placeholder_value" keyFields = "placeholder_value" contextData = "placeholder_value" error = "placeholder_value" return pb.returnOutputModel( resultData, returnData, keyFields, contextData, rawData, error )CODE BREAKDOWN
Lines 3: The
connectorvariable provides access to the parameters configured in step 1.Lines 5-10: Retrieve user-entered values from step 3, using
get(<parameter name>).Lines 12-17: Log the retrieved values to the Test Result > Custom Log tab (step 5).
Lines 19-33: Placeholder output values used to ensure that the Custom Log tab renders in the test result popover (step 5).
-20250623-235123.png?inst-v=14315ac1-e236-4137-b3db-d5c917e51e5f)
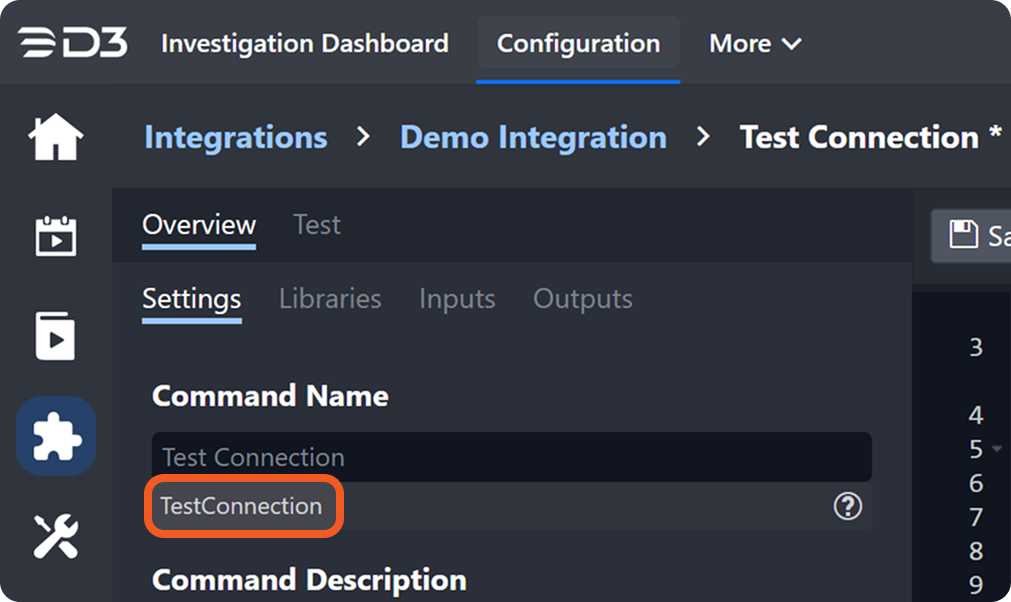
Ensure that the function name exactly matches the internal command name displayed in the Overview > Settings tab, directly beneath the command display name.
Click on the Custom Log tab to observe the values.
Establishing Connections
Establishing connections for custom integrations involves configuring the vendor-side environment, identifying appropriate endpoints for connectivity validation, and setting up the D3 platform with corresponding connection parameters that support those endpoints.
The example below demonstrates a simplified process of establishing connectivity, using minimal vendor-side setup and widely used connection parameters.
OBJECTIVE – Establish connectivity for a custom Mistral AI integration using custom connection parameters.
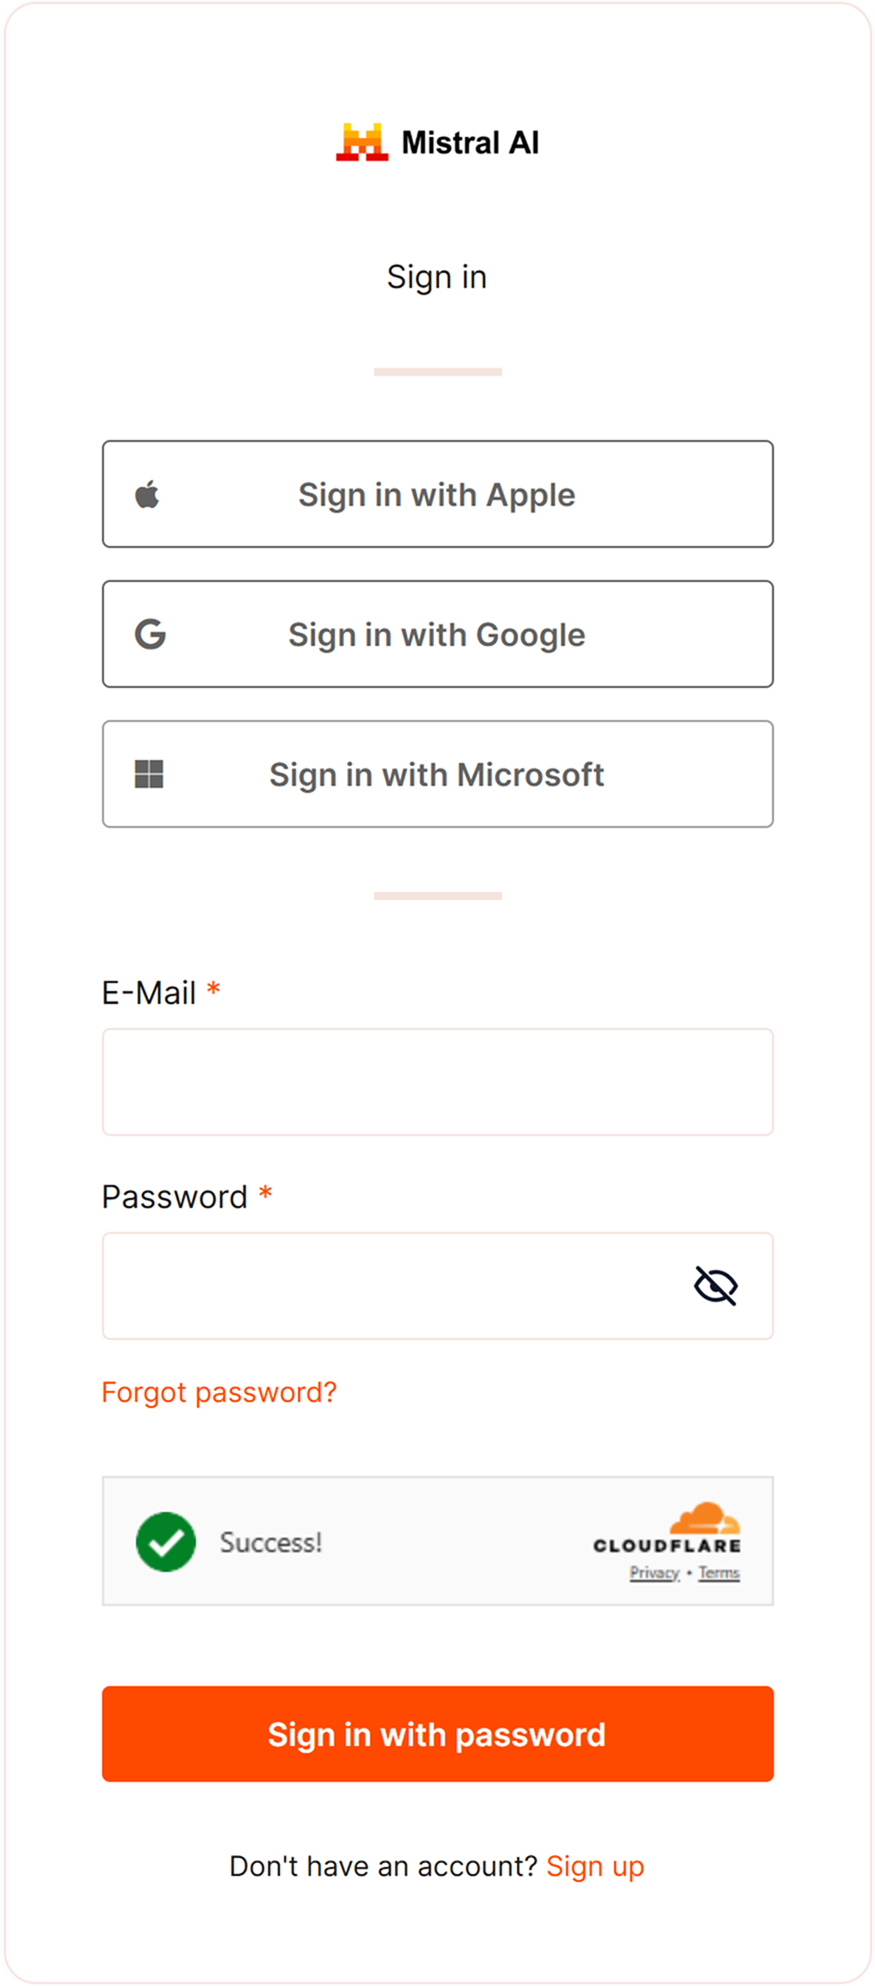
Log in to https://console.mistral.ai/home.
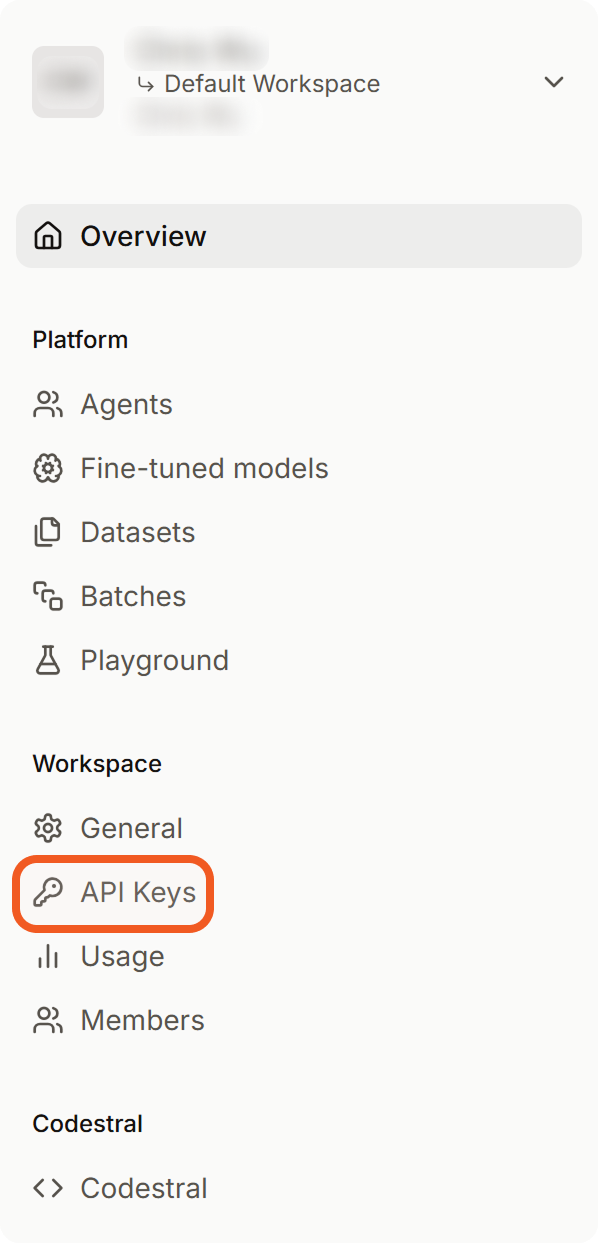
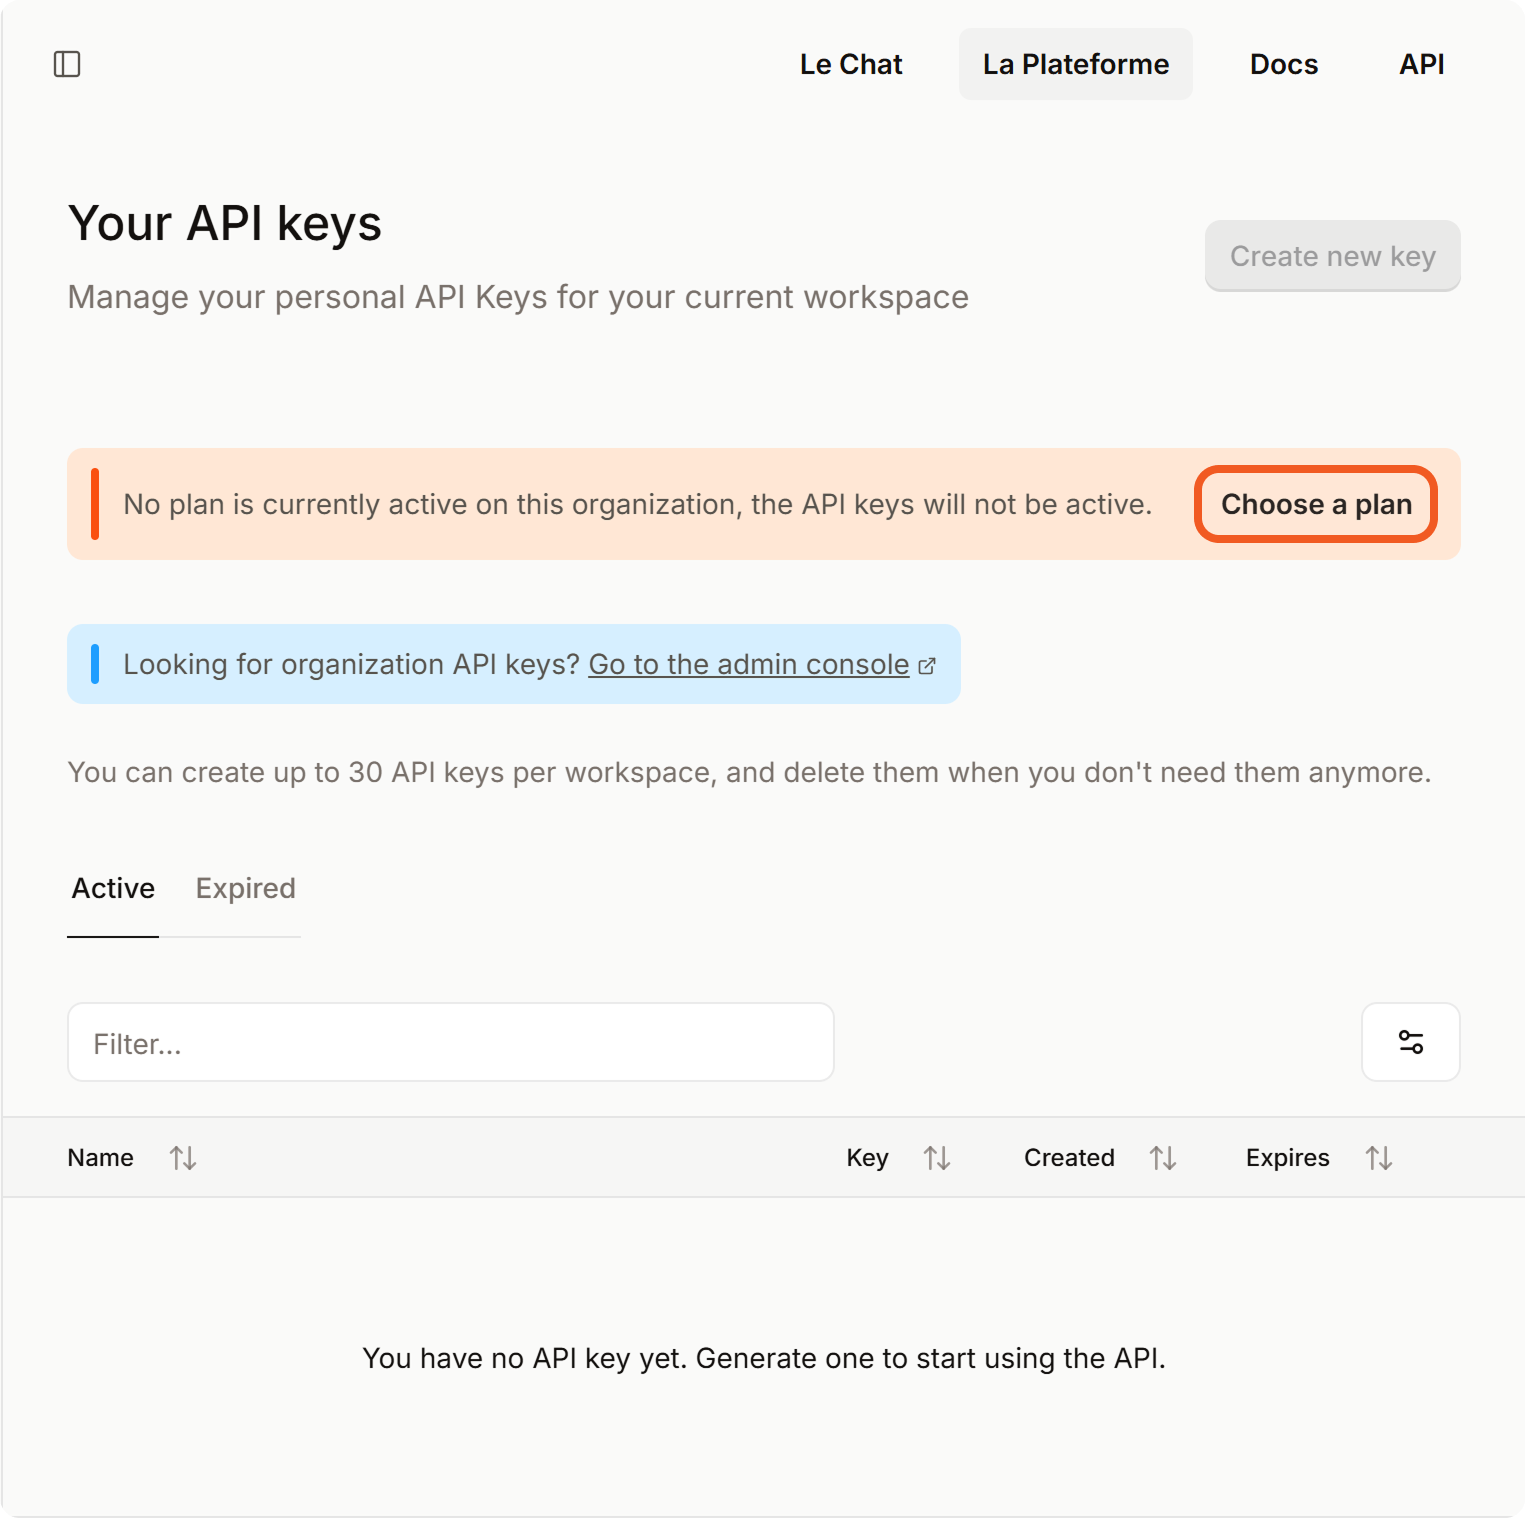
Click on the API Keys item within the left sidebar.
Click the Choose a plan button. Skip to step 8 if you see a Create new key button.
Click on the Experiment for free button.
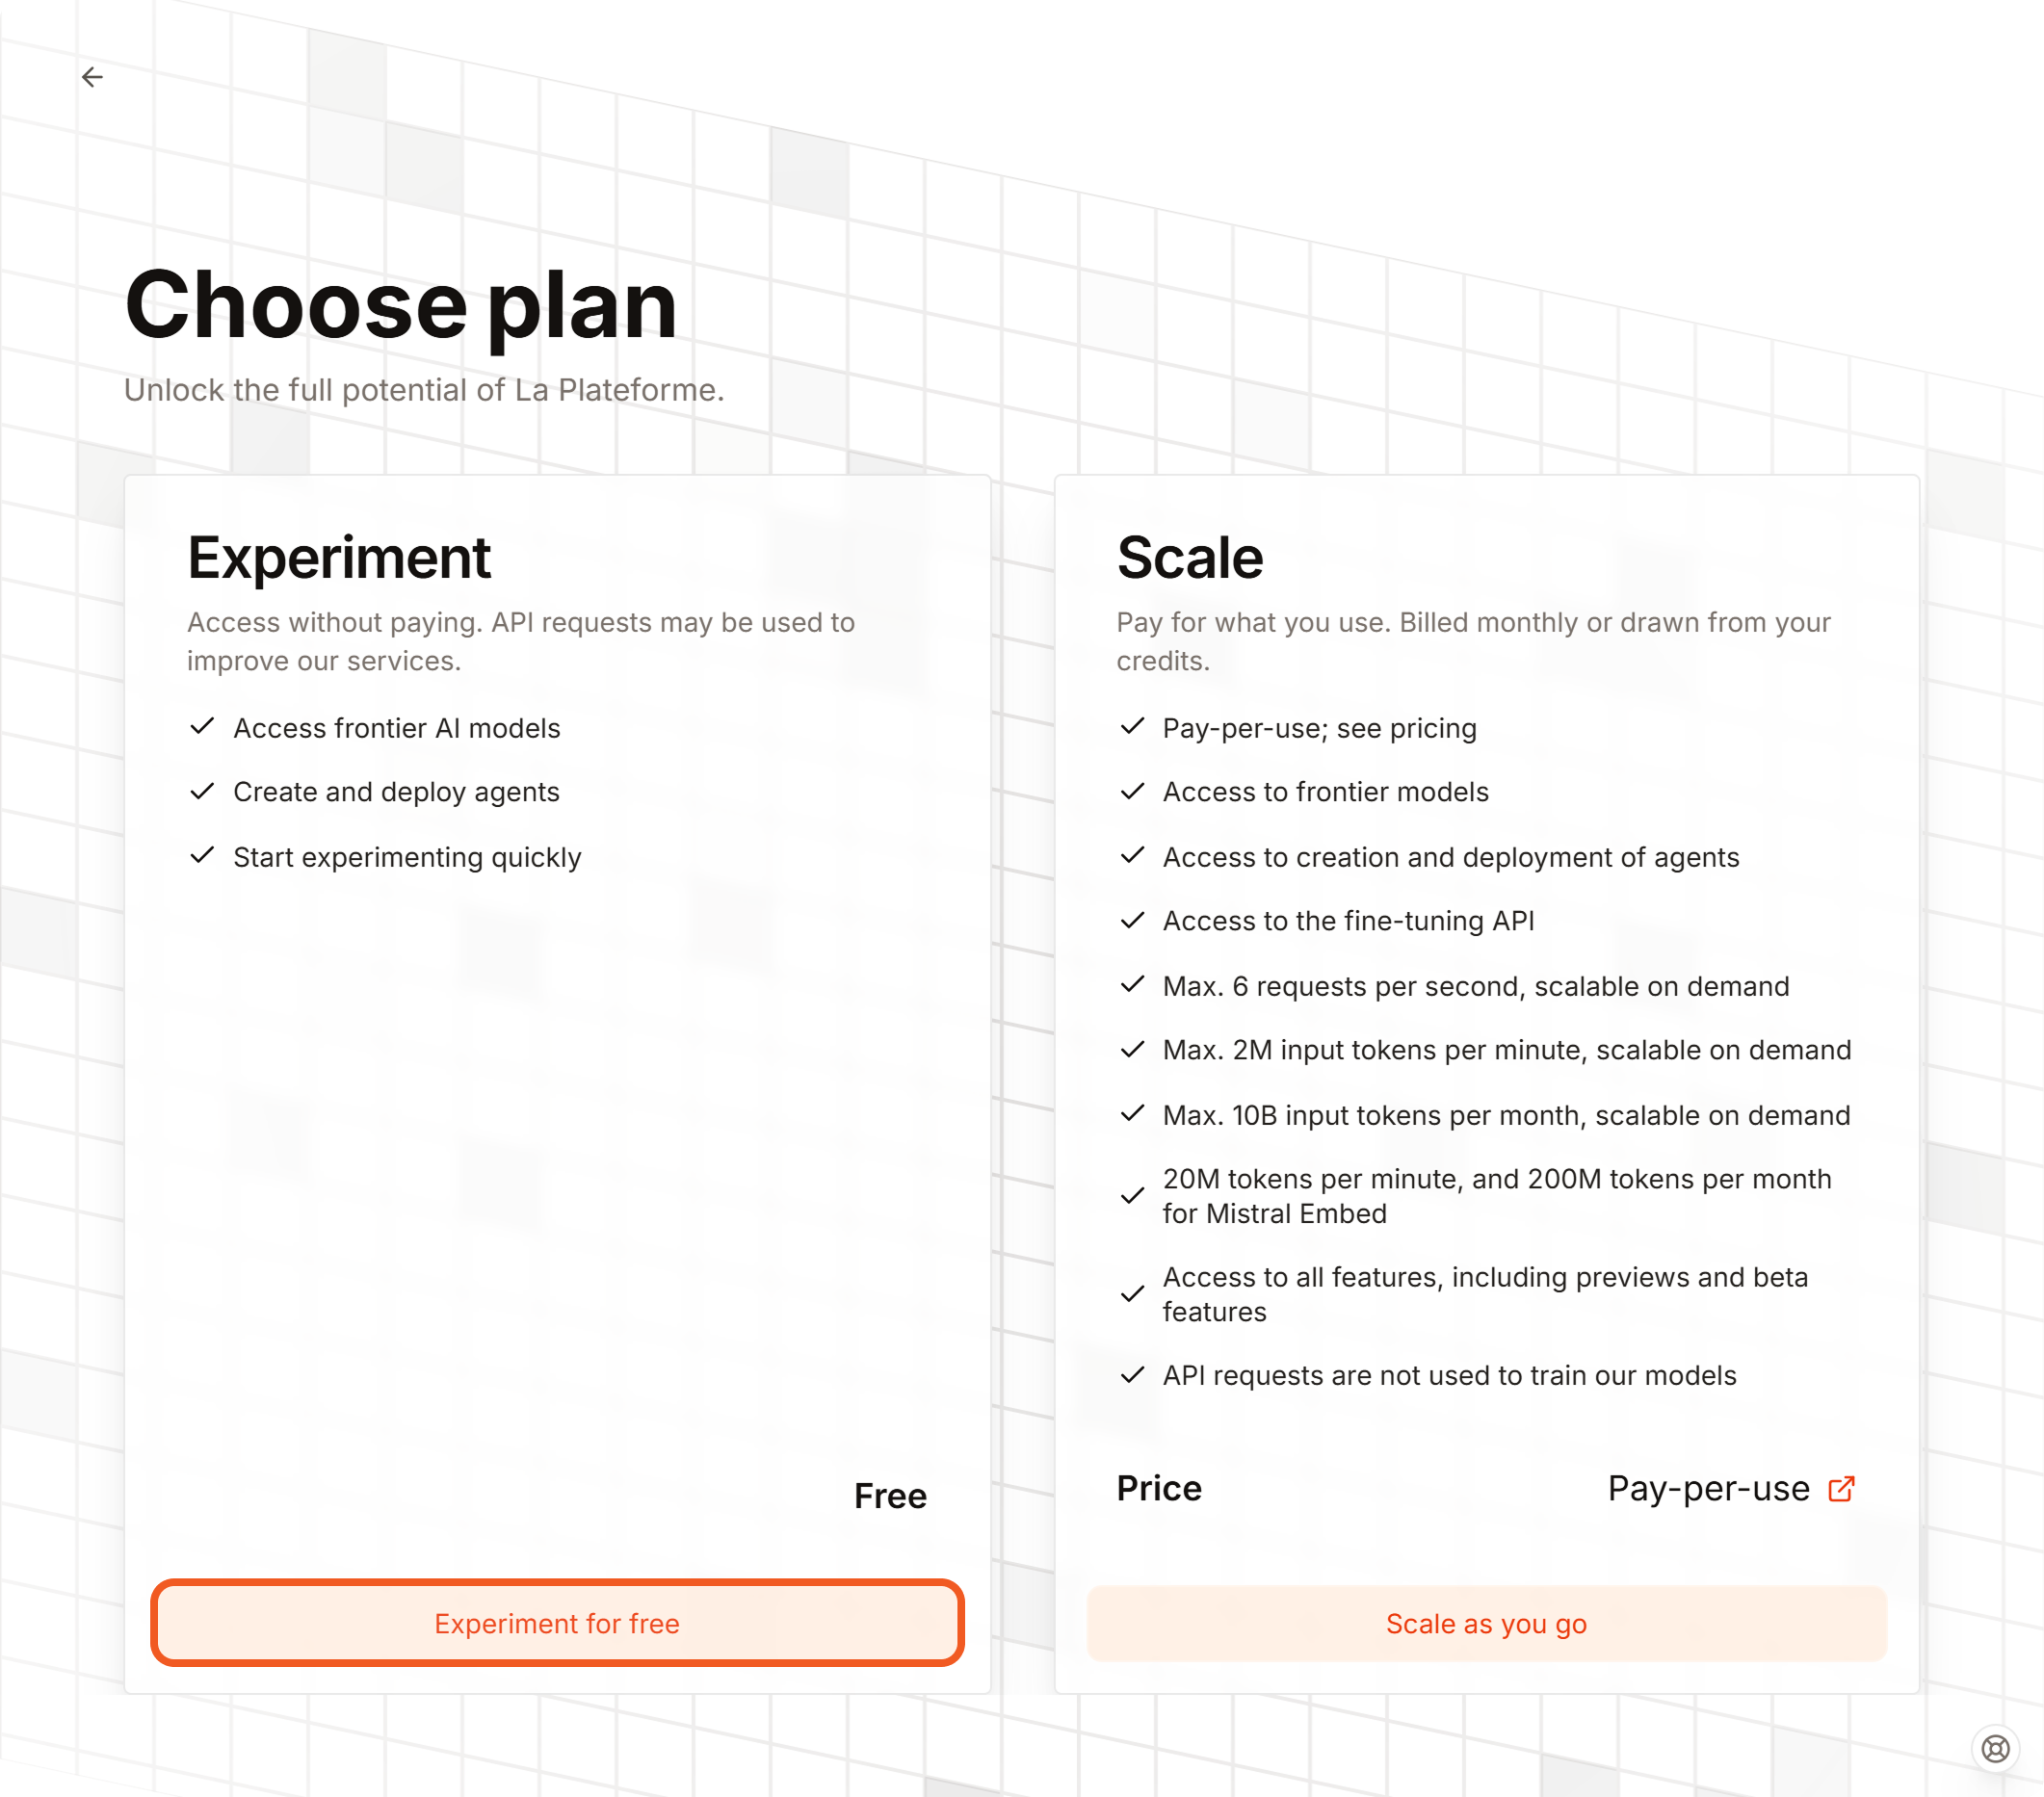
Tick the checkbox, then click on the Subscribe button.
-20250624-175128.png?inst-v=14315ac1-e236-4137-b3db-d5c917e51e5f)
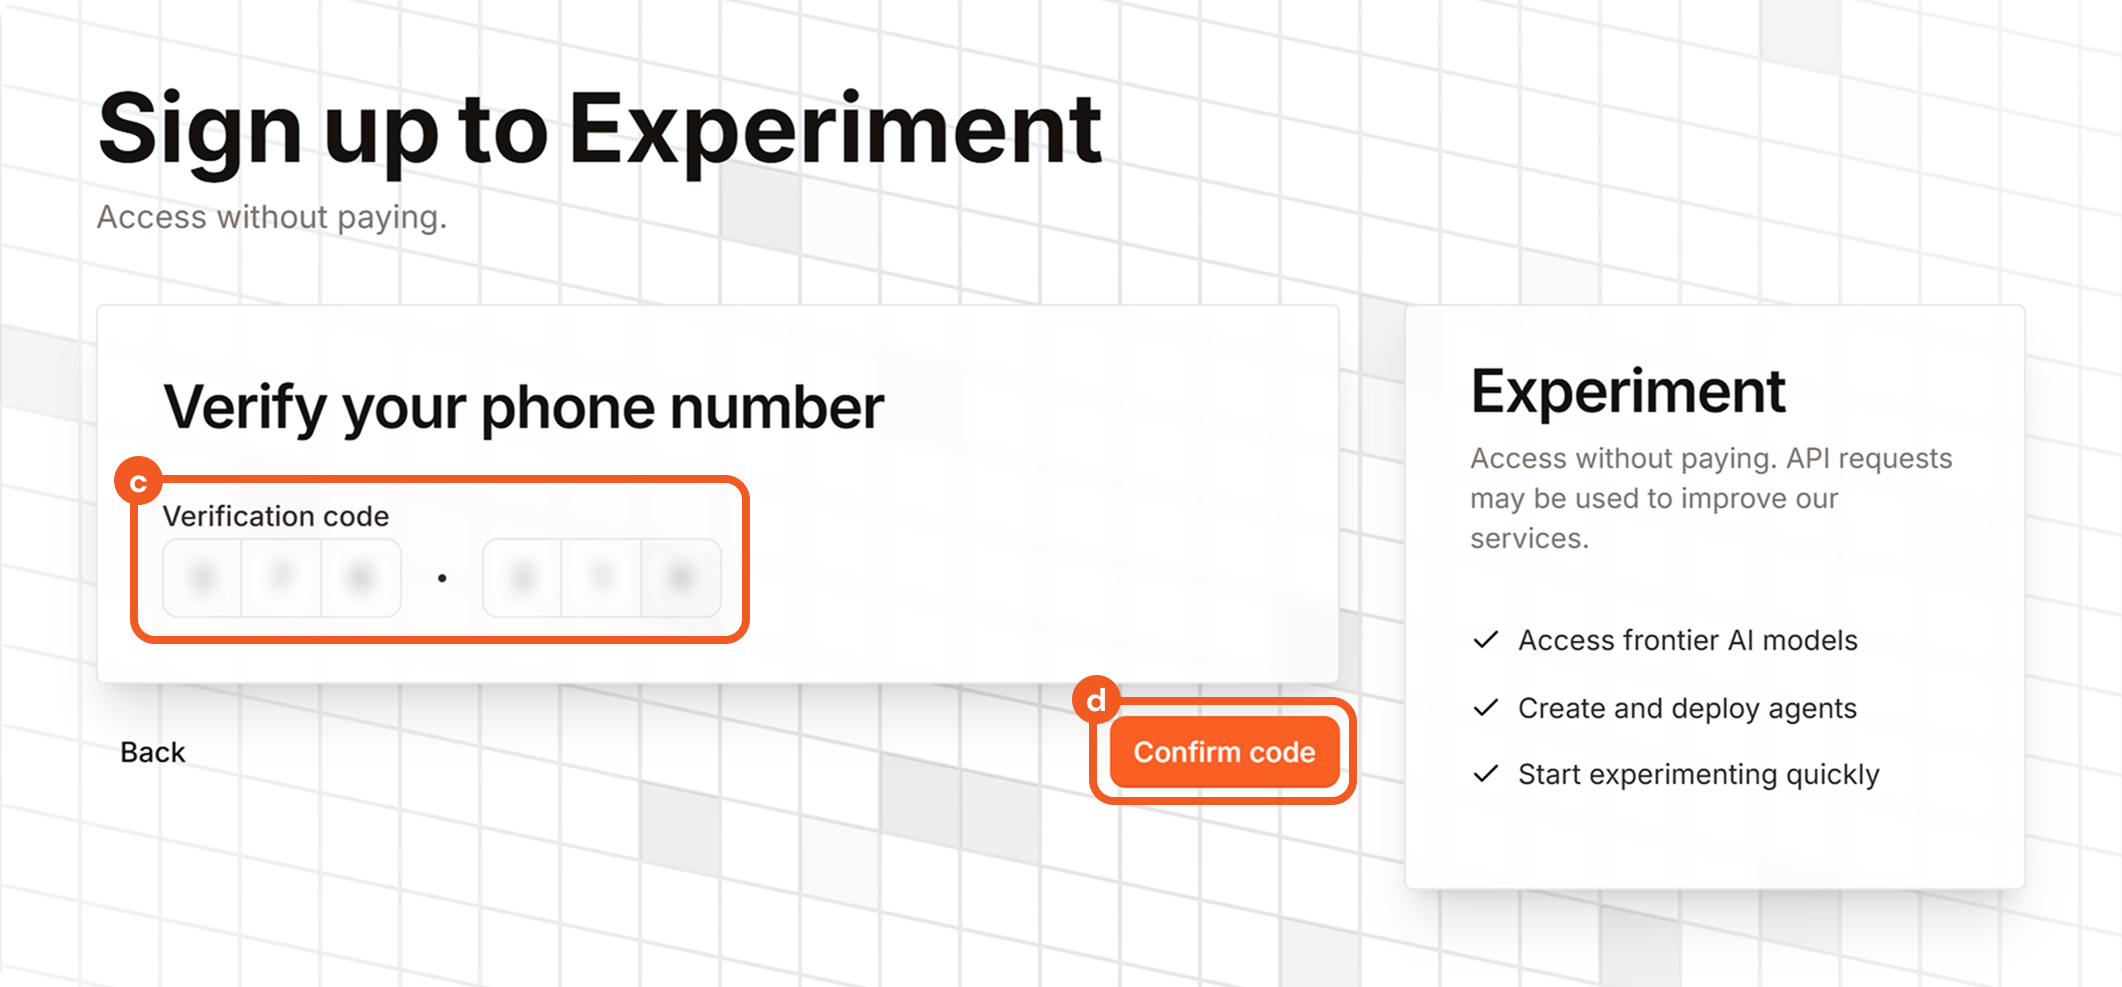
Verify you phone number.
-20250624-181859.png?inst-v=14315ac1-e236-4137-b3db-d5c917e51e5f)
Click on the Go to La Plateforme button.
-20250624-181927.png?inst-v=14315ac1-e236-4137-b3db-d5c917e51e5f)
Navigate back to the API Keys page, then click on the Create new key button.
-20250624-181938.png?inst-v=14315ac1-e236-4137-b3db-d5c917e51e5f)
Enter a key name, then click on the Create new key button.
-20250624-181949.png?inst-v=14315ac1-e236-4137-b3db-d5c917e51e5f)
Store the API key securely.
-20250624-181959.png?inst-v=14315ac1-e236-4137-b3db-d5c917e51e5f)
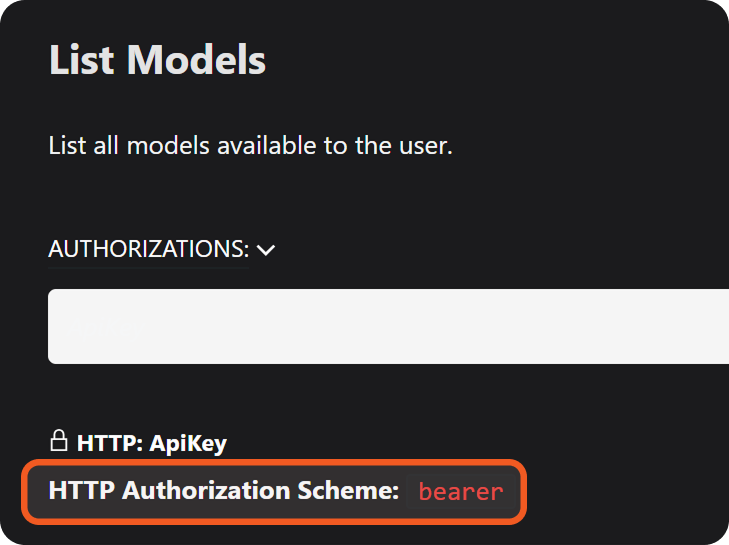
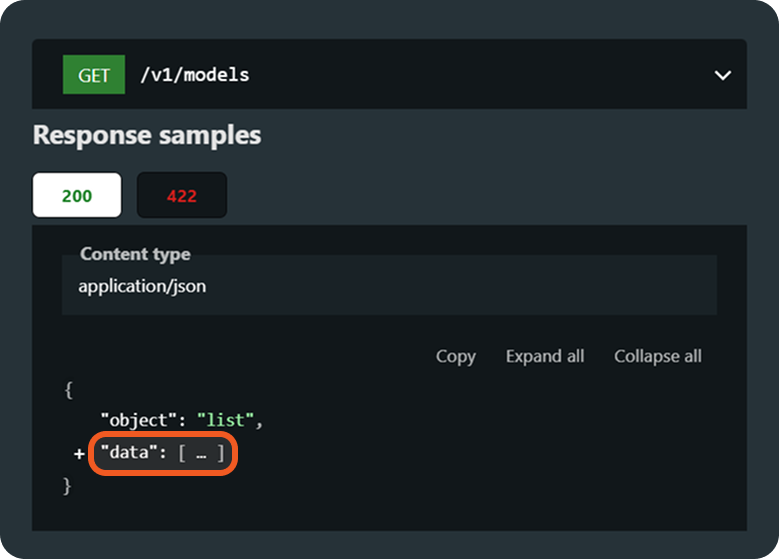
Visit https://docs.mistral.ai/api/#tag/models, then locate the GET /v1/models endpoint under the List Models section.
-20250624-183323.png?inst-v=14315ac1-e236-4137-b3db-d5c917e51e5f)
GET
TEXThttps://api.mistral.ai/v1/models
READER NOTE *
The GET /v1/models endpoint is well suited for connection validation because it:
Confirms functional connection via key-authorized access and valid response data
Simplifies usage by requiring no input parameters
Performs a safe, a non-destructive, read-only operation
Set up a Custom Integration - Mistral AI integration on D3 vSOC.
-20250624-182334.png?inst-v=14315ac1-e236-4137-b3db-d5c917e51e5f)
Add the following custom connection parameters:
server_url (display name: Server URL)
api_version (display name: API Version)
api_key (display name: API Key)
-20250624-183947.png?inst-v=14315ac1-e236-4137-b3db-d5c917e51e5f)
-20250624-191846.png?inst-v=14315ac1-e236-4137-b3db-d5c917e51e5f)
Set up a connection using the:
Add a custom command.
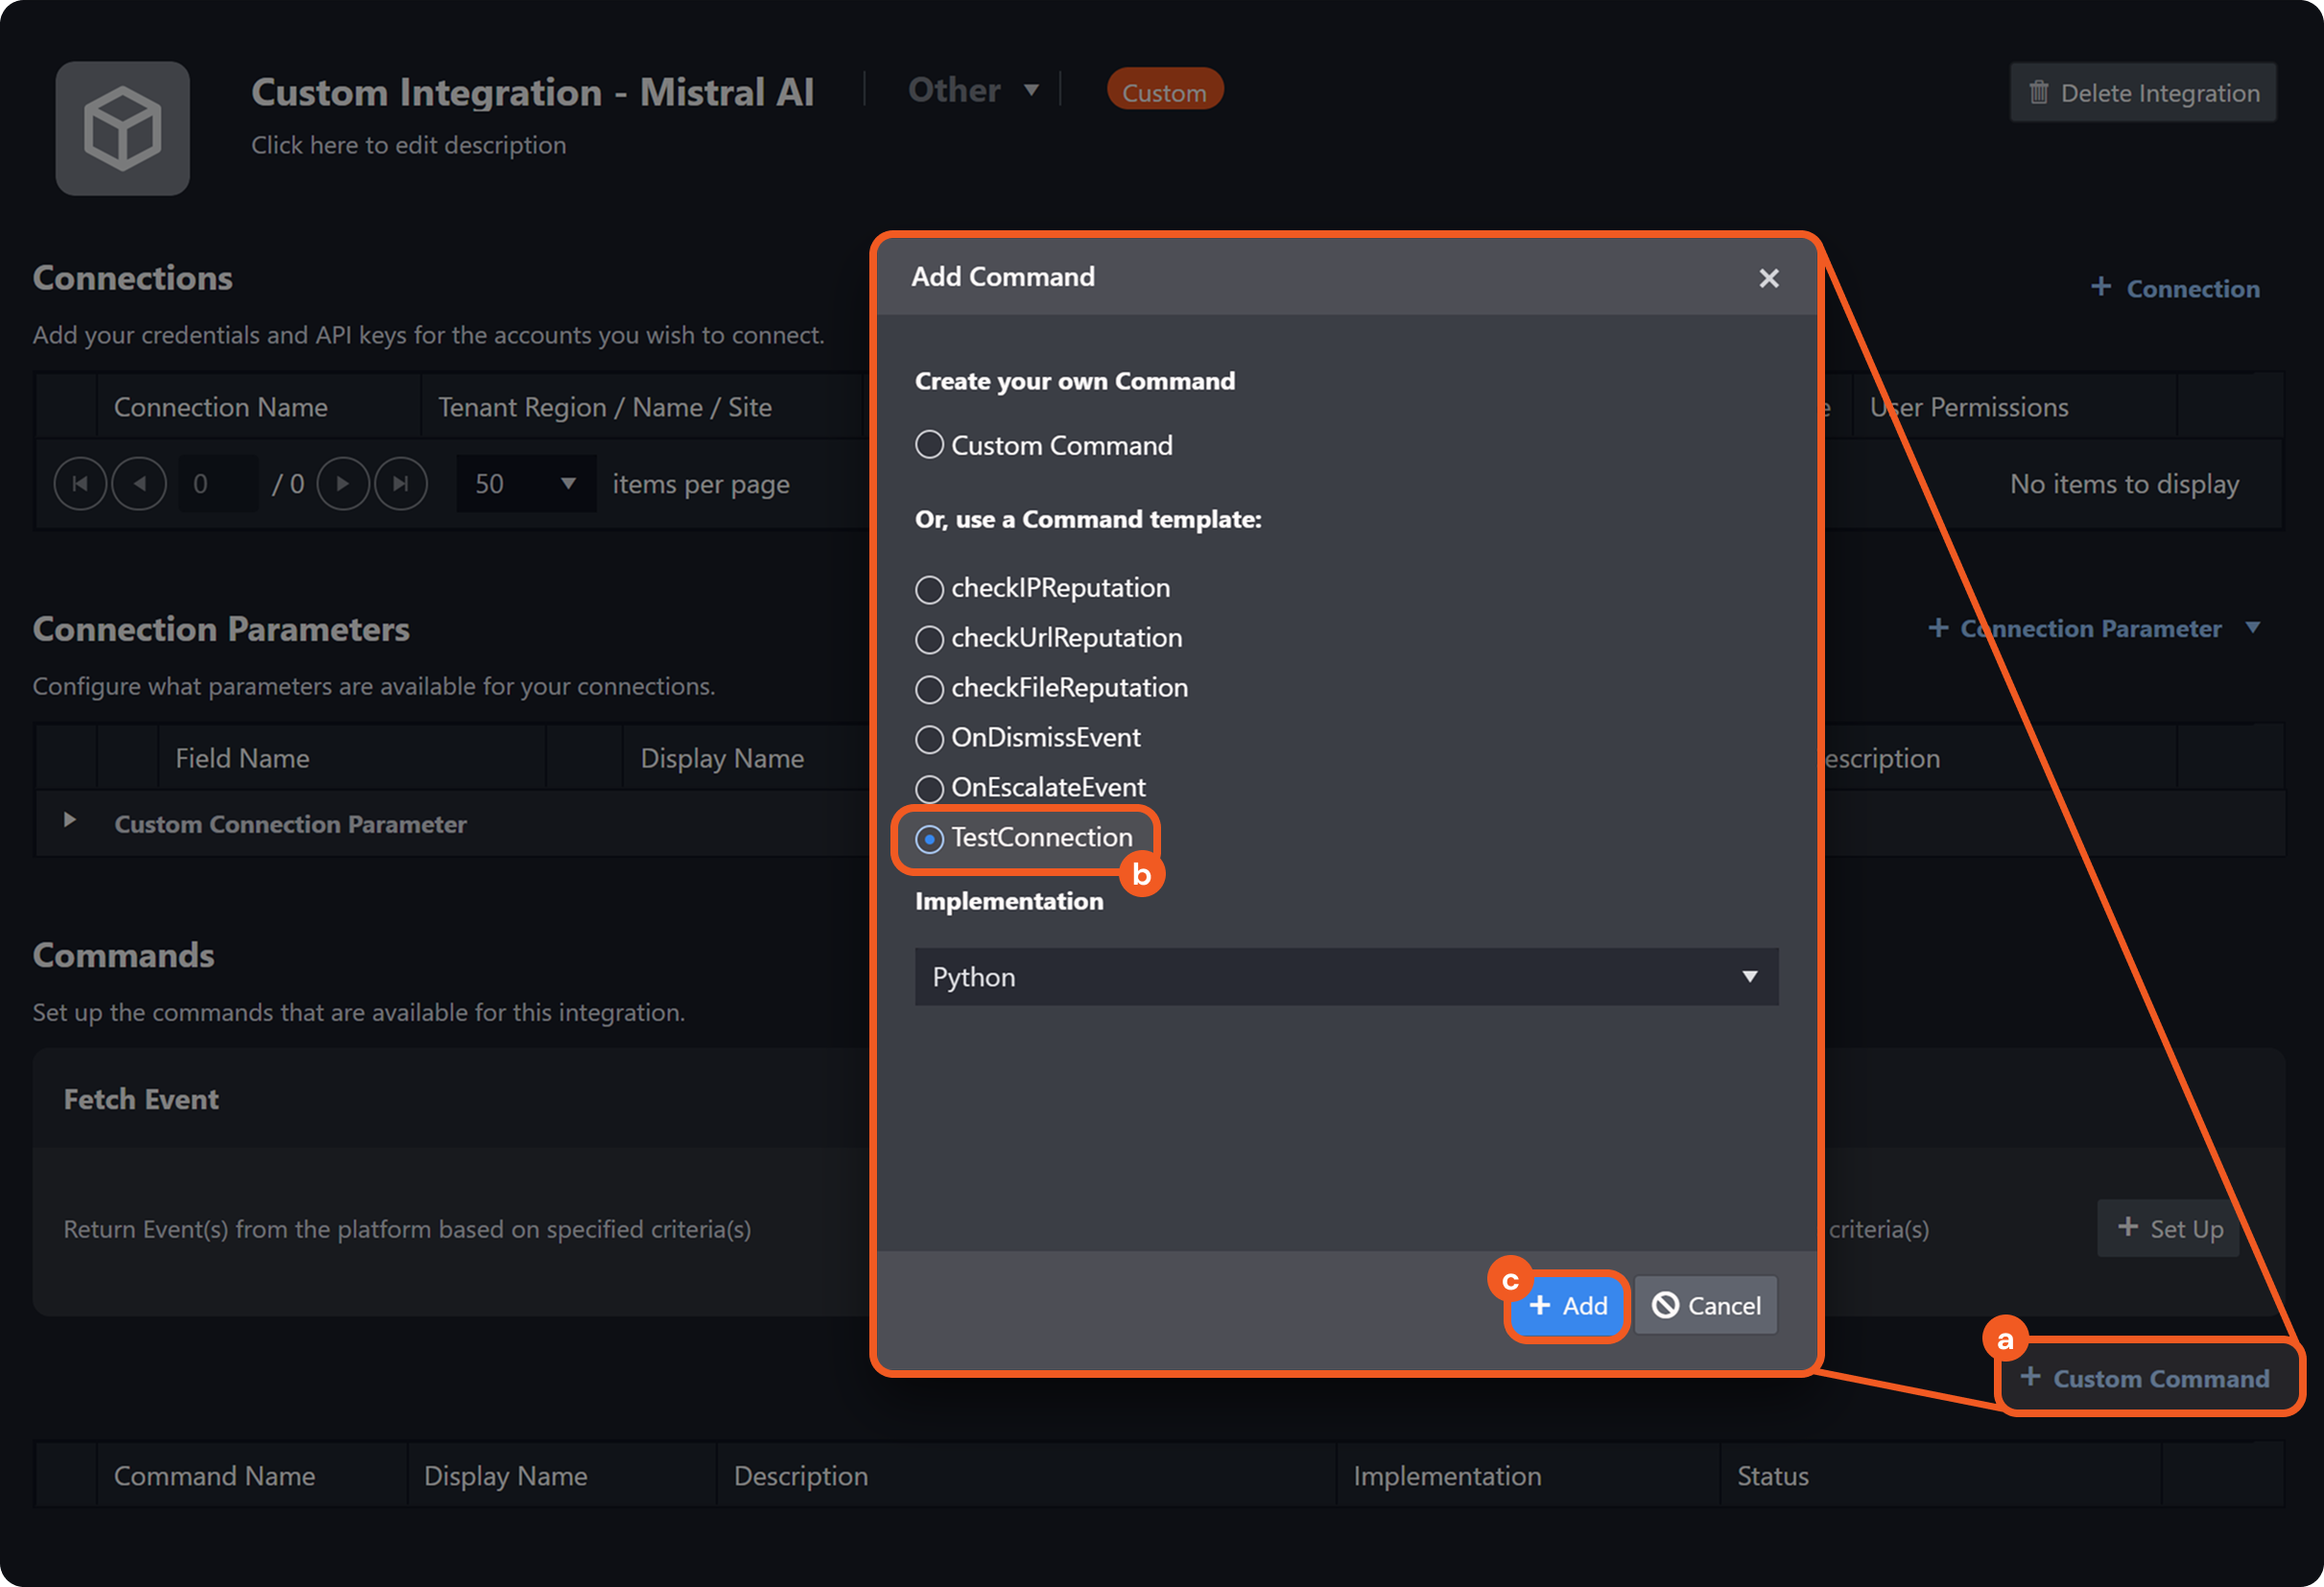
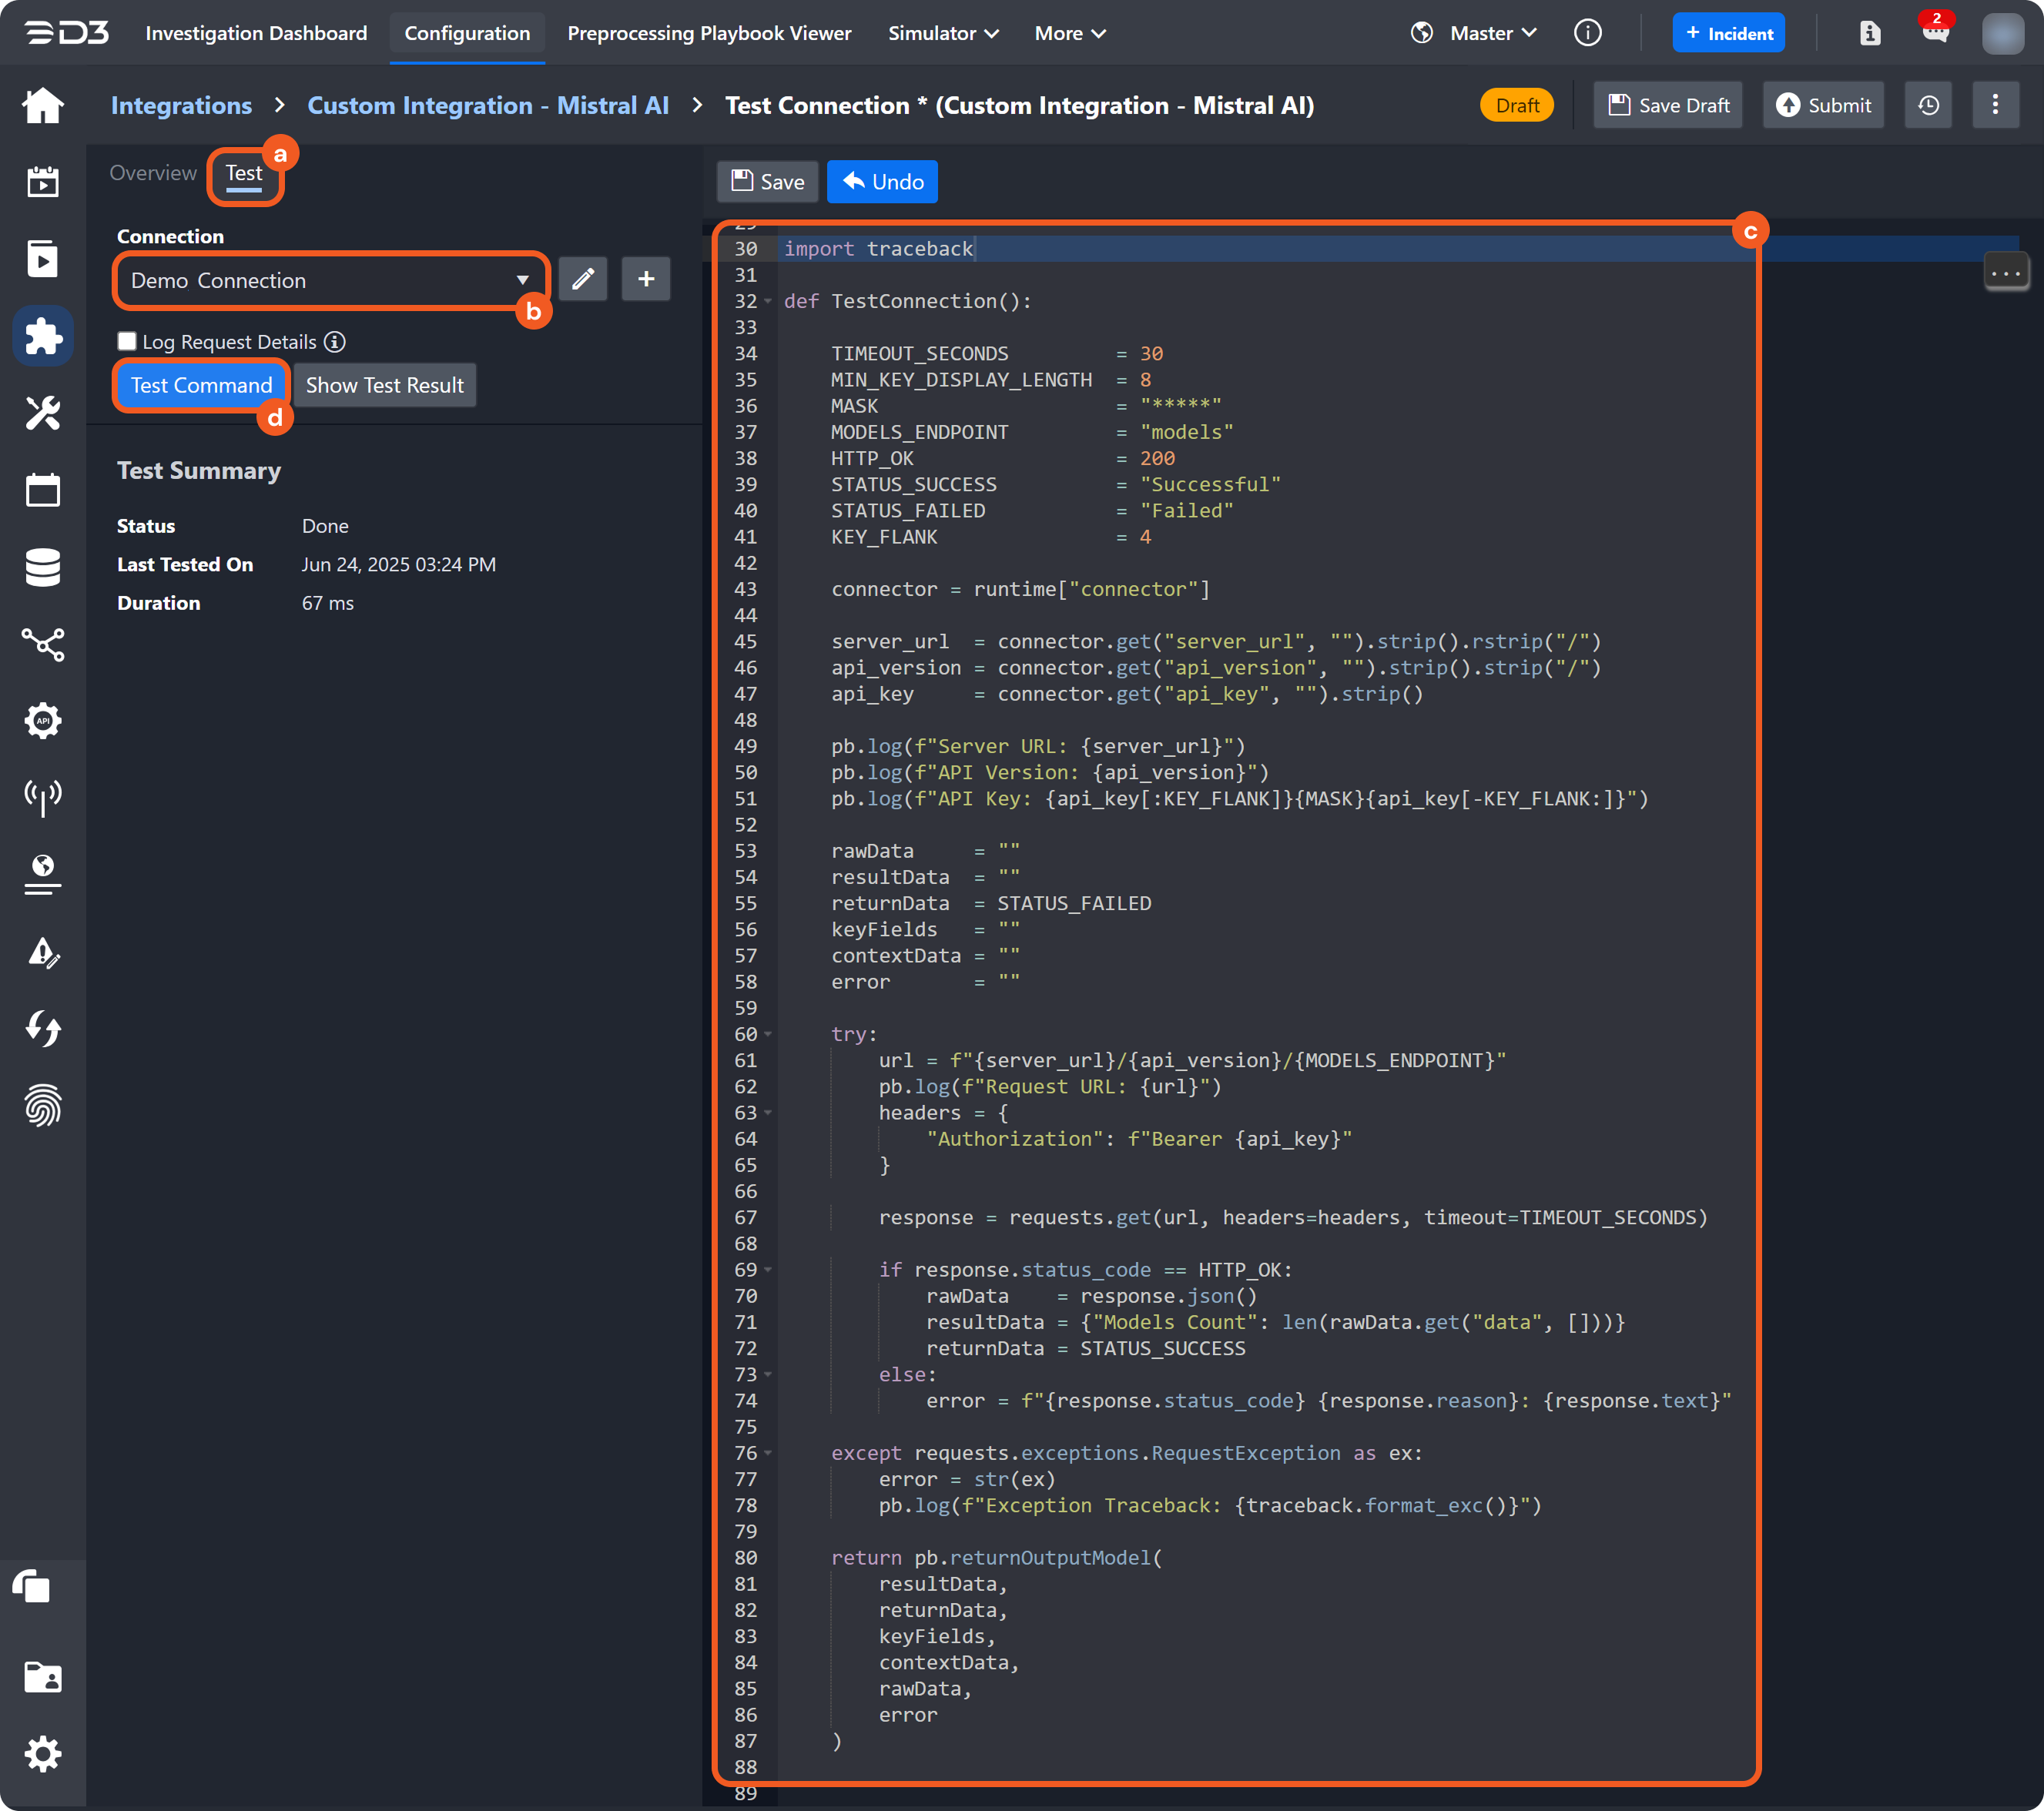
Select the connection created in step 14, enter the following code into the editor, then test the command.
PYimport traceback def TestConnection(): TIMEOUT_SECONDS = 30 MIN_KEY_DISPLAY_LENGTH = 8 MASK = "*****" MODELS_ENDPOINT = "models" HTTP_OK = 200 STATUS_SUCCESS = "Successful" STATUS_FAILED = "Failed" KEY_FLANK = 4 connector = runtime["connector"] server_url = connector.get("server_url", "").strip().rstrip("/") api_version = connector.get("api_version", "").strip().strip("/") api_key = connector.get("api_key", "").strip() pb.log(f"Server URL: {server_url}") pb.log(f"API Version: {api_version}") pb.log(f"API Key: {api_key[:KEY_FLANK]}{MASK}{api_key[-KEY_FLANK:]}") rawData = "" resultData = "" returnData = STATUS_FAILED keyFields = "" contextData = "" error = "" try: url = f"{server_url}/{api_version}/{MODELS_ENDPOINT}" pb.log(f"Request URL: {url}") headers = { "Authorization": f"Bearer {api_key}" } response = requests.get(url, headers=headers, timeout=TIMEOUT_SECONDS) if response.status_code == HTTP_OK: rawData = response.json() resultData = {"Models Count": len(rawData.get("data", []))} returnData = STATUS_SUCCESS else: error = f"{response.status_code} {response.reason}: {response.text}" except requests.exceptions.RequestException as ex: error = str(ex) pb.log(f"Exception Traceback: {traceback.format_exc()}") return pb.returnOutputModel( resultData, returnData, keyFields, contextData, rawData, error )CODE BREAKDOWN
Line 14: The
connectorvariable provides access to the parameters configured in step 13.Lines 16-22: Extracts, sanitizes, and logs all connection parameter values to the Test Result > Custom Log tab (step 17).
Lines 24-29: Initializes required variables for command output model.
Lines 32-33: Constructs and logs the full API endpoint URL used in the HTTPS GET request.
Lines 34-36: Prepares the HTTP headers required for API authorization.
Line 38: Sends an HTTP GET request to the constructed Mistral API URL using defined headers and timeout.
Lines 40-45: Processes the response from the Mistral API.
On success (HTTP 200), parses and counts models returned in the "data" field.
On failure, captures and formats the error message.
Lines 47-49: Logs any exceptions raised during the HTTP request.
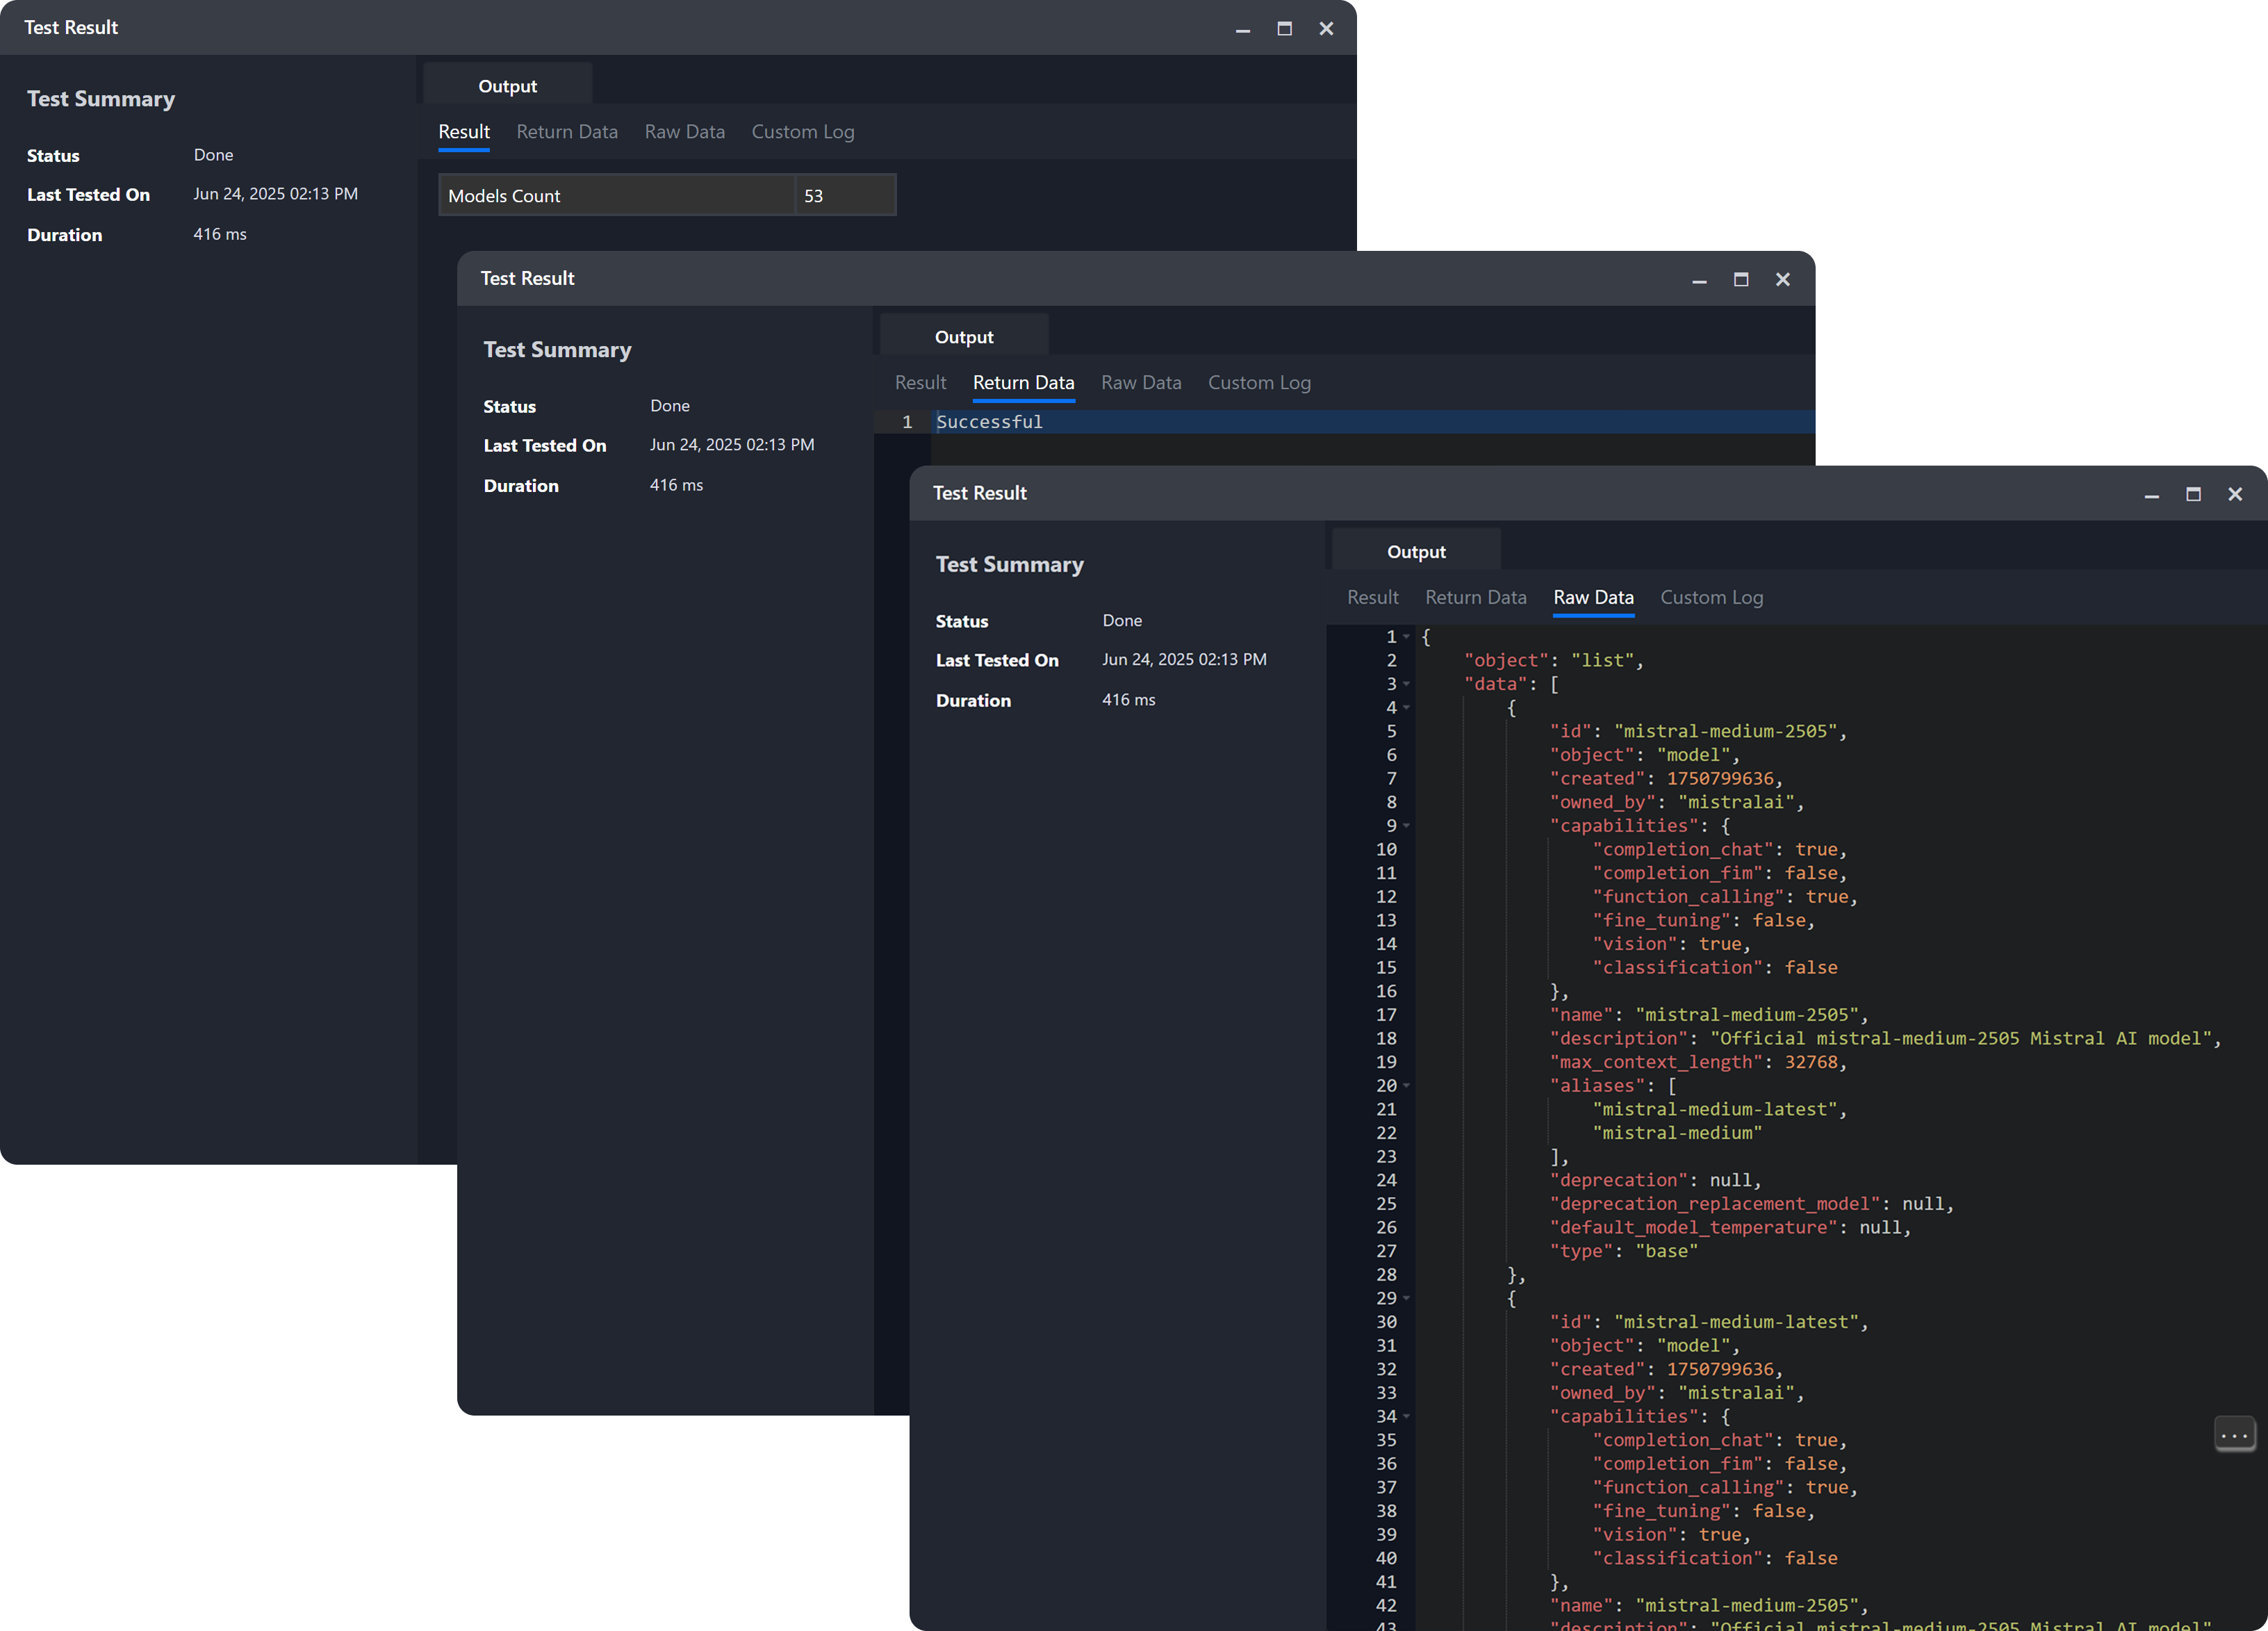
Lines 51-58: Returns the results of the test connection using D3's standardized output format. The output is displayed in the Test Result popover for review.
Review output tabs in the Test Result popover to verify the connection.
%201%20(1)-20250624-212810.png?inst-v=14315ac1-e236-4137-b3db-d5c917e51e5f)
-20250624-194648.png?inst-v=14315ac1-e236-4137-b3db-d5c917e51e5f)