
Webhook Data Formatter
LAST UPDATED: SEPT 28, 2024
The D3 SOAR Webhook Data Formatter feature allows for the customization and manipulation of data received through a webhook, before it is processed by an event or incident playbook. This can be helpful in a variety of situations, such as when integrating with external tools or applications that may not send data in a format that is immediately usable within the SOAR platform. Please note that this is a distinct feature from the Data Formatter task available in the playbook editor.
By setting up custom logic using the Webhook Data Formatter, you can transform and normalize incoming data to match your organization's specific needs, making it easier to process and take action on that data. The two available options to configure and implement the data formatter's logic - Codeless Playbook and Python - provide users with flexibility in how they choose to implement their data manipulation logic, allowing them to select the approach that best fits their skill level and use case.
Using the Webhook Data Formatter
Step 1: Create a Custom Utility Command
Before using the Webhook Data Formatter, you must first create a custom utility command to define the logic for transforming the ingested data. Follow these steps:
Navigate to Configuration > Utility Commands, and select + to add a new command.
Enter a name for your custom utility command, select a category, and choose an implementation method: Python or Codeless Playbook.
The Python implementation method will require you to write a Python script to transform the ingested data, while the Codeless Playbook method will allow you to define the data transformation logic as if you were building a playbook.
Enable the Event/Incident Data Formatter checkbox under the Features sections of your utility command's settings.
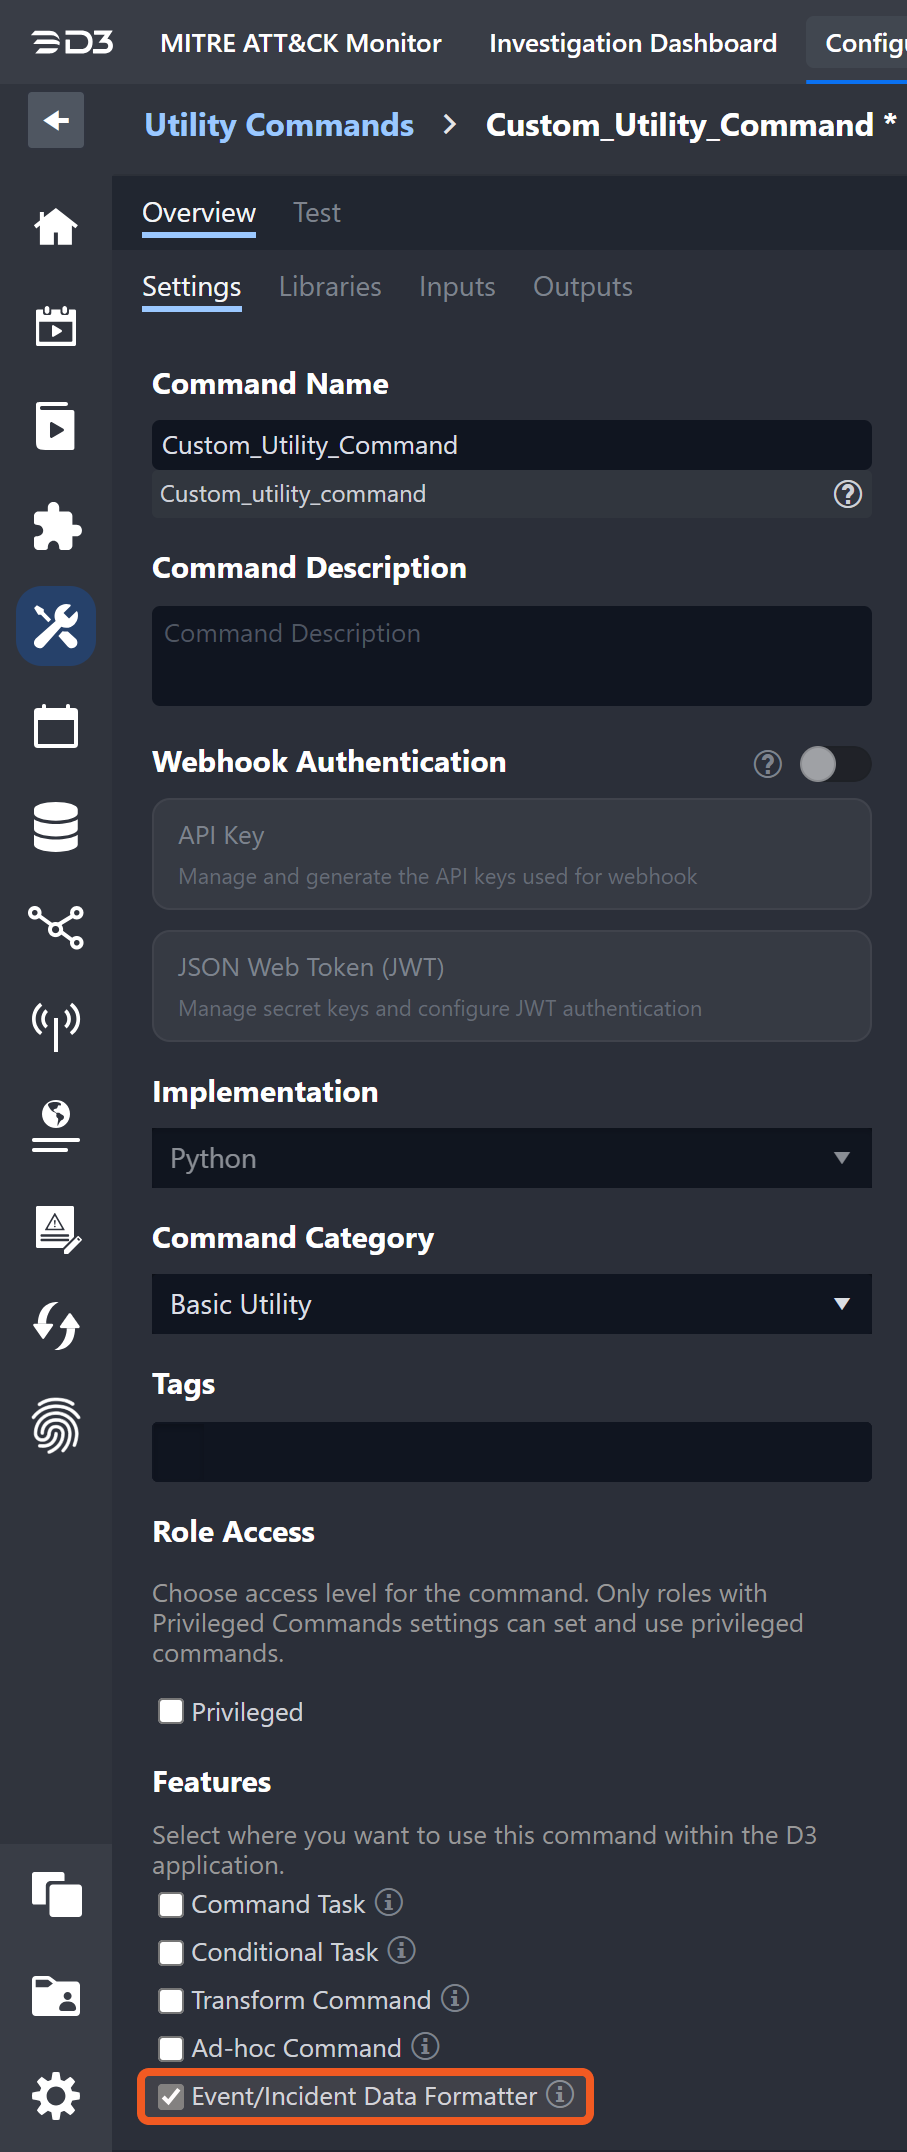
READER NOTE
The Event/Incident Data Formatter option must be enabled for the custom utility command to be used as a Webhook Data Formatter.
Create an input parameter to receive the raw webhook data. Go to the Inputs tab and click + New Input Parameter. Configure the parameter settings according to your use case and click + Add.
Step 2: Define the Data Transformation Logic
Depending on the selected implementation method, you will define the data transformation logic by either creating a Python script or building a playbook.
Python
If you have chosen the Python method, you will need to use the built-in Python editor to write your script that will define the data transformation logic. Once you have finished writing the script, you can submit it by clicking on the Submit button.
-20240927-171705.png?inst-v=528e314a-9917-40cf-b89f-4484cca9e5b8)
READER NOTE
The Python script must be submitted in order for the utility command to be selectable as the Webhook Data Formatter when configuring a webhook event or incident intake data source.
Codeless Playbook
If you have chosen the Codeless Playbook method, you will need to use the playbook editor with playbook tasks to define the data transformation logic. Once you have finished creating the playbook, you can submit it by clicking on the Submit button.
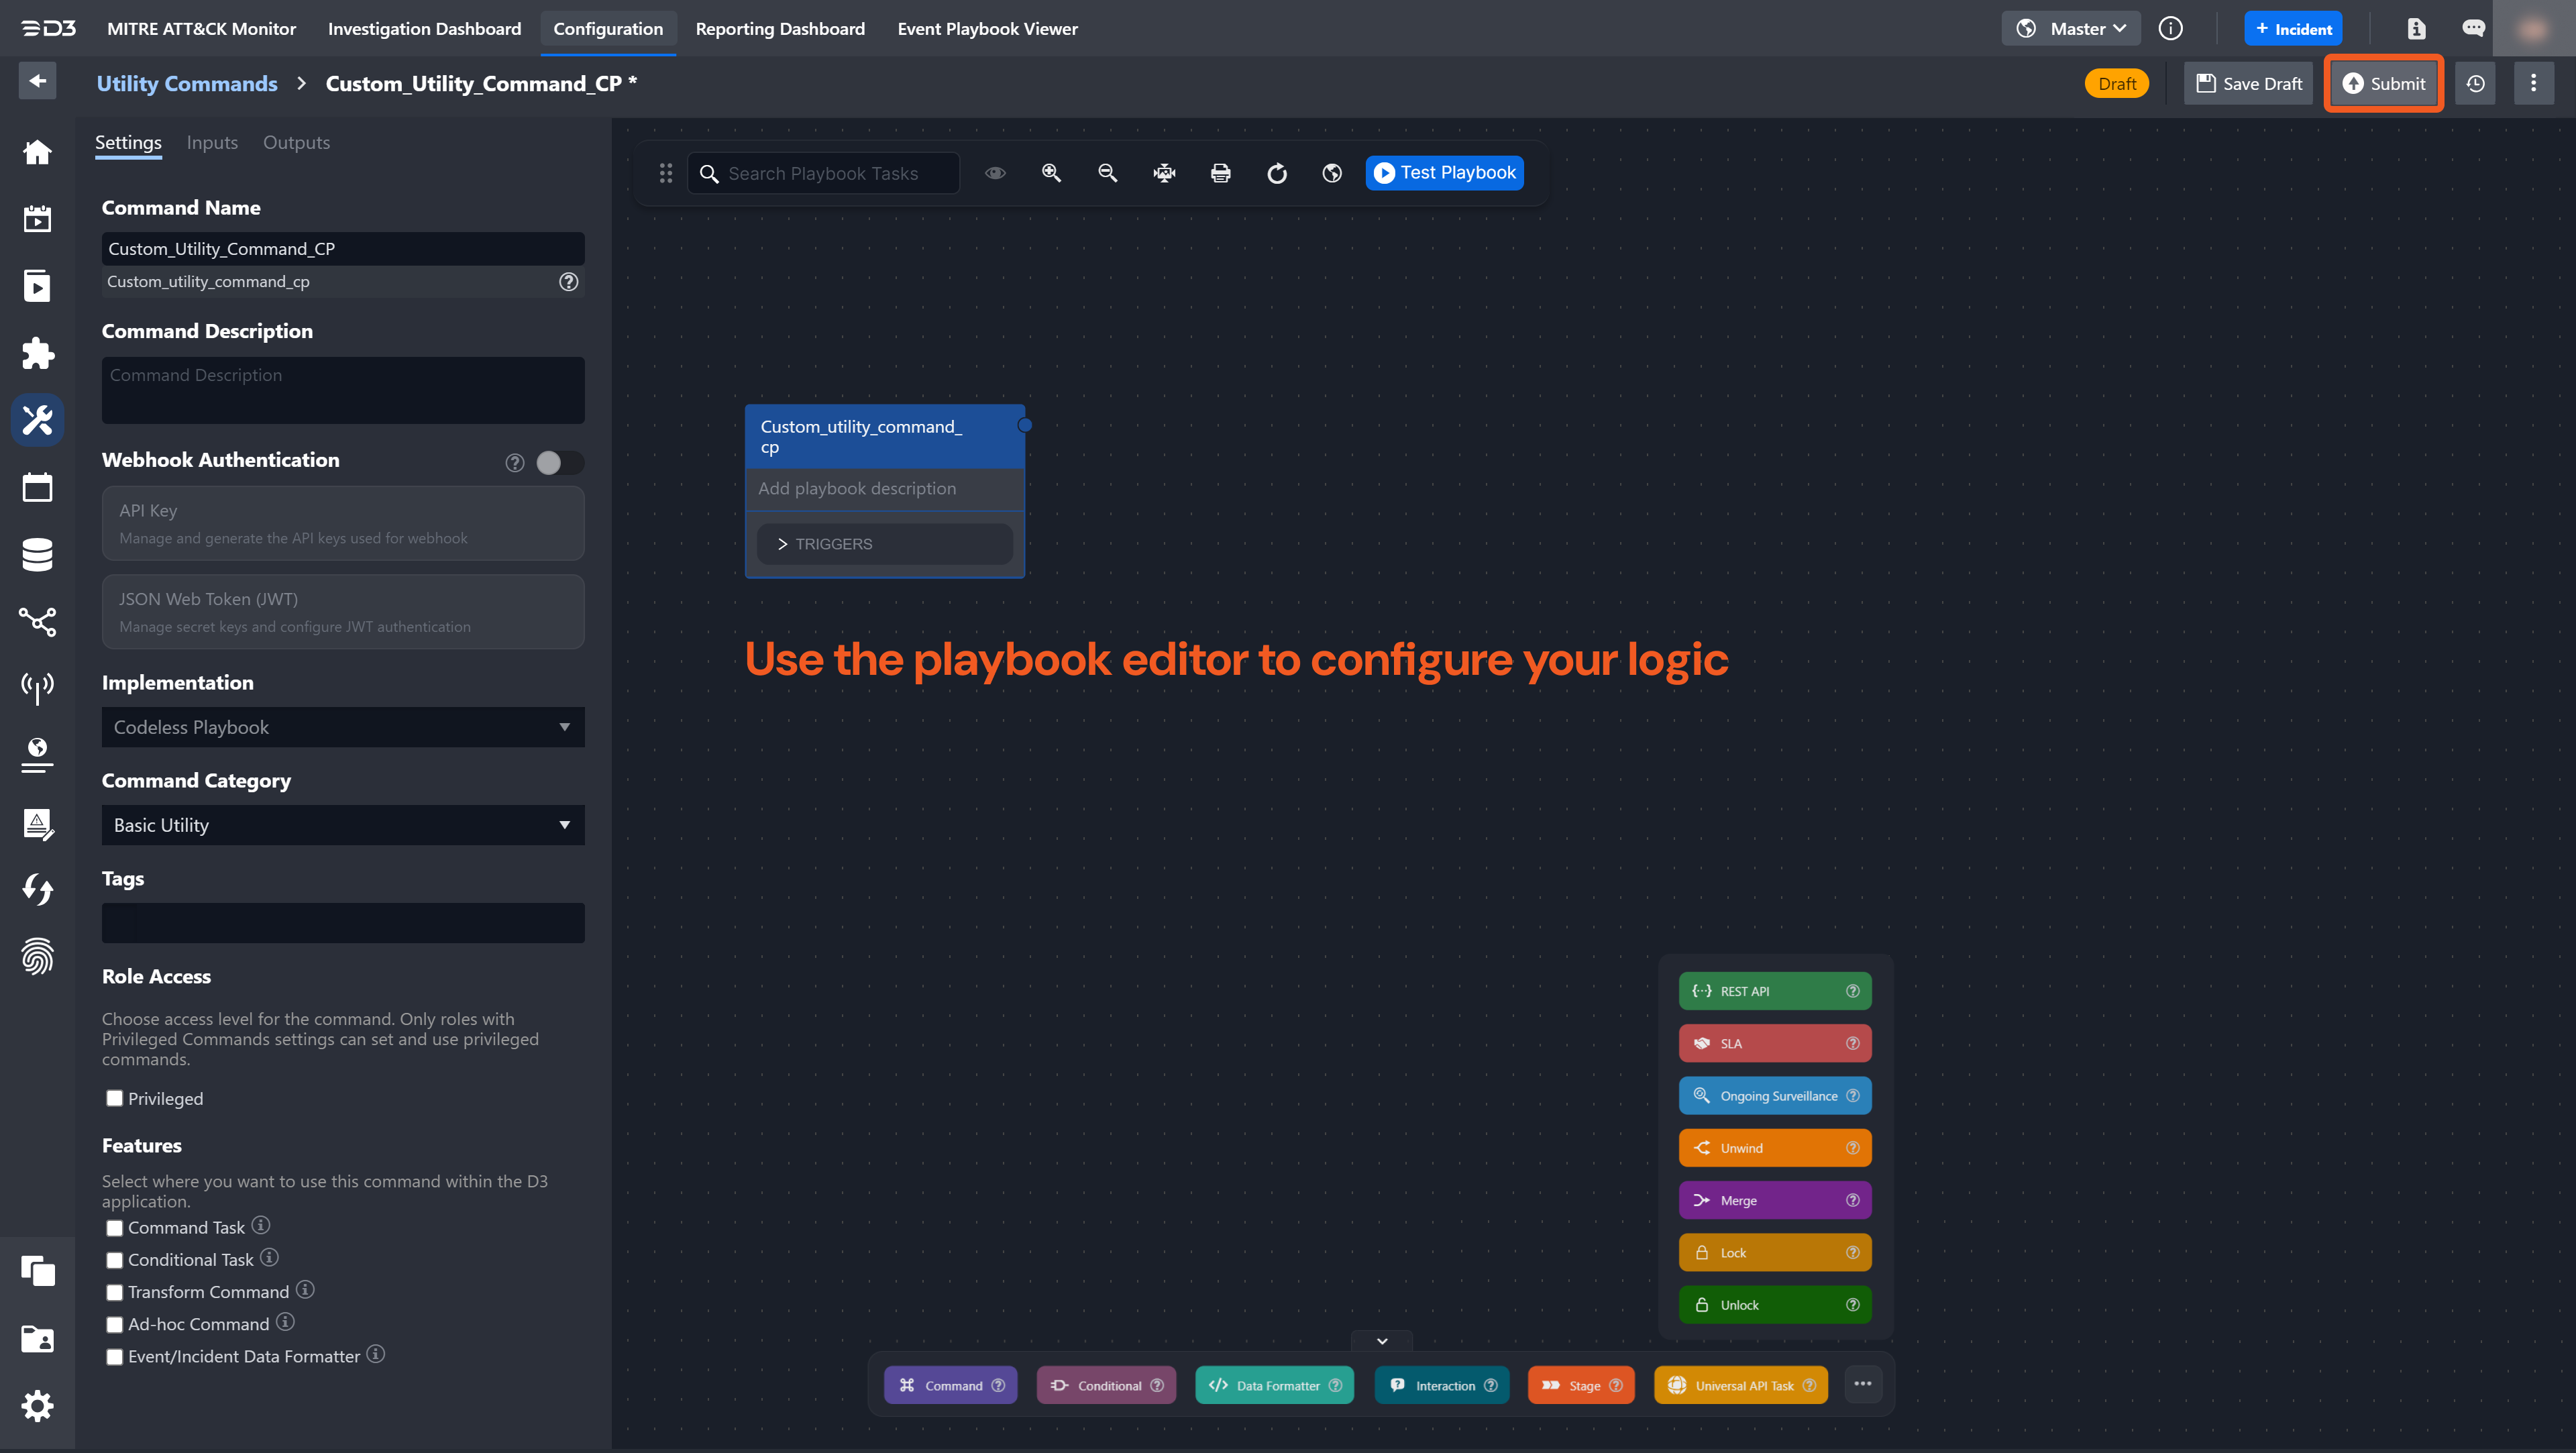
READER NOTE
The codeless playbook must be submitted in order for the utility command to be selectable as the Webhook Data Formatter when configuring a webhook event or incident intake data source.
Step 3: Enable the Configured Data Formatter for a Webhook Connection
Once you have created your Webhook Data Formatter utility command, you can enable it for a new event or incident intake webhook connection.
To add a new event or incident intake webhook connection, follow these steps:
Navigate to Configuration > Data Ingestion > Event Intake or Incident Intake.
Click on the + button, then click on the Webhook data intake option.
Configure the webhook connection according to your use case. See Configuring Fetch Event Data Ingestion for more detailed instructions on adding a new data source via webhook.
Under Additional Settings, locate the Data Formatter dropdown, then select your created utility command. If the command is not visible, verify that it has been submitted.
-20240927-173327.png?inst-v=528e314a-9917-40cf-b89f-4484cca9e5b8)
Once you have completed your configurations, click Save & Run to save your changes and begin receiving webhook events or incidents.
Step 4: Test
To verify that your webhook connection is set up correctly, you can use an external API application like Postman to send a test webhook to D3 SOAR. Here's how to do it:
Open Postman and create a new request.
Set the request method to POST and enter the webhook URL for your D3 SOAR instance.
In the request body, add sample event data in the format expected by your configured data formatted.
Send the request and wait for the response.
Check the corresponding site's Investigation Dashboard to confirm that the event or incident has been ingested. If everything has been configured properly, you should see the event or incident under the corresponding tab. Click on the event or incident to view its details.
If you do not see the expected event or incident in the Investigation Dashboard, review your webhook connection configuration and try again. Make sure that your request method is set to POST and that the request body matches the expected format. If you continue to have issues, consult the D3 SOAR documentation or contact support for assistance.
Sample Use Case
Let's consider a use case to demonstrate the capabilities of the Webhook Data Formatter. In this scenario, we are working with data from a Splunk integration as the data source. The current event field mapping is designed to handle data from fetch event jobs, with the main JSON path specified as $.results. However, we have identified an issue with this mapping, as the data pushed by Splunk through the D3 webhook does not include a "results" key.
The webhook raw data that we are ingesting from Splunk has the following format:
{
  "result": {
    "sourcetype": "mongod",
    "count": "8",
    "_cd": "{{$guid}}",
    "index": "d3 demo",
    "splunk_server": "Splunk Alpha",
    "host": "Vincent-LoudSpeaker-Test 2",
    "source": "Mongo DB",
    "timestamp": "{{$timestamp}}",
    "desc": "{{$randomCatchPhrase}}"
  },
  "sid": "scheduler_admin_search_W2_at_14232356_132",
  "results_link": "http://web.example.local:8000/app/search/@go?sid=scheduler_admin_search_W2_at_14232356_132",
  "search_name": null,
  "owner": "admin",
  "app": "search"
}
As you can see, the data has a key named "result" instead of "results", which is incompatible with our event field mapping.
To address this issue, we can use the Webhook Data Formatter to modify the webhook raw data before feeding it into the event pipeline. Specifically, we can restructure the object to match the expected format of the event field mapping. This involves restructuring the data object so that it aligns with the expected structure.
To achieve this, we can follow steps 1 and 2 outlined in Using the Webhook Data Formatter to create a custom utility command with the Python implementation. Using a Python script, we can define a logic that will modify ingested webhook data from Splunk so that the "result" key is changed to "results".
The Python script to define this logic is as follows:
import json


def Format_Splunk_Webhook_data(rawDataInput):
    errorMessage = None
    returnData = None

    try:
        parsed_json = json.loads(rawDataInput)

        if not parsed_json.get("results") and parsed_json.get("result"):
            parsed_json["results"] = []
            parsed_json["results"].append(parsed_json.get("result"))
            parsed_json.pop("result", None)

        returnData = json.dumps(parsed_json)

    except Exception as e:
        errorMessage = str(e)

    return pb.returnOutputModel(None, returnData, None, None, None, errorMessage)
This Python script defines a function called "Format_Splunk_Webhook_data" that takes in data as a parameter and formats it in a specific way for the Splunk webhook. If the data contains a "result" key, the script creates a "results" key and appends the "result" value to it, and removes the "result" key. If there is an error during execution, the function returns an error message. The script then converts the data to a JSON string and returns it using an external function called "pb.returnOutputModel()".
Once the Python script is defined, we can follow step 3 of Using the Webhook Data Formatter to enable the Webhook Data Formatter utility command with the Python logic above for a new Splunk event intake webhook connection.
If we send a test webhook to our configured webhook data connection with the raw data mentioned above, it will be transformed into the expected format that our event field mapping can process:
{
  "results": [
    {
      "sourcetype": "mongod",
      "count": "8",
      "_cd": "{{$guid}}",
      "index": "d3 demo",
      "splunk_server": "Splunk Alpha",
      "host": "Vincent-LoudSpeaker-Test 2",
      "source": "Mongo DB",
      "timestamp": "{{$timestamp}}",
      "desc": "{{$randomCatchPhrase}}"
    }
  ],
  "sid": "scheduler_admin_search_W2_at_14232356_132",
  "results_link": "http://web.example.local:8000/app/search/@go?sid=scheduler_admin_search_W2_at_14232356_132",
  "search_name": null,
  "owner": "admin",
  "app": "search"
}
You can see the data now has a "results" key, which is compatible with our event field mapping with the main JSON path specified as $.results.
This is just one example of how the Webhook Data Formatter can be used to transform webhook data. With the ability to write Python scripts or create playbooks to configure the data transformation logic, the possibilities are limitless.