.png)
D3 Python Conventions
Overview
In D3, we support custom Python scripts to be executed within the D3 Python custom image. As an admin user, you can write both Utility Commands and Integration Commands in Python.
For example, you can write a custom Integration Command such as IP Reputation Check, that enriches your data from third-party sources. Then you can write a custom Utility Command in Python that transforms the data to your preferred structure.
All Utility Commands can be created and viewed in the Utility Commands module. All Integration Commands can be created and viewed in their individual Integrations. Both types of commands can be implemented in Python or Codeless Playbook.
General Information
Python Version: 3.9.12
Available Third-party Libraries:
boto3: https://boto3.amazonaws.com/v1/documentation/api/latest/guide/quickstart.html
dateparser: https://pypi.org/project/dateparser/
defang: https://pypi.org/project/defang/
eml_parser: https://eml-parser.readthedocs.io/en/latest/
exchangelib: https://pypi.org/project/exchangelib/
gitPython: https://gitPython.readthedocs.io/en/stable/
google-api-Python-client: https://github.com/googleapis/google-api-Python-client
google-auth-oauthlib: https://pypi.org/project/google-auth-oauthlib/
google-auth: https://pypi.org/project/google-auth/
google-cloud-pubsub: https://cloud.google.com/pubsub/docs/reference/libraries
google-cloud: https://cloud.google.com/Python/docs/setup
html2text: https://pypi.org/project/html2text/
imap-tools==0.34.0: https://pypi.org/project/imap-tools/
inflect: https://pypi.org/project/inflect/
ioc-finder: https://pypi.org/project/ioc-finder/
iocextract: https://github.com/InQuest/Python-iocextract
Jinja2: https://pypi.org/project/Jinja2/
jsonpath-ng: https://pypi.org/project/jsonpath-ng/
mail-parser==3.15.0: https://docs.Python.org/3/library/email.parser.html
natsort: https://pypi.org/project/natsort/
nessrest: https://pypi.org/project/nessrest/0.31/
oauth2client: https://pypi.org/project/oauth2client/
osquery: https://github.com/osquery/osquery-Python
pandas: https://pandas.pydata.org/
psutil: https://pypi.org/project/psutil/
pyeti-Python3: https://pypi.org/project/pyeti-Python3/
pymssql: https://pypi.org/project/pymssql/
pyodbc: https://pypi.org/project/pyodbc/
Python-dateutil==2.8.0: https://dateutil.readthedocs.io/en/stable/
pywin32: platform_system == "Windows": https://pypi.org/project/pywin32/
selenium: https://selenium-Python.readthedocs.io/
setuptools: https://pypi.org/project/setuptools/
taxii2-client==1.0.1: https://pypi.org/project/taxii2-client/
urllib3: https://pypi.org/project/urllib3/
validators: https://validators.readthedocs.io/en/latest/
xmltodict: https://pypi.org/project/xmltodict/
xmltojson: https://pypi.org/project/xmltojson/
sqlparse==0.4.2: https://pypi.org/project/sqlparse/
psutil==5.9.0: https://pypi.org/project/psutil/
google-auth==2.6.6: https://developers.google.com/identity/protocols/oauth2
oauth2client==4.1.3: https://pypi.org/project/oauth2client/
dict2xml==1.7.1: https://pypi.org/project/dict2xml/
luqum==0.11.0: https://pypi.org/project/luqum/
pyodbc==4.0.32: https://pypi.org/project/pyodbc/
filelock == 3.7.1: https://pypi.org/project/filelock/
cymruwhois == 1.6: https://pypi.org/project/cymruwhois/
extract-msg==0.37.0: https://pypi.org/project/extract-msg/
Python-libnmap==0.7.3: https://pypi.org/project/Python-libnmap/
Command Type
Utility Command
Utility command is used for:
Custom data transformation or manipulation that cannot be achieved through D3’s out-of-box Utility commands
Setting up nested playbooks
The custom utility command can be assigned as a Basic Utility, System Utility or Cyber Utility, and be used in Command Task or Conditional Task.
Integration Command
Many security products support REST API integration, and D3 offers additional do-it-yourself (DIY) integration through custom Python scripts if an integration or command is not addressed by the current version of D3 SOAR. Users can follow the API documentation, along with D3’s Python code convention, to set up integration commands.
READER NOTE
When an integration or command is not covered within the D3 VSOC integration system, or the built-in command cannot perfectly match your use cases, you may write your own Python scripts and execute it within the D3 Python Docker Image to create Integration Custom Commands (ICCs). ICCs provide a high level of flexibility and customization for users to tailor their integrations to precise operational needs.
WARNING
Contact D3 if the requirement changes are related to Python environment configuration. These include:
Python Version Management
Python Library Add/Delete
Python Library Version Management
Environment Variables Setup
File Path Management
Execute System Command-Lines for Image
Custom Command
Special Use Cases on Creating Custom Command
Case 1: Create Custom Command based on System Command
Clone Command
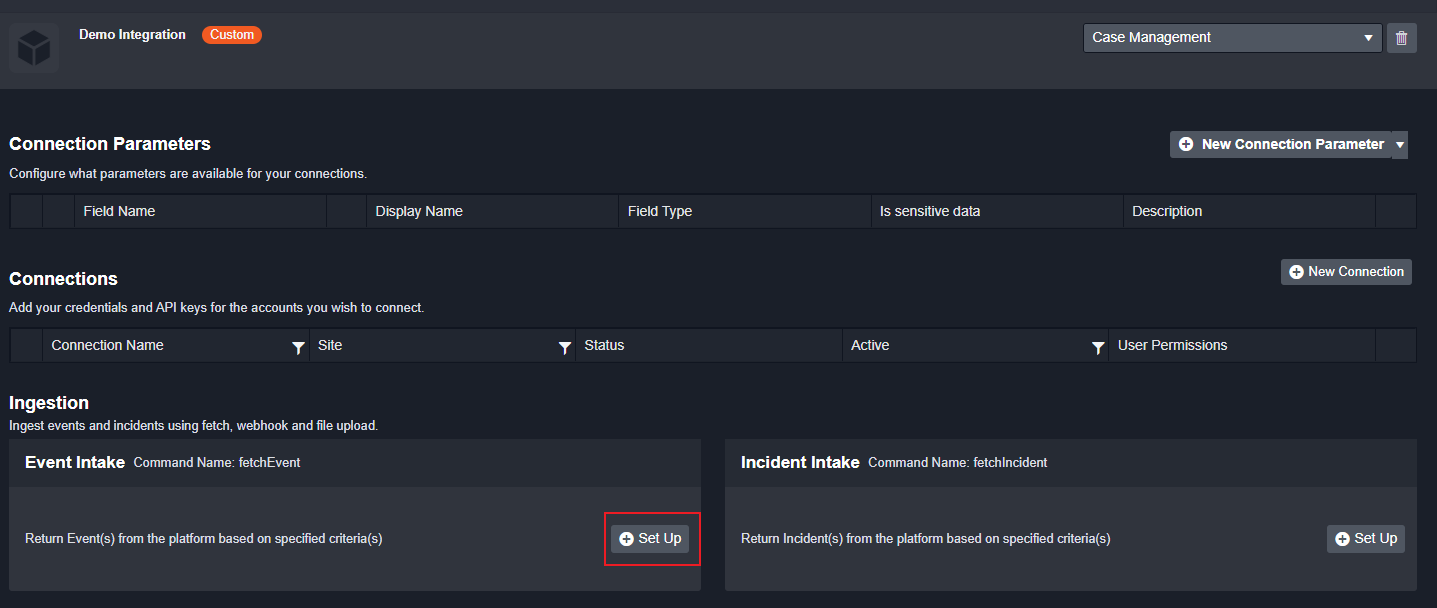
Case 2: Create Data Ingestion Commands (fetchEvent/fetchIncident)
Fields Setup
Fields Mapping Setup
Scheduled Time Passdown
Case 3: Create Codeless Playbook
Creating Your Custom Integration
Step 1: Navigate to Configuration on the top menu.
Step 2: Click on the Integrations icon on the vertical left sidebar.
Step 3: Click on the + button. A new Add Integration window will pop up.
Step 4: Enter an integration name in the Add Integration window and click on the Save button.
-20240320-232433.png?inst-v=526df509-4082-416f-8021-e6d677041253)
Command Implementation
Python Command Setup
Command Basic Setup
New Utility Command
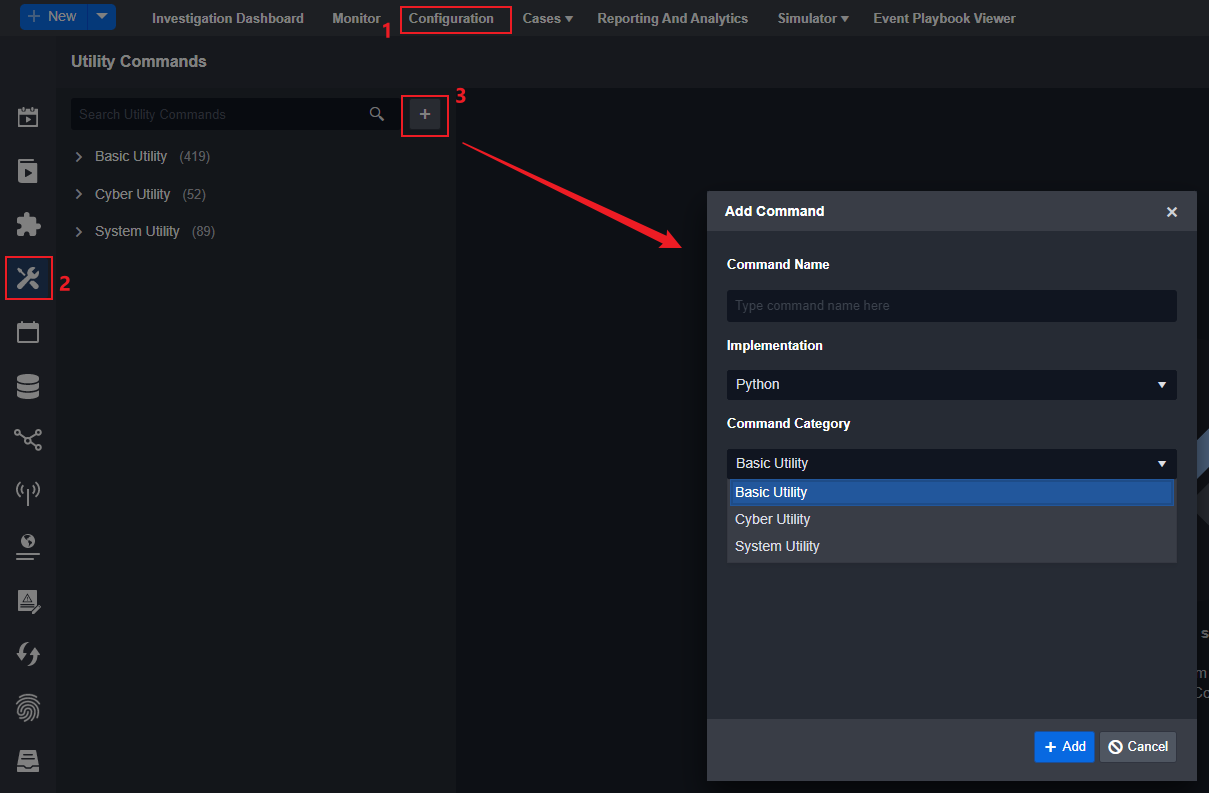
Step 1: Navigate to Configuration on the top menu.
Step 2: On the left sidebar, go to Utility Commands.
Step 3: Click the + button. A new Add Command window will pop up.
New Integration Command
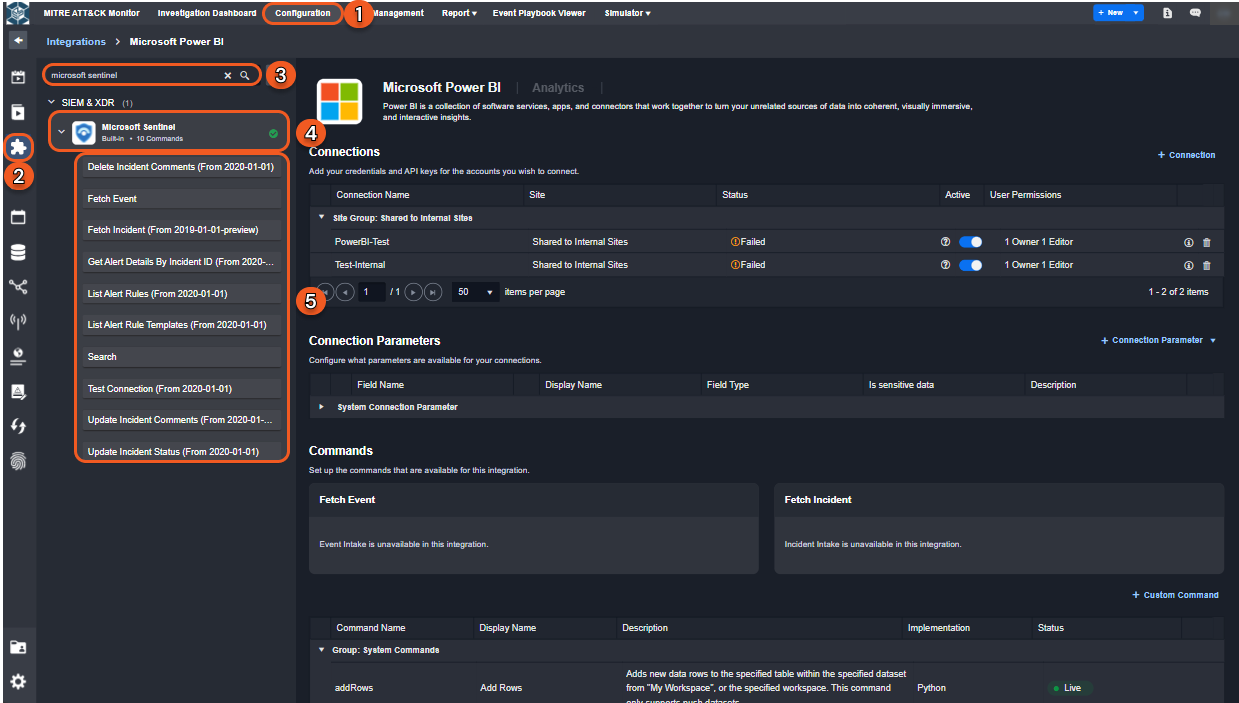
Step 1: Navigate to Configuration on the top menu.
Step 2: Click on the Integrations icon on the left sidebar.
Step 3: Search the name of the integration to which you wish to add the command.
Step 4: Select the the target integration under the search box.
Step 5: Click the + Custom Command button on the right panel. An Add Command window will pop up.
-20240321-174145.png?inst-v=526df509-4082-416f-8021-e6d677041253)
Step 6: Enter a name under the Custom Command section and click the + Add button.
-20240321-174931.png?inst-v=526df509-4082-416f-8021-e6d677041253)
Reader Note
A display name is required (under the Custom Command section); it must be unique. Set the display name to be the same as the Python function name.
Changing the display name induces changes on the internal name and affect function-reference.
Changing the display name induces changes on the Webhook URL of the custom command.
For every new command added through the + Custom Connection button, there should be a corresponding function in your Python script to handle it.
For custom Event Intake or Incident Intake commands, the function name should be fetchEvent/fetchIncident.
def fetchEvent():
  pass
def fetchIncident():
  pass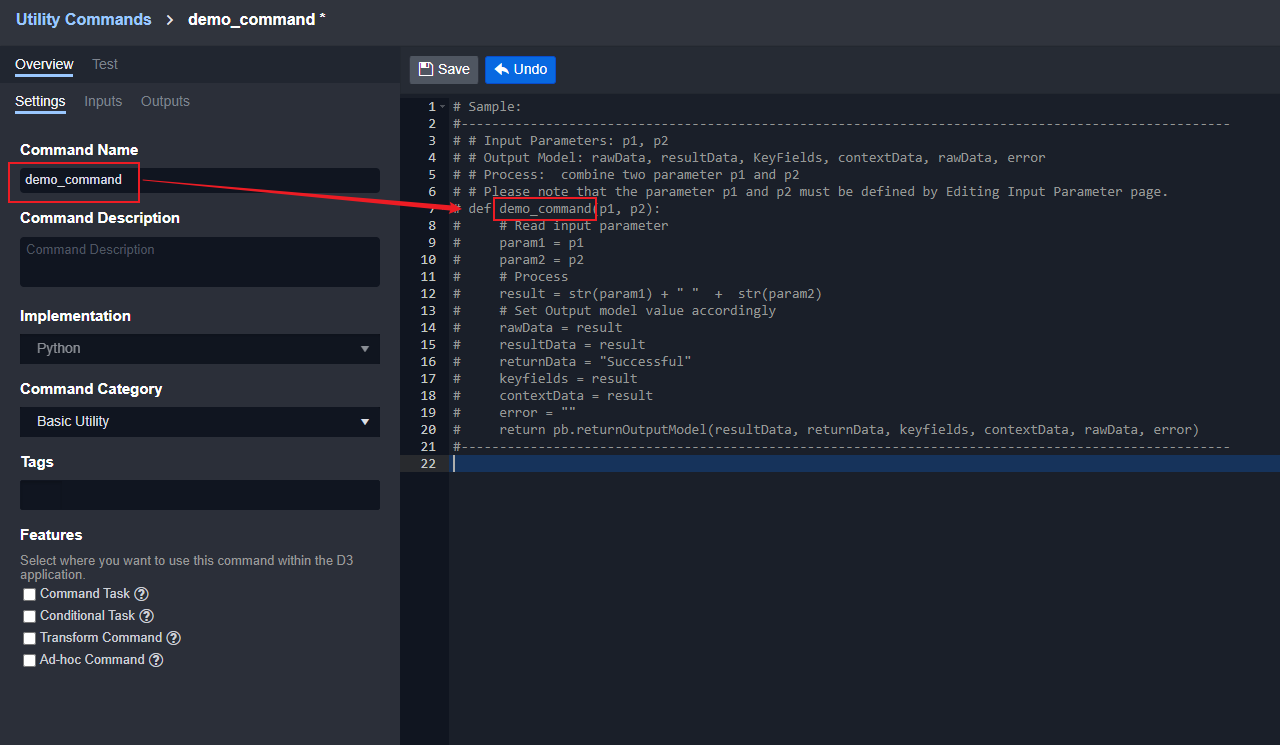
Command Input Setup
Adding new input parameters for your command:
Step 1: Navigate to Configuration on the top menu.
Step 2: Click on the Integrations icon on the left sidebar.
Step 3: Enter the name of your integration and press the Enter key.
Step 4: Click on this integration.
Step 5: Click on the command of interest.
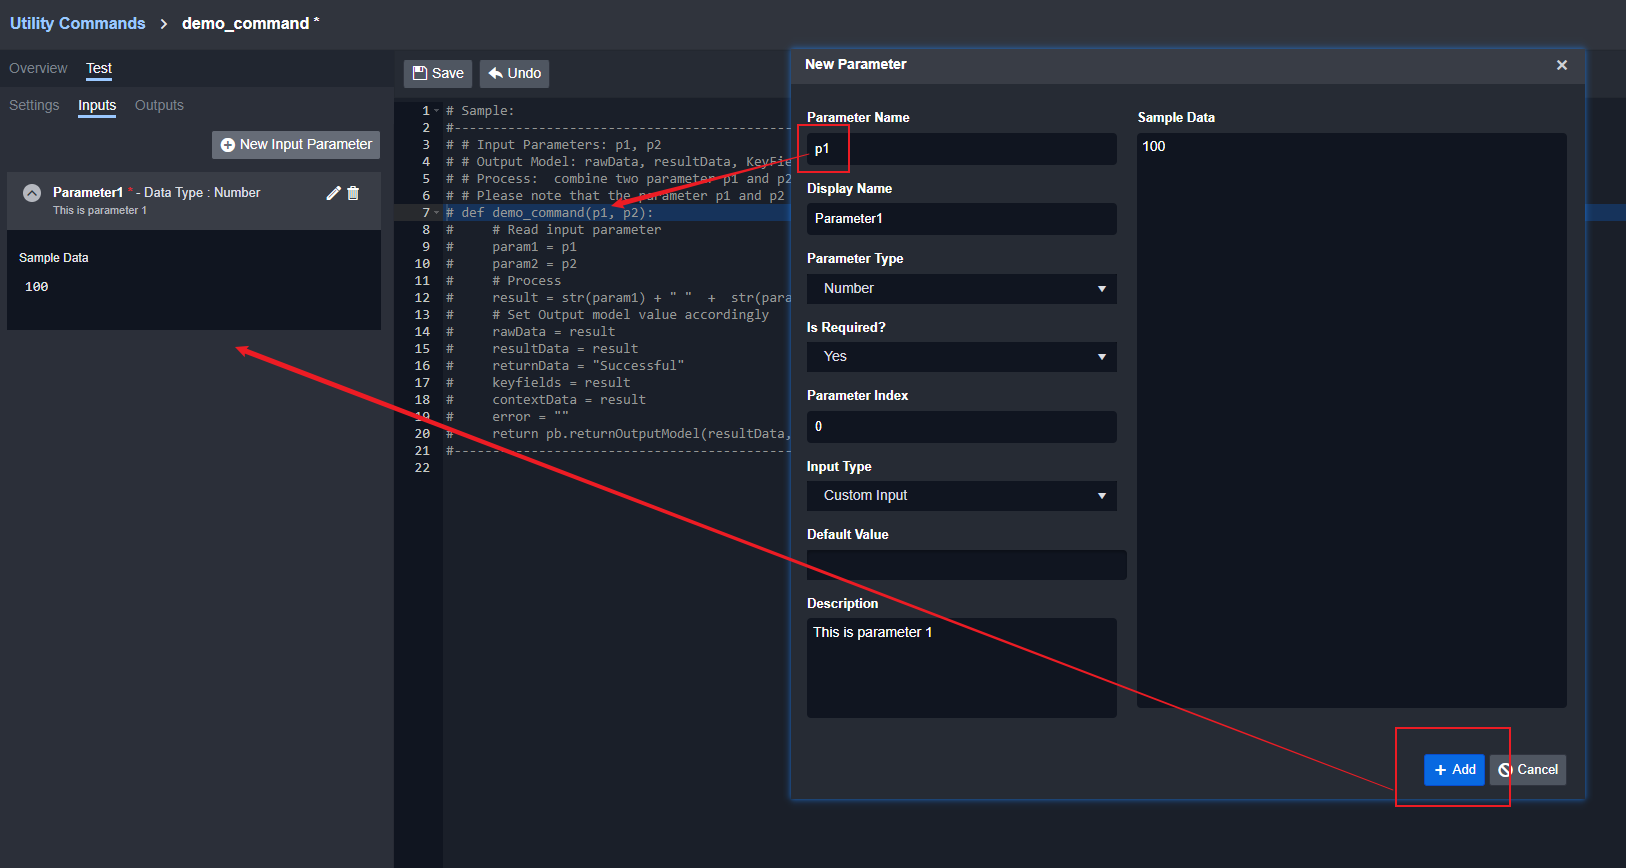
Step 6: Click on the + New Input Parameter button. A New Parameter window will appear.
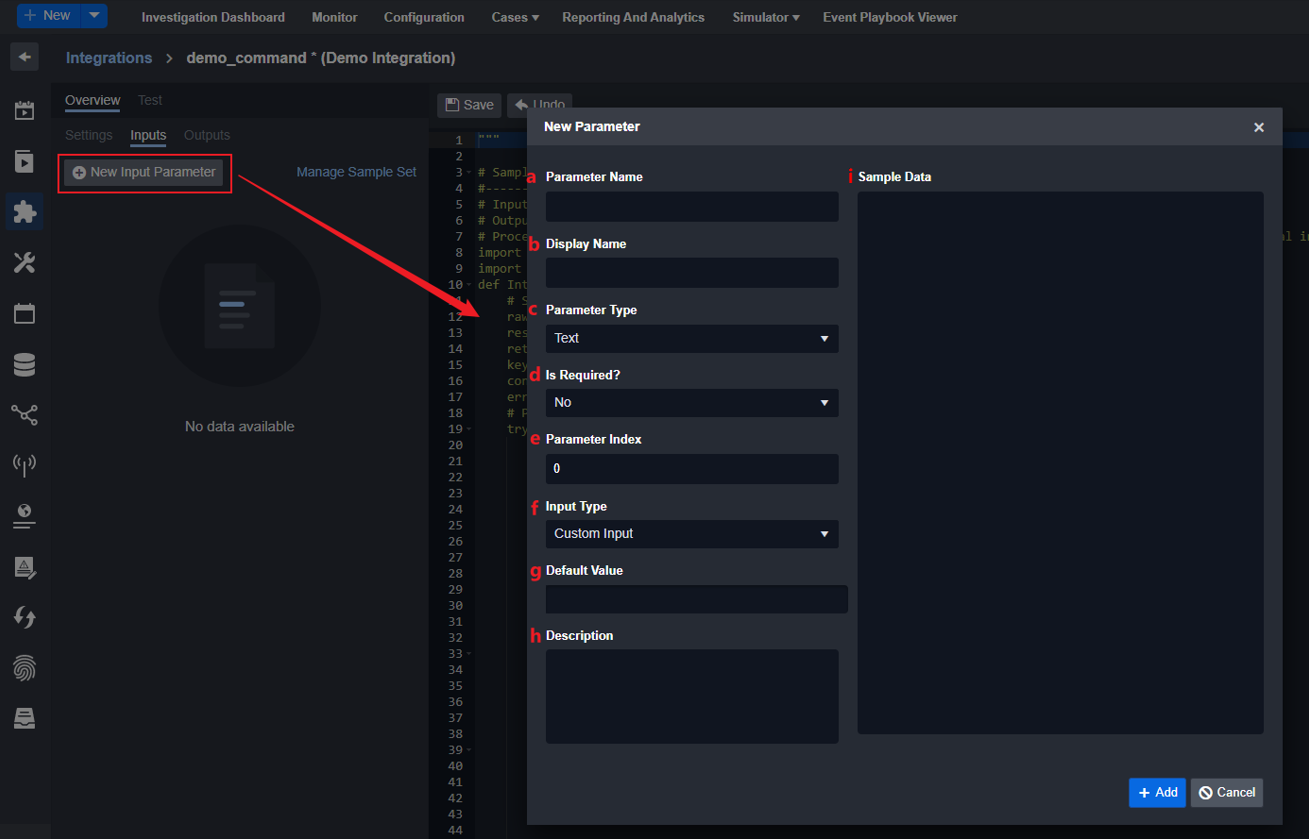
a. Parameter Name: The internal name of the parameter. It should match the parameter name in the function definition.
b. Display Name: The display name of the parameter.
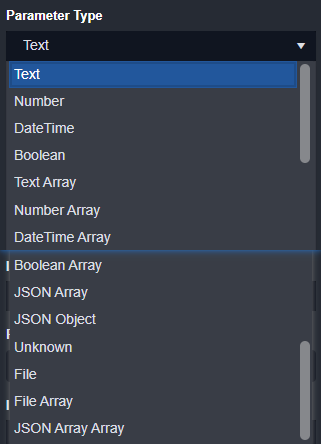
c. Parameter Type: The data type of the parameter.
Parameter Type options: Text, Number, DateTime, Boolean, Text Array, Number Array, DateTime Array, Boolean Array, JSON Array, JSON Object, Unknown, File, File Array, JSON Array Array
d. Is Required?: Whether or not the parameter is required when running the command.
e. Parameter Index: The order of the parameter, starting from 0.
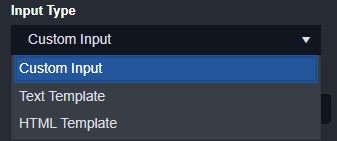
f. Input Type: The data type of this parameter. For more information regarding the Input type, please refer to this document.
g. Default Value: Whether the parameter has a default value. It can be empty.
h. Description: The description of the parameter.
i. Sample Data: Sample data of the parameter.
Parameter Type
READER NOTE
Parameter Type Options:
Text - default value: ““
Number (float) - default value: 0(int)
DateTime - default value: datetime.datetime(1900, 1, 1, 0, 0)
Boolean - default value: []
JSON Object - default value: {}
Text Array, Number Array, DateTime Array, Boolean Array, JSON Array, Unknown, File, File Array, JSON Array Array - default value: []
Input Type Options:
Custom Input: match and support parameter type, change input method according to parameter type
Text Template: text input
HTML Template: HTML input
Drop Down Option: selection, only support Text parameter type
Multi Select Option: multiple selection, only support Text Array parameter type
Custom Input
Command Output Setup
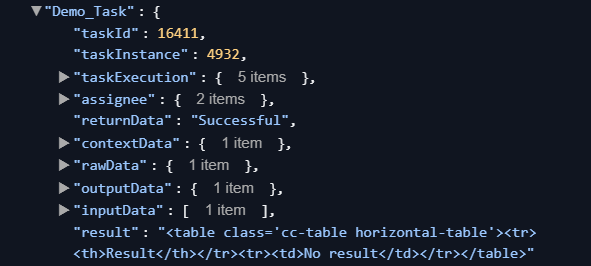
Each command should return data using pb.returnOutputModel, and users need to add additional fields such as Key Field at the output tabs.
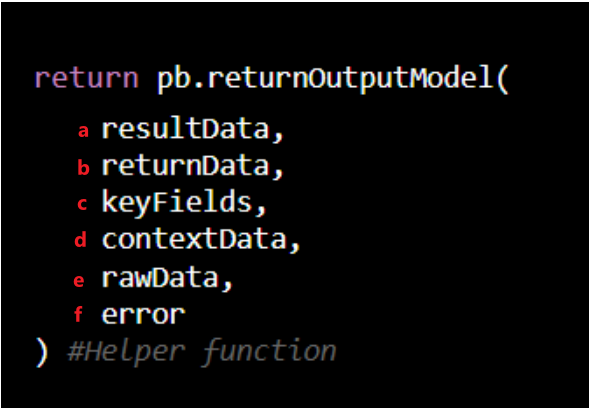
resultData — HTML formatted data displayed in Result tab; it is used for data visualization.
Result Data is used for data visualization.
Reader Note
HTML string can be generated from JSON or JSON array by our helper Python functions:
ConvertJsonObjectArrayToHTMLString
ConvertJsonObjectToHTMLString.
Check library below for more details.
returnData — Determine the success/failure of the command.
keyFields — Should be left empty. This will be automatically generated using Key Fields configuration.
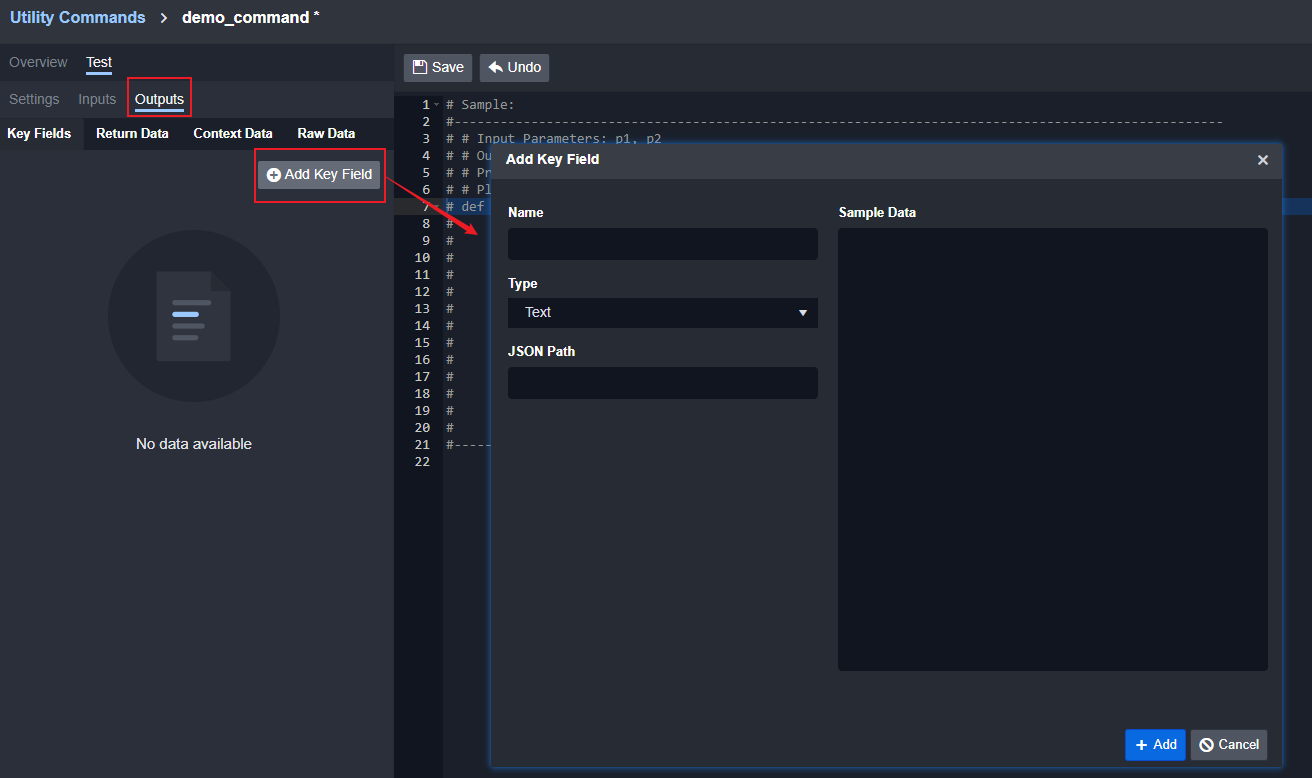
Set up the Key Fields from the Output configuration at the bottom of the Python script editing screen.
The Key Fields JSON path should be referred to the JSON path in Context Data.
contextData — Contextual data to be shared with other tasks.
Example of Recorded Future Check IP Reputation Context Data:
[
{
"risk": {
"score": 0,
"level": 0,
"context": {
"phishing": {
"score": 0,
"rule": {
"count": 0,
"maxCount": 1
}
},
"public": {
"summary": [],
"score": 0,
"mostCriticalRule": "",
"rule": {
"maxCount": 52
}
},
"c2": {
"score": 0,
"rule": {
"count": 0,
"maxCount": 2
}
}
}
},
"entity": {
"id": "ip:***.***.***.***",
"name": "***.***.***.***",
"type": "IpAddress"
},
"ipAddress": "***.***.***.***",
"riskLevel": "Low"
}
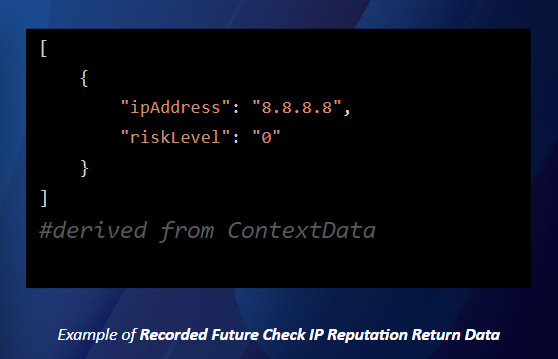
]rawData — Raw data from the command; this stores the raw message returned from 3rd-party API calls.
Example of Recorded Future Check IP Reputation:
{
  "data": {
    "results": [
      {
        "risk": {
          "score": 0,
          "level": 0,
          "context": {
            "phishing": {
              "score": 0,
              "rule": {
                "count": 0,
                "maxCount": 1
              }
            },
            "public": {
              "summary": [],
              "score": 0,
              "mostCriticalRule": "",
              "rule": {
                "maxCount": 52
              }
            },
            "c2": {
              "score": 0,
              "rule": {
                "count": 0,
                "maxCount": 2
              }
            }
          }
        },
        "entity": {
          "id": "ip:***.***.***.***",
          "name": "***.***.***.***",
          "type": "IpAddress"
        },
        "ipAddress": "***.***.***.***",
        "riskLevel": "Low"
      }
    ]
  },
  "counts": {
    "returned": 1,
    "total": 1
  }
}
Error — Error details.
OutputModel in playbook configuration:
For more information regarding Playbook Task Configuration, please refer to this document.
READER NOTE
The outcome of a command's execution hinges directly on the contents of the error field. Should the error field not be False (eg. an error message inside the error field), the command will fail.
Integration fetchEvent/fetchIncident pass down data
fetchEvent and fetchIncident commands are used to ingest raw data from third-party integrationsources into our D3 system and create Events and Incidents respectively.
For more details about Integration Commands, please refer to this document.
For more details about how to schedule and ingest Events and Incidents, please refer to this document.
fetchEvent and fetchIncident commands should also utilize another field in our D3 OutputModel: Passdown data.
Since fetchEvent and fetchIncident commands are usually time-sensitive, it is important to schedule the next start time for the next round of fetch events/incidents. In our system commands, this situation is handled as long as the start time of the command and the schedule interval is filled. If a custom fetchEvent/fetchIncident is needed, the next start time can be handled by the passdown data.
Reader Note
All parameters in a function can utilize the Passdown data from last fetchEvent/fetchIncident.
Set up command input as mentioned above.
Add a timespan parameter. Please note that this timespan should equal to or larger than your schedule interval time in order to avoid any fetchevent delay.
Time Span: the input to calculate the next fetch event input start time
Schedule Interval: the interval time to actually execute the fetch event command.
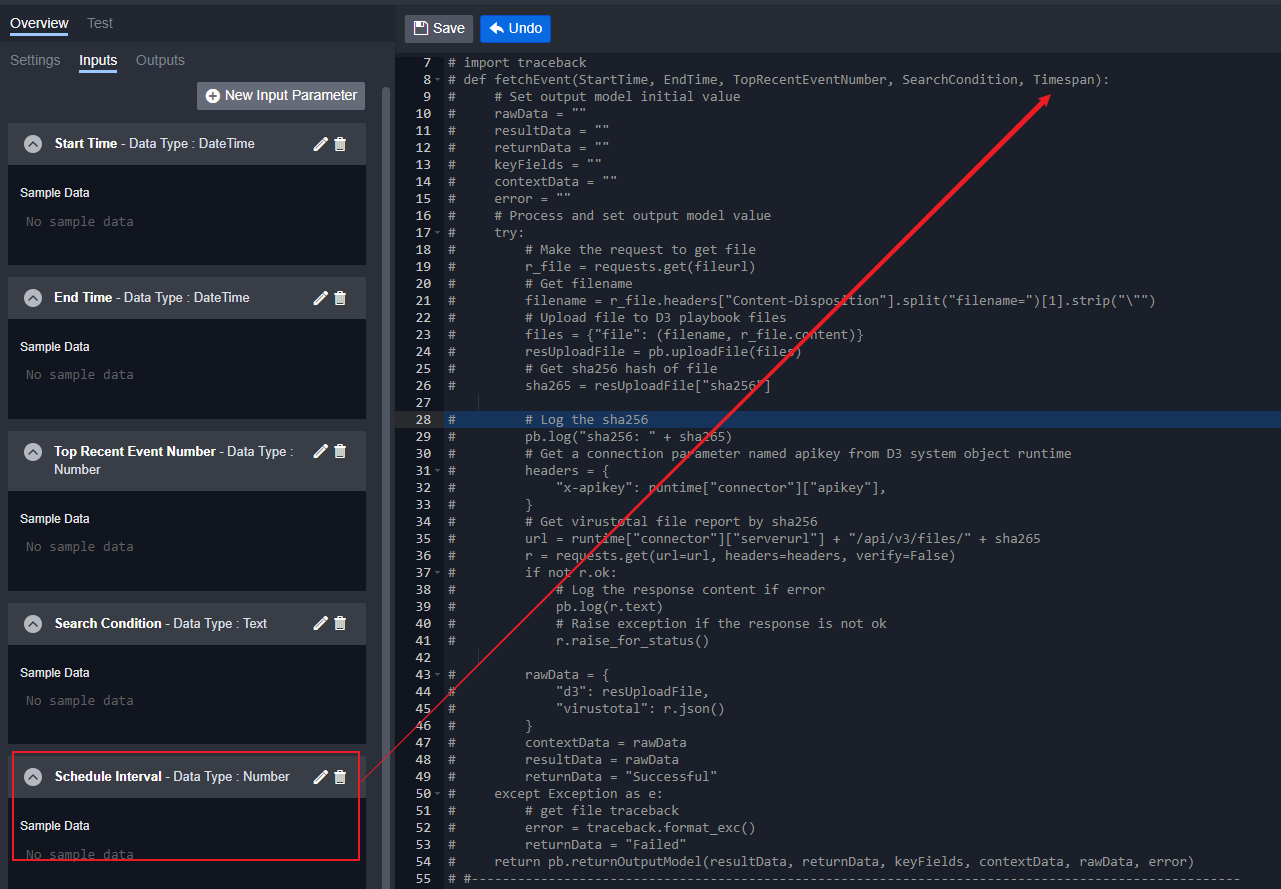

Write your main function logic.
Define your passdown data.
passdown = {
"startTime": startTime + timedelta( minutes = timeSpan) if startTime +timedelta(minutes=timeSpan) < datetime.datetime.utcnow() else startTime
}
In this example, next startTime is calculated by checking the current time and adding timeSpan.
Put your passdown data in the outputModel.
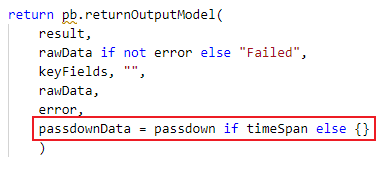
Next time in the schedule when this command is executed, the startTime will be the one in your passdown data.
passdownData = passdown if timeSpan else {}Integration Connection Parameter Setup
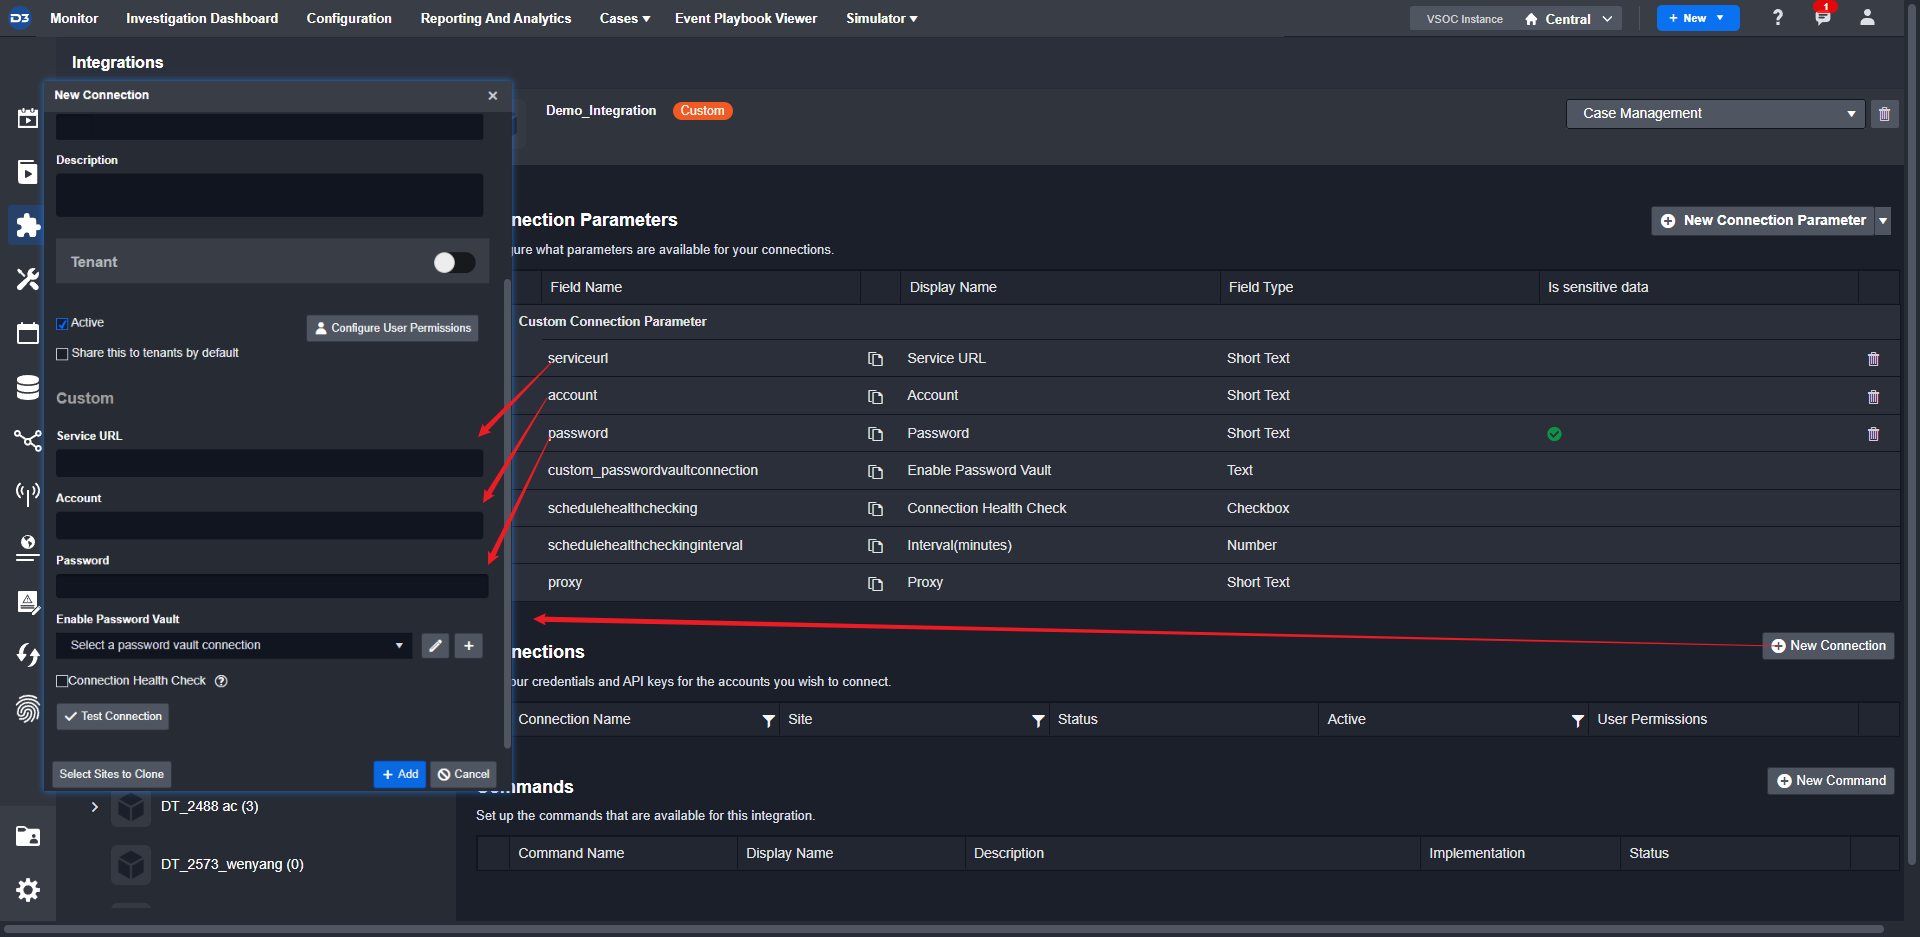
Because an integration must connect to third-party services, a connection must be established for API calls. In D3, you can create different types of connections with your desired parameters.
Configure your connection parameters.
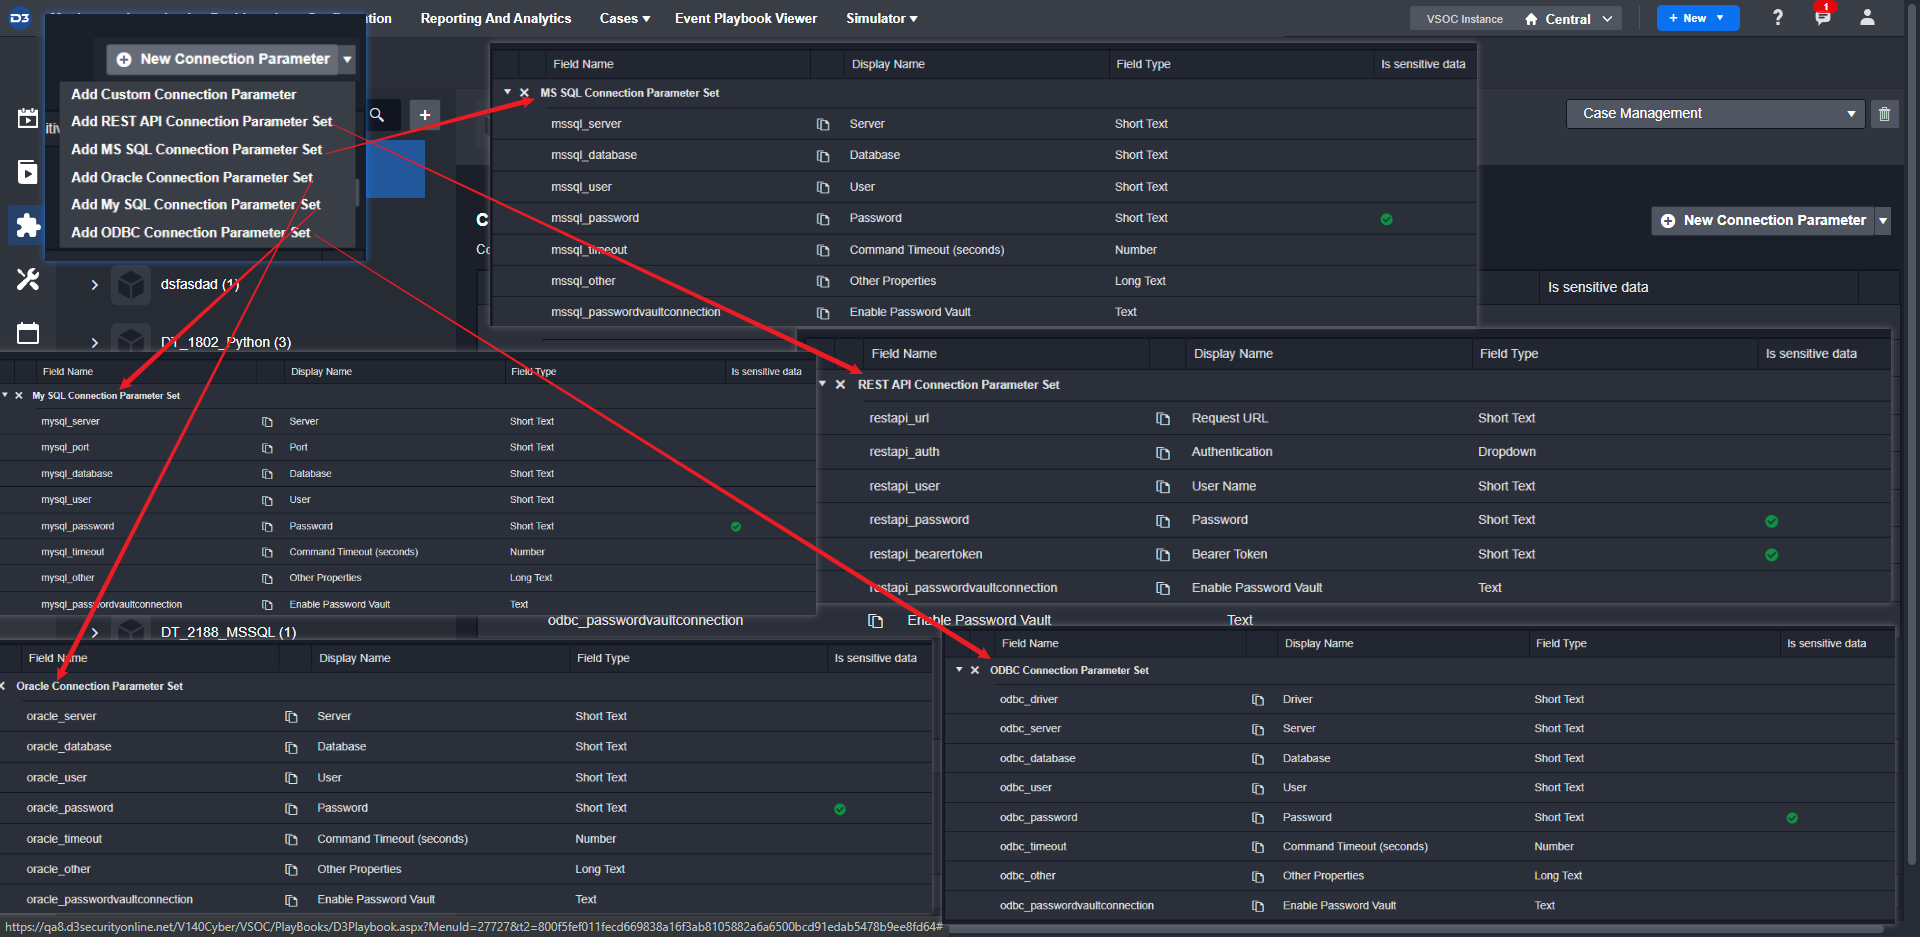
Add a custom parameter.
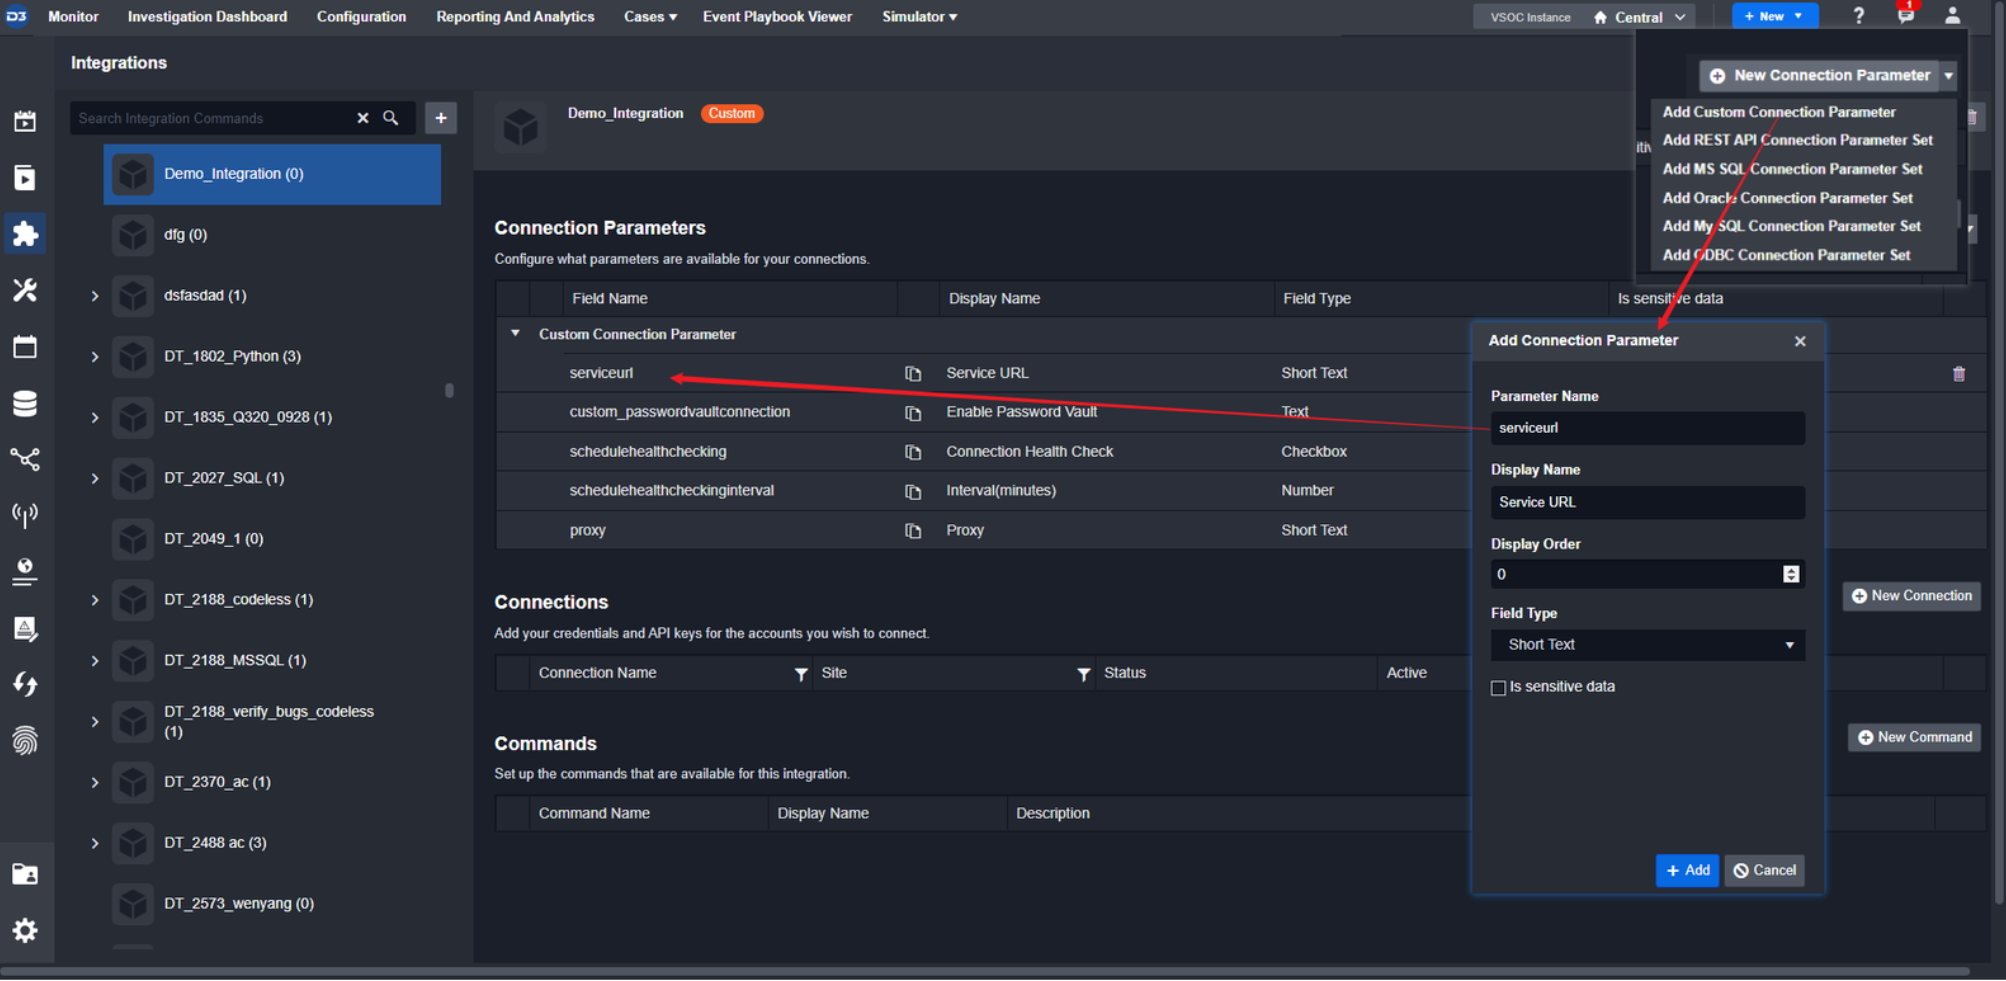
Add a new connection and fill in the connection data.
Reader Note
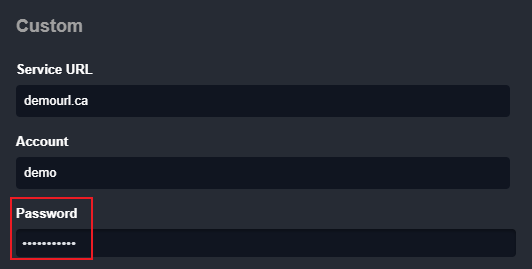
If the parameter is set to be sensitive, the field will be masked.
For integration commands, the global variable runtime['connector'] is the dictionary that contains Connection Parameters. The key for Connection Parameters are lowercase and without space
e.g. runtime['connector']['serverurl'] or runtime.get("connector").get("serverurl", "")
Command Functionality Definition
Utility command example
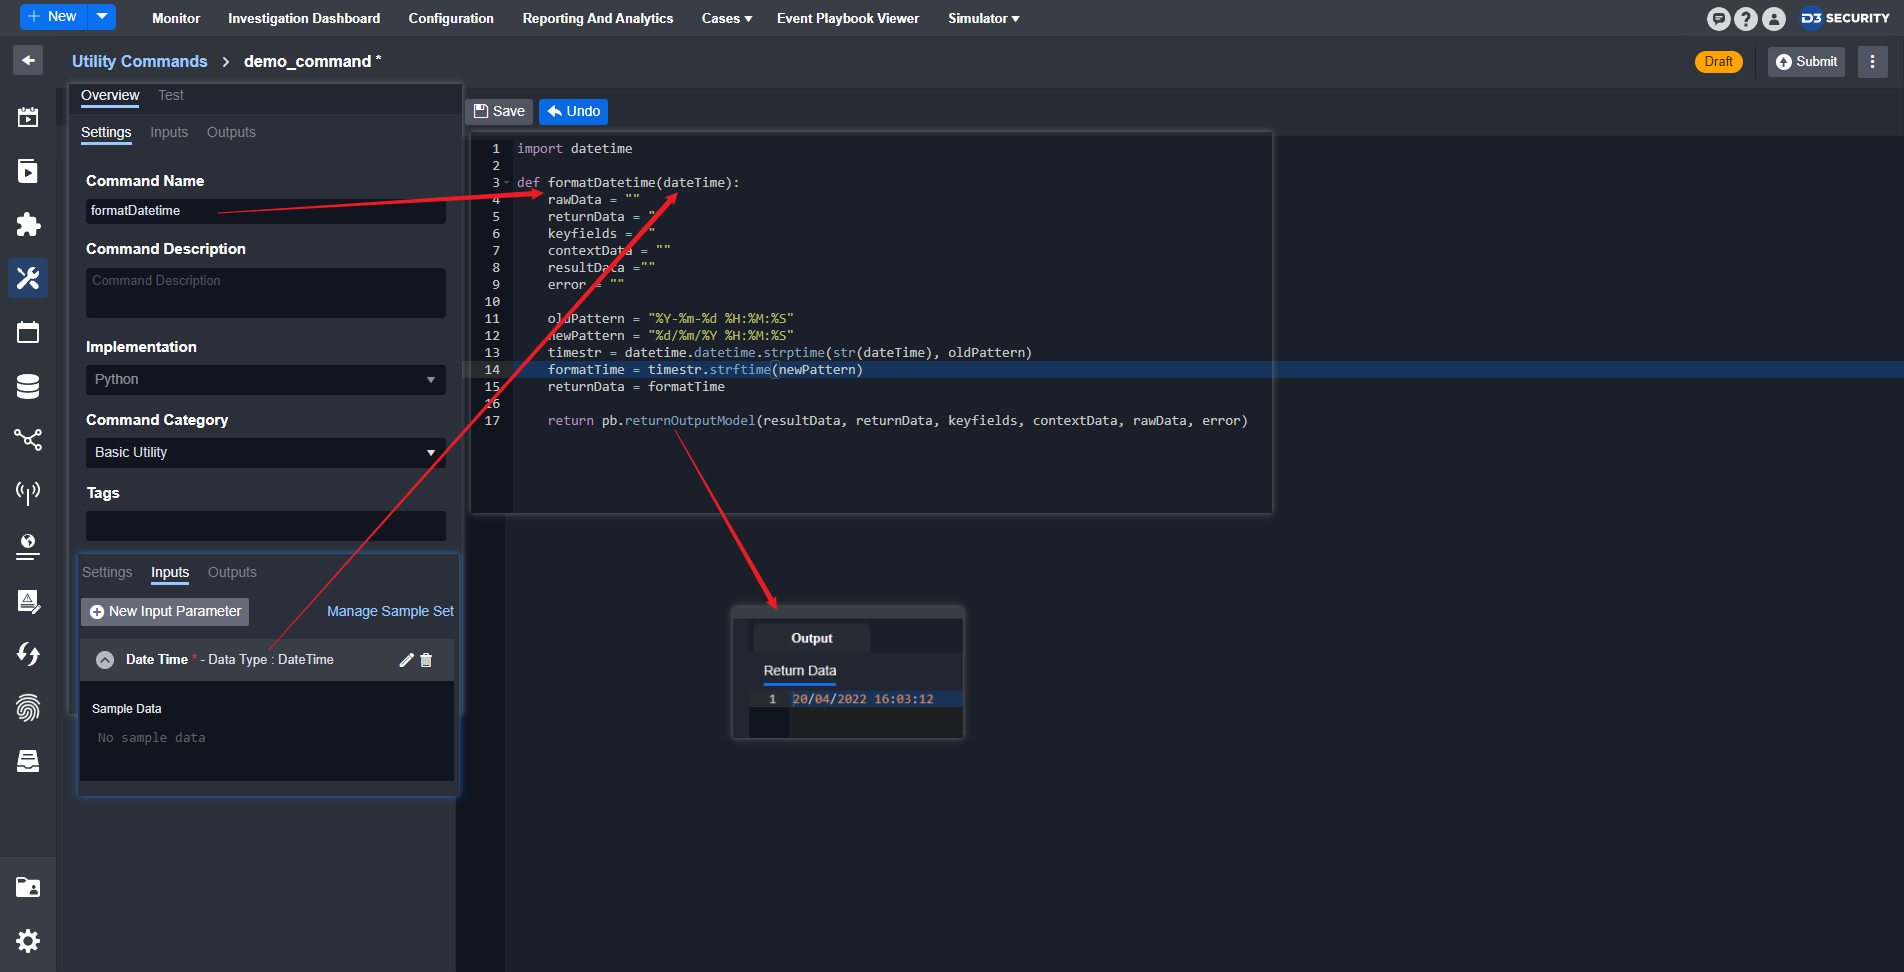
Use case: Convert datetime format
Method: Define the input datetime format (old Pattern) and convert it into another datetime format (newPattern)
Input — Datetime
Output — Datetime
Integration Command Example
Fetch event sample code
# define a _sendRequest helper function to handle all requests in this integration
def _sendRequest(self, method, resource=None, params=None, body=None):
    try:
        # this integration needs a connector
        connector = pb.runtime.get("connector")
        if not connector:
            raise Exception("Connection is required")

        # get the connector server url
        serverurl = connector.get("serverurl", "").strip()
        if not validators.url(serverurl):
            raise Exception("Server Url is not valid in format")
        # get the rest of connector parameters
        serverurl = serverurl.rstrip("/")
        username = connector.get("username", "").strip()
        apikey = connector.get("apikey", "").strip()
        version = connector.get("version", "").strip()

        # send request and error handling
        url = f"{serverurl}/{version}/"
        headers = {"Accept": "application/json", "Content-Type": "application/json", "Accept-Encoding": None}
        r = requests.request(method, url, headers=headers, params=params, json=body, verify=False, auth=(username, apikey))
        data = r.json() if "application/json" in r.headers["Content-Type"].lower() else r.text
        if not r.ok:
            return (False, data, f"Status Code: {r.status_code}, Message: {r.reason}, {r.text}")
        else:
            return (True, data, None)
    # handle ConnectionError the exception
    except requests.ConnectionError:
        raise Exception("The remote server refused to connect, please check Server URL in connection or API service availability.")
    except Exception as ex:
        raise Exception(_fmtExeptionErrMsg(ex))

def fetchEvent(args):
    error = ""
    rawData = []
    result = ""
    keyFields = ""
    passdown = {}
    try:
        # get the command parameters. args index following the defined index.
        startTime = args[0]
        endTime = args[1]
        index = args[2].strip() if args[2] else ""
        limit = _getValidInputValue(args[3], 1, 100, 20)
        offset = int(args[4]) if int(args[4]) >= 0 else 0
        timeSpan = int(args[6]) if int(args[6]) > 0 else 0
        queryString = args[5]
        # prepare body and send request
        body = _prepareRequestBody(startTime, endTime, limit, offset, queryString, "timestamp", timeSpan)
        pb.log(json.dumps(body))
        success, rawData, error = _sendRequest("GET", f"data/{index}/_search", data=json.dumps(body))
        # structure the result output
        if not success:
            error = "Search events failed: " + error
        else:
            result = rawData.get("hits", {}).get("hits")
        if result:
            keyFields = {
                "EventIDs":  [sub.get("_id") for sub in result],
                "EventIndexes": [sub.get("_index") for sub in result],
                "EventTypes": [sub.get("_type") for sub in result]
            }
        passdown = {
            "startTime": startTime + timedelta( minutes = timeSpan) if startTime +timedelta(minutes=timeSpan) < datetime.datetime.utcnow() else startTime
        }
    except Exception as ex:
        error = "Search events failed: " + _fmtExeptionErrMsg(ex)
        pb.log(traceback.format_exc())
    # return the D3 outputmodel with the request result
    return pb.returnOutputModel(
        result,
        rawData if not error else "Failed",
        keyFields, "",
        rawData,
        error,
        passdownData = passdown if timeSpan else {}
        )
Reader Note
Please be aware that, all custom commands within an integration will be put into one Python script.
For advanced users, it will be a good practice to create helper functions such as _sendrequest to avoid code duplication

Command Retry
Sometimes a command may fail due to some unexpected reasons. You can return a special "__RETRY__” as returnData in D3 output model and our system will re-run the command. Also, the retry count can be retrieved as pb.runtime.get('retrycount', 0).
Sample code as follow:
def retrySample():
    errors = []
    rawData = []
    result = []
    returnData = "Failed"
    # get the retry count
    retrycount = pb.runtime.get("retrycount", 0)
    # retry if updateEvents throw an expection and the retry count is less than 10. It will stop at the 10th time and return "Failed"
    try:
        return updateEvents()
    except Exception:
        if retrycount < 10:
            return pb.returnOutputModel(result, "RETRY", "", "", rawData, errors)
    return pb.returnOutputModel(result, returnData, "", "", rawData, errors)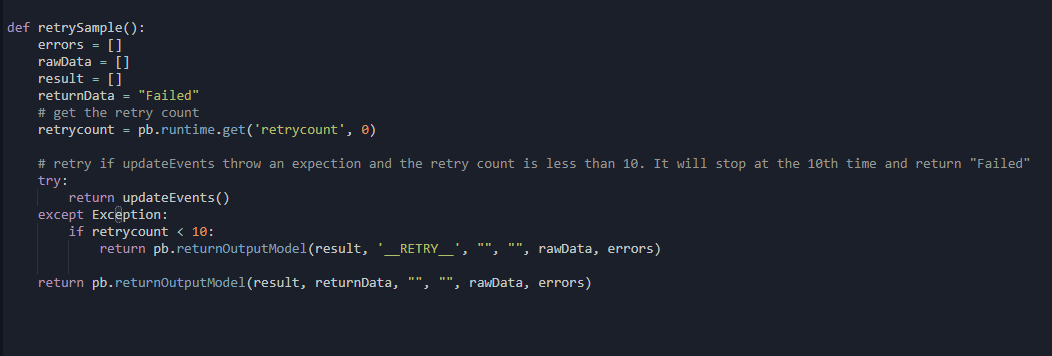
D3 Python Coding Conventions
Follow camelCase to create method name.
Do not use print function, or any other function that outputs to the standard output.
Do not define a class named PlaybookRunTime. It is reserved for D3 playbook engine.
Do not define a class named APIError. It is reserved for D3 playbook engine.
Do not define a class named HTTPAPIError. It is reserved for D3 playbook engine.
Do not define a variable or object named pb. It is reserved for D3 playbook engine.
Do not define a variable or object named args. It is reserved for D3 playbook engine.
Do not define a variable or object named runtime. It is reserved for D3 playbook engine.
Do not define a variable or object named input. It is reserved for D3 playbook engine.
Do not use the different method name from the command name in the command script.
Do not import a library which is neither Python standard library nor D3 3rd party library.
Debugging and Testing
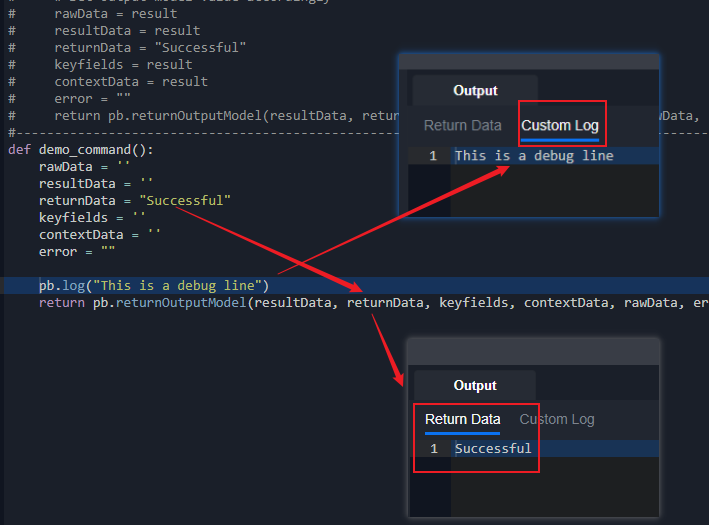
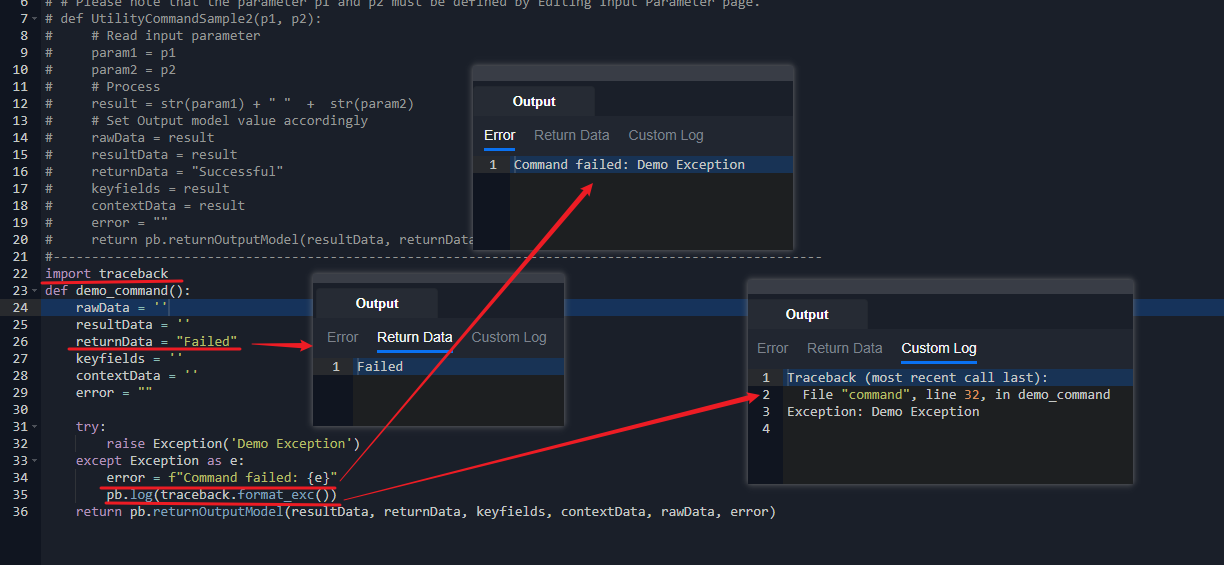
Use pb.log() to log data during command execution.
Logged data will be displayed in command testing, and in playbook runtime while testing a playbook.
Logged data will be saved even if the command exits due to an exception.
Use the traceback library to get the full stack trace of exceptions.
Stack traces will match the line number of the command script if a command exits due to an exception.
Use
traceback.format_exc()to get full stack trace during exception handling.
D3 Python Library
Global Runtime Variables
Integration Command Only
runtime["connector"]
{
  "custom_passwordvaultconnection": "",
  "schedulehealthchecking": "False",
  "schedulehealthcheckinginterval": "5"
  -- any defined connection paramater will also be here --
}
runtime["retrycount"]
return the number of the retry count
Command Execution Helper Functions
In your custom Python script, you can also use the D3 out-of-box System Utility Command or Integration Command.
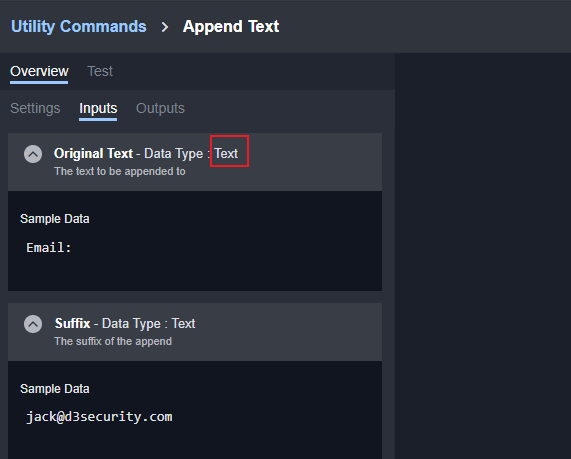
To Execute Utility Commands:
Follow this format:
D3.Utility.{Command Name}<{Command Type}>(parameters)
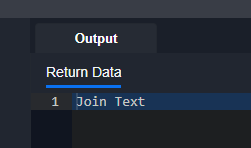
def Demo():
return D3.Utility.concatToRear <Text>("Join ", "Text")
Please be aware that Command Name is the internal name of the command.
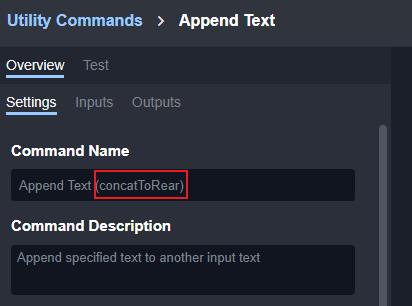
Command Type is the first parameter type of the command. Here is the possible parameter data type:
Text
Number
DateTime
Boolean
Text Array
Number Array
DateTime Array
Boolean Array
JSON Array
JSON Object
Unknown
It will return our D3 Outputmodel
To Execute Integration Commands:
Similar to the format of executing a Utility Command. Here is the format for executing Integration Command: D3.Integration.{Integration Name}.{Command Name}(parameters).
Note that data type is not necessary
The limitations are:
Only custom Integration Commands can execute other Integration Commands that belong to the same Integration
Custom Utility Commands cannot execute any Integration Commands.
sample ipReputationCheck() is a system command. sample fetchEvent is a custom command:
def ipReputationCheck():
return pb.returnOutputModel('', '', '', '', {"EventRawData": "rawData"}, '')def fetchEvent():
return D3.Integration.Demo_Integration.ipReputationCheck()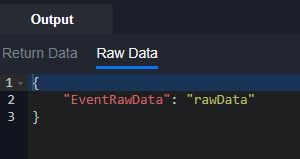
General Helper Functions:
Each helper function can be used with pb.{function name}
isJson(jsonString)
return
TrueorFalseif it is JSONParameters:
jsonString:the JSON string to validate
Sample Input: pb.isJson('{"Simple":"Simple JSON"}')
Sample Output: True
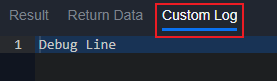
log(message)
Log any message to show in the Custom Log tab. The tab will only show when testing command
Sample Input: pb.log("Debug Line")
Sample Output:
returnOutputModel( result, returnData, outputData, contexData, rawData, error, passdownData={})
It will generate our D3 output model. It is recommended to be used in writing custom commands.
Parameters:
result: HTML formatted data displayed in Result tabreturnData: Simple data that can be directly used by the next commandsoutputData: Should be left empty. This will be automatically generated using Key Fields configurationcontextData: Contextual data to be shared with other tasksrawData: Raw data from the commanderror: Error detailspassdownData: A Event Intake and Incident Intake related field that can pass down parameter values to the next scheduled instance.
Sample Input:
pb.returnOutputModel("<body><h1>Sample Result Data</h1></body>", "Sample Return Data", "", {"SampleContextData": "ContextData"}, {"SampleRawData": "Rawdata"}, "Sample Error", passdownData = {})
Sample Output:
{
  "result": {
    "description": "<body><h1>Sample Result Data</h1></body>",
    "references": [],
    "actions": []
  },
  "returnData": "Sample Return Data",
  "outputData": "",
  "contextData": {
    "SampleContextData": "ContextData"
  },
  "rawData": {
    "SampleRawData": "Rawdata"
  },
  "error": "Sample Error",
  "passdownData": {},
  "customLog": "",
  "others": {}
}
uploadFile(file)
Upload the file to D3 playbook file table.
Parameters:
File JSON object to be uploaded to the file table. Format as follows:
{"file": (filename,content)}.contentis binary data of the file.
Sample Input: pb.uploadFile({"file": ("Sample File","*****=")})
Sample Output:
{
  "fileId": "*****",
  "fileName": "Sample File",
  "md5": "*****",
  "sha1": "*****",
  "sha256": "*****"
}downloadFile(fileid, filesource) > IR_ATCHMNT, PB_FILE, KC_AF_FILE
Download the file from D3 file tables
Parameters:
fileid: the file ID in the file tablefilesource: one of the three D3 file table:IR_ATCHMNT: Incident attachment filesPB_FILE: Playbook filesKC_AF_FILE: Artifact files
Sample Input: pb.downloadFile("*****", "PB_FILE") ('Sample File', b'*****=')
Sample Output: ('Sample File', b'*****=')
Note that it works best paired with the decode function
Sample Input: filename, filecontent = pb.downloadFile("*****", "PB_FILE") filecontent.decode("utf-8")
Sample Output: Sample Text
ConvertJsonObjectArrayToHTMLString(inputArray, showHeader=True, isCol="col")
Format the JSON Object array to an HTML table string to be put into the Result field in the D3 outputmodel.
Parameters:
inputArray: the JSON object array to be convertedshowHeader: whether to show the key name as header in the table. Default value is True. Can be set to False.isCol: whether to format the table in a column style. Default value is "col". Can be "row"
Sample Input:
pb.ConvertJsonObjectArrayToHTMLString([{ "fieldName": "EventKey", "value": "9635", "displayName": "Unique Event Key" }, { "fieldName": "EventName", "value": "*****", "displayName": "Event name" }, { "fieldName": "Severity", "value": "Medium", "displayName": "Severity" }, { "fieldName": "Status", "value": "New", "displayName": "Status" }])
Sample Output
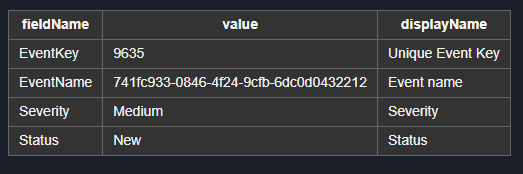
<table class='cc-table horizontal-table'><tr><th>fieldName</th><th>value</th><th>displayName</th></tr><tr><td>EventKey</td><td>9635</td><td>Unique Event Key</td></tr><tr><td>EventName</td><td>*****</td><td>Event name</td></tr><tr><td>Severity</td><td>Medium</td><td>Severity</td></tr><tr><td>Status</td><td>New</td><td>Status</td></tr></table>Sample Input:
pb.ConvertJsonObjectArrayToHTMLString([{ "fieldName": "EventKey", "value": "9635", "displayName": "Unique Event Key" }, { "fieldName": "EventName", "value": "*****", "displayName": "Event name" }, { "fieldName": "Severity", "value": "Medium", "displayName": "Severity" }, { "fieldName": "Status", "value": "New", "displayName": "Status" }], False)
Sample Output:
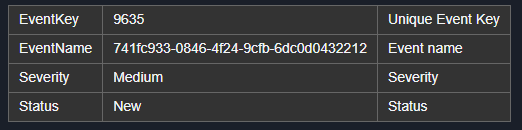
<table class='cc-table horizontal-table'><tr><td>EventKey</td><td>9635</td><td>Unique Event Key</td></tr><tr><td>EventName</td><td>*****</td><td>Event name</td></tr><tr><td>Severity</td><td>Medium</td><td>Severity</td></tr><tr><td>Status</td><td>New</td><td>Status</td></tr></table>Sample Input:
pb.ConvertJsonObjectArrayToHTMLString([{ "fieldName": "EventKey", "value": "9635", "displayName": "Unique Event Key" }, { "fieldName": "EventName", "value": "*****", "displayName": "Event name" }, { "fieldName": "Severity", "value": "Medium", "displayName": "Severity" }, { "fieldName": "Status", "value": "New", "displayName": "Status" }], True, "row")
Sample Output:

<table class='cc-table vertical-table'><tr><th>fieldName</th><td>EventKey</td><td>EventName</td><td>Severity</td><td>Status</td></tr><tr><th>value</th><td>9635</td><td>*****</td><td>Medium</td><td>New</td></tr><tr><th>displayName</th><td>Unique Event Key</td><td>Event name</td><td>Severity</td><td>Status</td></tr></table>