.png)
Custom Command
Custom Command Overview
D3 offers users the ability to implement custom (do-it-yourself) commands, enabling them to define additional and overriding methods for system data manipulation and to integrate with other security products via third-party APIs. Custom commands prove valuable in situations where a specific integration or command falls outside the scope of the D3 VSOC system, or where the system commands cannot perfectly align with customer operational requirements.
Types of Custom Command
Integration Command
An integration command is a specific action or task executed within the D3 platform that facilitates the software connection with external security products. These commands enable D3 users to interact with external systems, such as querying information from third-party APIs, performing actions in external applications, or automating responses based on predefined conditions. In the absence of a case-specific integration or command within the current version of D3 SOAR, we offer DIY custom integration solutions.
Utility Command
A utility command is an in-house, predefined action or function within the D3 platform that serves a specific purpose related to security operations or incident response. These built-in features are designed to assist users in performing common tasks like data manipulation, analysis, workflow automation, and nested playbook setup. Utility commands are categorized into three types: Basic Utility, System Utility, and Cyber Utility.
Types of Custom Command Implementations
Custom commands can be written with Python scripts and executed within the D3 Python Docker Image. They can also be assembled using a Codeless Playbook workflow.
Each command (system or custom) of Python implementation is associated with a Python function, whose name matches that of the internal name. These Python functions are displayed in integration-specific code files, with their draft versions modifiable through a code editor that opens upon clicking on any of the commands contained within an integration. Upon execution of the Python custom command, the D3 system concatenates the user-customized script and the built-in (ie. system) script to form a final script. These system scripts are visible to users as commented out code. The final script incorporates functions defined within the system script, allowing them to be invoked during execution. It is this final script that runs.
Integration command of Codeless Playbook implementation offers a user-friendly solution, particularly suitable for non-technical users. With its intuitive drag-and-drop interface, users can easily assemble command blocks to construct powerful workflows without requiring extensive programming expertise. Furthermore, Codeless Playbook custom commands are reusable in different event and incident playbooks, enhancing efficiency by enabling the replication of successful workflows across different scenarios.
D3 also provides additional types of custom commands, including those tailored for MS SQL, Oracle, MySQL, and ODBC environments.
Custom Command Status
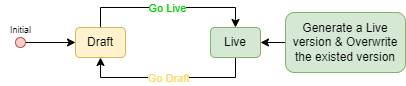
There are two statuses for the custom command: Live and Draft. While in Draft status, the command remains editable but cannot be referenced or executed, except for testing purposes. While in Live status, the command cannot be modified but can be referenced and executed within playbooks and schedules. The graph below illustrates the cycle of switching command status:
Each utility command and codeless playbook is unique and maintains its own status. Integration Python commands, on the other hand, are directly linked to their own custom script. Any changes made to the status of a custom command will affect the entire custom script associated with the corresponding integration.
READER NOTE
Given that integration Python commands are hard-linked to the custom script, you will observe the following:
The statuses of Python commands within the same integration are unified, meaning they are either all in Draft status or all in Live status.
Creating a new command will automatically set the statuses of all commands within the custom script to Draft.
Deleting a command in Draft status will induce the deletion of all other Draft status Python commands.
Deleting a command in Draft status will not affect the Live version of the integration script.
Deleting a command in Live status will solely remove the command and its configurations. There will be no alterations to the user-customized script.
Integration Command Status
To view integration command statuses:
Navigate back to the Integration tab on the left sidebar.
Select your integration underneath the breadcrumb.
Navigate to the table at the bottom of the Commands section.
Observe the integration command statuses in the fifth column.
Adjacent to the draft icons within the Status column are the "View Live" anchors, which serve the same purpose as the "View Live" button within a particular command. Clicking on these anchors enables you to access the live versions.
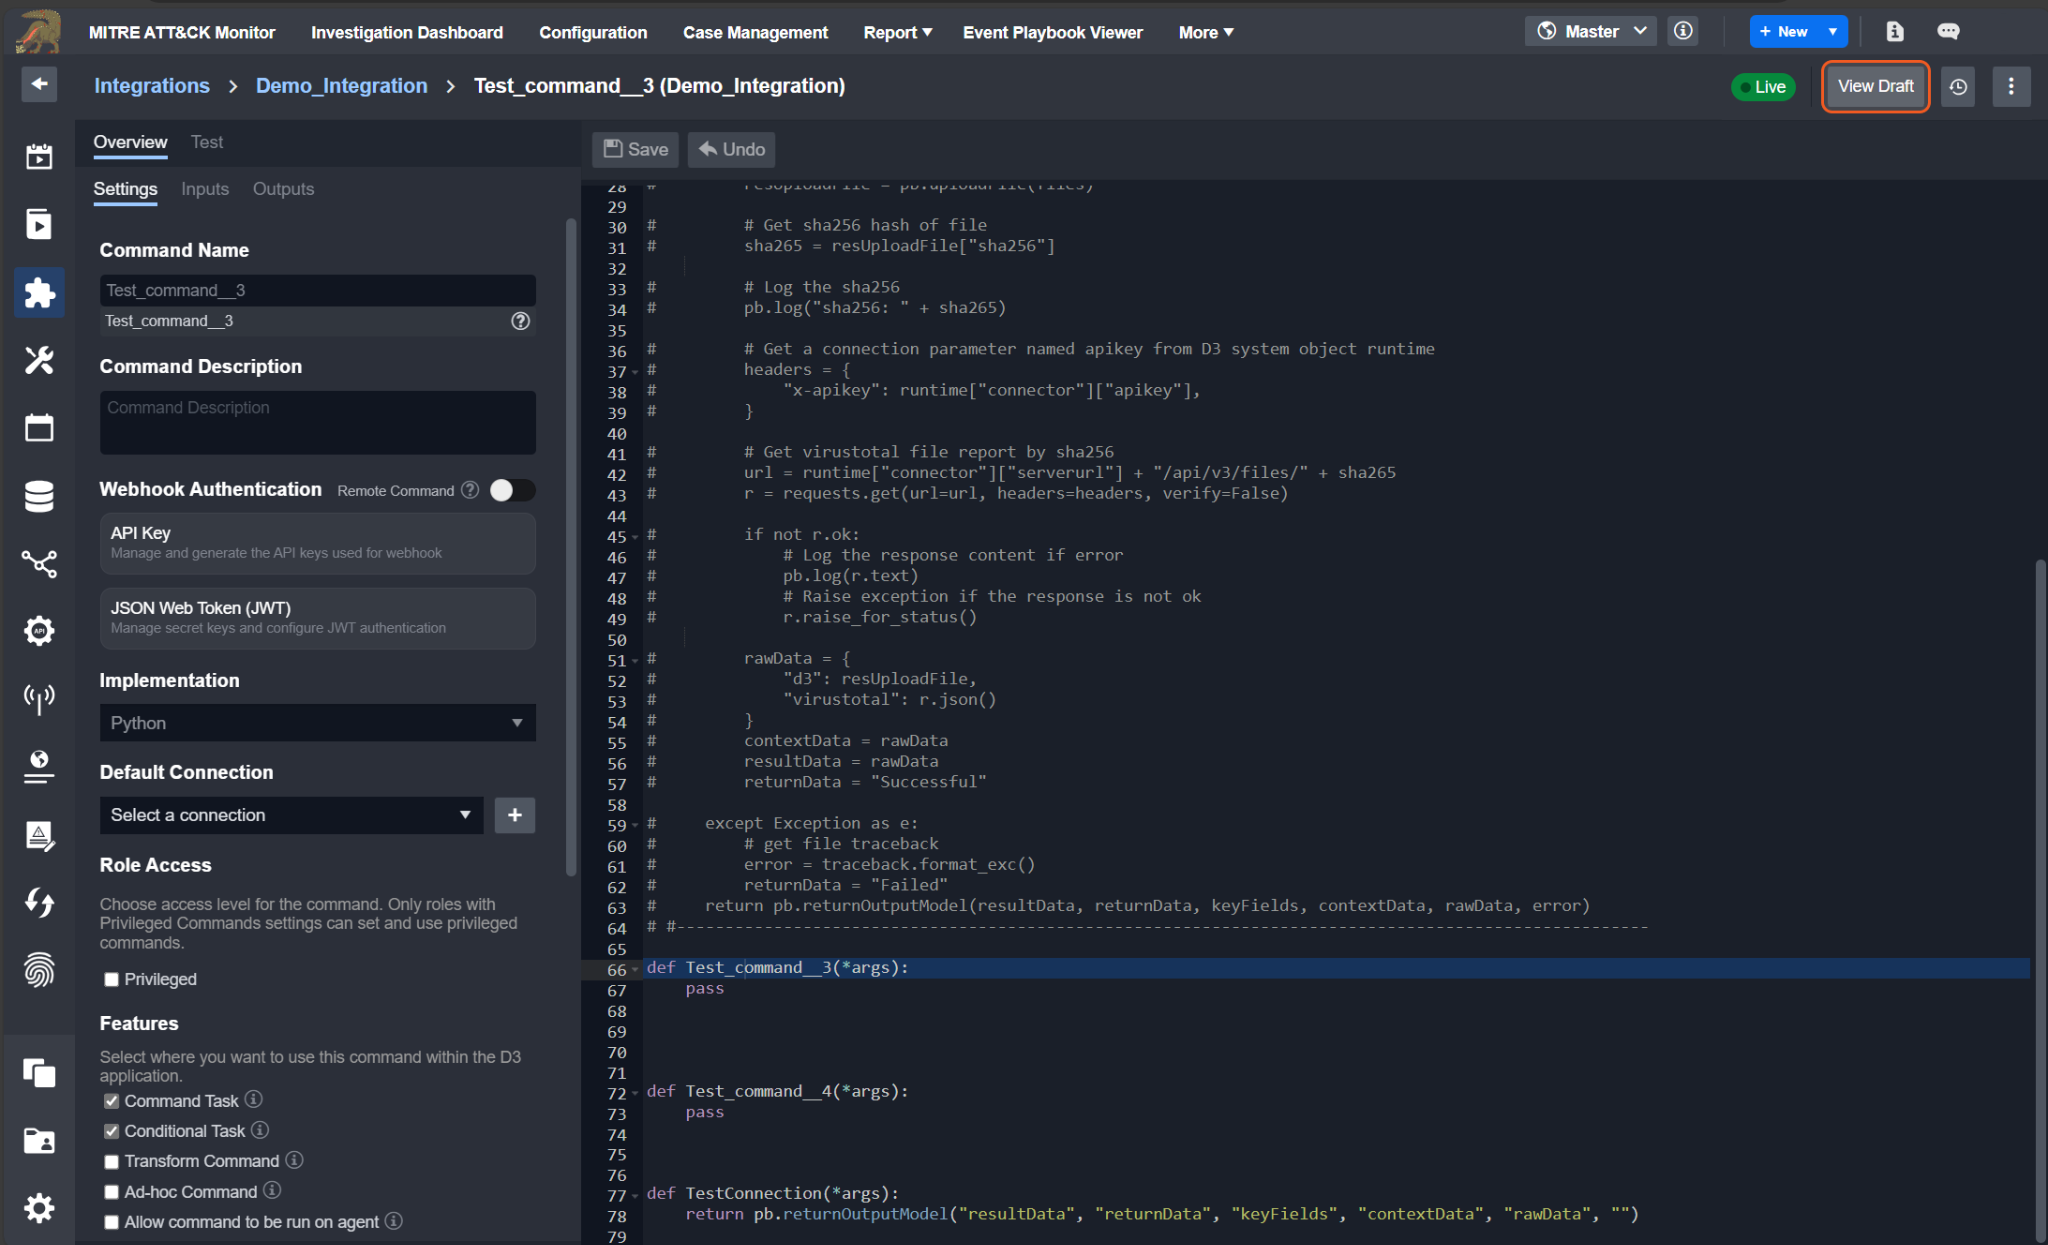
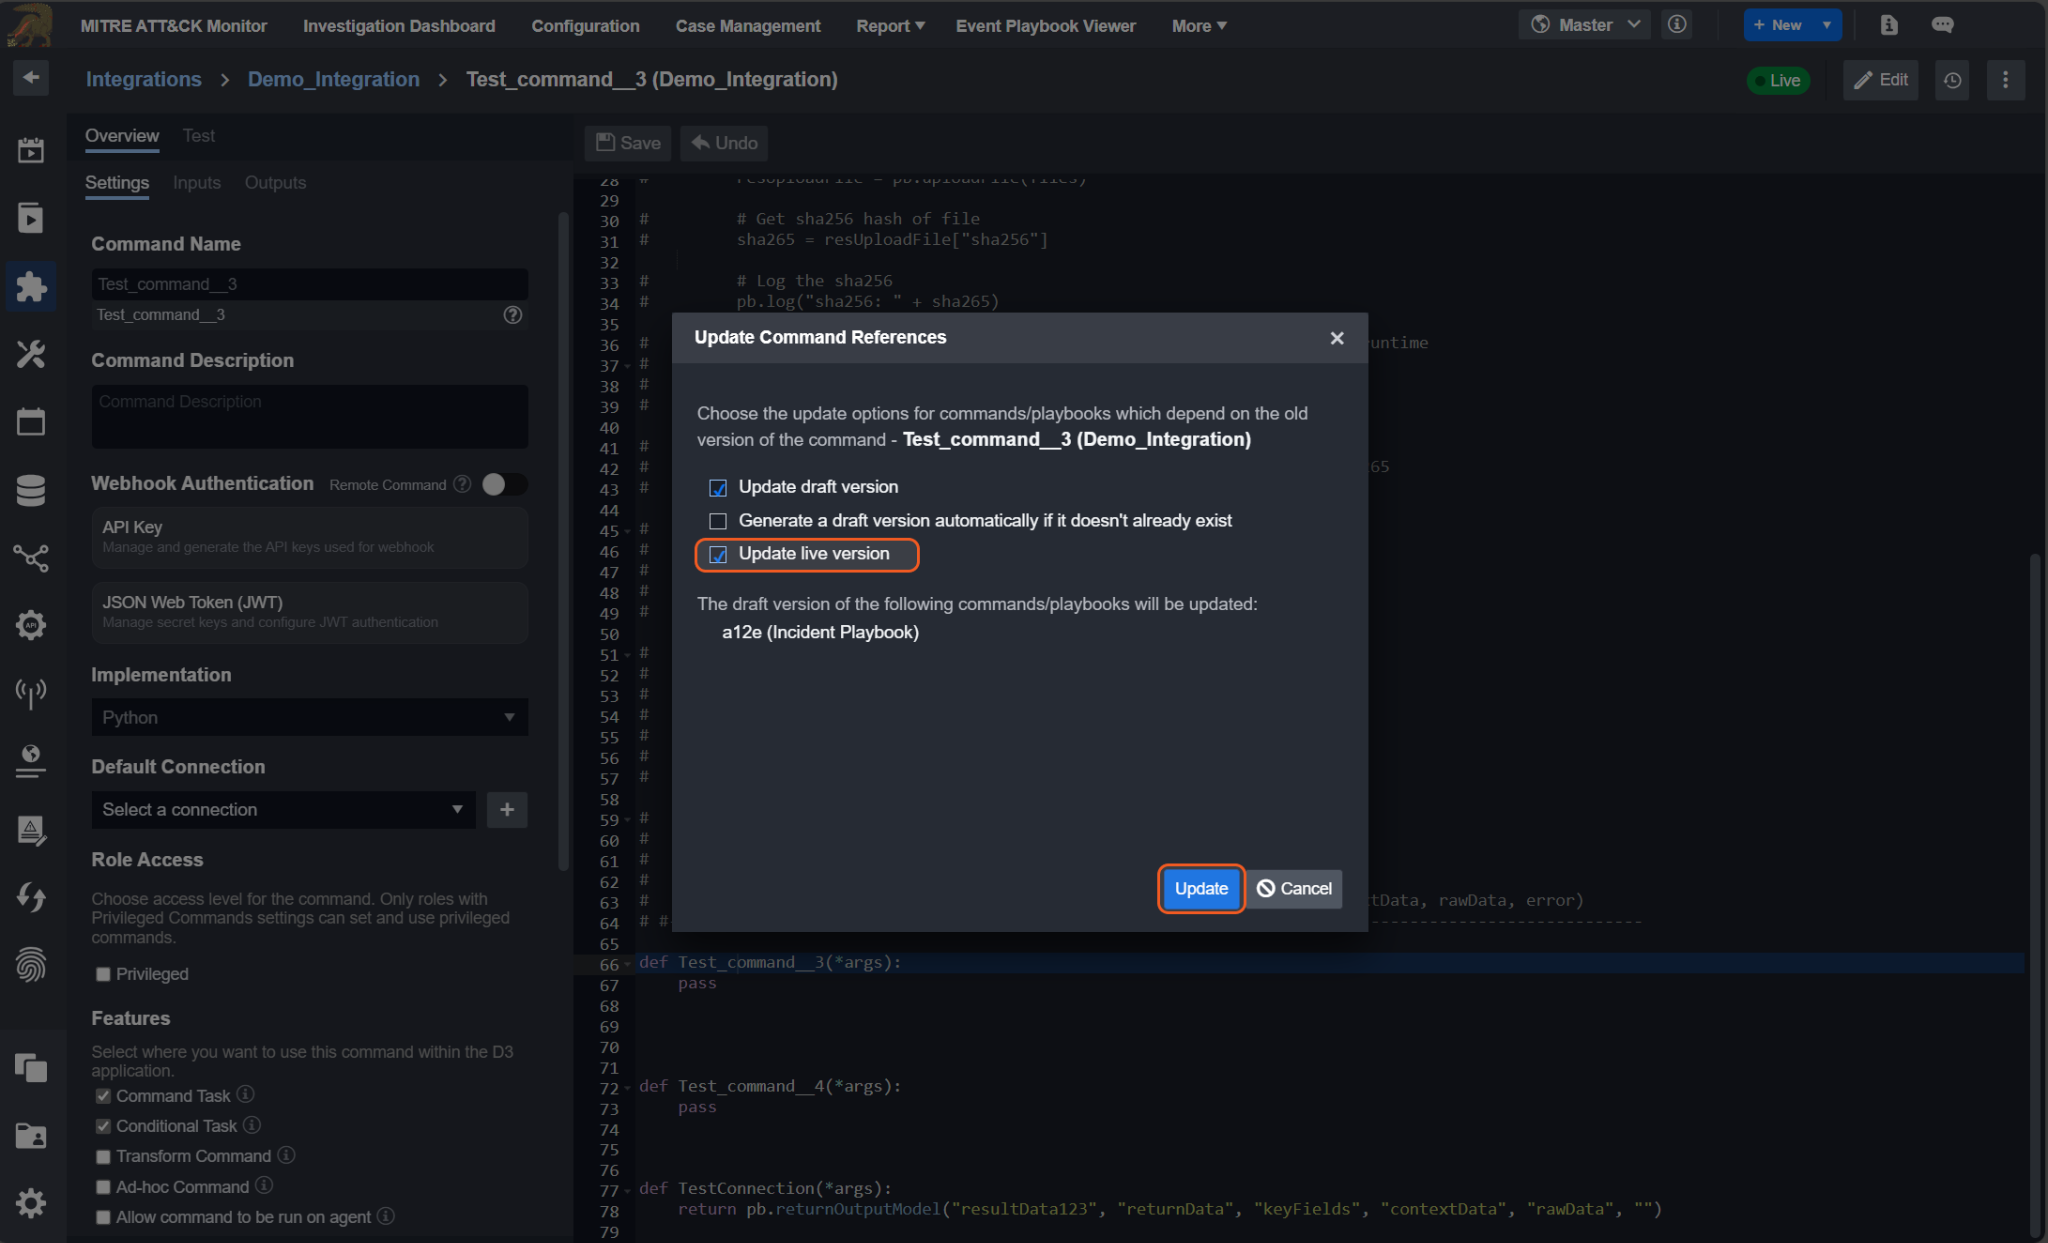
Upon entering the live version, the former "View Live" button transforms into a "View Draft" button, redirecting you to the draft version of the script. Modifying the Draft script does not affect the content of the Live script for the same command unless two conditions are met: i) The Draft script is submitted and ii) command references to the Live script are updated through a subsequent confirmation dialog.
Utility Command Status
To view the utility command statuses:
Navigate back to the Utility Commands tab on the left sidebar.
Select your utility command underneath the breadcrumb.
Click on your utility command within the expanded accordion.
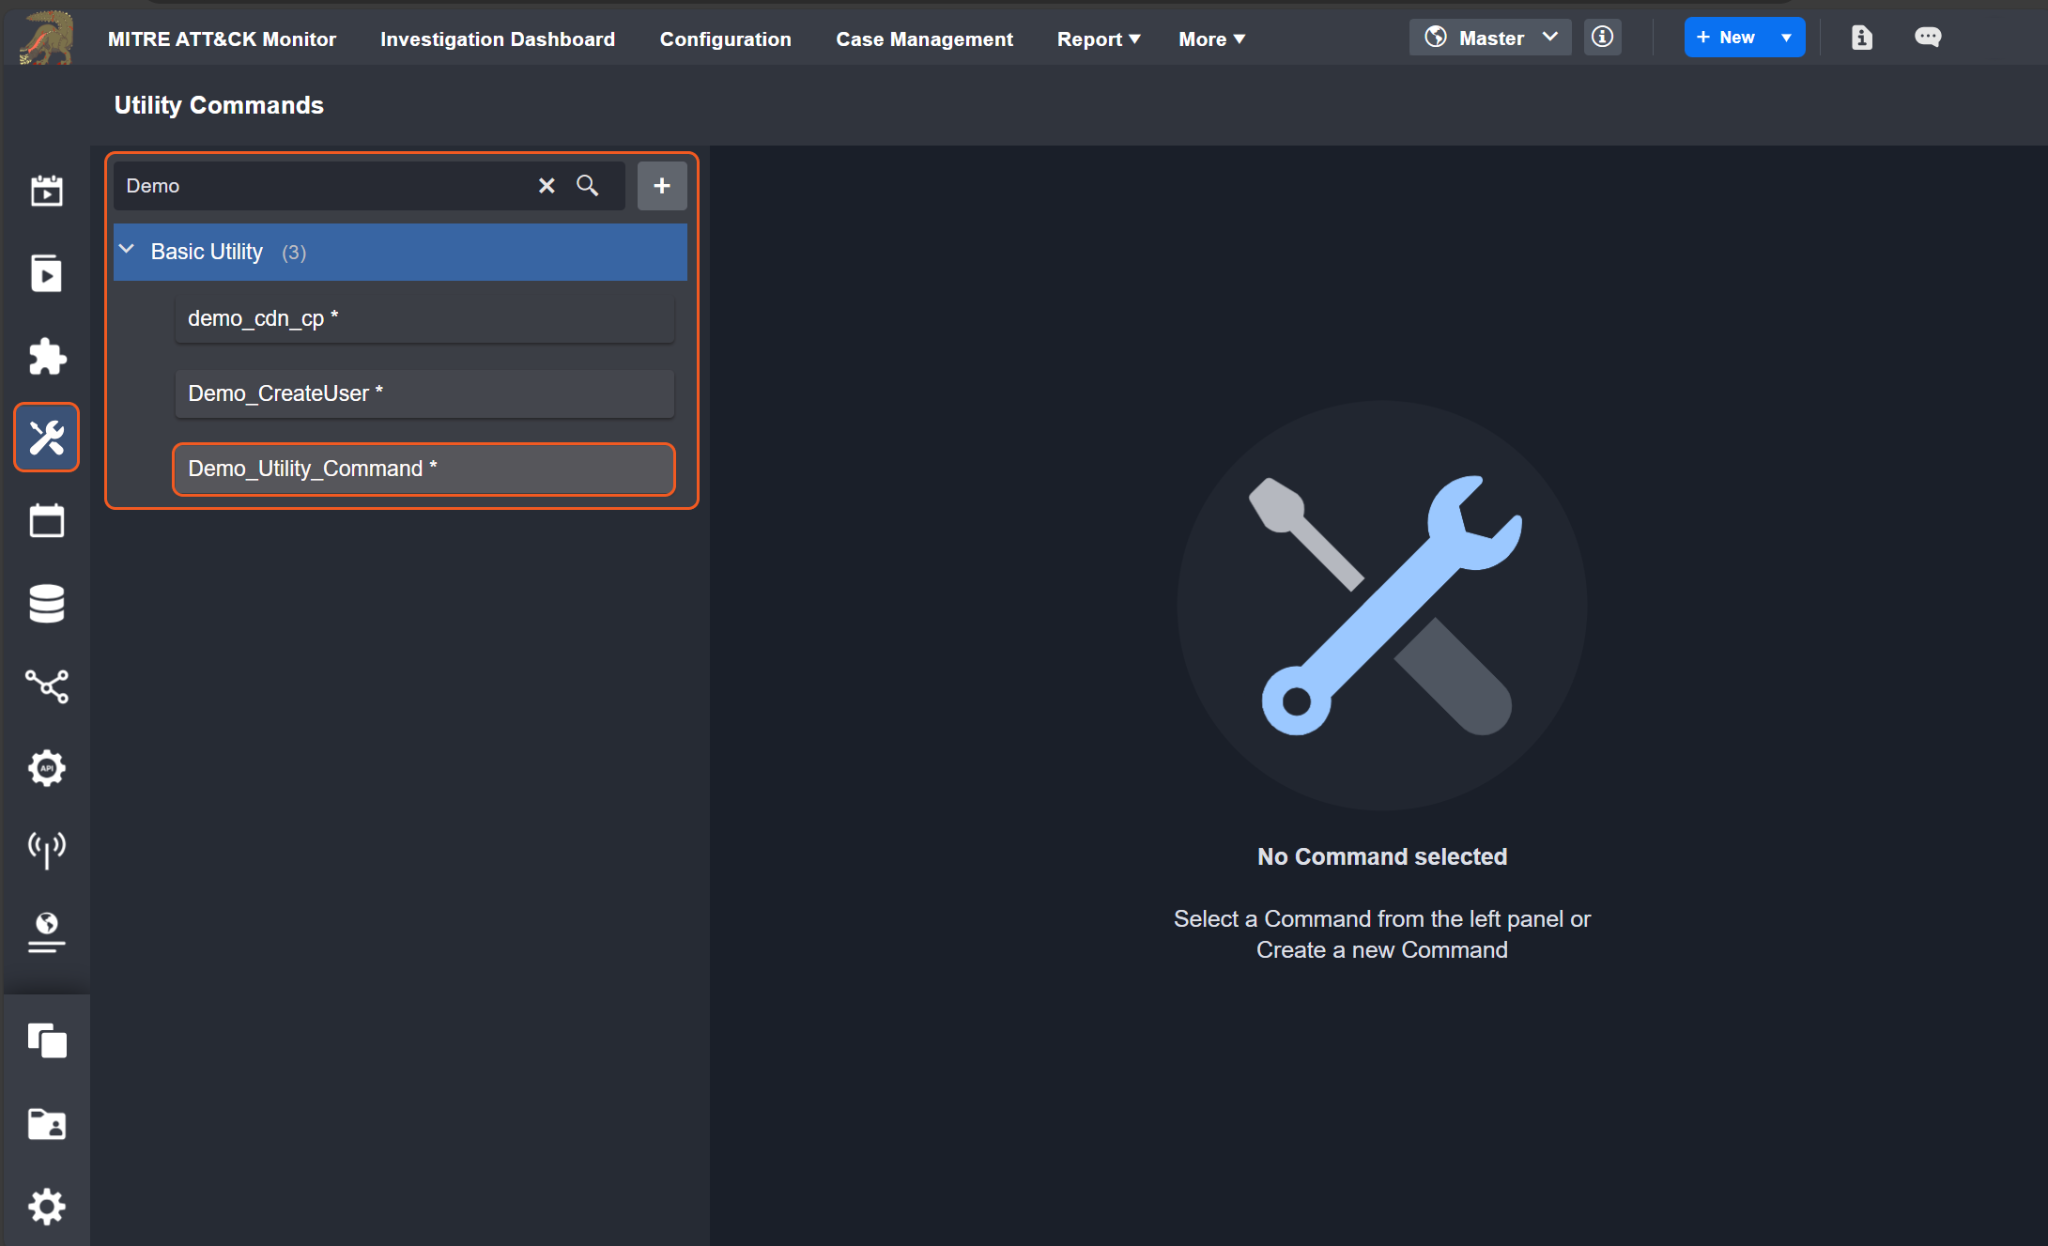
Observe the utility command status near the top right corner.
READER NOTE
To switch from Live to Draft, click on the Edit button located above the code editor.
Background
Python Command Environment Support
Language: Python
Python Version: 3.9.12
Available Library:
boto3: https://boto3.amazonaws.com/v1/documentation/api/latest/guide/quickstart.html
dateparser: https://pypi.org/project/dateparser/
defang: https://pypi.org/project/defang/
eml_parser: https://eml-parser.readthedocs.io/en/latest/
exchangelib: https://pypi.org/project/exchangelib/
gitPython: https://gitPython.readthedocs.io/en/stable/
google-api-Python-client: https://github.com/googleapis/google-api-Python-client
google-auth-oauthlib: https://pypi.org/project/google-auth-oauthlib/
google-auth: https://pypi.org/project/google-auth/
google-cloud-pubsub: https://cloud.google.com/pubsub/docs/reference/libraries
google-cloud: https://cloud.google.com/Python/docs/setup
html2text: https://pypi.org/project/html2text/
imap-tools==0.34.0: https://pypi.org/project/imap-tools/
inflect: https://pypi.org/project/inflect/
ioc-finder: https://pypi.org/project/ioc-finder/
iocextract: https://github.com/InQuest/Python-iocextract
Jinja2: https://pypi.org/project/Jinja2/
jsonpath-ng: https://pypi.org/project/jsonpath-ng/
mail-parser==3.15.0: https://docs.Python.org/3/library/email.parser.html
natsort: https://pypi.org/project/natsort/
nessrest: https://pypi.org/project/nessrest/0.31/
oauth2client: https://pypi.org/project/oauth2client/
osquery: https://github.com/osquery/osquery-Python
pandas: https://pandas.pydata.org/
psutil: https://pypi.org/project/psutil/
pyeti-Python3: https://pypi.org/project/pyeti-Python3/
pymssql: https://pypi.org/project/pymssql/
pyodbc: https://pypi.org/project/pyodbc/
Python-dateutil==2.8.0: https://dateutil.readthedocs.io/en/stable/
pywin32: platform_system == "Windows": https://pypi.org/project/pywin32/
selenium: https://selenium-Python.readthedocs.io/
setuptools: https://pypi.org/project/setuptools/
taxii2-client==1.0.1: https://pypi.org/project/taxii2-client/
urllib3: https://pypi.org/project/urllib3/
validators: https://validators.readthedocs.io/en/latest/
xmltodict: https://pypi.org/project/xmltodict/
xmltojson: https://pypi.org/project/xmltojson/
sqlparse==0.4.2: https://pypi.org/project/sqlparse/
psutil==5.9.0: https://pypi.org/project/psutil/
google-auth==2.6.6: https://developers.google.com/identity/protocols/oauth2
oauth2client==4.1.3: https://pypi.org/project/oauth2client/
dict2xml==1.7.1: https://pypi.org/project/dict2xml/
luqum==0.11.0: https://pypi.org/project/luqum/
pyodbc==4.0.32: https://pypi.org/project/pyodbc/
filelock == 3.7.1: https://pypi.org/project/filelock/
cymruwhois == 1.6: https://pypi.org/project/cymruwhois/
extract-msg==0.37.0: https://pypi.org/project/extract-msg/
Python-libnmap==0.7.3: https://pypi.org/project/Python-libnmap/
Supported Command Type: Integration, Utility
Execution: Custom Python scripts are executed within the D3 remote server which is hosted in a Docker container.
Python Environment Configuration
Changes in Python environment configuration requirements encompass:
Managing Python versions
Adding or deleting Python libraries
Managing Python library versions
Setting up environment variables
Managing file paths
Executing system command-lines for images
WARNING
For any actions or inquiries regarding Python image setup or updates, please contact D3.
Integration Custom Command
Steps to Create Integration Custom Command
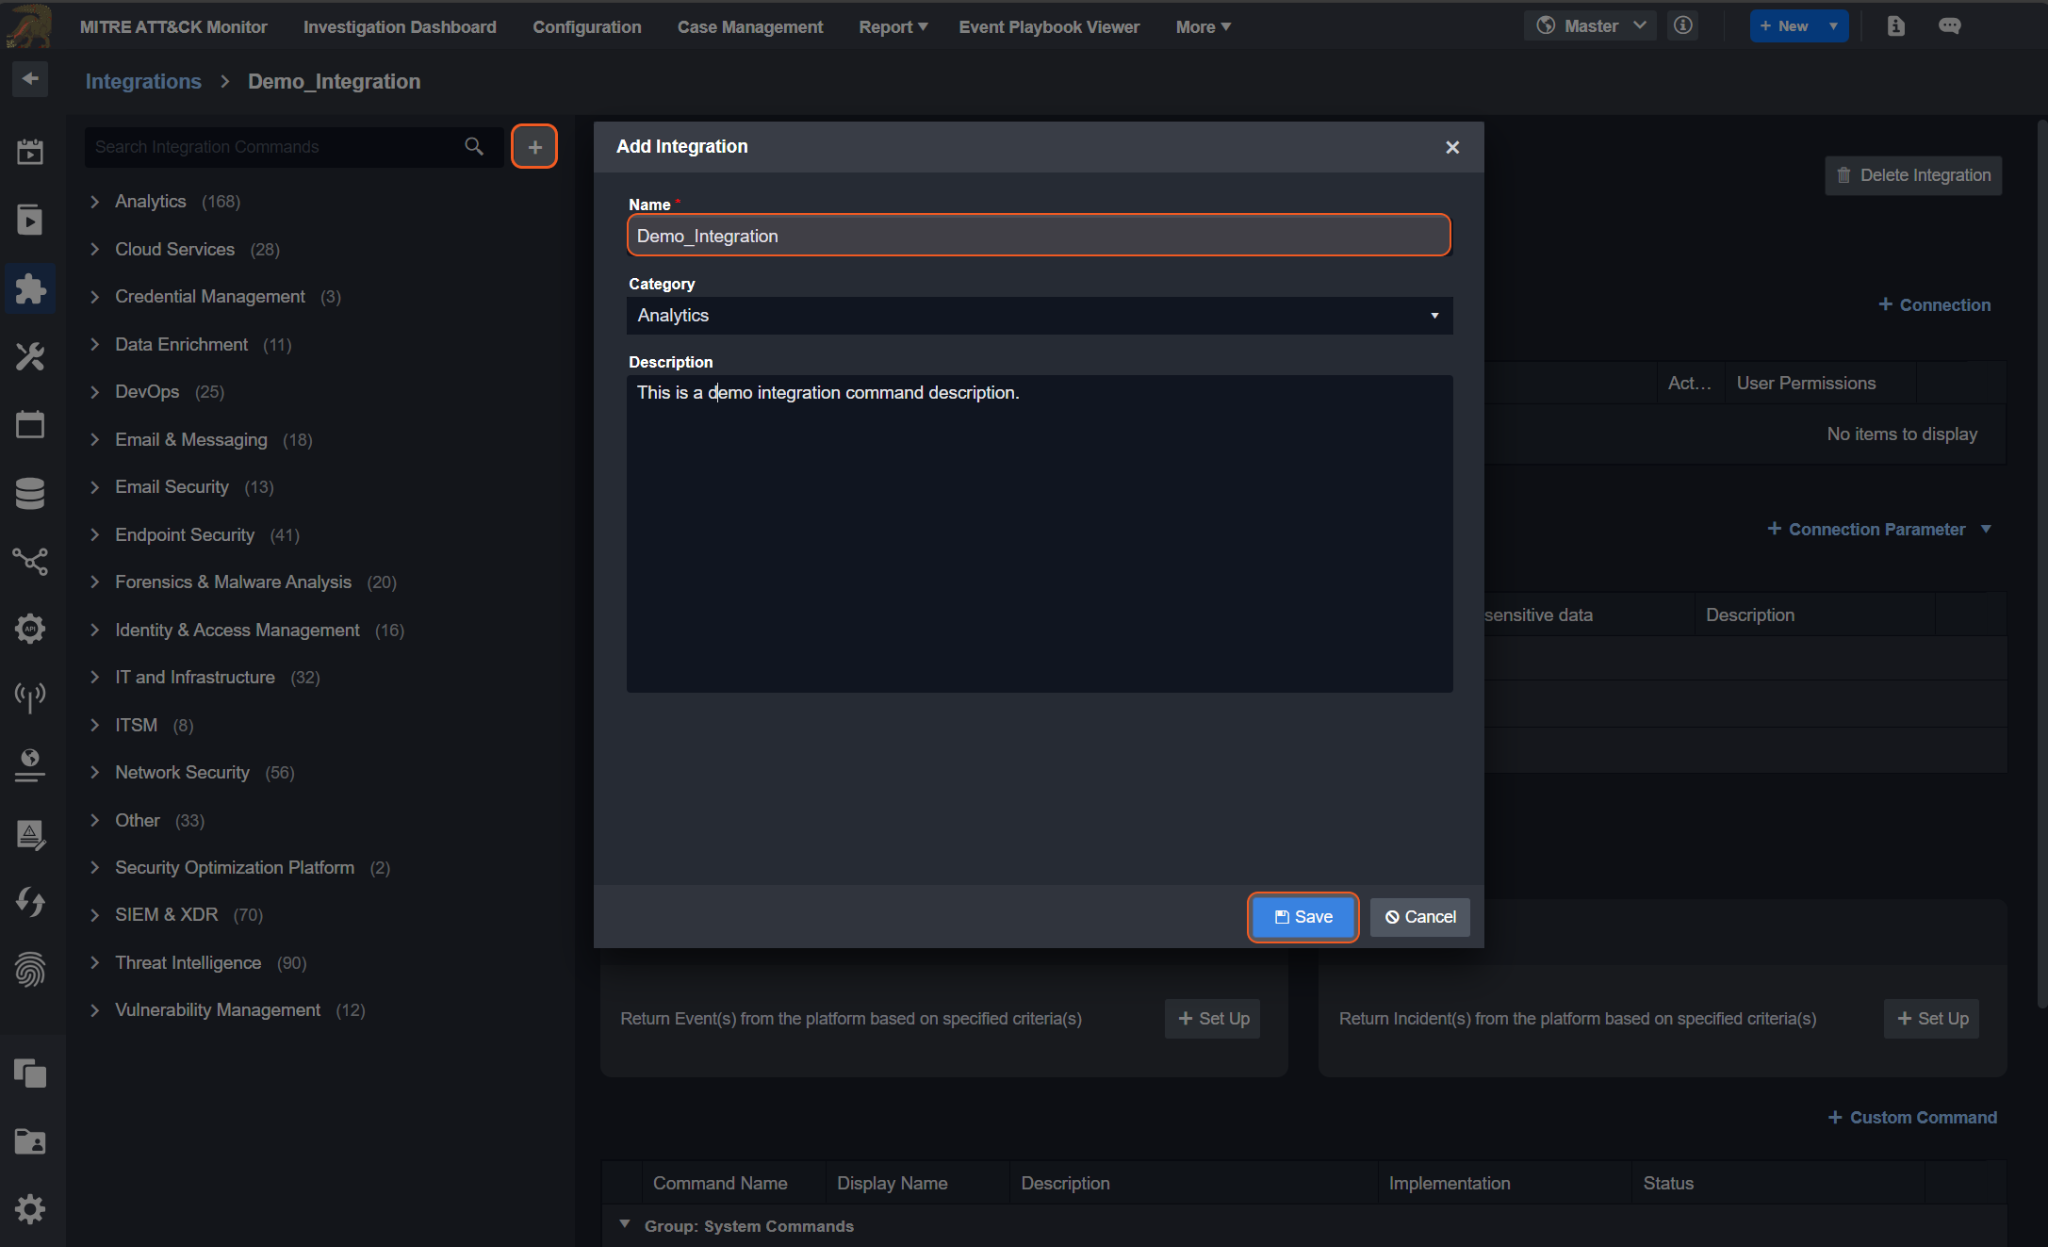
Create Custom Integration
To create your own custom integration, follow these steps:
Click on the Configuration tab at the top navigation bar.
Click on the Integration tab on the left sidebar.
Click on the + button next to the search field, underneath the breadcrumb.
Enter in a unique integration name. You may also optionally choose a more appropriate category and provide a description
Click the Save button.
READER NOTE
You must choose a unique integration name. Changing the integration name will result in changes in all Webhook URLs of the commands under this integration.
For custom integrations, there are no system commands and scripts — this means you will have to create your own commands. For more information on commands, see Integration Commands.
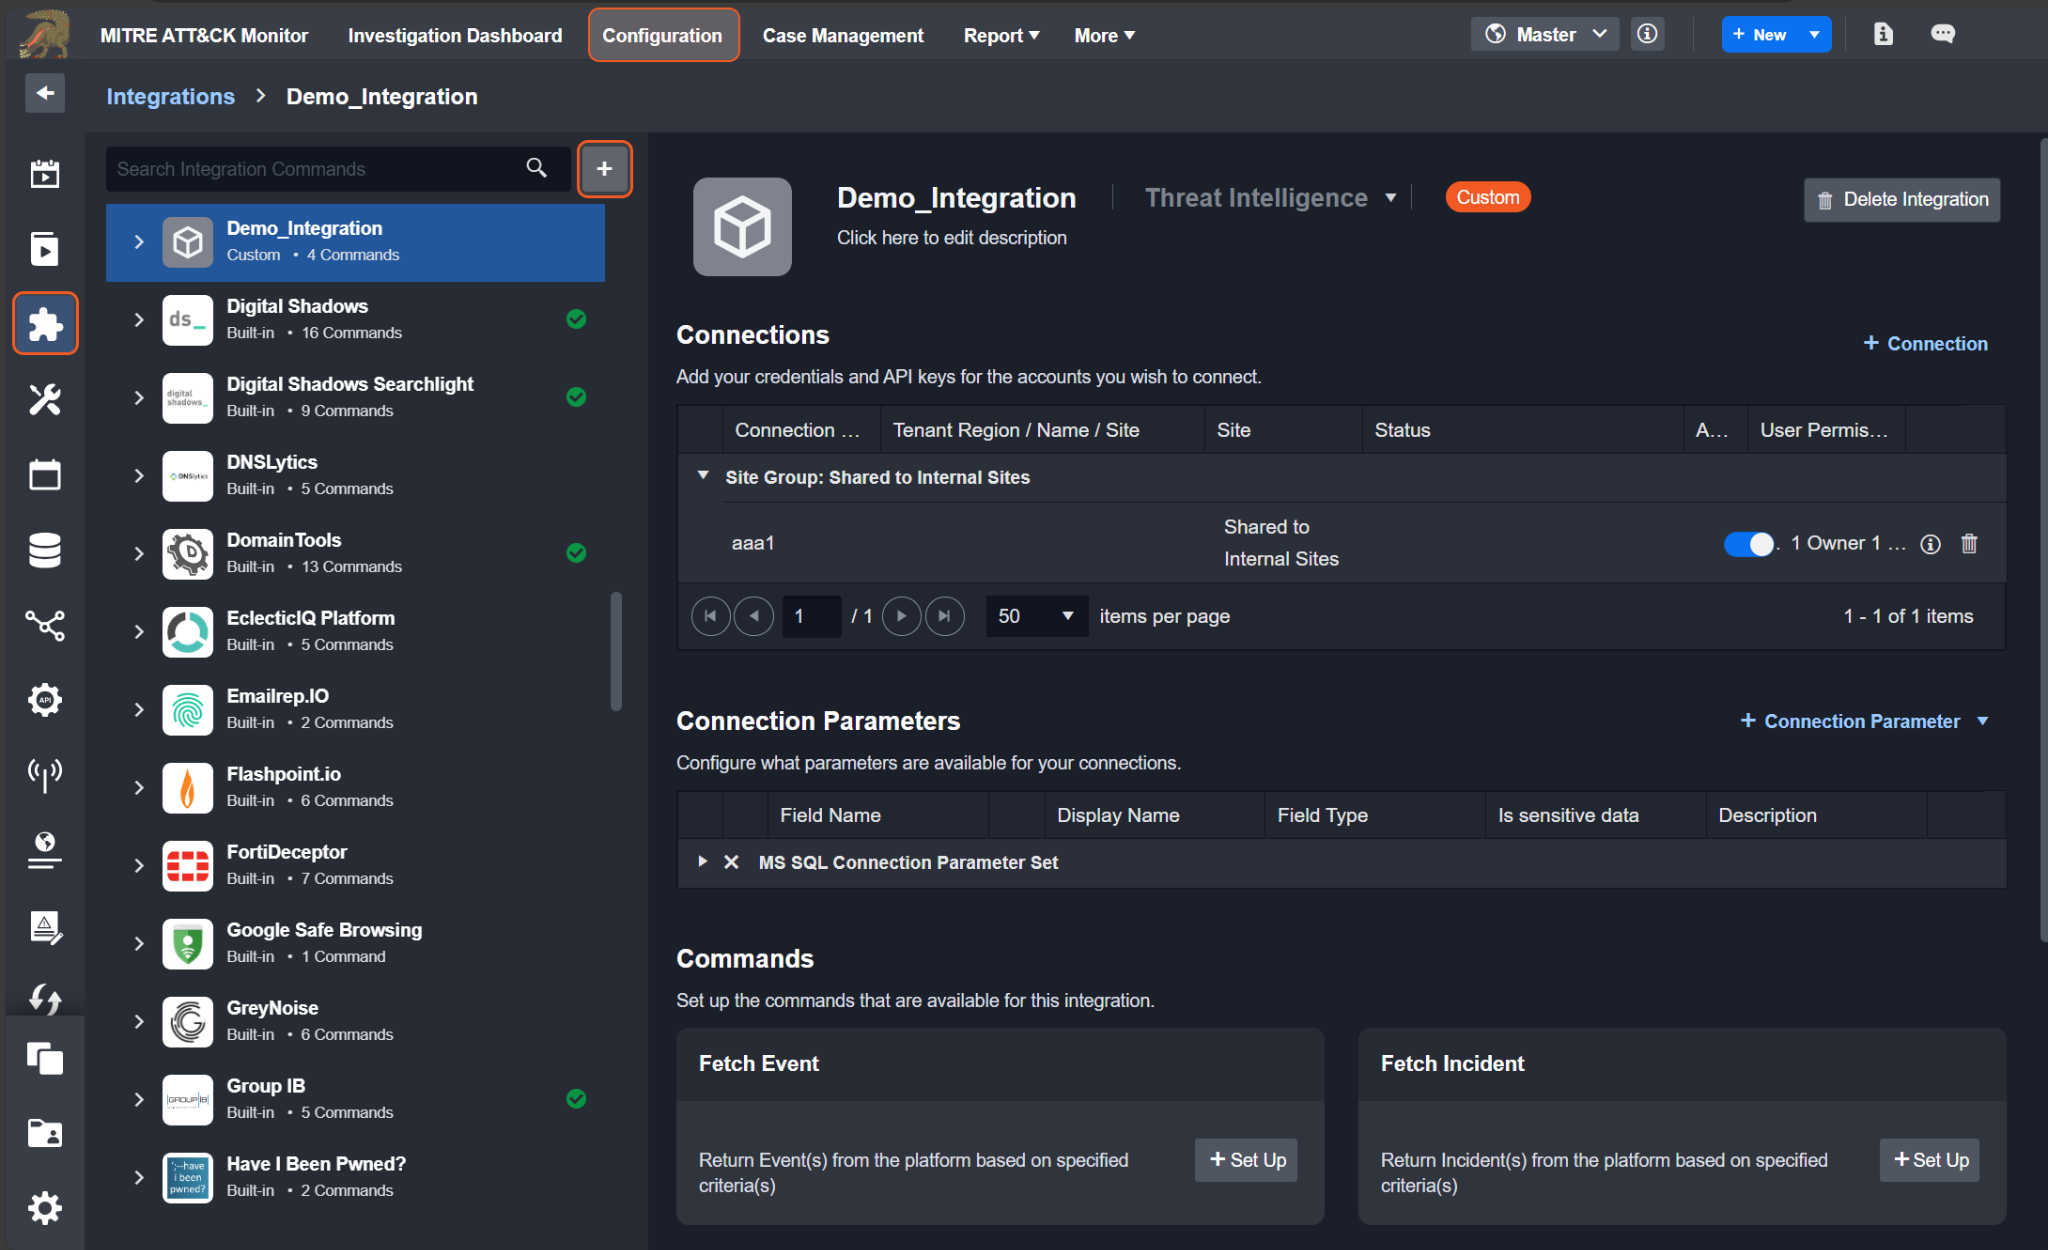
Configure Integration Connection
Connection Parameters
To enable your integration, you need to establish a connection for API calls. The initial stage of configuring an integration involves setting up the connection parameters. You will need to include either a custom parameter or choose from a set of predefined parameters.
In the integration script, the global variable runtime['connector'] holds a dictionary containing connection parameters. The keys for these parameters are lowercase and without spaces, like runtime['connector']['serverurl'] or runtime.get("connector").get("serverurl", "").
READER NOTE
For more information on creating custom connection parameters, see Custom Connection Parameter. For more information on adding connections, see Add Connections.
Preconfigured Connection Parameter Sets (MS SQL / Oracle / MySQL / ODBC)
By default, a newly created integration will not have any connection parameters.
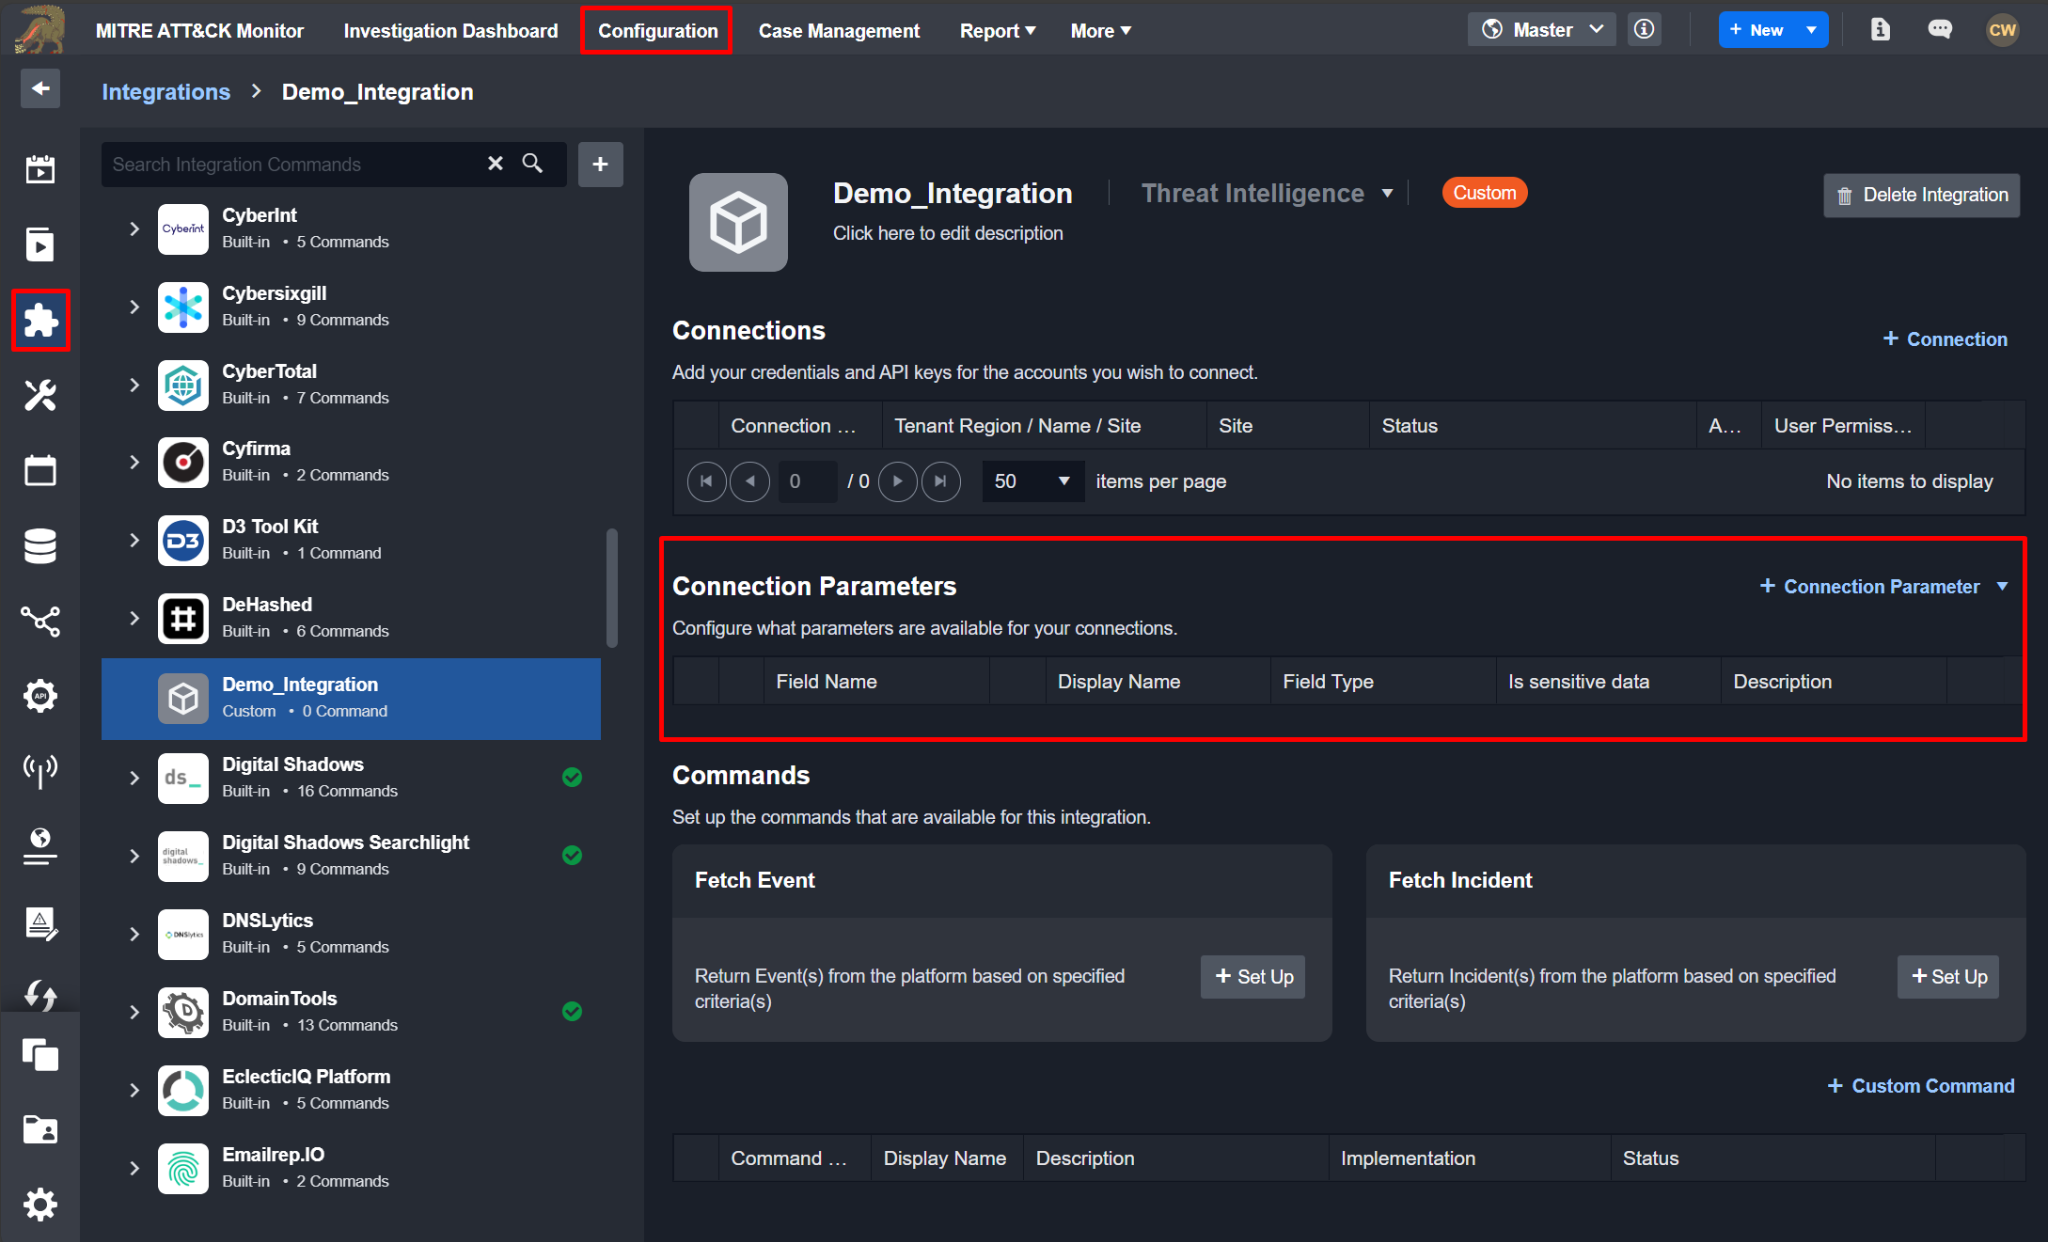
To establish a connection parameter, set up the connection by following the steps below.
Hover your cursor over the + Connection Parameter dropdown.
Click on your desired connection parameter set.
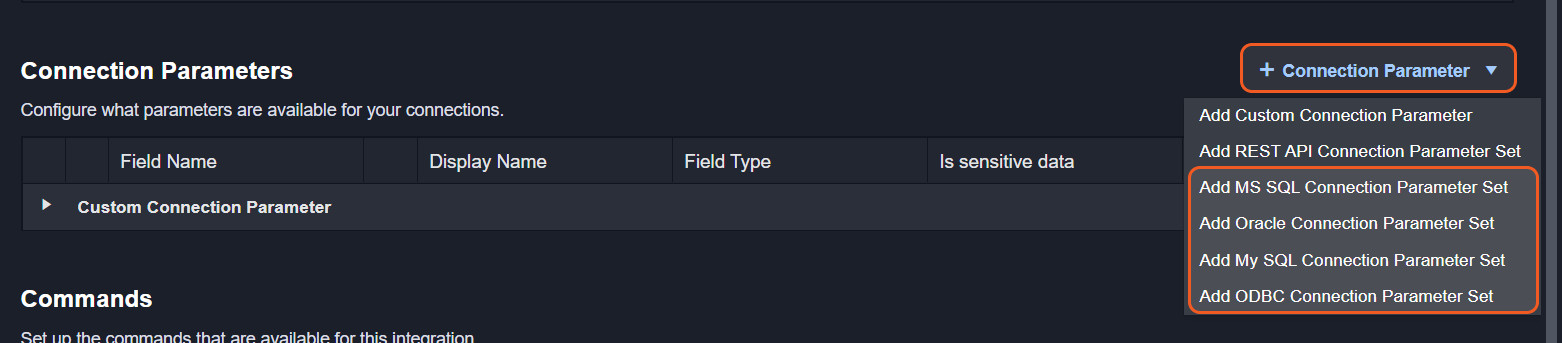
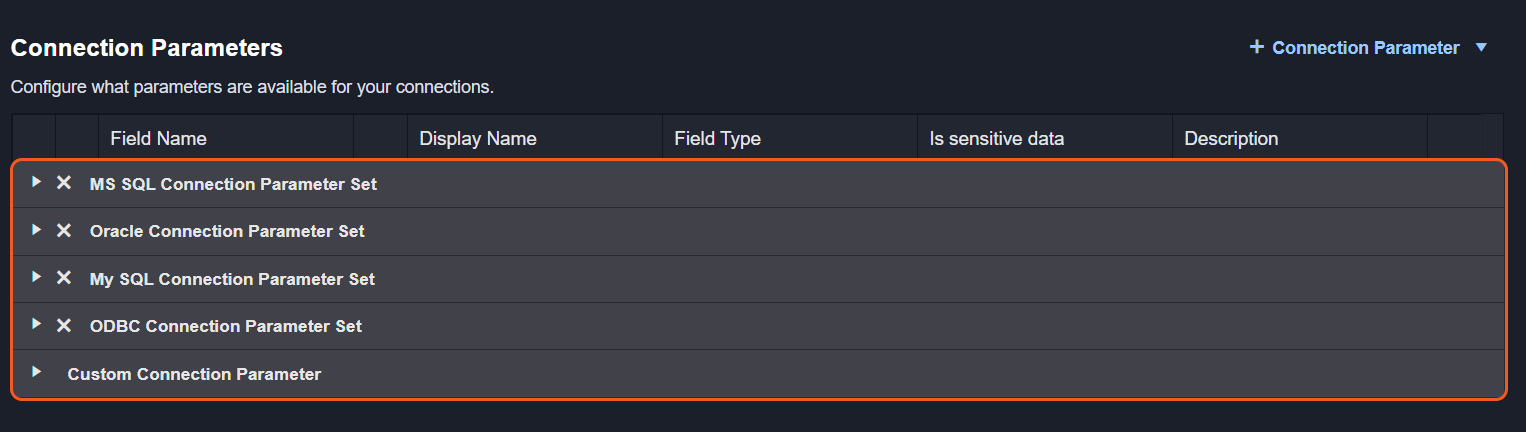
You will now see a row populated under the headers of the Connection Parameters table.
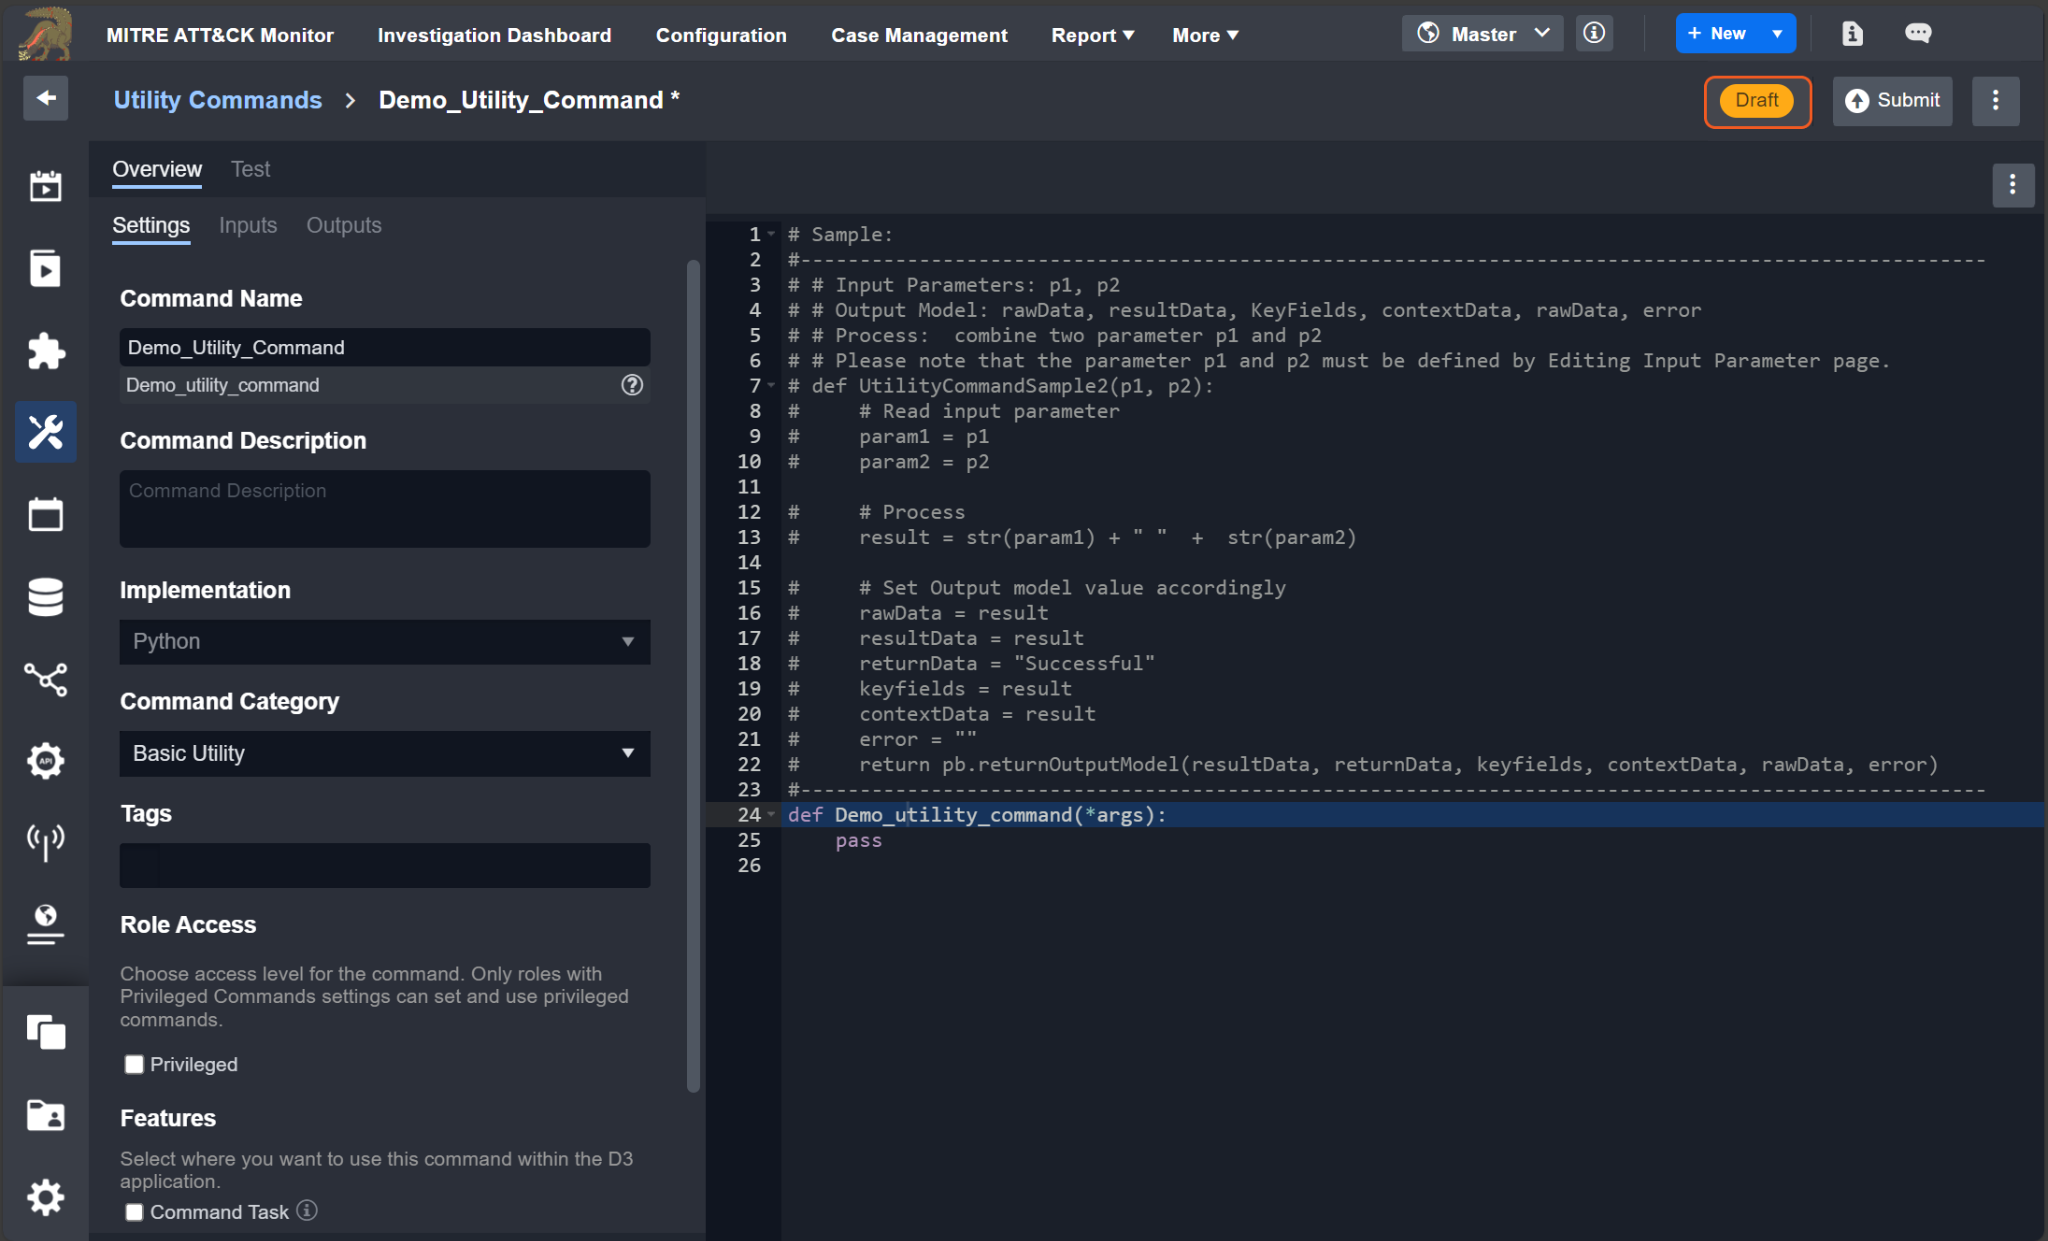
Create the Custom Command
Setup Command Features
In the Overview > Settings tab of the integration command level, you will find the Features section, comprising five checkbox options. These options dictate the availability of the command across the system. To enhance accessibility, D3 suggests checking all options whenever feasible, expanding the command's reach to multiple areas within the system. Select at least one feature in order to use the command (not required if solely triggered by a schedule).
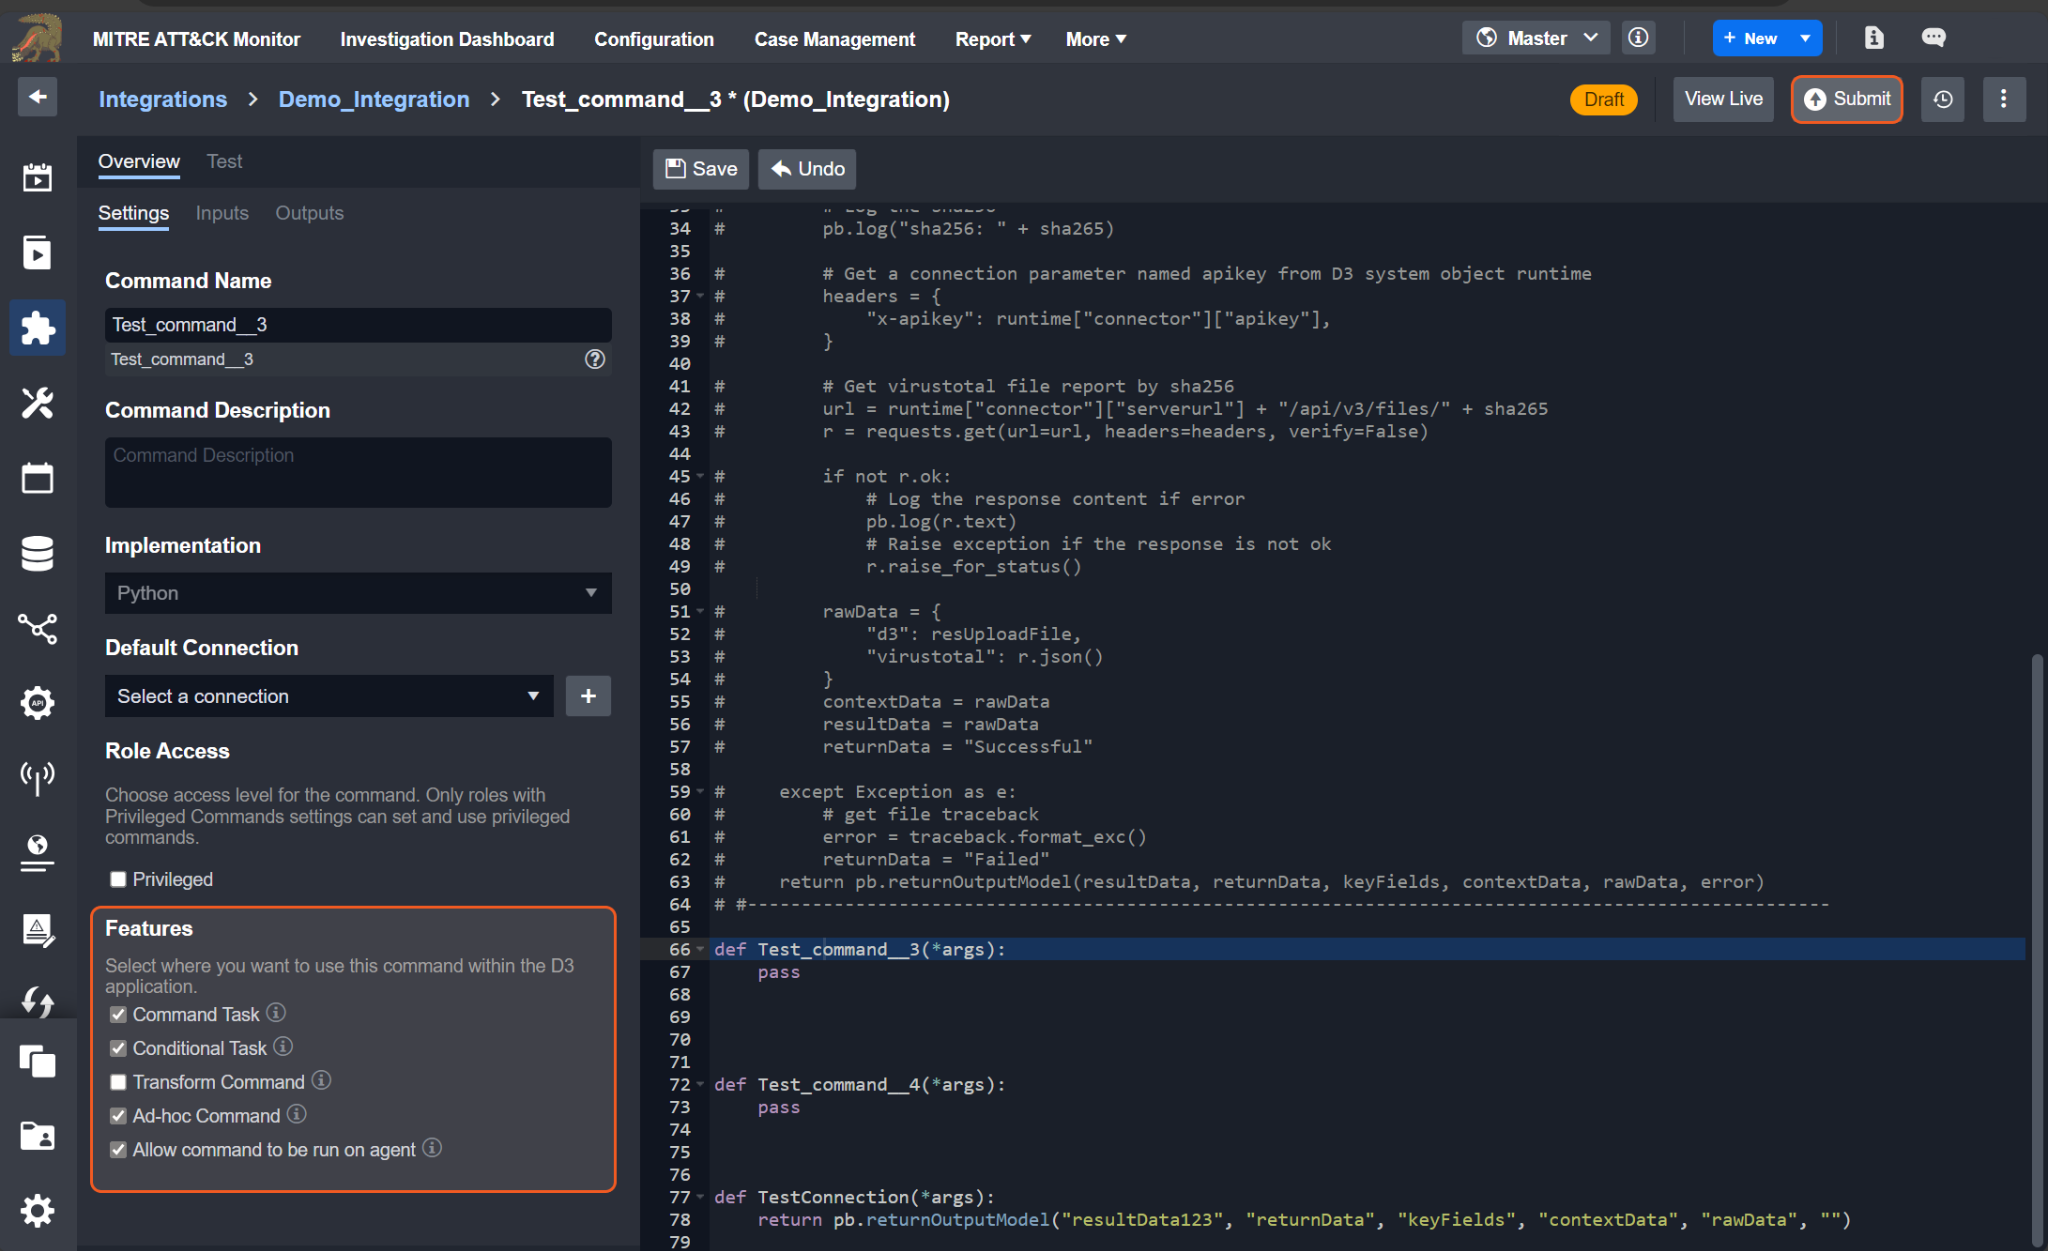
The Default Connection is required to enable use of the Transform Command feature.
Features | Usage |
Command Task | This command can be used in the Playbook Command Task. |
Conditional Task | This command can be used in the Playbook Conditional Task. |
Transform Command | This command can be used for data transformations when configuring a Codeless Playbook. This feature is only available for commands that do not require any manual user. |
Ad-Hoc Command | This command will be available in the command line toolbar within the Incident Workspace. |
Allow command to be run on agent | When checked and agent(s) are specified in the connection, the command will be run on an agent. Please refer to the Agent Configuration Scenarios section of the Agent Management document for detailed information. |
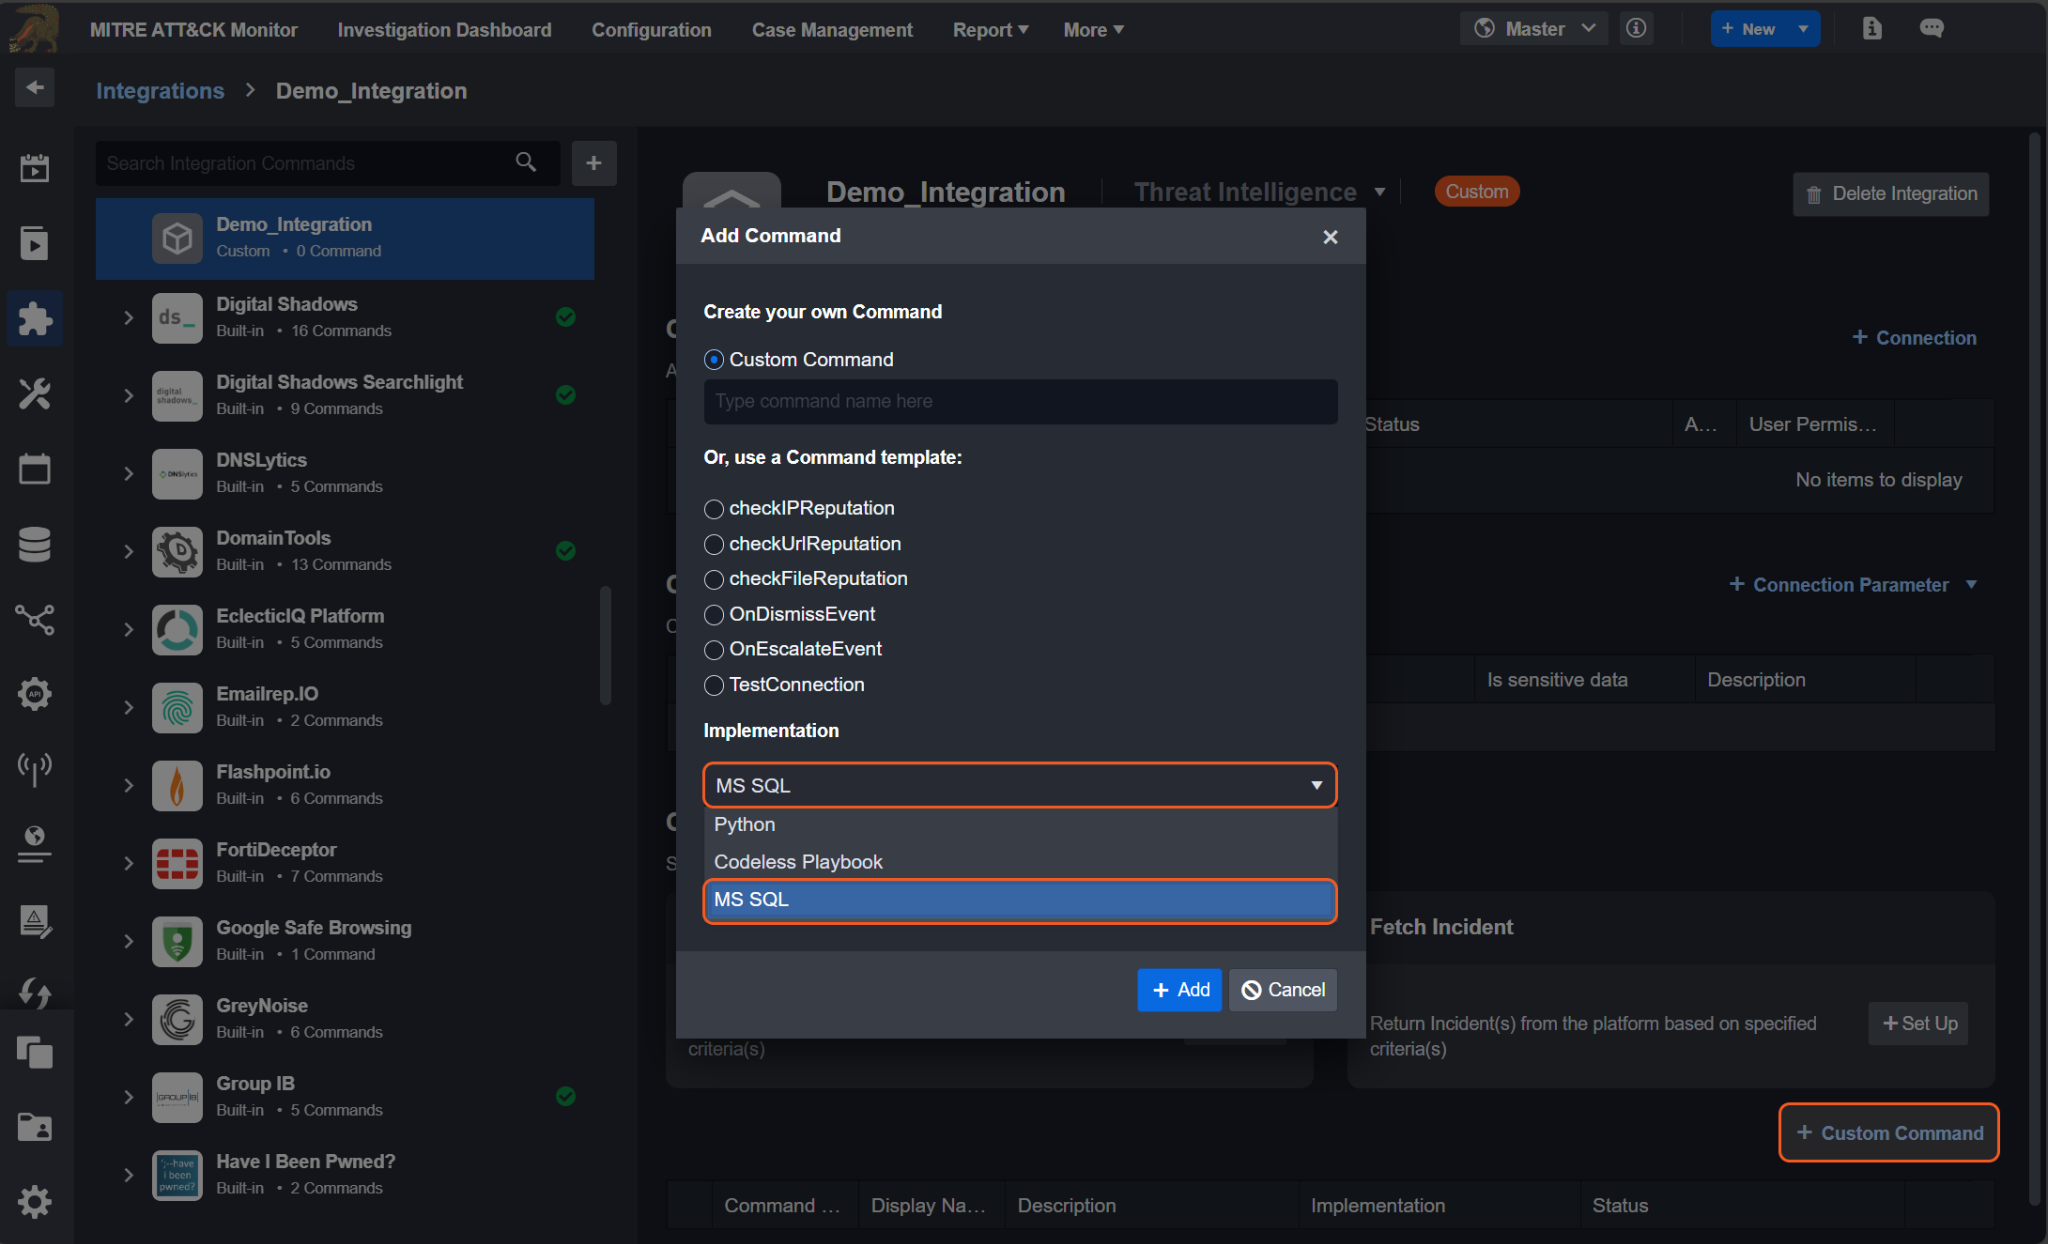
MS SQL / Oracle / MySQL / ODBC
Upon setting up the connection parameter sets, users will be able to see MS SQL/Oracle/MySQL/ODBC as an implementation option in the modal Add Command form. To render this form, click on the + Custom Command button within the Commands section.
Command Input Setup
To add a new input parameter:
Click on the Inputs tab within the Overview tab.
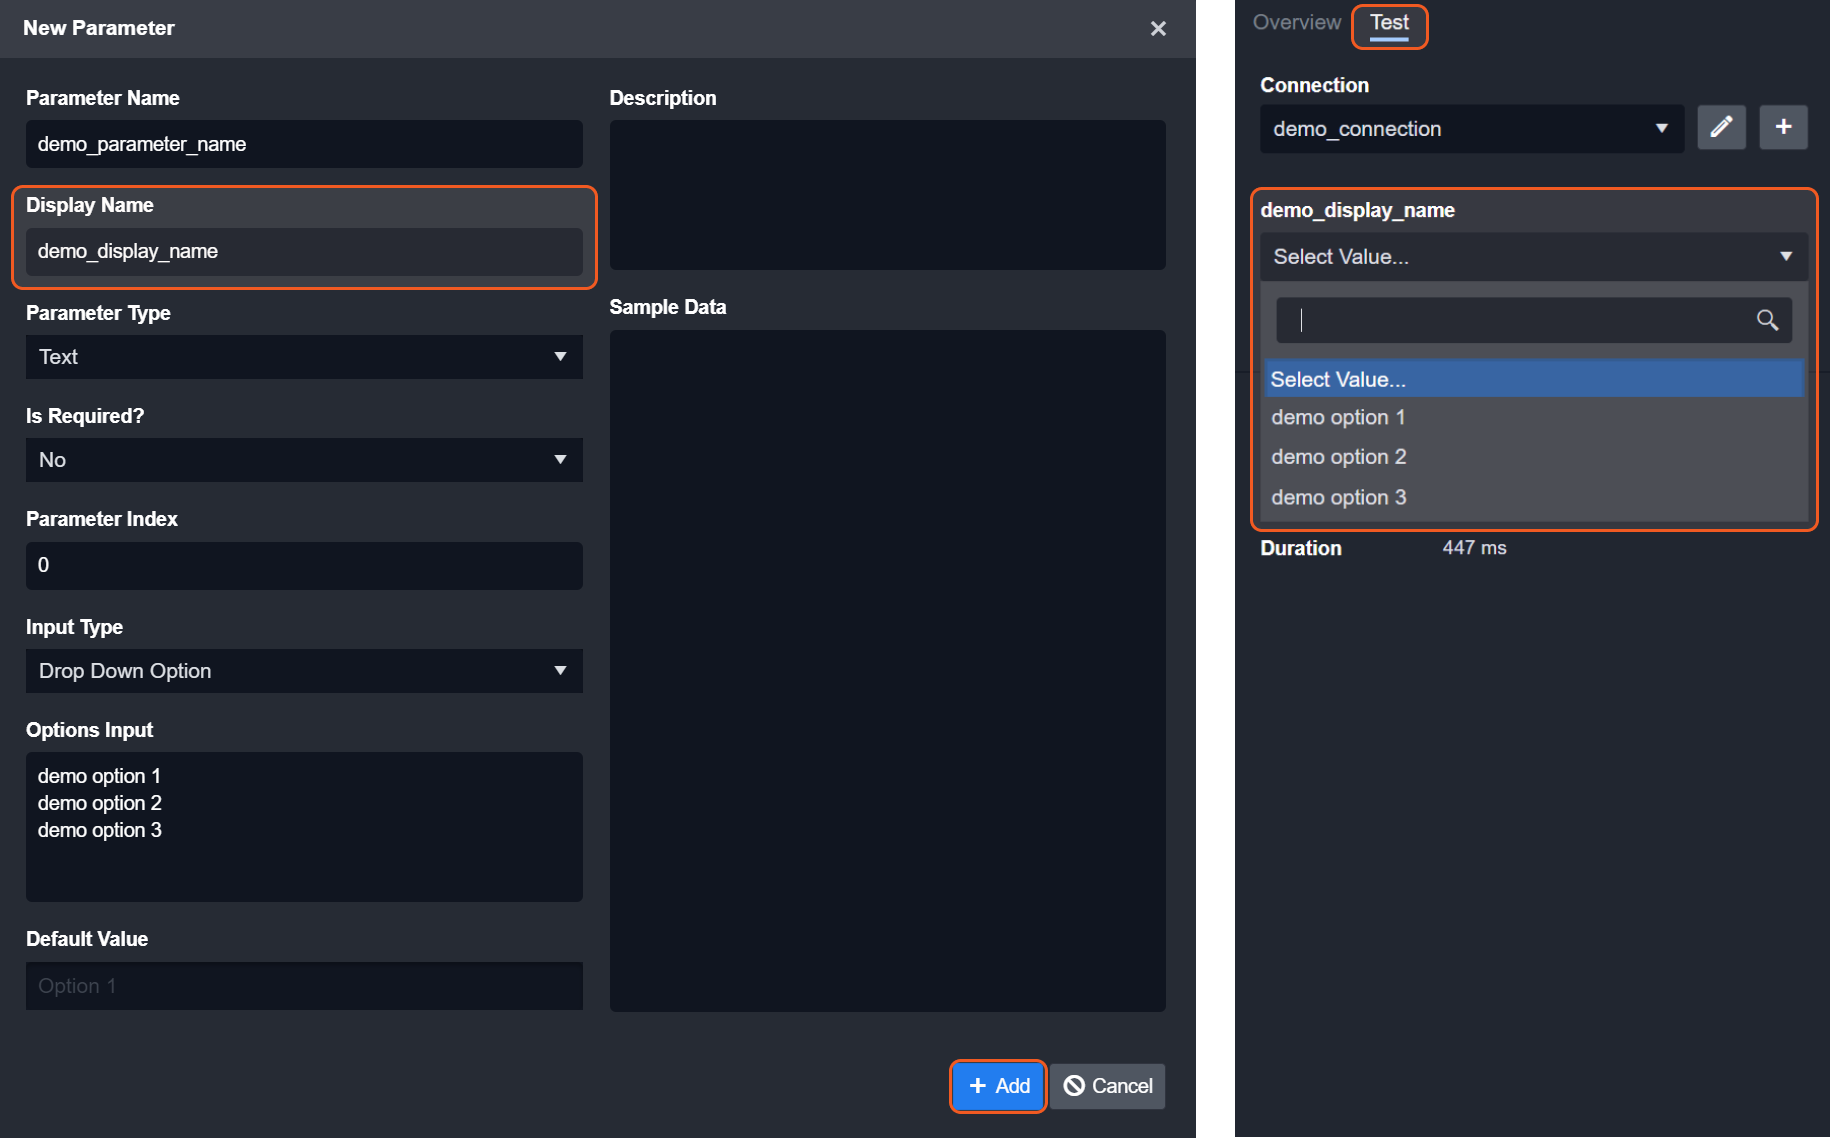
Click on the New Input Parameter button.
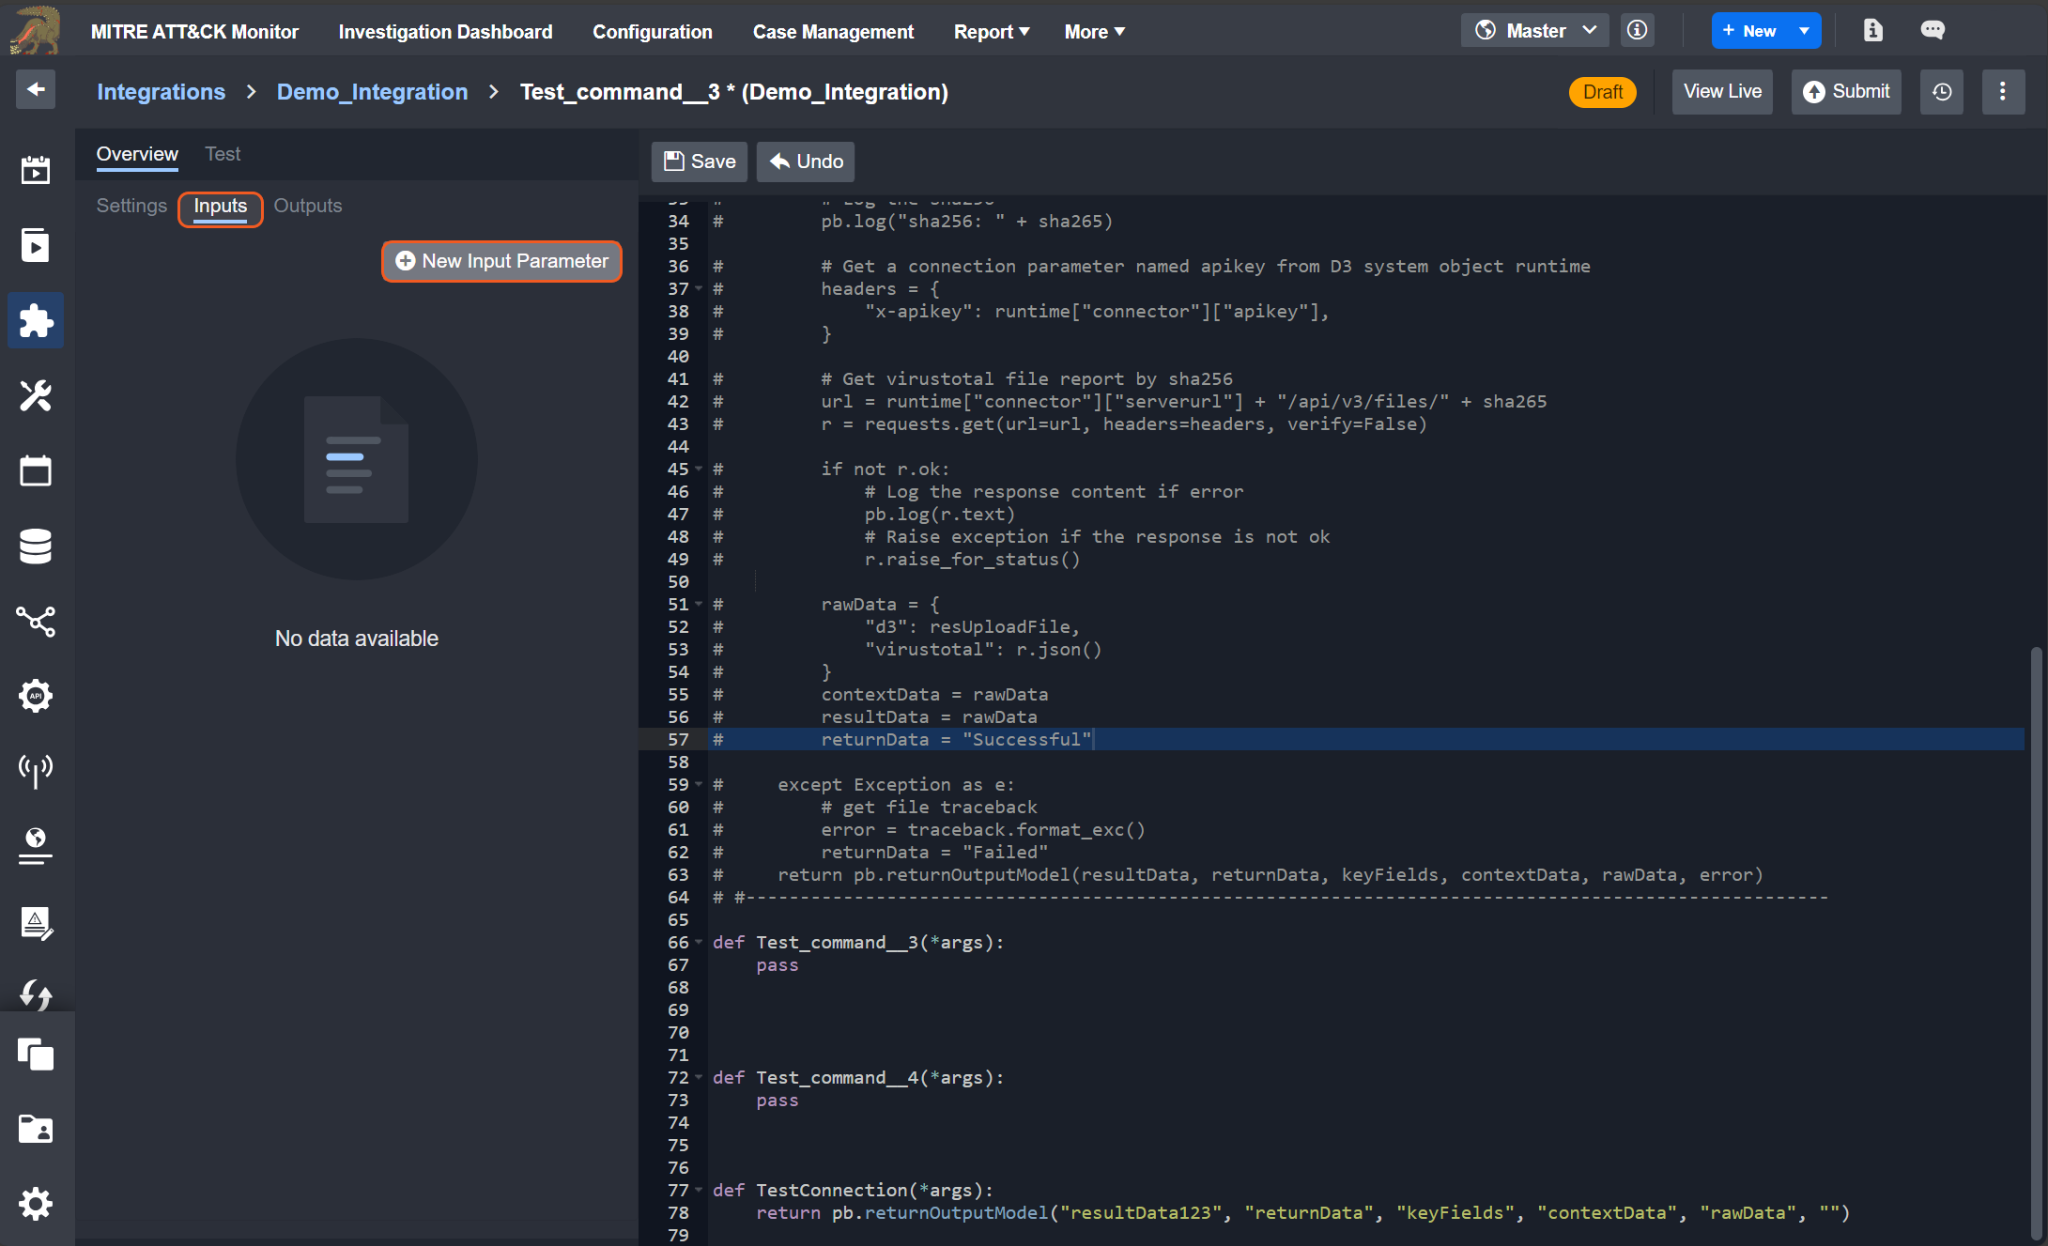
In the New Parameter popup, you will see nine or ten fields depending on the input type.
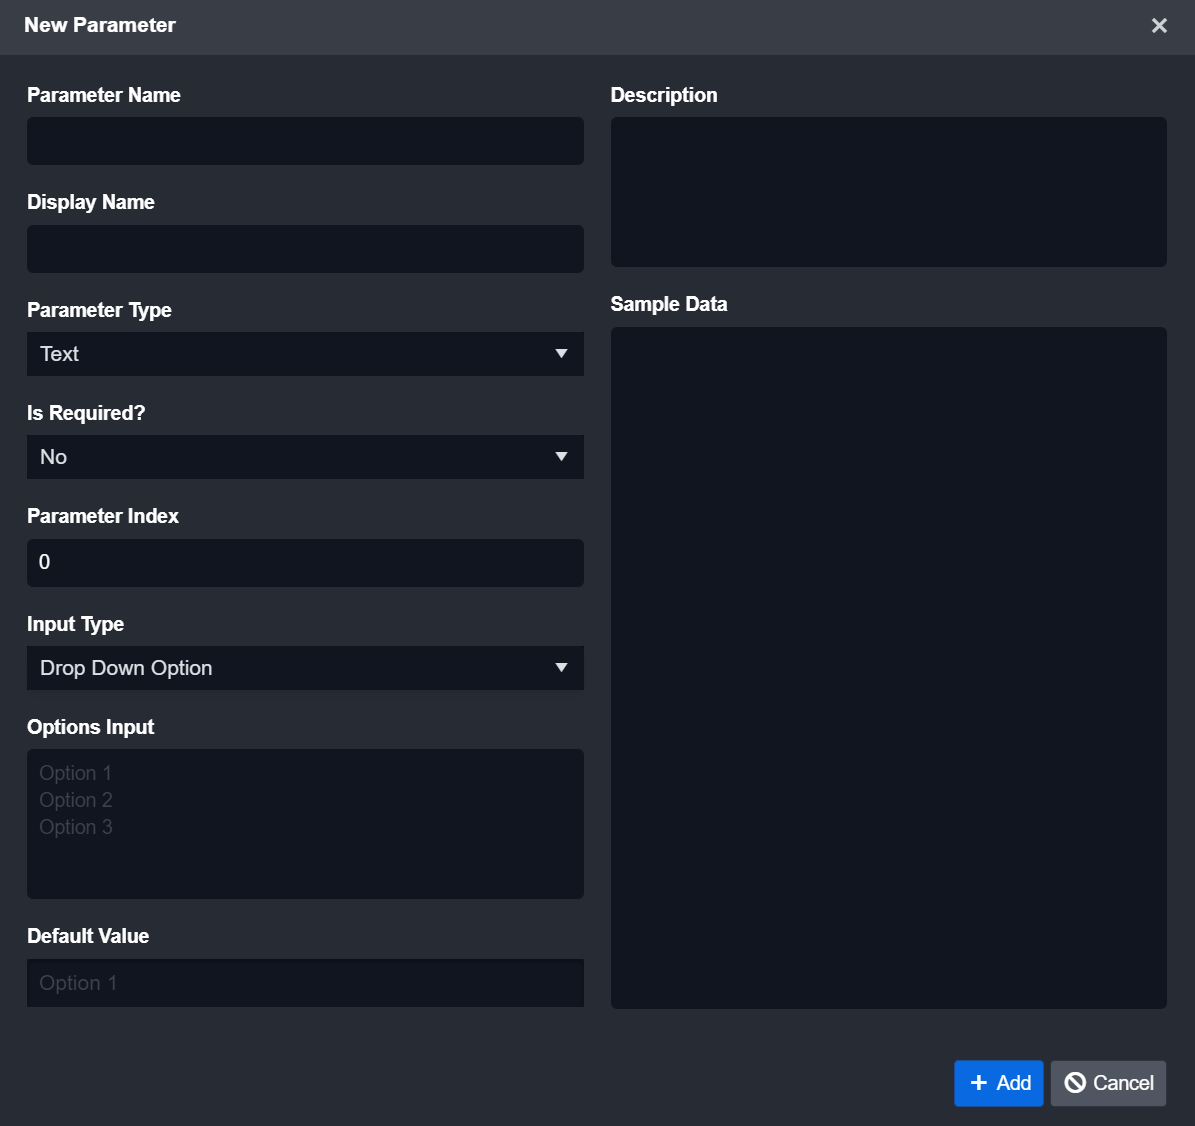
Field | Description |
Parameter Name | The internal identifier assigned to a parameter. It is an identical match to the parameter name in the function definition. |
Display Name | The display name of the parameter. |
Parameter Type | The data type of the parameter. 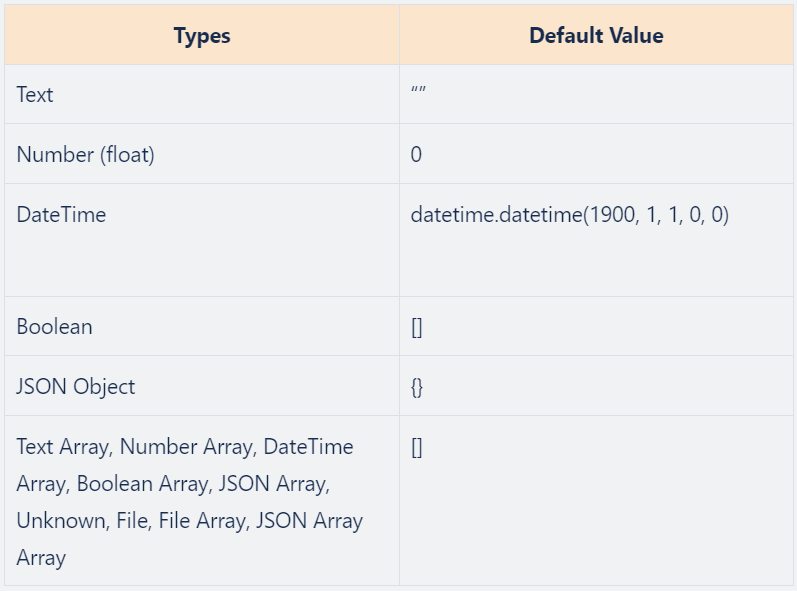 |
Is Required? | Whether or not the parameter is required when running the command. |
Parameter Index | The order of the parameter, starting from 0. |
Input Type | The data type of this parameter. Input Type Options:
|
Options Input | The options to appear in the input field; these should be listed with each option input on a separate line. |
Default Value | Whether the parameter has a default value. It can be empty. |
Description | The description of the parameter. |
Sample Data | Sample data of the parameter. |
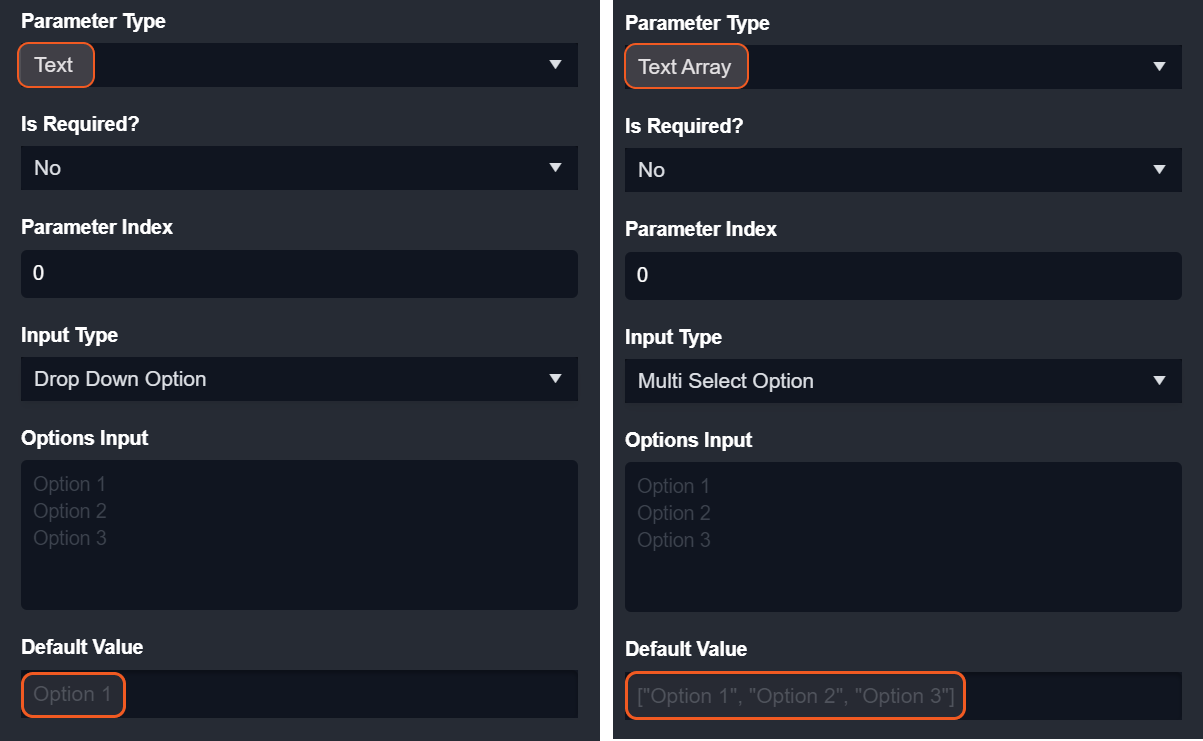
The parameter type dynamically adjusts based on the selected input type. The default value format will also adapt accordingly – adhere to the one shown in the placeholder.
To observe the dynamically generated input field:
Fill in the appropriate fields within the New Parameter popup.
Click on the + Add button of the New Parameter popup.
Click on the Test tab next to the Overview tab.
The newly added test input field will now be positioned beneath its display name.
Command Output Setup
To set up the command output:
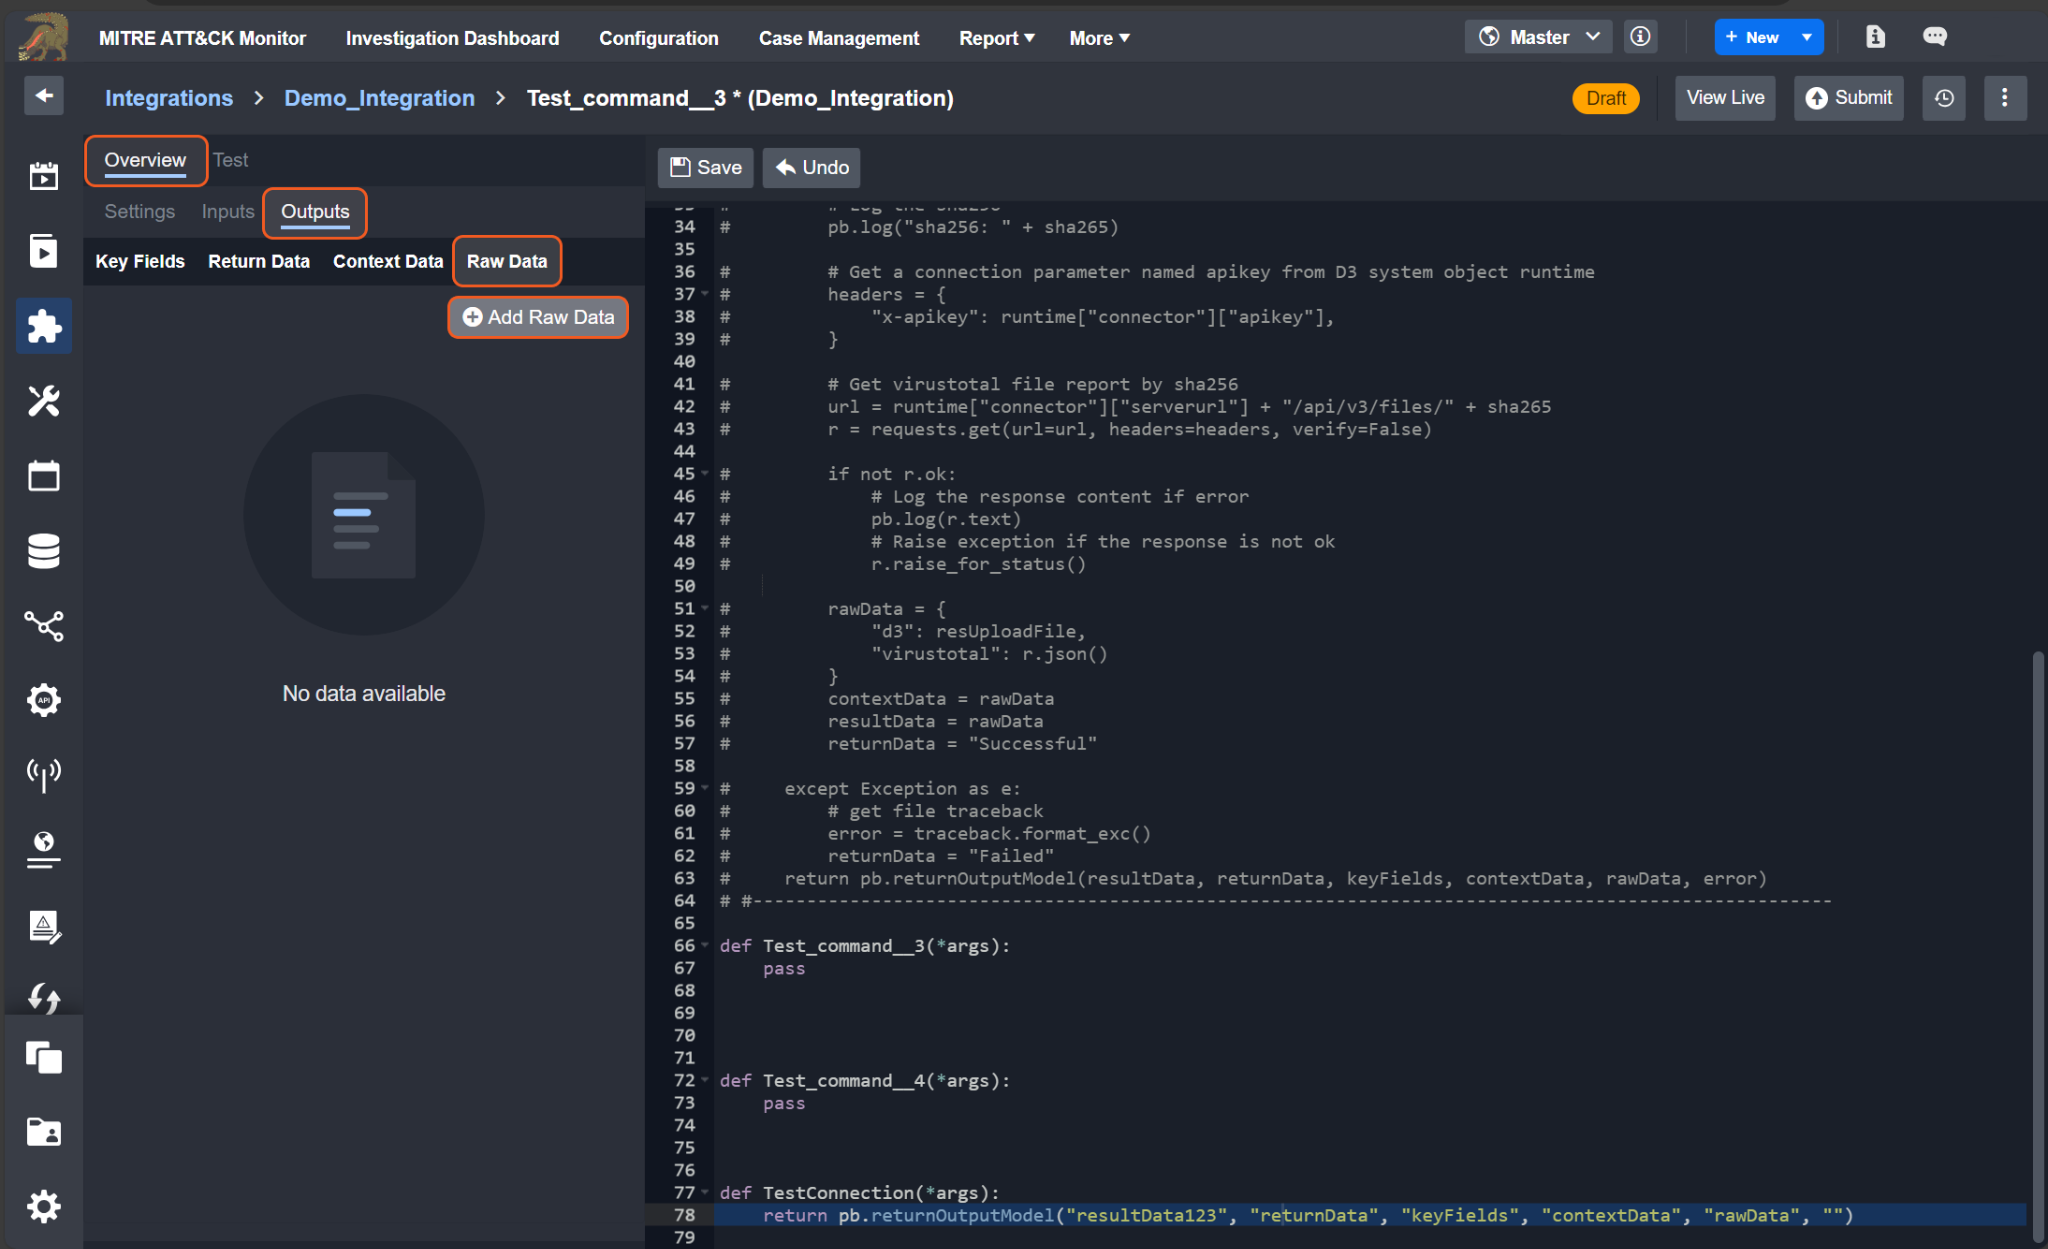
Click on the Overview tab.
Click on the nested Outputs tab.
Click on the Raw Data category.
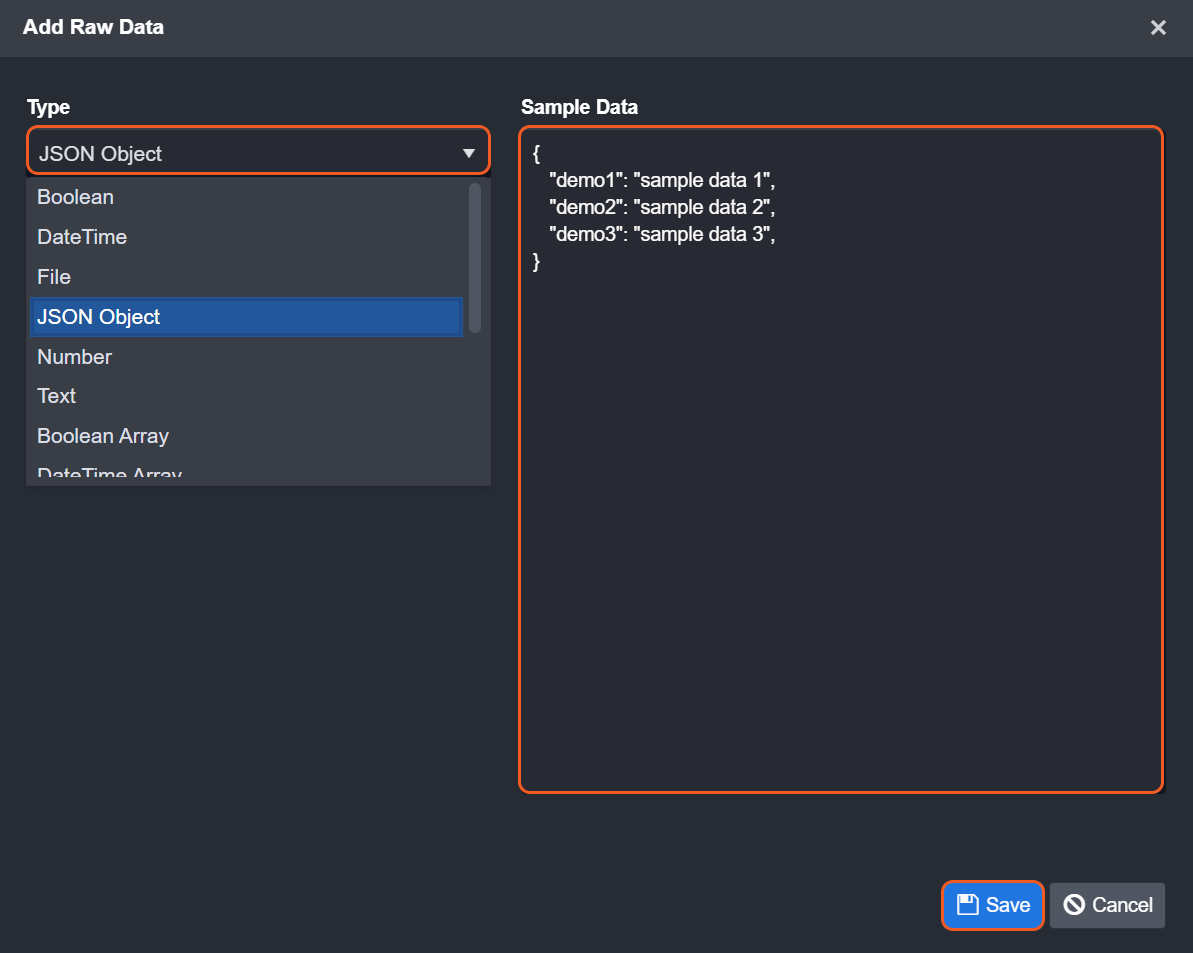
Click on the + Add Raw Data button.
Select the data type and input sample data accordingly.
Click the Save button.
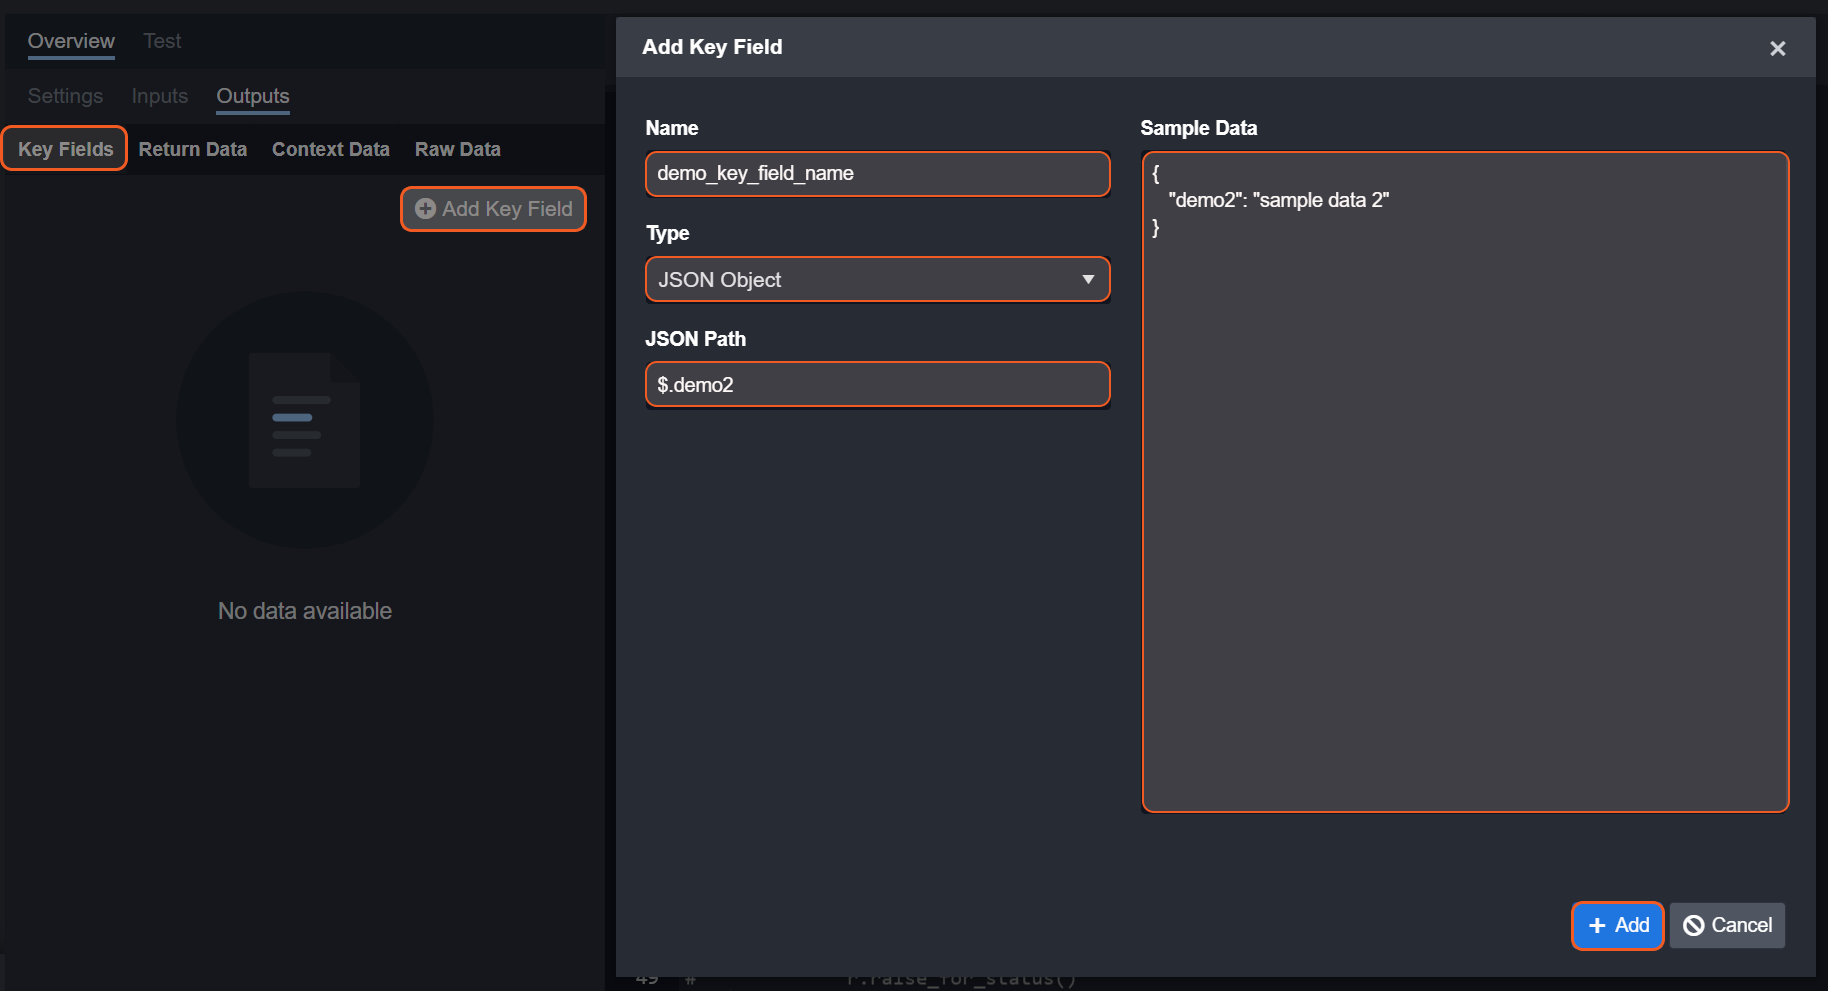
Click on the Key Fields category.
Click on the Add Key Fields button.
Enter a key field name, select the appropriate type, provide a JSON Path, and enter sample data.
Click on the + Add button.
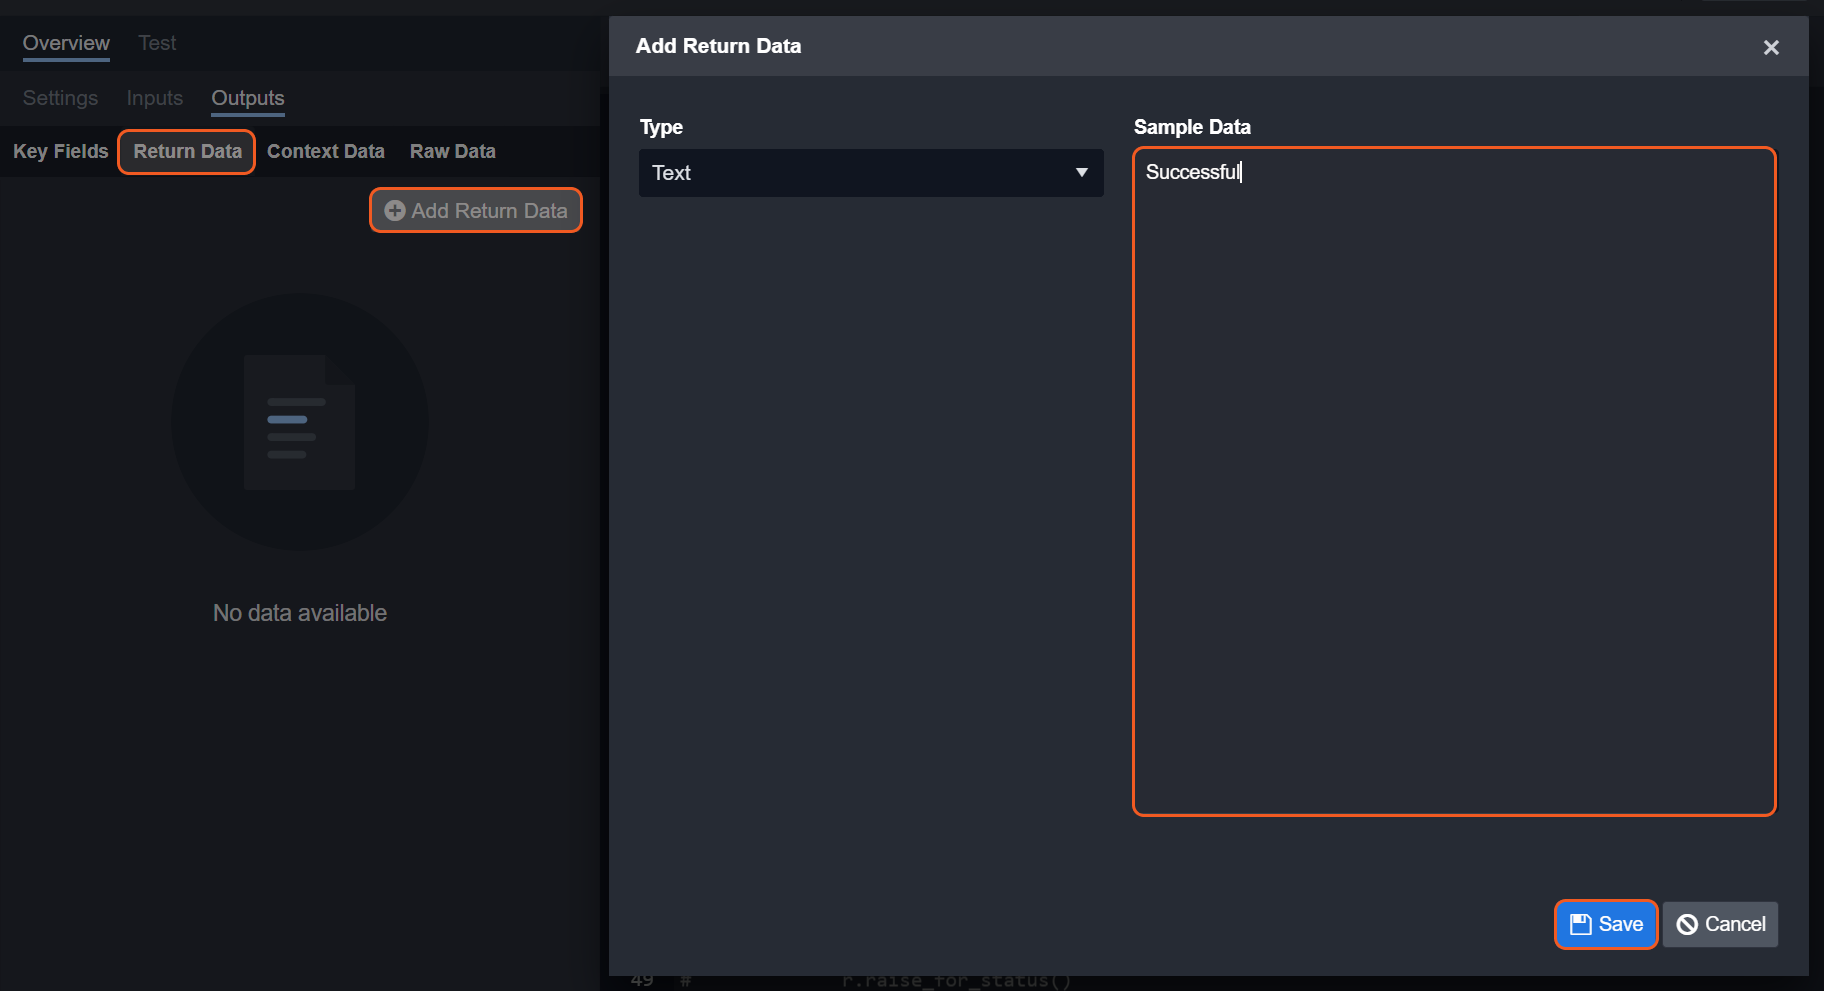
Click on the Return Data category.
Click on the Add Return Data button.
Enter “Successful”, “Failed”, or “Partially Successful” in the Sample Data section.
Click on the Save button.
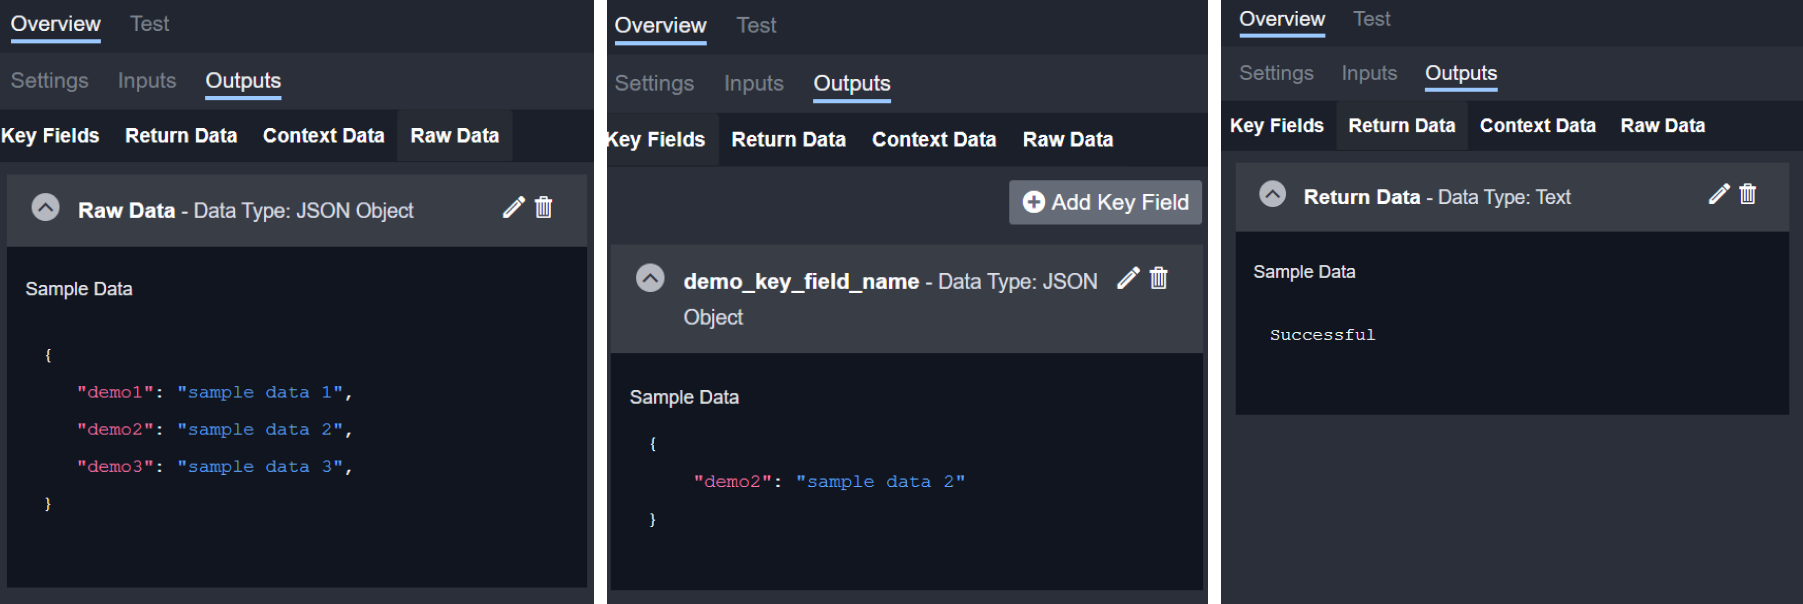
After completing these steps, you should see the output data presented somewhat similar to the following:
Write your Python Script
See Python Script below.
Clone Integration System Command
Clone Integration System Command
Integration System commands can be cloned by following these steps:
Click on the Configuration tab at the top navigation bar.
Click on the Integration tab on the left sidebar.
Search for your integration underneath the breadcrumb.
Click on your integration within the expanded accordion.
Click on the row in the Custom Commands table that you would like to clone.
Click on the Clone Command option.
If the above steps are completed successfully, you will see a new Python function displayed in the code editor. The name of this cloned command will automatically differ from the original command. Additionally, consistent with all commands, the function name will be identical to the internal name (Pascal case to the displayed command name).
-20240327-033426.png?inst-v=4d6f00ea-d563-42d6-b8c7-1a4ea4284139)
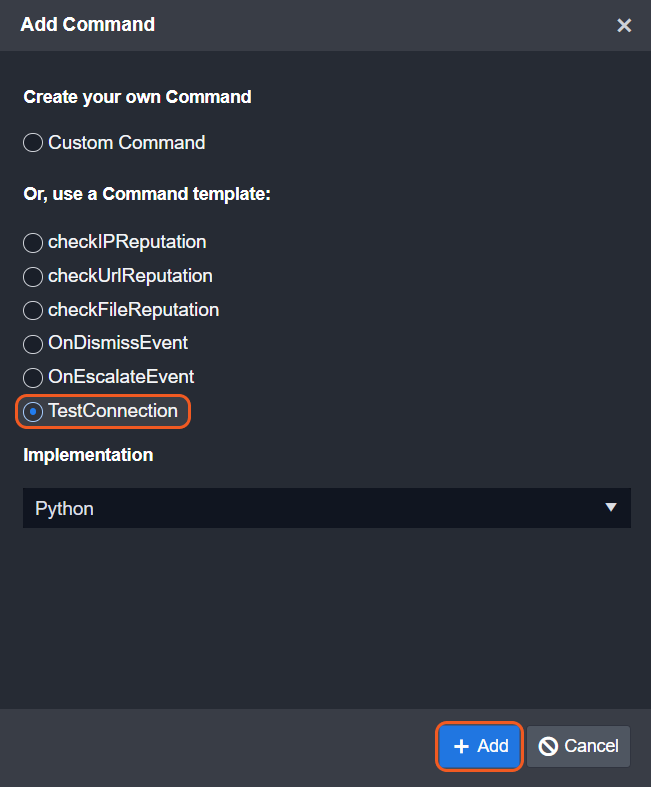
Pre-defined Custom Commands
There are six special command templates in the Add Command form:
checkIPReputation
checkUrlReputation
checkFileReputation
OnDismissEvent
OnEscalateEvent
TestConnection
Here we will focus on the last one, TestConnection.
Connection (TestConnection) Custom Command
The TestConnection command is used to verify the ability or health status of the D3 system to communicate with an external one (ie. an integration). To render the Add Command form, click on the + Custom Command button within the Commands section.
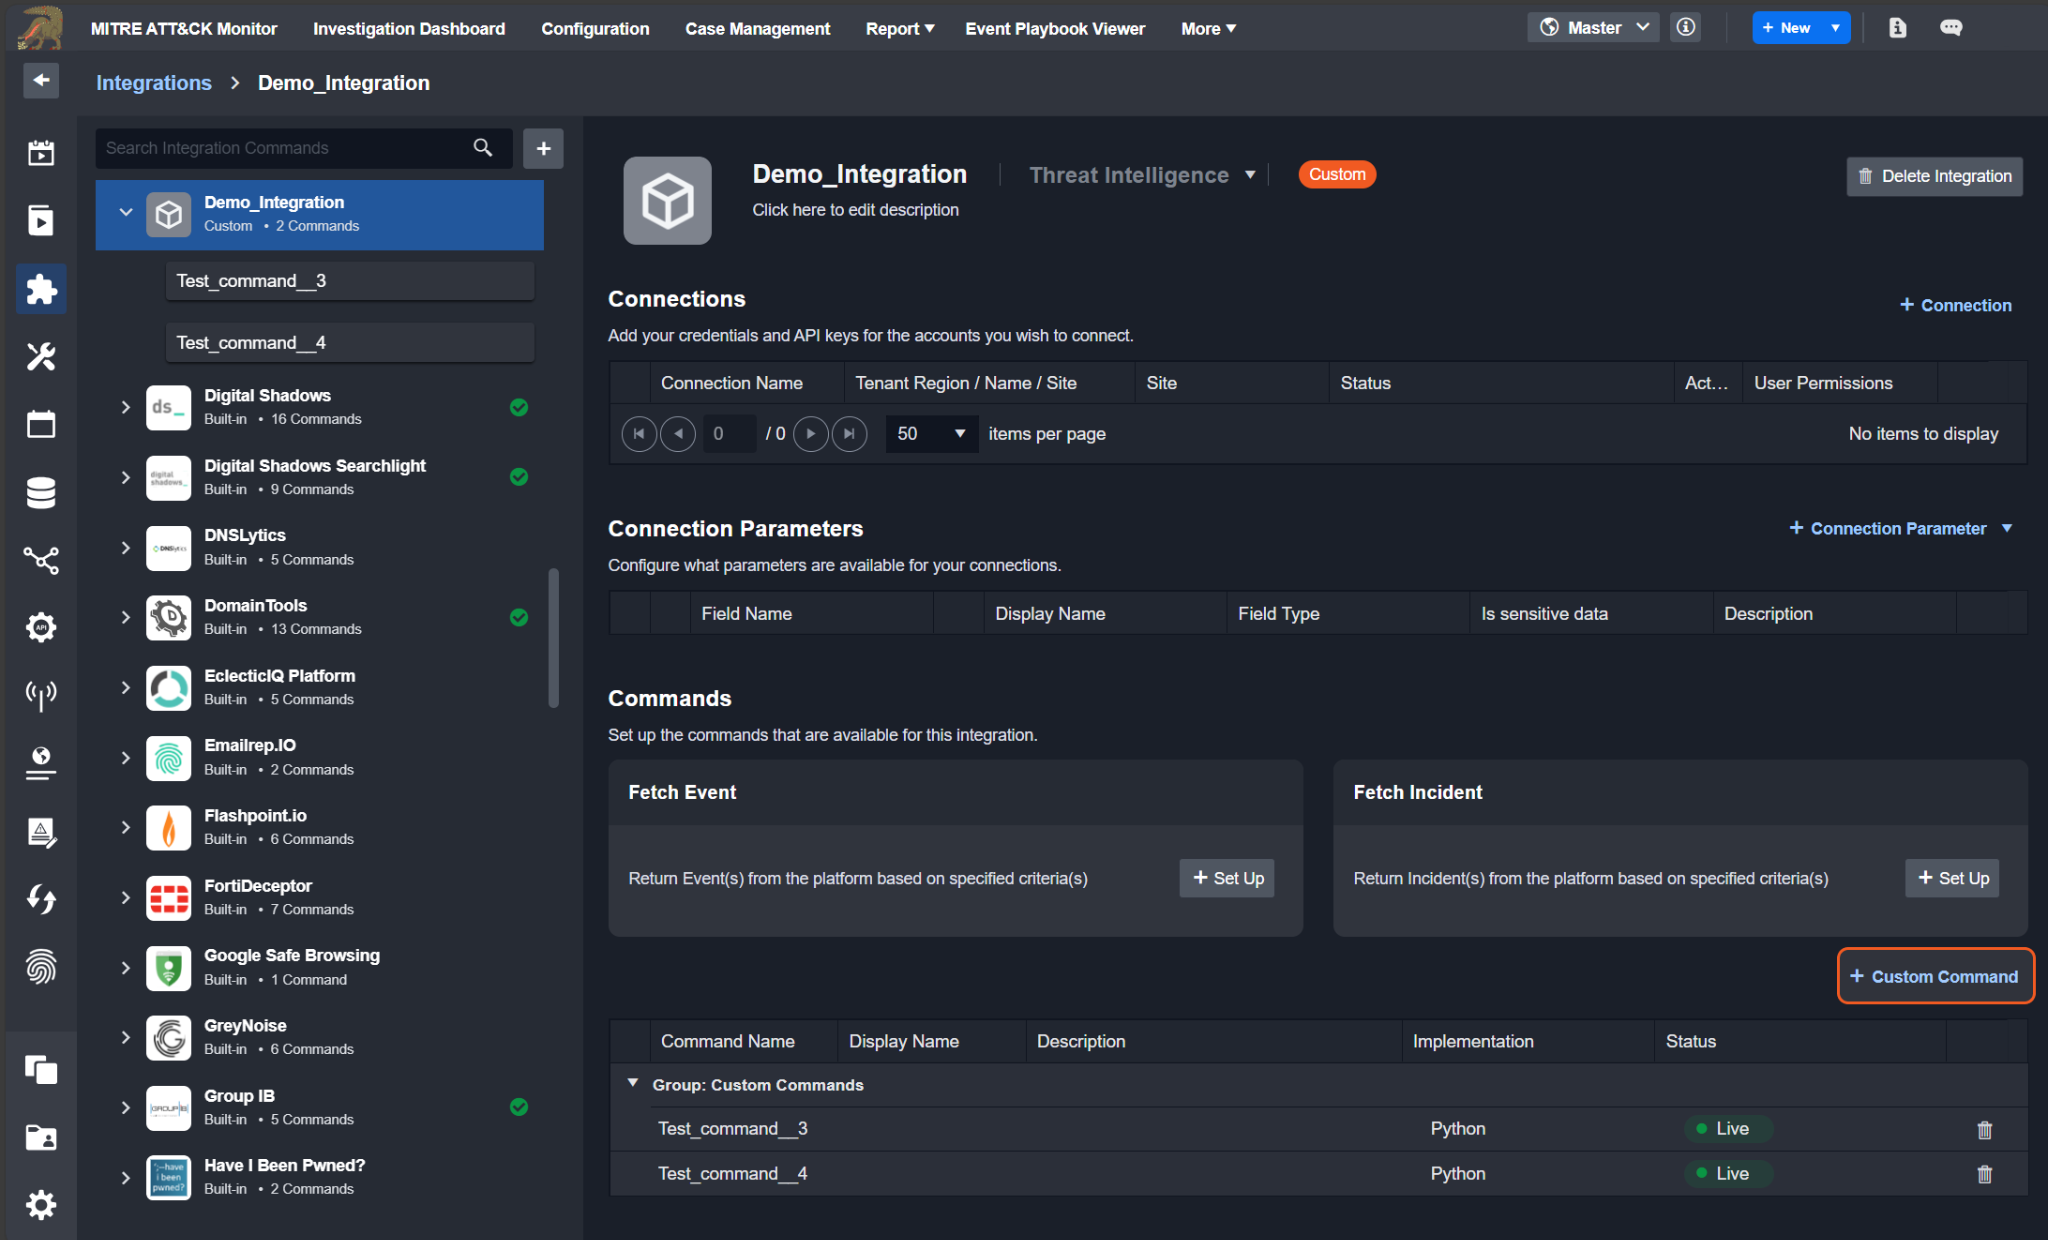
The TestConnection will appear as the last option under the command template section.
Click on the + Add button to enable the test connection functionality.
You will be redirected to the Python editor page. Here, consistent with integration commands, there will be a function name for the test connection identical to its internal name (Pascal case to the displayed command name). Click on the Submit button.
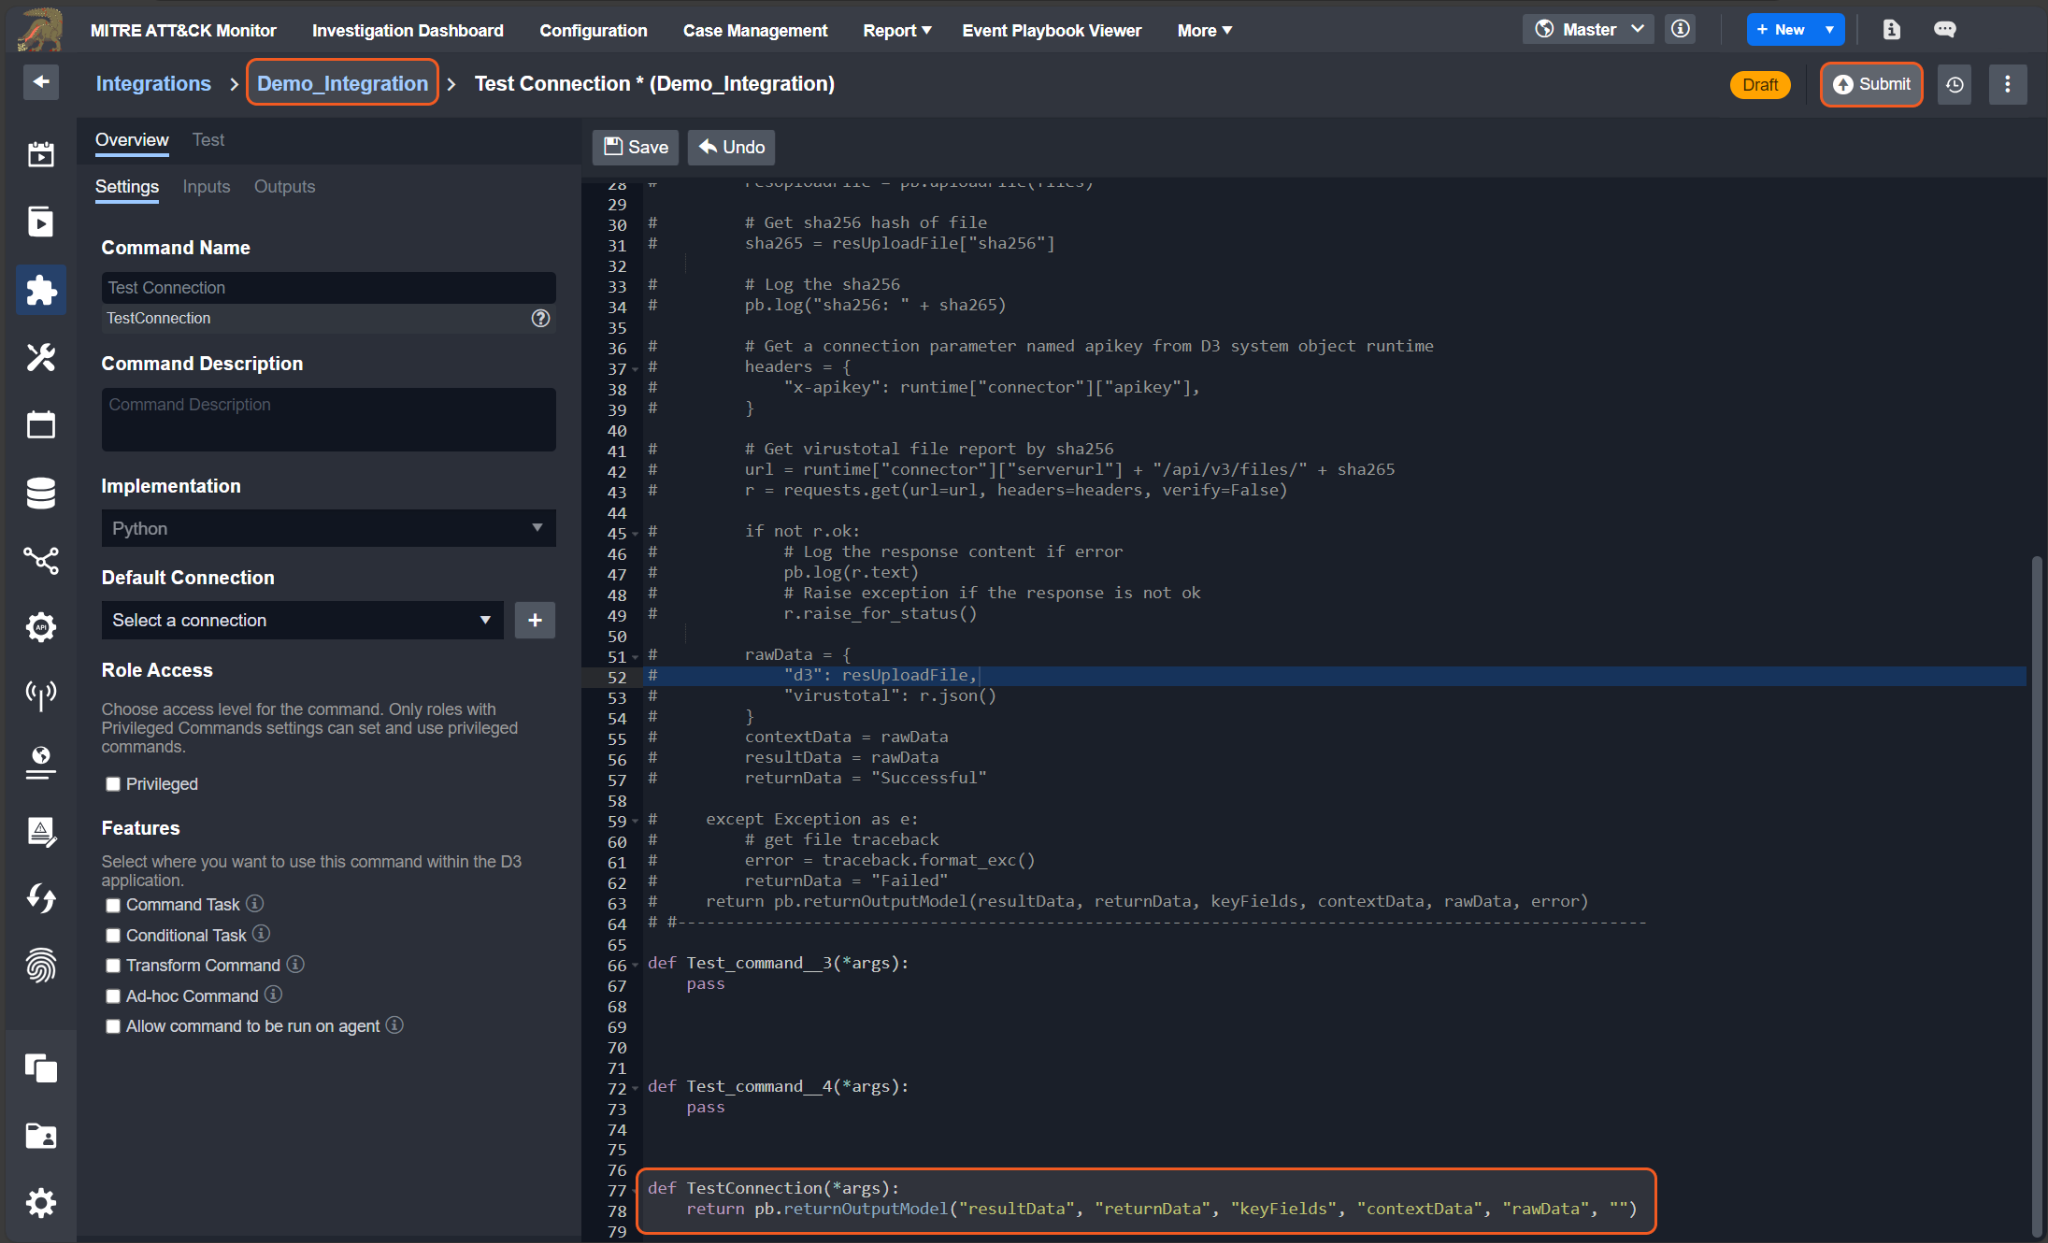
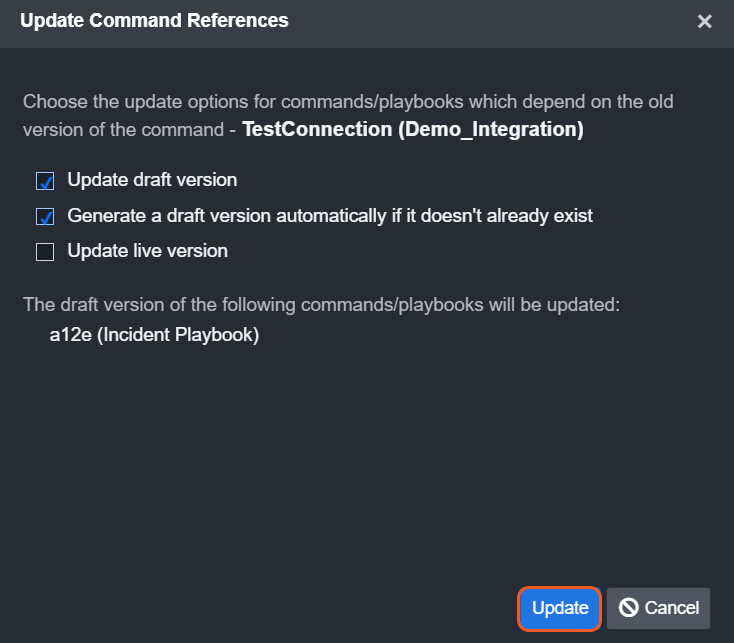
Due to the Python script's hard-linked nature for all commands, including TestConnection, a popup will emerge if any of the commands within the Python script are used elsewhere in the D3 system. Simply click the Update button, then the OK button to continue.
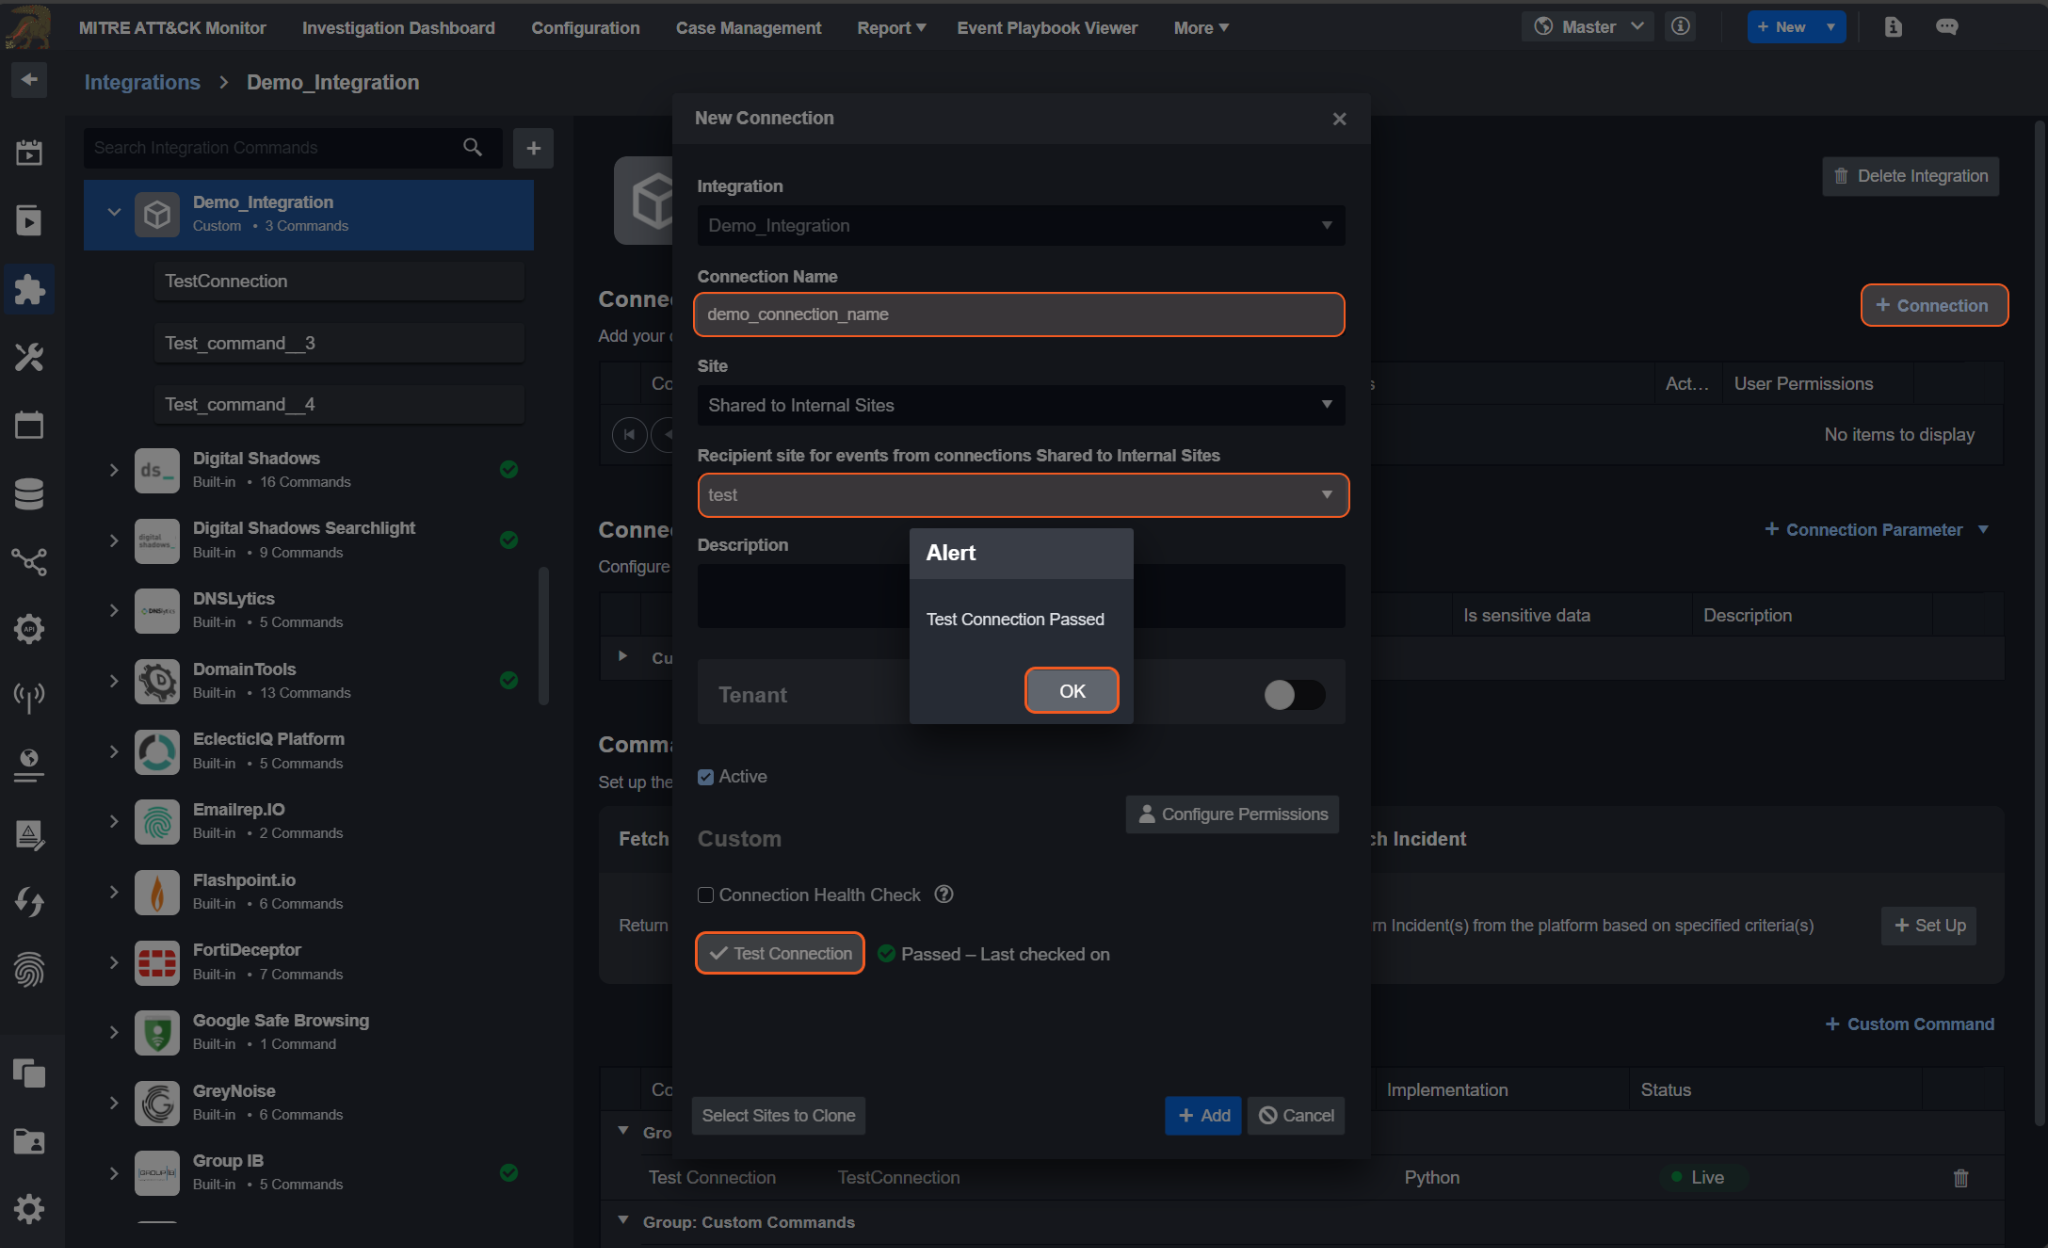
Navigate back to the second level of the breadcrumb and click on the + Connection button. To test the Connection, click the Test Connection button.
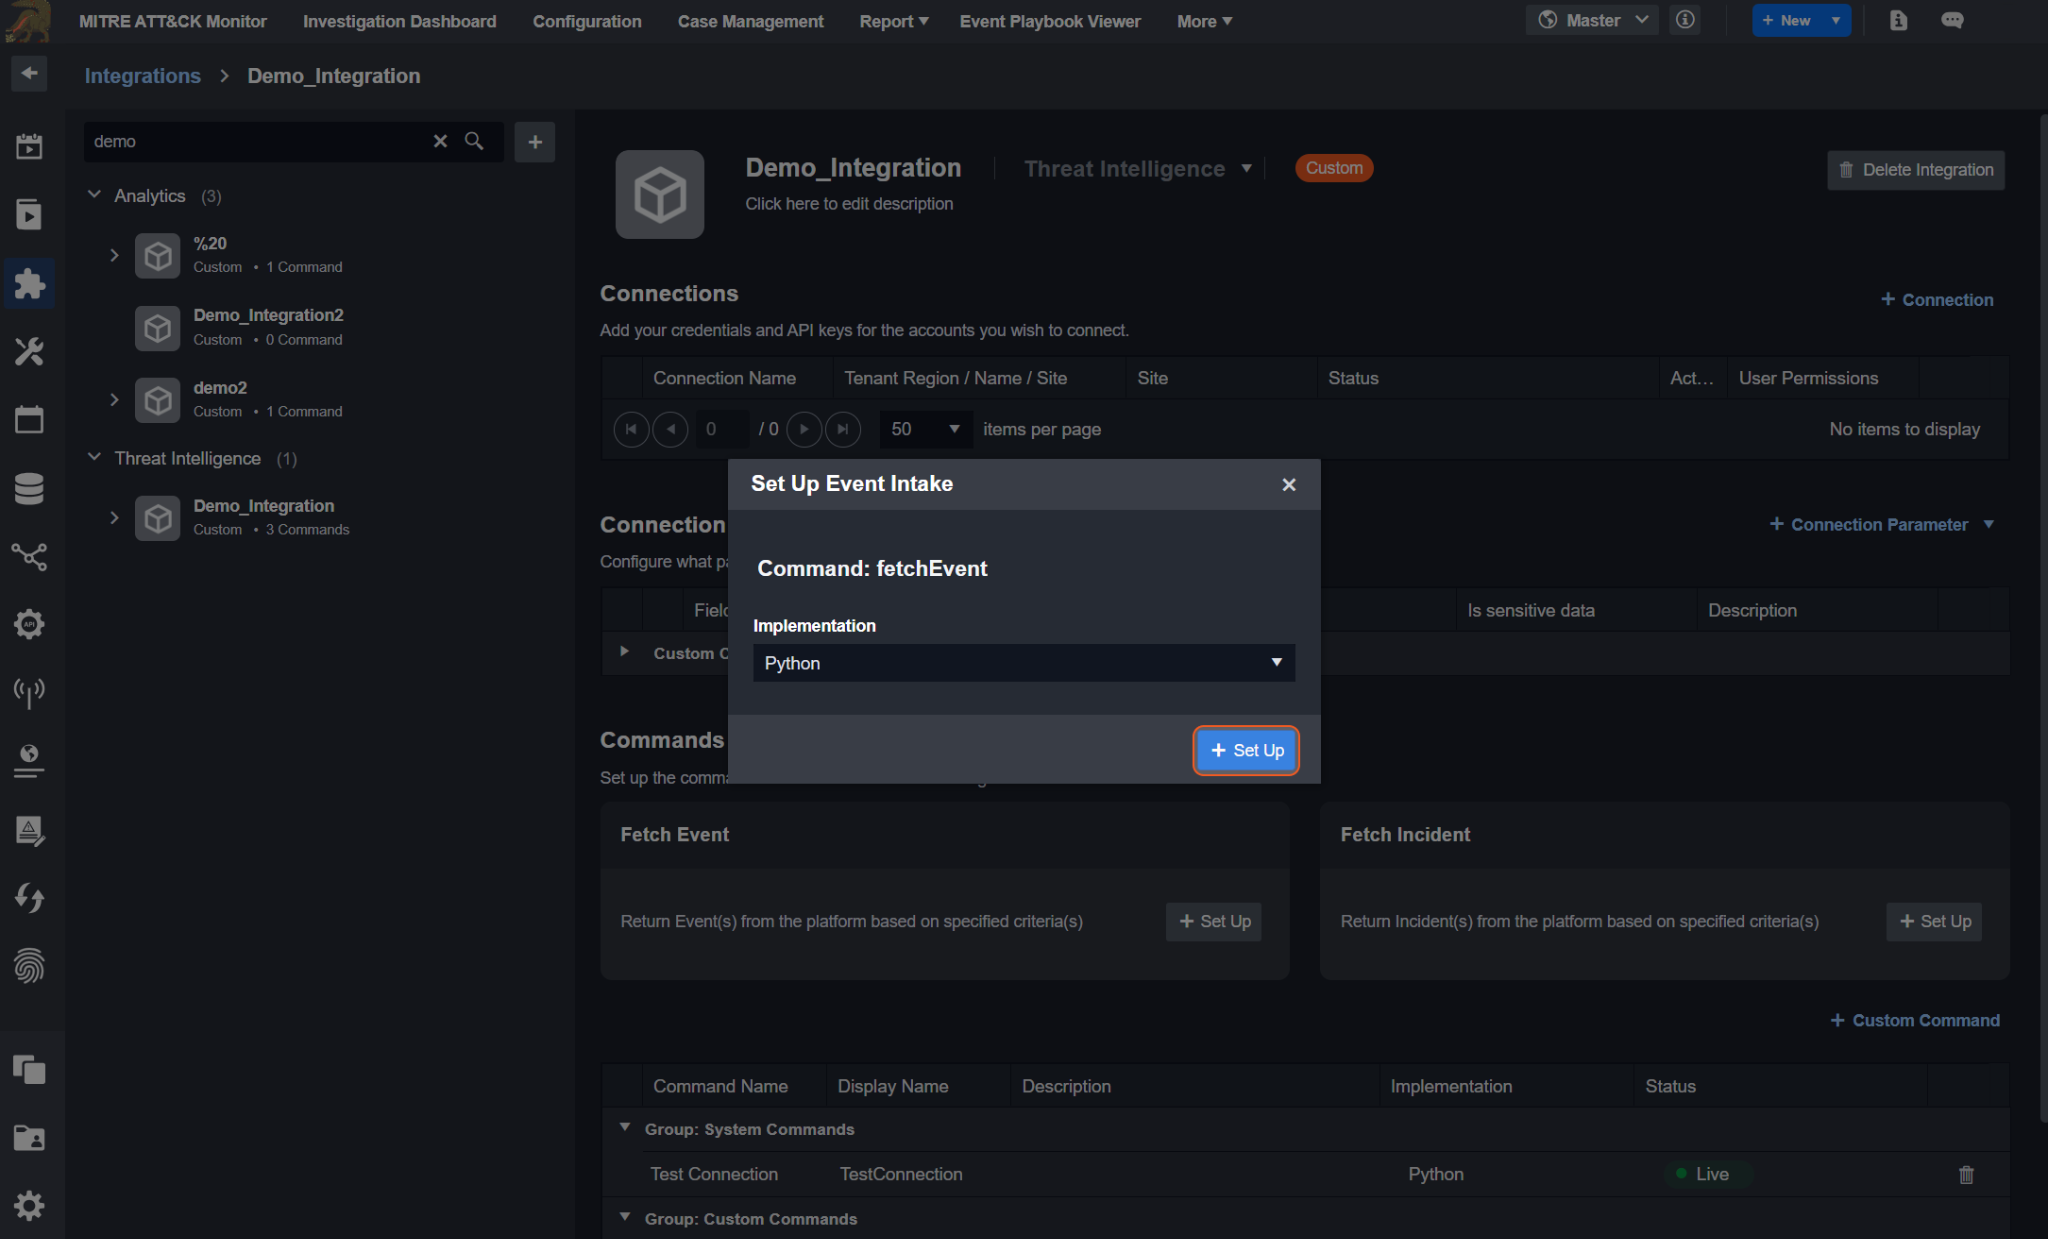
Data Ingestion (FetchEvent/FetchIncident) Custom Command
The Fetch Event and Fetch Incident commands serve essential roles in incident response and management. Fetch Event is used to retrieve relevant events or data related to security incidents, while Fetch Incident is used to retrieve incident details themselves. These functions are crucial because they allow security analysts to access historical data, aiding in investigation, analysis, and response.
Following the retrieval of events or incidents, the next step typically involves performing event field extraction mapping. This process involves defining how data within events or incidents should be structured and labeled for downstream analysis. By mapping specific fields within events to standardized or custom labels, analysts can better interpret and process security data, ultimately enabling faster identification and mitigation of threats.
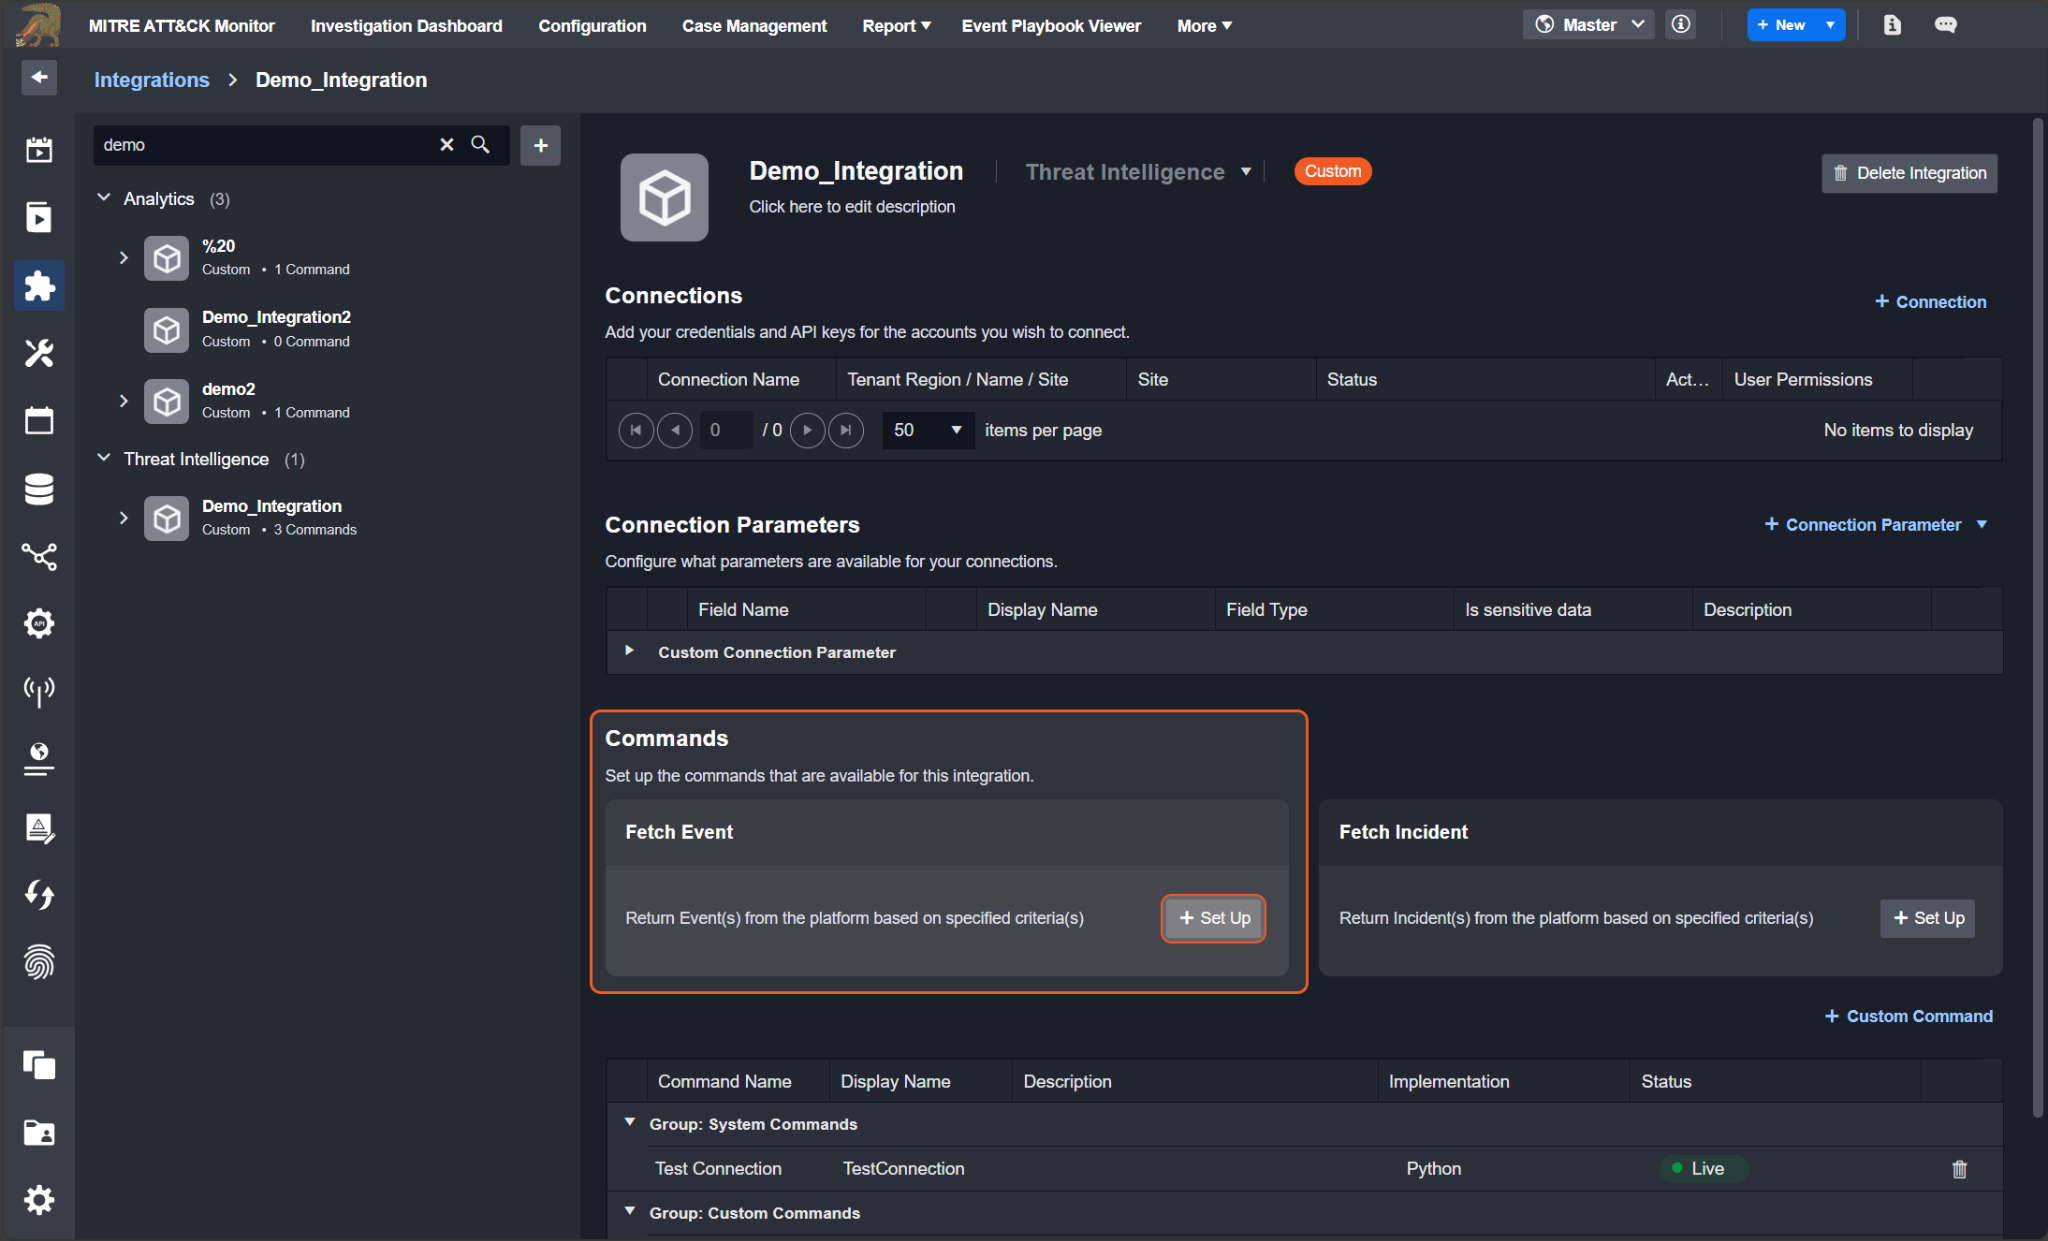
To set up the Fetch Event command:
Click on the + Set Up button in its ingestion container.
Click on the + Set Up button in the confirmation popup.
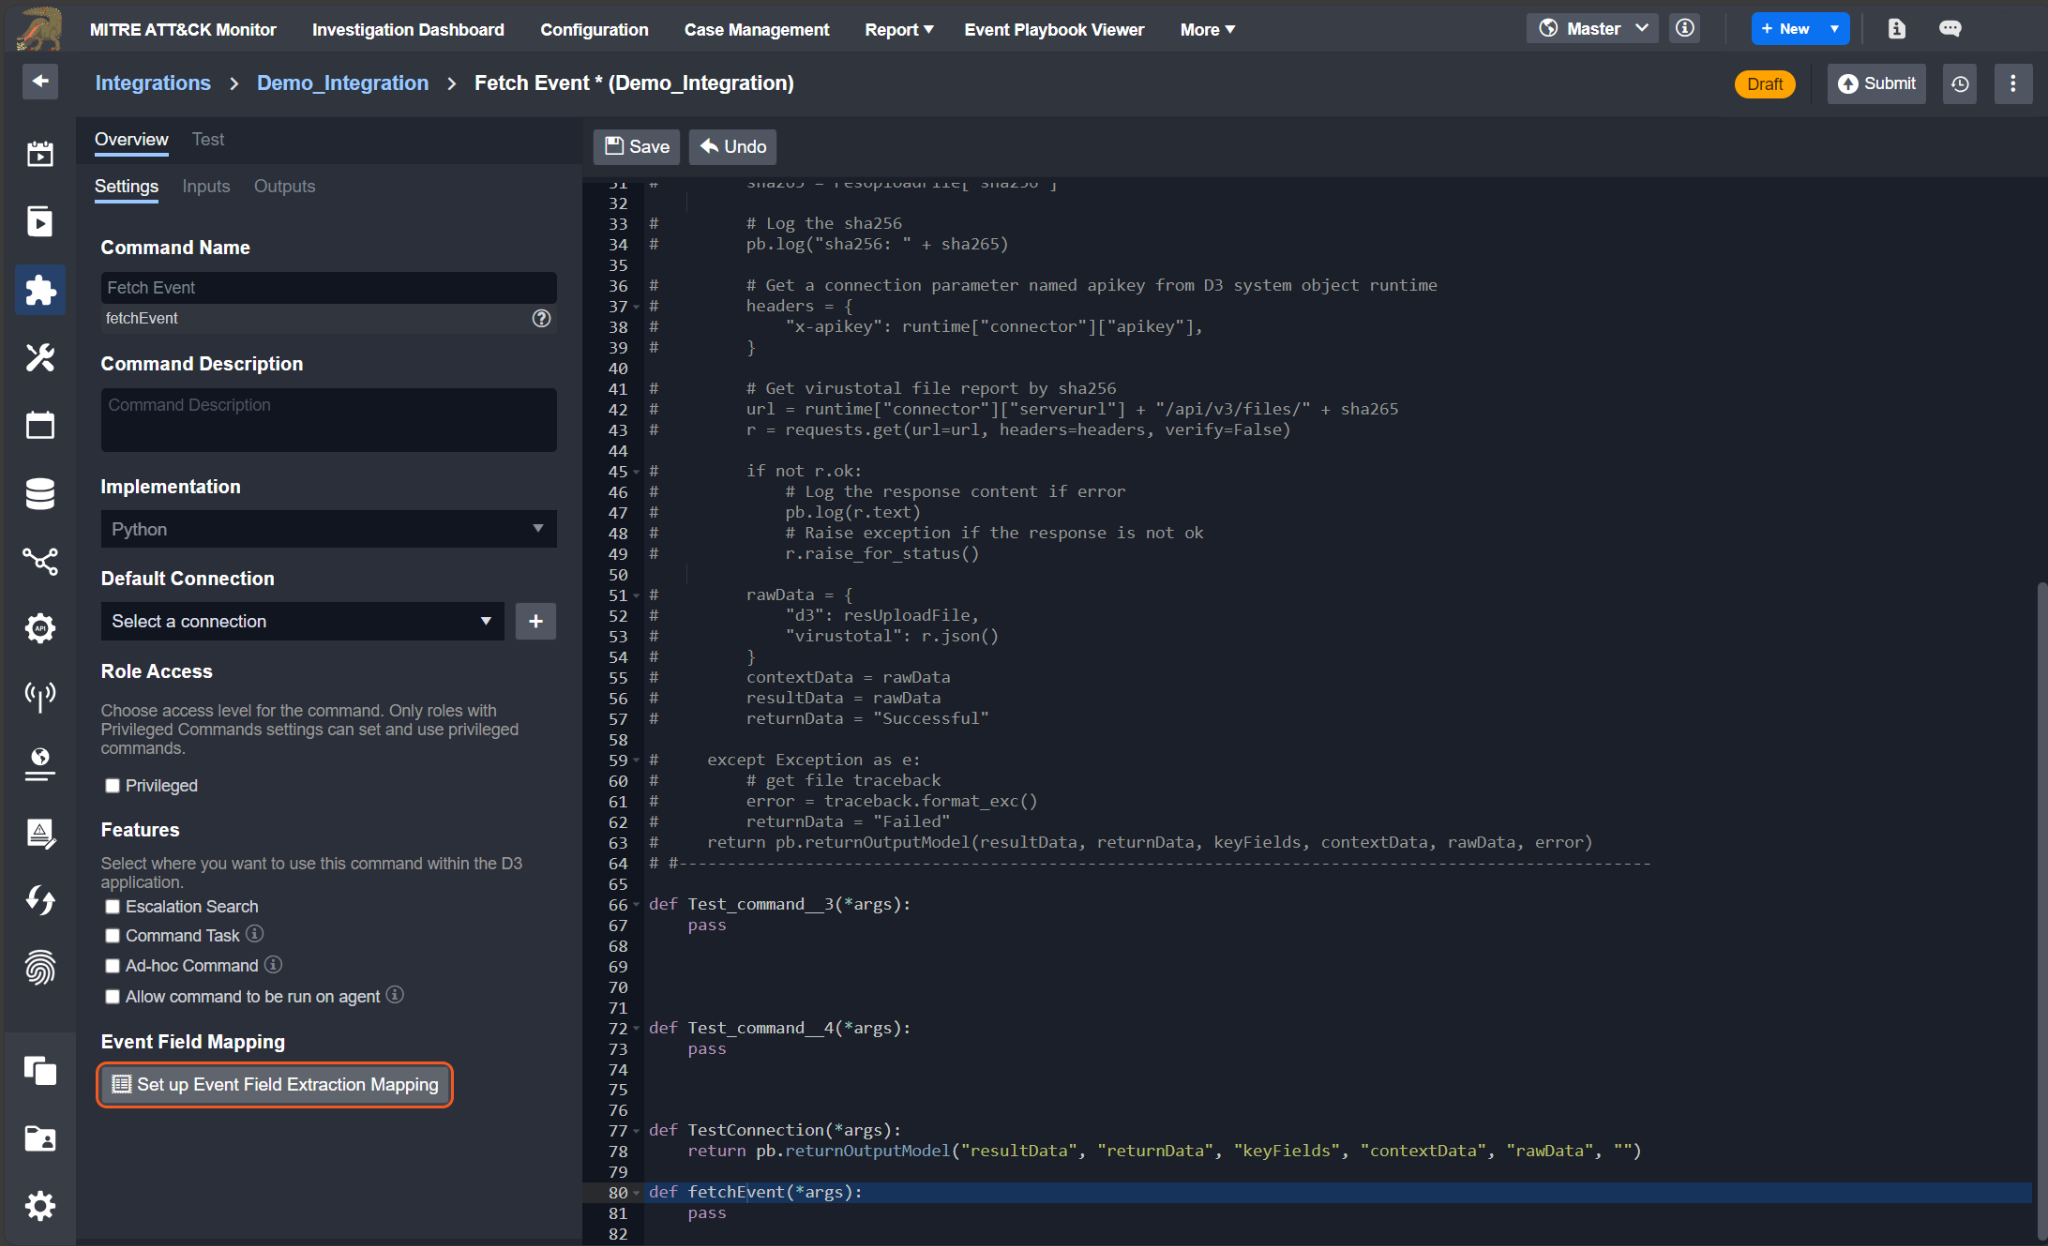
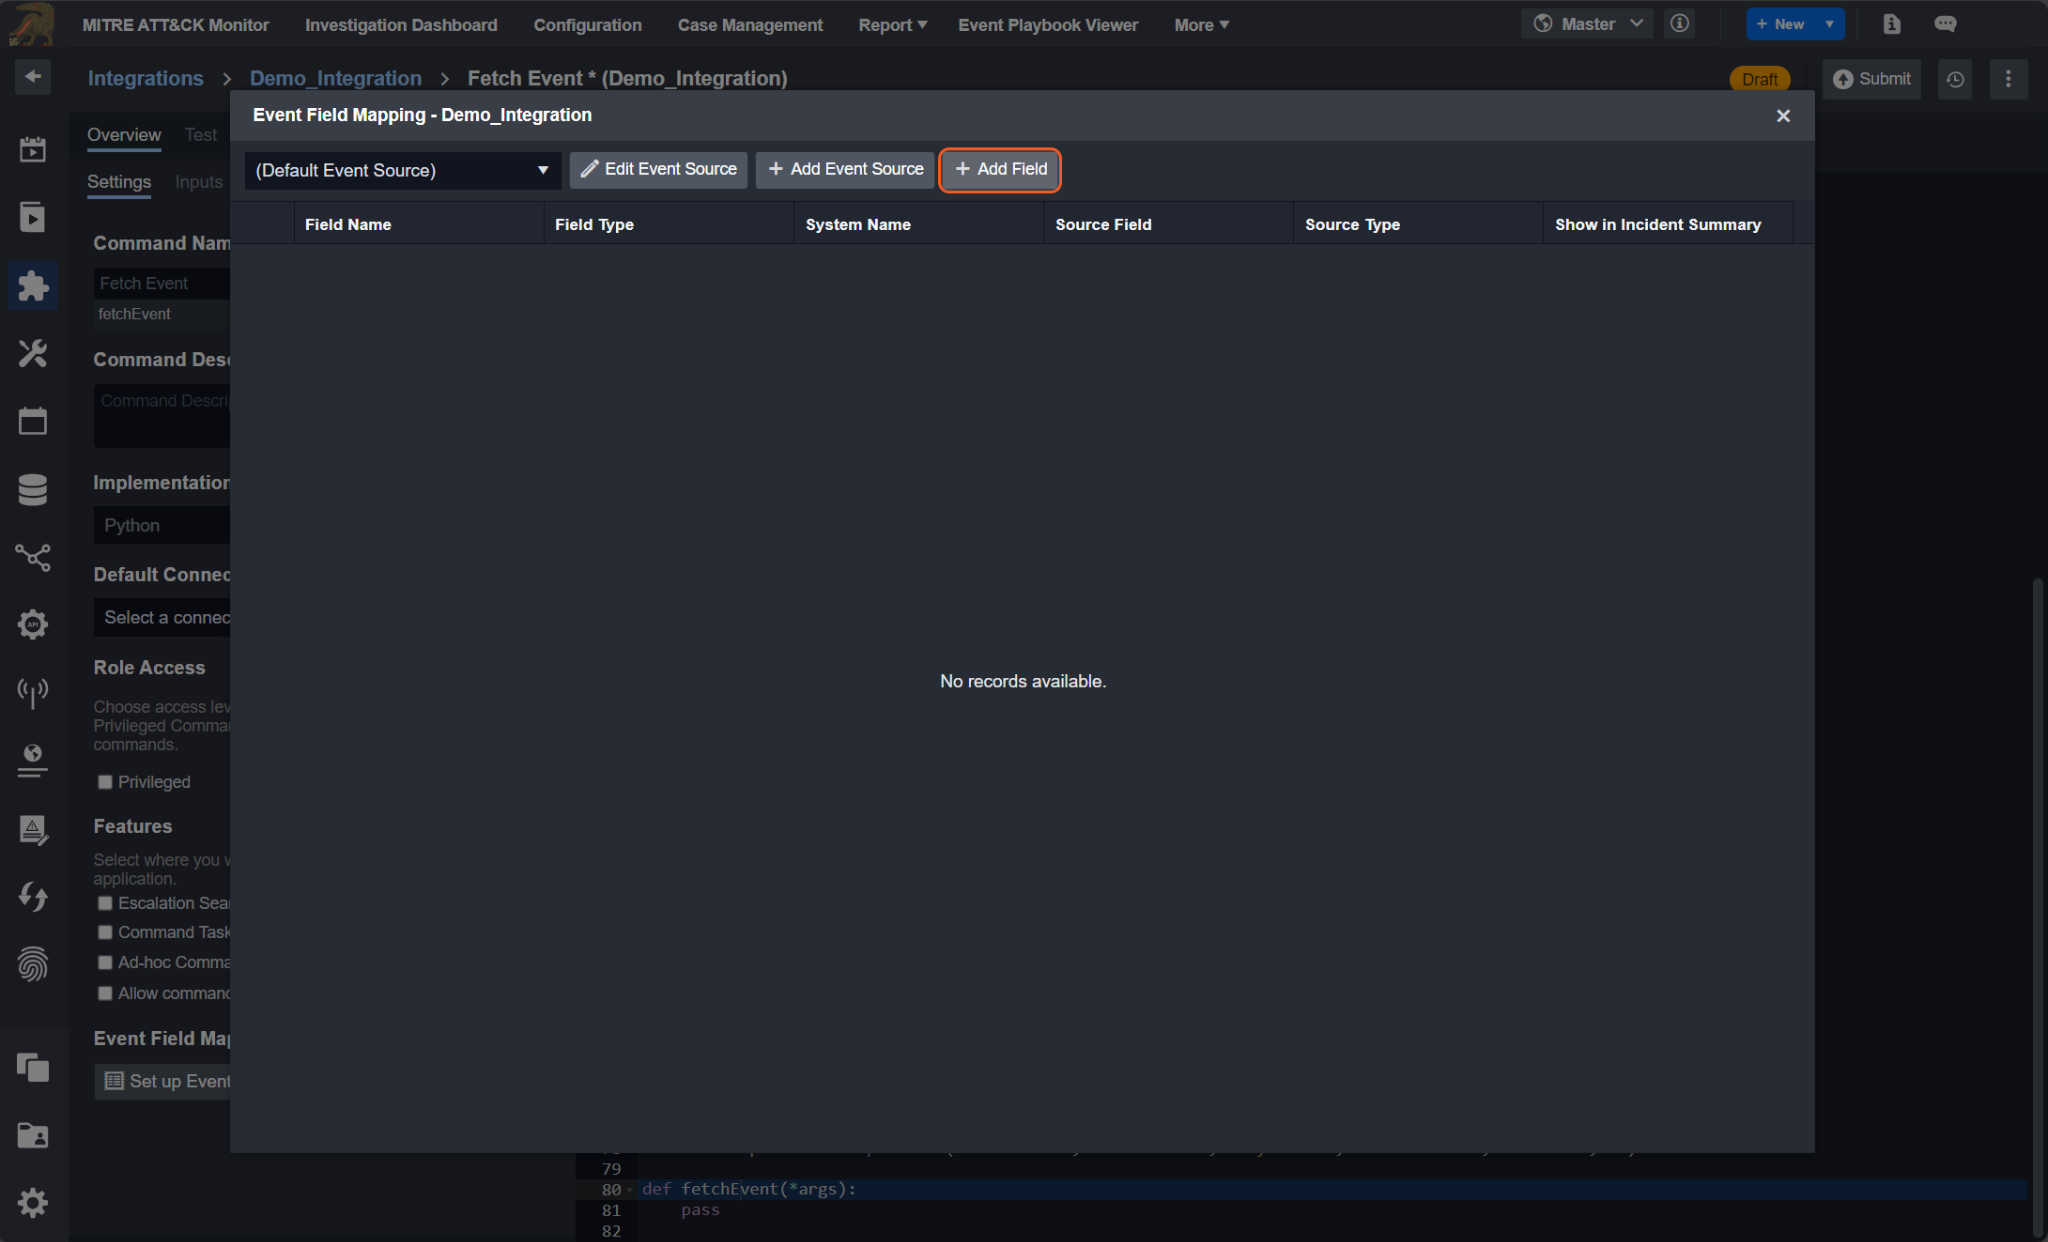
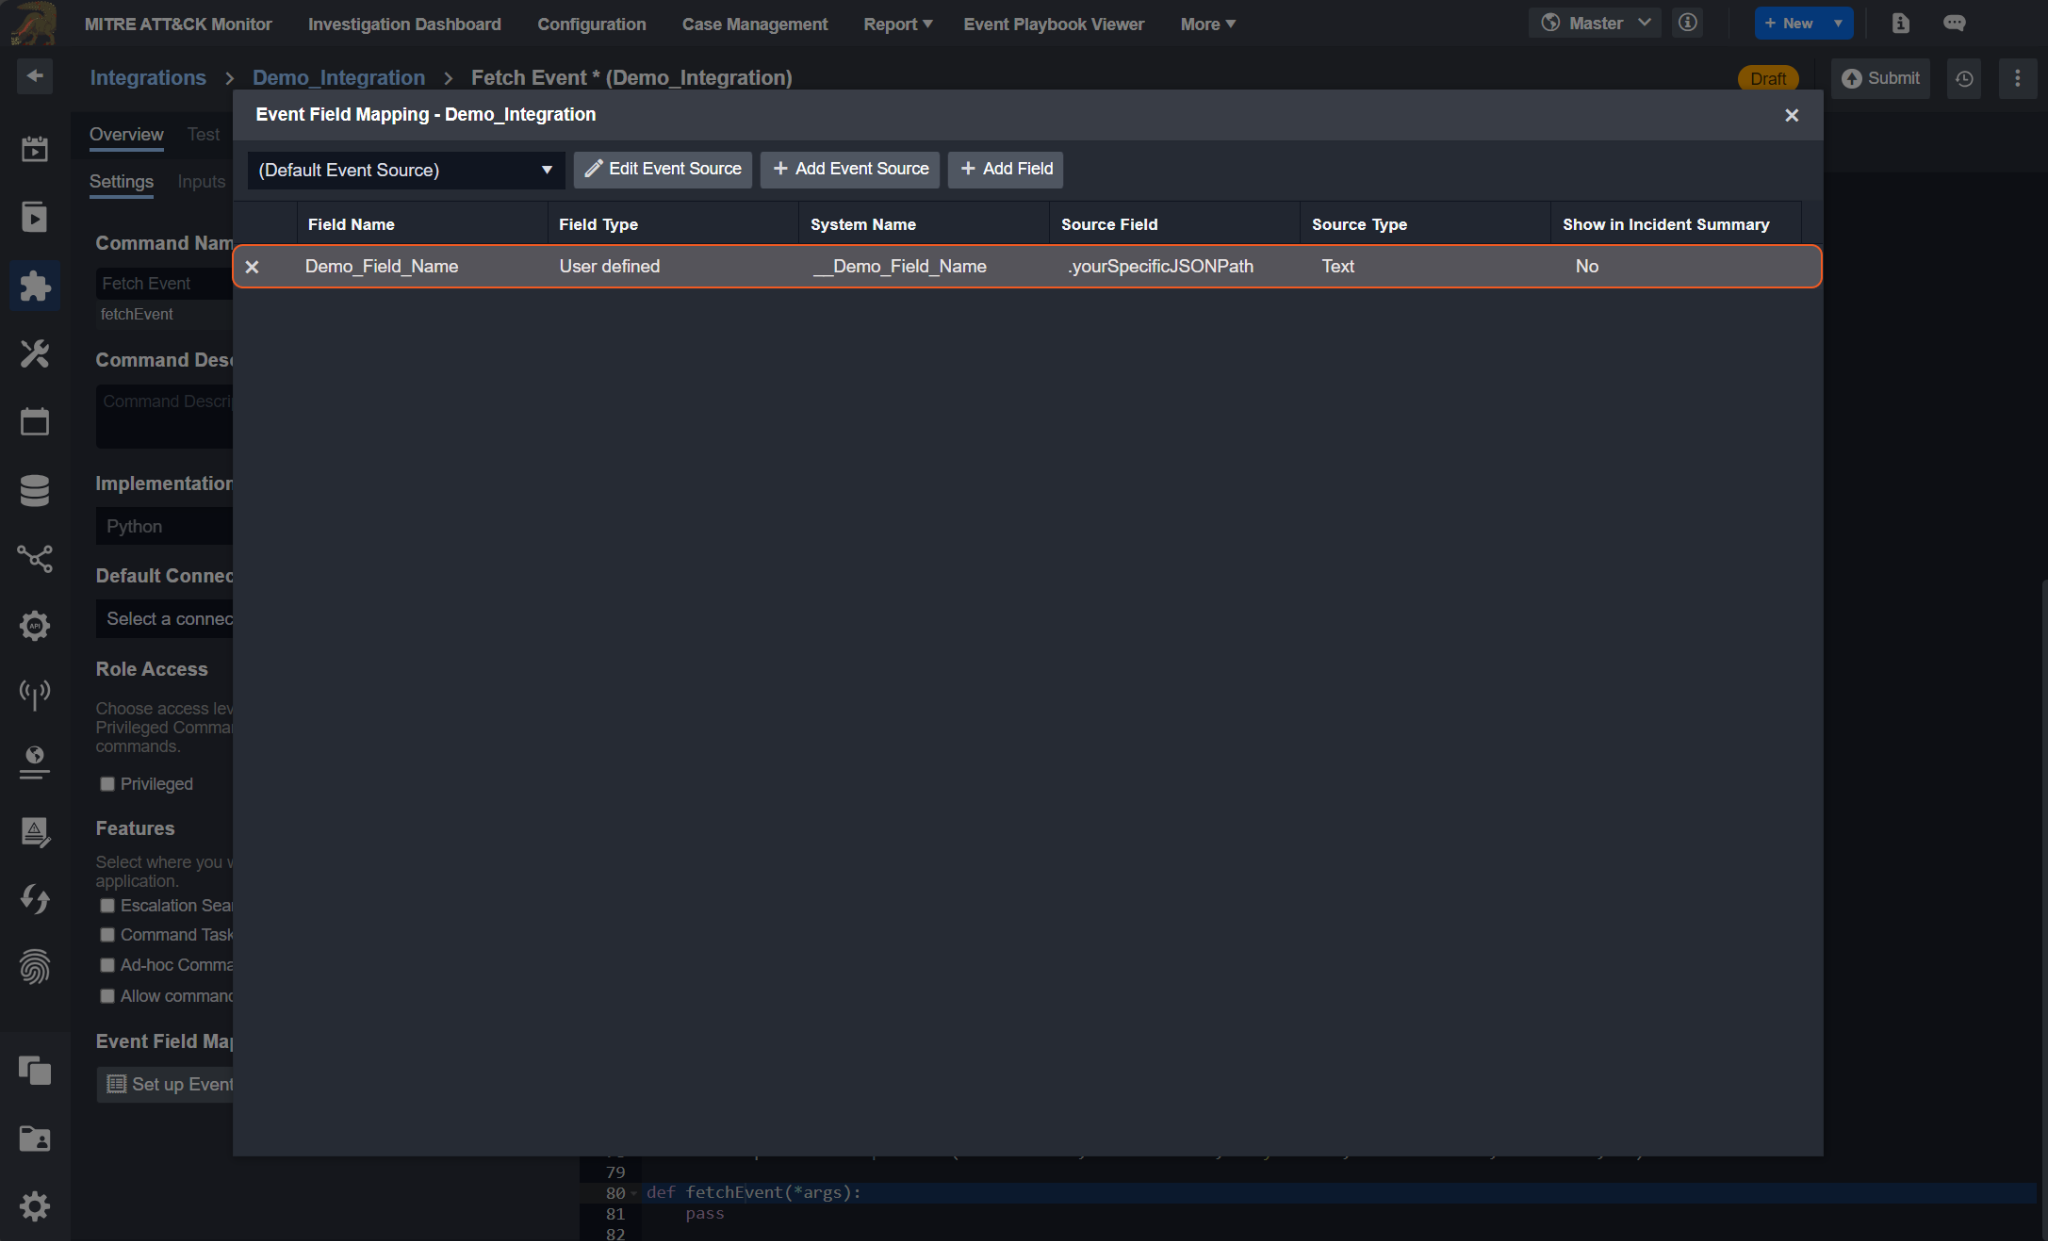
To set up event field extraction mapping:
Click on the Set up Event Field Mapping button in the Overview tab.
Click on the + Add Field button.
Enter in a field name.
Enter in the source field.
Click on the Save button.
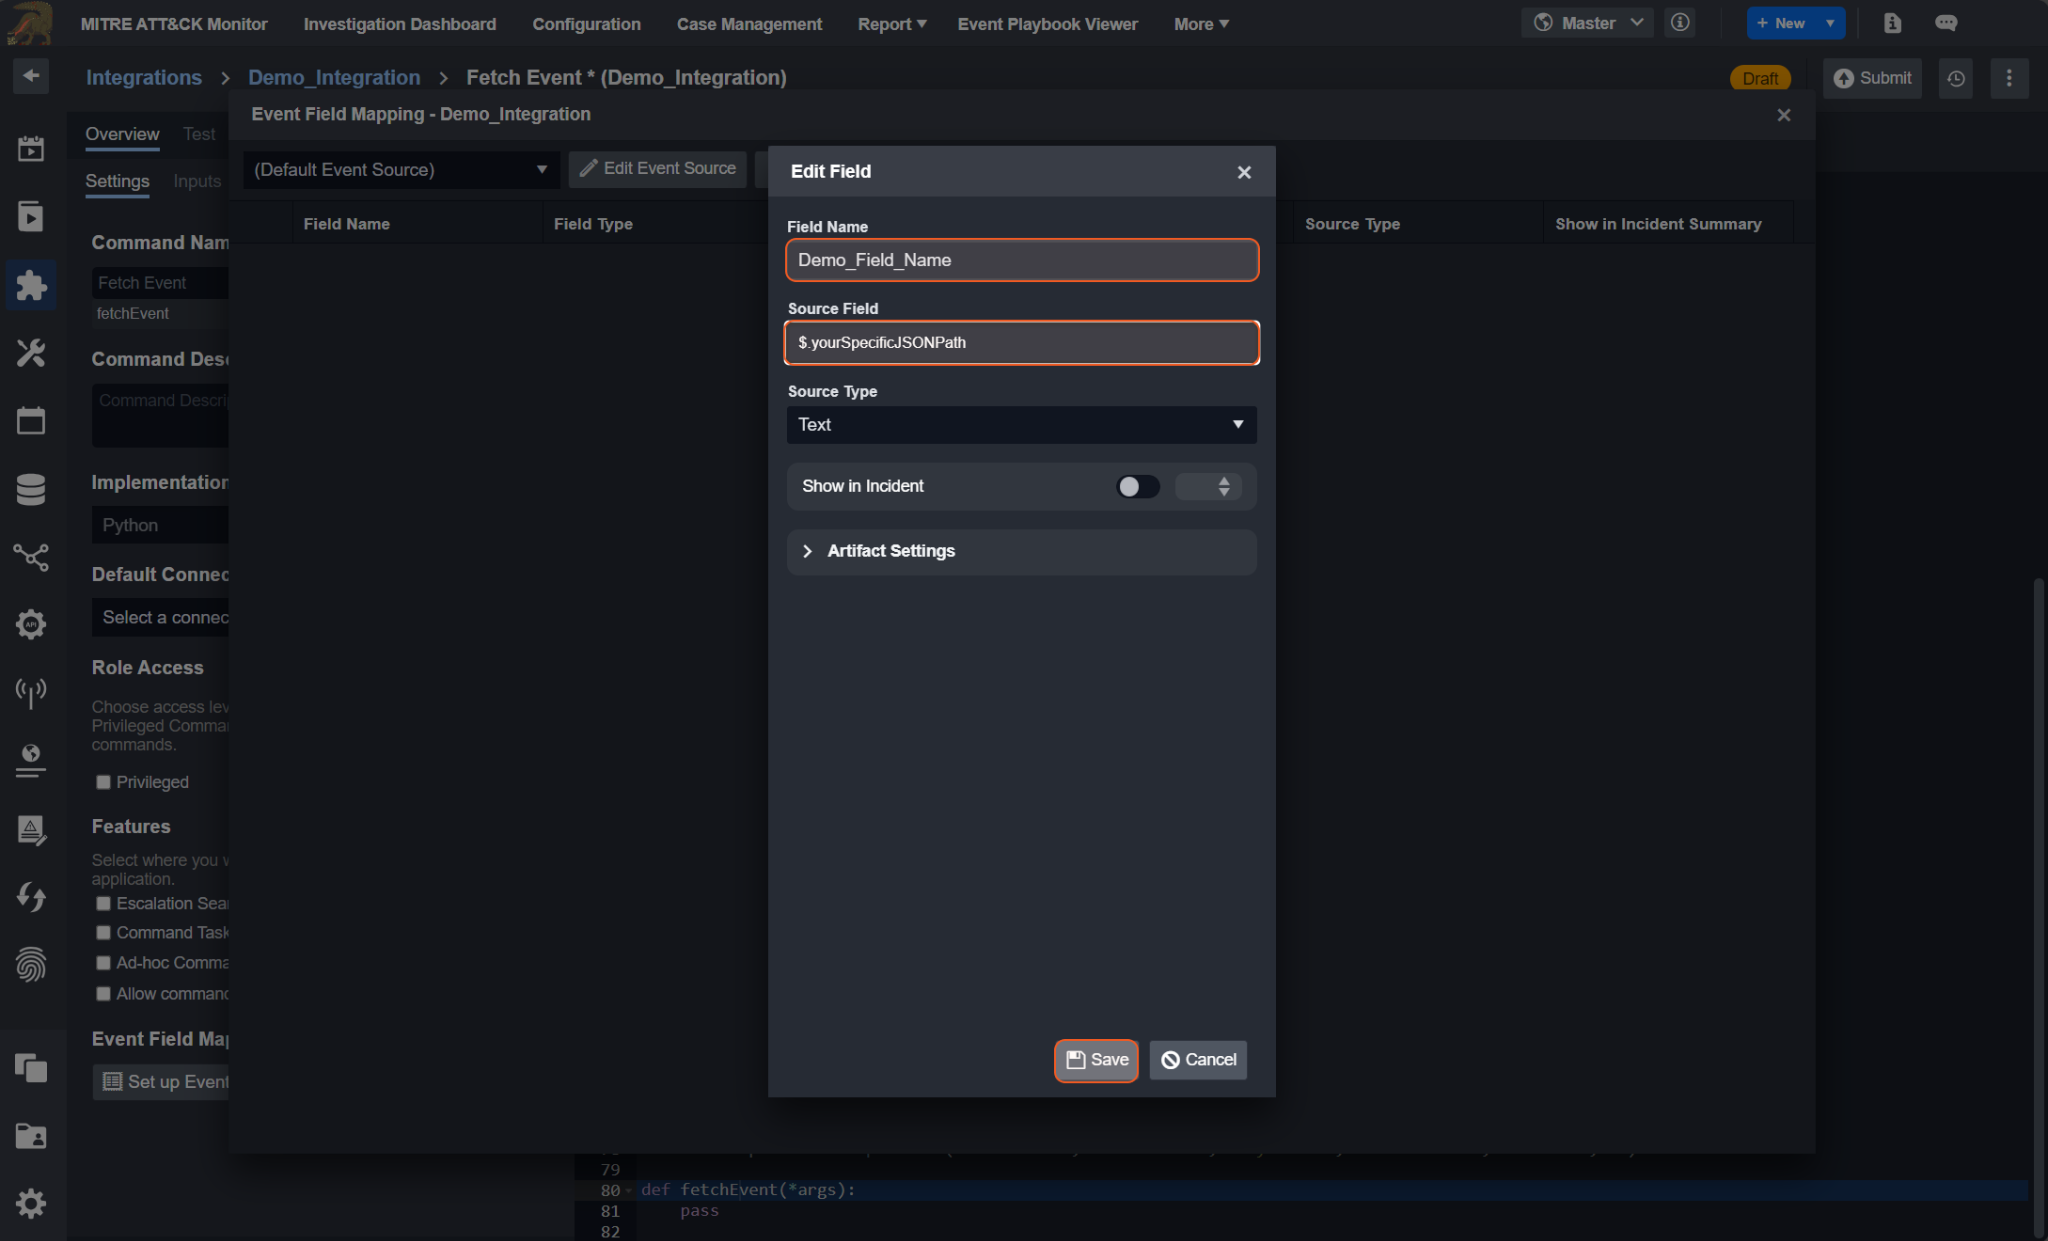
You will now see a new row in the table of the Event Field Mapping popup.
READER NOTE
See Event and Incident Intake Field Mapping for details.
Utility Custom Command
Steps to Create Utility Custom Command
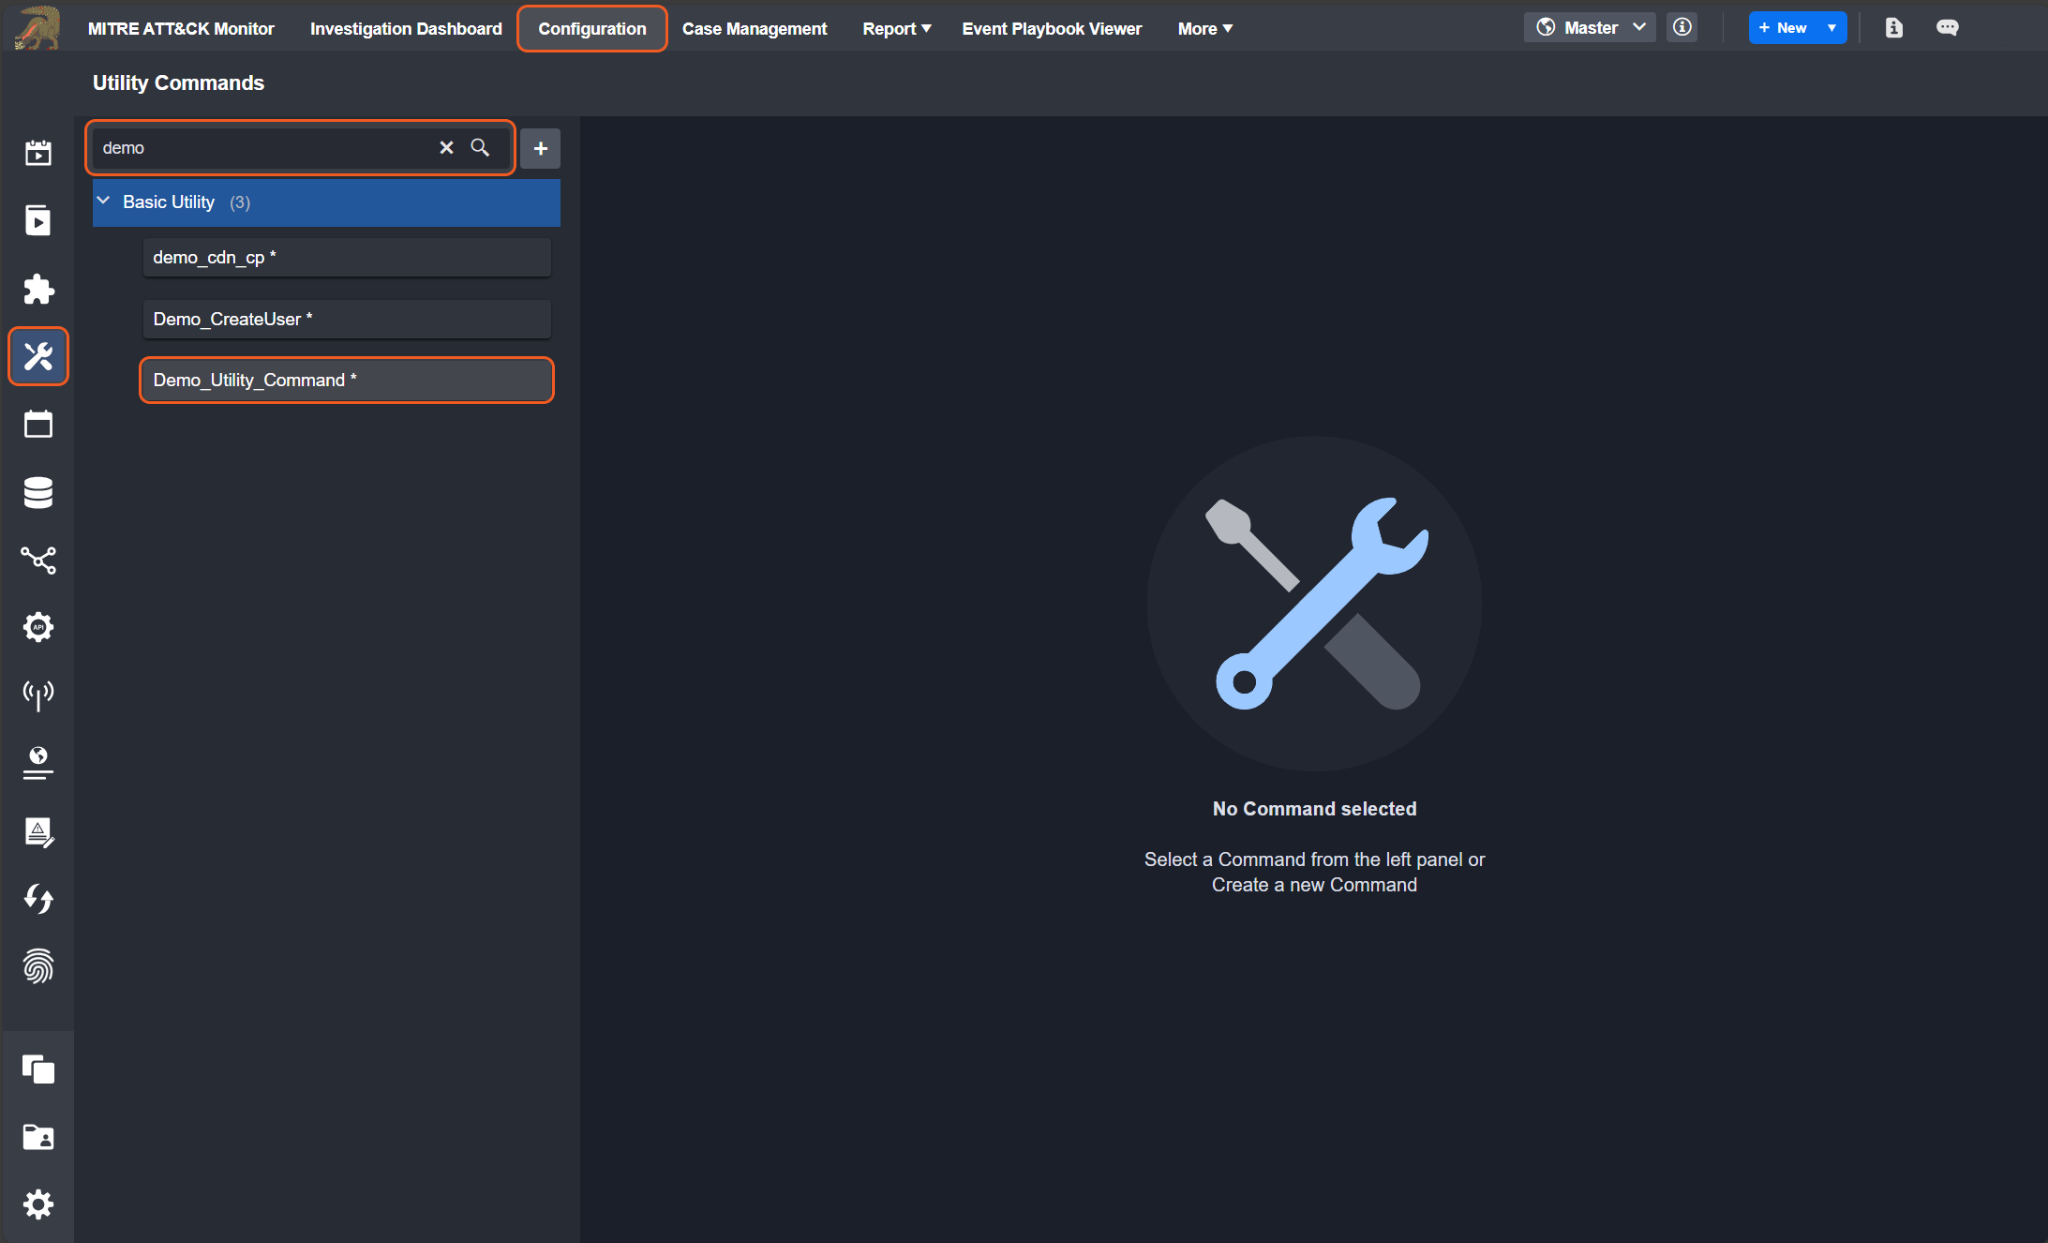
To see the various types of custom command implementations, follow the steps below.
Navigate to the Configuration tab at the top of the screen.
Click on the Utility Commands tab on the left sidebar.
Click on the
 icon.
icon. 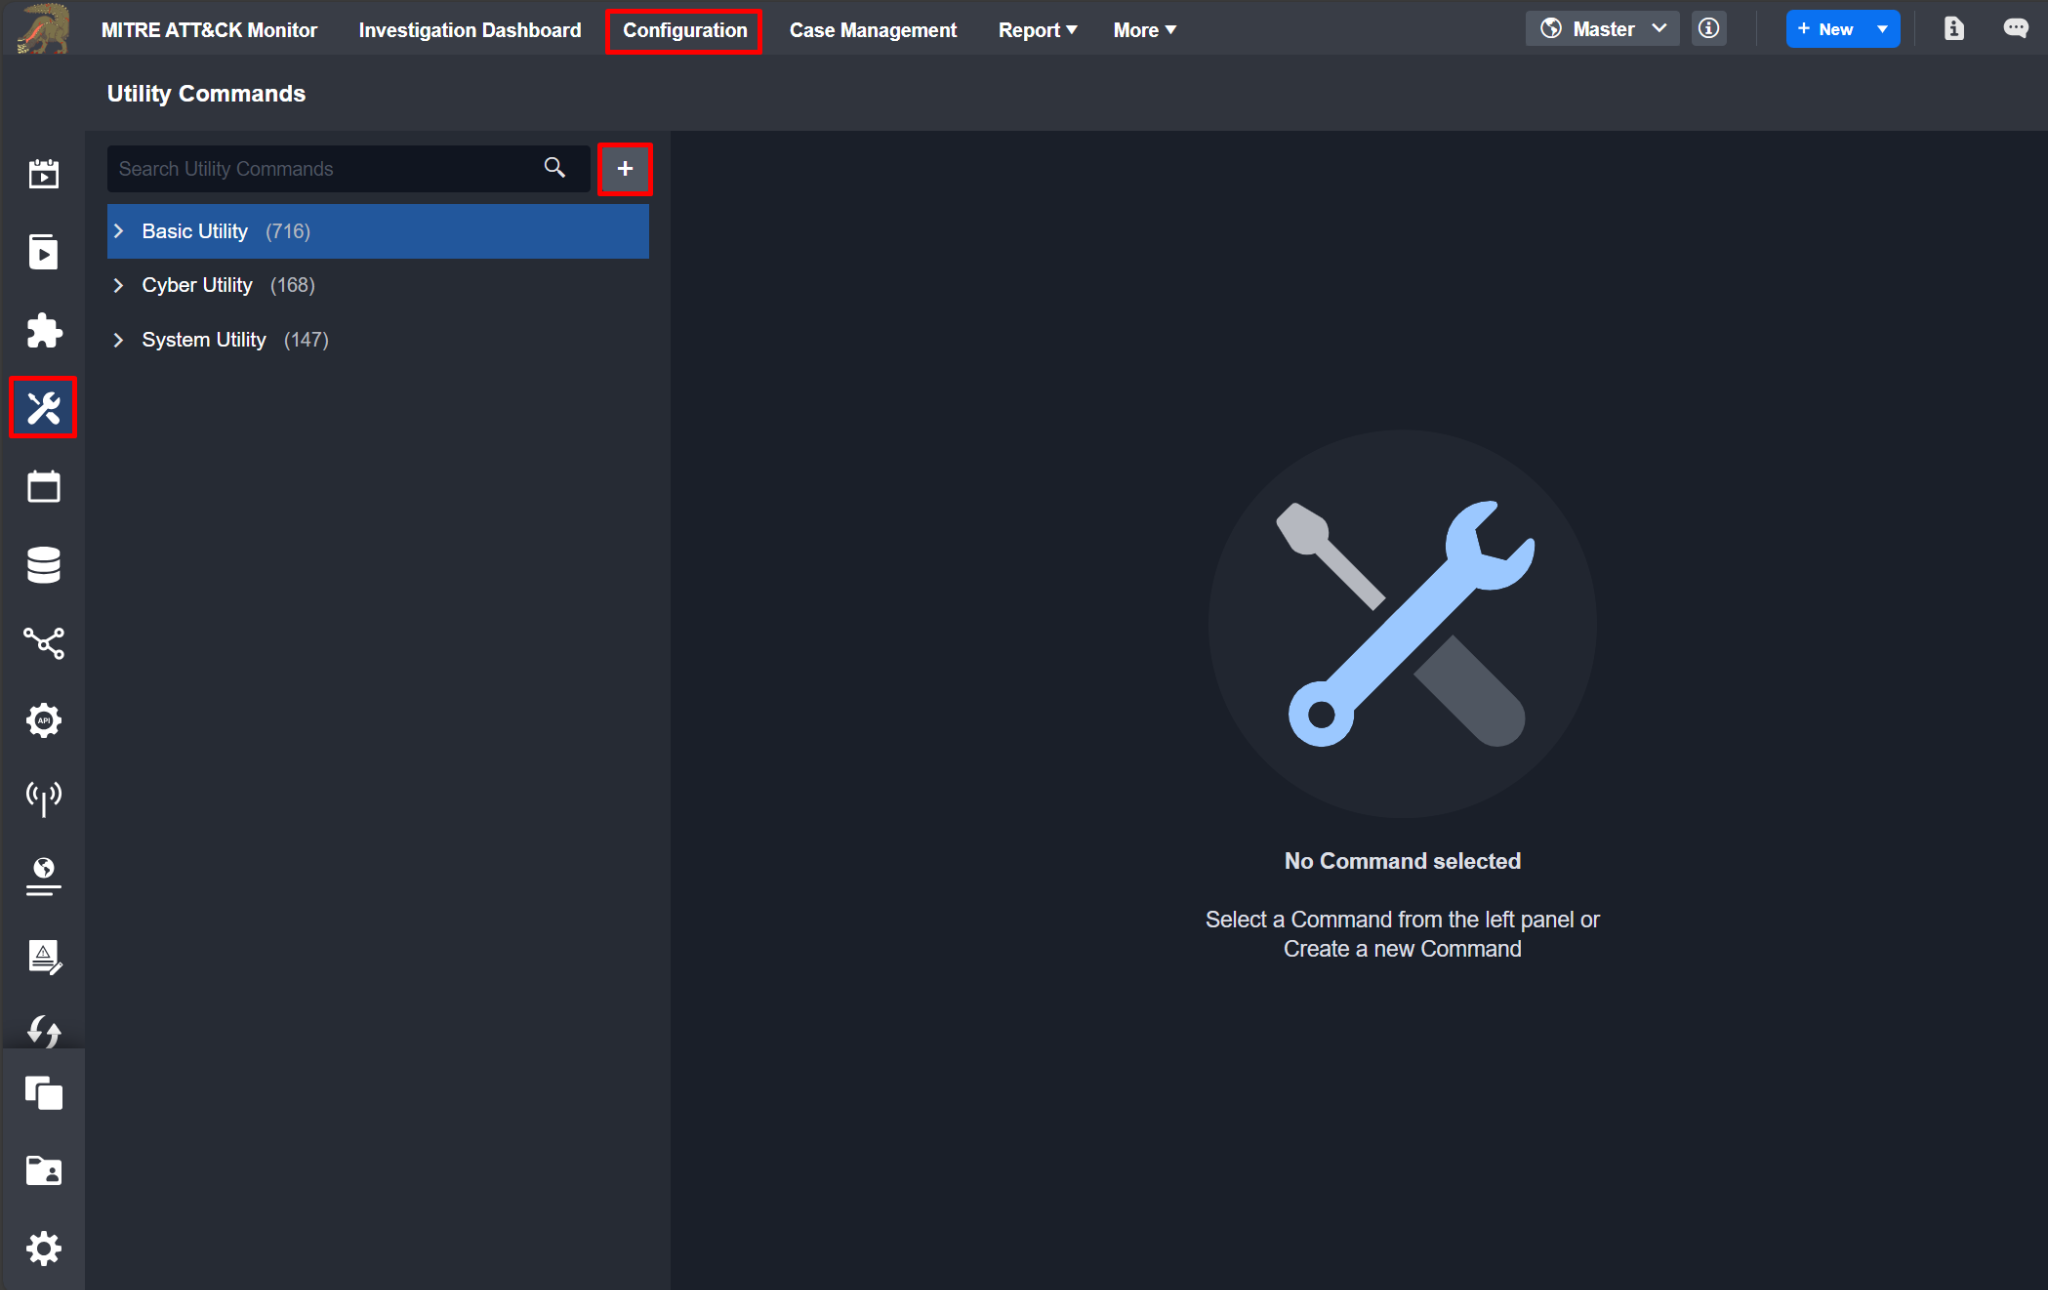
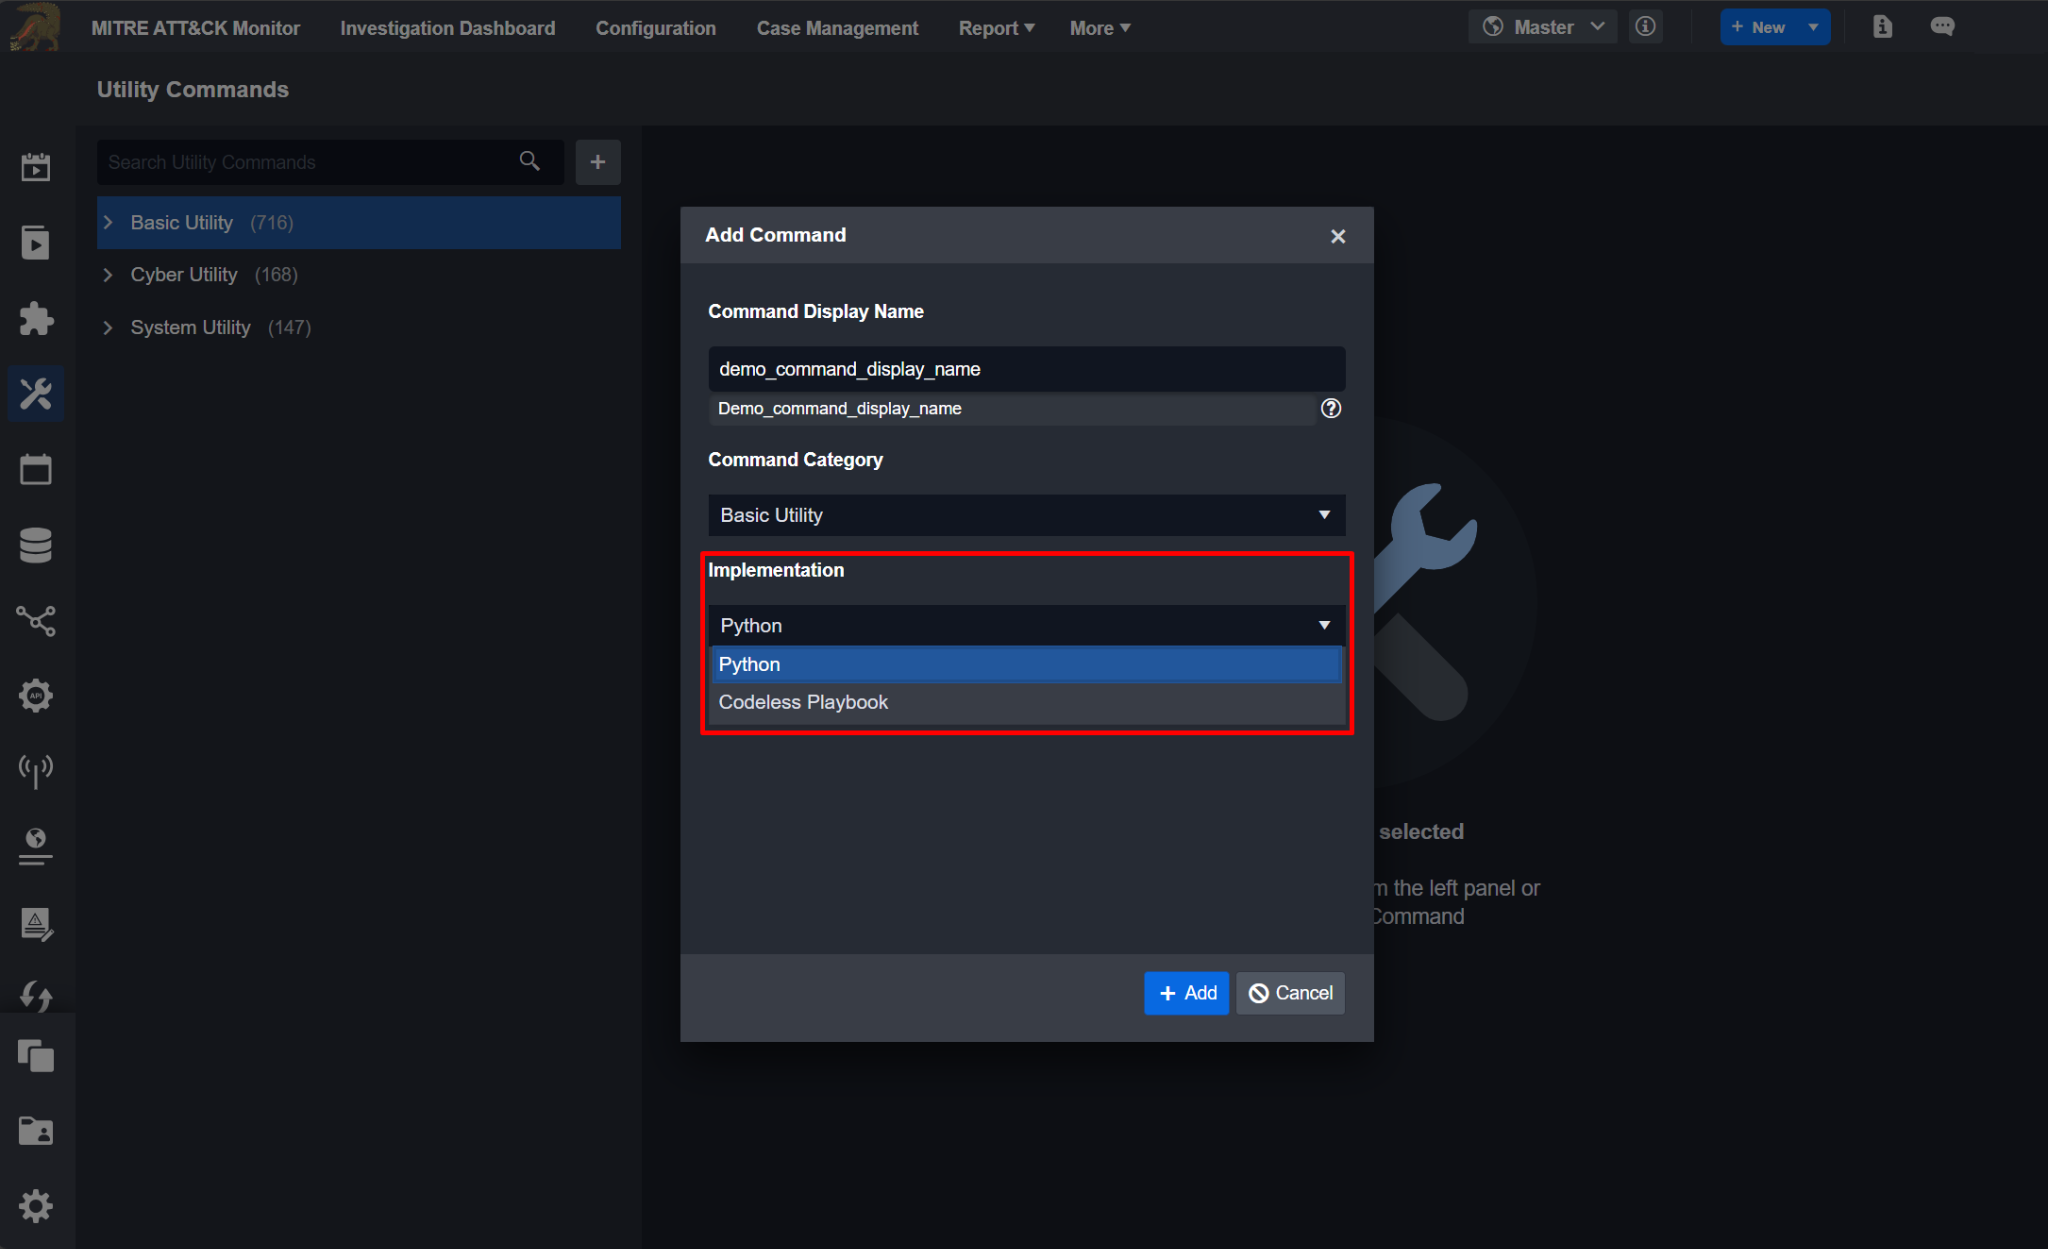
Click on the dropdown of the Implementation section in the Add Command popup. Notice that, by default, there exists two initial implementation options:
Python
Codeless Playbook
Python
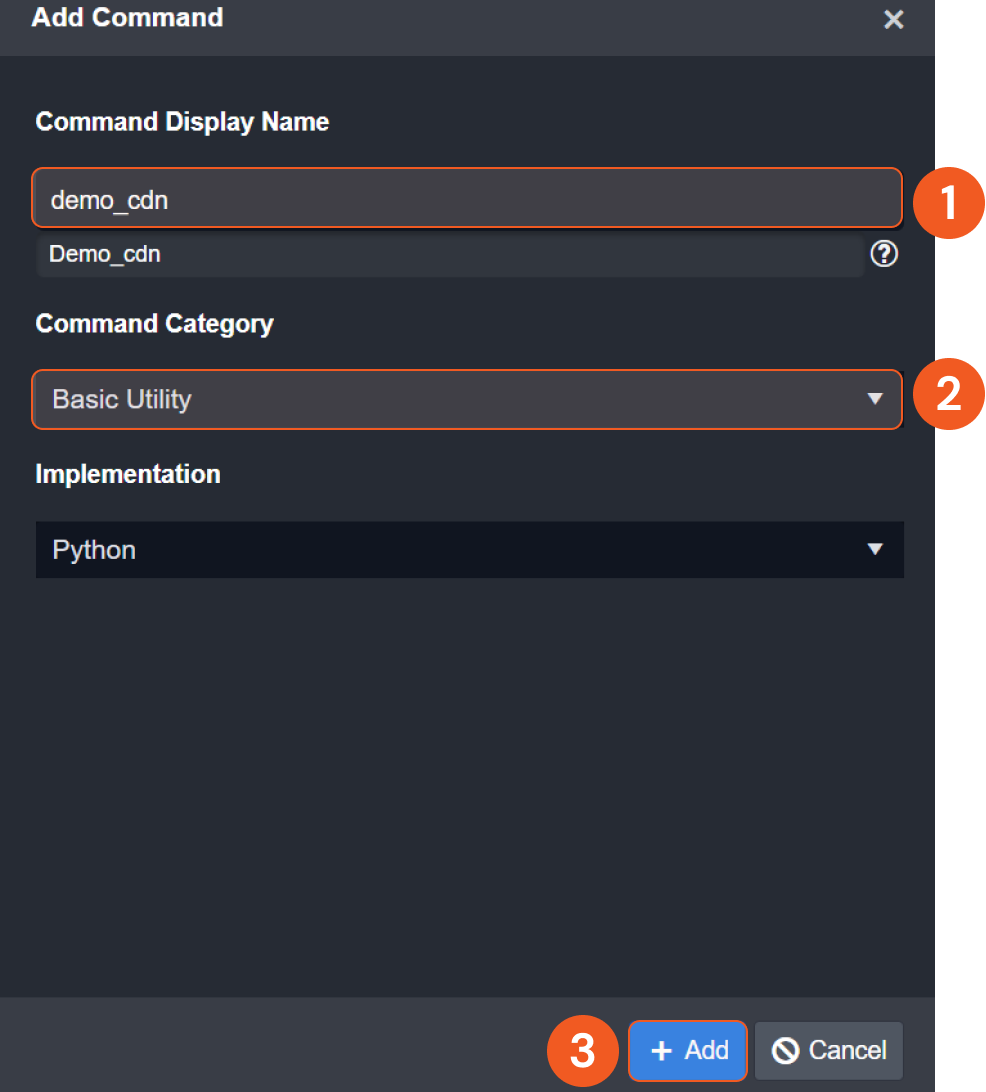
To create a custom Python utility command, follow these steps:
Enter in a Command Display Name.
Select a Command Category.
Click on the + Add button.
Codeless Playbook
To create a custom Codeless Playbook utility command, follow these steps:
Enter in a Command Display Name.
Select a Command Category.
Click on the + Add button.
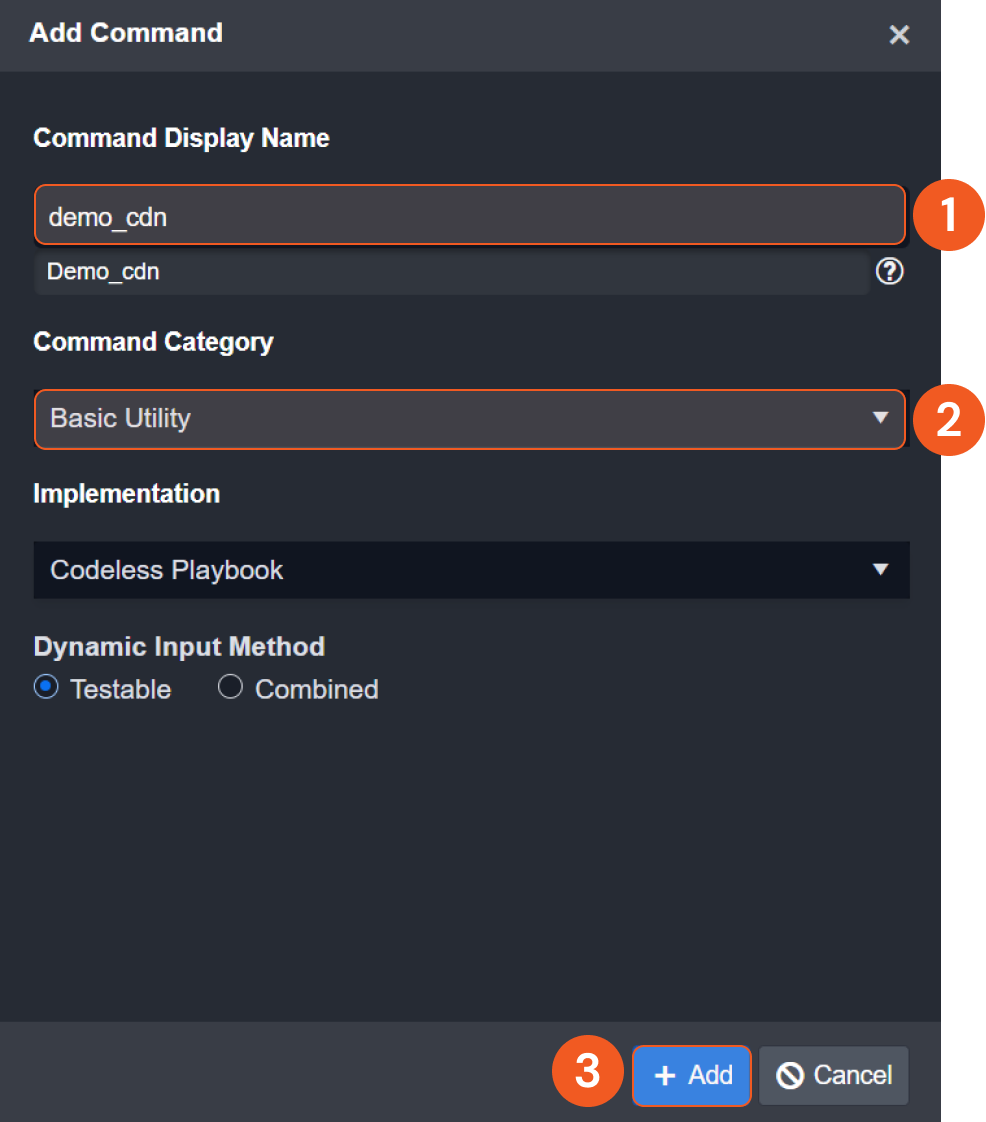
READER NOTE
The Dynamic Input Method section retrieves data from parent or preceding tasks along the same execution path. Only a small portion of cases necessitates switching to the "Combined" option. For further details, please consult a D3 cyber engineer.
Clone Utility Custom Command
Utility commands can be cloned by following these steps:
Click on the Configuration tab at the top navigation bar.
Click on the Utility Commands tab on the left sidebar.
Search for your integration in the search field.
Click on your integration within the expanded accordion.
Click on the utility command that you would like to clone.
Click on the
 icon.
icon.Click on the Clone Command option.

If the above steps are completed successfully, you will see a new Python function displayed in the code editor. The name of this cloned command will automatically differ from the original command. Additionally, consistent with all commands, the function name will be identical to the internal name (Pascal case to the displayed command name).

Python Script
In D3, we write most of our system commands with Python Script. These system Python scripts that we wrote are similar to the custom Python scripts that you can write. Therefore, this section will teach you how to write a proper and useful custom Python script like a D3 expert.
Command & Script
Below are the facts that demonstrate how the D3 command is being implemented and associated with the Python script.
Each system/custom command is associated with a Python function, whose name matches that of the internal name.
All system/custom commands of integration should be written in a system/custom Python script
With the same integration, the custom script contains the codebase of the system script, even though it doesn’t appear within the UI. This means that you can reference any functions, classes, or variables within the system script.
The functions, classes, variables, and modules in the custom scripts can override those defined in the system script if they share the same name.
Input parameters are passed to the parameters of the function of the corresponding commands by order. To reference the parameters, you can use either way
def commandName(param1,param2,param3):

def commandName(*args):
  param1,param2,param3 = args[0],args[1],args[2]
For integration command, connection parameters can be referenced by the global variable `runtime`, using either way:
runtime['connector']['serverurl'] or
runtime.get('connector',{}).get('serverurl','<your default value>')Output data can be separated into result data, return data, raw data, errors log and passdown data, and turn into command output through function `pb.returnOutputModel`. For details, refer to Return Output Model
One custom integration can only define one system-defined command, which includes testconnection, fetchevent, fetchincident, etc.
Convention
Do not define a class named PlaybookRunTime. It is reserved for D3 playbook engine.
Do not define a class named APIError. It is reserved for D3 playbook engine.
Do not define a class named HTTPAPIError. It is reserved for D3 playbook engine.
Do not define a variable or object named pb. It is reserved for D3 playbook engine.
Do not define a variable or object named args. It is reserved for D3 playbook engine.
Do not define a variable or object named runtime. It is reserved for D3 playbook engine.
Do not define a variable or object named input. It is reserved for D3 playbook engine.
Do not use the different function name from the command name in the command script.
Do not import a library which is neither Python standard library nor D3 3rd party library.
Use pb.log function to output the standard output instead of using print function, or any other function.
Data must be returned and output from the command through pb.returnOutputModel()
Do not input any OAuth 2.0 logic into your command since currently D3 custom integration doesn't support OAuth 2.0 authentication feature
Return Output Model
The return output model is a D3 helper function that formats the return data of a command into D3 output model.
pb.returnOutputModel( result, returnData, keyFields, contextData, rawData, errors, passdownData)READER NOTE
The returnData should return the status of the command which is either Successful, Partially Successful, or Failed. It it suggested to keep both the keyFields and contextData fields as an empty string "", as these fields are deprecated.
Error Handling
The success or failure of a command is determined solely by the errors field. If the errors field is not False, indicating the presence of an error message, the command will fail.
READER NOTE
errors field is a text field where it should only include one error message.
Although the returnData contains the status of the command, it is not directly related to the success or failure of the command. This means that if returnData is ‘Failed’ and the errors field is empty, the command will still be considered successful.
User Case I
In situations where a command may produce multiple error messages, the errors field, being a text field, is limited in its capacity to store more than one message. To address this limitation, a general message such as "There are more than one errors inside the command. For more information, please refer to the errorMessages field inside the rawData field" can be placed in the errors field. Subsequently, all individual error messages can be logged within the errorMessages field inside the rawData field. In this scenario, the rawData field should be formatted as a JSON object, with the error messages stored as an array. This approach allows for the logging of all errors encountered during the command execution while maintaining clarity and organization of the error data.
User Case II
In scenarios where a single command execution involves multiple requests, it's possible for any of these requests to contain errors within their responses. If you need to handle each error individually but prefer not to have a single error result in the failure of the entire command, there's a workaround. You can opt not to input the error message into the errors field and instead store it in the rawData field. By following this approach, you can mark the command as "Partially Successful" since it contains errors but still returns results. This ensures that each error is appropriately handled without compromising the overall execution of the command.
# This is the JSON format for rawData field that D3 recommend to use in case of handling multiple errors.

rawData = {
results: [<response rawData>]
errorMessages: [<error Messages>]
}
READER NOTE
Retry a command in order to handle a specific error. Please refer to Command Retry Mechanism
Passdown
To enable the scheduled advancement of a timed command, a Passdown data must be configured to contain the next start time. This ensures that the command is pushed according to the specified schedule.
READER NOTEs: For more information on how and when to set passdown data, please reference the real case in the code sample - Fetch Event/Fetch Incident Passdown Data
D3 Python Library
Utility Command & Integration Command Calls
In your custom Python script, you can use the D3 out-of-box System Utility Command or Integration Command.
To call a Utility Command within the Python Script
D3.Utility.{Command Name}<{Command Type}>(parameters)
def utilityCommandCalls(): return D3.Utility.concatToRear <Text>("Join ", "Text")WARNING
Please be aware that Command Name is the internal name of the command
Command Type is the first parameter type of the command.
Here are some useful and commonly used utility commands in the custom Python Script
Command Internal Name | Command Display Name | Description | Calls | Input | Output |
equals | Text Equals to | Checks if the two input texts are identical | D3.Utility.equals<Text>("SOAR","SOAR") | Input 1 - Text SOAR Input 2 - Text SOAR | Return Data - Data Type: Boolean true |
contains | Contains Text | Checks if the input text contains the specified text | D3.Utility.contains<Text>("Welcome to use the SOAR product","SOAR") | Input - Text Welcome to use the SOAR product Search Value - Text SOAR | Return Data - Data Type: Boolean true |
GetUTCTimeNow | Get Current UTC Time | Gets current UTC time | D3.Utility.GetUTCTimeNow<>() | Site: dropdown list | Return Data - Data Type: Text "2020-05-28 23:08:39" |
ExtractArtifactsToJsonObjectArrayWithArrayKeyValueO | Extract Key/Value Pairs from JSON Object | Extracts values of specified keys from a JSON Object | D3.Utility.GetUTCTimeNow<>() | Input - JSON Object The JSON Object to extract some key's value from Sample Data { "IPAddress": "***.***.***.***", "RiskLevel": "Low", "Type": "Cyber" } Keys - Text Array The keys list Sample Data [ "IPAddress", "RiskLevel" ] | Context Data - Data Type: JSON Object: { "IPAddress": "***.***.***.***", "RiskLevel": "Low" } |
greaterThan | Greater than | Checks if the first number is greater than the second number | D3.Utility.greaterThan<Number>(8000,8000) | Input 1 - Number 8000 Input 2 - Number 8000 | Return Data - Data Type: Boolean false |
READER NOTE
For more information about the Utility Commands, please refer to the Utility Command
To call an Integration Command within the Python Script
D3.Integration.{Integration Name}.{Command Name}(parameters)
READER NOTE
Data type is not necessary
The limitations are:
Only custom Integration Commands can execute other Integration Commands that belong to the same Integration
Custom Utility Commands cannot execute any Integration Commands.
D3 Helper Functions
D3 provides users with pre-defined helper functions to assist developers in writing cleaner, more modular, and efficient code in D3 ways.
Each helper function can be used with pb.{function name}
isJson(jsonString)
return
TrueorFalseif it is JSONParameters:
jsonString:the JSON string to validate
Sample Input: pb.isJson('{"Simple":"Simple JSON"}')
Sample Output: True
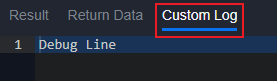
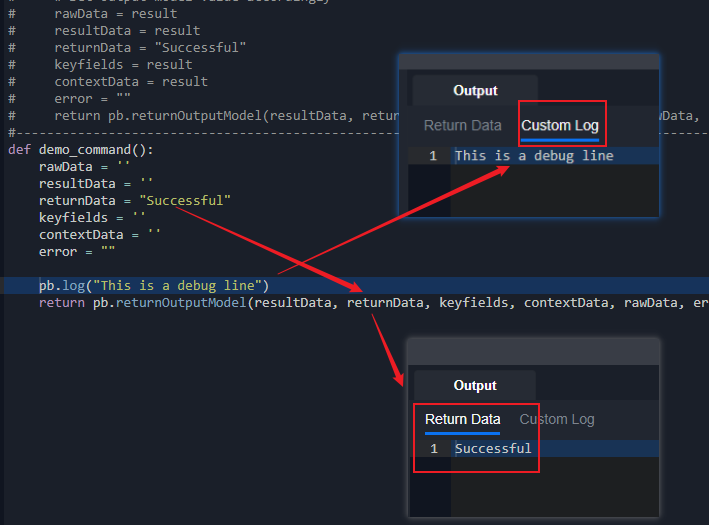
log(message)
Log any message to show in the Custom Log tab. The tab will only show when testing command
Sample Input: pb.log("Debug Line")
Sample Output:
returnOutputModel( result, returnData, outputData, contexData, rawData, error, passdownData={})
It will generate our D3 output model. It is recommended to be used in writing custom commands.
Parameters:
result: HTML formatted data displayed in Result tabreturnData: Simple data that can be directly used by the next commandsoutputData: Should be left empty. This will be automatically generated using Key Fields configurationcontextData: Contextual data to be shared with other tasksrawData: Raw data from the commanderror: Error detailspassdownData: A Event Intake and Incident Intake related field that can pass down parameter values to the next scheduled instance.
Sample Input:
pb.returnOutputModel("<body><h1>Sample Result Data</h1></body>", "Sample Return Data", "", {"SampleContextData": "ContextData"}, {"SampleRawData": "Rawdata"}, "Sample Error", passdownData = {})
Sample Output:
{
  "result": {
    "description": "<body><h1>Sample Result Data</h1></body>",
    "references": [],
    "actions": []
  },
  "returnData": "Sample Return Data",
  "outputData": "",
  "contextData": {
    "SampleContextData": "ContextData"
  },
  "rawData": {
    "SampleRawData": "Rawdata"
  },
  "error": "Sample Error",
  "passdownData": {},
  "customLog": "",
  "others": {}
}
uploadFile(file)
Upload the file to D3 playbook file table.
Parameters:
File JSON object to be uploaded to the file table. Format as follows:
{"file": (filename,content)}.contentis binary data of the file.
Sample Input: pb.uploadFile({"file": ("Sample File","*****=")})
Sample Output:
{
  "fileId": "*****",
  "fileName": "Sample File",
  "md5": "*****",
  "sha1": "*****",
  "sha256": "*****"
}downloadFile(fileid, filesource) > IR_ATCHMNT, PB_FILE, KC_AF_FILE
Download the file from D3 file tables
Parameters:
fileid: the file ID in the file tablefilesource: one of the three D3 file table:IR_ATCHMNT: Incident attachment filesPB_FILE: Playbook filesKC_AF_FILE: Artifact files
Sample Input: pb.downloadFile("*****", "PB_FILE") ('Sample File', b'*****=')
Sample Output: ('Sample File', b'*****=')
Note that it works best paired with the decode function
Sample Input: filename, filecontent = pb.downloadFile("*****", "PB_FILE") filecontent.decode("utf-8")
Sample Output: Sample Text
ConvertJsonObjectArrayToHTMLString(inputArray, showHeader=True, isCol="col")
Format the JSON Object array to an HTML table string to be put into the Result field in the D3 outputmodel.
Parameters:
inputArray: the JSON object array to be convertedshowHeader: whether to show the key name as header in the table. Default value is True. Can be set to False.isCol: whether to format the table in a column style. Default value is "col". Can be "row"
Sample Input:
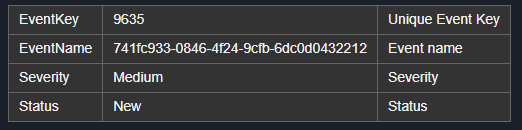
pb.ConvertJsonObjectArrayToHTMLString([{ "fieldName": "EventKey", "value": "9635", "displayName": "Unique Event Key" }, { "fieldName": "EventName", "value": "*****", "displayName": "Event name" }, { "fieldName": "Severity", "value": "Medium", "displayName": "Severity" }, { "fieldName": "Status", "value": "New", "displayName": "Status" }])
Sample Output
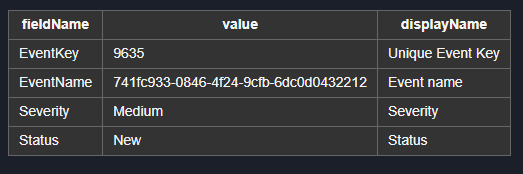
<table class='cc-table horizontal-table'><tr><th>fieldName</th><th>value</th><th>displayName</th></tr><tr><td>EventKey</td><td>9635</td><td>Unique Event Key</td></tr><tr><td>EventName</td><td>*****</td><td>Event name</td></tr><tr><td>Severity</td><td>Medium</td><td>Severity</td></tr><tr><td>Status</td><td>New</td><td>Status</td></tr></table>Sample Input:
pb.ConvertJsonObjectArrayToHTMLString([{ "fieldName": "EventKey", "value": "9635", "displayName": "Unique Event Key" }, { "fieldName": "EventName", "value": "*****", "displayName": "Event name" }, { "fieldName": "Severity", "value": "Medium", "displayName": "Severity" }, { "fieldName": "Status", "value": "New", "displayName": "Status" }], False)
Sample Output:
<table class='cc-table horizontal-table'><tr><td>EventKey</td><td>9635</td><td>Unique Event Key</td></tr><tr><td>EventName</td><td>*****</td><td>Event name</td></tr><tr><td>Severity</td><td>Medium</td><td>Severity</td></tr><tr><td>Status</td><td>New</td><td>Status</td></tr></table>Sample Input:
pb.ConvertJsonObjectArrayToHTMLString([{ "fieldName": "EventKey", "value": "9635", "displayName": "Unique Event Key" }, { "fieldName": "EventName", "value": "*****", "displayName": "Event name" }, { "fieldName": "Severity", "value": "Medium", "displayName": "Severity" }, { "fieldName": "Status", "value": "New", "displayName": "Status" }], True, "row")
Sample Output:

<table class='cc-table vertical-table'><tr><th>fieldName</th><td>EventKey</td><td>EventName</td><td>Severity</td><td>Status</td></tr><tr><th>value</th><td>9635</td><td>*****</td><td>Medium</td><td>New</td></tr><tr><th>displayName</th><td>Unique Event Key</td><td>Event name</td><td>Severity</td><td>Status</td></tr></table>Debugging & Testing
When coding in the D3 Python script, you can logout any output during command execution by using our helper function pb.log().
Logged data will be displayed in command testing, and in playbook runtime while testing a playbook.
Logged data will be saved even if the command exits due to an exception.
Use the traceback library to get the full stack trace of exceptions.
Stack traces will match the line number of the command script if a command exits due to an exception.
Use
traceback.format_exc()to get full stack trace during exception handling.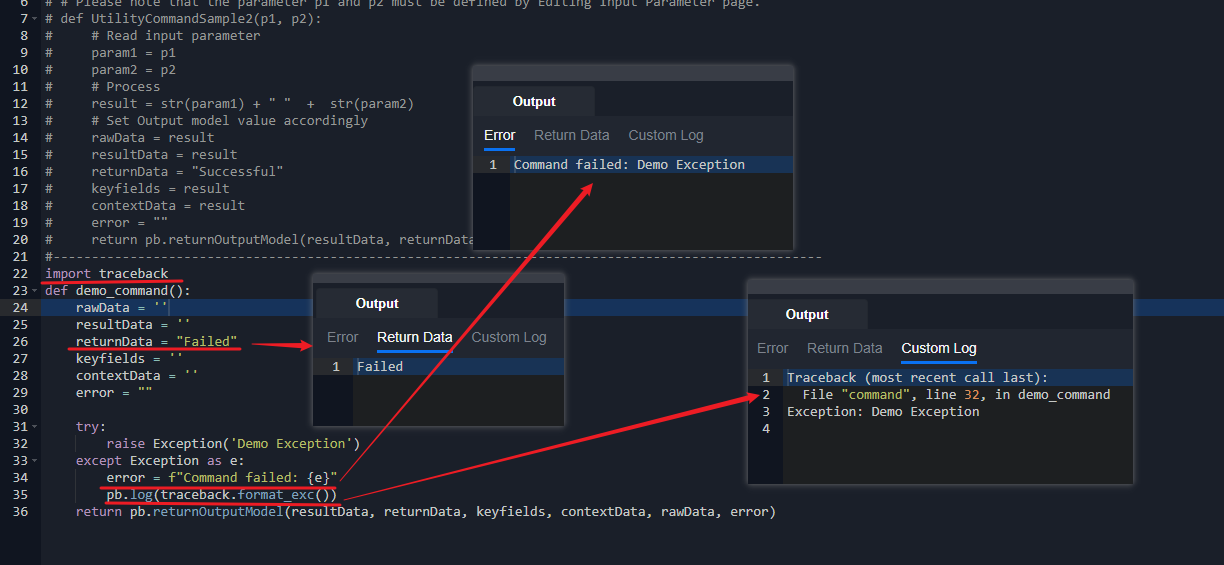
Command Retry Mechanism
Sometimes command may fail due to some unexpected reasons. You can return a special "__RETRY__” as returnData in D3 output model and our system will rerun the command. Also, the retry count can be retrieved as pb.runtime.get('retrycount', 0).
def retrySample():
    errors = []
    rawData = []
    result = []
    returnData = "Failed"
    # get the retry count
    retrycount = pb.runtime.get("retrycount", 0)
    # retry if updateEvents throw an expection and the retry count is less than 10. It will stop at the 10th time and return "Failed"
    try:
        return updateEvents()
    except Exception:
        if retrycount < 10:
            retryOptions = {
                "__ACTION__": "__RETRY__",
                "__DELAY__": [10, 20, 30, 40]
            }
            return pb.returnOutputModel(result, retryOptions, "", "", rawData,
                                        errors)
    return pb.returnOutputModel(result, returnData, "", "", rawData, errors)
Code Sample
Fetch Event/Fetch Incident
Schedule Command Execution
During a data ingestion schedule, the End Time of each command execution is variable. Therefore, you need to adjust the End Time based on the Start Time of the command input parameter.
Here we offers an algorithm to determine the End Time of each command execution.
Case 1: If Current Time (UTCNowTime) - Start Time >= 1 hour, it means that the schedule is way behind. Therefore, you need to quickly catch up to the Current Time in order to make the schedule responsive to the present timeline.
Solution: Since the MAX catch up time D3 recommend is 1 hour, the End Time should be set to 1 hour after Start Time.
EndTime = StartTime + 1 hour
Case 2: If Current Time (UTCNowTime) - Start Time < 1 hour, it means that the schedule is either a little behind or right on time.
Solution: Since the schedule is either on time or a little behind, the End Time should be set to the current time to make the schedule responsive to the present timeline.
EndTime = UTCNowTime
Tolerance Scope
As the data of the product may have a gap between the data generated in the product and then able to be queried by the REST API service, we often need to set a tolerance scope in minutes for the command to cover a little bit past time to get the data that generated but not able to be ingested by the REST call.
Calculate the Start Time by applying the Tolerance Scope: StartTime = StartTime - ToleranceScope
Passdown Data
Since fetchEvent and fetchIncident commands are usually time-sensitive, it is important to schedule the next start time for the next round of fetch events/incidents. In our system commands, this situation is handled as long as the start time of the command and the schedule interval is filled. If a custom fetchEvent/fetchIncident is needed, the next start time can be handled by the passdown data.
Calculate the next start time which basically will be the current end time of the current task and set it to the passdown data object with the key StartTime and set the format to D3's datetime format "%Y-%m-%d %H:%M:%S".
After generating the Passdown data, it must be set in the return model to be used for the next schedule
Passdown = {
    "StartTime": EndTime.strftime("%Y-%m-%d %H:%M:%S")
}
return pb.returnOutputModel(result, returnData, "", "", returnData, errors, passdownData=Passdown )
Sample Code
def fetchEvent(*args):
    # args[0]: StartTime
    # args[1]: EndTime
    # args[2]: topRecentEventNumber
    # args[3]: SearchCondition
    # args[4]: ToleranceScope

    errors = []
    returnData = ""
    result = ""
    returnData = "Successful"

    passdown = {}
    passdownMinutes = int(args[4])

    # Only calculate the endTime when the Tolerance scope has a value which indicate the task is for schedule
    def _calcEndTime(start, endTime):
        if start < datetime.utcnow() - timedelta(hours = 1):
            if endTime < datetime.utcnow() - timedelta(hours = 1):
                nextEndtime = endTime + timedelta(hours = 1)
            else:
                nextEndtime = datetime.utcnow()
        else:
            if endTime >= datetime.now():
                endTime = datetime.now() # auto-adjustment invalid input time


        passdown = {
            "StartTime": endTime.strftime("%Y-%m-%d %H:%M:%S")
        }

        return Endtime, passdown


    try:
        startTime, endTime = args[0].replace(tzinfo=pytz.utc), args[1].replace(tzinfo=pytz.utc)
        topRecentEventNumber = int(args[2])

        if args[4] > 0:
            endTime, passdown = _calcEndTime(startTime, endTime)
            startTime = startTime - timedelta(minutes = int(args[4]))


        ## conn is a variable with the credential setup
        params = {
            "startDate": startTime,
            "endDate": endTime,
            "filter": args[3]
        }

        ## remove the datetime in the request field if the year value is 1900
        if startTime.year == 1900:
            params.pop("startDate")
        if endTime.year == 1900:
            params.pop("endDate")


        returnData, error = conn.sendRequest("GET", "REST endpoint path", params=params)
        if not error:
            caseItems = returnData.get("results", [])
            if topRecentEventNumber > 0:
                caseItems = caseItems[:topRecentEventNumber]
                returnData["results"] = caseItems
            result = {
                "Start Time (UTC)": startTime.strftime("%Y-%m-%d %H:%M:%S"),
                "End Time (UTC)": endTime.strftime("%Y-%m-%d %H:%M:%S"),
                "Events Count": len(caseItems)
            }
        else:
            errors.append(error)

        if len(errors) == 0 and len(caseItems) == 0:
            returnData = "Successful with No Event Data"
        elif len(errors) > 0 and len(caseItems) > 0:
            returnData = "Partially Successful"
        elif len(errors) > 0 and len(caseItems) == 0:
            returnData = "Failed"

    except Exception as ex:
        errors += list(ex.args)
        returnData = "Failed"

    return pb.returnOutputModel(result, returnData, "", "", "", errors, passdownData=passdown)
Test connection
To test your integration's connection, you can manually send a request to the third-party API and monitor the response. If the response indicates any connection issues, the test connection command should fail; otherwise, it should succeed.
READER NOTE
We offer the functionality to schedule your test connection command for periodic connection health checks. Therefore, when building your own test connection, D3 recommends choosing a request with minimal impact and low cost, such as a simple GET request.
Sample Code
def TestConnection():
    # Set output model initial value
    rawData = ""
    resultData = ""
    returnData = ""
    keyFields = ""
    contextData = ""
    error = ""

    # Process and set output model value
    try:
        r = requests.get(url="http://ip.jsontest.com/", verify=False)
        if(r.ok):
          rawData = r.json()
          returnData = "Successful"
        else:
          error = "cannot connect to the site."
    except Exception as e:
        error = str(e)
        returnData = "Failed"
    return pb.returnOutputModel(resultData, returnData, keyFields, contextData, rawData, error)