
Additional Configurations and Setups
LAST UPDATED: NOV 28, 2024
Commands
Application Integration
Open the Settings popup.
.png?inst-v=9d16beaf-952a-4ae4-8fe8-e35f7a3745da)
Click into a Slack channel of interest.
Click on the vertical ellipsis button on the top right corner.
Click on the Edit settings menu option.
Click on the Integrations tab, then click on the Add an App button.
.png?inst-v=9d16beaf-952a-4ae4-8fe8-e35f7a3745da)
Click on the Add button for your application.
.png?inst-v=9d16beaf-952a-4ae4-8fe8-e35f7a3745da)
Test the Send Messages command in D3 vSOC.
.png?inst-v=9d16beaf-952a-4ae4-8fe8-e35f7a3745da)
Select your configured connection.
Enter the channel ID or user ID.
Channel ID
If the channel ID is unknown, execute the List Channels command to retrieve it.-20241112-225553.png?inst-v=9d16beaf-952a-4ae4-8fe8-e35f7a3745da)
i. Select your configured connection.
ii. Click on the Test Command button.
iii. Copy and paste the channel ID into the Channel or User ID input parameter of the Send Messages or Send Interactivity command.
Alternatively, users may find the Channel ID in Slack:-20241125-182019.png?inst-v=9d16beaf-952a-4ae4-8fe8-e35f7a3745da)
1. Right click on your channel of choice.
2. Click on on the View channel details option.-20241125-182148.png?inst-v=9d16beaf-952a-4ae4-8fe8-e35f7a3745da)
3. Copy and paste the Channel ID into the Channel or User ID input parameter of the Send Messages or Send Interactivity command.
User ID
If the user ID is unknown, execute the List Users command to retrieve it.-20241112-234248.png?inst-v=9d16beaf-952a-4ae4-8fe8-e35f7a3745da)
i. Select your configured connection.
ii. Click on the Test Command button.
iii. Copy and paste the User ID into the Channel or User ID input parameter for the Send Messages or Send Interactivity command. The IDs in the UserIDs list correspond to the users in the UserNames list, with each ID matching the user at the same position in the respective lists.
Alternatively, users may find the User ID in Slack:-20241125-231750.png?inst-v=9d16beaf-952a-4ae4-8fe8-e35f7a3745da)
1. Open the Direct Messages accordion.
2. Click on your user of choice.
3. Click on the large user icon.
4. Click on the vertical ellipsis button within the Profile section.
5. Click on the Copy member ID button, then paste the User ID into the Channel or User ID input parameter for the Send Messages or Send Interactivity command.Enter a message.
Click on the Test Command button.
Ensure that the command have executed successfully.
Verify that the message appears in Slack.
.png?inst-v=9d16beaf-952a-4ae4-8fe8-e35f7a3745da)
If the message is sent to a user, a new chat with the bot user will appear for that individual under the Apps accordion.
-20241113-000916.png?inst-v=9d16beaf-952a-4ae4-8fe8-e35f7a3745da)
Enabling Interactivity
Slack's Block Kit is a UI framework that enables the creation and use of interactive elements within messages, such as buttons, dropdowns, and checkboxes. To use interactive elements, an interactivity URL must be configured in the app settings; interactivity is not supported by default.
-20241113-194509.png?inst-v=9d16beaf-952a-4ae4-8fe8-e35f7a3745da)
Follow the steps below to enable interactivity:
Toggle on Interactivity.
-20241113-195025.png?inst-v=9d16beaf-952a-4ae4-8fe8-e35f7a3745da)
Navigate to the Interactivity & Shortcuts page.
Click on the toggle.
Enter the Request URL in the following format:
TEXThttps://<domain>/<path>/VSOC/api/TaskResponse/slack/interactivity-20241113-203544.png?inst-v=9d16beaf-952a-4ae4-8fe8-e35f7a3745da)
Click on the Save Changes button at the bottom right corner.
Implement a Send Interactivity playbook task in D3 vSOC.
Input a Channel or User ID. See the instructions on retrieving these.
Let us use the following code for the Message Blocks input parameter:
JSON[ { "type": "input", "element": { "type": "datetimepicker", "action_id": "datetimepicker-action" }, "hint": { "type": "plain_text", "text": "This is some hint text", "emoji": true }, "label": { "type": "plain_text", "text": "Start date", "emoji": true } } ]Set the Wait for Response parameter is set to True.
Click on the Test Playbook button in the playbook UI, then click on the Run Test button in the popup.
READER NOTE
If the Wait for Response parameter was set to True, the Send Interactivity command should be in a Paused state.
-20241113-203749.png?inst-v=9d16beaf-952a-4ae4-8fe8-e35f7a3745da)
Navigate to Slack and submit a response.
-20241113-204329.png?inst-v=9d16beaf-952a-4ae4-8fe8-e35f7a3745da)
Select a date using the dropdown menu.
Click on the Submit your response button.
Click on the Submit button in the Information popup.
-20241113-204347.png?inst-v=9d16beaf-952a-4ae4-8fe8-e35f7a3745da)
READER NOTE
Following the initial submission, no further changes or submissions will be processed by the D3 playbook task.
Navigate back to D3 vSOC and verify the completion of the Send Interactivity task.
-20241113-204511.png?inst-v=9d16beaf-952a-4ae4-8fe8-e35f7a3745da)
Application Reinstallation
Reinstallation of a Slack application is warranted for various application configuration changes, such as Scopes.
%201-20241113-230806.png?inst-v=9d16beaf-952a-4ae4-8fe8-e35f7a3745da)
Removing the Application
Navigate to the page containing all of your installed apps.
-20241113-224026.png?inst-v=9d16beaf-952a-4ae4-8fe8-e35f7a3745da)
Click on your workspace dropdown menu.
Click on the Tools & settings menu option.
Click on the Manage apps sub-menu option.
Click on the ellipsis button next to your application, then click on the Uninstall option within the popup.
-20241129-031155.png?inst-v=9d16beaf-952a-4ae4-8fe8-e35f7a3745da)
An Uninstall <application name> from your team popup will render.

Click on the I want to uninstall <application name> from my team checkbox.
Click on the Uninstall button.
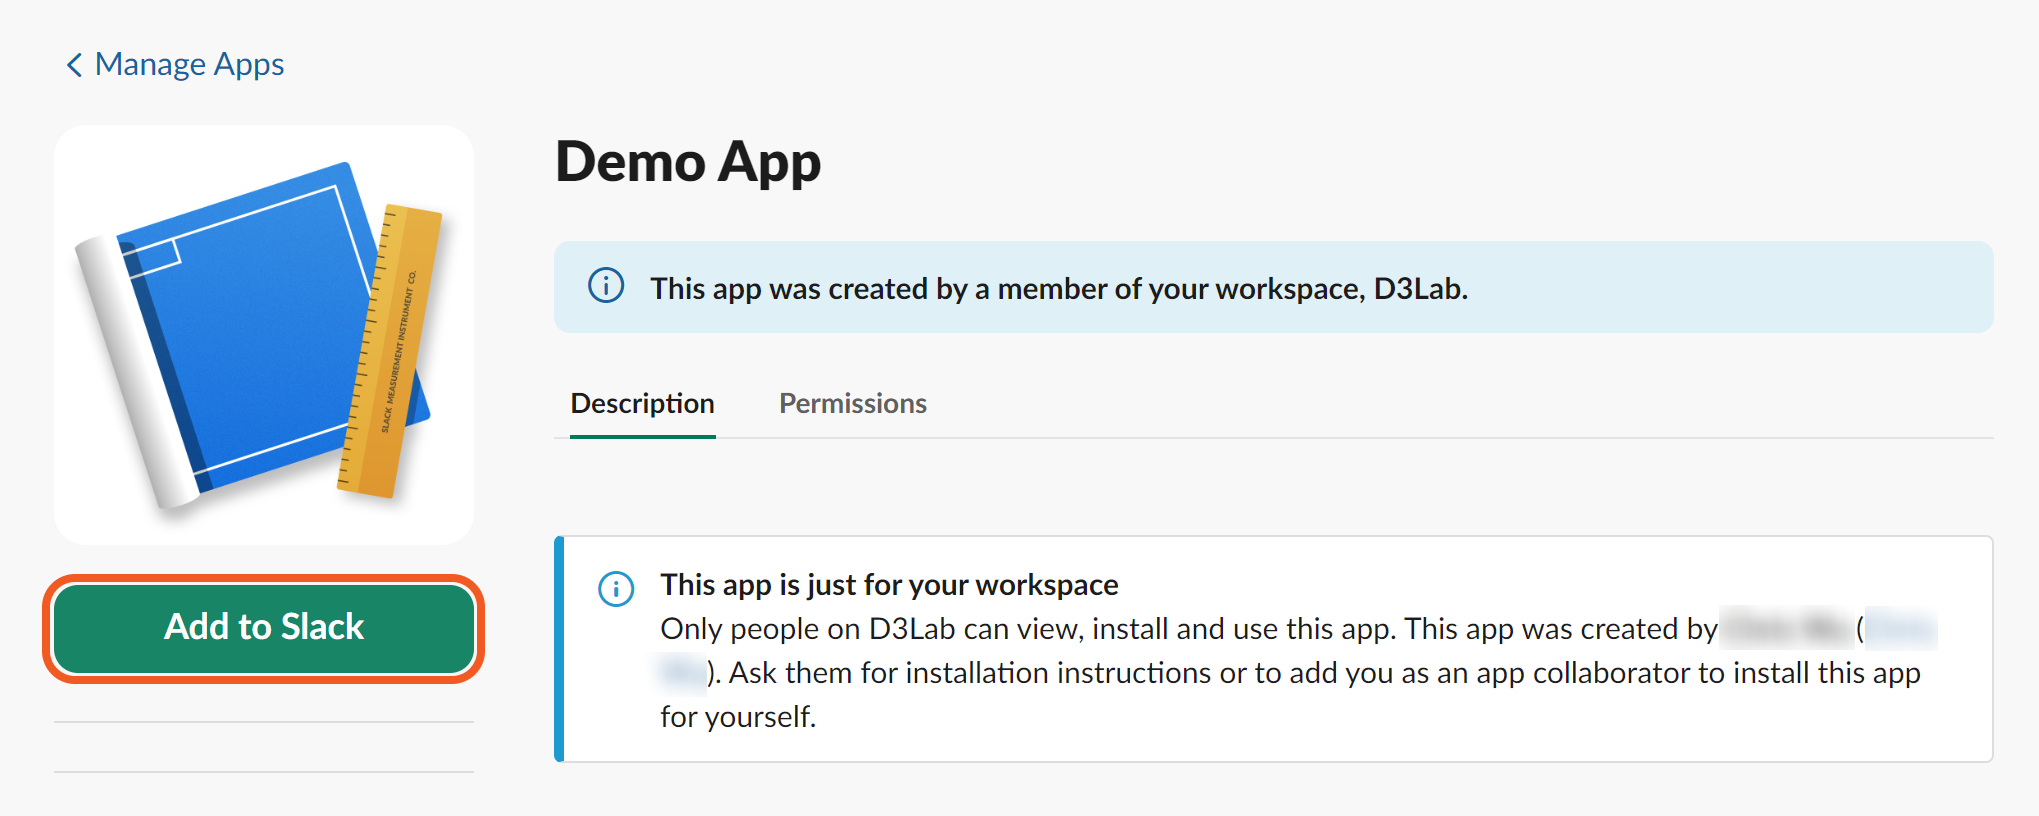
Reinstalling the Application
Authenticating with a User OAuth Token (API token):
Navigate to https://
<workspace-name>.slack.com/marketplace/<app-id>-<app-name>To obtain your
<app-id>, navigate to Slack API: Applications | Slack > your application > Basic Information > App ID
Click on the Add to Slack button.
Click on the Allow button.
-20241113-224802.png?inst-v=9d16beaf-952a-4ae4-8fe8-e35f7a3745da)
Click on the Install to <application name> button.
-20241113-224807.png?inst-v=9d16beaf-952a-4ae4-8fe8-e35f7a3745da)
Click on the Copy button to copy to Bot User OAuth Token.
-20241113-224814.png?inst-v=9d16beaf-952a-4ae4-8fe8-e35f7a3745da)
Test and save the connection.
-20241113-230001.png?inst-v=9d16beaf-952a-4ae4-8fe8-e35f7a3745da)
Paste in the Bot User OAuth Token into the API Token field in D3 vSOC.
Click on the Test Connection button.
Click on the OK button, then click on the Save button.
Save the new connection, then add the Slack application to the chosen Slack channels. Refer to steps 1-3 for the Application Integration command.
Authenticating with an OAuth 2.0 Authorization Code:
Click on the Add to Slack button.
Click on the Allow button.

Click on the Copy button.
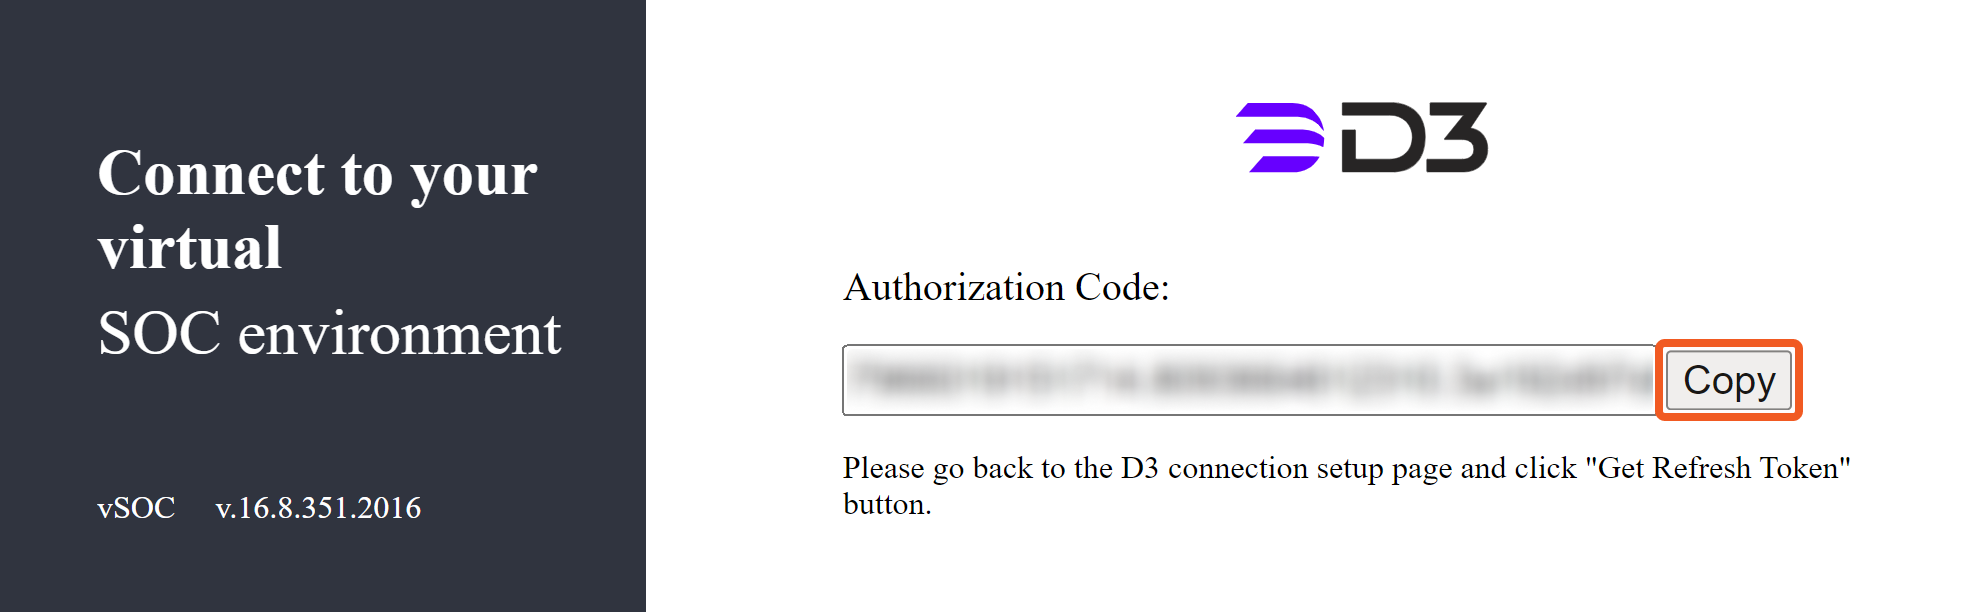
4. Navigate to D3 vSOC.
ALERT
Do not click the Get Authorization button.
Paste the content within the Authorization Code field.

Click on the Get Refresh Token button to automatically populate the Refresh Token and Authorization Code fields.
-20241023-193028.png?inst-v=9d16beaf-952a-4ae4-8fe8-e35f7a3745da)
Save the new connection, then add the Slack application to the chosen Slack channels. Refer to steps 1-3 for the Application Integration command.
Enabling Slash Commands
-20241125-194723.png?inst-v=9d16beaf-952a-4ae4-8fe8-e35f7a3745da)
Navigate into your application, then click on the Basic Information menu item.
Copy the App ID.
-20241125-201318.png?inst-v=9d16beaf-952a-4ae4-8fe8-e35f7a3745da)
Paste the App ID into the API ID field in D3 vSOC.
Copy the Channel ID of for the channel you wish to be able to use the slash command (step 4b of the Application Integration section) and paste it into the Channel ID field in D3 vSOC.

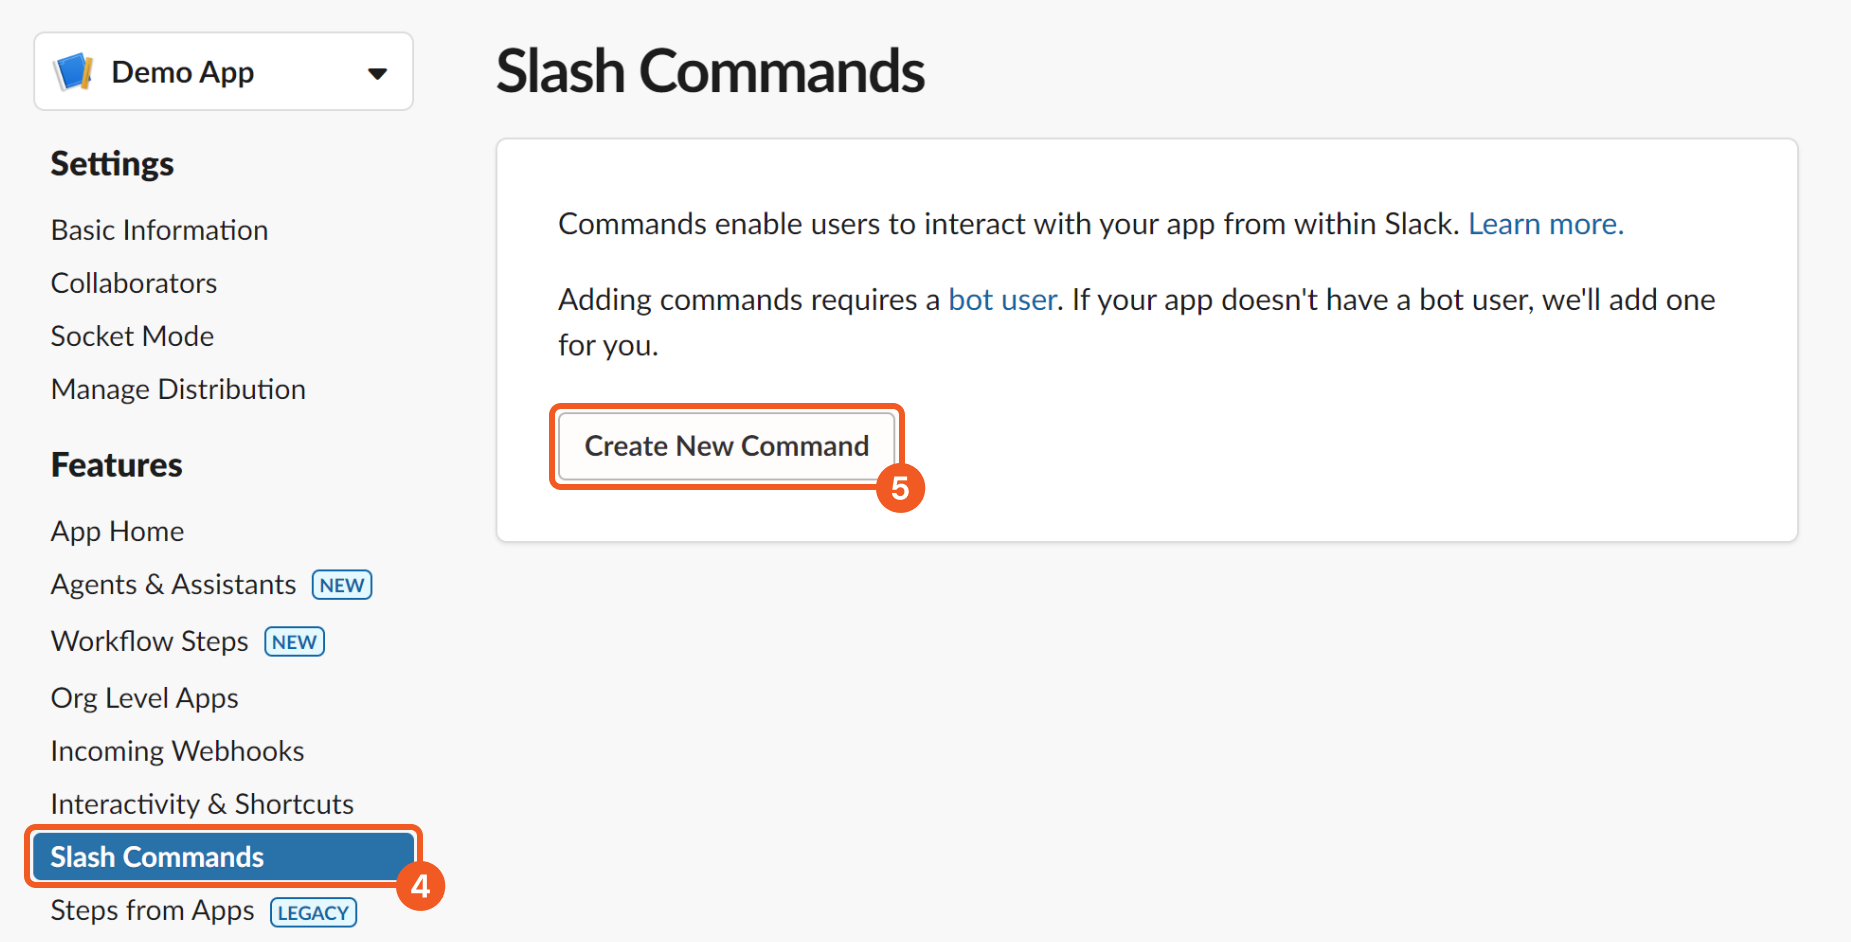
Click on the Slash Commands menu item.
Click on the Create New Command button.
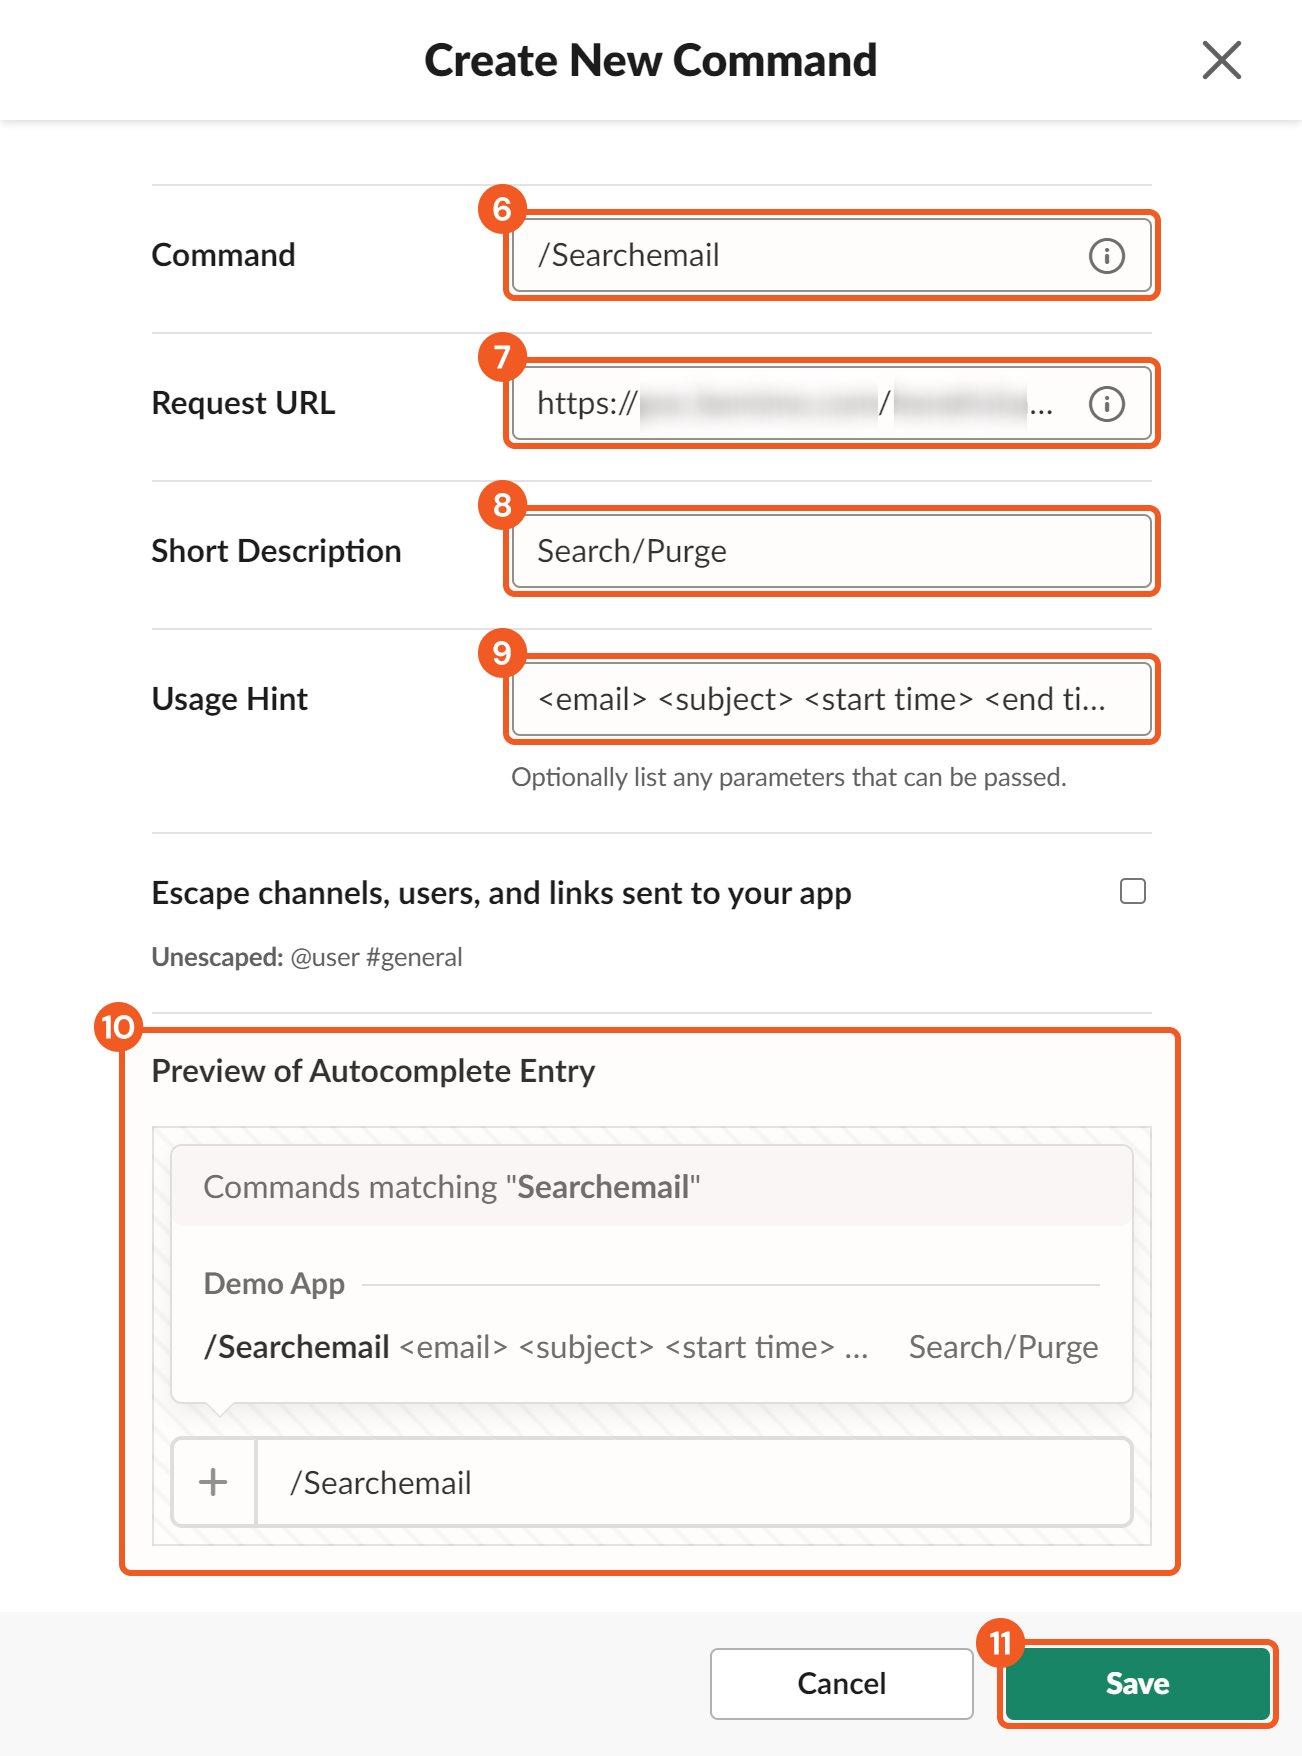
CAUTION
Do not check the Escape channels, users, and links sent to you app option, as it will prevent email addresses or any text containing "@" or "#" from being passed as parameters.
Input the slash command. The slash command adheres to the following structure:
/<System name of a D3 utility command>.
For playbook commands:
-20241125-202400.png?inst-v=9d16beaf-952a-4ae4-8fe8-e35f7a3745da)
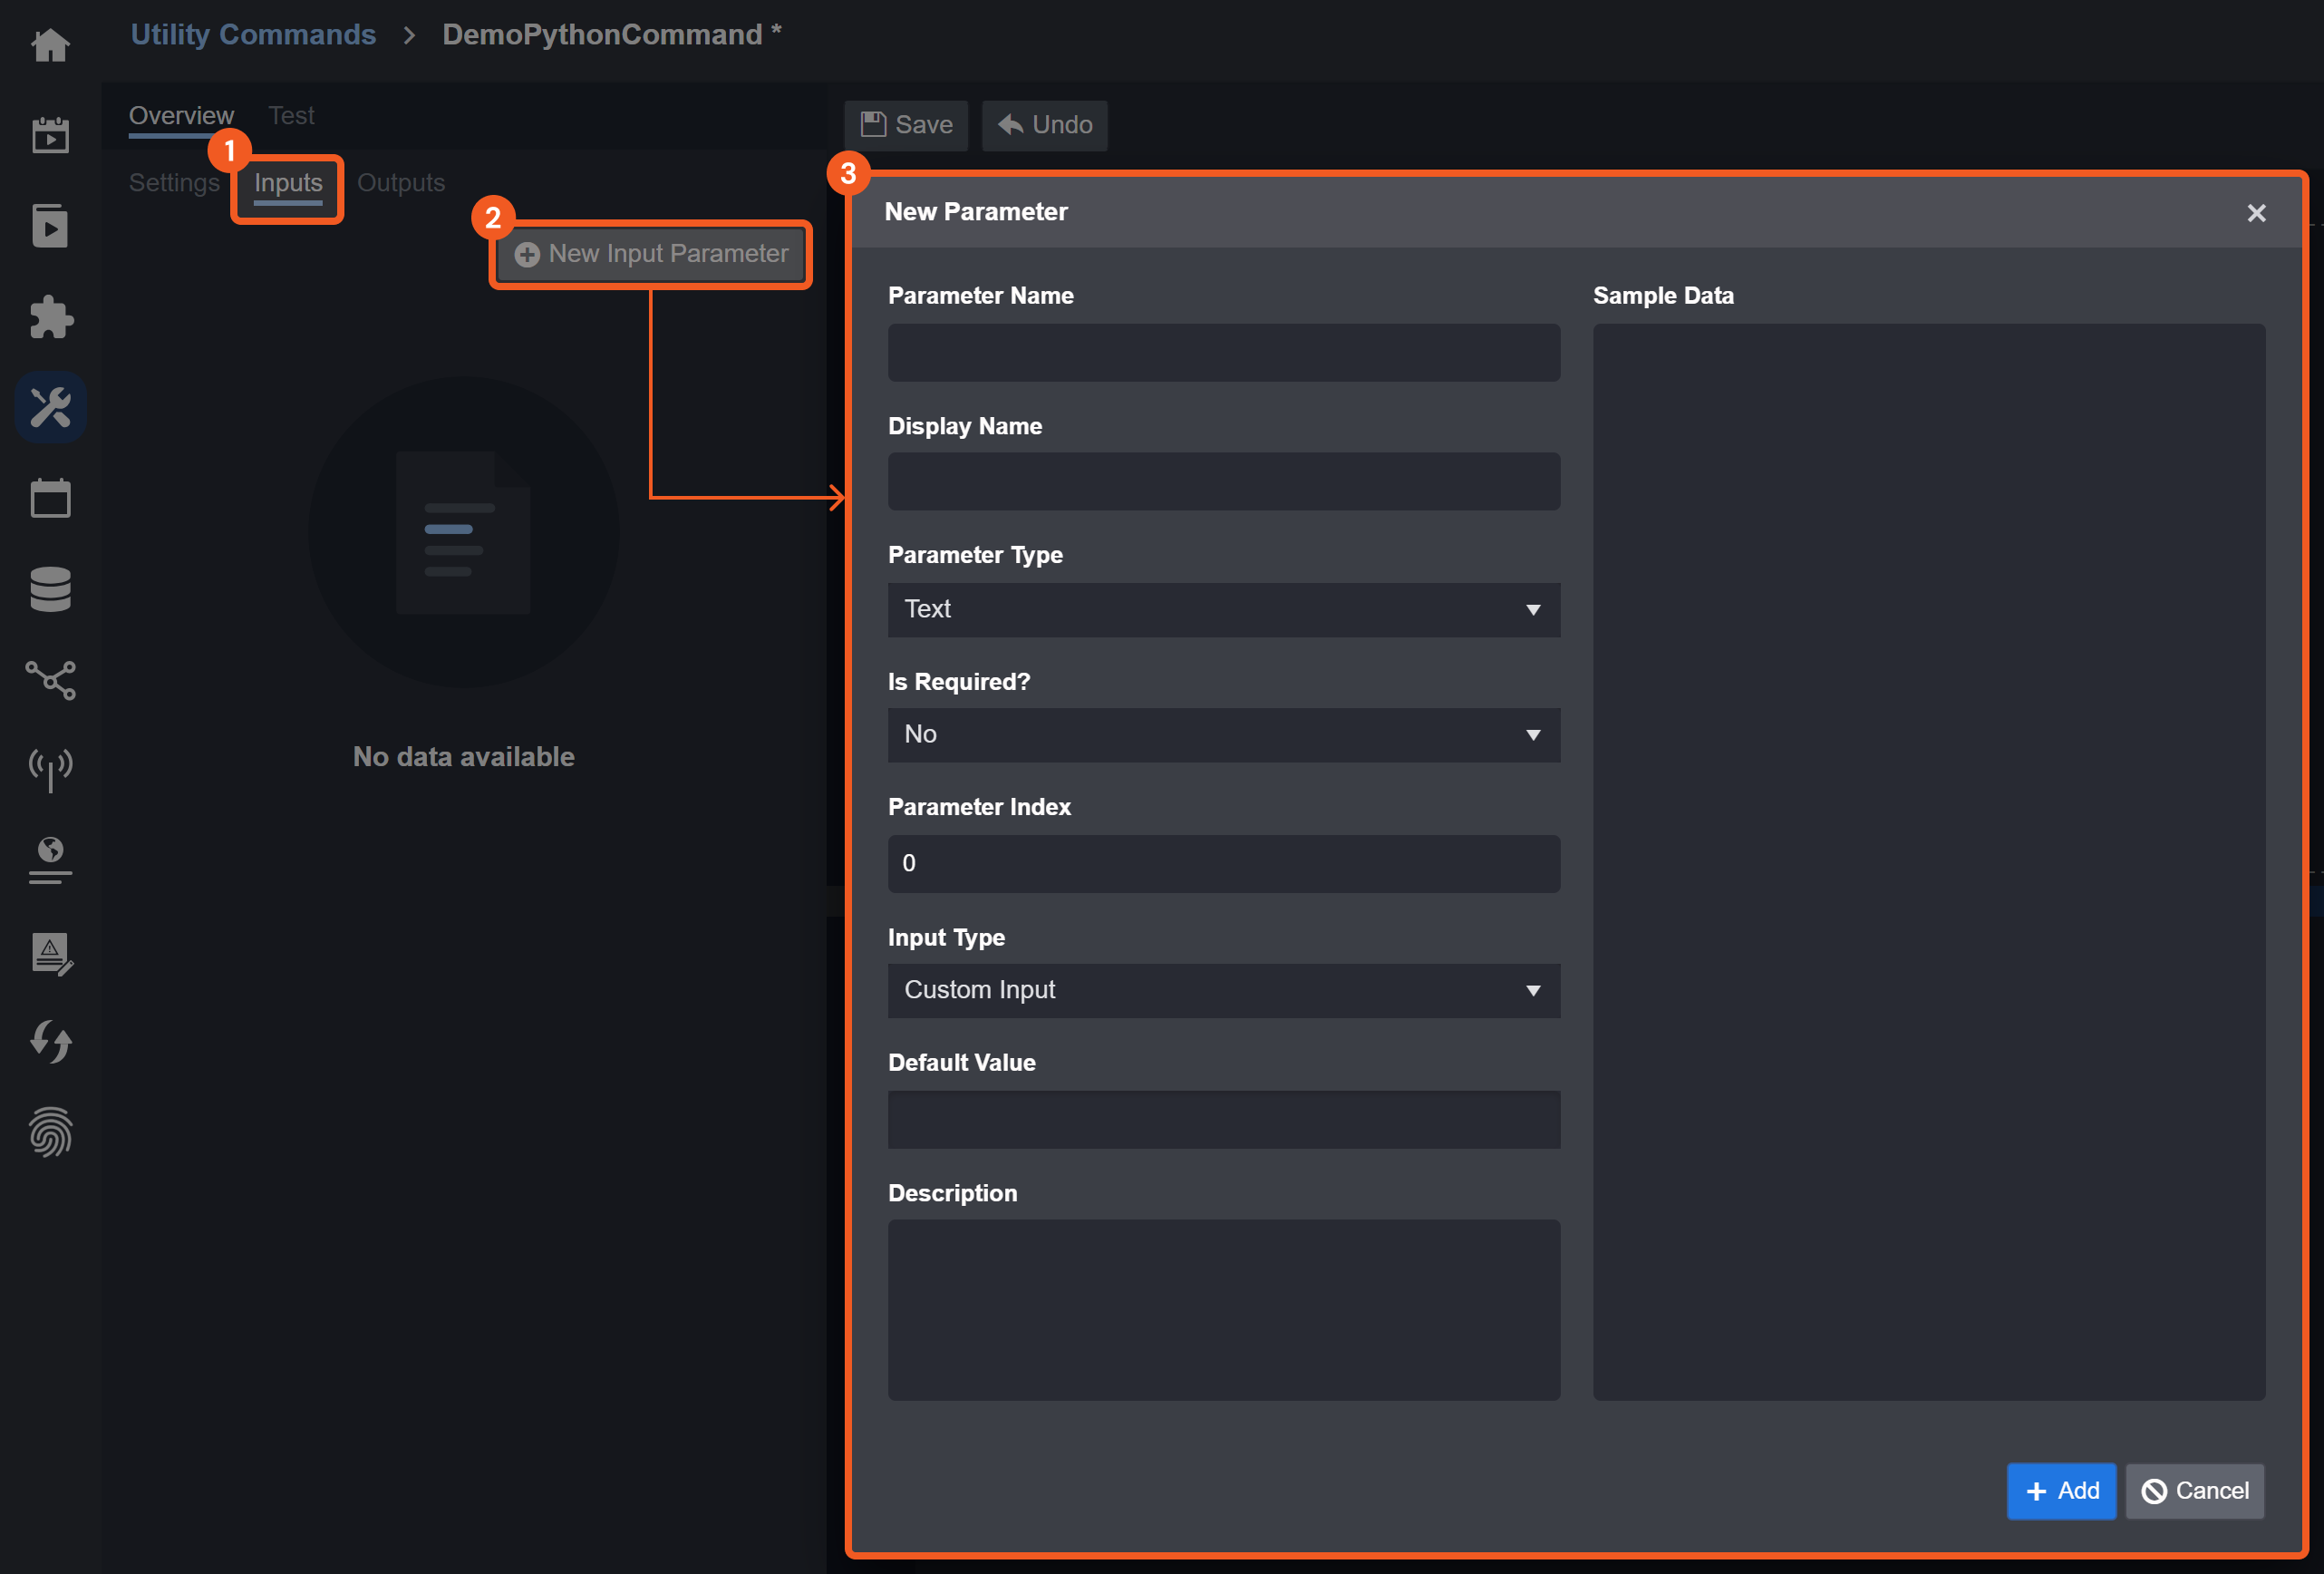
For system (built-in) and Python commands:
-20241125-204814.png?inst-v=9d16beaf-952a-4ae4-8fe8-e35f7a3745da)
Input the Request URL.
READER NOTE
The Request URL adheres to the following structure:
https://<your D3 domain>/<path>/VSOC/api/slack/slashcommandThe
https://<your D3 domain>/<path>/VSOC/portion of the Request URL is located in the URL of your D3 vSOC login page.
Enter a short description for this slash command.
(Recommended) Enter a usage hint for your slash command.
READER NOTE
Slash commands require the exact number of parameters defined by the D3 utility command, regardless of whether the parameters are optional or mandatory when executed in D3 vSOC. It is recommended to list all parameters as a reference. See the example beneath.
For playbook commands:
-20241125-212829.png?inst-v=9d16beaf-952a-4ae4-8fe8-e35f7a3745da)
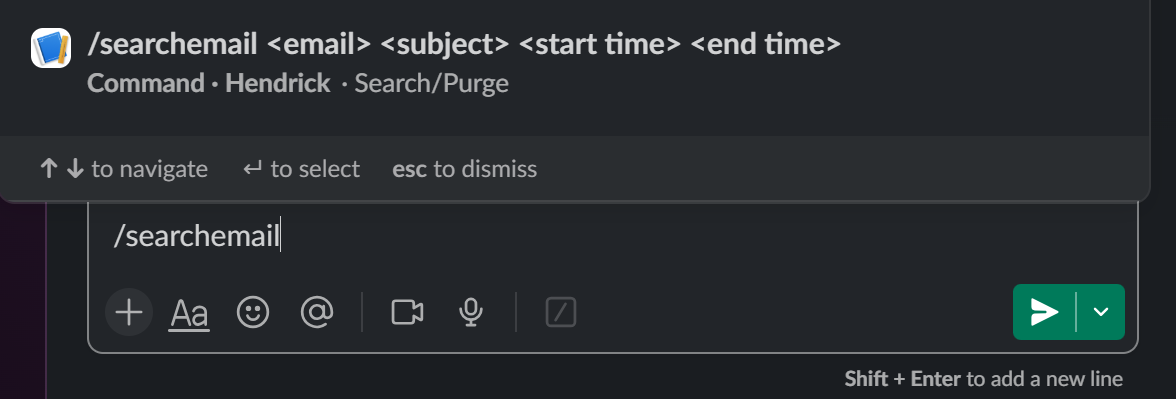
For Python commands:
Preview the autocomplete entry.
Click on the Save button.
Verify that the slash command has been created.
-20241125-211636.png?inst-v=9d16beaf-952a-4ae4-8fe8-e35f7a3745da)
Verify the created slash command on Slack.
READER NOTE
The slash command name and parameters must be separated by one or more spaces.