Integration Custom Command
LAST UPDATED: OCT 15, 2024
Steps to Create Integration Custom Command
Create Custom Integration
To create your own custom integration, follow these steps:
Click on the Configuration tab at the top navigation bar.
Click on the Integration tab on the left sidebar.
Click on the + button next to the search field, underneath the breadcrumb.
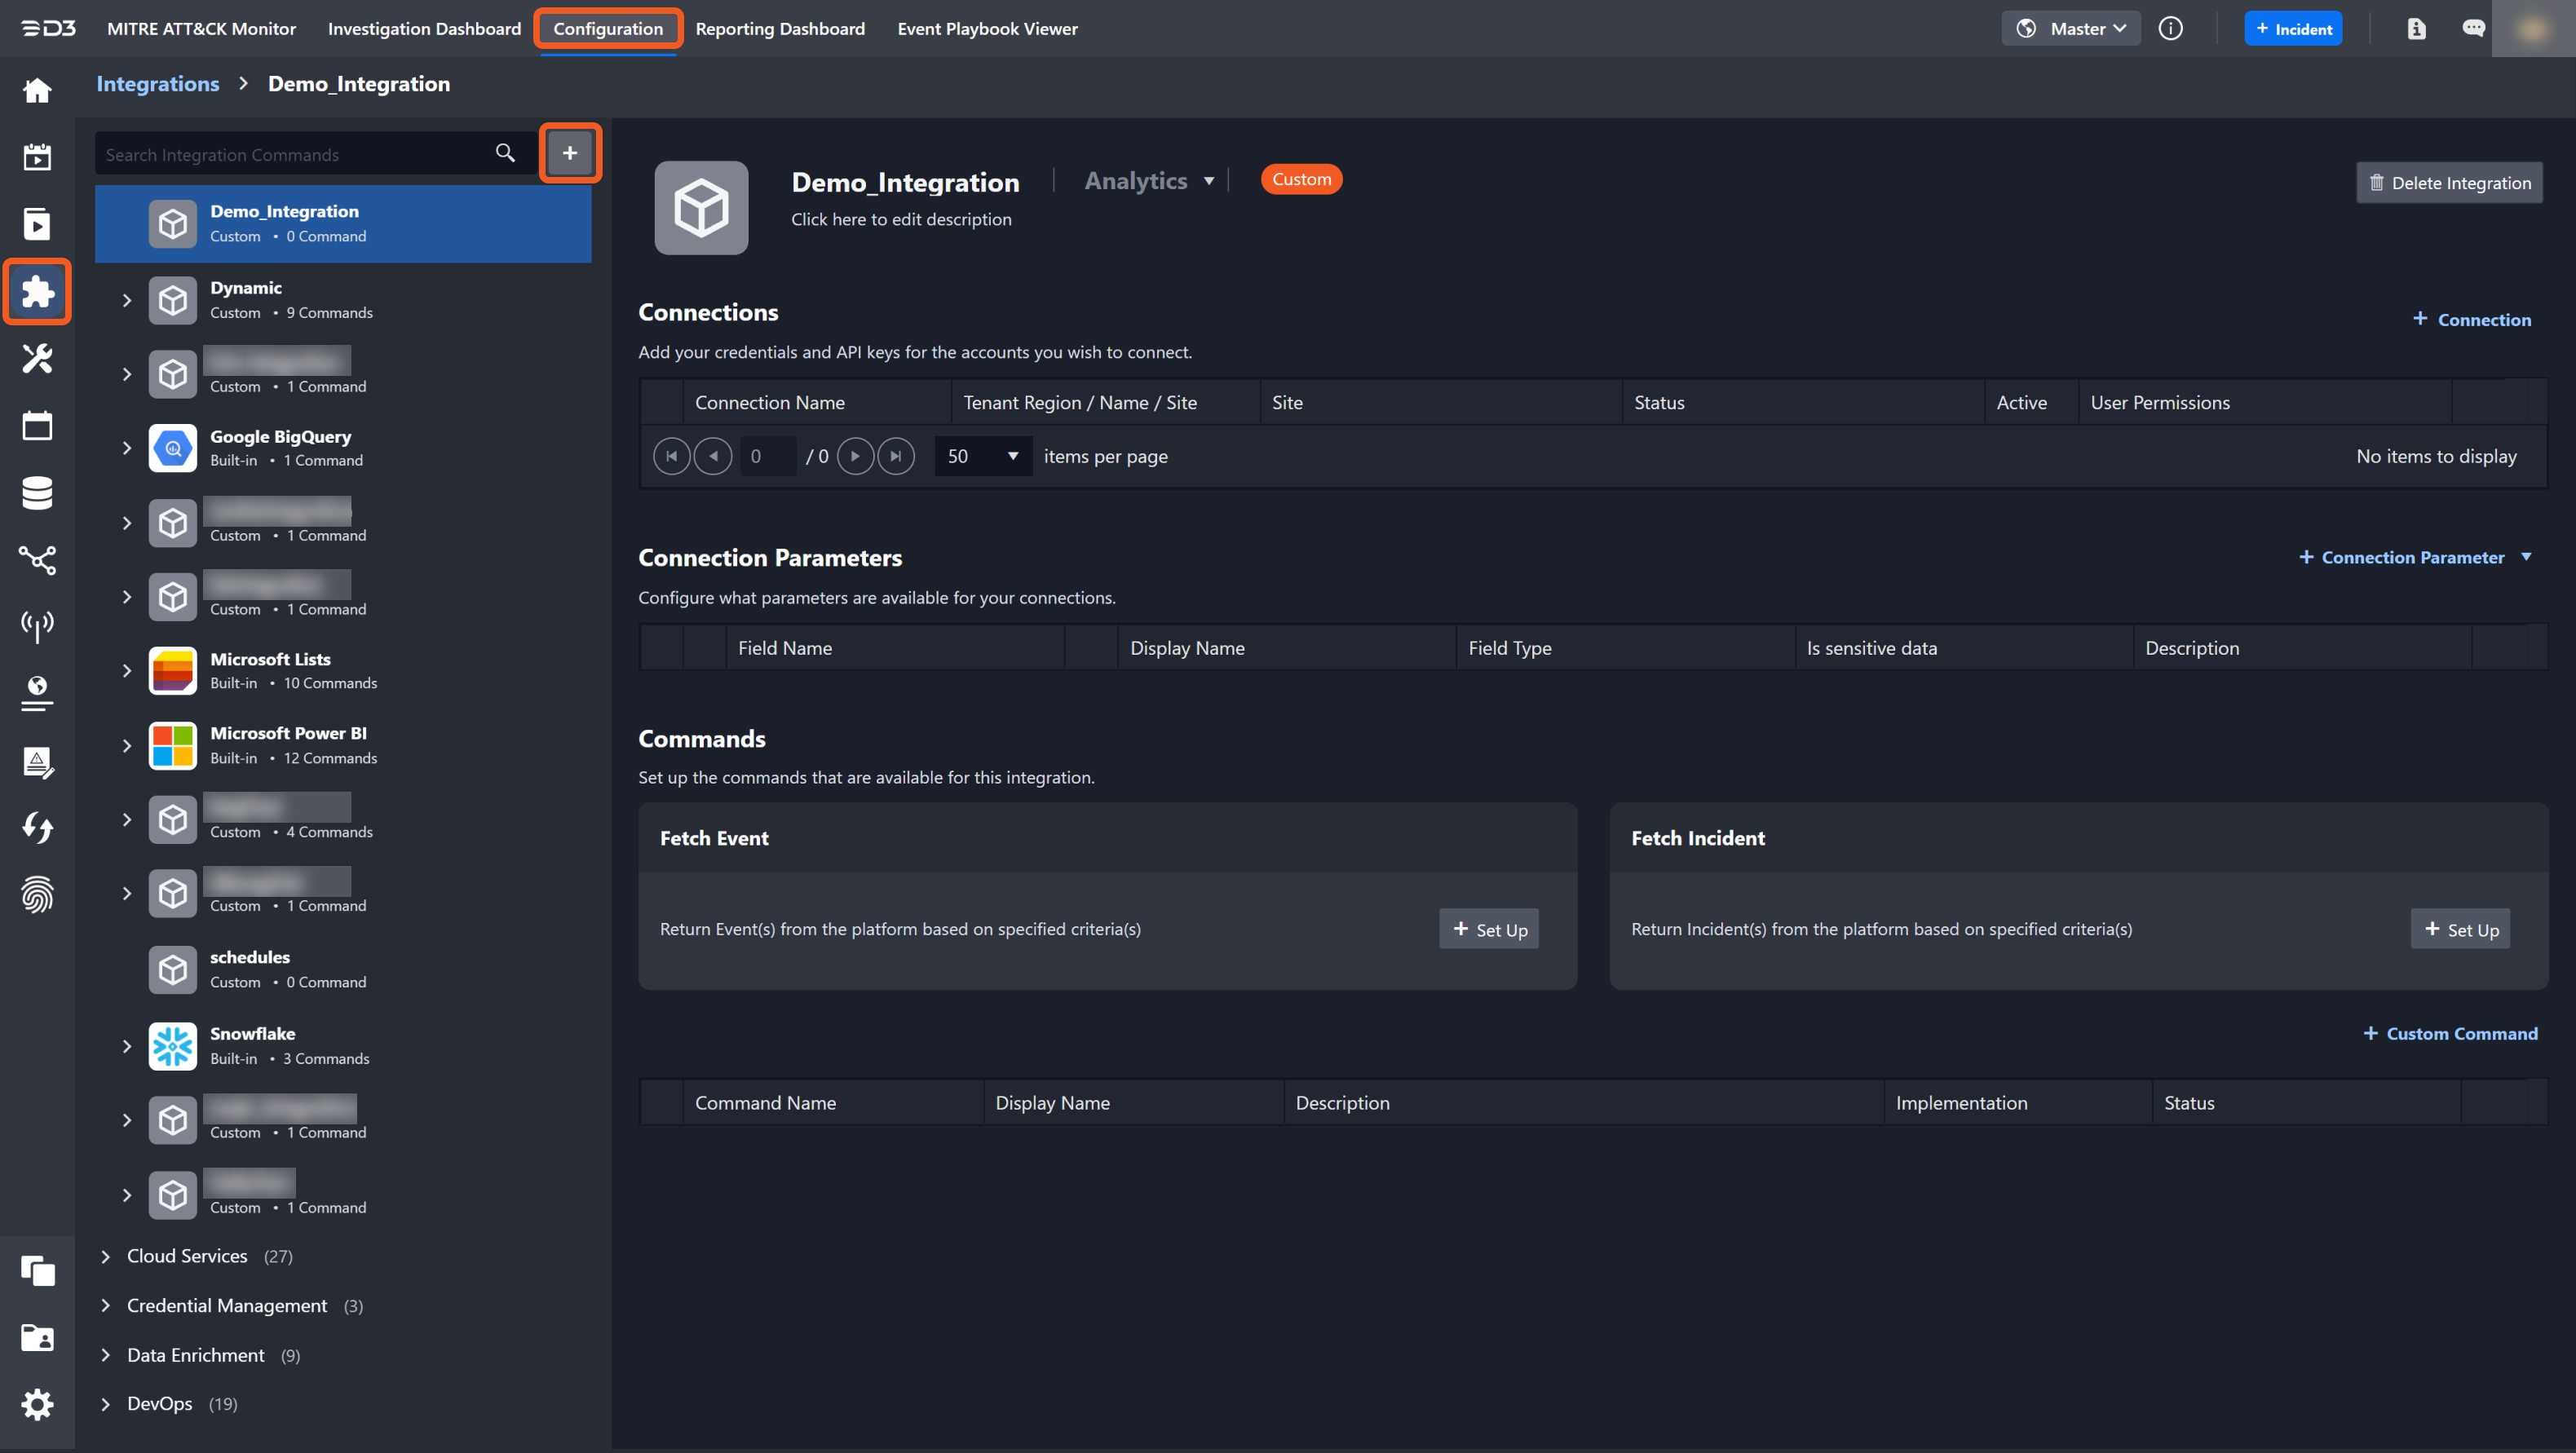
Enter in a unique integration name. You may also optionally choose a more appropriate category and provide a description
Click the Save button.
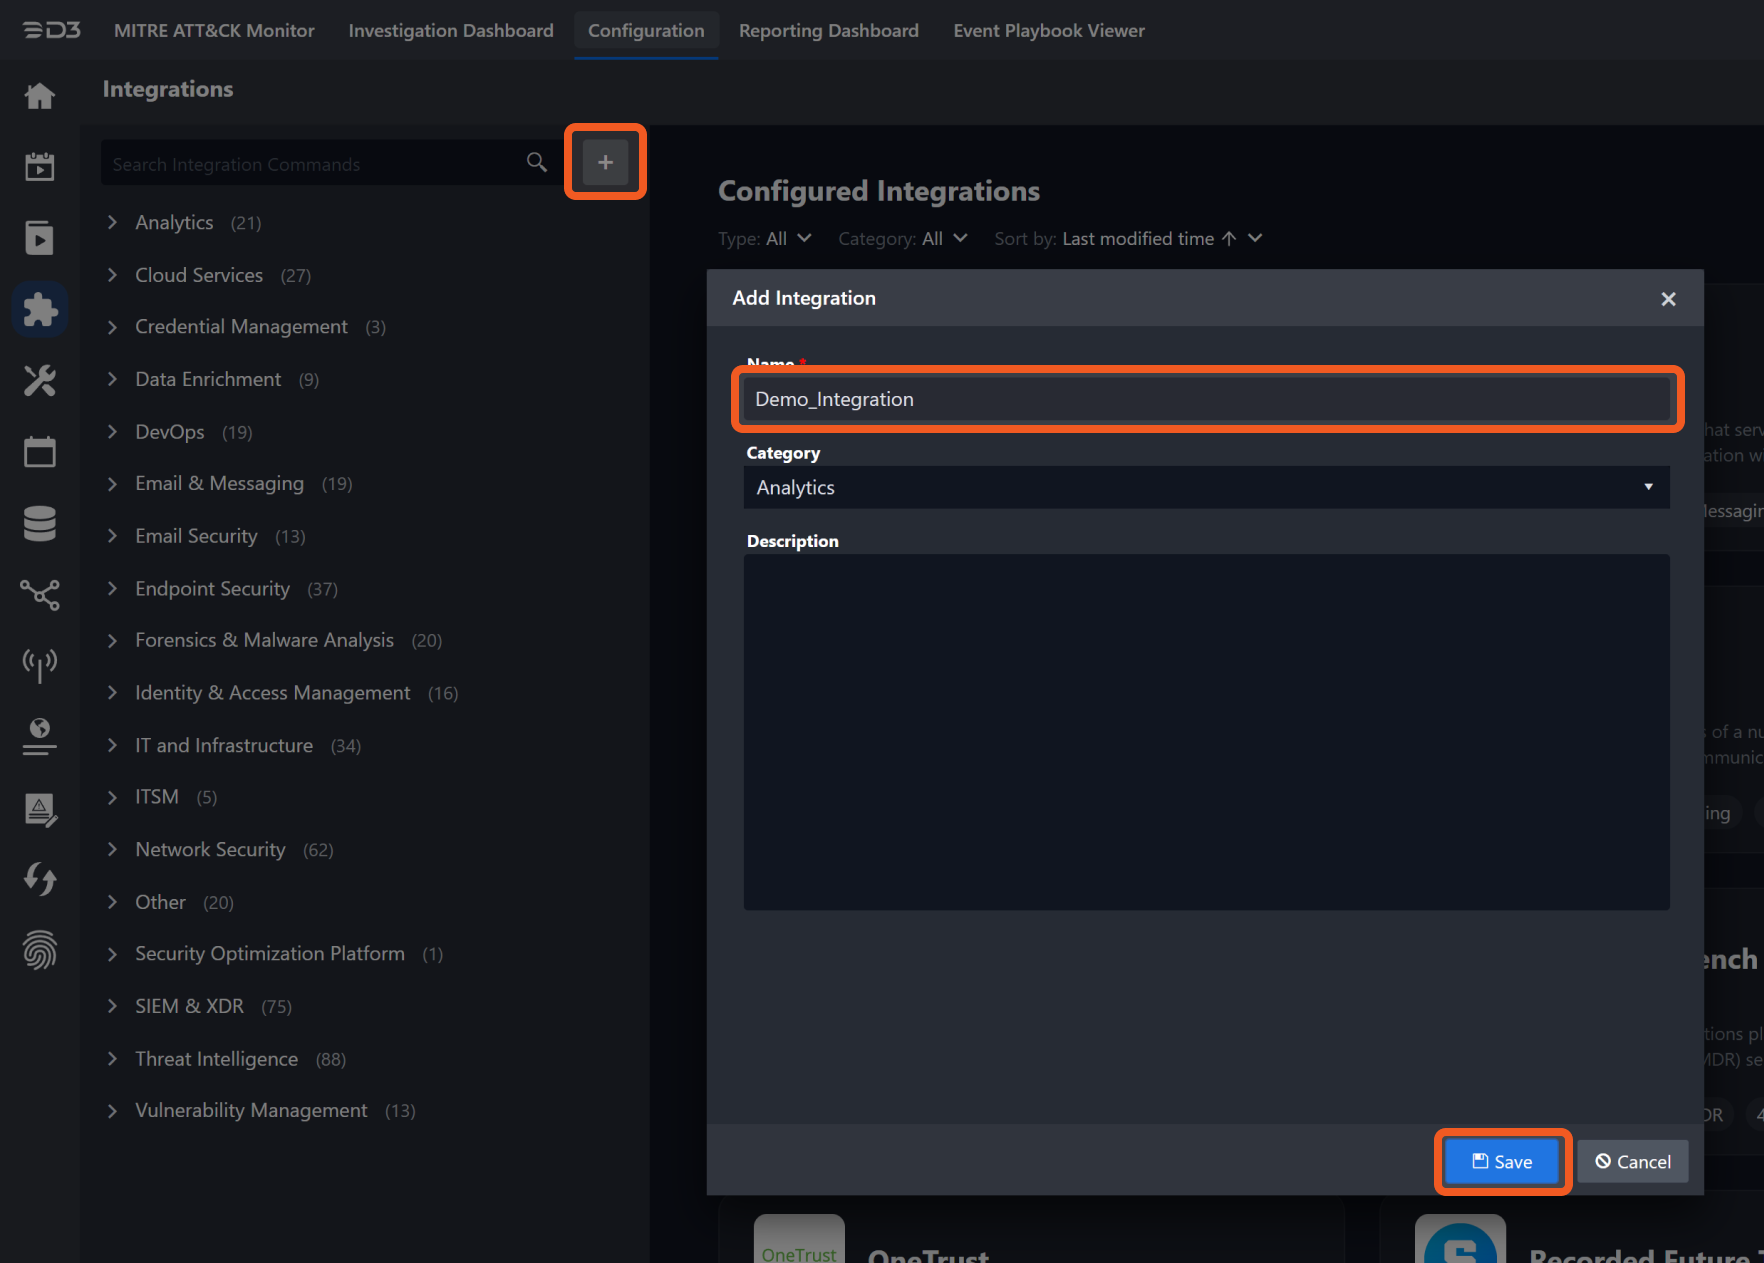
READER NOTE
You must choose a unique integration name. Changing the integration name will result in changes in all Webhook URLs of the commands under this integration.
For custom integrations, there are no system commands and scripts — this means you will have to create your own commands. For more information on commands, see Integration Commands.
Configure Integration Connection
Connection Parameters
To enable your integration, you need to establish a connection for API calls. The initial stage of configuring an integration involves setting up the connection parameters. You will need to include either a custom parameter or choose from a set of predefined parameters.
In the integration script, the global variable runtime['connector'] holds a dictionary containing connection parameters. The keys for these parameters are lowercase and without spaces, like runtime['connector']['serverurl'] or runtime.get("connector").get("serverurl", "").
READER NOTE
For more information on creating custom connection parameters, see Custom Connection Parameter. For more information on adding connections, see Add Connections.
Preconfigured Connection Parameter Sets (MS SQL / Oracle / MySQL / ODBC)
By default, a newly created integration will not have any connection parameters.
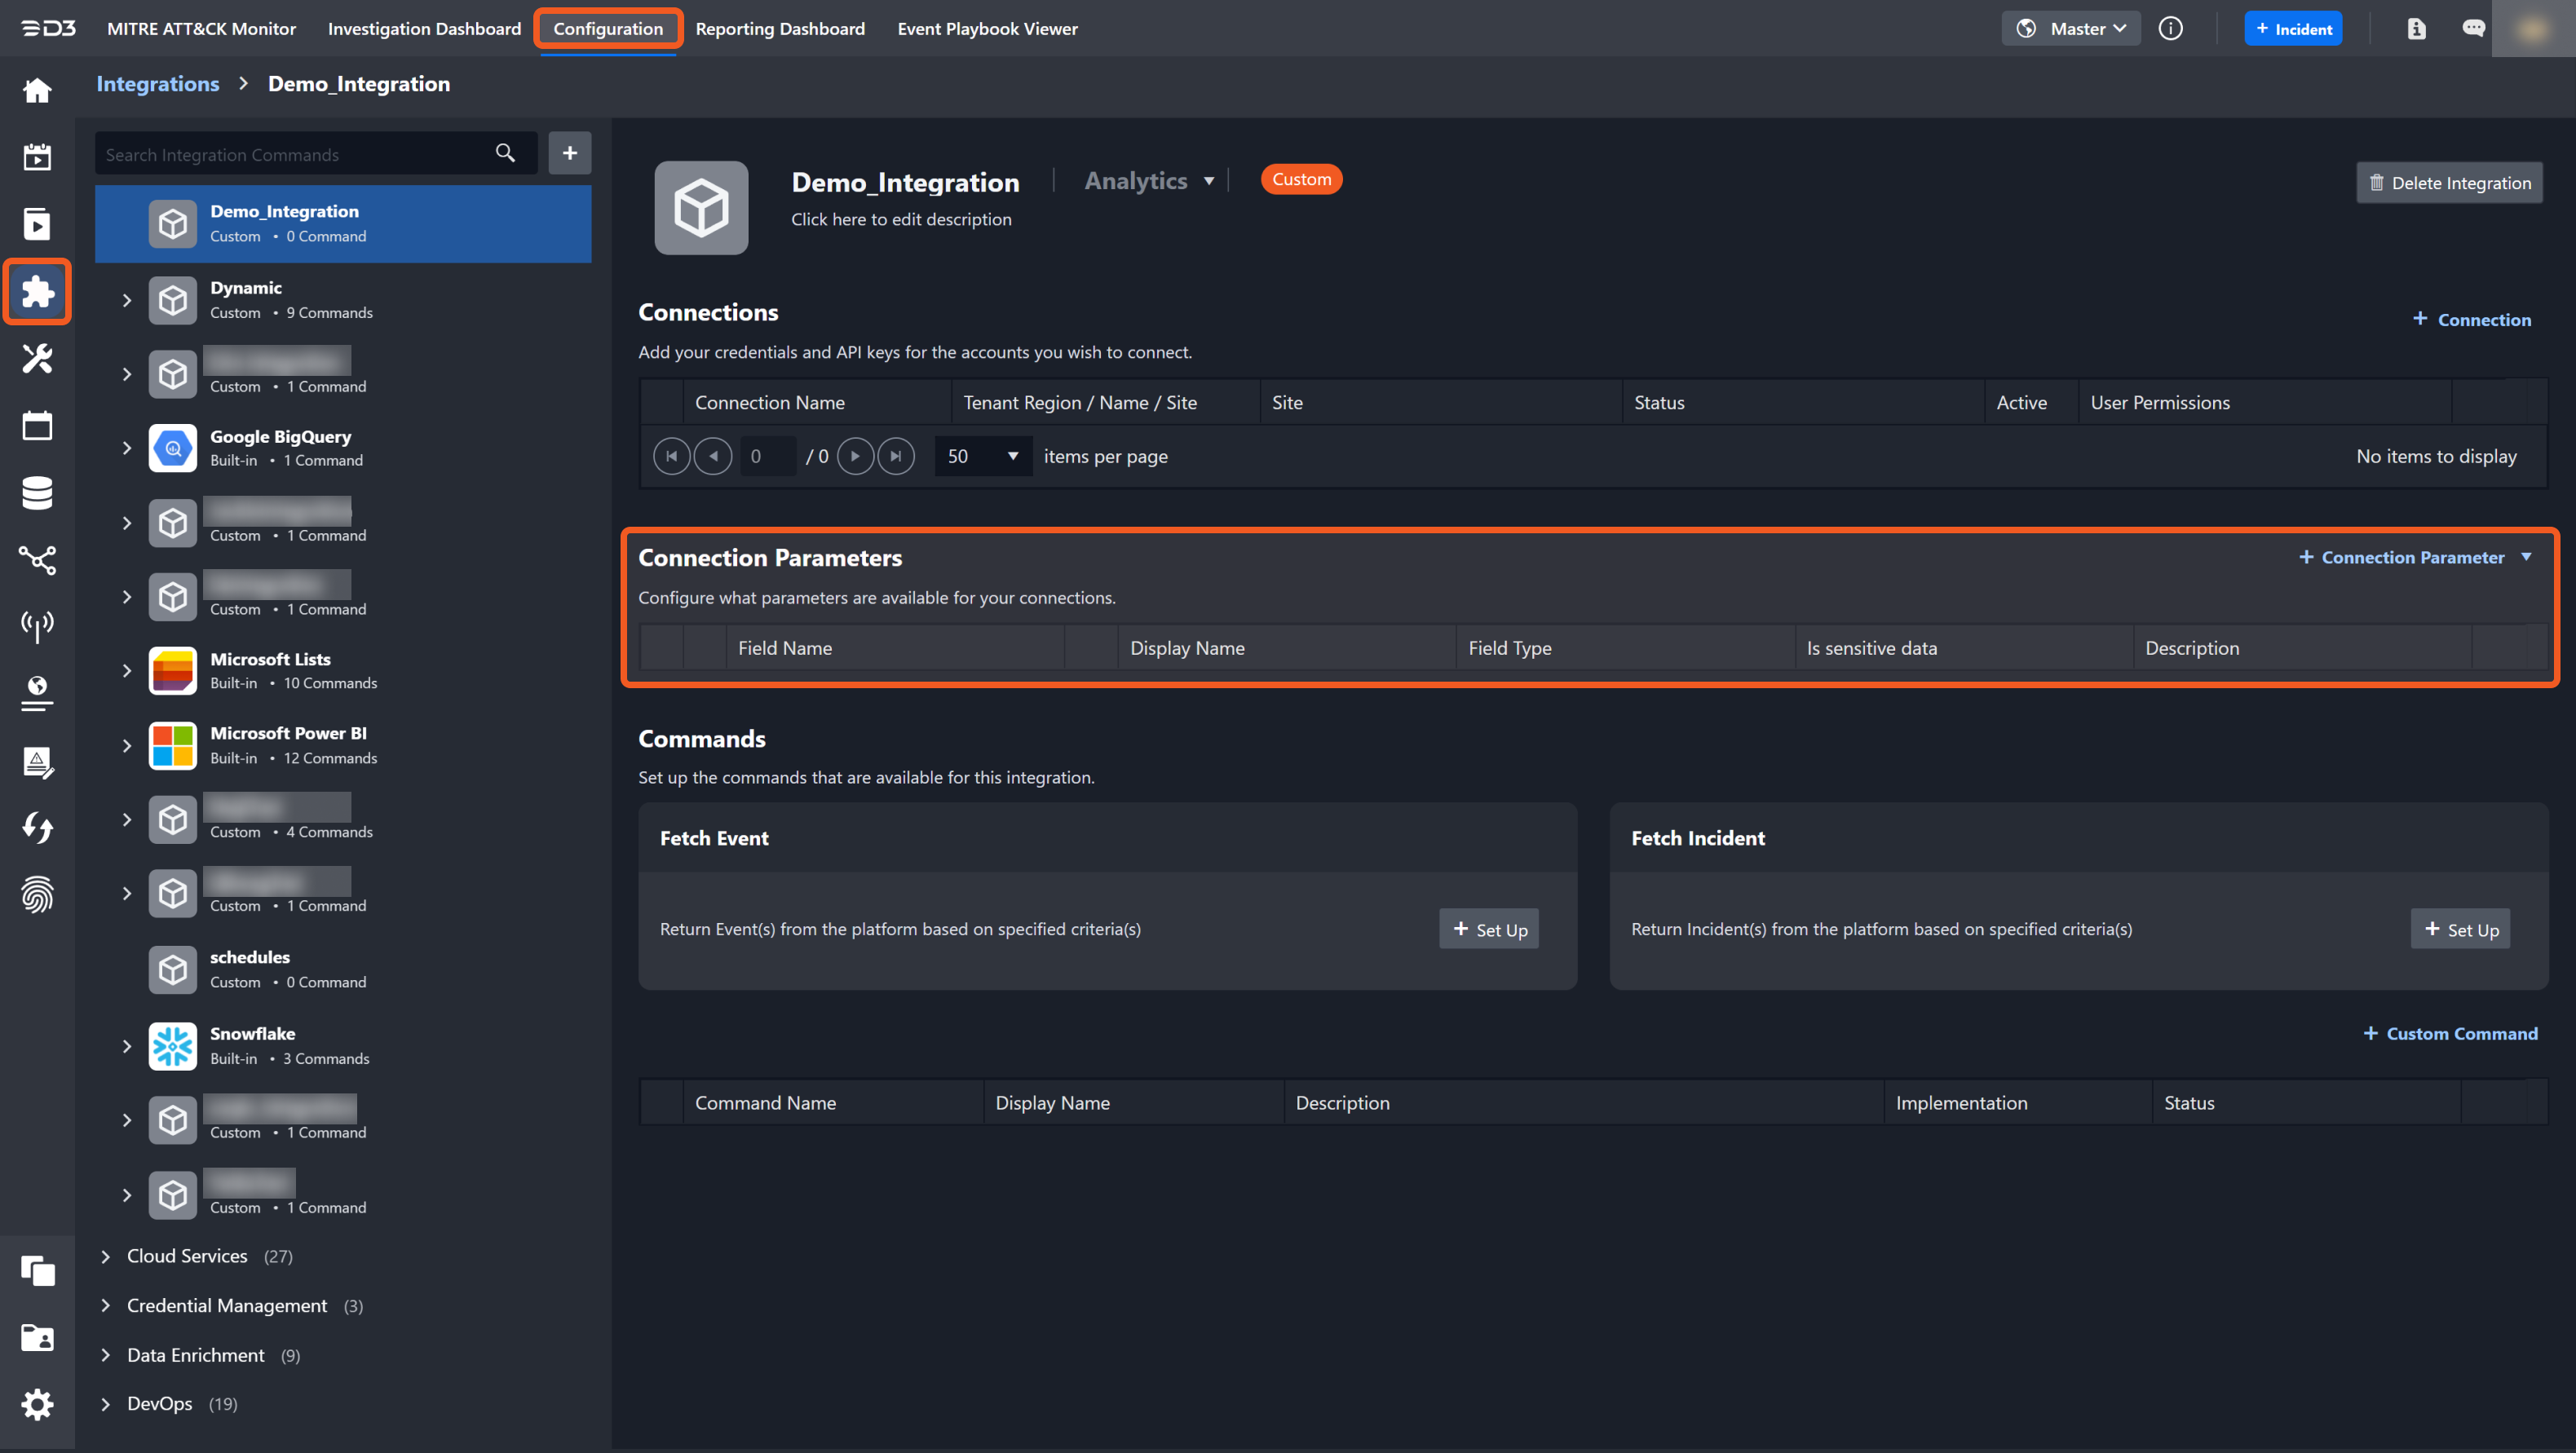
To establish a connection parameter, set up the connection by following the steps below.
Hover your cursor over the + Connection Parameter dropdown.
Click on your desired connection parameter set.

You will now see a row populated under the headers of the Connection Parameters table.

Create the Custom Command
Setup Command Features
In the Overview > Settings tab of the integration command level, you will find the Features section, comprising five checkbox options. These options dictate the availability of the command across the system. To enhance accessibility, D3 suggests checking all options whenever feasible, expanding the command's reach to multiple areas within the system. Select at least one feature in order to use the command (not required if solely triggered by a schedule).
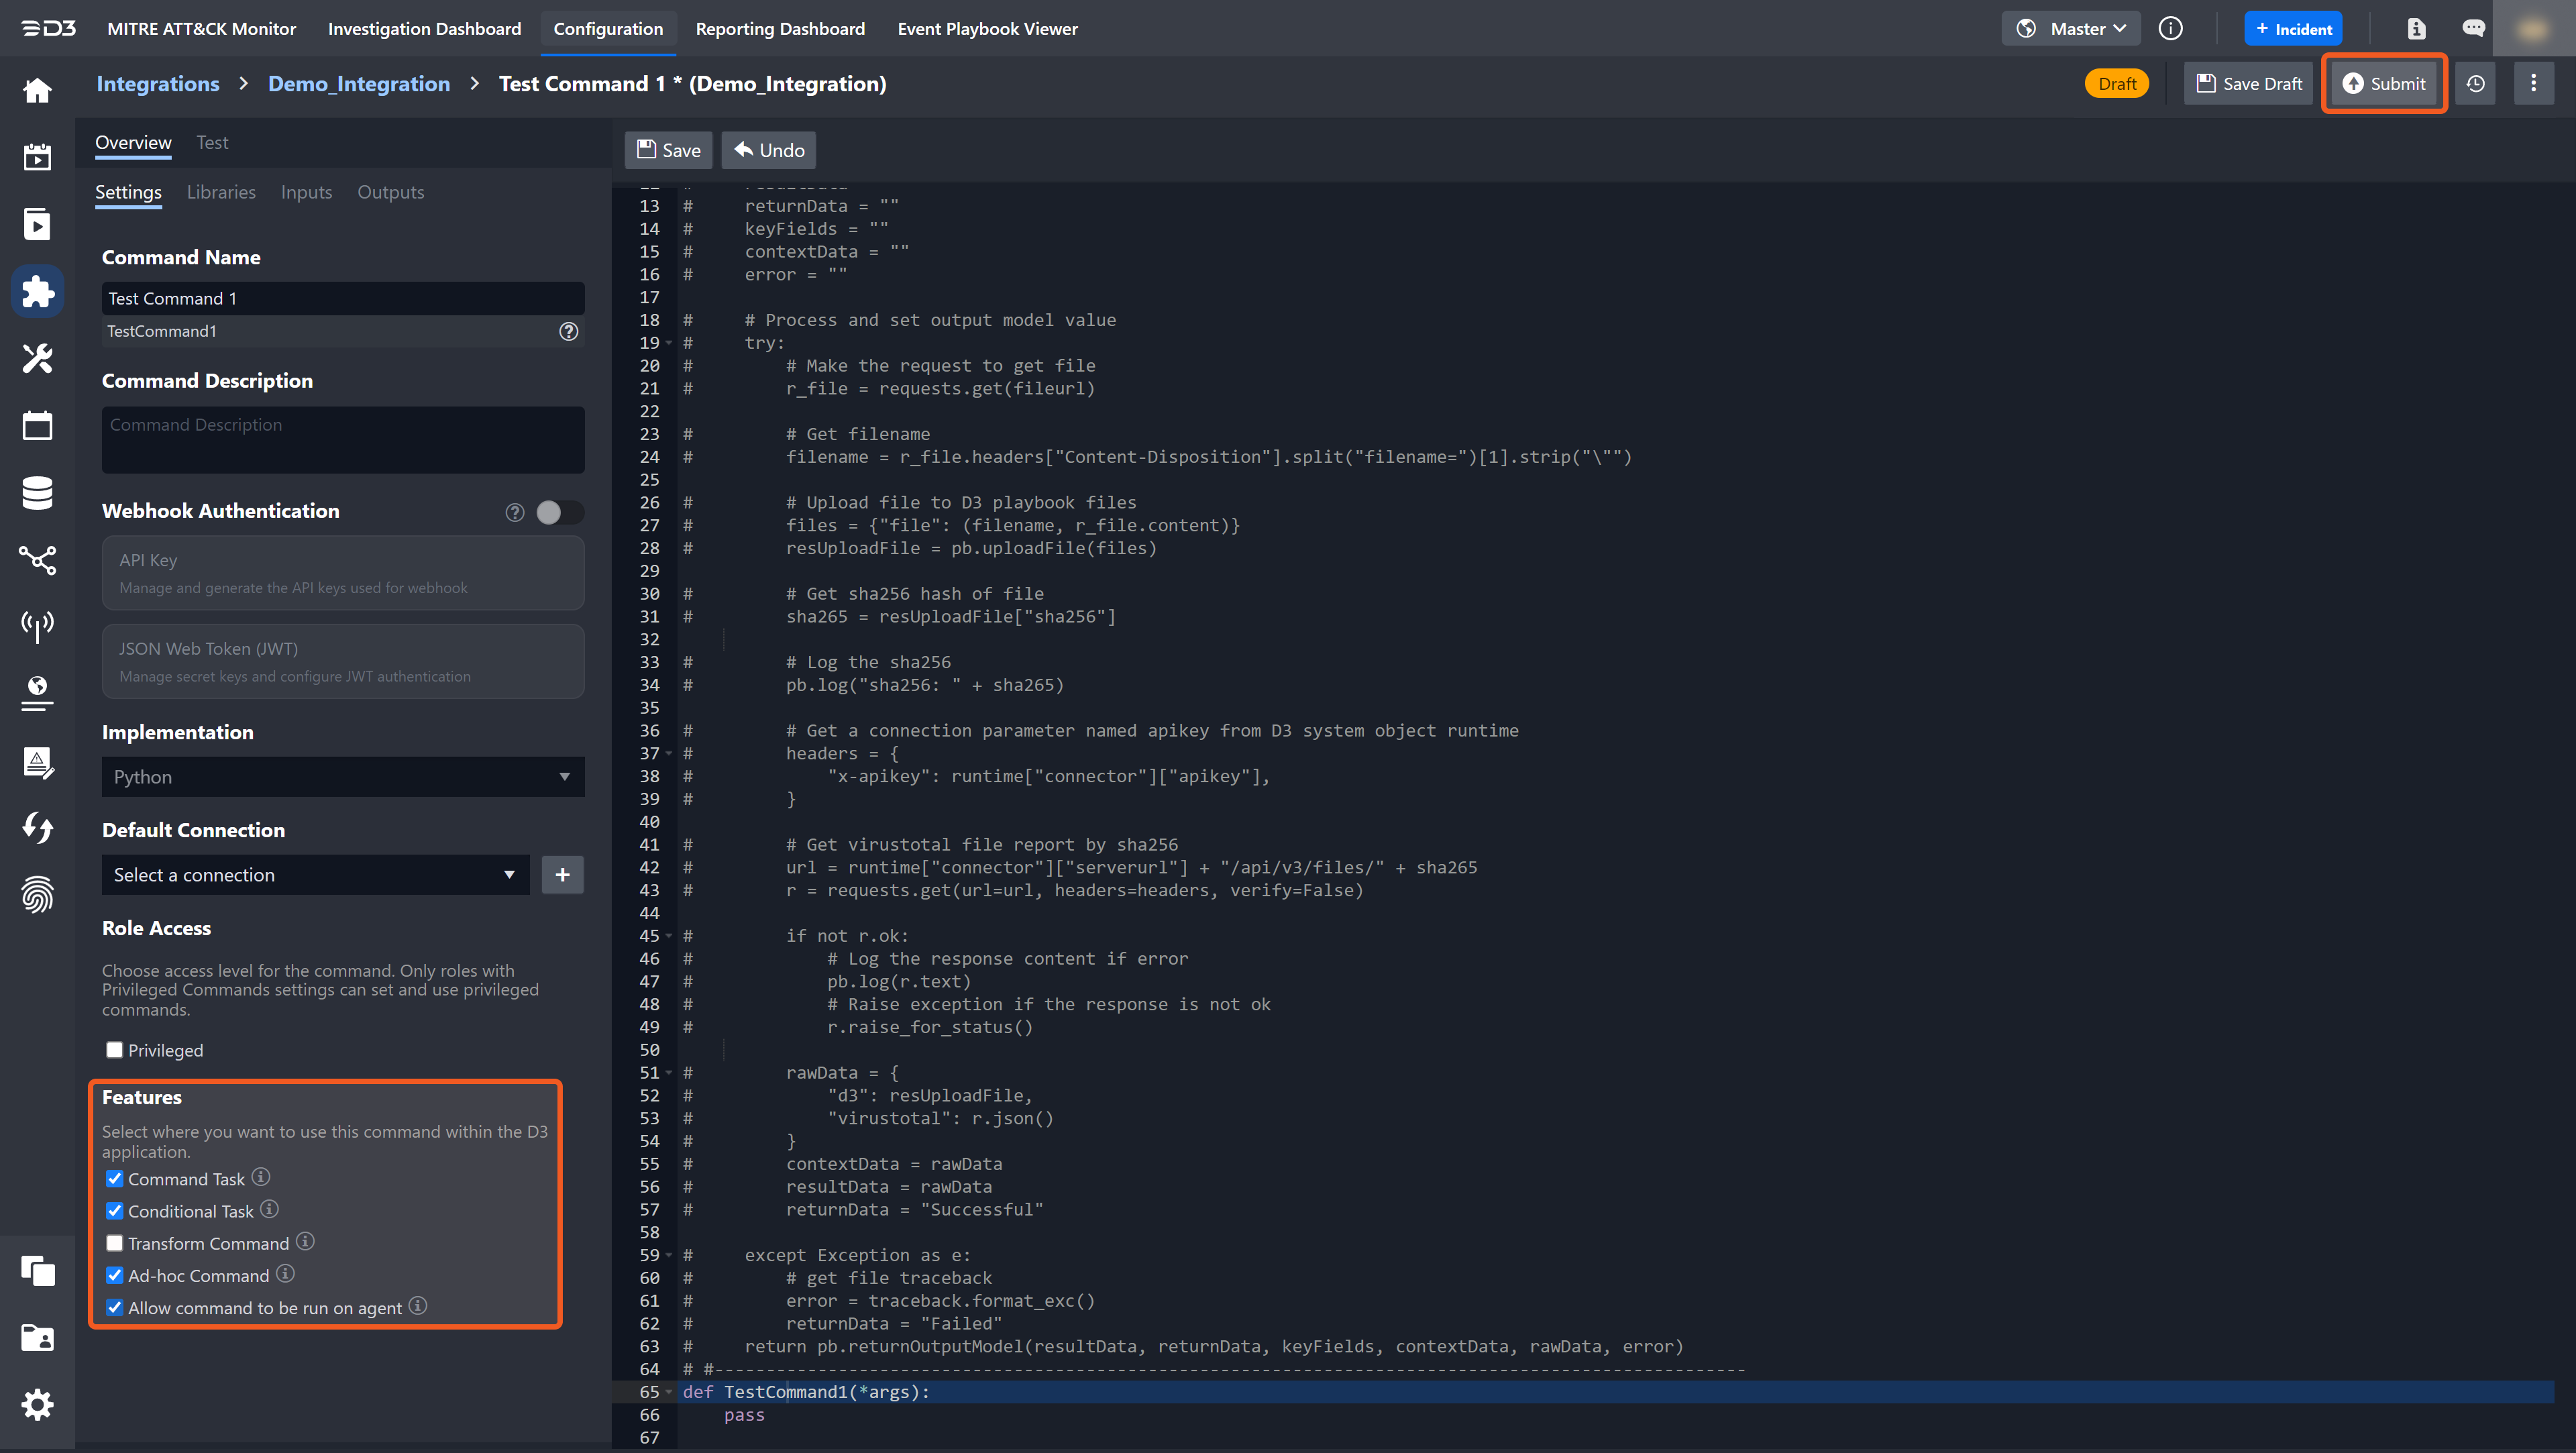
The Default Connection is required to enable use of the Transform Command feature.
Features | Usage |
Command Task | This command can be used in the Playbook Command Task. |
Conditional Task | This command can be used in the Playbook Conditional Task. |
Transform Command | This command can be used for data transformations when configuring a Codeless Playbook. This feature is only available for commands that do not require any manual user. |
Ad-Hoc Command | This command will be available in the command line toolbar within the Incident Workspace. |
Allow command to be run on agent | When checked and agent(s) are specified in the connection, the command will be run on an agent. Please refer to the Agent Configuration Scenarios section of the Agent Management document for detailed information. |
MS SQL / Oracle / MySQL / ODBC
Upon setting up the connection parameter sets, users will be able to see MS SQL/Oracle/MySQL/ODBC as an implementation option in the modal Add Command form. To render this form, click on the + Custom Command button within the Commands section.
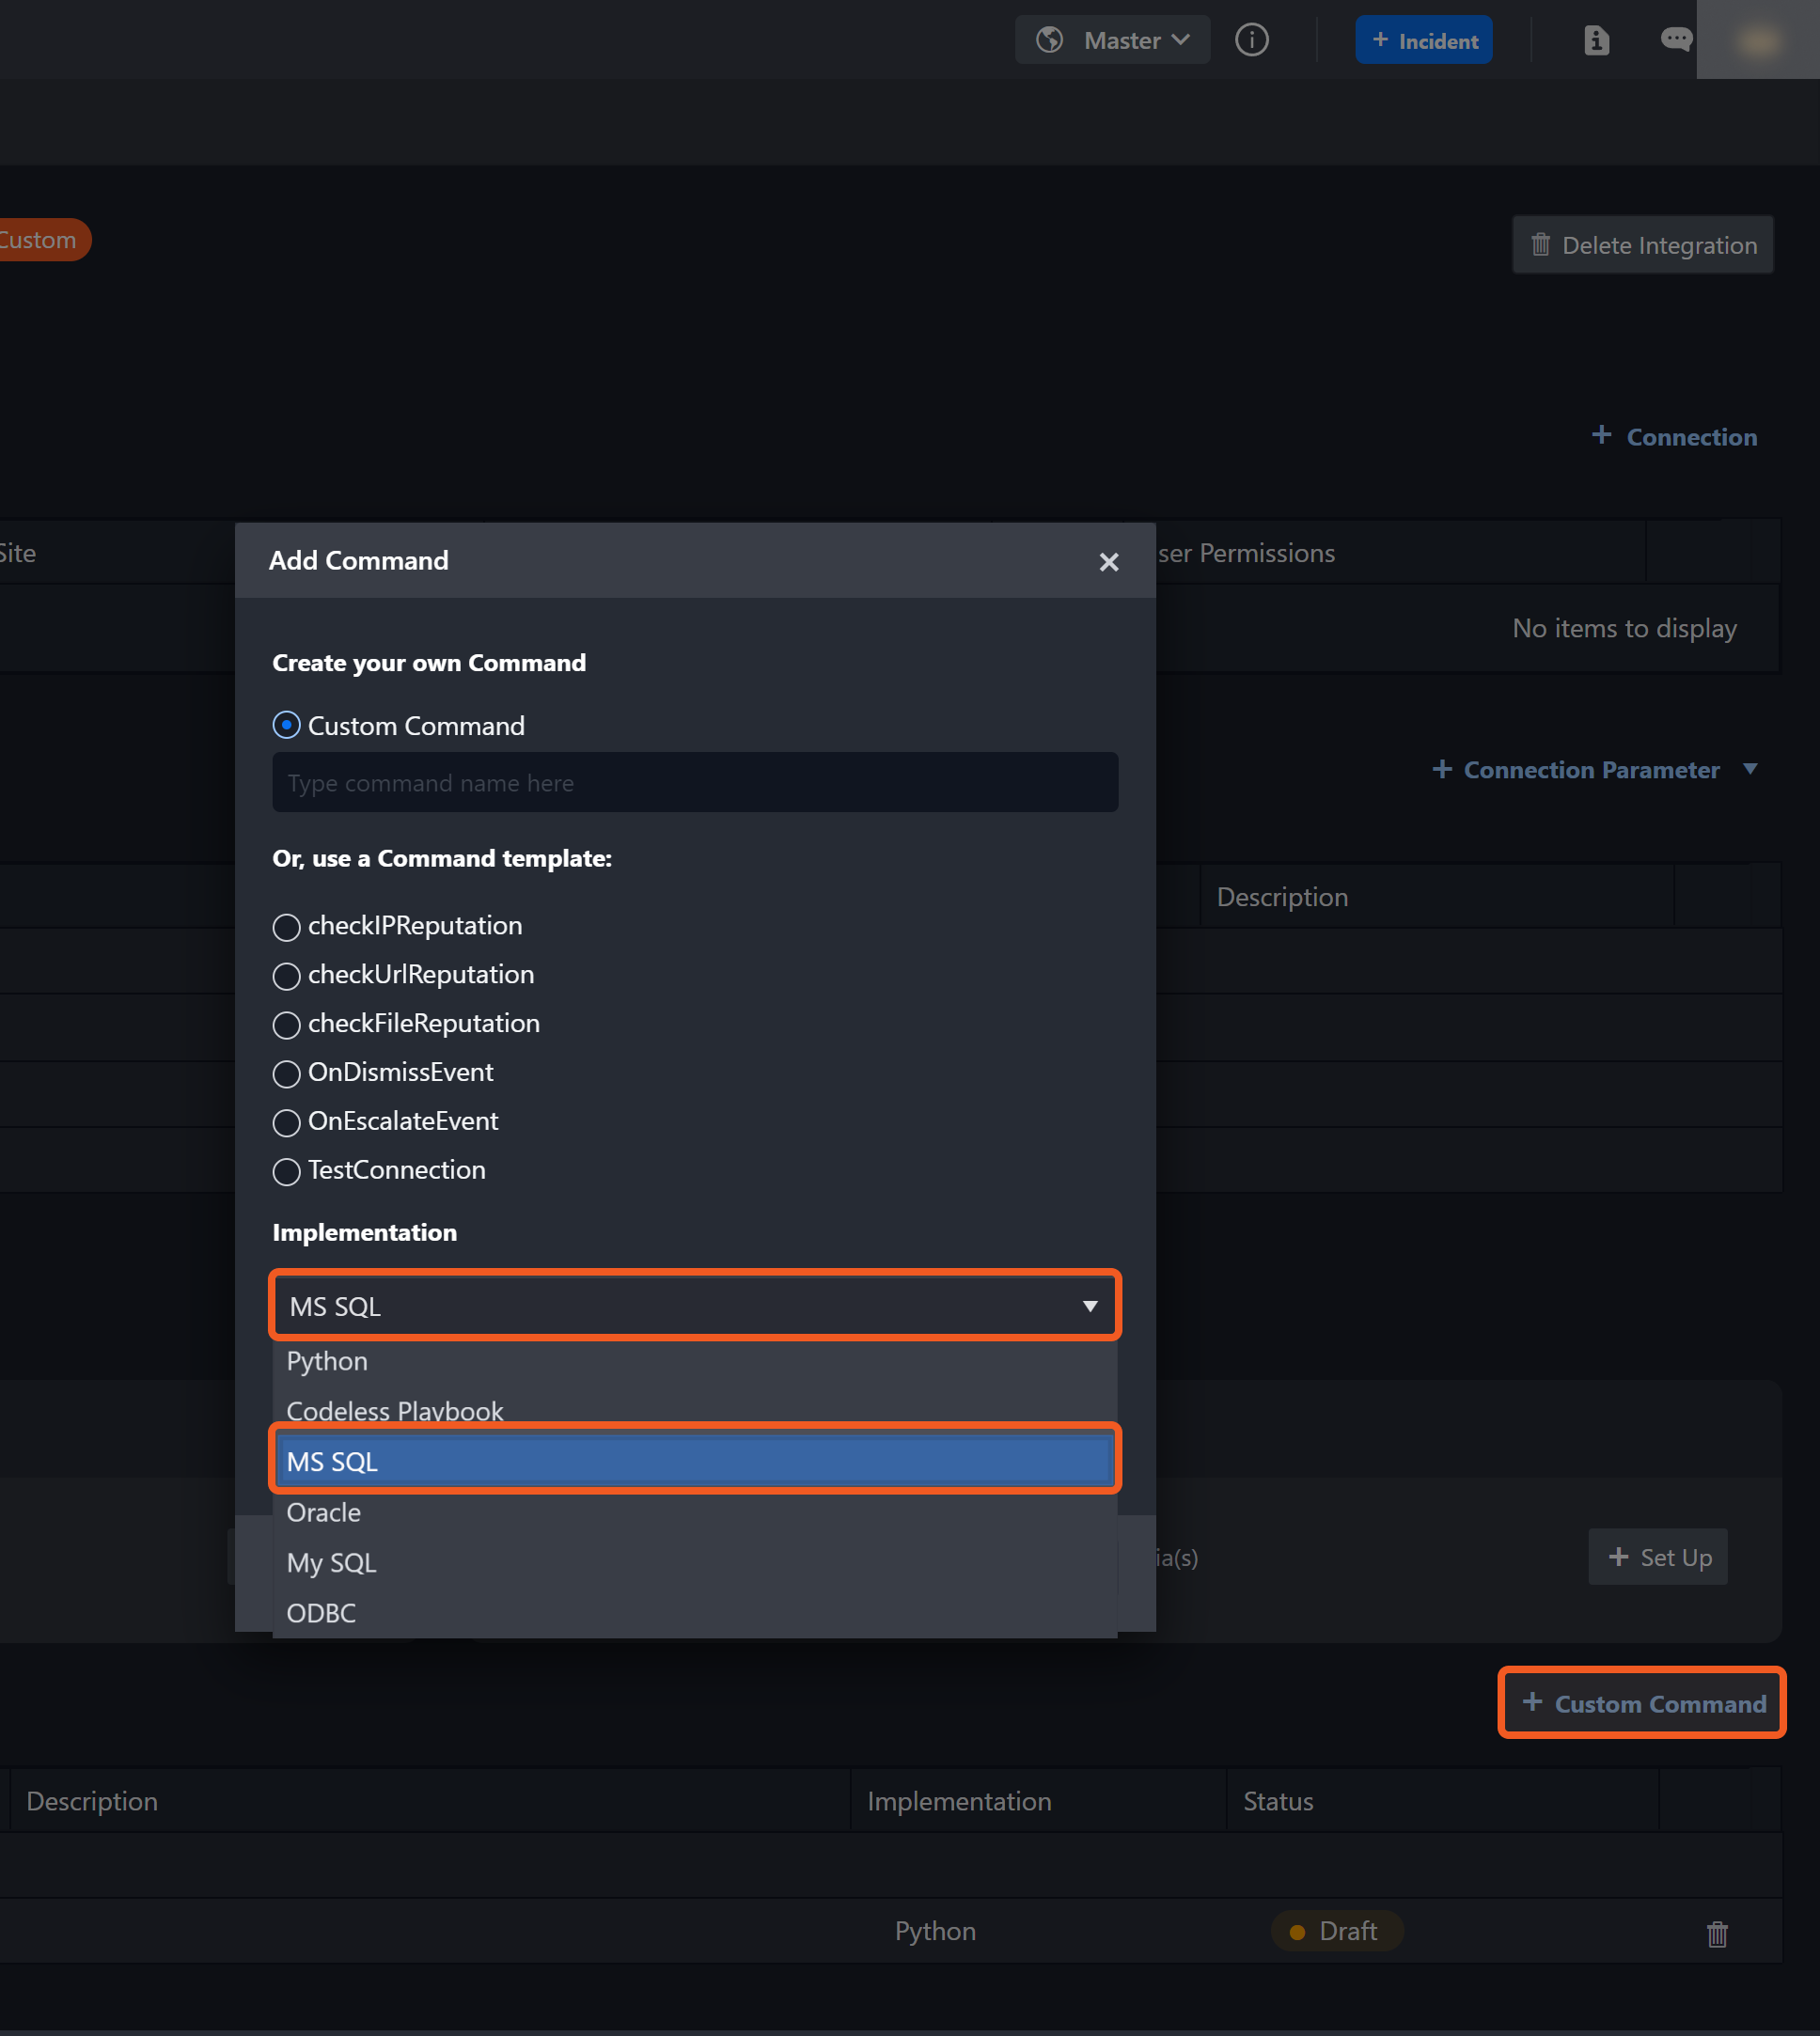
Command Input Setup
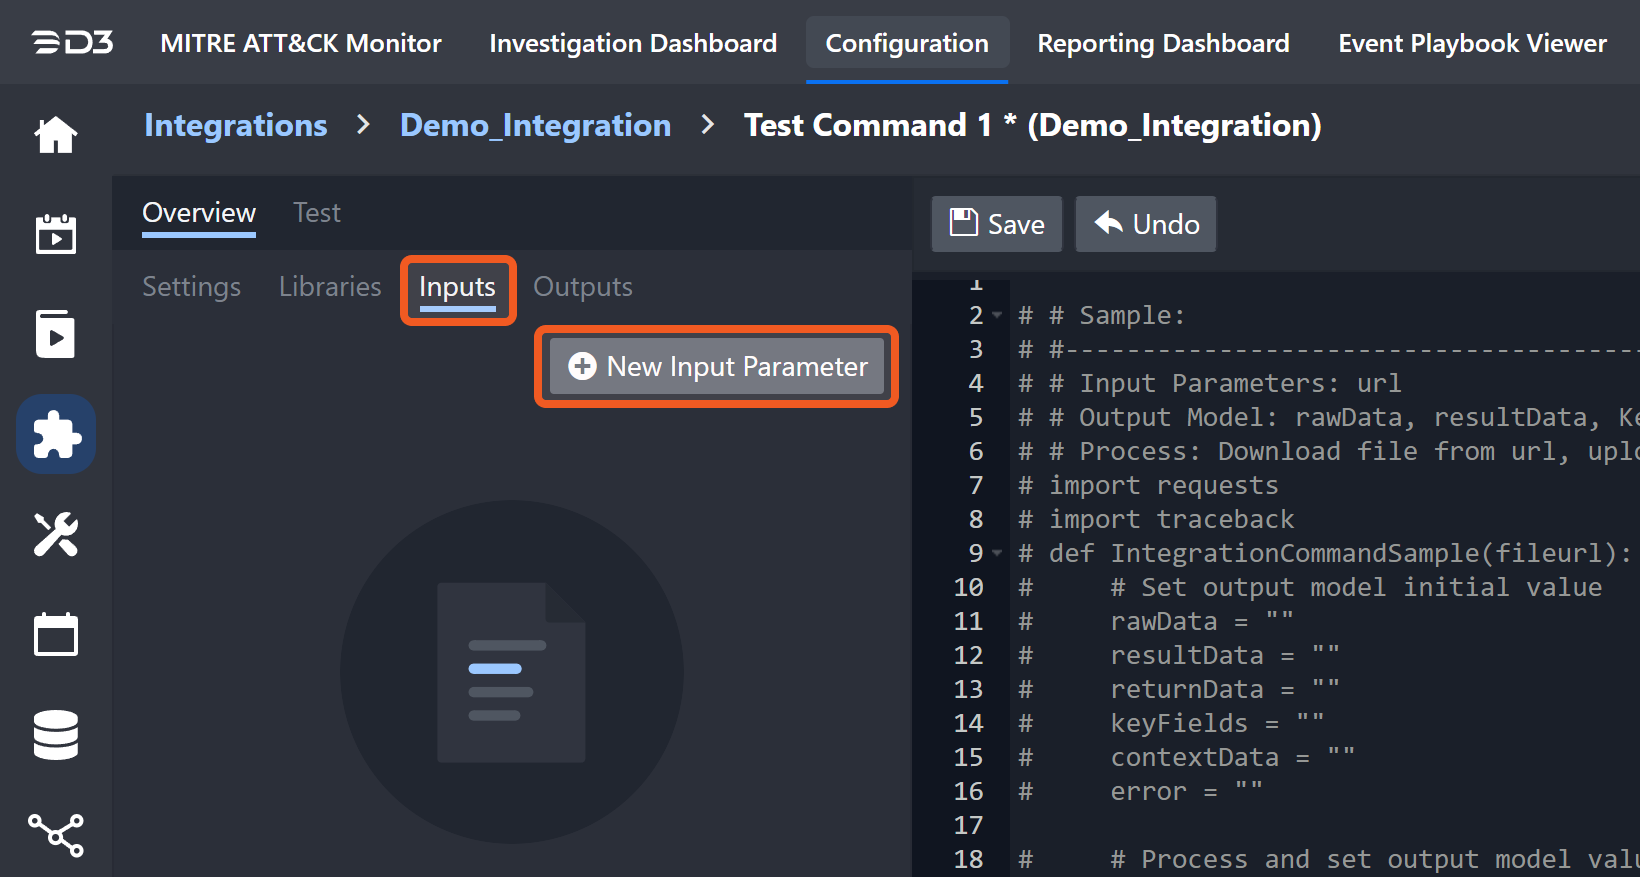
To add a new input parameter:
Click on the Inputs tab within the Overview tab.
Click on the New Input Parameter button.
In the New Parameter popup, you will see nine or ten fields depending on the input type.
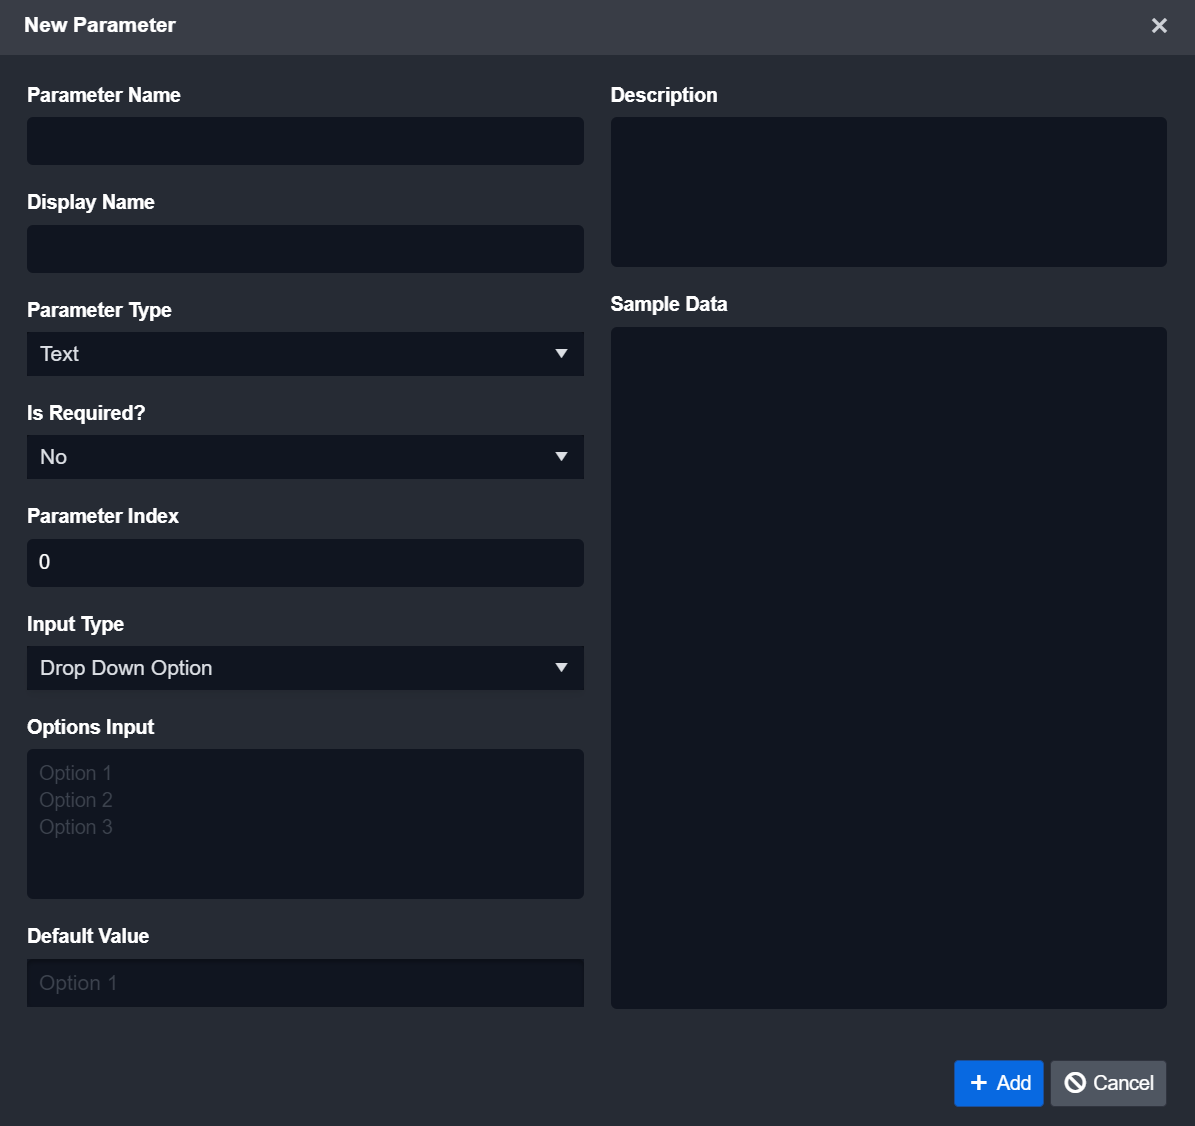
Field | Description |
Parameter Name | The internal identifier assigned to a parameter. It is an identical match to the parameter name in the function definition. |
Display Name | The display name of the parameter. |
Parameter Type | The data type of the parameter. 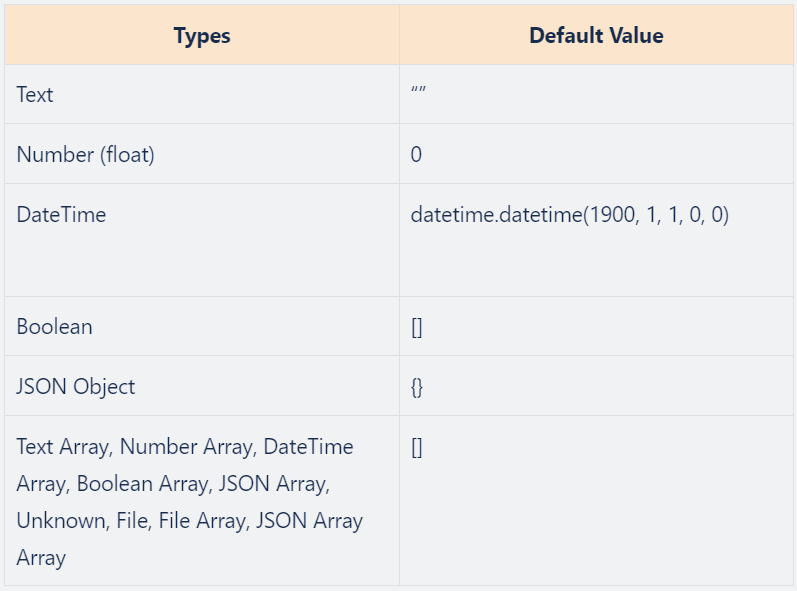 |
Is Required? | Whether or not the parameter is required when running the command. |
Parameter Index | The order of the parameter, starting from 0. |
Input Type | The data type of this parameter. Input Type Options:
|
Options Input | The options to appear in the input field; these should be listed with each option input on a separate line. |
Default Value | Whether the parameter has a default value. It can be empty. |
Description | The description of the parameter. |
Sample Data | Sample data of the parameter. |
The parameter type dynamically adjusts based on the selected input type. The default value format will also adapt accordingly – adhere to the one shown in the placeholder.
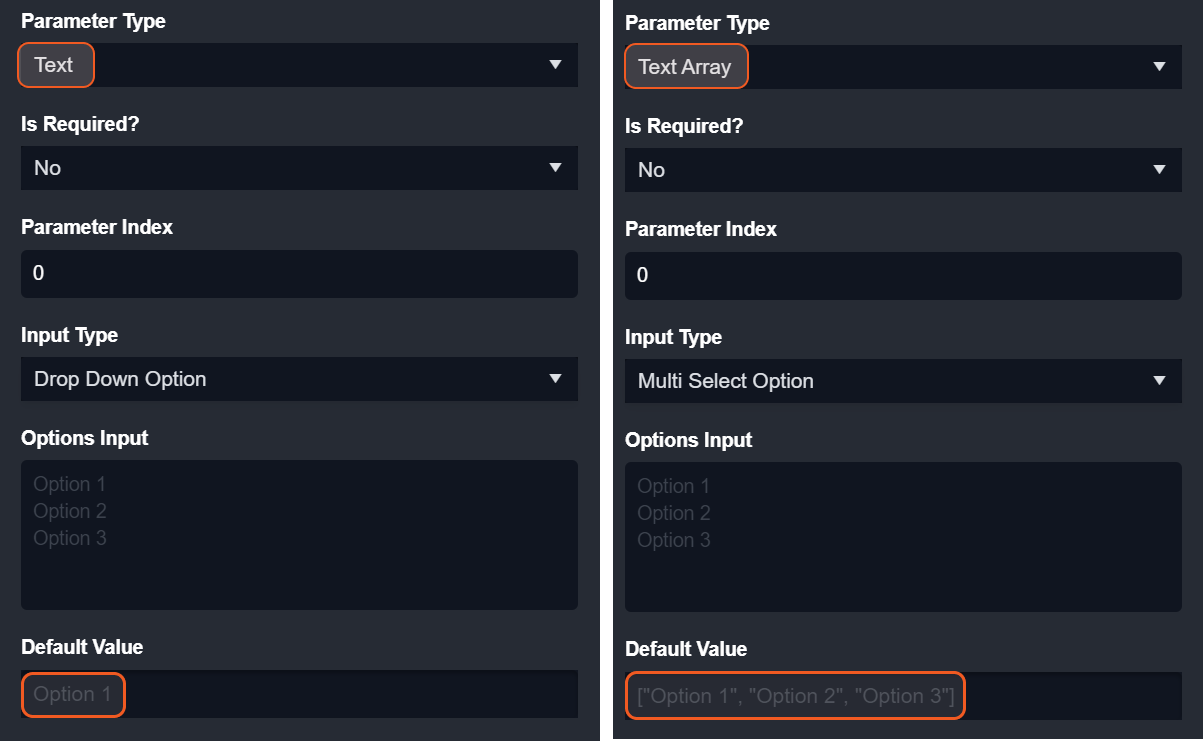
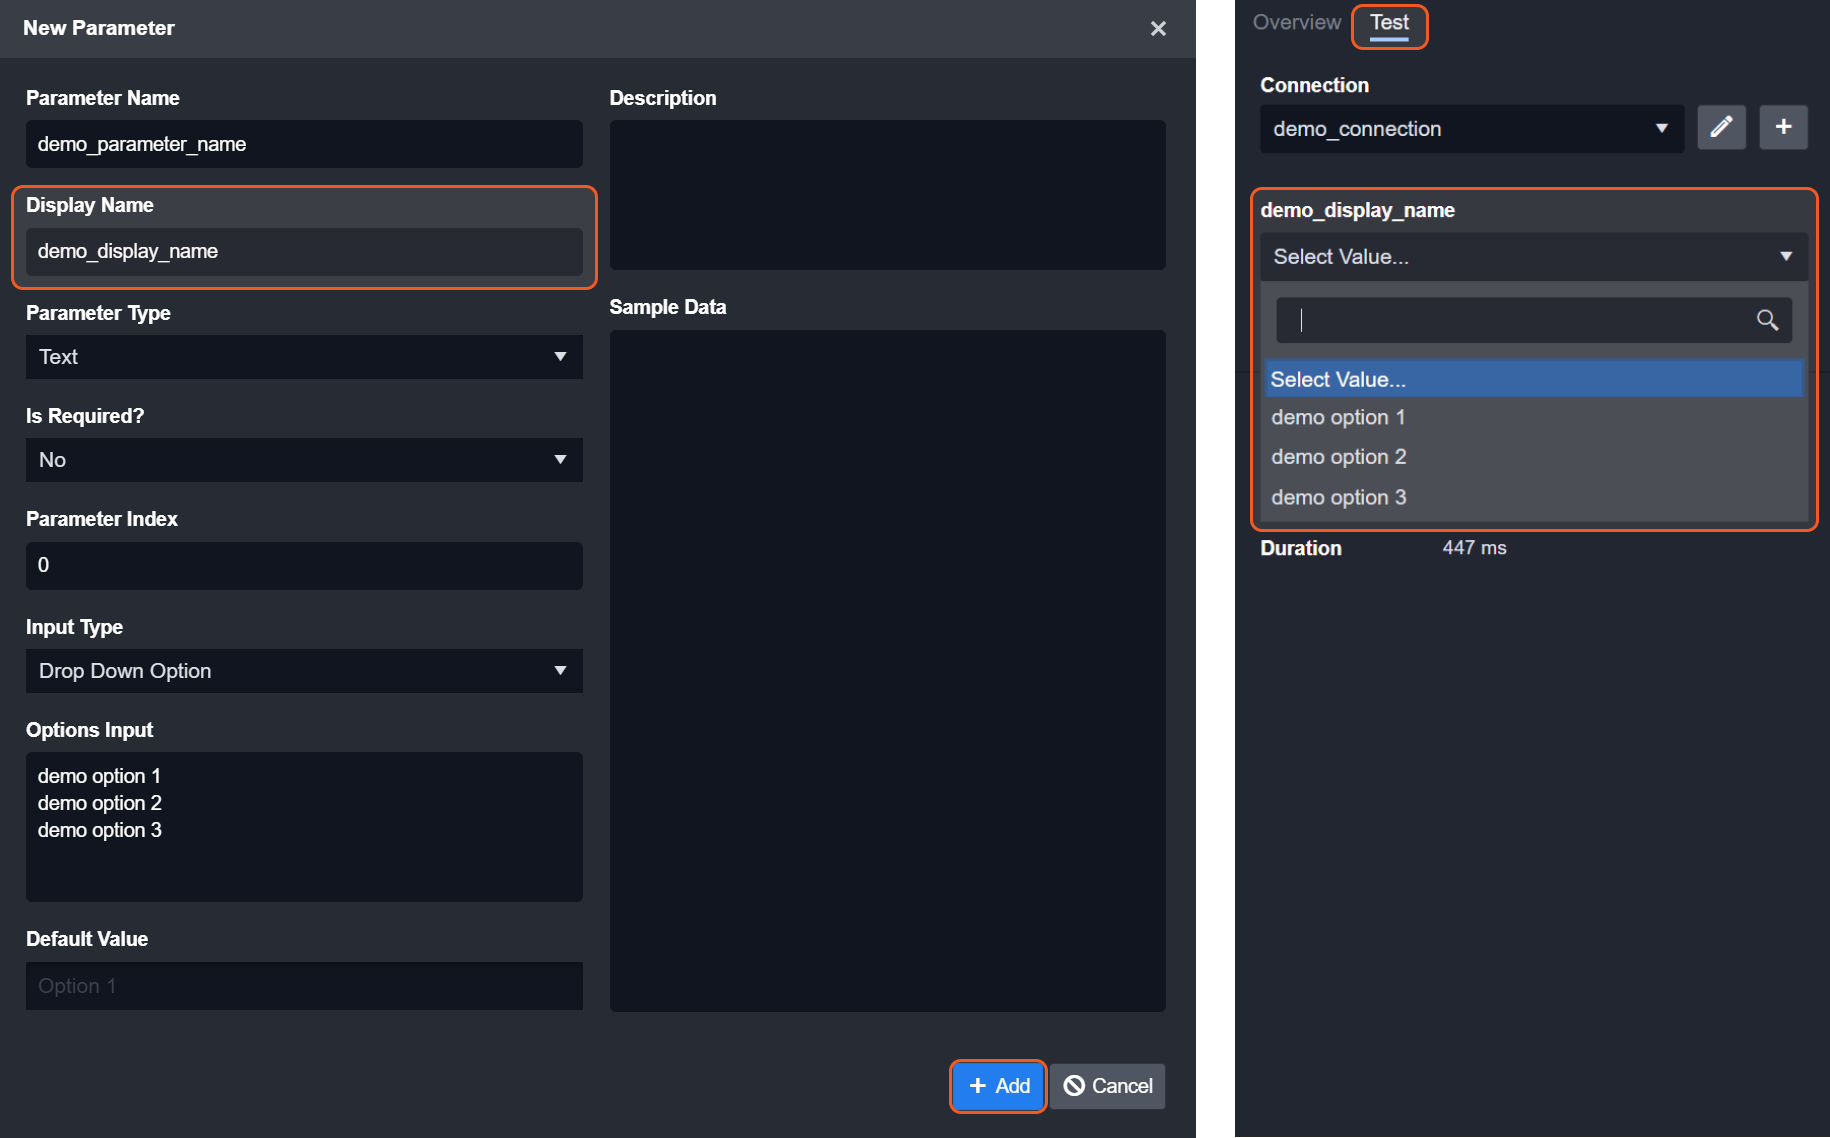
To observe the dynamically generated input field:
Fill in the appropriate fields within the New Parameter popup.
Click on the + Add button of the New Parameter popup.
Click on the Test tab next to the Overview tab.
The newly added test input field will now be positioned beneath its display name.
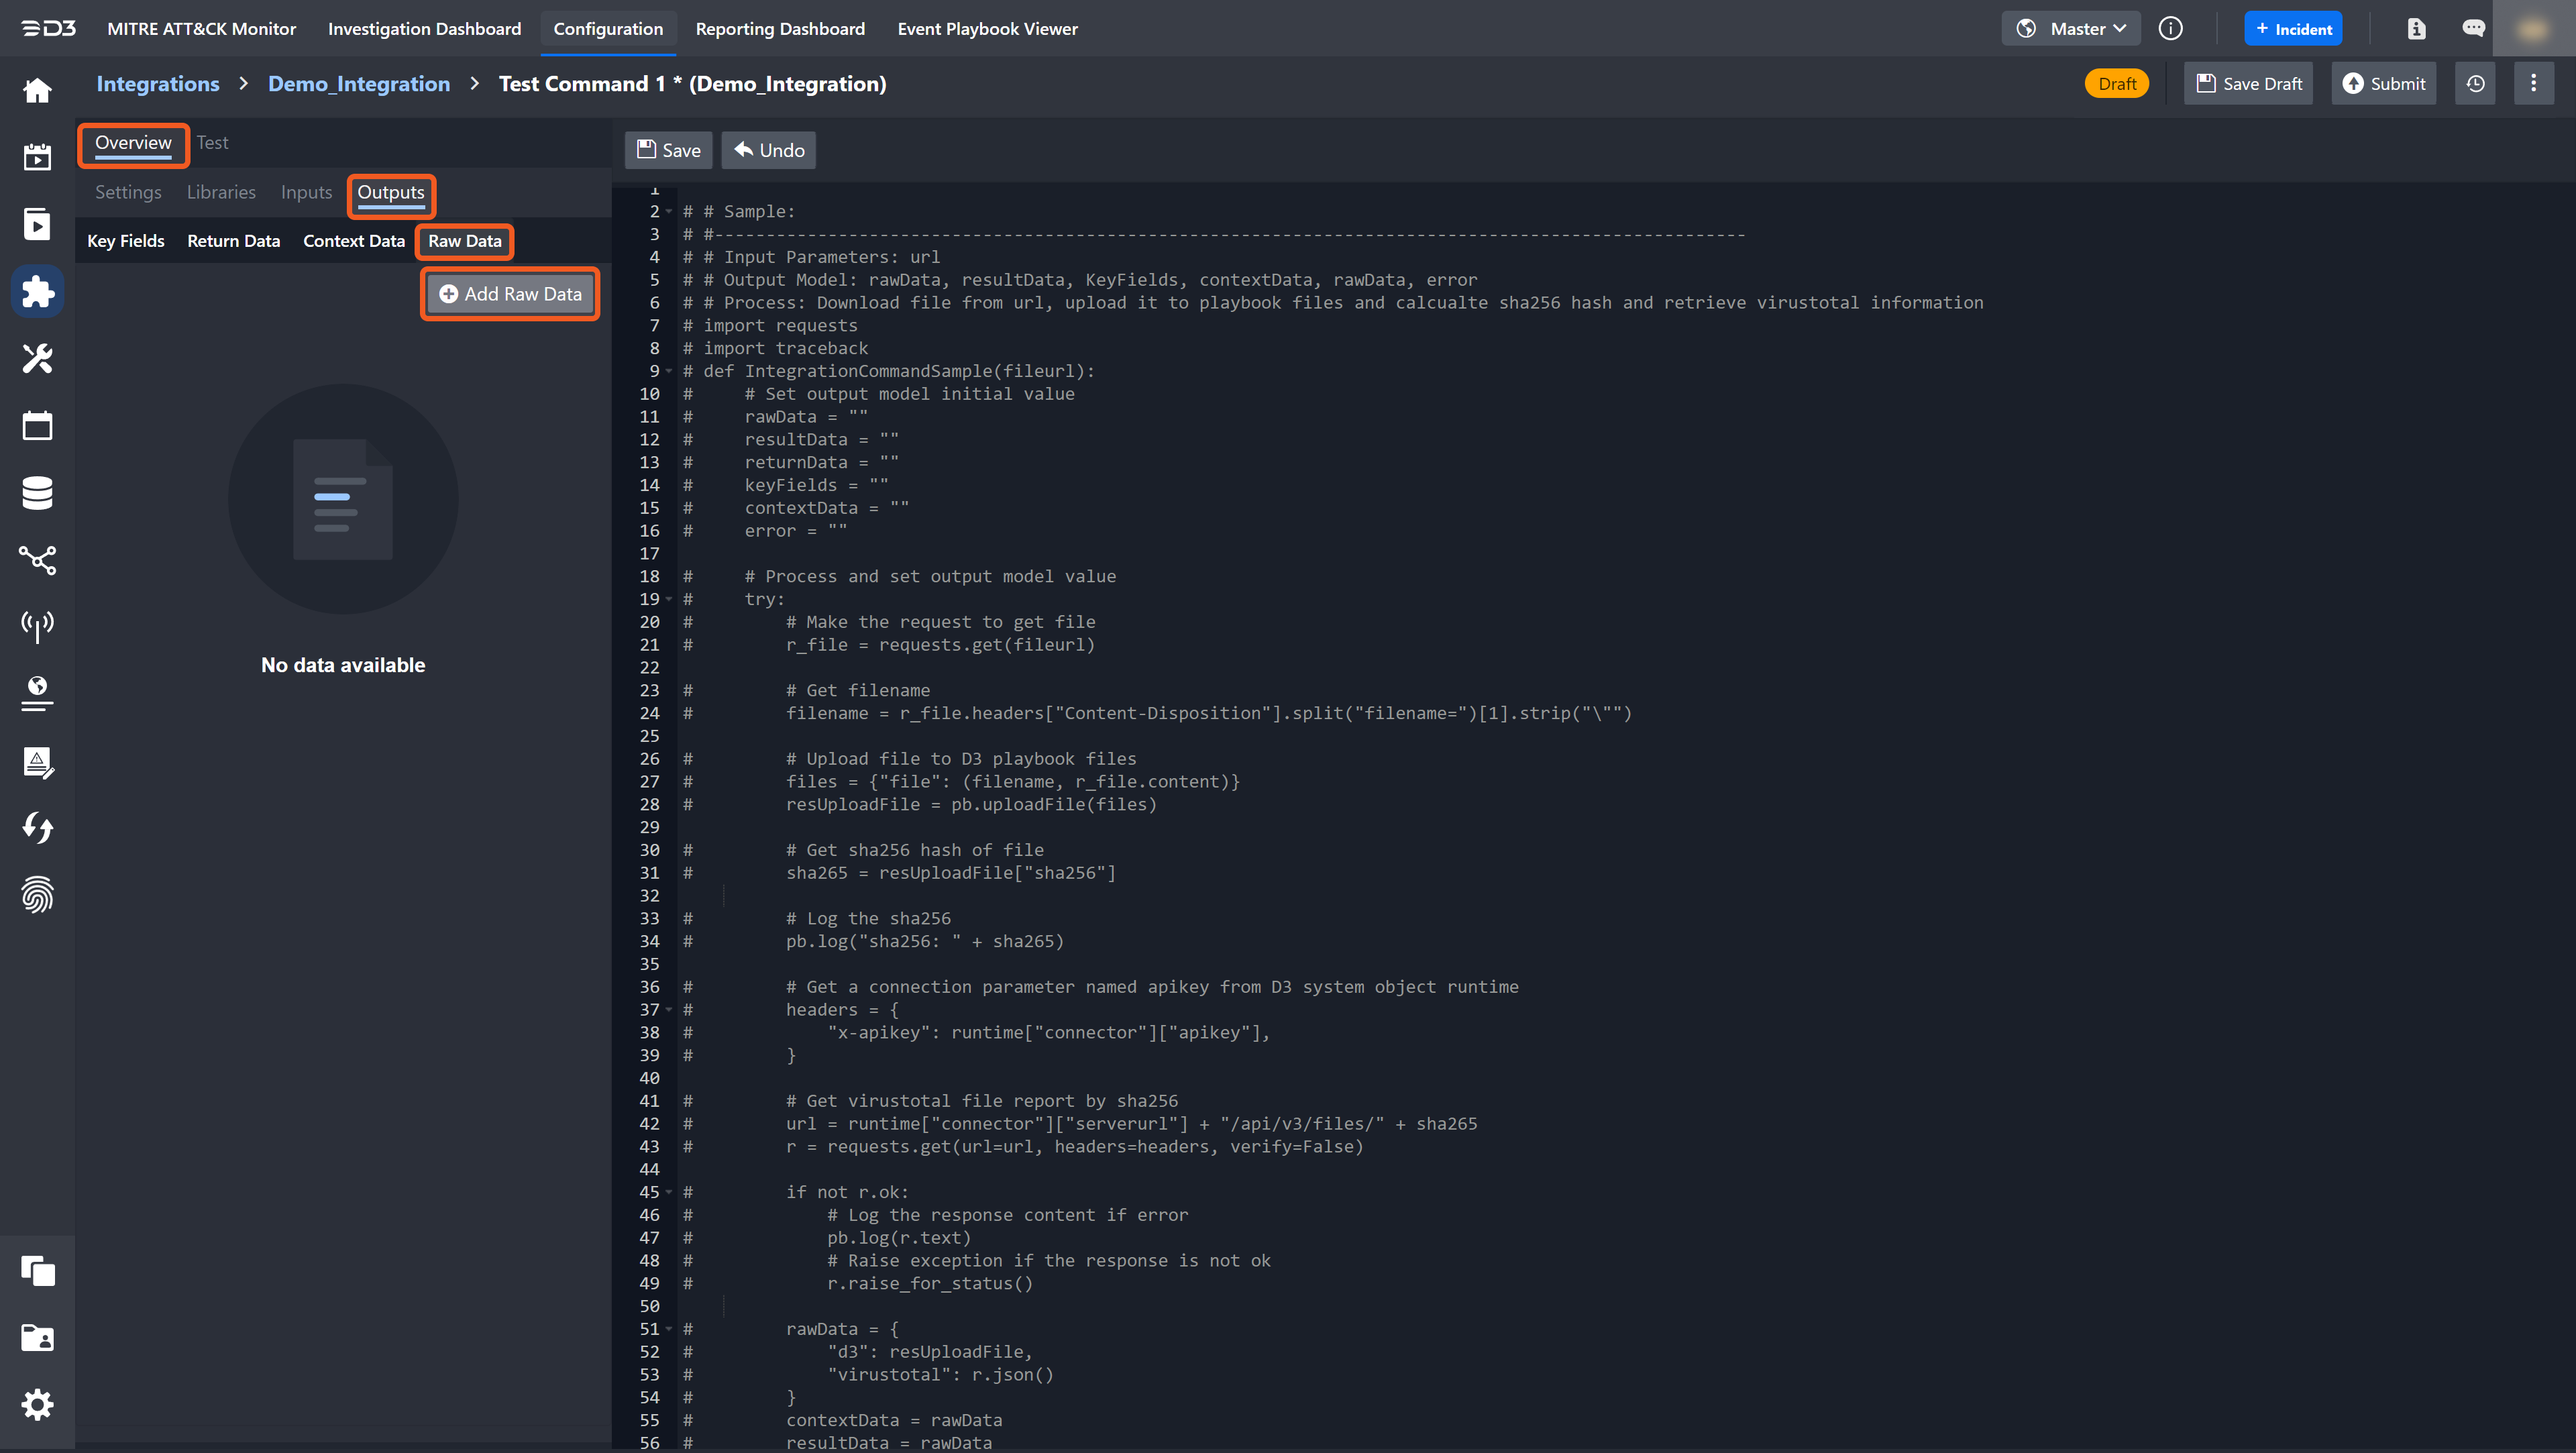
Command Output Setup
To set up the command output:
Click on the Overview tab.
Click on the nested Outputs tab.
Click on the Raw Data category.
Click on the + Add Raw Data button.
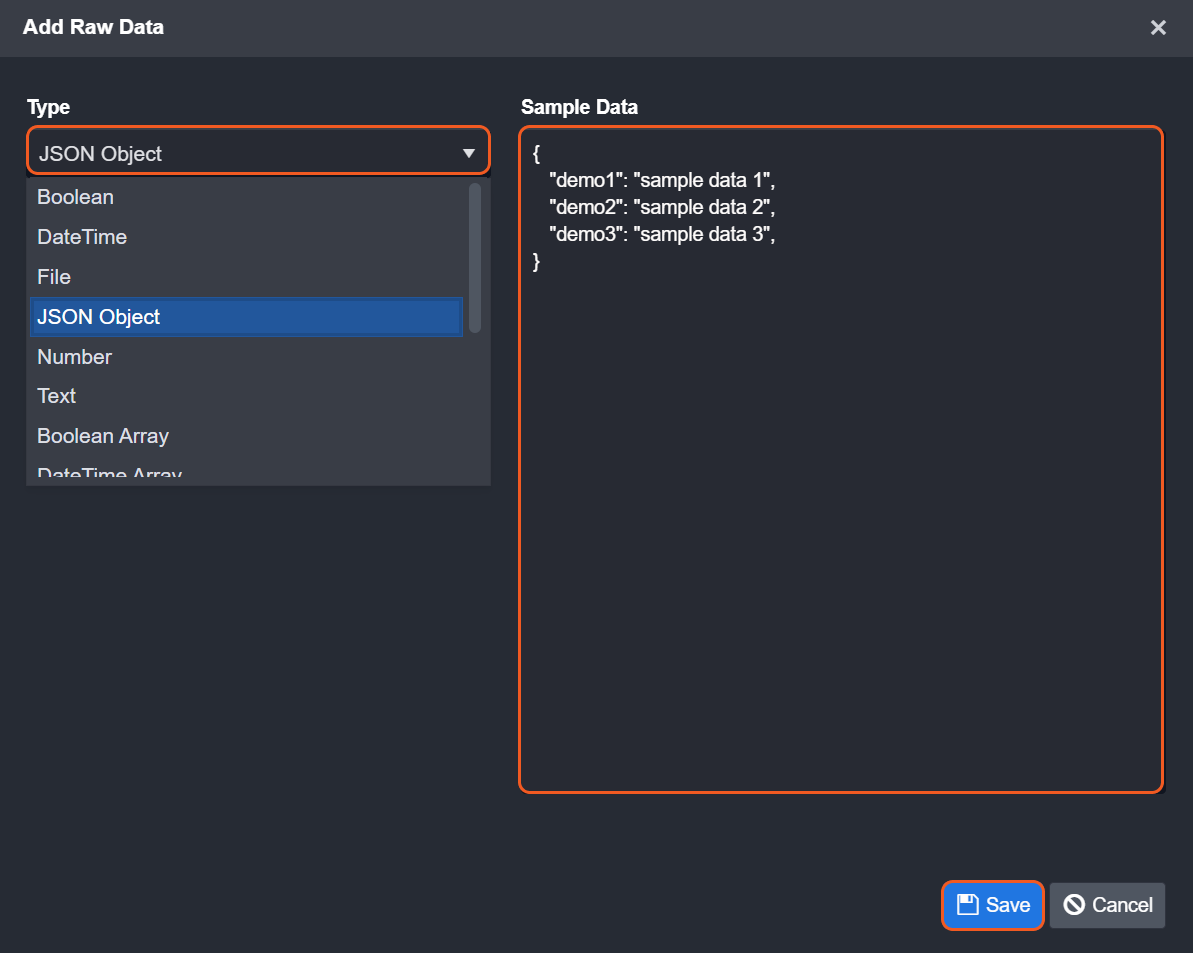
Select the data type and input sample data accordingly.
Click the Save button.
Click on the Key Fields category.
Click on the Add Key Fields button.
Enter a key field name, select the appropriate type, provide a JSON Path, and enter sample data.
Click on the + Add button.
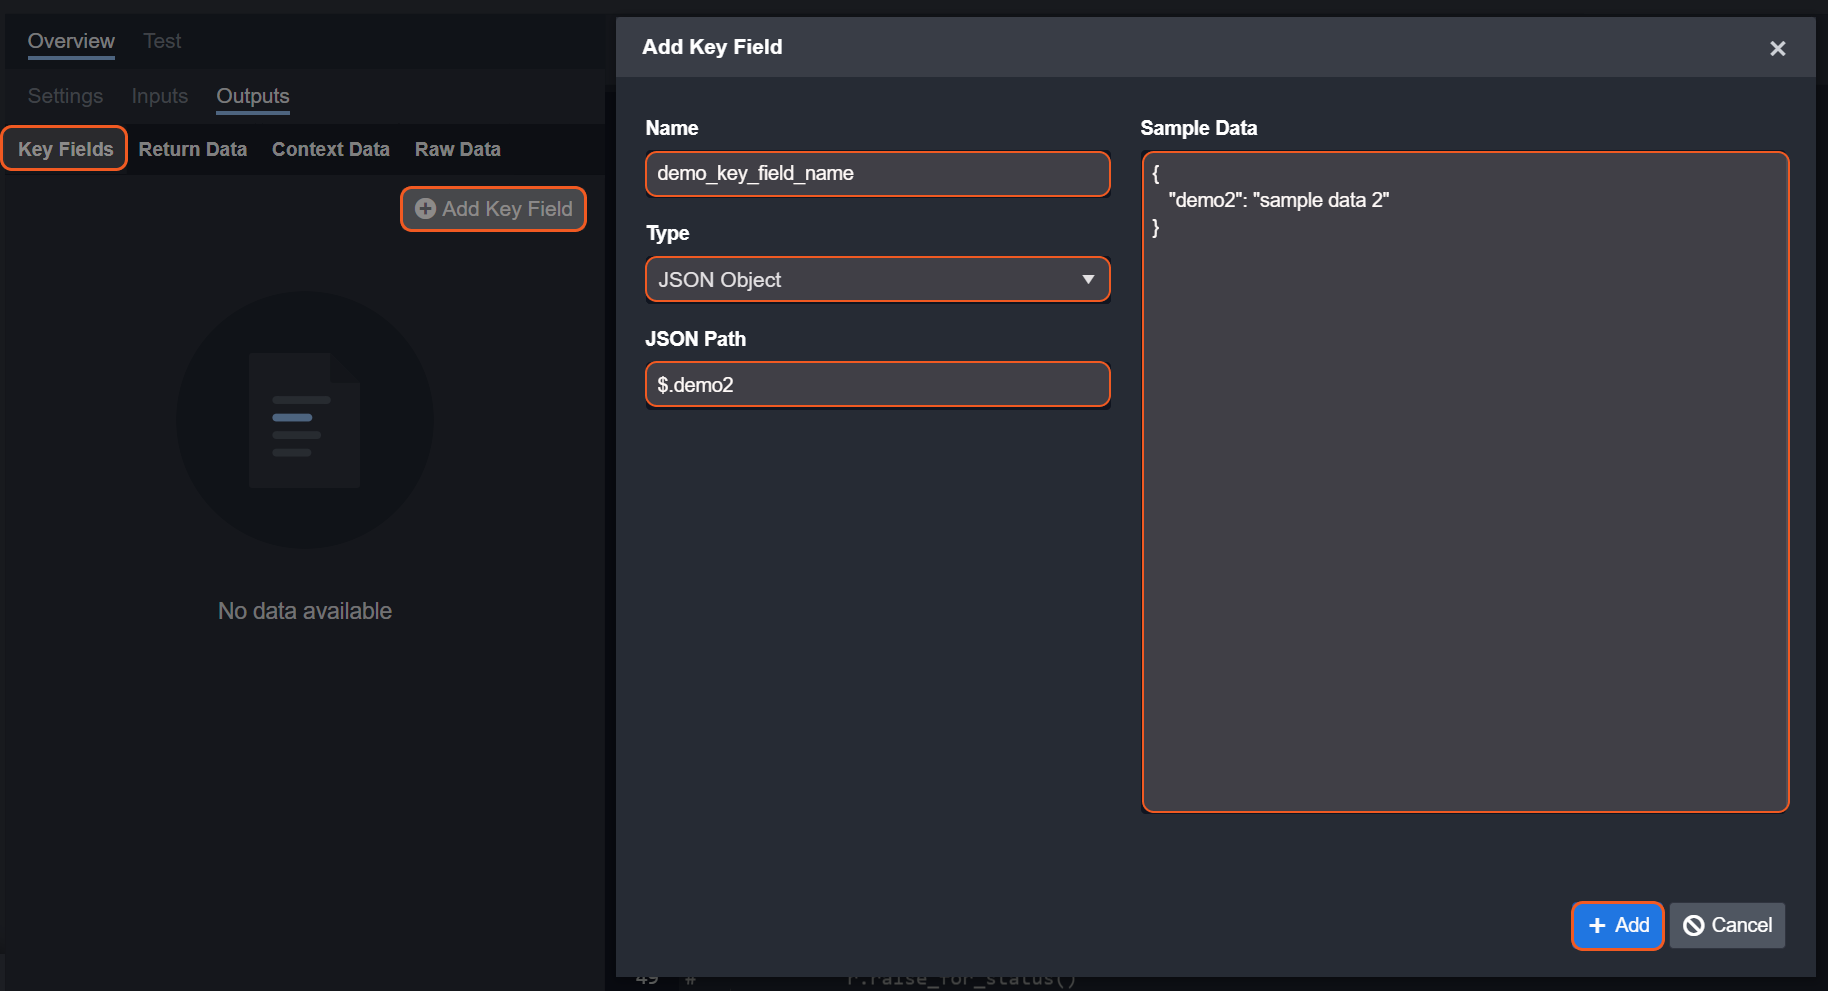
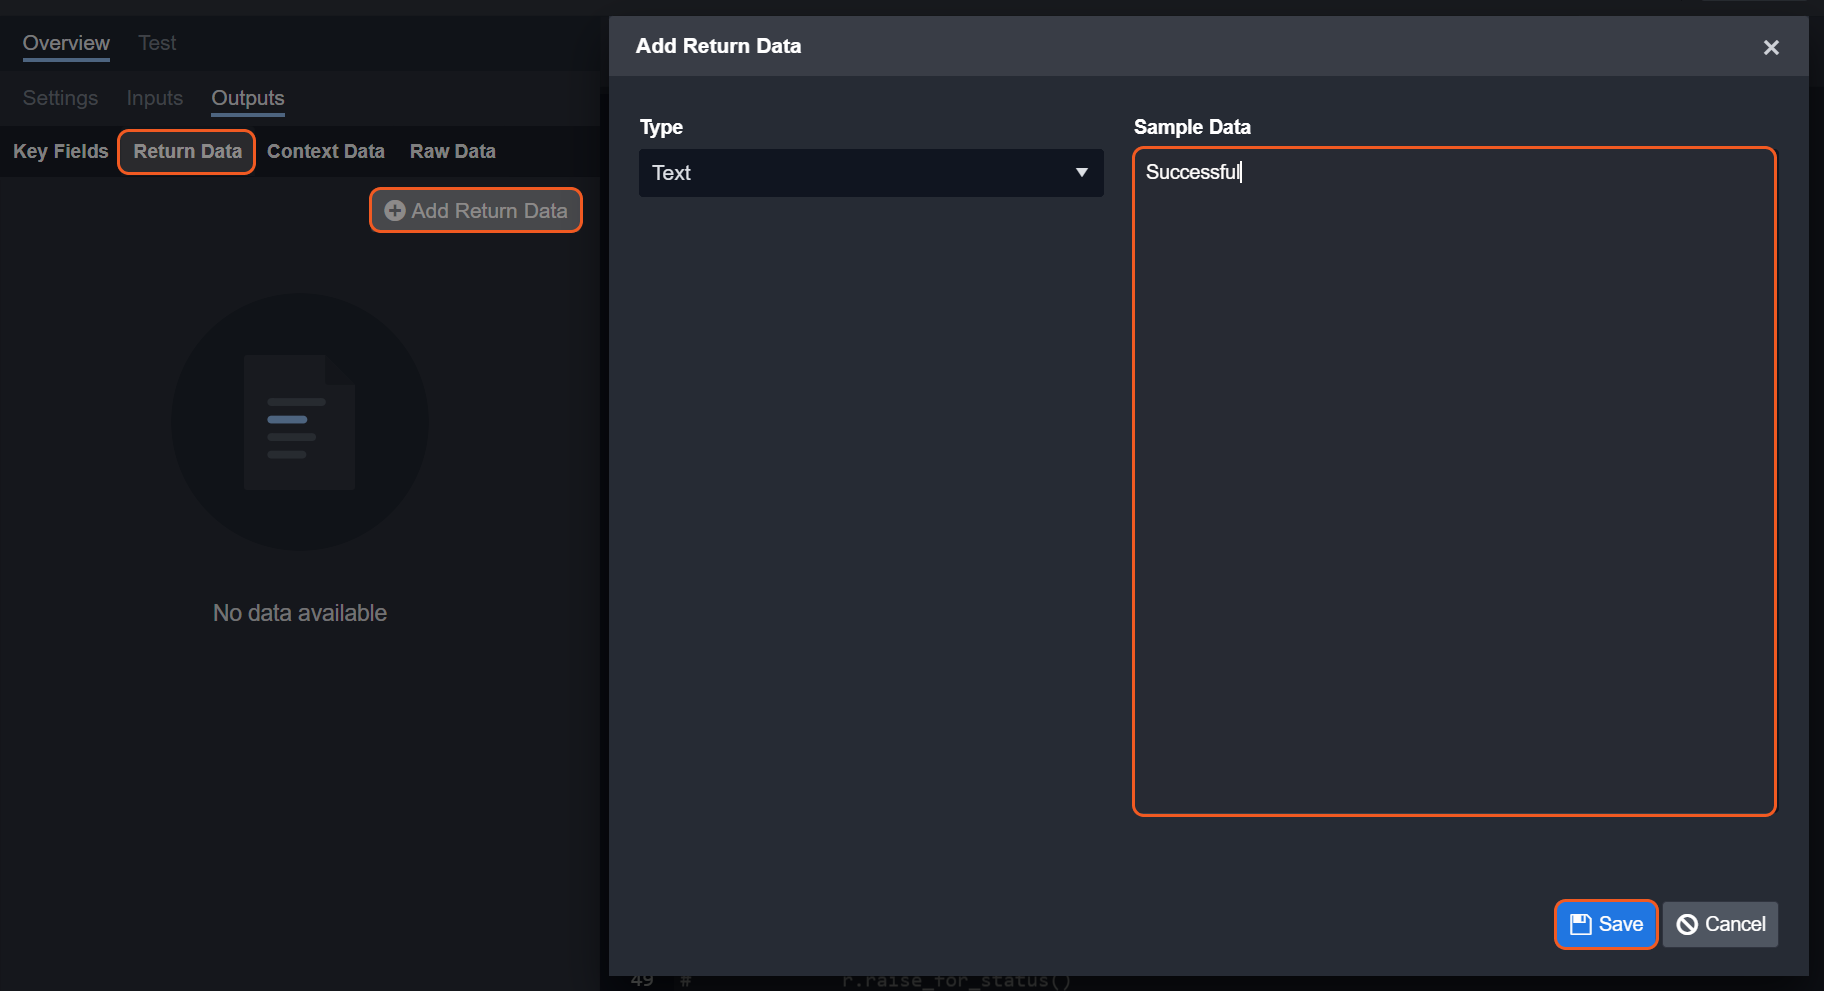
Click on the Return Data category.
Click on the Add Return Data button.
Enter “Successful”, “Failed”, or “Partially Successful” in the Sample Data section.
Click on the Save button.
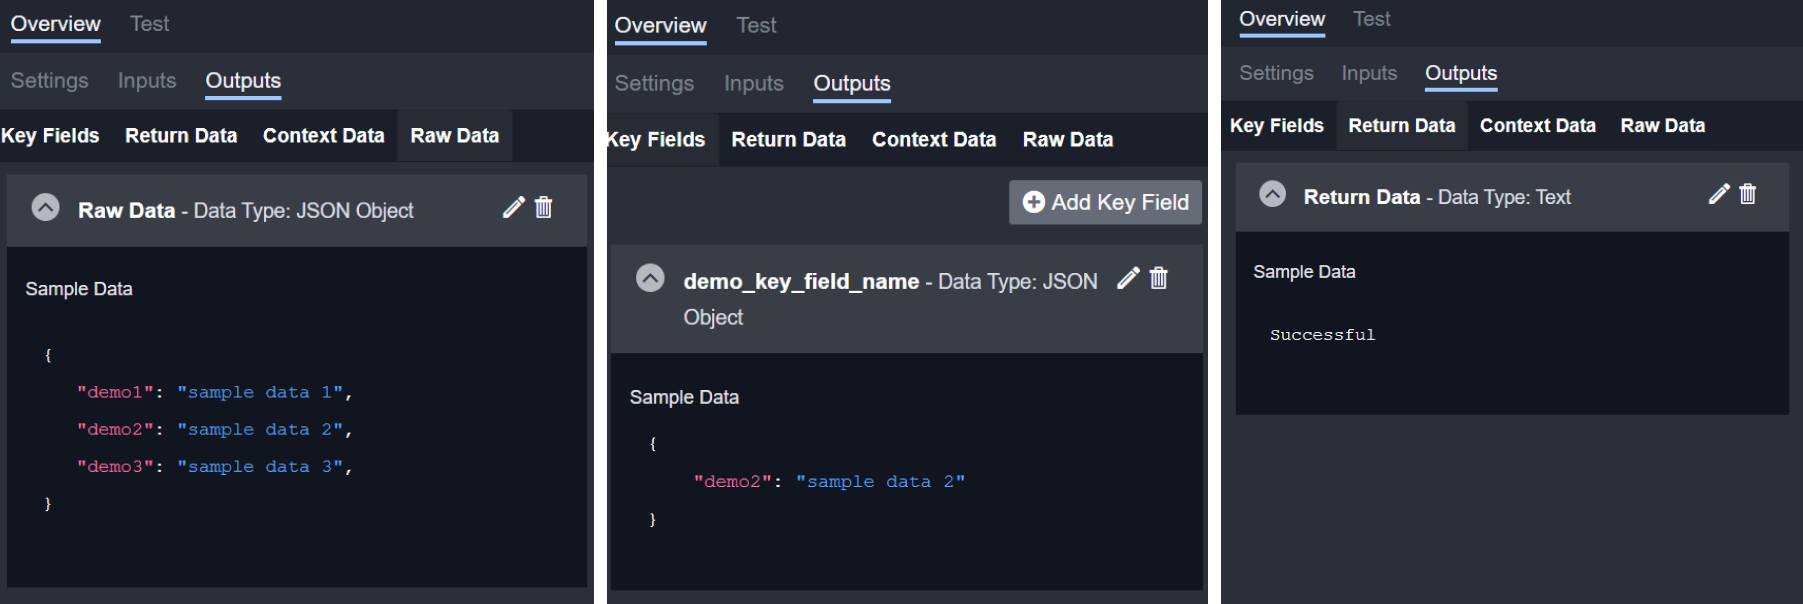
After completing these steps, you should see the output data presented somewhat similar to the following:
Write your Python Script
See Python Script.
Clone Integration System Command
Clone Integration System Command
Integration System commands can be cloned by following these steps:
Click on the Configuration tab at the top navigation bar.
Click on the Integration tab on the left sidebar.
Search for your integration underneath the breadcrumb.
Click on your integration within the expanded accordion.
Click on the row in the Custom Commands table that you would like to clone.
Click on the Clone Command option.
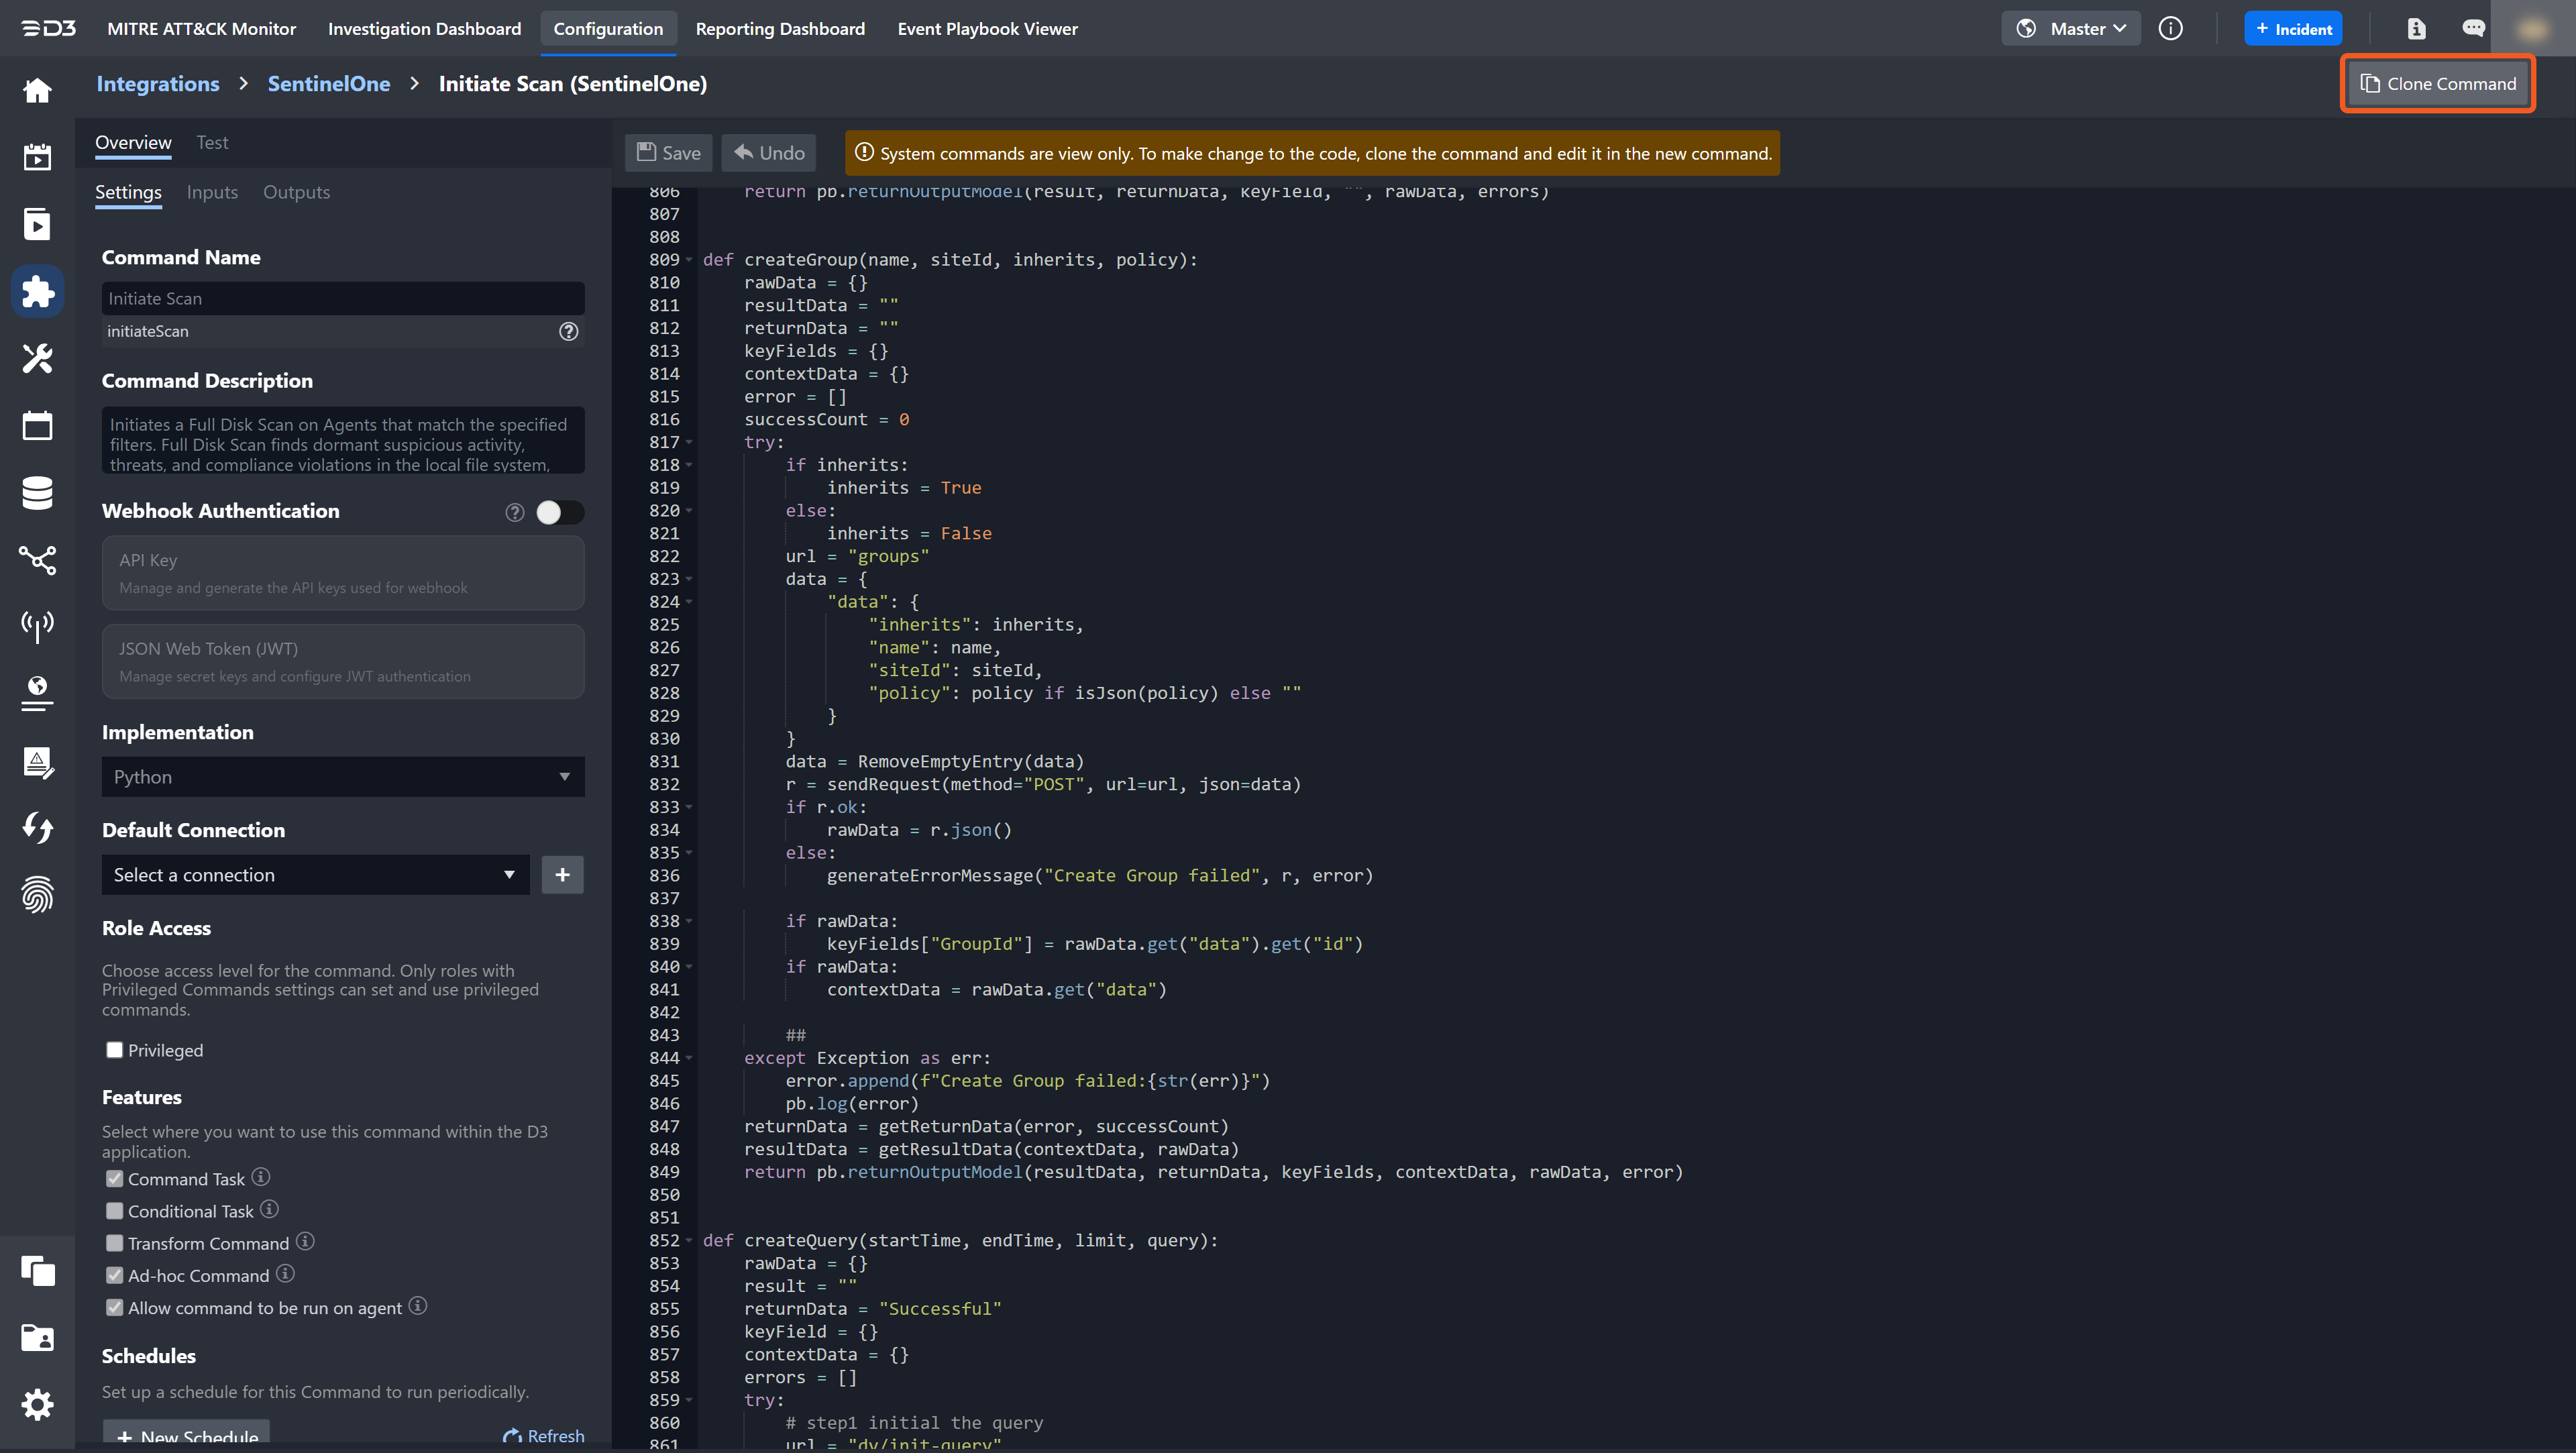
If the above steps are completed successfully, you will see a new Python function displayed in the code editor. The name of this cloned command will automatically differ from the original command. Additionally, consistent with all commands, the function name will be identical to the internal name (Pascal case to the displayed command name).
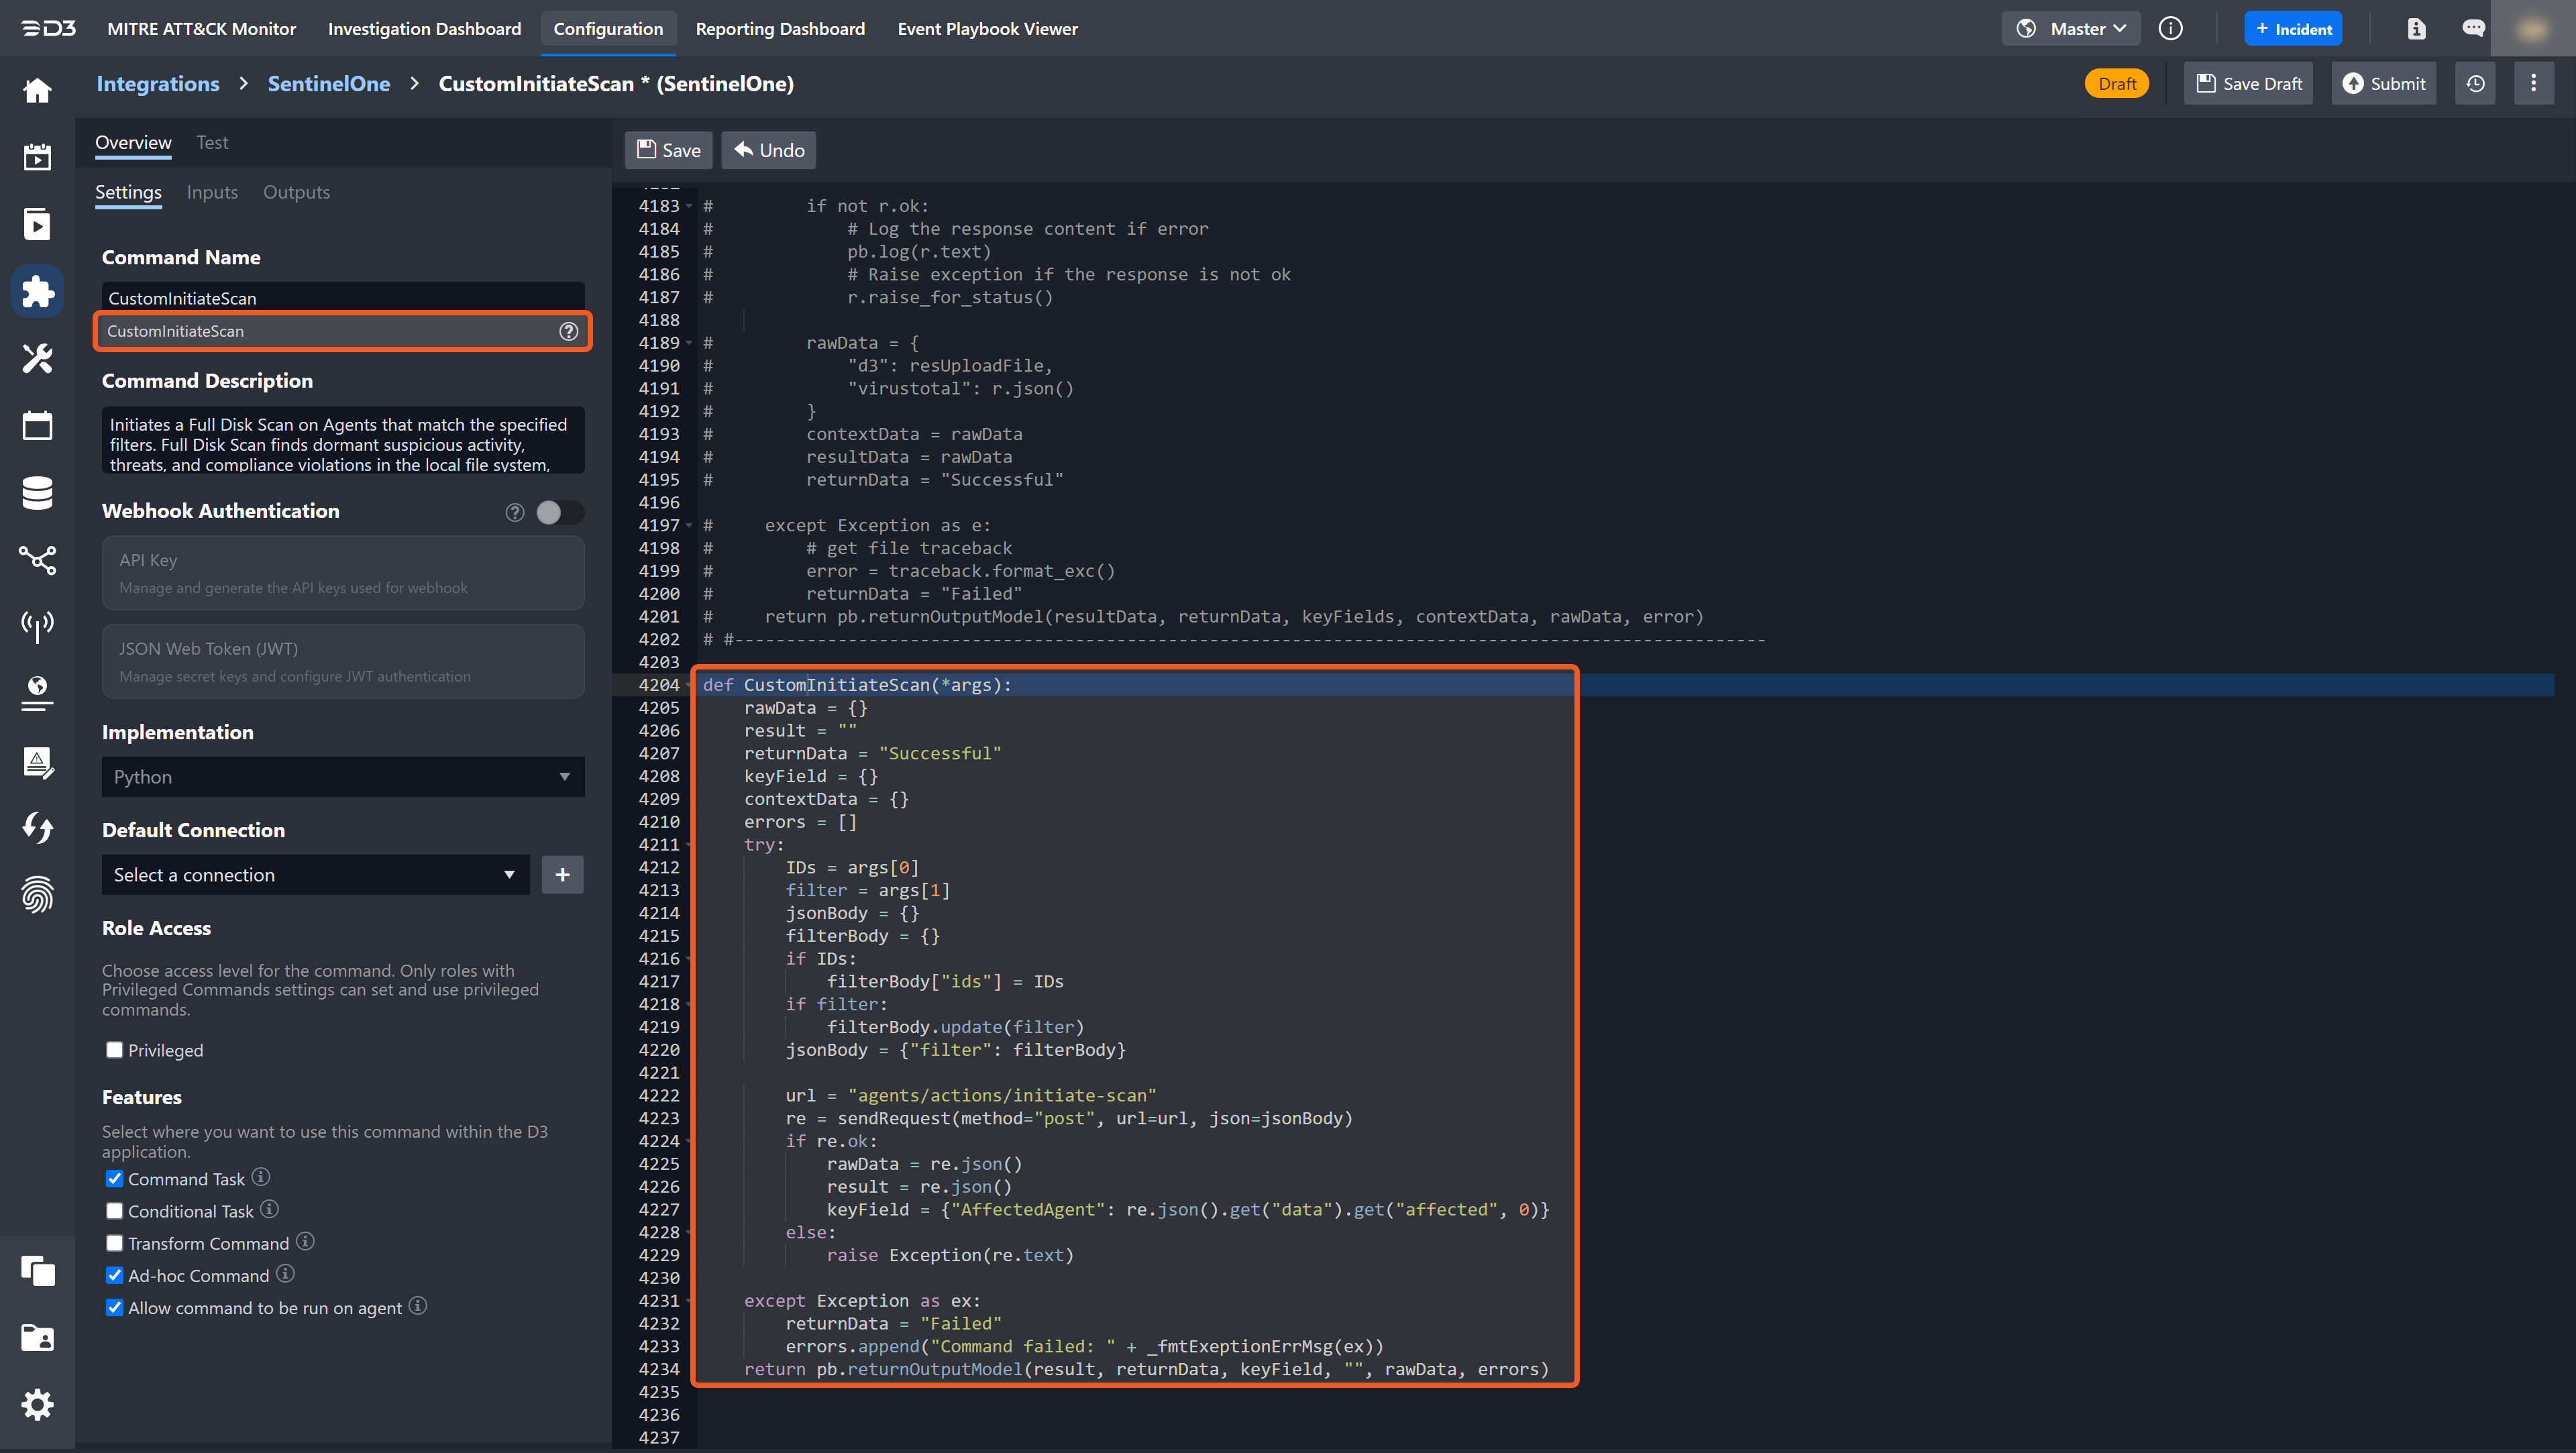
Pre-defined Custom Commands
There are six special command templates in the Add Command form:
checkIPReputation
checkUrlReputation
checkFileReputation
OnDismissEvent
OnEscalateEvent
TestConnection
Here we will focus on the last one, TestConnection.
Connection (TestConnection) Custom Command
The TestConnection command is used to verify the ability or health status of the D3 system to communicate with an external one (ie. an integration). To render the Add Command form, click on the + Custom Command button within the Commands section.
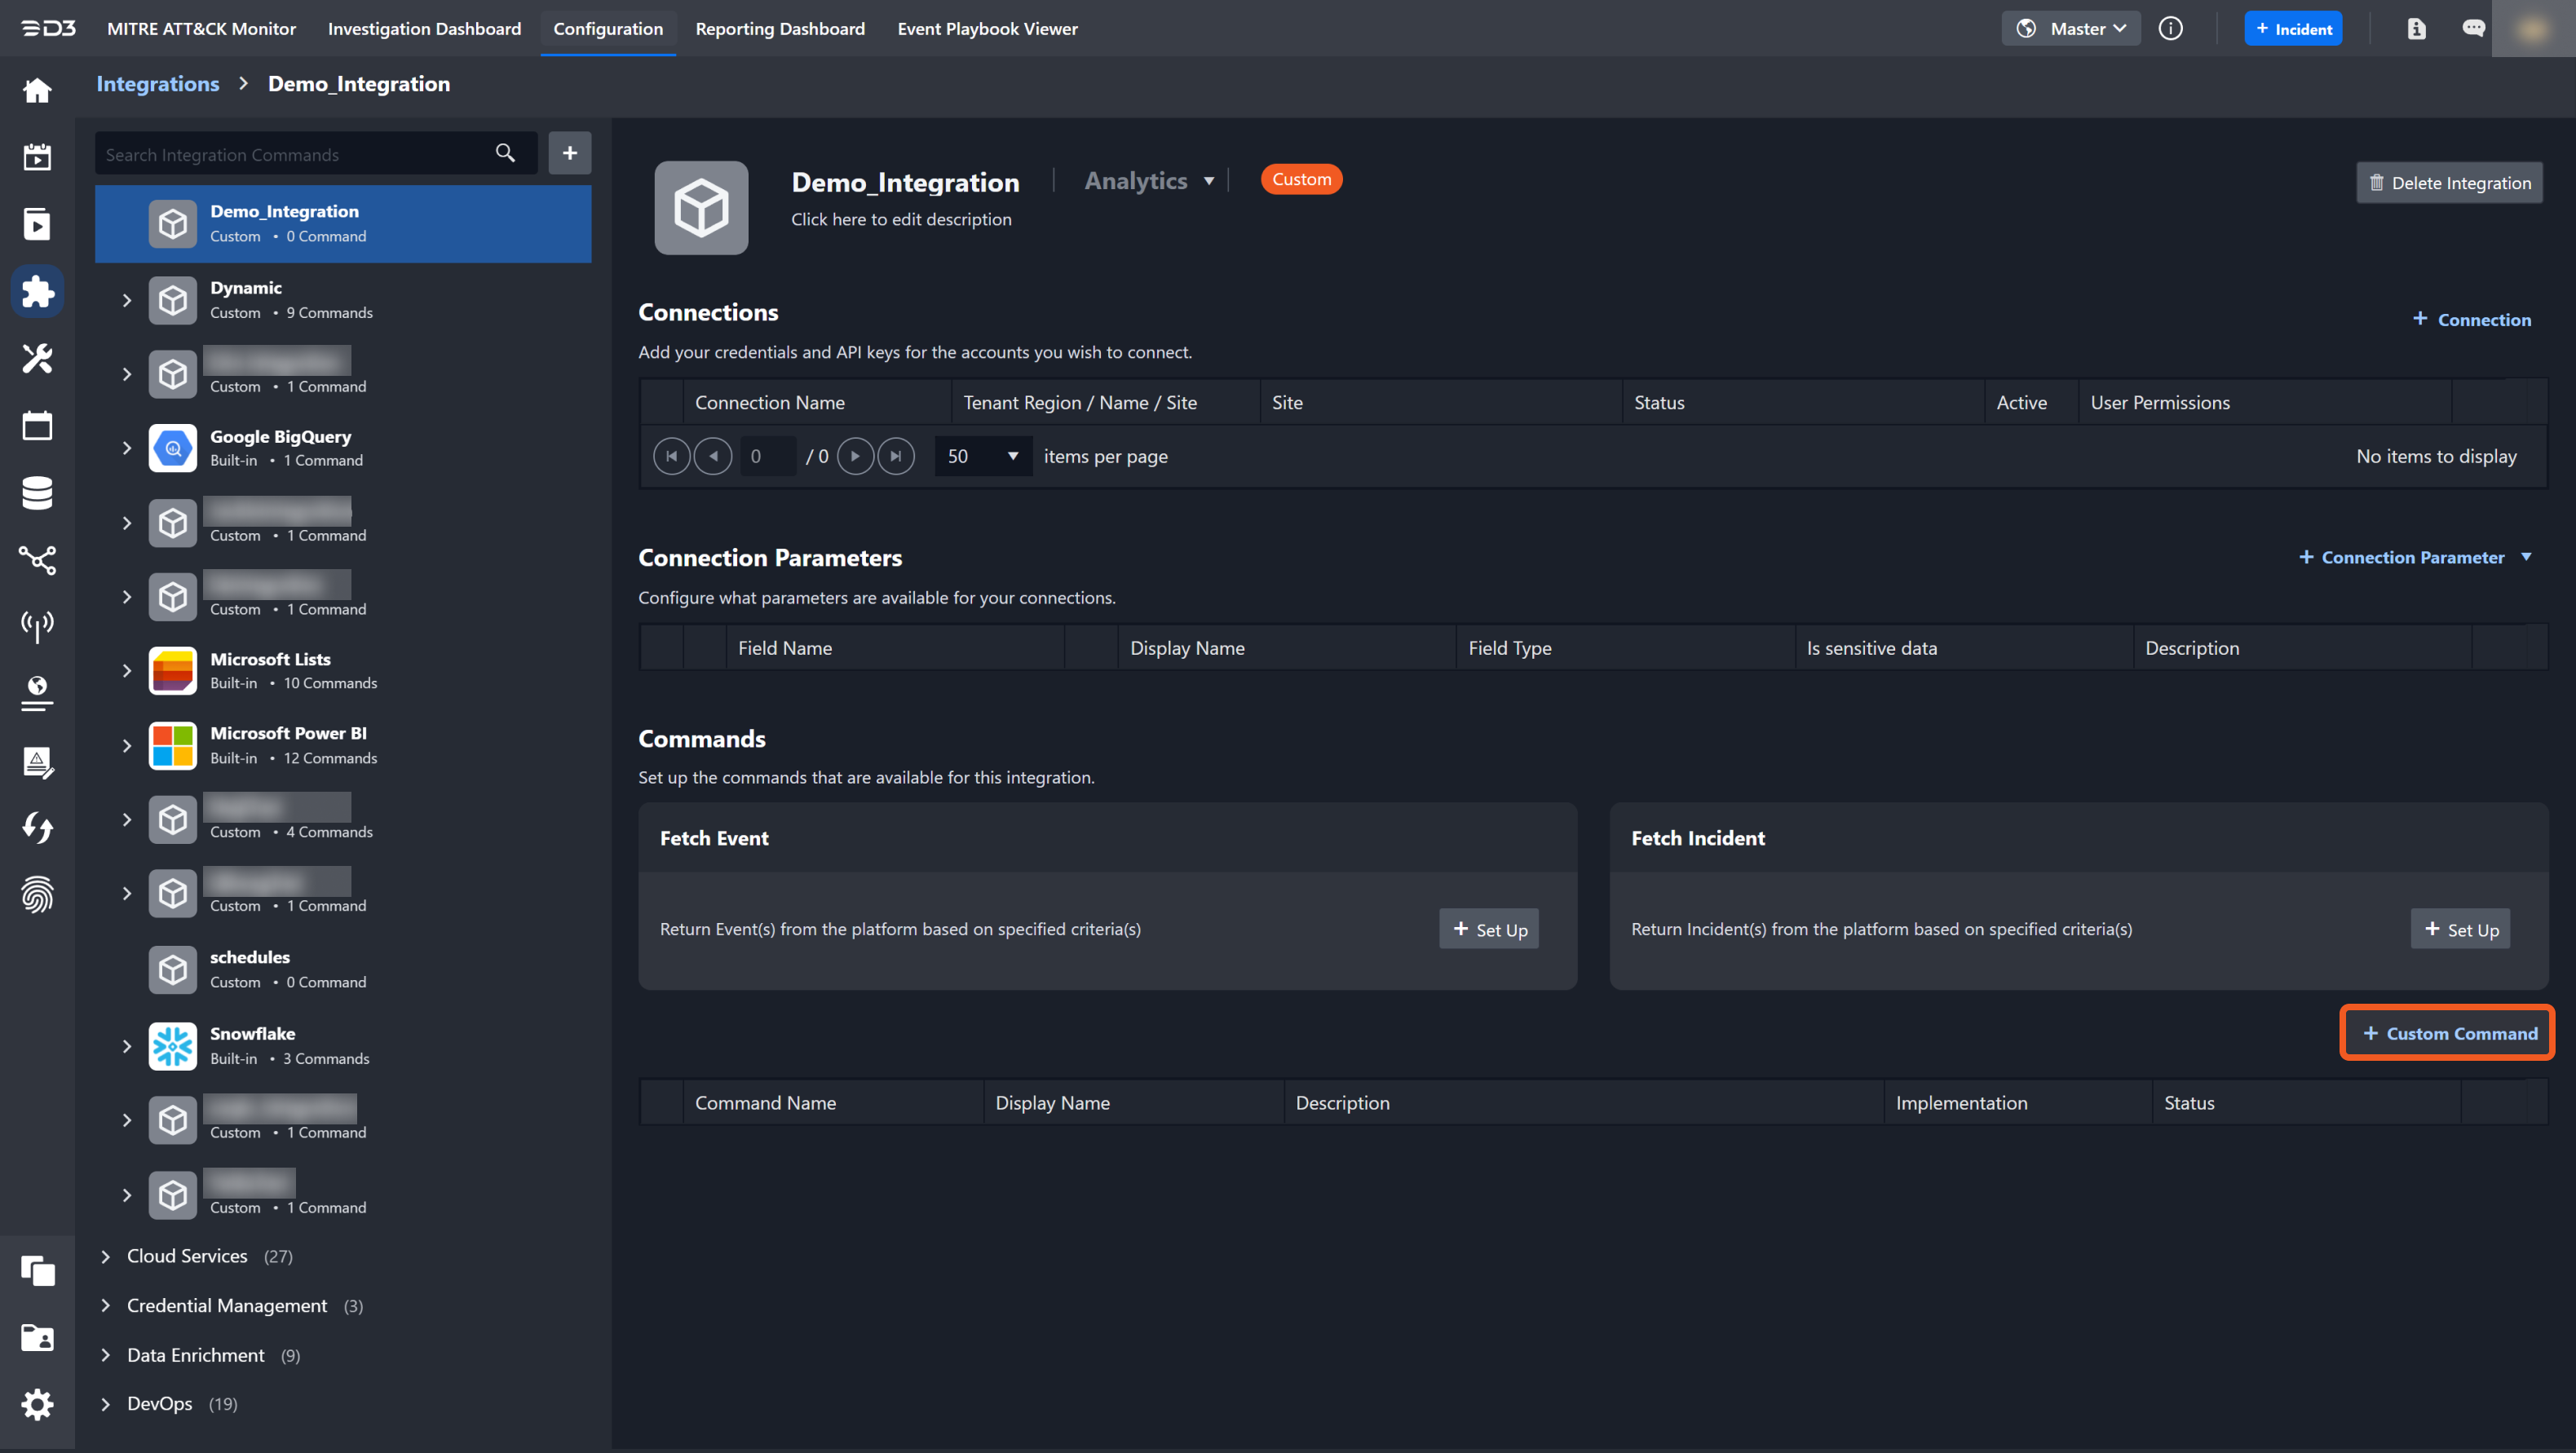
The TestConnection will appear as the last option under the command template section.
Click on the + Add button to enable the test connection functionality.
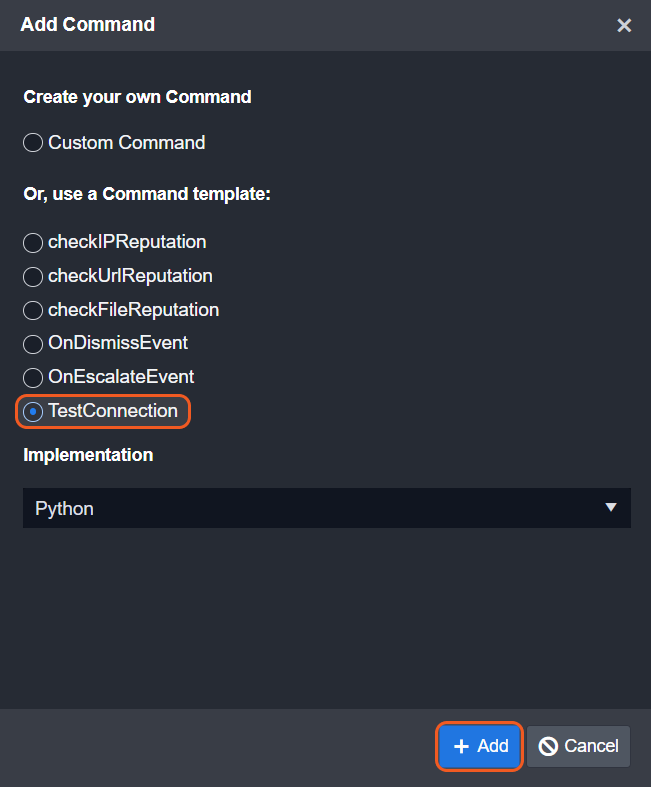
You will be redirected to the Python editor page. Here, consistent with integration commands, there will be a function name for the test connection identical to its internal name (Pascal case to the displayed command name). Click on the Submit button.
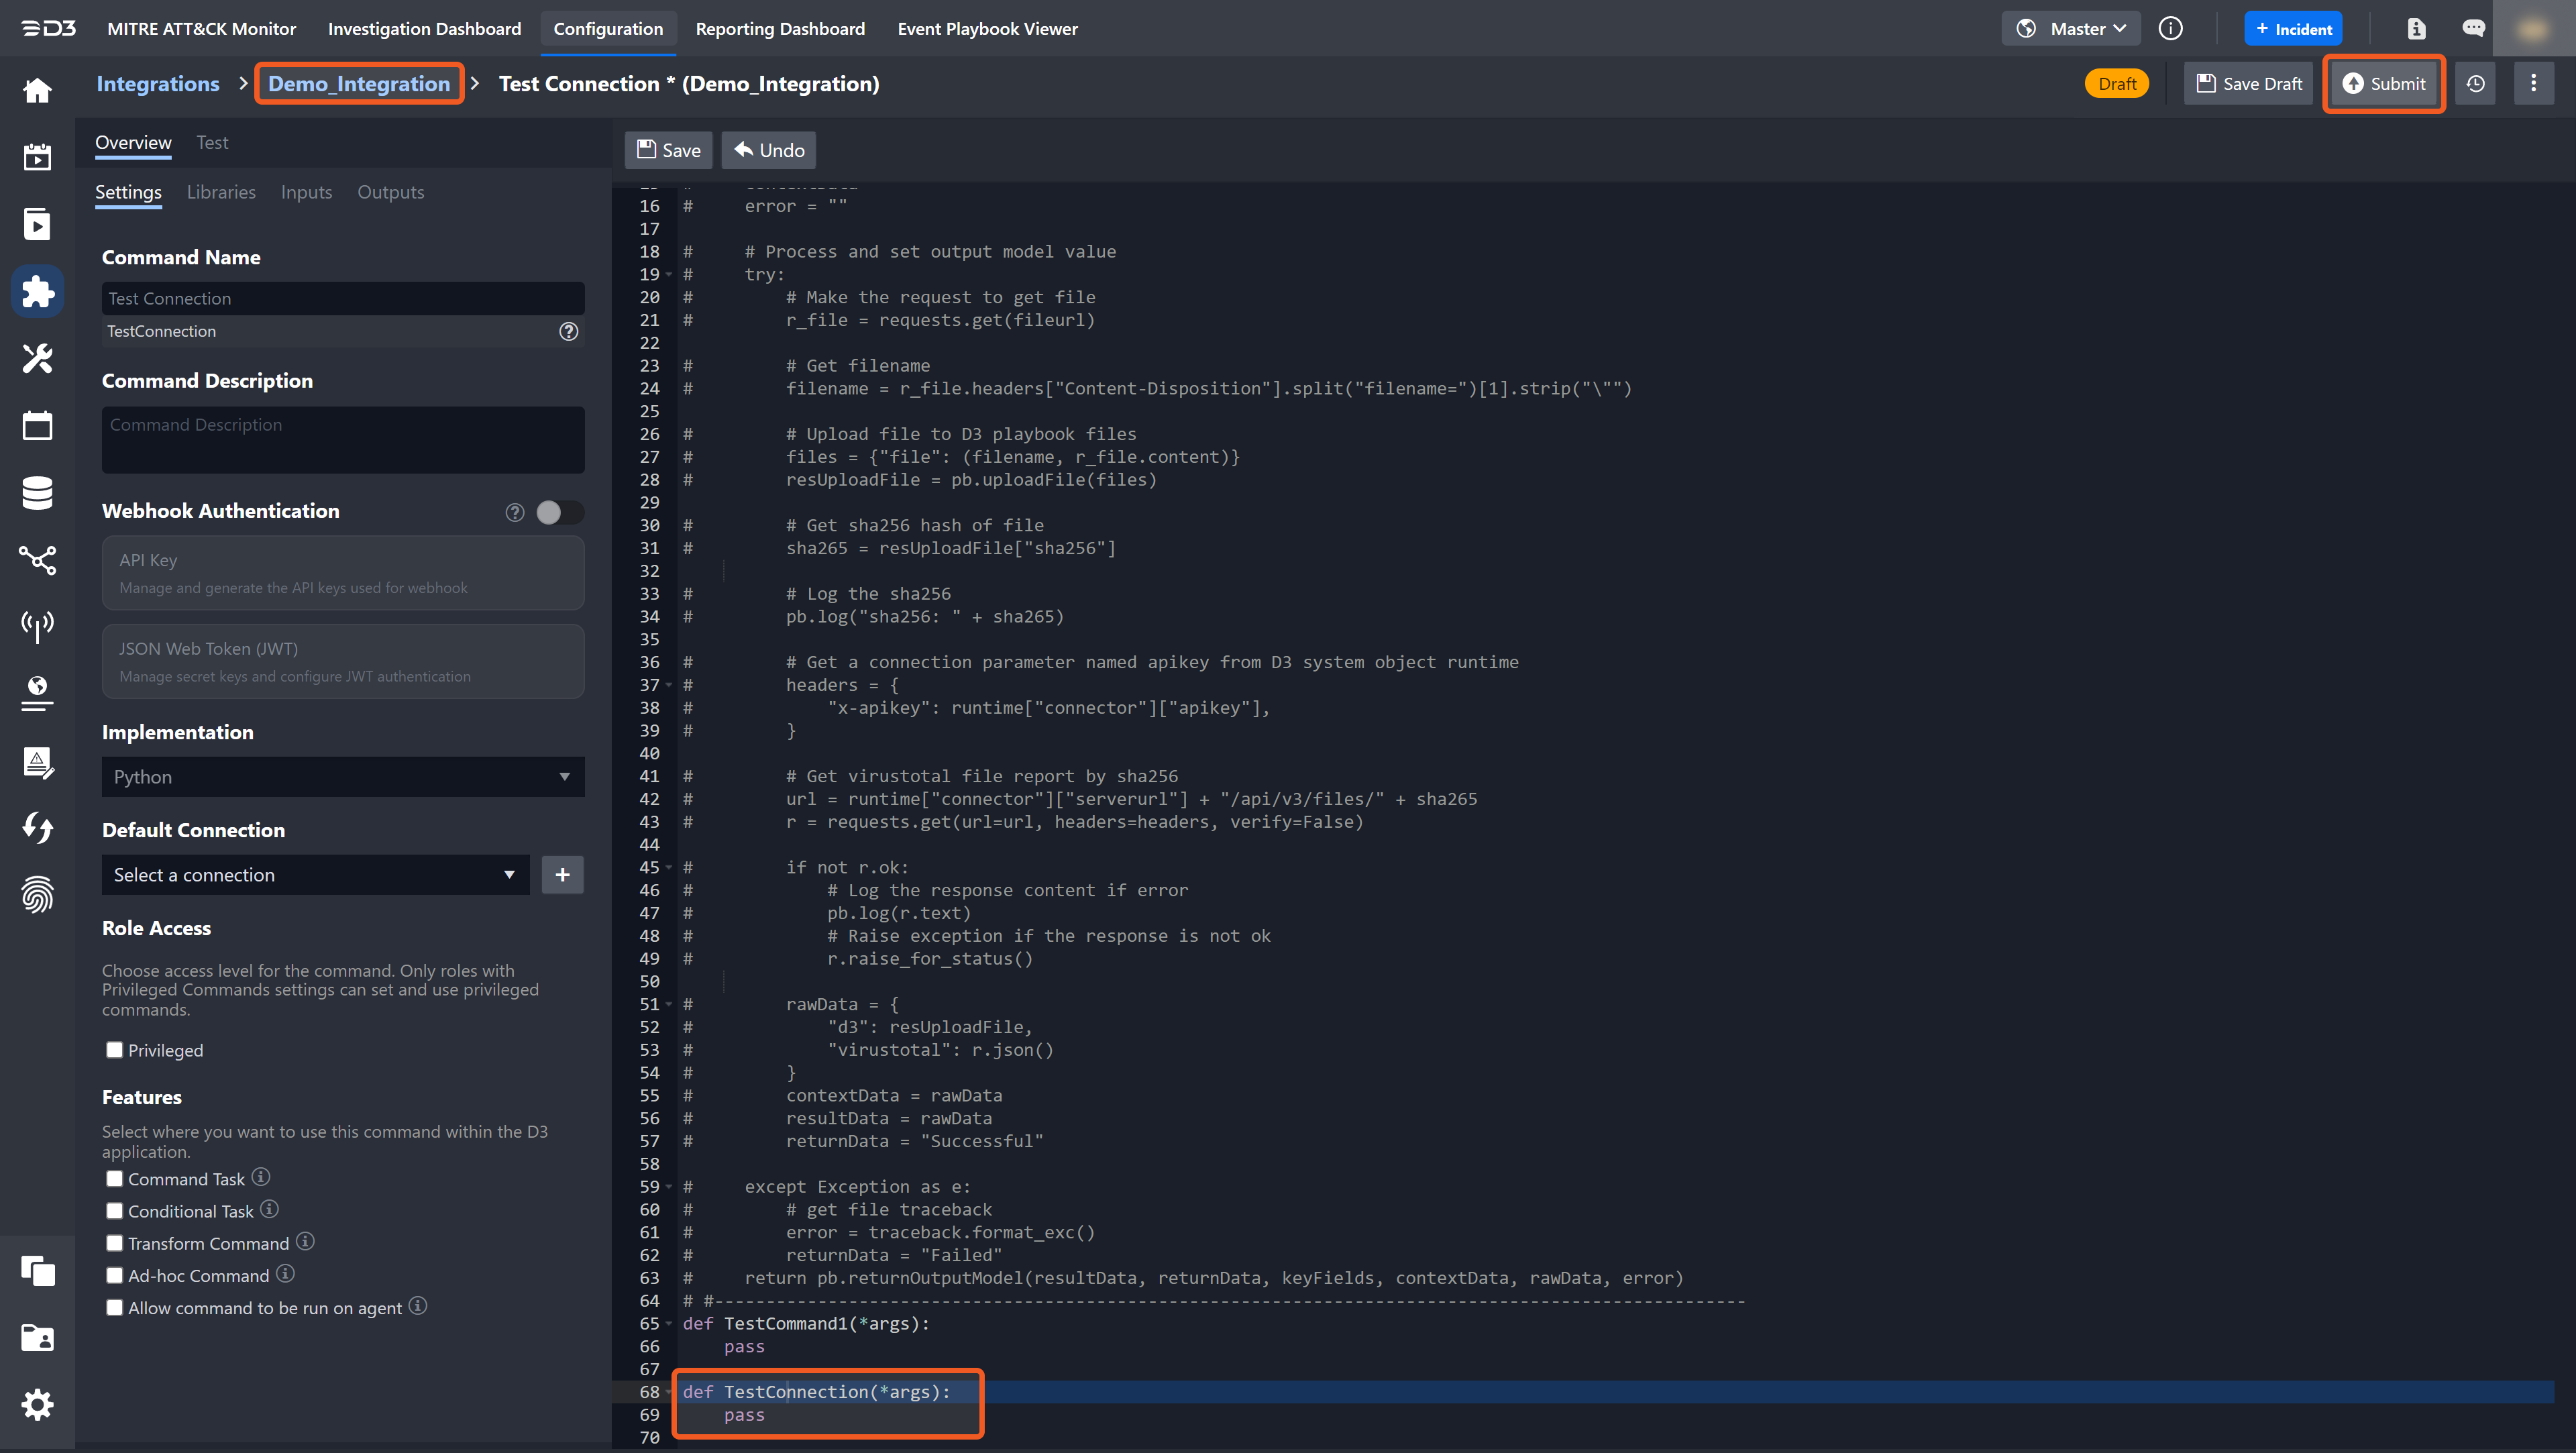
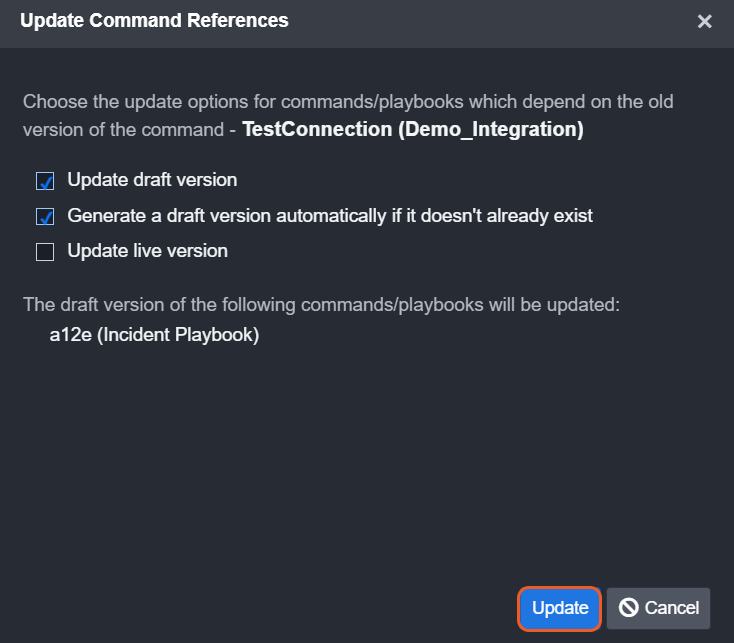
Due to the Python script's hard-linked nature for all commands, including TestConnection, a popup will emerge if any of the commands within the Python script are used elsewhere in the D3 system. Simply click the Update button, then the OK button to continue.
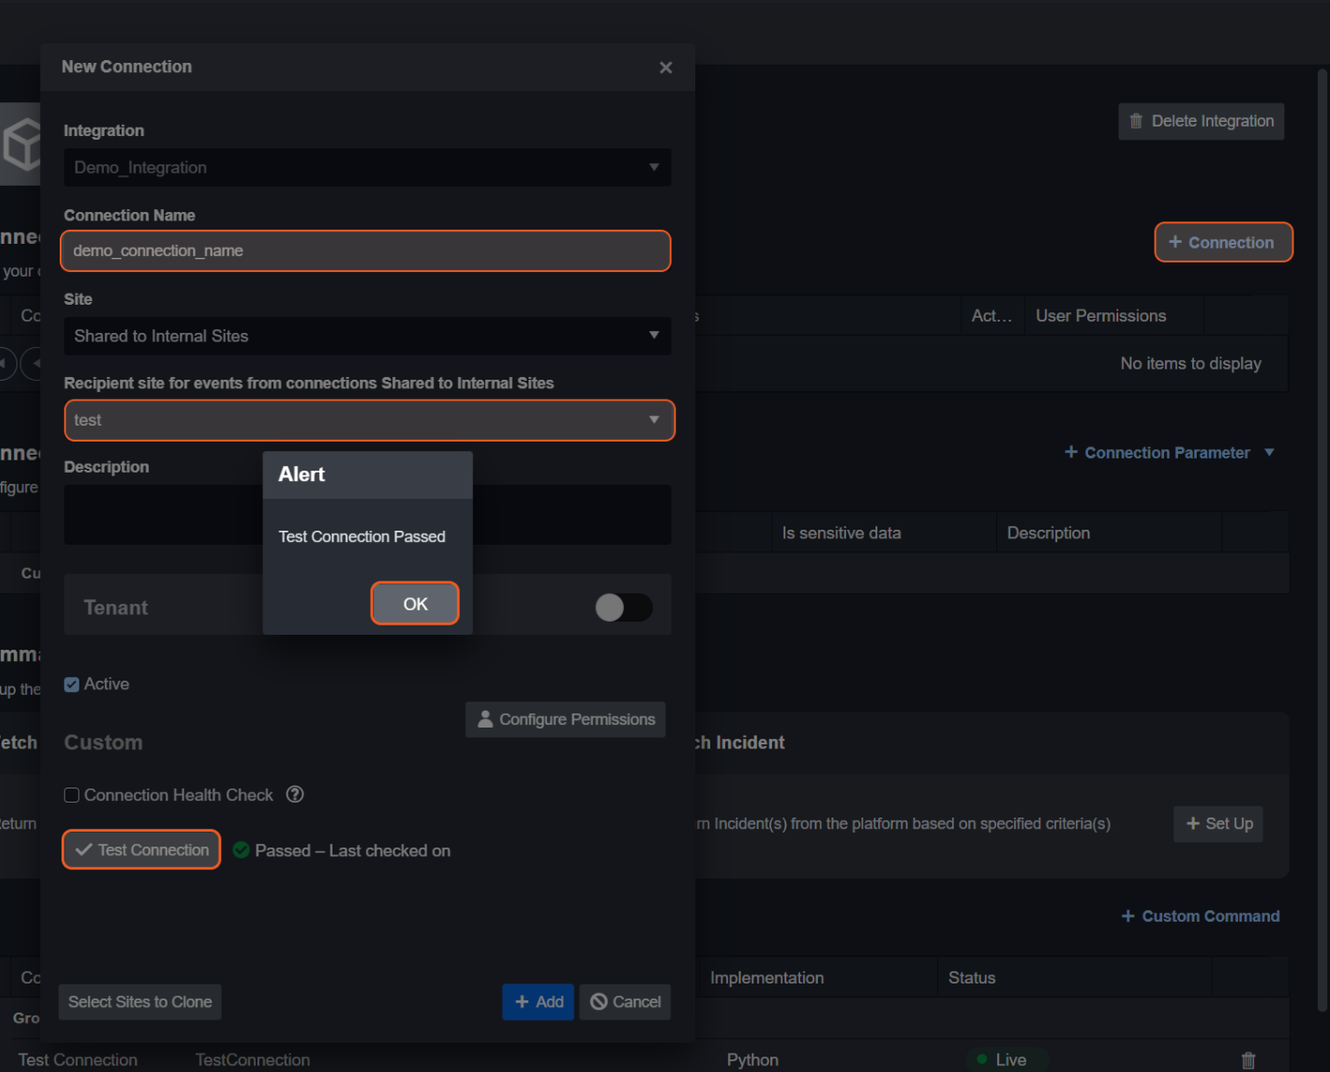
Navigate back to the second level of the breadcrumb and click on the + Connection button. To test the Connection, click the Test Connection button.
Data Ingestion (FetchEvent/FetchIncident) Custom Command
The Fetch Event and Fetch Incident commands serve essential roles in incident response and management. Fetch Event is used to retrieve relevant events or data related to security incidents, while Fetch Incident is used to retrieve incident details themselves. These functions are crucial because they allow security analysts to access historical data, aiding in investigation, analysis, and response.
Following the retrieval of events or incidents, the next step typically involves performing event field extraction mapping. This process involves defining how data within events or incidents should be structured and labeled for downstream analysis. By mapping specific fields within events to standardized or custom labels, analysts can better interpret and process security data, ultimately enabling faster identification and mitigation of threats.
To set up the Fetch Event command:
Click on the + Set Up button in its ingestion container.
.png?inst-v=4d6f00ea-d563-42d6-b8c7-1a4ea4284139)
Click on the + Set Up button in the confirmation popup.
.png?inst-v=4d6f00ea-d563-42d6-b8c7-1a4ea4284139)
To set up event field extraction mapping:
Click on the Set up Event Field Mapping button in the Overview tab.
.png?inst-v=4d6f00ea-d563-42d6-b8c7-1a4ea4284139)
Click on the + Add Field button.
.png?inst-v=4d6f00ea-d563-42d6-b8c7-1a4ea4284139)
Enter in a field name.
Enter in the source field.
Click on the Save button.
.png?inst-v=4d6f00ea-d563-42d6-b8c7-1a4ea4284139)
You will now see a new row in the table of the Event Field Mapping popup.
.png?inst-v=4d6f00ea-d563-42d6-b8c7-1a4ea4284139)
READER NOTE
See Event and Incident Intake Field Mapping for details.
.png)